1
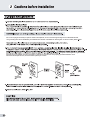
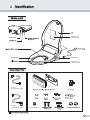
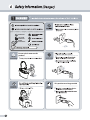
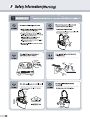
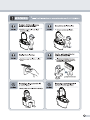
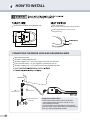
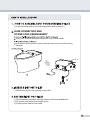
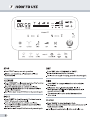
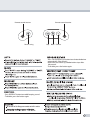
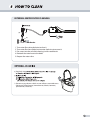
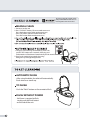
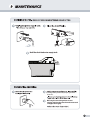
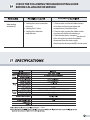
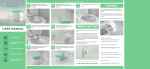
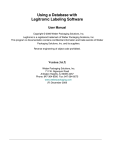
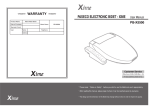
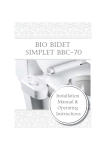
Integrated Bidet Toilet System
The IB 835 is just for AC 120V.
Retain this instruction manual in an easily accessible place.
ECONOMY MODE
CHANGE / SET TIME
15
CHECK THE FOLLOWING
TROUBLESHOOTING GUIDE
BEFORE CALLING IN FOR SERVICE
19
handicapped persons.
handicapped persons, or people with sensitive skin.
Do not operate this appliance if the cord is damaged or if the product is dropped into water.
Only authorized persons can install or repair the unit. Do not attempt to service this appliance by yourself.
Doing so will void the warranty.
where condensation might form on the product’s surface.
11.38 psi to 106.68 psi
are not potable.
Cool the unit in the room before installation.
The thermal protector in the water tank may malfunction when transporting or storing warm water.
Do not plug the unit in until installation is complete. It may result in malfunction.
If the cord or plug is necessary to repair or needs to be replaced, do not connect the grounding wire to a flat blade terminal.
The grounding wire can be identified by its insulated outer surface. It will either be colored green or will not contain yellow stripes.
The green colored rigid ear, lug and the like
extending from the adapter must be connected to a permanent ground such as a properly grounded outlet box cover.
Whenever the adapter is used, it must be held in place by the screw.
Flush button
Side control
Heated seat
Hose"A"
To the toliet 7/8" x 3/8"
Hose"B"
To the bidet 1/2" x 1/2"
* Hose “A” Packed in Ceramic package
7/8" T-valve
1/2"
Conversion nut
F
PROHIBITED
USE OF FIRE
PROHIBITED
DO NOT
SPRAY WATER
Do not splash water on this
product
DO NOT
SPRAY WATER
This product must be grounded
USE OF FIRE
PROHIBITED
F
(Drinking water)
Do not obstruct or put anything
into the dry air outlet
If the dry air outlet is obstructed with any objects,
it may result in fire.
If the dry air outlet is obstructed with hands,
it may result in injury.
F
O
F
HOW TO INSTALL
This product is installed with C800 toilet only.
It will stop working if the user stands up
during cleansing.
12.44
5.51
15.74
15.35
It has a seat switch.
If you do not sit on the seat, it does not work.
19.29
27.56
(inches)
CONNECTING THE WATER HOSE AND GROUNDING WIRE
Remove existing hose.
Connect T valve to toilet fill valve.
Connect supplied 7/8" x 3/8" hose (a) from T valve to shut off valve.
If your shut off valve is 1/2", use supplied 1/2"conversion nut (C).
Connect supplied 1/2" x 1/2" hose (b) from T valve to bidet seat inlet.
Water tank
(a)
7/8" x 3/8" hose
(b)
1/2" x 1/2" hose
(c) 1/2"conversion nut
(optional)
Using inline carbon filter
- The use of an external inline carbon water filter
is not required unless the unit is used in an area
with extreme hard water.
If a carbon filter is used, the filter must be replaced
every 6 months. Inline carbon filters can be purchased
from any authorized Bio Bidet reseller.
1) Insert mounting pottery nuts into empty holes. Refer to picture 1.
HOSE CONNECTION AND
POWER CORD ARRANGEMENT
Place power cord into the cable management areas under the bidet.
Insert bidet to toilet carefully in order to keep the hose and wire cord from being
damaged.
1) Slide the unit until it rests securely on the toilet.
1) Once the bidet is placed on the toilet, fasten it with the provided bolts.
2) Cover bolts with white silicone angle covers.
3) Plug the power cord into the outlet.
HOW TO INSTALL
properly.
Plug the power cord into the outlet to fill the water tank in the bidet.
3. Water residue that remained in the toilet may come out while heating the bidet.
Make sure you can reach the remote while seated.
Place the remote control far away from any material that can damage magnet or card.
27.55
7.87
13.77
(inches)
FLUSH
Remote control receiver
Power saving
Remote control receiver
Stop Bidet Cleanse
- Press 'DEODORIZATION' button to activate deodorizer
automatically. (Max 20 min)
- When the user stands up, deodorization stops after
60 seconds.
- To disable, press the button again.
Seat
BEEPING
- Press 'BEEPING' button to enable beeping sound.
- To disable, press the button again.
Be careful not to drop your remote control in water.
It may stop working or cause malfunction.
ECONOMY MODE
• On the remote press and hold the “STOP” button for 3-5 seconds.
The unit will be in economy mode after 1 hour of last use.
• In economy mode, temperature of water and seat will be kept to 30 degrees Celsius.
“Eco” will be displayed on the remote control LED screen next to both the seat temperature gauge
as well as the water temperature gauge.
• When the unit is occupied during economy mode, temperature will be returned
original setting levels and goes back t economy mode after 1 hour of last use.
• Press and hold the “STOP” button again for 3-5 seconds again to release the economy mode function.
CHANGE / SET TIME
• On the remote press and hold the “Pressure Lo” (down arrow) for 3-5 seconds.
• The hour setting will begin to flash.
• Pressing the “Nozzle FR” or “Nozzle Bk” buttons will toggle between hours and minutes.
• Use the “Pressure Hi” and “Pressure Lo” (Up and down arrows) to change the hour and minutes.
• Once the time is set correctly, press the “STOP” button to accept the changes.
INTERNAL WATER FILTER CLEANING
(a)
(b)
(c)
1. Turn water flow valve clockwise to close it.
2. Turn water flow hose (bidet) nut counter clockwise to remove it.
3. Put screen into the unit after cleaning it with a toothbrush.
4. Reattach the water hose to the bidet.
5. Reopen the water valve.
Regularly wipe
3. Do not use any cleaners which are not safe to use on toilet seats.
(Not to use: Toilet cleanser, Home cleanser, bleach, benzene,
paint thinner, cresol etc.)
Do not force to push, pull, or bend the nozzles.
It may result in malfunction. Make sure to use
"cleansing" button on the remote control.
MANUAL CLEAN
1. Do not sit on the seat
2. Press “CLEANSE” button, Cleanse nozzle comes out.
Press the button again, Bidet nozzle comes out.
(Press “FR” button, Cleanse nozzle comes out.
Press “BK” button, Bidet nozzle comes out. )
1. Using passive cleansing simultaneously, if the user
pushes "BK" button over 3 seconds, cleansing and
bidet nozzles will be cleaned automatically for 30 seconds.
2. Don't grab nozzle during nozzle cleansing.
Doing so may damage the appliance.
AUTOMATIC FLUSH
- After using the bidet, the toilet will automatically
flush when user stands up.
TO FLUSH
- Push the "flush" button on the remote to flush.
FLUSH WITHOUT POWER
- No Power is required to flush,
simply push the flush button
on the side of the unit.
Hold the drain button to empty tank.
(Freezing can be prevented by keeping the water
heater on.)
Not using the unit during winter season?
-Unplug and drain the water from the water tank
and pipes thoroughly.
CHECK THE FOLLOWING TROUBLESHOOTING GUIDE
BEFORE CALLING IN FOR SERVICE
Check first
- Does the Occupied Sensor LED light up when you cover the skin sensor on the seat ?
- If the Economy Mode LED is lit, the temperature settings for the seat and water will be on low
- Replace the remote control batteries and point the remote directly at the transmitter on the main unit
POSSIBLE
Unit completely fails
to work or power on
1. Power outage
2. Unit is not plugged in
3. Faulty receptacle
4. Skin sensor is not activated
1. Reset the GFI outlet
2. Plug the power cord in to a GFI outlet
3. Test another appliance in the outlet
4. Activate the skin sensor on the unit
Nozzle does not
extend
1. Remote control is not working
2. Nozzle is dirty
3. External bidet filter
4. Skin sensor is not activated
5. Seat riser is covering the skin
sensor
1. Replace the remote control batteries
- try to operate the unit with the side
control panel
2. Clean the nozzle
3. Remove the external bidet filter
4. Activate the skin sensor on the unit
5. The seat riser must go underneath the bidet
seat
Low water pressure
1. Clogged nozzle tip
2. Water pressure is set to
low on remote
1. Clean the nozzle tip
2. Raise the water pressure on the
remote control
Seat is not heating
1. Unit is set on Economy mode
2. Remote control batteries
1. Turn off Economy mode
2. Replace batteries
3. Unplug the unit for 10 sec.
Stops in the middle
of use
1.Washing or drying exceeded
cycle time
2. Skin sensor lost contact
3. Clogged nozzle tip
1. Press the wash or dry mode again
2. Activate the skin sensor with full skin contact
through the entire cleansing period
3. Clean the nozzle tip
Water coming out
from the nozzle
unexpectedly
1. Self-cleaning
1. The unit will self-clean the nozzle before and
after each use automatically
CHECK THE FOLLOWING TROUBLESHOOTING GUIDE
BEFORE CALLING IN FOR SERVICE
POSSIBLE
Water leaking
continuously
1. Leaking from hose connection
at the unit
2. Leaking from T-valve
3. Leaking from behind or
under the tank
1. Check to make sure that all rubber washers
are in place and do not over tighten the
connection but it should be secure
2. Check to make sure that the rubber washer
is in place with the flat side pointing up
3. Check that the drain is not opened on the unit
if the unit continues to leak, immediately
disconnect it from the water supply,
drain the tank, and contact the BBC service center
11-106psi
Room Temp~104℉
Room Temp~104℉
(W)15.75 inches X (L)27.56 inches X (H)6.10 inches
12.13 lbs
11-106psi
9
If you need any help,
Please call us.
847.458.2334
BBC INNOVATION
204 Berg St., Algonquin, IL 60102
4
847-458-2334
847-854-1296