1
TM
LabVIEW DataPlugin SDK
User Manual
LabVIEW DataPlugin SDK
July 2012
372601D-01
Support
Worldwide Technical Support and Product Information
ni.com
Worldwide Offices
Visit ni.com/niglobal to access the branch office Web sites, which provide up-to-date
contact information, support phone numbers, email addresses, and current events.
National Instruments Corporate Headquarters
11500 North Mopac Expressway Austin, Texas 78759-3504 USA Tel: 512 683 0100
For further support information, refer to the Technical Support and Professional Services
appendix. To comment on National Instruments documentation, refer to the National
Instruments Web site at ni.com/info and enter the Info Code feedback.
© 2008–2012 National Instruments. All rights reserved.
Important Information
Warranty
The media on which you receive National Instruments software are warranted not to fail to execute programming instructions,
due to defects in materials and workmanship, for a period of 90 days from date of shipment, as evidenced by receipts or other
documentation. National Instruments will, at its option, repair or replace software media that do not execute programming
instructions if National Instruments receives notice of such defects during the warranty period. National Instruments does not
warrant that the operation of the software shall be uninterrupted or error free.
A Return Material Authorization (RMA) number must be obtained from the factory and clearly marked on the outside of the
package before any equipment will be accepted for warranty work. National Instruments will pay the shipping costs of
returning to the owner parts which are covered by warranty.
National Instruments believes that the information in this document is accurate. The document has been carefully reviewed
for technical accuracy. In the event that technical or typographical errors exist, National Instruments reserves the right to
make changes to subsequent editions of this document without prior notice to holders of this edition. The reader should
consult National Instruments if errors are suspected. In no event shall National Instruments be liable for any damages arising
out of or related to this document or the information contained in it.
EXCEPT AS SPECIFIED HEREIN, NATIONAL INSTRUMENTS MAKES NO WARRANTIES, EXPRESS OR IMPLIED, AND SPECIFICALLY DISCLAIMS ANY
WARRANTY OF MERCHANTABILITY OR FITNESS FOR A PARTICULAR PURPOSE. CUSTOMER’S RIGHT TO RECOVER DAMAGES CAUSED BY FAULT
OR NEGLIGENCE ON THE PART OF NATIONAL INSTRUMENTS SHALL BE LIMITED TO THE AMOUNT THERETOFORE PAID BY THE CUSTOMER.
NATIONAL INSTRUMENTS WILL NOT BE LIABLE FOR DAMAGES RESULTING FROM LOSS OF DATA, PROFITS, USE OF PRODUCTS, OR INCIDENTAL
OR CONSEQUENTIAL DAMAGES, EVEN IF ADVISED OF THE POSSIBILITY THEREOF. This limitation of the liability of National Instruments
will apply regardless of the form of action, whether in contract or tort, including negligence. Any action against National
Instruments must be brought within one year after the cause of action accrues. National Instruments shall not be liable for any
delay in performance due to causes beyond its reasonable control. The warranty provided herein does not cover damages,
defects, malfunctions, or service failures caused by owner’s failure to follow the National Instruments installation, operation,
or maintenance instructions; owner’s modification of the product; owner’s abuse, misuse, or negligent acts; and power failure
or surges, fire, flood, accident, actions of third parties, or other events outside reasonable control.
Copyright
Under the copyright laws, this publication may not be reproduced or transmitted in any form, electronic or mechanical,
including photocopying, recording, storing in an information retrieval system, or translating, in whole or in part, without the
prior written consent of National Instruments Corporation.
National Instruments respects the intellectual property of others, and we ask our users to do the same. NI software is protected
by copyright and other intellectual property laws. Where NI software may be used to reproduce software or other materials
belonging to others, you may use NI software only to reproduce materials that you may reproduce in accordance with the
terms of any applicable license or other legal restriction.
End-User License Agreements and Third-Party Legal Notices
You can find end-user license agreements (EULAs) and third-party legal notices in the following locations:
• Notices are located in the <National Instruments>\_Legal Information and <National Instruments>
directories.
• EULAs are located in the <National Instruments>\Shared\MDF\Legal\license directory.
• Review <National Instruments>\_Legal Information.txt for more information on including legal information
in installers built with NI products.
Trademarks
DIAdem, LabVIEW, National Instruments, NI, ni.com, the National Instruments corporate logo, and the Eagle logo are
trademarks of National Instruments Corporation. Refer to the Trademark Information at ni.com/trademarks for other
National Instruments trademarks.
Other product and company names mentioned herein are trademarks or trade names of their respective companies.
Members of the National Instruments Alliance Partner Program are business entities independent from National Instruments
and have no agency, partnership, or joint-venture relationship with National Instruments.
Patents
For patents covering National Instruments products/technology, refer to the appropriate location: Help»Patents in your
software, the patents.txt file on your media, or the National Instruments Patent Notice at ni.com/patents.
Export Compliance Information
Refer to the Export Compliance Information at ni.com/legal/export-compliance for the National Instruments global
trade compliance policy and how to obtain relevant HTS codes, ECCNs, and other import/export data.
WARNING REGARDING USE OF NATIONAL INSTRUMENTS PRODUCTS
(1) NATIONAL INSTRUMENTS PRODUCTS ARE NOT DESIGNED WITH COMPONENTS AND TESTING FOR A
LEVEL OF RELIABILITY SUITABLE FOR USE IN OR IN CONNECTION WITH SURGICAL IMPLANTS OR AS
CRITICAL COMPONENTS IN ANY LIFE SUPPORT SYSTEMS WHOSE FAILURE TO PERFORM CAN
REASONABLY BE EXPECTED TO CAUSE SIGNIFICANT INJURY TO A HUMAN.
(2) IN ANY APPLICATION, INCLUDING THE ABOVE, RELIABILITY OF OPERATION OF THE SOFTWARE
PRODUCTS CAN BE IMPAIRED BY ADVERSE FACTORS, INCLUDING BUT NOT LIMITED TO FLUCTUATIONS
IN ELECTRICAL POWER SUPPLY, COMPUTER HARDWARE MALFUNCTIONS, COMPUTER OPERATING
SYSTEM SOFTWARE FITNESS, FITNESS OF COMPILERS AND DEVELOPMENT SOFTWARE USED TO
DEVELOP AN APPLICATION, INSTALLATION ERRORS, SOFTWARE AND HARDWARE COMPATIBILITY
PROBLEMS, MALFUNCTIONS OR FAILURES OF ELECTRONIC MONITORING OR CONTROL DEVICES,
TRANSIENT FAILURES OF ELECTRONIC SYSTEMS (HARDWARE AND/OR SOFTWARE), UNANTICIPATED
USES OR MISUSES, OR ERRORS ON THE PART OF THE USER OR APPLICATIONS DESIGNER (ADVERSE
FACTORS SUCH AS THESE ARE HEREAFTER COLLECTIVELY TERMED “SYSTEM FAILURES”). ANY
APPLICATION WHERE A SYSTEM FAILURE WOULD CREATE A RISK OF HARM TO PROPERTY OR PERSONS
(INCLUDING THE RISK OF BODILY INJURY AND DEATH) SHOULD NOT BE RELIANT SOLELY UPON ONE
FORM OF ELECTRONIC SYSTEM DUE TO THE RISK OF SYSTEM FAILURE. TO AVOID DAMAGE, INJURY, OR
DEATH, THE USER OR APPLICATION DESIGNER MUST TAKE REASONABLY PRUDENT STEPS TO PROTECT
AGAINST SYSTEM FAILURES, INCLUDING BUT NOT LIMITED TO BACK-UP OR SHUT DOWN MECHANISMS.
BECAUSE EACH END-USER SYSTEM IS CUSTOMIZED AND DIFFERS FROM NATIONAL INSTRUMENTS'
TESTING PLATFORMS AND BECAUSE A USER OR APPLICATION DESIGNER MAY USE NATIONAL
INSTRUMENTS PRODUCTS IN COMBINATION WITH OTHER PRODUCTS IN A MANNER NOT EVALUATED
OR CONTEMPLATED BY NATIONAL INSTRUMENTS, THE USER OR APPLICATION DESIGNER IS
ULTIMATELY RESPONSIBLE FOR VERIFYING AND VALIDATING THE SUITABILITY OF NATIONAL
INSTRUMENTS PRODUCTS WHENEVER NATIONAL INSTRUMENTS PRODUCTS ARE INCORPORATED IN A
SYSTEM OR APPLICATION, INCLUDING, WITHOUT LIMITATION, THE APPROPRIATE DESIGN, PROCESS
AND SAFETY LEVEL OF SUCH SYSTEM OR APPLICATION.
Contents
Conventions
Chapter 1
An Introduction to the LabVIEW DataPlugin SDK
DataPlugin Overview ....................................................................................................... 1-2
LabVIEW DataPlugin Types............................................................................................ 1-4
One-Shot DataPlugins .............................................................................................. 1-4
On-Demand DataPlugins.......................................................................................... 1-4
One-Shot versus On-Demand DataPlugins .............................................................. 1-4
Chapter 2
Creating DataPlugins with LabVIEW
LabVIEW Project Folders ................................................................................................ 2-1
Debugging and Testing Your LabVIEW DataPlugin....................................................... 2-2
Adapting the LabVIEW Project Build.............................................................................. 2-3
DataPlugin Parameterization .................................................................................... 2-3
Build Configuration.................................................................................................. 2-4
Chapter 3
Constraints
Channel Length Limitation............................................................................................... 3-1
Supported Data Types and Conversions........................................................................... 3-1
Name Conventions ........................................................................................................... 3-2
Supported LabVIEW Versions......................................................................................... 3-3
Appendix A
Technical Support and Professional Services
© National Instruments
|
v
Conventions
The following conventions are used in this manual:
<>
Angle brackets that contain numbers separated by an ellipsis represent
a range of values associated with a bit or signal name—for example,
AO <3..0>.
»
The » symbol leads you through nested menu items and dialog box
options to a final action. The sequence Options»Settings»General
directs you to pull down the Options menu, select the Settings item,
and select General from the last dialog box.
This icon denotes a tip, which alerts you to advisory information.
This icon denotes a note, which alerts you to important information.
bold
Bold text denotes items that you must select or click in the software,
such as menu items and dialog box options. Bold text also denotes
parameter names.
italic
Italic text denotes variables, emphasis, cross-references, or an
introduction to important concepts.
monospace
Text in this font denotes text or characters that you should enter from
the keyboard, such as sections of code, programming examples, and
syntax examples. This font is also used for the proper names of disk
drives, paths, folders, programs, subprograms, subroutines, device
names, functions, operations, commands, variables, controls, events,
methods, filenames and extensions, and code excerpts.
© National Instruments | vii
An Introduction to the
LabVIEW DataPlugin SDK
1
The LabVIEW DataPlugin SDK enables you to create DataPlugins from scratch using 100%
LabVIEW G-code. The SDK also enables you to create an installer in order to install the new
DataPlugin on any Windows computer.
Refer to the readme_DataPlugin_SDK.html for system and software requirements.
Visit www.ni.com/dataplugins for the list of all freely downloadable DataPlugins and for
more information about DataPlugins.
Visit www.ni.com/tdm for more information about the TDM data model, the TDM file format,
and associated TDM tools.
Visit the following web sites for more information about these related software packages:
•
LabVIEW: www.ni.com/labview
•
DIAdem: www.ni.com/diadem
•
DataFinder Server Edition: www.ni.com/datafinder
© National Instruments | 1-1
Chapter 1
An Introduction to the LabVIEW DataPlugin SDK
DataPlugin Overview
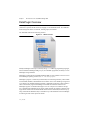
A DataPlugin is encapsulated code that understands how to read and to interpret the data
contained in a specific data file format by mapping it to the TDM data model. The TDM data
model arranges the data in root element, channel groups, and channels.
The TDM data model has the following structure:
Figure 1-1. TDM Data Model
Initially DataPlugins could only be created by using C++ or VBScript programming languages,
but the LabVIEW DataPlugin SDK gives you, the LabVIEW programmer, the ability to create
DataPlugins using LabVIEW.
DataPlugins created with the LabVIEW DataPlugin SDK can only read data. This is the case for
most DataPlugins publicly posted at www.ni.com/dataplugins.
DataPlugins “plug into” a software layer called USI (Universal Storage Interface), which installs
with LabVIEW, DIAdem, and DataFinder Server Edition. Once a new DataPlugin is registered
on a computer, any installed LabVIEW, DIAdem, or DataFinder application on that computer is
able to use that newly registered DataPlugin to load data files in the file format the new
DataPlugin supports. In LabVIEW this happens via a set of Express VIs called the “Storage
VIs”. In DIAdem the DataPlugin can be used by simply interactively dragging a data file of the
supported file format from the NAVIGATOR window into the Data Portal, or alternatively, by
using commands like DataFileLoad() in a DIAdem script. The DataFinder uses the DataPlugin
for indexing the files of this specific file format.
1-2 | ni.com
LabVIEW DataPlugin SDK
The main advantage of creating a DataPlugin with the LabVIEW DataPlugin SDK is to leverage
LabVIEW G-code to give new file format reading capability to DIAdem and/or the DataFinder.
When the LabVIEW DataPlugin installer runs, no record of it appears in “Add and Remove
Programs”, instead the DataPlugin is registered with the USI layer it “plugs into”. You may run
the LabVIEW DataPlugin installer as many times as you want, and each time the DataPlugin
registered with USI is simply updated. So to install a newer version of the DataPlugin on top of
an older version, you just run the newer LabVIEW DataPlugin installer on that computer. To get
an overview of the installed DataPlugins use the “DataPlugin Settings” dialog box in DIAdem
or DataFinder Server Edition. Use the same dialog box to uninstall LabVIEW DataPlugins.
In LabVIEW you can use the Storage VIs to enumerate, register, or deregister DataPlugins.
Figure 1-2. Overview of Installed DataPlugins
The LabVIEW DataPlugin example projects contain a For testing project
folder with a VI you can use to debug your LabVIEW DataPlugin from within
LabVIEW, without needing to first build the DataPlugin DLL and installer. Refer to
LabVIEW Project Folders in Chapter 2, Creating DataPlugins with LabVIEW for
further information on DataPlugins.
Note
© National Instruments | 1-3
Chapter 1
An Introduction to the LabVIEW DataPlugin SDK
LabVIEW DataPlugin Types
There are two types of LabVIEW DataPlugins, One-Shot and On-Demand. You need to choose
between implementing a One-Shot or an On-Demand DataPlugin based on the structure of the
data file and your level of LabVIEW programming experience, as described below.
One-Shot DataPlugins
The one-shot DataPlugin, is the simplest. The one-shot DataPlugin has one callback VI that you
program, yourCodeHere.vi. This VI is called exactly once any time the DataPlugin is used.
The one-shot DataPlugin passes all the descriptive information (meta-data, group and channel
hierarchy) as well as all the data values for all the channels. This type of DataPlugin agrees well
with the way LabVIEW programmers are used to operating, because the VI runs exactly once
when loading data with the DataPlugin.
On-Demand DataPlugins
The on-demand DataPlugin is more complicated and less comfortable for the LabVIEW
programmer, but in general this is still the right choice for very large data files. The on-demand
DataPlugin has two callbacks, the yourCodeHere_meta.vi which is called exactly once any
time the DataPlugin runs, and the yourCodeHere_raw.vi which can be called one or more
times but is only called when data values are requested. The yourCodeHere_meta.vi
declares on-demand data channels which specify, for example, the data type, name, length,
descriptive properties, but which contain no data values. Then the yourCodeHere_raw.vi is
called individually for each on-demand data channel.
One-Shot versus On-Demand DataPlugins
The advantages of the one-shot DataPlugin are that it is simple to program and often loads all
the values from all the channels faster than an on-demand DataPlugin. The one-shot DataPlugin
is an excellent choice when the data files you need to load are always small enough to fit in
RAM. If it only takes a few seconds to load all the values of all the channels, this is the way to
go. If, though, you know that some or most of your data files will be too big to load into RAM,
then you should seriously consider the more complicated on-demand DataPlugin. Note that
when loading data values into DIAdem, the values are always converted to DBLs in DIAdem’s
internal memory (not the case for LabVIEW), so in that case you should estimate your file’s
effective size in DBLs when determining if it fits in RAM.
The downside to the one-shot DataPlugin is that you load all the data values any time the
DataPlugin is called. If the DataPlugin is being called by the DataFinder in order to index the
file (which needs only the descriptive information), this takes much longer than necessary
because the one-shot DataPlugin loads all the data values even though they are not needed in that
case.
In case of the on-demand DataPlugin when the DataFinder is indexing the file, the on-demand
DataPlugin only returns the descriptive information—it does not waste unnecessary time
reading all the data values.
1-4 | ni.com
LabVIEW DataPlugin SDK
If the One-Shot DataPlugin is being called by DIAdem to load only 1 out of 200 channels, it
loads the data much slower, because it is loading all the data values for all 200 channels, even
though only the data values for 1 channel were requested. Similarly, if only the first 100 values
from a 100 million value long data channel are being requested, the one-shot DataPlugin loads
all 100 million values anyway and then only returns the first 100 of them.
On the other hand, if your data file contains 20 channels, and an on-demand DataPlugin is called
to load all the data values from all 20 channels, the yourCodeHere_raw.vi is called 20 times,
once for each separate on-demand channel. If you are dealing with a binary file that has excellent
random access, and you know exactly at which byte position each channel starts, this does not
slow you down at all. If, however, you have a datalog file with an array of clusters where each
cluster has 20 elements, this causes you to read the file 20 times in order to load all the data
values from all the channels. This is how the one-shot DataPlugin can be faster if you can fit your
data file into RAM (including LabVIEW copies and DataPlugin copies). At that point you have
to weigh how much virtual memory will slow you down versus the inefficiency of loading the
file multiple times.
Another distinction of on-demand DataPlugins and on-demand channels is that the data values
are in general loaded in buffers. When an on-demand DataPlugin is called to load all the data
from a given on-demand channel, the DataPlugin engine usually calls the
yourCodeHere_raw.vi multiple times to load the data values buffer by buffer for that
channel. The DataPlugin engine decides what buffer size to use and how many times to call the
yourCodeHere_raw.vi, so you neither have to worry about that nor can you affect the buffer
size yourself. This is why the yourCodeHere_raw.vi has “Offset” and “Count” inputs, so
that the DataPlugin engine can tell you which data buffer to load from the requested channel.
This also means that when the on-demand DataPlugin is called to load the first 100 values from
a 100,000 value on-demand channel, that the DataPlugin can very efficiently just load the needed
values and not have to process all 100,000 unnecessarily. Again, for very large files with a data
file format that offers excellent random access, this is an ideal fit.
ASCII files, however, are particularly bad for the on-demand DataPlugins, because in order to
forward the file cursor to the correct “Offset” position, you have to parse all the endline
characters in the file up to that point, and this you must do all over again for every successive
buffer read. In this particular case you might want to think of using VBS DataPlugins as they
provide built-in optimized on-demand ASCII (and binary) readers.
One more scenario where on-demand DataPlugins shine (provided a file format with reasonable
random access) is when the DataPlugin is called to load all the values from only one channel out
of, for example, 200. In this case you can read the whole file much faster and only store data in
LabVIEW memory from one channel instead of all 200. Furthermore there is the advantage that
you do not unnecessarily load data values when only descriptive information is being requested.
In summary, the type of DataPlugin you choose depends partly on your file format, partly on
your average file size relative to RAM, and partly on your typical loading/indexing use cases.
© National Instruments | 1-5
2
Creating DataPlugins
with LabVIEW
In this chapter you will learn how to adapt predefined LabVIEW projects, how to test your
DataPlugin, and how to set the DataPlugin parameters.
LabVIEW Project Folders
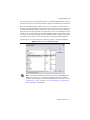
LabVIEW DataPlugins are built by adapting predefined LabVIEW projects to your specific
needs. Use the Project Explorer to load such a predefined project.
You can also access these examples by browsing to the folder labview»examples»file»
dataplugin.
Figure 2-1. LabVIEW Project Layout for On-Demand DataPlugins
The LabVIEW project folder Adapt this to your file format contains your actual
file-format-specific source code to read the data from the particular data file that your
DataPlugin supports. In the one-shot case this is the yourCodeHere.vi, while in the
on-demand case this is both the yourCodeHere_meta.vi and the
© National Instruments | 2-1
Chapter 2
Creating DataPlugins with LabVIEW
yourCodeHere_raw.vi. You should adapt the code in this project folder from one of the
LabVIEW DataPlugin examples, since the input and output terminals of these VIs must remain
the same for the rest of the DataPlugin architecture to call your VIs correctly. Refer to LabVIEW
DataPlugin Types in Chapter 1, An Introduction to the LabVIEW DataPlugin SDK for
information about the correct DataPlugin type, and thus the correct example project to start with.
This project folder also includes a required RegisterLabVIEWDataPlugin.ini file, which
you need to edit in order to match the expected file extension, programming name of the
DataPlugin, associated DataPlugin icon file, and so on. The optional .ico file that is associated
with the DataPlugin is the last resource file in this project folder. Refer to Adapting the LabVIEW
Project Build in this chapter for further information.
The LabVIEW project folder Don’t change this contains several files which comprise the heart
of the LabVIEW DataPlugin architecture and should never be edited nor deleted in your
DataPlugin project.
The LabVIEW project folder For testing contains several completely optional files which
should be useful to you in debugging and testing your DataPlugin. Refer to Debugging and
Testing Your LabVIEW DataPlugin in this chapter for further information.
The LabVIEW project folder Dependencies contains files or file references which need to be
included in the built source distribution that goes in the installer—in general you should not need
to change anything by hand here. The list of included VIs begins with all the vi.lib files used
in your project. Any additionally included subVIs can show up here, and any included DLLs,
such as the lvStorage.dll (always) or the lvanlsis.dll also appear here.
The LabVIEW project folder Build Specifications contains the configurations for creating the
DataPlugin DLL and for building the LabVIEW DataPlugin installer. All the LabVIEW code in
the DataPlugin is built into the DataPlugin DLL, and the installer orchestrates the installation of
the DataPlugin DLL and a few other resource files, as well as the subsequent registration of the
DataPlugin with the host computer. In general you should not need to change anything in the
DataPlugin DLL configuration, except perhaps the target name of the DLL. The DataPlugin
installer is another matter. Refer to Adapting the LabVIEW Project Build in this chapter for
further information.
Debugging and Testing Your
LabVIEW DataPlugin
The LabVIEW project folder For testing contains several completely optional files which
should be useful to you in testing your DataPlugin.
The first of these is an example Test Data File.xxxxx for you to try to load with
the DataPlugin code. This is useful to you only if you are getting familiar with
LabVIEW DataPlugin architecture and using one of the examples without any edits. It is a good
practice, though, to add a sample data file to this project folder so that you or others have an easy
way to test/edit the source code later on.
2-2 | ni.com
LabVIEW DataPlugin SDK
The second file is a Create Test Data File.vi with which you can create additional test
data files with different types of data and/or different file sizes. Again, this is only useful in the
unedited examples, and here you should only include one for your DataPlugin if you happen to
have it handy.
The third file is a Create DataPlugin Output File.vi, which enables you to test your
DataPlugin code, prior to building and running the DataPlugin installer and while still in
LabVIEW. This VI simulates the way the DataPlugin architecture calls the yourCodeHere…vi
you edited, and then displays the resulting loaded data in a pop-up, interactive VI. You should
use this VI to debug your code, prior to building the installer, so that you can use LabVIEW
debugging to identify the source of any errors or incorrect data loading. Feel free to look at this
VI’s block diagram to gain a clearer understanding of what the DataPlugin architecture is doing
with your code.
Use the Data File Viewer.vi in the File I/O»Storage VIs/DataPlugins palette to test the
built and installed DataPlugin from within LabVIEW.
Adapting the LabVIEW Project Build
In this section you will learn how to set the DataPlugin parameters such as the DataPlugin name
and the supported file extensions. Additionally you will learn how to change the build
configuration.
DataPlugin Parameterization
To personalize your LabVIEW DataPlugin, you need to edit the content of the
RegisterLabVIEWDataPlugin.ini from the Adapt this to your file format project
folder. Below is the content of the RegisterLabVIEWDataPlugin.ini file in the
LabVIEW DataPlugin example “Datalog DataPlugin on demand”:
[LVDataPluginDatalog]
Name = LVDataPluginDatalog
FileExtension = *.lvlog
PluginFileName = LabVIEWDataPluginDatalog.dll
IconFileName = Datalog.ico
The first line sets the Name of the DataPlugin, as it is listed in the USI configuration file and how
it shows up in the user dialog boxes in DIAdem and the DataFinder. It is also the programmatic
name of the DataPlugin for LabVIEW VIs and DIAdem scripts. You just need to make sure you
pick a user-friendly name that is different from all other DataPlugins which might be on your
target host computers.
The FileExtension of the DataPlugin is the default file extension or extensions that are
associated with this DataPlugin in DIAdem and the DataFinder. Multiple extensions can be
specified by using semicolon as a separator between each extension.
© National Instruments | 2-3
Chapter 2
Creating DataPlugins with LabVIEW
Note Please note that DataPlugins with wildcards as extensions, for example *.*
or *.lv?og, are not used by DataFinder for indexing.
The PluginFileName of the DataPlugin is the name of the DataPlugin DLL – make sure it
matches the name listed in the DataPlugin DLL configuration dialog box as well as the name in
the installer configuration dialog box.
The IconFileName of the DataPlugin is the .ico file which is associated with your
DataPlugin—make sure this matches the actual name of the icon file in the Adapt this to your
file format project folder. If you choose to take the default DataPlugin icon, you can end this
line with the “=” sign. You also need to change the name of the associated .ico file in the
Source Files»Destination View to match your actual icon file, or else delete the icon file from
the Source Files»Destination View if you choose not to have one.
Note To create your own icon files you must use an appropriate graphics program,
for example you could buy Axialis IconWorkshop (www.axialis.com). The icon
size should be 16 × 16 pixels.
Build Configuration
The DataPlugin DLL configuration does not require changes, because it always builds the DLL
starting with the DataPlugin architecture code in the Don’t change this project folder, which
you never need to edit. You will, however, probably choose to change the target name of the
DataPlugin DLL to better reflect the name of your particular DataPlugin. You should similarly
change the Product Information»Product Name in the installer configuration.
The DataPlugin installer includes the resulting DataPlugin DLL as well as the
RegisterLabVIEWDataPlugin.exe from the Don’t change this project folder and the
RegisterLabVIEWDataPlugin.ini plus any associated icon file from the Adapt this to
your file format project folder. If you change the name of the DataPlugin DLL in the DLL build
configuration, you have to make corresponding name changes to the resulting .dll, .h, .ini,
.lib files in the Source Files»Destination View.
You may want to remove the “NI LabVIEW Run-Time Engine” from the “Additional Installers”
section to reduce the size of the resulting installer. If you do this, you are assuming that all the
clients that will ever install your DataPlugin will previously and separately have installed the
same LabVIEW Run-Time Engine version that the DataPlugin is using. In general it is safer to
include the LabVIEW Run-Time Engine in the DataPlugin installer.
Something else you do not need to change but should be aware of, is that the last step of
your DataPlugin installer kicks off an additional installer called
RegisterLabVIEWDataPlugin.exe, which is located in the Don’t change this project
folder. This additional installer must be selected to run in the “Advanced” section of the installer
configuration, because this is what registers the DataPlugin with the host computer after the
DataPlugin has successfully installed onto the host computer.
2-4 | ni.com
3
Constraints
In this chapter you will learn which data types DataPlugins support, and which channel length
limitation and name conventions you have to consider.
Channel Length Limitation
DataPlugins currently can only declare channels to have a length from 0 to 231. If you pass more
than 231 values to a DataPlugin channel, the DataPlugin throws an error.
Supported Data Types and Conversions
You can import the following data types with a DataPlugin:
Time, U8, I8, I16, U16, I32, U32, I64, U64, SGL, DBL
Only the following data types are natively supported by DataPlugins:
Time, U8, I16, I32, SGL, DBL
All other data types are type converted when passed to the DataPlugin. The final converted type
can depend on which VI you use to pass the data to the DataPlugin.
If you use the standard Write Data.vi express VI from the Storage VI palette, the following
type conversions automatically occur:
I8
I16
U16
I32
U32
I32
I64
DBL Waveform
U64
DBL Waveform
© National Instruments | 3-1
Chapter 3
Constraints
If you are reading U32, U64, or I64 data, you should use the Write Channel Values.vi
instead (see below).
If you use instead the Write Channel Values.vi (which you can find in the Datalog
example project), the following type conversions automatically occur:
I8
I16
U16
I32
U32
DBL
I64
DBL
U64
DBL
Even here the 64 bit integer conversions still in some cases result in loss of
data, so if you are dealing with digital ports, for example, you might want to map a
U64 into four separate U16 DataPlugin channels (which would automatically be
converted to I32 internally).
Note
None of the following data types are supported at all in DataPlugins:
Booleans, Clusters, extended data types, or arrays of greater dimensionality than 1D.
Note
Name Conventions
All channel groups within a LabVIEW DataPlugin and all channels within a specific channel
group should have a unique name. The same applies to custom properties added to the file,
channel group or channel level.
Additionally some characters may not be used in names. Please find below a table listing those
special characters.
Area of Usage
Forbidden Characters
File names (Data set names)
\ / : * ? < > | ".
Channel group names
/*?'[]
Channel names
/*?'[]
Property names
.:,;'\@<>#[]%(){}|*?=!"^$&+-/
and a space
The following property names for file have a special meaning in the TDM data model: author,
datestring, datetime, description, name, mime_type, registertxt1,
registertxt2, registertxt3, timestring, title, wf_create_time.
3-2 | ni.com
LabVIEW DataPlugin SDK
The following property names for file are reserved for internal use: channelgroups,
children, environment, external_references, id, instance_attributes,
objecttype, parent, registercomments, version, version_date.
The following property names for channel groups have a special meaning in the TDM data
model: description, measurement_begin, measurement_end, mime_type, name,
registertxt1, registertxt2, registertxt3.
The following property names for channel groups are reserved for internal use: channels,
children, equipments, external_references, id, index,
instance_attributes, measurement_quantities, objecttype, parent, root,
sequences, submatrices, test, units_under_test, version, version_date.
The following property names for channels have a special meaning in the TDM data model:
description, displaytype, maximum, mime_type, minimum, monotony, name,
novaluekey, registerint1, registerint2, registerint3, registerint4,
registerint5, registerint6, registertxt1, registertxt2, registertxt3,
registerval1, registerval2, registerval3, registerval4, registerval5,
registerval6, unit_string, wf_increment, wf_samples, wf_start_offset,
wf_start_time, wf_xnametype, wf_xunit_string.
The following property names for channels are reserved for internal use: average,
channel, children, datatype, deletebehaviour, dimension, empty,
external_references, flagkey, group, groupindex, id, implicit_increment,
implicit_start, instance_attributes, internal_params, internal_res1,
internal_res2, interpolation, is_scaled_by, length, lengthmax,
local_columns, measurement, number, objecttype, parent, quantity, rank,
representation, scales, sourcedatafilename, sourcedatafilepath,
sourcegenparam1, sourcegenparam2, sourcehandle, sourceinstancekey,
sourcename, sourceparentname, sourcerepresentation, sourcetype,
sourcevalue, standard_deviation, status, type_size, unit, valuetype,
version, version_date, waveform, writeprotection.
Supported LabVIEW Versions
DataPlugins have been supported in LabVIEW Storage VIs since LabVIEW 2010. In earlier
versions DataPlugins could be used by a work around.
Note Use a DataPlugin built with the LabVIEW DataPlugin SDK only with the
same LabVIEW version with which you created this DataPlugin.
The same applies if this DataPlugin is used together with the LabVIEW DataFinder Toolkit.
© National Instruments | 3-3
A
Technical Support and
Professional Services
Log in to your National Instruments ni.com User Profile to get personalized access to your
services. Visit the following sections of ni.com for technical support and professional services:
•
Support—Technical support at ni.com/support includes the following resources:
–
Self-Help Technical Resources—For answers and solutions, visit ni.com/
support for software drivers and updates, a searchable KnowledgeBase, product
manuals, step-by-step troubleshooting wizards, thousands of example programs,
tutorials, application notes, instrument drivers, and so on. Registered users also
receive access to the NI Discussion Forums at ni.com/forums. NI Applications
Engineers make sure every question submitted online receives an answer.
–
Standard Service Program Membership—This program entitles members to direct
access to NI Applications Engineers via phone and email for one-to-one technical
support, as well as exclusive access to eLearning training modules at ni.com/
elearning. All customers automatically receive a one-year membership in the
Standard Service Program (SSP) with the purchase of most software products and
bundles including NI Developer Suite. NI also offers flexible extended contract
options that guarantee your SSP benefits are available without interruption for as long
as you need them. Visit ni.com/ssp for more information.
For information about other technical support options in your area, visit ni.com/
services, or contact your local office at ni.com/contact.
•
Training and Certification—Visit ni.com/training for training and certification
program information. You can also register for instructor-led, hands-on courses at locations
around the world.
•
System Integration—If you have time constraints, limited in-house technical resources, or
other project challenges, National Instruments Alliance Partner members can help. To learn
more, call your local NI office or visit ni.com/alliance.
You also can visit the Worldwide Offices section of ni.com/niglobal to access the branch
office Web sites, which provide up-to-date contact information, support phone numbers, email
addresses, and current events.
© National Instruments | A-1