1
A framework for processing and
presenting parallel text corpora
Dissertation
der Fakultät für Informations- und Kognitionswissenschaften
der Eberhard-Karls-Universität Tübingen
zur Erlangung des Grades eines
Doktors der Naturwissenschaften (Dr. rer. nat.)
vorgelegt von
Dipl.-Inform. Volker Simonis
aus Mediasch
Tübingen
2004
Tag der mündlichen Qualifikation:
Dekan:
1. Berichterstatter:
2. Berichterstatter:
Prof. Dr. Ulrich Güntzer
Prof. Dr. Rüdiger Loos
Prof. Dr. Wolfram Luther
(Univ. Duisburg-Essen)
Meinen Eltern
Abstract
This thesis describes an extensible framework for the processing and presentation of multi-modal, parallel text corpora. It can be used to load digital
documents in many formats like for example pure text, XML or bit-mapped
graphics, to structure these documents with a uniform markup and link them
together. The structuring or tagging can be done with respect to formal, linguistic, semantic, historical and many other aspects. Different, parallel taggings are
possible for a document and the documents marked up this way can be linked
together with respect to any of these structures. Depending on the nature of
the tagging and the scope of the linking, they can be performed automatically,
semi-automatically or manually.
As a foundation of this work, XTE, a simple but powerful XML standoff
annotation scheme has been developed and realized as a DTD and as an XML
Schema. XTE is especially well suited for the encoding of multiple, overlapping
hierarchies in multi-modal documents and for the cross linking of the elements
of these encodings across several documents.
Together with XTE, elaborate editor and browser applications have been developed which allow the comfortable creation and presentation of XTE encoded
documents. These applications have been realized as a configurable and extensible framework which makes it easy for others to extend, customize and adopt
the system for their special needs. The combination of a classical textual synopsis with the supplementary options of dictionaries, encyclopedias, multi-media
extensions and powerful tools opens a wide area of applicability for the system
ranging from text analysis and language learning to the creation of critical editions and electronic publishing.
As a side effect of the main topic, different tools for program and software
documentation have been developed and a new and innovative, multilingual
user interface has been created. The documentation tools have been used to document the components of the framework while the new user interface has been
built into the created applications.
Zusammenfassung
Diese Arbeit stellt ein erweiterbares System für die Bearbeitung und Präsentation von multi-modalen, parallelen Textkorpora vor. Es kann dazu verwendet
werden um digitale Dokumente in vielerlei Formaten wie zum Beispiel einfache Textdateien, XML-Dateien oder Graphiken zu bearbeiten wobei bearbeiten
in diesem Zusammenhang vor allem strukturieren und verlinken bedeutet. Diese Strukturierung nach einem neu entwickelten Kodierungschema kann zum
Beispiel auf formalen, linguistischen, semantischen, historischen oder auch vielen anderen Gesichtspunkten beruhen. Die Dokumente können gleichzeitig mit
beliebig vielen parallelen und sich möglicherweise auch überlappenden Strukturen versehen werden und bezüglich jeder dieser Strukturen auch miteinander
verknüpft werden. Die unterschiedlichen Strukturen können je nach Art entweder automatisch oder halbautomatisch erzeugt werden oder sie können vom
Benutzer manuell spezifiziert werden.
Als Grundlage des vorgestellten Systems dient XTE, ein einfaches aber zugleich mächtiges, externe Kodierungsschema das sowohl als eine XML DTD als
auch als ein XML Schema verwirklicht wurde. XTE ist besonders zum Kodieren von vielen, sich gegenseitig überlappenden Hierarchien in multi-modalen
Dokumenten und zum Verknüpfen dieser Strukturen über mehrere Dokumente
hinweg, geeignet.
Zusammen mit XTE wurden zwei ausgereifte Anwendungen zum Betrachten und Bearbeiten von XTE-kodierten Dokumenten sowie zum komfortablen
Arbeiten mit den so erstellten Ergebnisdokumenten geschaffen. Diese Anwendungen wurden als anpassbares und erweiterbares System konzipiert, das möglichst einfach für andere Einsatzgebiete und an neue Benutzerwünsche angepasst werden können soll. Die Kombination einer klassischen Synopse zusammen mit den vorhandenen Erweiterungsmöglichkeiten mittels Wörterbüchern,
Lexika und Multi-Media Elementen die das System bietet, machen es zu einem
Werkzeug das auf vielen Gebieten, angefangen von der Text-Analyse und dem
Sprachenlernen über die Erstellung textkritischer Editionen bis hin zum elektronischen Publizieren, einsetzbar ist.
Neben diesem System sind als weitere Ergebnisse dieser Arbeit verschiedene
Werkzeuge für die Softwaredokumentation entstanden und zur Dokumentation
des Systems eingesetzt worden. Weiterhin wurde eine neuartige, mehrsprachige, graphische Benutzeroberfläche entwickelt, die unter anderem in dem hier
beschriebenen System eingesetz wurde.
Contents
1 Introduction
1.1 Text encoding . . . . . . . . . . . . . . . . . . . .
1.1.1 History of text encoding . . . . . . . . . .
1.1.2 Electronic character encodings . . . . .
1.2 Text markup . . . . . . . . . . . . . . . . . . . . .
1.2.1 Text processing . . . . . . . . . . . . . . .
1.2.2 General Markup Languages . . . . . . .
1.2.3 Specialized Markup Languages for Text
1.3 Scope and contribution . . . . . . . . . . . . . .
1.4 Structure of this work . . . . . . . . . . . . . . . .
.
.
.
.
.
.
.
.
.
.
.
.
.
.
.
.
.
.
.
.
.
.
.
.
.
.
.
.
.
.
.
.
.
.
.
.
.
.
.
.
.
.
.
.
.
.
.
.
.
.
.
.
.
.
.
.
.
.
.
.
.
.
.
.
.
.
.
.
.
.
.
.
1
1
2
4
5
5
6
8
9
10
2 A new markup scheme for text
2.1 A short introduction to XML . . . . . . . . . . . . . . . . . . . .
2.1.1 XML namespaces . . . . . . . . . . . . . . . . . . . . .
2.1.2 XML schema languages . . . . . . . . . . . . . . . . . .
2.1.3 XPath, XPointer and XLink . . . . . . . . . . . . . . . . .
2.1.4 XSL - The Extensible Stylesheet Language . . . . . . .
2.1.5 The future of XML . . . . . . . . . . . . . . . . . . . . . .
2.2 The problem of overlapping hierarchies . . . . . . . . . . . .
2.3 Workarounds for the problem of overlapping hierarchies . .
2.3.1 The SGML CONCUR feature . . . . . . . . . . . . . . . . .
2.3.2 Milestone elements . . . . . . . . . . . . . . . . . . . . .
2.3.3 Fragmentation . . . . . . . . . . . . . . . . . . . . . . .
2.3.4 Virtual joins . . . . . . . . . . . . . . . . . . . . . . . . . .
2.3.5 Multiple encodings . . . . . . . . . . . . . . . . . . . . .
2.3.6 Bottom up virtual hierarchies . . . . . . . . . . . . . . .
2.3.7 Just in time trees . . . . . . . . . . . . . . . . . . . . . .
2.3.8 Standoff markup . . . . . . . . . . . . . . . . . . . . . .
2.4 XTE - A new standoff markup scheme . . . . . . . . . . . . . .
2.4.1 The XTE DTD . . . . . . . . . . . . . . . . . . . . . . . . .
2.4.2 XTE - Expressed as an XML Schema . . . . . . . . . . .
2.4.3 Using the XTE DTD together with the XTE XML Schema
2.4.4 Encoding facsimile texts with XTE . . . . . . . . . . . .
.
.
.
.
.
.
.
.
.
.
.
.
.
.
.
.
.
.
.
.
.
.
.
.
.
.
.
.
.
.
.
.
.
.
.
.
.
.
.
.
.
.
.
.
.
.
.
.
.
.
.
.
.
.
.
.
.
.
.
.
.
.
.
.
.
.
.
.
.
.
.
.
.
.
.
.
.
.
.
.
.
.
.
.
.
.
.
.
.
.
.
.
.
.
.
.
.
.
.
.
.
.
.
.
.
.
.
.
.
.
.
.
.
.
.
.
.
.
.
.
.
.
.
.
.
.
.
.
.
.
.
.
.
.
.
.
.
.
.
.
.
.
.
.
.
.
.
11
11
13
14
15
17
17
17
18
18
19
20
20
21
21
21
21
22
23
30
38
41
3 The software architecture of LanguageExplorer and LanguageAnalyzer
3.1 The Java programming language . . . . . . . . . . . . . . . . . . . .
3.1.1 The Java APIs . . . . . . . . . . . . . . . . . . . . . . . . . . . .
3.2 The LanguageExplorer text classes . . . . . . . . . . . . . . . . . . .
3.2.1 The document class . . . . . . . . . . . . . . . . . . . . . . . .
3.2.2 The editor kit . . . . . . . . . . . . . . . . . . . . . . . . . . . . .
.
.
.
.
.
.
.
.
.
.
.
.
.
.
.
43
43
44
49
50
52
.
.
.
.
.
.
.
.
.
.
.
.
.
.
.
.
.
.
.
.
.
.
.
.
.
.
.
.
.
.
.
.
.
.
.
.
.
.
.
.
.
.
.
.
.
.
.
.
.
.
.
.
.
.
.
.
.
.
.
.
.
.
.
Dissertation der Fak. f. Informations- u. Kognitionswissenschaften, Univ. Tübingen - 2004
ii
CONTENTS
3.2.3 The view classes . . . . . . . . . . . . . .
3.3 The LanguageExplorer file formats . . . . . . . .
3.3.1 The LanguageExplorer book format . . .
3.3.2 Encryption of LanguageExplorer books
3.3.3 LanguageExplorer configuration files . .
3.4 The design of LanguageAnalyzer . . . . . . . .
3.5 The design of LanguageExplorer . . . . . . . . .
3.6 The plugin concept . . . . . . . . . . . . . . . .
3.6.1 Handling new XTE elements . . . . . . .
3.6.2 Support for new media types . . . . . . .
3.6.3 Adding new tools . . . . . . . . . . . . . .
.
.
.
.
.
.
.
.
.
.
.
.
.
.
.
.
.
.
.
.
.
.
.
.
.
.
.
.
.
.
.
.
.
.
.
.
.
.
.
.
.
.
.
.
.
.
.
.
.
.
.
.
.
.
.
.
.
.
.
.
.
.
.
.
.
.
.
.
.
.
.
.
.
.
.
.
.
.
.
.
.
.
.
.
.
.
.
.
.
.
.
.
.
.
.
.
.
.
.
.
.
.
.
.
.
.
.
.
.
.
.
.
.
.
.
.
.
.
.
.
.
54
55
55
57
58
59
60
62
62
62
63
4 Implementation techniques and libraries
4.1 Program documentation with ProgDOC . . . . . . . . . .
4.1.1 Introduction . . . . . . . . . . . . . . . . . . . . . .
4.1.2 Some words on Literate Programming . . . . . .
4.1.3 Software documentation in the age of IDEs . . .
4.1.4 Software documentation and XML . . . . . . . .
4.1.5 Overview of the ProgDOC system . . . . . . . . .
4.1.6 The \sourceinput command . . . . . . . . . . . .
4.1.7 Using ProgDOC in two-column mode . . . . . . .
4.1.8 Using the alternative highlighter pdlsthighlight .
4.1.9 The \sourcebegin and \sourceend commands . .
4.1.10 The \sourceinputbase command . . . . . . . . . .
4.1.11 The source file format . . . . . . . . . . . . . . . .
4.1.12 LATEX customization of ProgDOC . . . . . . . . . . .
4.1.13 An example Makefile . . . . . . . . . . . . . . . .
4.2 Program documentation with XDoc . . . . . . . . . . .
4.2.1 Introduction . . . . . . . . . . . . . . . . . . . . . .
4.2.2 The new XDoc approach . . . . . . . . . . . . . .
4.2.3 A prototype implementation . . . . . . . . . . . .
4.2.4 Conclusion . . . . . . . . . . . . . . . . . . . . . . .
4.3 A Locale-Sensitive User Interface . . . . . . . . . . . . .
4.3.1 Introduction . . . . . . . . . . . . . . . . . . . . . .
4.3.2 The Java Swing architecture . . . . . . . . . . . .
4.3.3 The solution - idea and implementation . . . . .
4.3.4 Conclusion . . . . . . . . . . . . . . . . . . . . . . .
4.4 Scrolling on demand . . . . . . . . . . . . . . . . . . . . .
4.4.1 Introduction . . . . . . . . . . . . . . . . . . . . . .
4.4.2 Scrollable menus and toolbars! . . . . . . . . . .
4.4.3 The implementation . . . . . . . . . . . . . . . . .
4.4.4 Using the ScrollableBar class . . . . . . . . . . . .
4.4.5 Conclusion . . . . . . . . . . . . . . . . . . . . . . .
.
.
.
.
.
.
.
.
.
.
.
.
.
.
.
.
.
.
.
.
.
.
.
.
.
.
.
.
.
.
.
.
.
.
.
.
.
.
.
.
.
.
.
.
.
.
.
.
.
.
.
.
.
.
.
.
.
.
.
.
.
.
.
.
.
.
.
.
.
.
.
.
.
.
.
.
.
.
.
.
.
.
.
.
.
.
.
.
.
.
.
.
.
.
.
.
.
.
.
.
.
.
.
.
.
.
.
.
.
.
.
.
.
.
.
.
.
.
.
.
.
.
.
.
.
.
.
.
.
.
.
.
.
.
.
.
.
.
.
.
.
.
.
.
.
.
.
.
.
.
.
.
.
.
.
.
.
.
.
.
.
.
.
.
.
.
.
.
.
.
.
.
.
.
.
.
.
.
.
.
.
.
.
.
.
.
.
.
.
.
.
.
.
.
.
.
.
.
.
.
.
.
.
.
.
.
.
.
.
.
.
.
.
.
.
.
.
.
.
.
.
.
.
.
.
.
.
.
.
.
.
.
.
.
.
.
.
.
.
.
.
.
.
.
.
.
.
.
.
.
.
.
.
.
.
.
.
.
.
.
.
.
.
.
.
.
.
.
.
.
.
.
.
.
.
.
.
.
.
.
.
.
.
.
.
.
.
.
.
.
.
.
.
.
.
.
.
.
.
.
65
65
66
66
70
71
72
75
77
77
78
79
79
81
83
85
85
85
88
94
97
97
98
99
107
108
108
109
110
114
116
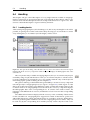
5 LanguageExplorer
5.1 Introduction . . . . . . . . . . . . . .
5.2 Overview . . . . . . . . . . . . . . . .
5.3 Installation . . . . . . . . . . . . . . .
5.3.1 Installation under Windows .
5.3.2 Installation under Linux . . .
5.3.3 Installation under Mac OS X
5.4 Handling . . . . . . . . . . . . . . . .
.
.
.
.
.
.
.
.
.
.
.
.
.
.
.
.
.
.
.
.
.
.
.
.
.
.
.
.
.
.
.
.
.
.
.
.
.
.
.
.
.
.
.
.
.
.
.
.
.
.
.
.
.
.
.
.
.
.
.
.
.
.
.
.
.
.
.
.
.
.
117
117
118
119
119
120
120
121
.
.
.
.
.
.
.
.
.
.
.
.
.
.
.
.
.
.
.
.
.
.
.
.
.
.
.
.
.
.
.
.
.
.
.
.
.
.
.
.
.
.
.
.
.
.
.
.
.
.
.
.
.
.
.
.
.
.
.
.
.
.
.
.
.
.
.
.
.
.
.
.
.
.
.
.
.
.
.
.
.
.
.
.
.
.
.
.
.
.
.
.
.
.
.
.
.
.
.
.
.
.
.
.
.
.
.
.
.
.
.
.
.
.
.
.
.
.
.
.
.
.
.
.
.
.
.
.
Dissertation der Fak. f. Informations- u. Kognitionswissenschaften, Univ. Tübingen - 2004
CONTENTS
5.4.1
5.4.2
5.4.3
5.4.4
5.4.5
5.4.6
5.4.7
5.4.8
5.4.9
iii
Loading books . . . .
Navigation . . . . . . .
The KWIC-Index . . . .
The dictionary . . . . .
Searching . . . . . . .
Regular expressions .
Audio output . . . . .
Configuration . . . . .
System dependencies
.
.
.
.
.
.
.
.
.
.
.
.
.
.
.
.
.
.
.
.
.
.
.
.
.
.
.
.
.
.
.
.
.
.
.
.
.
.
.
.
.
.
.
.
.
.
.
.
.
.
.
.
.
.
.
.
.
.
.
.
.
.
.
.
.
.
.
.
.
.
.
.
.
.
.
.
.
.
.
.
.
.
.
.
.
.
.
.
.
.
.
.
.
.
.
.
.
.
.
.
.
.
.
.
.
.
.
.
.
.
.
.
.
.
.
.
.
.
.
.
.
.
.
.
.
.
.
.
.
.
.
.
.
.
.
.
.
.
.
.
.
.
.
.
.
.
.
.
.
.
.
.
.
.
.
.
.
.
.
.
.
.
.
.
.
.
.
.
.
.
.
.
.
.
.
.
.
.
.
.
.
.
.
.
.
.
.
.
.
121
122
126
128
128
130
131
132
136
6 LanguageAnalyzer
6.1 Introduction . . . . . . . . . . . . . . . . . . . . . . . . . . .
6.2 Overview . . . . . . . . . . . . . . . . . . . . . . . . . . . . .
6.3 Handling . . . . . . . . . . . . . . . . . . . . . . . . . . . . .
6.3.1 Loading content . . . . . . . . . . . . . . . . . . . .
6.3.2 Saving XTE files . . . . . . . . . . . . . . . . . . . . .
6.3.3 Working with multiple documents and encodings
6.3.4 Tools . . . . . . . . . . . . . . . . . . . . . . . . . . . .
6.3.5 Plugins . . . . . . . . . . . . . . . . . . . . . . . . . .
6.4 Command line tools . . . . . . . . . . . . . . . . . . . . . .
6.4.1 Merging XTE files . . . . . . . . . . . . . . . . . . . .
6.4.2 Encrypting XTE files . . . . . . . . . . . . . . . . . . .
.
.
.
.
.
.
.
.
.
.
.
.
.
.
.
.
.
.
.
.
.
.
.
.
.
.
.
.
.
.
.
.
.
.
.
.
.
.
.
.
.
.
.
.
.
.
.
.
.
.
.
.
.
.
.
.
.
.
.
.
.
.
.
.
.
.
.
.
.
.
.
.
.
.
.
.
.
.
.
.
.
.
.
.
.
.
.
.
.
.
.
.
.
.
.
.
.
.
.
139
139
139
140
140
141
142
144
144
146
146
147
7 Summary and outlook
7.1 Outlook . . . . . . . . . . . . . . . . . . . . . . .
7.2 Related work . . . . . . . . . . . . . . . . . . .
7.2.1 Synopses and e-books . . . . . . . . . .
7.2.2 Natural language processing systems
7.2.3 Related standards . . . . . . . . . . . .
.
.
.
.
.
.
.
.
.
.
.
.
.
.
.
.
.
.
.
.
.
.
.
.
.
.
.
.
.
.
.
.
.
.
.
.
.
.
.
.
.
.
.
.
.
149
149
150
150
152
153
.
.
.
.
.
.
.
.
.
.
.
.
.
.
.
.
.
.
.
.
.
.
.
.
.
.
.
.
.
.
.
.
.
.
.
.
.
.
.
.
.
.
.
.
.
.
.
.
.
.
.
.
.
.
.
.
.
.
.
.
.
.
.
.
.
.
.
.
.
.
.
.
.
.
.
.
.
.
.
.
A Constants
155
Bibliography
159
Dissertation der Fak. f. Informations- u. Kognitionswissenschaften, Univ. Tübingen - 2004
iv
CONTENTS
Dissertation der Fak. f. Informations- u. Kognitionswissenschaften, Univ. Tübingen - 2004
Chapter 1
Introduction
Although we live in the electronic age and electronic media is a natural component of our
everyday live, written text is still the main means of storing and communicating information. It was the development of scripts which allowed it for the first time to make ideas
which have been thought and expressed in natural language to be made persistent across
time and space. It was the different writing systems which made it possible to communicate
knowledge not only from man to man, but also from one generation to all the subsequent
generations and thus directly led to the development of the human culture.
From the very beginning the results of writing became manifest in many different ways.
It may have started with scribing into clay, carving into stone and wood or painting on
walls. It developed further from writing on papyrus up to printing on paper and finally
typing keys on a keyboard and storing the results on a magnetic or optical media the content
of which can be displayed on a screen or printed on a printing device. This evolution
finally led to a tremendous number of texts being available today in many different formats,
languages and scripts.
Now, with the possibilities offered by the computer and information technology, we
have the unique possibility to collect, edit and structure all these texts, no difference in
which format, language or script they exist, such that they are available to everybody who
has access to these new technologies.
This work will present an extensible framework which allows the processing, structuring, analyzing and finally the presentation of texts from arbitrary sources. Special emphasis will be placed on the comparative processing of related texts such as translations or
synopses, linking these texts together and finally integrating other tools like for example
dictionaries with the texts in order to increase the comprehension of the original versions.
As the word “text” itself derives from the Latin texere - to weave, it seams natural to finally
represent related texts in a form which makes it possible to “weave them together” in a
sophisticated way.
1.1
Text encoding
The expression “text encoding” is sometimes misleading and overloaded with several different meanings in the area of text processing. Throughout this chapter we will use it as
an expression that denotes the way how single characters or ideographs are presented electronically on a computer system. It is not to be confused with markup schemas like for
example the Text Encoding Initiative (see section 1.2.3) which are often also called “encodings”.
Dissertation der Fak. f. Informations- u. Kognitionswissenschaften, Univ. Tübingen - 2004
2
Chapter 1
·
Introduction
1.1.1 History of text encoding
As we know today, there is no canonical way to convert spoken or thought language to text.
Different cultures have developed different writing systems to record language.
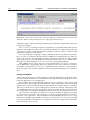
The oldest scripts we know of consist of hieroglyphics, which may be thought of as
iconic representations of the concept they intend to describe. Further on, some cultures
developed ideographic scripts which also use graphic symbols to represent objects or ideas,
but in some more abstract way than it is was done by the hieroglyphics. Other cultures
developed alphabetic scripts, where each symbol represents a phoneme of the language. A
sequence of these symbols, which together mimic the pronunciation of an object or an idea
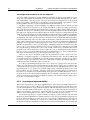
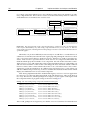
in the corresponding spoken language, must be used to represent it in textual form.
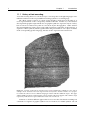
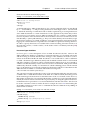
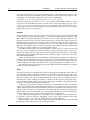
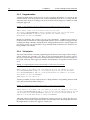
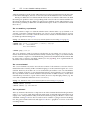
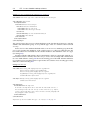
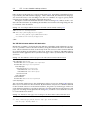
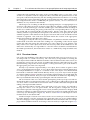
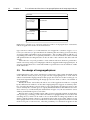
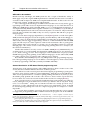
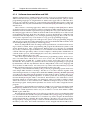
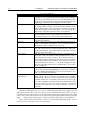
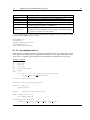
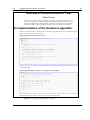
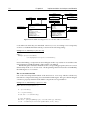
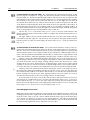
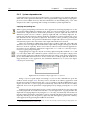
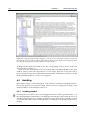
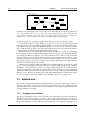
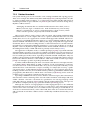
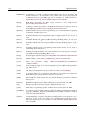
Figure 1.1: A picture of the famous “Rosetta Stone” [Park]. Dated back to 200 BC, it is not only an
example of how characters have been engraved into stone, but also the first evidence of a synopsis.
It contains the same text in two different languages written with three different scripts. The upper
and the middle part both contain Egyptian versions written with a hieroglyphic and a demotic script
respectively while the lower part contains the Greek version of the text.
Common to all these different approaches however was the fact that the resulting text
consisted of a sequence of graphic symbols out of a fixed set of available symbols. We call
Dissertation der Fak. f. Informations- u. Kognitionswissenschaften, Univ. Tübingen - 2004
1.1
·
Text encoding
each of these symbols a character 1 .
In the early days of writing, creating textual representations of language has always
been a manual task. And in order to make their texts understandable to others, writers had
to adhere to certain “standards” concerning the shapes of the different characters. This however did not prevent them from turning writing into a highly creative and artistic process
as can be seen for example when looking at calligraphic masterpieces of medieval writers.
The situation changed drastically after Johannes Gutenberg invented the printing press
in the middle of the 15th century. Single letters were efficiently molded and casted from
metal resulting in movable metal types with their lead base width varying according to
the letter’s size. Every page of a book could now be assembled easily from these types.
And because the shape of a letter was exactly the same at every position on a page and
everywhere in a book, this led to a perfect regular appearance.
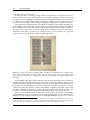
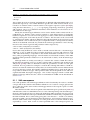
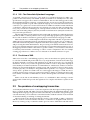
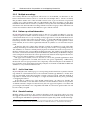
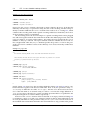
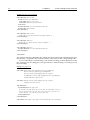
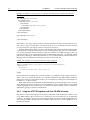
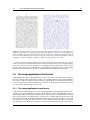
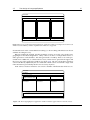
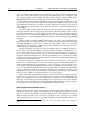
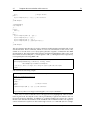
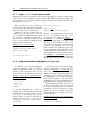
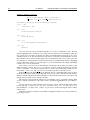
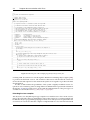
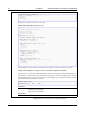
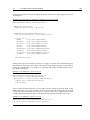
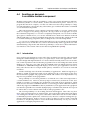
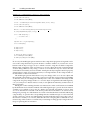
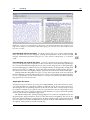
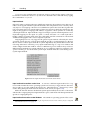
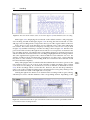
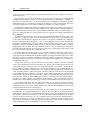
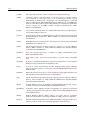
Figure 1.2: A page of the famous Gutenberg bible. The bible was printed using two columns where
each of them contained 42 lines of black letters. The coloring was done later on manually, as well
as the painting of the initials, for which place had been reserved already on the page. (Picture taken
from [GJ].)
In the middle of the 19th century, the typewriter was invented. This was a mechanical
machine, which had a builtin metal type for every letter of the Latin alphabet. This type was
coupled with a key on the keyboard of the typewriter such that the user could print a letter
by pressing the corresponding key. Because of physical constraints, a typewriter could not
contain more than the amount of letters and numbers available in the Latin script. And
in order to simplify the machinery, all the letter types had the same extent. So in fact the
invention of the typewriter was at the same time the invention of mono-spaced fonts.
Because of the limited number and fixed size of their types, documents created with a
typewriter did not look very impressive from a typographic point of view. Gutenberg for
example not only used proportional types for the first printed bible [GJ], but also a typeset
1 Following [MW] the word “character” is derived from the Greek charaktEr which itself derives from charassein
and means as much as “to scratch” or “to engrave” which immediately leads us back to the very first text evidences
we are aware of today and which have been scratched into clay or have been engraved into stone
Dissertation der Fak. f. Informations- u. Kognitionswissenschaften, Univ. Tübingen - 2004
3
4
Chapter 1
·
Introduction
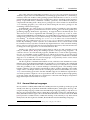
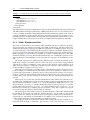
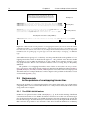
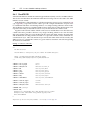
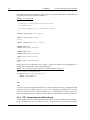
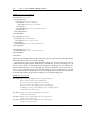
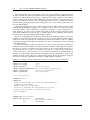
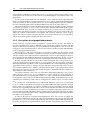
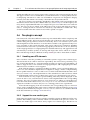
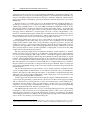
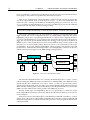
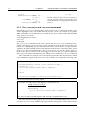
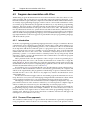
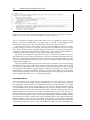
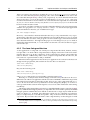
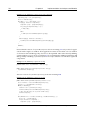
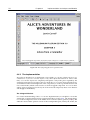
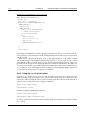
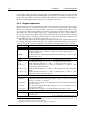
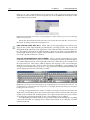
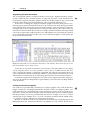
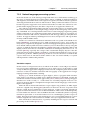
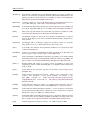
Figure 1.3: Even though the first typewriters where restricted to Latin characters, they have been
quickly adopted to other scripts like Greek or Cyrillic. As these pictures show, even typewriters for
Chinese and Japanese have been developed. They could handle between 2000 and 4000 ideographs,
however at a moderate writing speed.
of about 290 different letters, which contained several, slightly varying sizes for each letter
and a set of ligatures for common two and three letter combinations.
1.1.2 Electronic character encodings
After IBM invented the first electric typewriter in the 1960s, the 1970s brought us the first
microcomputers. And one thing for which micro or personal computers have always been
used ever since (besides playing and calculating) is writing. Here for the first time characters had to be encoded in binary form. And because memory was very precious at that
time, programmers have been very conservative when they had to choose a coding scheme.
In 1960, R.W. Bemer described in a survey [BE60] the big number of different character
encodings available at that time. This was the starting point for the creation of the ASCII
(American Standard Code for Information Interchange) standard [BSW, BE63]. ASCII was
still a 7-bit encoding, but with the help of escape sequences it was possible to express characters which didn’t fit in the set of the original 128 characters.
Later on, in the 1980s, the the European Computer Manufacturer’s Association (ECMA)
[ECMA] created a 8-bit encoding family, which contained the ASCII characters as a subset and used the additional 128 code points to encode other alphabetic languages such as
Cyrillic, Arabic, Greek, Hebrew and the various special characters needed for the European languages written with Latin characters. These encodings have been endorsed by the
International Standards Organization (ISO) [ISO] as the ISO 8859 family of encodings.
But these encodings still had some drawbacks: they combined the standard Latin characters available in ASCII with just one single national character set. So for example ISO
8859-5 could be used to write texts which used Latin and Cyrillic characters and ISO 8859-1
could be used to write texts which contained German umlauts and French accented characters. However it was still not possible to use one of these standard encodings for writing
texts which contained Cyrillic as well as special German and French characters. Another
problem was that ideographic scripts with theirs thousands of symbols could not fit naturally within an 8-bit encoding. Therefore special escape sequences, which where unhandy
because they required complicated parsing, had to be used in these cases. Additionally,
the character represented by an arbitrary code point became ambiguous because it was depended from the characters and escape sequences which had been read just before it.
Dissertation der Fak. f. Informations- u. Kognitionswissenschaften, Univ. Tübingen - 2004
1.2
·
Text markup
The Unicode Standard
All these problems led to the foundation of the UNICODE consortium [UNI] in 1991 with
the goal to create a universal, efficient, uniform and unambiguous character encoding not
only for all the written languages used today in the world but also for punctuation marks,
mathematical and technical symbols and eventually for historic scripts. The Unicode consortium synchronizes its work with ISO such that the Unicode 3.0 standard [U30] is actually
equivalent with the ISO 10646 standard.
Unfortunately Unicode is a 16-bit encoding, which by default can handle about 65.000
characters. This is still a tribute to memory requirements and was dictated by the widespread
use of 16-bit computer architectures at the end of the 1990s. With the help of so called “surrogate pairs” however, it is possible to encode about one million different characters.
Although the Unicode standard is still under active development and more and more
scripts get added as time goes by (Unicode 3.0 defines 49.194 different characters, symbols
and ideographs), Unicode also reserved certain code areas for private use if there is a special
need for characters not currently encoded by the standard.
But Unicode also does a lot more than just defining a code point for a given character.
Because many scripts have special requirements like for example changing the writing direction or special obligatory ligatures and because in some scripts new characters can be
built by combining two or more existing characters, the Unicode standard also provides
support for normalization, decomposition, bidirectional behavior and efficient searching
and sorting.
Meanwhile, the Unicode standard gained broad acceptance in virtually all areas of the
computer industry. All modern operating systems as well as most of the modern programming languages and computer programs have support for Unicode today. Many new standards like for example XML and XHTML [XML, XHTML] depend on Unicode.
1.2
Text markup
From the beginning computers have been used for writing and text processing. Usual typewriters were used as printing devices to output the texts. Because of the deficiencies mentioned at the end of section 1.1.1, the visual appearance of these works was not very appealingly. For this reason text processing with computers was first used for administrative
purpose only.
After the appearance of the first matrix printers (Epson claims to have introduced the
first personal computer printer, the MX 80, in 1978) the situation changed. Now it became
feasible to print not only different fonts in different sizes and styles, but also graphics and
pictures. After Xerox finally invented the laser printer in 1978 and HP shipped the first laser
printers for the mass market in 1984 and the first ink-jet printers in 1988, the output created
with such devices became comparable with the one produced by traditional print offices.
The time was ripe for the so called “desktop publishing” era.
1.2.1
Text processing
The only remaining problem was the fact that the screen devices and graphics hardware
could not keep up with the development of printing devices. For a long time they only supported the display of text in a fixed sized font, usually based on ASCII or an 8-bit encoding.
So the first text processing programs defined special commands or macros which could be
inserted into the running text. These commands had the only purpose to change the appearance of the text such as its size or style. Some programs like for example WordStar, one
of the first word processing programs produced for microcomputers and released back in
1979, could use the bare printer escape sequences for this purpose.
Dissertation der Fak. f. Informations- u. Kognitionswissenschaften, Univ. Tübingen - 2004
5
6
Chapter 1
·
Introduction
One of the oldest text formatting programs is nroff/troff by J. F. Ossanna [Os76] from
AT&T. Its origins can be traced back back to a formatting program called runoff, written by J.
E. Saltzer, which ran on MIT’s CTSS operating system in the mid-sixties. Later on, troff was
rewritten by Brian Kernighan [Ke78] in C and became a de facto standard on Unix machines
[EP87]. It provided macros, arithmetic variables, operations, and conditional testing for
complicated formatting tasks. Many macro packages have been written for the different
*roff formating programs, one of the most famous being the man macro package for the
formatting of Unix manual pages.
Donald Knuth, one of the pioneers of computer science, invented his own typesetting
program called TEX [Kn91] sometimes back in 1978. In fact TEX was a domain specific programming language dedicated to typesetting. It supported macros defined by the user.
These macros took text as arguments and formatted it in a special way. Later on, Leslie
Lamport extended TEX by a standard macro set called LATEX [La86]. This was a fundamental
change from a purely visual or procedural markup towards a kind of structural or descriptive markup2 . So instead of writing {\bf Section title} in order to set a section header in
bold face, the user could write now \section{Section title} to declare a sentence as section
header. By including a certain “style file” he could influence how a section header would
be formatted. In fact, style files contained only implementations of the structural markup
macros. However, because structure was separated from appearance, it became much easier
to change the visual appearance of a whole document at once.
Another very old text processing system which is still in use and constantly revised
today is TUSTEP [TU01, Ba95], the “Tübinger System of Text-processing Programs”. In
contrast to the two abovementioned programs, TUSTEP does a lot more than typesetting.
It is also an extendable system of different tools which can be used to process the text in
various ways, such as creating indices, annotations or apparatuses. Furthermore TUSTEP
supports a lot of different, even ancient languages. It is primarily used to create critical
editions, encyclopedias and reference books.
The development of TUSTEP started back in 1966, while the name TUSTEP was established in 1978. In the beginning TUSTEP also required a lot of formatting codes which had
to be inserted right into the text in order to define the text layout. Today however, TUSTEP
offers the possibility to use a custom markup for structuring texts. The markup can be
bound to arbitrary visual formating commands in order to produce printable or browsable
output. This is a technique similar to the cascading style sheets used in HTML (see section
1.2.3). One interesting point is the fact that TUSTEP supports two different output modes:
one which produces output in a mono-spaced font and one which produces high quality,
postscript output. The first format is a reminiscence of the time when displays and printers
supported only fixed sized fonts in one style.
1.2.2 General Markup Languages
In 1969, Charles Goldfarb, Edward Mosher and Raymond Lorie picked up an idea proposed
already some time ago by William Tunnicliffe and Stanley Rice, and begun to develop a descriptive markup language called Generalized Markup Language (GML) [Go90]. However
they not only generalized the generic coding ideas suggested so far but also introduced formally defined document types. The formal definitions which were derived from the BNF
[Wir77] notation could be used to validate the markup of a document [Go81]. Their efforts
finally led to the development of SGML, the Standard Generalized Markup Language.
2 The
concept of descriptive markup is also called generic coding by some authors.
Dissertation der Fak. f. Informations- u. Kognitionswissenschaften, Univ. Tübingen - 2004
1.2
·
Text markup
SGML - The Standard Generalized Markup Language
In 1986 SGML was approved as an international standard by ISO [ISO] under the name ISO
8879. One important point about SGML is the fact that it is a generalized markup language
not tied to any special content type, although it was strongly influenced by the needs of the
publishing industry. Secondly, SGML does not define a particular markup syntax or special
markup tags. Instead it provides authors with the possibility to create arbitrary document
types by defining document type definitions (DTDs) and arbitrary markup conventions which
are called concrete syntax in SGML.
Additionally, SGML defined several optional features, which can be used in an SGML
document. For example one of these features is CONCUR which allows a document to
contain different, maybe even overlapping, logical structures.
However this universality, which is one of the strength of SGML, also leads to many
problems. It is quite hard to implement a conforming SGML system, that is a system which
can process any standard conforming SGML document. Furthermore, an SGML document
is in general much more verbose compared to a document which contains only procedural markup because the format of the latter is usually optimized to be as user friendly as
possible and contains a lot of implicit information which has to made explicit in an SGML
document. Therefore it is much harder for an author to manually create an SGML document
and sophisticated tools are needed instead of simple text editors.
XML - The Extensible Markup Language
Sometime back in 1996 the World Wide Web Consortium (W3C) [WWW] formed a working
group with the goal of bringing together the two powerful ideas of the Web and of descriptive markup. The intention was to develop a markup language which could be used easily
on the Web while maintaining compatibility with SGML.
The result was the specification of XML, the Extensible Markup Language [XML], which
was published as a W3C recommendation in 1998. Because of its simplicity - the initial specification consisted of 25 pages only - paired with its elegant design it was rapidly adopted
by virtually all software vendors and became a de facto standard for data exchange.
The drawback of its simplicity is of course the fact that it can not cover every desirable
functionality. Therefore a big amount of accompanying specifications have been created in
the last time in order to fill the gaps. But while XML itself is well established meanwhile,
all the other auxiliary standards seem to suffer from the same problems like SGML did:
they are difficult to understand and implement, often they are too specific to be of general
interest and because they are developed by different working groups they often do not fit
together very well. Section 2.1 will present some of the different XML related standards
used throughout this work in more detail.
Publishing marked-up documents
Composing a document in a structured way is only the first step in the editing process.
For publication, the document will usually have to be translated into another format. Depending on where it will be published, this may be HTML [HTML] for online publications
or PS/PDF [PS, PDF] for printed ones. Another widely used possibility is to translate a
marked-up document into one of the text processing systems described in section 1.2.1, like
for example TEX or troff and let them produce the final output.
For documents defined in SGML or XML this transformation is usually done with a
stylesheet language based on a stylesheet. The most commen stylesheet languages in use
today are the Document Style Semantics and Specification Language (DSSSL) for SGML
documents which has been standardised by ISO [DSSSL], the Extensible Stylesheet LanDissertation der Fak. f. Informations- u. Kognitionswissenschaften, Univ. Tübingen - 2004
7
8
Chapter 1
·
Introduction
guage (XSL) for XML which is a W3C recommendation [XSL] and finally Cascading Style
Sheets (CSS) [CSS] which are a stylesheet language for HTML (see section 1.2.3).
Both, DSSSL and XSL define a vocabulary for specifying an abstract formatting description in the sense that the layout of a document may be specified in terms of typographic
categories like paragraphs, flow objects, footnotes, headings, side marks and so on. While
this so called style language is a part of the DSSSL standard, it is known under the separate
name XSL Formatting Objects (XSL-FO) for XSL. Both style languages however leave the
fine tuning of the typographic layout like for example line breaking and line balancing on
a page to the formatter, whereby they are not yet tied to a special formatter.
One possibility to create the final, publishable document is by directly transforming
the document description with the help of the DSSSL or XSL transformation languages3
into the desired target format. The second possibility is to first transform to the abstract
style language and then use a specific formatter (also called formatting engine) to create
the final representation. The first path is often taken for online documentation published
in the HTML format, while the second on is more common for high quality, printed output
formats like PS or PDF.
1.2.3 Specialized Markup Languages for Text
HTML - The Hypertext Markup Language
The Hypertext Markup Language is the well known lingua franca of the World Wide Web.
It was developed in 1989 by Tim Berners-Lee and Robert Caillau at the Conseil Européen
pour la Recherche Nucléaire (CERN), a high energy physics research center near Geneva. It
was designed as a very simple markup language with a syntax based on SGML. It offered
a minimalistic set of tags, some style options and so called “hyperlinks” which could associate arbitrary HTML documents with each other. Like in the early text processing systems,
structural markup was not strictly separated from visual markup.
Although it was primarily intended as a linked information system for high energy
physicists it turned out to be extremely useful for making any kind of content available
to others on a computer network. After the National Center for Supercomputer Applications (NCSA) at Urbana-Champaign encouraged Marc Andreessen and Eric Bina to develop
Mosaic, a freely available, graphical HTML browser, the distribution of HTML grew exponentially, forming the corner stone of the World Wide Web as we know it today.
Meanwhile, the development of HTML is controlled by the W3C. HTML has been revised and extended several times. The actual W3C recommendation is version 4.x [HTML].
In general however, HTML is moving towards XHTML [XHTML] which is a reformulation
of HTML in XML syntax. It uses an own stylesheet language called Cascading Style Sheets
(CSS) [CSS] to associate style information with the different elements.
DocBook
DocBook [WaMu] is a set of tags for describing books, articles and other prose documents,
particularly about computer hardware and software, although it is not limited to these applications. It is defined as a native DTD for SGML as well as for XML.
It was started as a pure SGML DTD around 1991 in order to facilitate the exchange of
Unix documentation by HaL Computer Systems and O’Reilly & Associates. Later on, many
other computer companies have been involved in the further development and extension
of DocBook. In 1998 finally, it became a technical committee of of the Organization for the
3 XSLT, the XSL Transformations Language is the second part of the XSL Specification. It is available as an own
W3C recommendation [XSLT].
Dissertation der Fak. f. Informations- u. Kognitionswissenschaften, Univ. Tübingen - 2004
1.3
·
Scope and contribution
Advance of Structured Information Standards (OASIS) [OASIS]. Today both, SGML and
XML versions are provided by OASIS [DocB].
The are two main ways to publish a DocBook document. The first one uses Jade [Jade],
which is a free DSSSL processor and a DocBook style sheet to produce HTML, TeX, RTF
[RTF] or MIF [MIF] output. The second way is to use an XSLT processor and produce
either HTML output directly or XSL Formatting Objects which can in turn be processed by
a formatting objects engine to produce PDF or TeX output.
Meanwhile DocBook is widely used for the documentation of software projects in the
open source community, for example by the Linux Documentation Project [LDP].
<OeB> - Open eBook Publication Structure
The Open eBook Publication Structure [OeB] is a standard developed by major soft- and
hardware companies which have joined in the Open eBook Forum [OeBF]. Its primarily
intention is to facilitate and to advance the publication and representation of books in electronic form. The main target is to define a format in which content providers can publish
their books such that they are readable on a variety of different reading systems no difference whether these systems are special hardware devices, special software or a combination
of the two.
In order to simplify the transition from existing systems, OeB is based on several other,
well established standards. It is defined in XML and uses a subset of HTML 4.0 and CSS
1 for the description of content and appearance respectively. The Dublin Core meta-data
language [DuCo] (also known as RFC 2413 [RFC2413]) is used to specify the bibliographic
data and the Multipurpose Internet Mail Extensions (MIME) media types [RFC2046] are
used to denote the type of embedded media objects.
TEI - The Text Encoding Initiative
TEI [SperBu] is a standard encoding scheme for the representation of all kinds of literary
and linguistic texts. Like DocBook, it is in fact a set of tags defined in a DTD. TEI was
launched in 1987 and has since than gained big acceptance especially in the linguistic and
philologic community. It is available as an SGML as well as an XML version.
While DocBook was designed in order to facilitate the writing of technical documentation, the main focus of TEI was the methodical markup of already existing documents to
make them available electronically.
More than one hundred big projects which use the TEI encoding are registered at the
TEI home page, most of them being digital libraries and text corpora. Although many of
the documents encoded with TEI already exist in a printed version, there also exist various
stylesheets which transform TEI-encoded documents to HTML, TEX or PDF. The main advantage of TEI for the humanities community however are the extended search capabilities
offered by documents encoded in such a way, the possibility of easily generating statistics
from them, and finally the possibility to easily interchange documents which are encoded
in this format.
1.3
Scope and contribution
This thesis introduces a framework for structuring, analyzing and presenting texts in arbitrary languages and media formats. Although it can be used as a text processor or editor,
the main application is not the support of the input and editing process of a text.
Instead, its main feature is the possibility to load digital documents in many formats
(pure text, facsimile manuscripts, XML files), to structure these documents with a uniform
Dissertation der Fak. f. Informations- u. Kognitionswissenschaften, Univ. Tübingen - 2004
9
10
Chapter 1
·
Introduction
markup and link them together. Structuring is used here in the sense of tagging a document
with respect to formal, linguistic, semantic, historical or any other aspects. Different, parallel taggings are possible for a document and the documents marked up this way can be
linked together with respect to any of these structures. Depending on the nature of the tagging and the scope of the linking, they can be performed automatically, semi-automatically
or manually.
The documents processed this way can be combined with other tools like for example
dictionaries or index generators and then be made available in a form in which they can be
comfortably read, browsed, analyzed or transformed into other formats.
All this functionality is realized as a configurable and extensible framework where the
word framework is used here in the sense of software framework as defined for example in
[GHJV, Szy]. This makes it easy for others to extend, customize and adopt the system for
their special needs where the target domains may be as different as for example text analysis, language learning, creation of critical and historical editions or electronic publishing.
The framework is built around a new XML encoding scheme which is used as a standardized, persistent and media independent repository for all different kind of documents along
with the different tagging and linking structures defined for them. The advantage of this
format which is defined as an XML DTD and an XML Schema is the fact that the whole
armada of XML-related tools can be used to process the documents, but also to easily transform them into other formats, exchange them or to use them independently of the framework.
As a side effect of the main topic, different tools for program and software documentation have been developed and a new and sophisticated, multilingual user interface has
been created. The documentation tools have been used to document the components of the
framework while the new user interface has been built into the created applications.
1.4 Structure of this work
The remainder of this thesis is organized as follows. The next chapter will describe XTE, a
new XML markup scheme which can handle an arbitrary number of possibly overlapping
hierarchies and which may be used not only with encoded texts but also with texts available
in different media formats like graphics or sound.
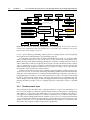
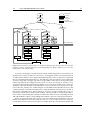
Chapter 3 will then give a brief overview of the software architecture of the implemented
system which consists of an extendable editor for the efficient and comfortable tagging
and linking of texts with the new markup scheme (LanguageAnalyzer) and a viewer and
browser application for displaying and working with these texts (LanguageExplorer).
Chapter 4 will give some implementation details and describe some general purpose
libraries which have been created during the development process. A new software documentation approach will be introduced which was used to document the system and a
new and an innovative, multi-lingual user interface which is part of LanguageAnalyzer
and LanguageExplorer will be presented.
Finally, the two applications LanguageExplorer and LanguageAnalyzer are described in
full detail in chapter 5 and 6 respectively. A chapter containing references to related work, a
discussion of the contributions of this thesis and an outlook on further research topics will
conclude the work.
Dissertation der Fak. f. Informations- u. Kognitionswissenschaften, Univ. Tübingen - 2004
Chapter 2
A new markup scheme for text
Section 1.2 introduced some common text markup languages. This chapter will analyze the
advantages and problems of the existing languages especially in the context of overlapping
hierarchies. A new encoding scheme based on XML and some ideas of the Text Encoding
Initiative [SperBu] will then be described which tries to eliminate the identified drawbacks
of the other approaches. The new encoding will finally be formally defined as an XML DTD
as well as an XML Schema.
2.1
A short introduction to XML
XML is a markup language developed by the W3C consortium [WWW] as a simple and
general data interchange format for the World Wide Web. XML was intended to fill the gap
between SGML and HTML, i.e. it should have a formal and concise design but at the same
time it should be easy to create and process data in an XML format. The final specification
defined a compatible subset of SGML on about 25 pages compared to the 500+ pages of the
original SGML standard. The following description of XML does not pretend to completely
and formally explain XML. Instead, it wants to give a short and simple introduction to the
reader who is not familiar with XML in order to support the understanding of the following
sections. For the complete specification refer to [XML].
An XML document is composed of markup and character data. The markup basically
consists of opening, closing and empty tags and of comments and processing instructions.
In order to distinguish markup from character data several special characters like <, >, ’, "
and & have to be escaped as <, >, ', " and & when used in character data.
A start tag is defined as <tag-name>, an end tag as </tag-name> and an empty tag as <tagname/>. Start and empty tags may additionally contain an arbitrary number of attribute
definitions of the form key=’value’ before the closing >. It is also possible to use double
quotes instead of the single quotes. An element is either an empty tag or a composition
of comments, processing instructions, tags and character data enclosed by a matching start
and end tag, that is a start and an end tag with the same name.
A textual object is called a well-formed XML document if all the start and end tags
are properly nested and matching and the whole document has a single root element. For
illustration purpose a well-formed XML document can be imagined as a well-formed mathematical infix expression where operations, numbers and variables correspond to the XML
character data and the different parentheses, brackets and curly braces correspond to the
different XML tags respectively. Usually XML documents also contain an XML declaration
of the form <?xml version=’1.0’ encoding=’utf8’> as their first line which specifies the actual
XML version and character encoding. The following listing shows a small XML file which
Dissertation der Fak. f. Informations- u. Kognitionswissenschaften, Univ. Tübingen - 2004
12
Chapter 2
·
A new markup scheme for text
illustrates the before mentioned properties:
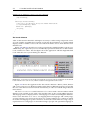
Listing 2.1: A minimalist, well-formed XML example
<?xml version=’1.0’ encoding=’utf-8’?>
<message style=’bold’>
Hello world!
</message>
As mentioned before, XML documents may also contain comments which are introduced
by <!-- and ended by --> and processing instructions which begin with <? and end with
?>. While the meaning of comments needs no further explanation, processing instructions
allow XML documents to contain instructions for the applications by which they will be
processed. For convenience reasons, XML documents may also contain so called CDATA
sections anywhere in the document where character data is allowed. CDATA sections are
introduced by <![CDATA[ and ended by ]]>. They can contain arbitrary character data (except
the character sequence ]]>) which would have to be quoted elsewhere and can be used if a
bigger part of text needs to be escaped because it would be recognized as markup otherwise.
In order to specify characters not available in the current encoding, character references of
the form &#dec-number; or &#xhex-number; can be used to refer to an arbitrary Unicode [U30]
character code.
Document type definitions
So far we gave a coarse description of how an XML document looks like. However the
XML standard also defines a possibility to restrict the structure of a document. The name
and the nesting of elements and the name and type of the attributes allowed for each element can be defined inside the XML document or associated with it. Such a definition
is called a document type definition (DTD) and an XML document which is well-formed
and fully complies to its DTD is called a valid document. XML parsers are not required to
validate a document but they need to check at least if it is well-formed. XML parsers which
additionally check the validity of a document are called validating parsers. The document
type of a document is given in its document type declaration which is located between the
XML declaration and the root element and has the following form:
<!DOCTYPE Name ExternalID? [intSubset]? >
The optional ExternalID specifies the location of an external DTD while the optional intSubset defines the so called internal subset of the DTD. In a valid document, the name given in
the document type declaration has to match the name of the root element. Notice however,
that neither an internal nor an external DTD must be available for a well-formed document.
If both, the internal and an external DTD are present, they are merged together while internal definitions have precedence over external definitions with the same name. This fact can
be used to customize a DTD as will be shown for example in section 2.4. Transforming the
small XML example given above into a valid XML document could be done by adding an
internal DTD as follows:
Listing 2.2: A minimalist, well-formed and valid XML example
<?xml version=’1.0’ encoding=’utf-8’?>
<!DOCTYPE message [
<!ELEMENT message (#PCDATA)>
<!ATTLIST message style (normal|bold|italic) ’normal’>
]>
<message style=’bold’>
Dissertation der Fak. f. Informations- u. Kognitionswissenschaften, Univ. Tübingen - 2004
2.1
A short introduction to XML
·
Listing 2.2: A minimalist, well-formed and valid XML example (continued)
Hello world!
</message>
The example shows how elements and attributes are defined with with ELEMENT and ATTLIST
statements respectively. The ELEMENT definition specifies the child elements which are allowed for an element with a notation similar to the regular expression syntax [Friedl] by
using the meta-characters (, ), ,, |, ?, * for grouping, sequencing, alternation, optionality
and repetition. The ATTLIST definition determines which attributes are allowed for an element and narrow their type.
Finally the document type definition can be used to define entities which will be expanded later on. Entities can be used for example to create abbreviations for frequently
used text sequences to save the user from typing or to make a DTD itself customizable by
defining certain parts of the DTD by means of entities. The first task can be solved with
so called general entities which are defined in the DTD but which can be used only in the
XML document. The second task may be accomplished with so called parameter entities
which can be defined and used only inside the document type definition. The following
lines show the format of general and parameter entities respectively:
<!ENTITY Name (EntityValue|ExternalID)>
<!ENTITY % Name (EntityValue|ExternalID)>
Notice that entity definitions can be used to include external files into a document type
definition or into an XML file if the ExternalID declaration is present and references such
a file. This functionality is comparable to the include mechanism available in C/C++ and
many other programming languages. General entities are referenced as &Name; in the XML
document while parameter entities have to be referenced as %Name; in the document type
definition.
Although DTDs are widely used today to constrain the content of XML files and although there meanwhile exist a lot of quite complex XML vocabularies like DocBook and
TEI [DocB, SperBu] which are defined as DTDs, the possibilities of DTDs are still quite
restricted. It is not possible for example to constrain the ordering and number of child elements in an element with mixed content, that is an element which contains child elements
as well as character content. The number of different attribute types is quite small and it is
not possible to define new types. These problems led to the development of new and more
sophisticated XML description languages. One of these languages which is called XML
Schema Language and has become a W3C recommendation in 2001 will be introduced in
section 2.1.2.
2.1.1
XML namespaces
One of the problems of document type definitions is the fact that they do not have a module
concept and all the element and attribute definitions are located in a single global name
space. This may lead to name clashes when bigger DTDs are developed or parts of a DTD
should be reused.
These deficiencies led to the development of the XML namespace specification [XML-Na]
which became a W3C recommendation in 1999. One of the important points about this specification is the fact that it does not change the underlying XML specification in any way but
instead tries to define the namespace mechanism such that it remains fully compatible with
the XML standard. This is achieved by giving the colon character ’:’ which is an ordinary
character in XML a special meaning in name declarations. Following the namespace specification, XML names can be composed of a name prefix and a local name which are both
separated by a colon. Such a name is called a qualified name. The namespace prefix can
Dissertation der Fak. f. Informations- u. Kognitionswissenschaften, Univ. Tübingen - 2004
13
14
Chapter 2
·
A new markup scheme for text
be bound to a namespace which is identified by a URI (Unique Resource Identifier) [URI]
by using an attribute declaration of the form xmlns:NSprefix=’URI’. This declaration binds
the prefix NSprefix for the actual element and all other nested elements to the specified URI.
In order to save the user from excessive typing in the case where most of the elements in a
document belong to a single namespace, it is possible to declare a default namespace with
the attribute xmlns =’URI’. After such a declaration all unprefixed elements are implicitly
bound to belong to that default namespace. Namespaces apply equally well to attributes,
that is attributes names can also be given as qualified names according to the XML namespace recommendation. It is essential to notice, that the prefix name can be chosen arbitrary.
What counts is the associated URI, that is qualified names are bound to a URI corresponding
to their actual prefix, not to the prefix itself.
Although XML namespaces are designed to fit smoothly into the XML specification
without affecting it, this goal has not been fully achieved. One of the biggest problems
is that DTDs are not namespace aware. Although it is possible to use qualified names in
a DTD, the prefixes have no meaning. The consequence is that instance documents have
to use exactly the same prefix as the DTD for a certain namespace. This is an anachronism
however, because it leads to exactly the same problems which should be solved by namespaces. Although there exist some techniques as shown in section 2.4.1 and 2.4.3 to partially
work around this problem the only real solution for the problem is to use another schema
language instead of DTDs which is namespace aware.
2.1.2 XML schema languages
To overcome the deficiencies of document type definitions several new so called schema
languages have been designed and developed [Relax, Trex]. Finally, the W3C consortium
itself created a new schema language called XML Schema Language and made it a recommendation in 2001. One of the main features of XML Schema is the fact that the schemas
themselves are completely written in XML and no additional syntax as for example the
DTD syntax is required. XML Schema also supports namespaces and as such facilitates the
modularization of schemas. It allows the definition of own simple and complex types and
supports some object oriented features which allow type derivation and extension. Finally,
the XML Schema language has a more flexible and powerful cross-document concept of
keys and references than it is available in DTDs and allows a more fain-grained constraining of the uniqueness of attribute and element values.
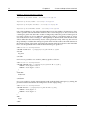
As an example of an XML Schema definition consider the following schema for the
“Hello world!” example shown before:
Listing 2.3: An XML Schema for the ”Hello world!”example which uses derivation by restriction.
<xsd:schema xmlns:xsd=’http://www.w3.org/2001/XMLSchema’>
<xsd:element name=’message’ type=’messageType’/>
<xsd:complexType name=’messageType’>
<xsd:simpleContent>
<xsd:extension base=’xsd:string’>
<xsd:attribute name=’style’ type=’styleType’/>
</xsd:extension>
</xsd:simpleContent>
</xsd:complexType>
<xsd:simpleType name=’styleType’>
<xsd:restriction base=’xsd:string’>
Dissertation der Fak. f. Informations- u. Kognitionswissenschaften, Univ. Tübingen - 2004
2.1
·
A short introduction to XML
Listing 2.3: An XML Schema for the ”Hello world!”example which uses derivation by restriction.
(continued)
<xsd:enumeration value=’normal’/>
<xsd:enumeration value=’bold’/>
<xsd:enumeration value=’italic’/>
</xsd:restriction>
</xsd:simpleType>
</xsd:schema>
The XML Schema language is defined in two parts, namely XML Schema Structures [XMLSch1]
and XML Schema Datatypes [XMLSch2]. Additionally, there exists a non-normative but a
lot more readable document called XML Schema Primer [XMLSch2] which can be used as
a simple introduction to the schema language. Finally notice that it is possible to automatically generate an XML Schema from an XML DTD although this transformation is not
unique and that there exist several tools which accomplish this task [dtd2xsA, dtd2xsB].
2.1.3 XPath, XPointer and XLink
This section will describe some auxiliary XML standards which are of little use by themselves, but which are extensively used by other XML specifications. The first of this standards is XPath [XPath], a language for addressing the parts of an XML document. The need
for such a language evolved during the development of XSL, the Extensible Stylesheet Language (see section 2.1.4) because XSL needed a transformation language and the transformation language in turn needed a possibility to somehow address the parts of the XML
document which it processes. Because this functionality was considered of general use for
other applications and standards as well, it became an own W3C recommendation in the
end.
The XPath expressions for addressing the different parts of an XML document are defined using a simple, non-XML syntax in order to be more concise and to support XPath
expressions as values of attributes. They operate on the abstract, logical structure of an
XML document which is comparable with the tree-like structure of the document object
model (DOM) for example (see section 3.1.1).
Although any literal string or number can be a valid XPath expression, in general an expression will be a so called locations path where each location path may consist of several
location steps separated by a / character. Every location step in turn consists of an axis specification, a node test and a predicate and has the following format: axis::nodetest[predicate].
Of these three parts only the nodetest is mandatory, the axis and the predicate parts are
optional.
The axis part of a location step specifies which kind of nodes will be selected in the corresponding step. XPath defines several axes which can be used to navigate the XML tree from
a given context node like for example child:: for all the immediate child nodes, parent:: for
the parent node, descendant:: for all the child nodes taken recursively, ancestor:: for all the
parent nodes taken recursively, attribute:: for all the attribute nodes or namespace:: for all
the namespace nodes (for a complete list refer to [XPath, § 2.2]). If no explicit axis is given
in a location step, the child axis will be taken as a default.
The nodetest part of the XPath expression specifies the name of the nodes which should
be selected on the chosen axis while the asterisk character * can be used to select all the
nodes on that axis. Finally, the predicate part can be used to further narrow down the selected node set. The XPath recommendation also defines a set of functions which can be
used to further refine the results returned by an XPath expression.
Navigating an XML document with XPath can be compared with the navigation of a
filesystem with the help of wildcards. The selection of the slash character as a location
Dissertation der Fak. f. Informations- u. Kognitionswissenschaften, Univ. Tübingen - 2004
15
16
Chapter 2
·
A new markup scheme for text
step separator in XPath has been chosen intentionally to encourage this association. The
following code line shows an XPath expression which would select the string “Hello world”
if applied to our small XML example previously shown in listing 2.2.
/descendant-or-self::node()/message[attribute::style=’bold’]/text()
The first location step /descendant-or-self::node() which could be abbreviated as // recursively selects all the child nodes of the root node. The second location step message[attribute
::style=’bold’] selects all element nodes with a style attribute set to bold and the last location step finally selects the text elements of the elements found in the previous step by
applying the special text() node test.
XPointer
The initial XML Pointer Language (XPointer) has been factored out into the general XML
Pointer Framework [XPoint] with simple, so called short hand fragment identifiers and
three additional fragment identification schemes: the XPointer element() scheme for addressing elements by their position in the document tree, the XPointer xmlns() scheme for
binding namespace prefixes to namespace names and the XPointer xpointer() scheme for
full XPath-based addressing. The specification only covers the addressing of fragments in
XML files although the syntax is open for extensions and could be adopted to other media
types like for example simple text or certain graphic formats.
The XML Pointer Framework essentially defines a syntax for how to compose an XPointer
from one or more schema parts and a semantics for how an XPointer processor, that is an
application which claims to support the XPointer standard, should handle it. The simple
short hand fragment identifiers defined by the standard roughly corresponds to the fragment identifiers in HTML.
While the xmlns() scheme is only intended to bind namespace prefixes for subsequent
schemes and the element() scheme can only be used to select elements based on their position in the tree representation of an XML document, the xpointer() scheme allows for the full
XPath standard to be used for the identification of certain fragments in an XML resource.
The XPointer framework is used in many other XML related standards like for example
XLink [XLink] or XInclude [XInc].
XLink
The XLink specification which became a W3C recommendation in 2001 generalizes the concept of simple, unidirectional hyperlinks known from HTML. In particular it provides complex links between more than two resources, it allows to associate meta-data with a link
and it allows links to be expressed independently from the resources which they reference.
XLink may be used to address documents of arbitrary media types by using uniform resource identifiers [URI]. However if the target of the link is an XML document, the fragment
identifier of the URI is interpreted as an XPointer.
XLink also provides the possibility of defining so called link bases, that is documents
which contain third-party and inbound links. If the source of a link is in a remote resource
and the target points into the actual document, the link is called inbound, if both, the source
and the target of a link are located in remote document, the link is called to be third-party.
Simple links as known from HTML are so called outbound links following the XLink specification. Link bases can be used to collect related links in a single place.
Notice that the XLink specification only defines a set of attributes. These attributes may
be applied to arbitrary elements. Depending on the values of these attributes they make
resources, locators or arcs out of the elements they have been applied to.
Besides HTML, many other hyper-media standards like HyTime [DeRoDu] and TEI
[SperBu] have been influential for the XLink specification.
Dissertation der Fak. f. Informations- u. Kognitionswissenschaften, Univ. Tübingen - 2004
2.2
2.1.4
·
The problem of overlapping hierarchies
XSL - The Extensible Stylesheet Language
As pointed out before in section 2.1.3, the need for a stylesheet language for XML comparable in the functionality with DSSSL [DSSSL] for SGML arose already before the XML
specification was approved as a W3C recommendation. This was the starting point for XSL,
the Extensible Stylesheet Language. It quickly became clear however that the transformation language needed as a part of the stylesheet language was of broader interest because it
could serve as a general tool for the transformation of XML documents written in different
vocabularies. Therefore the specification was split into two parts: the XSL part which effectively only contains the formatting part of the specification which is also known under the
name XSL Formatting Objects (XSL-FO) and XSL Transformations (XSLT) the transformation part of the specification.
XSL-FO and XSLT are both quite big and complicated specifications. While the first tries
to define an XML vocabulary which covers every possible typographic aspect of publication
the second one defines a full-blown, general purpose transformation language for XML.
XSLT is based on a so called template mechanism comparable with the one present in the
AWK [AKW] programming language. XPath based patterns are used to choose an XSLT element and execute its body, that is output the elements not belonging to the XSLT vocabulary
and processing the XSLT child elements. The processing of an XML document advances until no more matching templates can be found in the corresponding XSLT stylesheet. One of
the biggest problems of XSLT is that it has no global variables, i.e. it is stateless. This makes
it extremely hard and time consuming to achieve certain computations like for example
creating page references or indices for a book based on an XML document in on pass.
2.1.5
The future of XML
XML seems to be like a self fulfilling prophecy. Since its introduction it quickly developed
to a de-facto standard and proliferated into every single domain of information technology.
Its initial strengths, conciseness and simplicity more and more become one of its biggest
drawbacks. In fact, every feature dropped from SGML in order to keep XML simple gets
reinvented by new XML related W3C recommendations. And because all these recommendations are prepared by different working groups and are mainly focused on their single,
isolated topic, they can hardly be integrated without problems. Tool support, which has
always been a problem for SGML and one of the biggest advantages of XML becomes a
problem again because it will get continuously harder to find tools which will support the
exact subset of needed recommendations out the unmanageable total number of existing
ones.
While it looks like it will definitely survive as a standard for data exchange, it seems
questionable if XML will provide the right basis for complex information systems in the
future.
2.2
The problem of overlapping hierarchies
As already described in section 1.2.2, the development of the descriptive markup languages
like for example SGML and XML was heavily influenced by the publishing industry. And
although these languages are general in the sense that they are not tied to any specific application domain they are nevertheless somewhat biased towards document creation instead
of document editing or marking of existing documents.
This fact leads to the phenomena that the creation of new SGML or XML vocabularies
and the creation of new documents with these vocabularies is straightforward and easy.
However, as time goes by, vocabularies tend to grow in order to fulfill the needs and wishes
Dissertation der Fak. f. Informations- u. Kognitionswissenschaften, Univ. Tübingen - 2004
17
18
Chapter 2
·
A new markup scheme for text
...
This is the first sentence on the first line. The second
sentence begins on the first line and extends across the
second and third line.The third sentence is a short one.
...
Example text.
<line n=’1’>This
is the first sentence on the first line. The second</line>
n=’1’>
</line>
<line n=’2’>sentence
begins on the first line and extends across the</line>
n=’2’>
</line>
<line n=’3’>second
and third line. The third sentence is a short one.</line>
n=’3’>
</line>
Encoding lines.
<s n=’1’>This
is the first sentence on the first line.</s><s
second
n=’1’>
</s><s n=’2’>The
n=’2’>
sentence gegins on the first line and extends across the
second and third line</s><s
third sentence is a short one.</s>
</s><s n=’3’>The
n=’3’>
</s>
Encoding sentences.
Encoding lines and sentences (Illegal XML!!!)
<line n=’1’>
n=’1’><s n=’1’>This is the first sentence on the first line.</s><s n=’2’>The second</line>
</line>
Figure 2.1: A demonstration of the problem of overlapping hierarchies (also known under the names
“multiple hierarchies” or “concurrent hierarchies”). The text in the upper box is encoded twice, once
line-wise and once sentence-wise. However, encoding both hierarchies simultaneously is impossible
in XML because an opening tag of a given type can not be followed by a closing tag of a different
type.
of the different user groups of a vocabulary. At some point this leads to the problem of overlapping hierarchies which is illustrated in figure 2.1. The problem arises because SGML
documents as well as XML documents are in fact a kind of tree structure and not a general graph structure. But in a tree structure subtrees can not overlap, they are disjoint by
definition.
The problem of overlapping hierarchies arises if there is more than one way to structure a given text. It has been already extensively discussed by different authors [SpHu99,
SpHu00, ReMyDu, DuOD01, DuOD02, ThMcK] and several solutions have been proposed.
The TEI manual for example dedicates a whole chapter to the problem an describes several
workarounds [SperBu, § 31].
2.3
Workarounds
for the problem of overlapping hierarchies
Because the problem of overlapping hierarchies arises quite often in the area of humanities
computing there exist several workarounds for it. They will be discussed in this section
along with some examples.
2.3.1
The SGML CONCUR feature
SGML has an optional feature called CONCUR [Bryan, § 9]. It allows the markup of different
concurrent hierarchies in one SGML document. Therefore more than one document type
may be declared in the header of an SGML document. The first document type will be the
base document type. Its elements may be used in the usual way throughout the document.
But it will also be possible to use elements of the other document definitions at arbitrary
Dissertation der Fak. f. Informations- u. Kognitionswissenschaften, Univ. Tübingen - 2004
2.3
·
Workarounds for the problem of overlapping hierarchies
places in the document no difference if they overlap with elements of the additional document definitions, as long as they are proceeded by a prefix which denotes the document
type they belong to. This is demonstrated in listing 2.4 which uses the two document types
page-layout and structure to encode the two hierarchies from figure 2.1.
Listing 2.4: An example of using the SGML CONCUR to encode overlapping hierarchies
<!SGML "ISO 8879-1986"
...
>
<!DOCTYPE page-layout [
<!ELEMENT line - - #PCDATA>
...
]>
<!DOCTYPE structure [
<!ELEMENT s - - #PCDATA>
...
]>
<line n= 1><(structure)s n=’1’>This is the first sentence on the first line. </(structure)s>
<(structure)s n=’2’>The second</line><line n= 2>sentence begins on the first line and extends
across the</line><line n= 3>second and third line. </(structure)s><(structure)s n=’3’>The
third sentence is a short one.</(structure)s></line>
The SGML CONCUR feature is somewhat related with the XML namespaces [XML-Na] functionality with the difference that XML documents always have to be well formed, i.e. their
elements always have to be properly nested, no difference which namespace they belong
to. The CONCUR feature is an elegant method for the encoding of concurrent hierarchies. Unfortunately it is only an optional feature of SGML which has been seldom implemented and
which has been dropped entirely in XML.
2.3.2 Milestone elements
One method suggested by TEI to avoid problems with concurrent hierarchies is the use of
empty elements, so called milestone elements. Because they contain no content, they do not
nest and thus they can not overlap with other elements. The text from listing 2.4 could be
encoded as follows in XML if the two empty elements sb for “sentence begin” and se for
“sentence end” would be used instead of the s element:
Listing 2.5: Encoding the structure from listing 2.4 with milestone elements
<line n= 1><sb n=’1’/>This is the first sentence on the first line. <se/>
<sb n=’2’/>The second</line><line n= 2>sentence begins on the first line and extends
across the</line><line n= 3>second and third line. <se/><sb n=’3’/>The
third sentence is a short one.<se/></line>
The advantage of this approach is simplicity. The problem is that the valid placement of
the sb and se elements can not be validated by the XML parser, because in a document type
definition there is no way to specify the fact that an sb tag must logically always be followed
by an se tag. There is also a certain kind of unbalance between the main structure expressed
by the line elements in this example and other auxiliary structures expressed by milestone
elements.
Dissertation der Fak. f. Informations- u. Kognitionswissenschaften, Univ. Tübingen - 2004
19
20
Chapter 2
·
A new markup scheme for text
2.3.3 Fragmentation
Another method which can be used to avoid overlapping hierarchies is to break up the
elements which cause the problems into smaller fragments which do not overlap with the
other structures anymore. Listing 2.6 shows how the text from listing 2.4 could be encoded
using this approach.
Listing 2.6: Encoding the structure from listing 2.4 by breaking elements into fragments
<line n= 1><s n=’1’>This is the first sentence on the first line. </s>
<s n=’2’>The second</s></line><line n= 2><s n=’2’>sentence begins on the first line and extends
across the</s></line><line n= 3><s n=’2’>second and third line. </s><s n=’3’>The
third sentence is a short one.</s></line>
Besides its simplicity, this solution also has some drawbacks. Additional processing is
needed for the reconstruction of the fragmented structure. Just as with the last approach the
resulting encoding is biased towards the main, unfragmented structure. Finally fragmentation does not scale very well and has to be potentially further refined as new structures are
being added to a document.
2.3.4 Virtual joins
The last method which worked by segmenting the document can be improved by using so
called “virtual joins” [SperBu, § 31]. They are special elements which are used to express
the logical relationship of otherwise structural unrelated elements as shown in listing 2.7.
Notice the similarity of this approach with the XLink link base concept discussed in section
2.1.3.
Listing 2.7: Augmenting the structure from listing 2.6 with virtual join elements
<line n= 1><s n=’1’ id=’s1’>This is the first sentence on the first line. </s><s n=’2’ id=’s2’>
The second</s></line><line n= 2><s n=’2’ id=’s3’>sentence begins on the first line and extends
across the</s></line><line n= 3><s n=’2’ id=’s4’>second and third line. </s><s n=’3’ id=’s5’>The
third sentence is a short one.</s></line>
<join targets=’s2 s3 s4’ result=’s’/>
Another possibility to create virtual joins is to simply link the corresponding elements with
each other as demonstrated in listing 2.8:
Listing 2.8: Augmenting the structure from listing 2.6 with virtual join elements
<line n= 1><s n=’1’ id=’s1’>This is the first sentence on the first line. </s><s n=’2’ id=’s2’ next=
’s3’>The second</s></line><line n= 2><s n=’2’ id=’s3’ prev=’s2’ next=’s4’>sentence begins on the first
line and extends across the</s></line><line n= 3><s n=’2’ id=’s4’ prev=’s3’>second and third line.
</s><s n=’3’ id=’s5’>The third sentence is a short one.</s></line>
Although virtual joins make the fragmentation solution some more robust, this has to be
payed with an increased complexity. On the other hand the same advantages discussed for
the fragmentation solution also apply to virtual joins.
Dissertation der Fak. f. Informations- u. Kognitionswissenschaften, Univ. Tübingen - 2004
2.3
2.3.5
·
Workarounds for the problem of overlapping hierarchies
Multiple encodings
If it is likely that the text in question will not have to be modified, an alternative to the
before mentioned solutions can be to encode the text multiple times. On the one hand,
this procedure makes each of the encoded versions easier to process because it represents
a single view of the document and is not disturbed by the other encodings. On the other
hand the method needs more memory and there is always the risk of introducing redundant
information into the individual encodings which are hard to keep up to date and which can
lead to inconsistencies between the different copies of the document.
2.3.6
Bottom up virtual hierarchies
In [DuOD01] Durusau and O’Donnell propose the use of a single encoding for every hierarchy in question and the automatic creation of a so called base file which contains the
collected information for every encoding. For this approach to work, the individual encodings have to use the same atomic level PCDATA1 , i.e. all the individual documents have to
be built up from the same base elements. In their paper they use word segments as base
level elements, however a finer segmentation based on syllables or even characters may be
used.
In the base file each of these base elements contains an attribute for each of the individually marked up documents which records its position in the corresponding hierarchy.
The attributes are written as XPath [XPath] expressions which denote the exact position of
the base element in the corresponding markup hierarchy. The authors argue that the base
file can be constructed automatically from the different, individually encoded files and give
some examples how the base file can be queried for information which requires the knowledge of several of the potentially overlapping hierarchies.
The approach is feasible, however as soon as a more fine grained segmentation than
world level segmentation is needed, the base file size grows significantly. Additionally,
the base file size is not proportional to the complexity of the hierarchy but to the number of
base elements. Even an imaginary hierarchy with just one element would add an additional
attribute to every element in the base file.
2.3.7
Just in time trees
In [DuOD02] the same authors propose a new parsing model which honors just the element
tags which are valid with reference to the current document type definition. All the other
tags are discarded, while there PCDATA content is still processed. With this method, it
is possible to attach custom encodings to a single document which may have potentially
overlapping hierarchies.
In fact this is a rediscovery of the SGML CONCUR feature. In order to be feasible, the
method would need to relax the XML constraint of well-formedness which is a key feature
of XML documents. Despite its attractiveness, the new approach requires a new data and
processing model which is not compatible with XML. It is therefore questionable if it will
become widely accepted.
2.3.8
Standoff markup
Markup which is external to the content it describes in the sense that it does not wrap
the tagged content but only references it is called external or standoff markup. In the year
1997 Thompson and McKelvie [ThMcK] introduced a system they called “standoff markup”
1 The term PCDATA derives historically from ”parsed character data.”It is widely used throughout the W3C
Recommendations and denotes the actual character data of an XML document (i.e. all text that is not markup).
Dissertation der Fak. f. Informations- u. Kognitionswissenschaften, Univ. Tübingen - 2004
21
22
Chapter 2
·
A new markup scheme for text
which uses links to include parts of one or more other documents which are already tagged
into a new hierarchy. Initially designed to add markup to read-only documents and to
documents spread across different locations, the approach also solves the problem of overlapping hierarchies.
In their paper the authors assume a pipelined architecture where individual tools work
on a stream of SGML/XML documents and augment, transform or modify them stepwise.
The advantages of the system are evident: different editors can create different markup for
the same document. The documents which are marked up do not even have to be available
together or be editable. And finally, the markup can be distributed independently from the
documents they describe.
The disadvantages are an increased processing complexity and the restriction on SGML/XML elements as targets for the links to the external markup structures.
The TEI consortium established a special working group dedicated to the area of standoff markup [TEISO]. It tries to elaborate guidelines for an external encoding which use
the XML XInclude [XInc] and XPointer [XPoint] features to include content from external
resources into a document based on the TEI encoding standards.
2.4
XTE - A new standoff markup scheme
After various workarounds for the realization of overlapping hierarchies have been discussed in the last sections a new standoff markup scheme called XTE (eXternal Text Encoding)
which solves the mentioned problems will be introduced.
In contrast to the before mentioned external markups, the main idea with XTE is not
to have several files which contain a different markup of a reference document. Instead,
in XTE, all the different markups are collected in a single file. This file effectively stores
an arbitrary number of independent encodings of the same document, i.e. different tree
structures referencing the same source document. All the single tree structures are of course
well formed, however, it is perfectly legal for elements from different trees to overlap with
respect to the content that they reference in the source document.
Although it is possible for the different markups in XTE to reference content from external resources, this is not strictly necessary. XTE is designed in a way to allow the source
content to be stored along with the different encodings2 in the same file. Finally, XTE allows
the user not only to combine an arbitrary number of encodings of the same document, but
also to combine different source documents with an arbitrary number of encodings into a
single XTE file.
In addition to the encoding of language in textual form, XTE also addresses the encoding
of language given in various other formats like for example graphics (i.e. facsimile editions
of a historic text) or sound formats.
The combination of different documents where each of them may be encoded by a number of different markups and available in different media formats and the ability to easily
specify links between the different documents and encoding elements makes XTE especially
useful for the encoding of parallel, multilingual and multi-modal text corpora.
While XTE is fully based on XML and a number of other XML related standards like
XML Namespaces, XPath and XLink, it is nevertheless a quite complex markup scheme
which makes it hard to work on with standard tools like simple word or even sophisticated
XML editors. In order to take full advantage of its features a graphical editor and browser
tool have been developed which will be introduced in chapter 6 and 5 respectively.
2 Please note that the terms “encoding” and “markup” will be used interchangeably in this section with the
meaning of “markup” as defined in section 1.2
Dissertation der Fak. f. Informations- u. Kognitionswissenschaften, Univ. Tübingen - 2004
2.4
2.4.1
·
XTE - A new standoff markup scheme
The XTE DTD
XTE can be defined as an XML Document Type Definition (DTD) as well as an XML Schema.
This section will introduce the XTE DTD while the following section is devoted to the XML
Schema version of XTE.
In the definition of the XTE DTD so called customization layers (see for example [DocB,
§ 5] or [SperBu, § 29]) will be used in order to provide a simple and intuitive way for users
to extend XTE with their own markup schemes or to adapt existing schemes to their needs.
This technique is based on an XML/SGML feature which allows entity declarations to be
repeated. If an entity is declared more than once, the first declaration will be used.
Together with external entities which can be used to include data from other files into
a DTD it becomes possible to declare every single encoding scheme in its own file while
still using entities that have been defined in the main XTE DTD. Finally, the XTE DTD
and the different encoding schemes needed for a special document can be combined in a
customization layer. This customization layer will be the DTD which will be used by the
XML processor to validate the content of a given instance document. The following listing
shows the base XTE DTD:
Listing 2.9: The base XTE DTD
<!-XTE DTD version 0.1
This DTD module is identified by the foll. PUBLIC and SYSTEM identifiers:
PUBLIC "-//Language-Explorer//DTD XTE XML V0.1//EN">
SYSTEM "http://www.language-explorer.org/XTE/dtd/XTE.dtd"
-->
<!ENTITY % xte.ns.suffix
":xte">
<!ENTITY % xte.ns.prefix
"xte:">
<!ENTITY % namespace.xte
"xmlns%xte.ns.suffix;">
<!ENTITY % XTE
"%xte.ns.prefix;XTE">
<!ENTITY % text
"%xte.ns.prefix;text">
<!ENTITY % group
"%xte.ns.prefix;group">
<!ENTITY % content
"%xte.ns.prefix;content">
<!ENTITY % body
"%xte.ns.prefix;body">
<!ENTITY % loadLinkBase
"%xte.ns.prefix;loadLinkBase">
<!ENTITY % xlink.ns.suffix
":xlink">
<!ENTITY % xlink.ns.prefix
"xlink:">
<!ENTITY % namespace.xlink
"xmlns%xlink.ns.suffix;">
<!ELEMENT %XTE; (%text;)>
<!ATTLIST %XTE;
%namespace.xte; CDATA #FIXED "http://www.language-explorer.org/XTE"
%namespace.xlink; CDATA #FIXED "http://www.w3.org/1999/xlink"
xmlns CDATA #IMPLIED
>
<Definition of the text and group elements - see Listing 2.10 on page 25>
Dissertation der Fak. f. Informations- u. Kognitionswissenschaften, Univ. Tübingen - 2004
23
24
Chapter 2
·
A new markup scheme for text
Listing 2.9: The base XTE DTD (continued)
<Definition of the content element - see Listing 2.11 on page 25>
<Definition of the body element - see Listing 2.12 on page 25>
<Definition of the default attributes - see Listing 2.13 on page 26>
<Definition of the loadLinkBase element - see Listing 2.14 on page 26>
One of the problems we face is the fact that DTDs have no knowledge of namespaces. If we
want to put the elements defined in XTE into their own namespace, we have to hard-code
a namespace prefix into the DTD. As this would greatly reduce the profit of namespaces if
not make it useless at all, we define the namespace prefix as a parameter entity as can be
seen in the first two lines of listing 2.9. Subsequently, we define all the element names that
will be defined in the XTE DTD by means of this parameter entity. This way, the user has
the possibility to redefine the namespace prefix which will be used for the XTE elements in
the internal subset of the DTD. An instance document which just references the XTE DTD
has to use the qualified names with the default namespace prefix xte:
<?xml version="1.0" encoding="UTF-8"?>
<!DOCTYPE xte:XTE PUBLIC "-//Language-Explorer//DTD XTE XML V0.1//EN">
<xte:XTE>
<xte:text>
...
</xte:XTE>
It is however possible to use another, arbitrary prefix as follows:
<?xml version="1.0" encoding="UTF-8"?>
<!DOCTYPE xteNS:XTE PUBLIC "-//Language-Explorer//DTD XTE XML V0.1//EN" [
<!ENTITY % xte.ns.prefix "xteNS:">
<!ENTITY % xte.ns.suffix ":xteNS">
]
>
<xteNS:XTE>
<xteNS:text>
...
</xteNS:XTE>
It is even possible to let the XTE elements reside in the default namespace, by setting the
parameter entities that define the XTE prefix to be the empty string:
<?xml version="1.0" encoding="UTF-8"?>
<!DOCTYPE XTE PUBLIC "-//Language-Explorer//DTD XTE XML V0.1//EN" [
<!ENTITY % xte.ns.prefix "">
<!ENTITY % xte.ns.suffix "">
]
>
<XTE>
<text>
...
</XTE>
Dissertation der Fak. f. Informations- u. Kognitionswissenschaften, Univ. Tübingen - 2004
2.4
·
XTE - A new standoff markup scheme
After the namespace prefix for the XTE namespace has been parameterized we do the same
for the XLink namespace, because we will use some XLink attributes later on in the DTD.
Finally, we define the XTE element which will be the root element of the DTD. We bind
the namespace prefixes to their corresponding fixed values for the XTE element and thus for
the whole document. We also define an optional xmlns attribute for the XTE element to give
the user the possibility to define his own default namespace on the root element if he would
like to do so.
The text and the group elements
The XTE contains a single text element which in turn contains either a group element or an
optional loadLinkBase element followed by one or more content elements and one or more
body elements. The loadLinkBase element can be used to include an XLink link base and will
be further specified in listing 2.14.
Listing 2.10: Definition of the text and group elements (Referenced in Listing 2.9 on page 23)
<!ELEMENT %text; (%group; | (%loadLinkBase;?, %content;+, %body;+))>
<!ATTLIST %text; nr
CDATA #IMPLIED
xmlns CDATA #IMPLIED>
<!ELEMENT %group; (%text;+)>
The group element is used for recursion only because it can contain one or more text elements. At the moment, an XTE document usually contains just a single group element which
in turn contains a sequence of all the different, parallel texts included in the document. But
by using such a recursive encoding schema (see also [SperBu]), more sophisticated text
structures can be realized in the future.
The content element
The content elements are used to store the text content of a document as a stream of unformatted characters. Usually all the content belonging to one document is kept in one content
element. However, more than one content element may be useful to store out of band data
like for example footnotes or user supplied annotations. Notice that the content element is
the only element which contains character data (PCDATA in XML notation). All the other
elements may well refer to a part of this content, however only through pointers (e.g. the
start and end attributes defined in default.attributes).
Listing 2.11: Definition of the content element (Referenced in Listing 2.9 on page 23)
<!ELEMENT %content; (#PCDATA)>
<!ATTLIST %content; type CDATA #IMPLIED>
The body element
The body element is declared as a composition out of the elements declared in the parameter
entity local.encodings, while the parameter entity itself, as declared in the XTE DTD, has an
empty value. This parameter entity is the main extension point provided for a user of the
XTE DTD. Listing 2.17 shows how it can be used to combine or plug in custom encodings
into the general XTE framework and figure 2.2 shows a graphical overview of the XTE
encoding scheme.
Dissertation der Fak. f. Informations- u. Kognitionswissenschaften, Univ. Tübingen - 2004
25
26
Chapter 2
·
A new markup scheme for text
Listing 2.12: Definition of the body element (Referenced in Listing 2.9 on page 23)
<!ENTITY % local.encodings "EMPTY">
<!ELEMENT %body; %local.encodings;>
<!ATTLIST %body; encodingName CDATA #REQUIRED
type
(default|auxiliary) #REQUIRED
view
CDATA #REQUIRED
xmlns
CDATA #IMPLIED
>
Default attributes defined by XTE
Finally, the base XTE DTD also defines some parameter entities which are used in the XTE
DTD itself but which are intended at the same time to simplify the creation of new XTE
encodings by the user. An example for such a parameter entity is default.attributes which
defines the attributes that should be present on every internal, user created encoding element. The start and end attributes can be used for example to link the element to the content
while the link element can be used to link an element to other elements in the same or even
from other encodings in the same document. Notice that the format of these attributes is intentionally specified very loose as CDATA to get a maximum of flexibility. This allows simple
solutions like for example plain numbers as references into the content for the start and end
attributes, but also supports more complex and powerful solutions like for example XPath
[XPath] or XPointer [XPoint] expressions as values for these attributes.
Listing 2.13: Definition of the default attributes (Referenced in Listing 2.9 on page 23)
<!ENTITY % default.attributes "start
end
CDATA #IMPLIED
CDATA #IMPLIED
link
CDATA #IMPLIED
n
CDATA #IMPLIED
viewClass
CDATA #IMPLIED
loadClass
CDATA #IMPLIED
saveClass
CDATA #IMPLIED
style
CDATA #IMPLIED
xmlns
CDATA #IMPLIED"
>
The various *Class attributes are intended as a hint for the processing application for how to
handle elements of that specific type. They can contain for example Java class names which
specify a special view class which should be used to optimally display the corresponding
element. The precise process of loading and displaying XTE files is covered in section 3.2.
The loadLinkBase element
There was one part missing in listing 2.9, namely the definition of the loadLinkBase. This
part is now appended in the following listing:
Listing 2.14: Definition of the loadLinkBase element (Referenced in Listing 2.9 on page 23)
<!ENTITY % src
"%xte.ns.prefix;src">
<!ENTITY % linkbase
"%xte.ns.prefix;linkbase">
<!ENTITY % load
"%xte.ns.prefix;load">
Dissertation der Fak. f. Informations- u. Kognitionswissenschaften, Univ. Tübingen - 2004
2.4
·
XTE - A new standoff markup scheme
27
XTE base elements
XTE
User supplied elements
text
Character content
Contains
group
References
Additional elements
text
content
text
body
body
pages
div1
content
page
page
p
p
line
line
s
s
body
body
Der zweite Text ist die deutsche ..
This is the first sentence on the first line. The second sentence ..
Figure 2.2: An example of how XTE could be used to encode the overlapping hierarchies used as an
example in figure 2.1. Notice how the elements of the different encodings may well reference parts
of the text which overlap (gray arrows) while the single encodings are still well-formed. The various
element attributes have been omitted for brevity.
<!ENTITY % xlinkType
"%xlink.ns.prefix;type">
<!ENTITY % xlinkHref
"%xlink.ns.prefix;href">
<!ENTITY % xlinkLabel
"%xlink.ns.prefix;label">
<!ENTITY % xlinkArcrole
"%xlink.ns.prefix;arcrole">
<!ENTITY % xlinkActuate
"%xlink.ns.prefix;actuate">
<!ENTITY % xlinkFrom
"%xlink.ns.prefix;from">
<!ENTITY % xlinkTo
"%xlink.ns.prefix;to">
<!ELEMENT %loadLinkBase; ((%src; | %linkbase; | %load;)*)>
<!ATTLIST %loadLinkBase;
%xlinkType;
(extended)
%xlinkType;
(locator)
#FIXED "locator"
%xlinkHref;
CDATA
#REQUIRED
%xlinkLabel;
NMTOKEN
#IMPLIED>
%xlinkType;
(locator)
#FIXED "locator"
%xlinkHref;
CDATA
#REQUIRED
%xlinkLabel;
NMTOKEN
#IMPLIED>
%xlinkType;
(arc)
#FIXED "arc"
#FIXED "extended">
<!ELEMENT %src; EMPTY>
<!ATTLIST %src;
<!ELEMENT %linkbase; EMPTY>
<!ATTLIST %linkbase;
<!ELEMENT %load; EMPTY>
<!ATTLIST %load;
%xlinkArcrole; CDATA
#FIXED
Dissertation der Fak. f. Informations- u. Kognitionswissenschaften, Univ. Tübingen - 2004
28
Chapter 2
·
A new markup scheme for text
Listing 2.14: Definition of the loadLinkBase element (continued)
"http://www.w3.org/1999/xlink/properties/linkbase"
%xlinkActuate; (onLoad
|onRequest
|other
|none)
#IMPLIED
%xlinkFrom;
NMTOKEN
#IMPLIED
%xlinkTo;
NMTOKEN
#IMPLIED>
The loadLinkBase element can contain child elements which can be used to define an XLink
link base. This can be used together with the link attribute specified in default.attributes
or as an exclusive source of linking information for the corresponding encoding.
Defining custom encodings for XTE
As explained until now, the base XTE DTD is just a framework for other, separately defined
encodings. The XTE DTD alone can not be used to tag any documents. However XTE comes
with some simple encodings which can be plugged into the XTE base DTD in order to get a
practically usable DTD. The following paragraphs will present two of these encodings and
demonstrate how they can be merged into a new, customized DTD.
The following listing for example shows a DTD which divides a text into sentences and
paragraphs. Furthermore, there exist three additional elements, div1, div2 and div3 which
can be used to structure the content on a higher level (e.g. divide it into sections, chapters
and parts). The structuring level of these elements (e.g. chapter) can be declared with the
help of the name attribute.
Listing 2.15: div1.dtd
<!-An external encoding which can be used with the XTE DTD version 0.1
This encoding divides the text into up to three divisions (e.g. chapter,
section, subsection) where each of these divisons contains paragraphs and
the paragraphs contain sentences.
-->
<!ELEMENT div1 ((p | div2)+)>
<!ATTLIST div1 %default.attributes;
name CDATA #IMPLIED >
<!ELEMENT div2 ((p | div3)+)>
<!ATTLIST div2 %default.attributes;
name CDATA #IMPLIED>
<!ELEMENT div3 (p+)>
<!ATTLIST div3 %default.attributes;
name CDATA #IMPLIED>
<!ELEMENT p (s+)>
<!ATTLIST p %default.attributes;>
Dissertation der Fak. f. Informations- u. Kognitionswissenschaften, Univ. Tübingen - 2004
2.4
·
XTE - A new standoff markup scheme
Listing 2.15: div1.dtd (continued)
<!ENTITY % sentence.parts "EMPTY">
<!ELEMENT s %sentence.parts;>
<!ATTLIST s %default.attributes;>
Notice how the sentence element is declared as empty element. However, by doing this
indirectly with the help of a parameter entity, the user of the encoding will have the possibility to further subdivide the sentence element if she needs to do so. Listing 2.17, which
combines this encoding with another partial encoding and the base XTE DTD, shows how
such an extension can be accomplished.
The next listing shows the second example of a partial encoding which can be plugged
into and used together with the base XTE DTD. It divides the underlying text into lines and
pages according to an actual printed edition. The edition may be specified in the edition
attribute of the pages element. The hyphen attribute indicates whether the last word of a
line is hyphenated while the para-pos attribute specifies the position of a line in the paragraph. The last two attributes can be used as hints by view classes when they render these
elements.
Listing 2.16: pages.dtd
<!-An external encoding which can be used with the XTE DTD version 0.1
This encoding divides the text into pages and lines as present in a certain
edition of a printed version of the text.
-->
<!ELEMENT pages (page+)>
<!ATTLIST pages %default.attributes;
edition CDATA #IMPLIED>
<!ELEMENT page (line+)>
<!ATTLIST page %default.attributes;>
<!ELEMENT line EMPTY>
<!ATTLIST line %default.attributes;
para-pos (begin | end | default) "default"
hyphen
(true) #IMPLIED
>
Finally, listing 2.17 shows how the encodings defined in listing 2.15 and 2.16 can be combined and used together with the base XTE DTD. First of all, the parameter entity local.encodings is defined to be either div1 or pages. This has to be done before the inclusion of the XTE DTD as an external entity in order to overwrite the empty definition of
local.encodings their. Then the two partial encodings presented before are pulled into the
file by declaring them as external entities respectively.
Notice how the sentence element which is declared as an empty element in listing 2.15
is extended to contain latin and french elements (which can denote latin and french words
in a text) by redefinition of the parameter entity sentence.parts. Also notice how the use of
the standard element attributes defined in the main XTE DTD is only possible in the partial
Dissertation der Fak. f. Informations- u. Kognitionswissenschaften, Univ. Tübingen - 2004
29
30
Chapter 2
·
A new markup scheme for text
encodings shown in the listings 2.15 and 2.16, because the main XTE DTD is included before
the partial encodings into the final DTD file.
Listing 2.17: div1pages.dtd
<!-A collection of external encodings which can be used with
the XTE DTD version 0.1
This collection combines the ’div1’ and the ’pages’ encoding.
-->
<!ENTITY % local.encodings "(div1 | pages)">
<!ENTITY % xte.dtd SYSTEM "XTE.dtd">
%xte.dtd;
<!ENTITY % sentence.parts "(latin | french)*">
<!ELEMENT latin EMPTY>
<!ATTLIST latin %default.attributes;>
<!ELEMENT french EMPTY>
<!ATTLIST french %default.attributes;>
<!ENTITY % div1 SYSTEM "div1.dtd">
%div1;
<!ENTITY % pages SYSTEM "pages.dtd">
%pages;
Finally, the newly created DTD can be used to validate an XML file, by including the following lines in the header of the corresponding file:
Listing 2.18: An example XML file which uses the DTD defined in listing 2.17
<?xml version="1.0" encoding="UTF-8"?>
<!DOCTYPE XTE SYSTEM "resources/div1pages.dtd"
<!ENTITY % xte.ns.prefix "">
<!ENTITY % xte.ns.suffix "">
]
>
<XTE>
...
</XTE>
As shown in this section, the XTE DTD is an easily extensible and easily configurable DTD
which allows users to define and use several, even overlapping encodings on several different documents and store all this information into a single XML file. Another approach,
namely the implementation of XTE as an XML Schema, will be discussed in the next section.
2.4.2 XTE - Expressed as an XML Schema
As described in section 2.1, XML document type definitions have a number of serious drawbacks. But XTE is not tied to a DTD in any way. In particular it can also be expressed by
Dissertation der Fak. f. Informations- u. Kognitionswissenschaften, Univ. Tübingen - 2004
2.4
·
XTE - A new standoff markup scheme
means of a more general schema language (see 2.1.2). In this section XTE will be defined as
an W3C XML Schema [XMLSch0, XMLSch1, XMLSch2].
Listing 2.19: XTE.xsd
<xsd:schema xmlns="http://www.language-explorer.org/XTE"
xmlns:xsd="http://www.w3.org/2001/XMLSchema"
targetNamespace="http://www.language-explorer.org/XTE"
elementFormDefault="qualified">
<xsd:annotation>
<xsd:documentation xml:lang="en">
XTE Schema version 0.1
This Schema is available from the following Schema Location:
http://www.language-explorer.org/XTE/schema/XTE.xsd
</xsd:documentation>
</xsd:annotation>
<xsd:element name="XTE" type="XTE"/>
<xsd:complexType name="XTE">
<xsd:sequence>
<xsd:element name="text" type="text"/>
</xsd:sequence>
</xsd:complexType>
<xsd:complexType name="text">
<xsd:choice>
<xsd:element name="group" type="group"/>
<xsd:sequence>
<xsd:element name="loadLinkBase" type="loadLinkBase" minOccurs="0"/>
<xsd:element name="content" type="xsd:string" maxOccurs="unbounded"/>
<xsd:element name="body" type="body" maxOccurs="unbounded"/>
</xsd:sequence>
</xsd:choice>
<xsd:attribute name="nr"/>
</xsd:complexType>
<xsd:complexType name="group">
<xsd:sequence>
<xsd:element name="text" type="text" maxOccurs="unbounded"/>
</xsd:sequence>
</xsd:complexType>
<Definition of the ’body’ element and type - see Listing 2.20 on page 32>
<xsd:attributeGroup name="defaultAttributes">
<xsd:attribute name="start"/>
<xsd:attribute name="end"/>
... Some more attribute definitions ...
</xsd:attributeGroup>
Dissertation der Fak. f. Informations- u. Kognitionswissenschaften, Univ. Tübingen - 2004
31
32
Chapter 2
·
A new markup scheme for text
Listing 2.19: XTE.xsd (continued)
... Definition of the loadLinkBase type. ...
</xsd:schema>
Listing 2.19 shows the XTE schema which conforms to the XTE DTD known from listing 2.9.
First of all a global element XTE of type XTE is defined. Then the type XTE is defined to be a
complex type which contains a single element of type text. Subsequently the complex type
text is defined to contain either a group element of type group or a sequence of the optional
loadLinkBase element and the two content and body elements which are of type string and
body respectively. Finally, the group element is defined as a complex type which contains a
single element of type text. While the XML Schema version is a little bit more verbose than
the DTD version, until now we have a more or less one-to-one translation of the XTE DTD
presented in the previous section which could also have been done automatically by means
of a DTD to XML Schema translation tool. The extension and configuration capabilities of
the DTD version however will be implemented by specific features available only in the
XML Schema language.
The XTE XML Schema realized with substitution groups
While customization layers have been used in the DTD version to make XTE easily extensible for users, two more convenient and intuitive possibilities are available to achieve the
same result within XML Schema. The first one is to define a global, empty and abstract
encoding element of type encoding which is contained in the body element as shown in listing
2.20.
Listing 2.20: XTE.xsd (Referenced in Listing 2.19 on page 31)
<xsd:complexType name="body">
<xsd:sequence maxOccurs=’unbounded’>
<xsd:element ref="encoding"/>
</xsd:sequence>
<xsd:attribute name="encodingName" use="required"/>
<xsd:attribute name="type" use="required">
<xsd:simpleType>
<xsd:restriction base="xsd:string">
<xsd:enumeration value="default"/>
<xsd:enumeration value="auxiliary"/>
</xsd:restriction>
</xsd:simpleType>
</xsd:attribute>
<xsd:attribute name="view" use="required"/>
</xsd:complexType>
<xsd:element name="encoding" type="encoding" abstract="true"/>
<xsd:complexType name="encoding" abstract="true">
</xsd:complexType>
Users who want to define their own encodings can now easily do this by deriving the root
element of their encoding from encoding and add that element to the substitution group for
encoding as shown in listing 2.21.
Dissertation der Fak. f. Informations- u. Kognitionswissenschaften, Univ. Tübingen - 2004
2.4
·
XTE - A new standoff markup scheme
Listing 2.21: div1.xsd (Referenced in Listing 2.22 on page 33)
<xsd:element name="div1" type="div1" substitutionGroup="xte:encoding"/>
<xsd:complexType name="div1">
<xsd:complexContent>
<xsd:extension base="xte:encoding">
<xsd:choice maxOccurs=’unbounded’>
<xsd:element name="p" type="p"/>
<xsd:element name="div2" type="div2"/>
</xsd:choice>
<xsd:attributeGroup ref="xte:defaultAttributes"/>
<xsd:attribute name="name"/>
</xsd:extension>
</xsd:complexContent>
</xsd:complexType>
The crucial point in the previous schema definition is the fact that the element div1 is being
added to the substitution group encoding and the type of the div1 element is derived from
encoding.
Notice also how the attributes defined in the defaultAttributes attribute group in the file
XTE.xsd are reused in the definition of the complex type div1. This is possible because the
base XTE Schema was included into the schema file before the definition of the div1 type
(see listing 2.22).
Together with the XML Schema import mechanism, which is comparable with the external entities feature of DTDs, it becomes easy to create own encodings and combine them
in a new XML Schema. Listing 2.22 shows the missing part of the XML Schema definition
for a sentence-wise encoding which is equivalent to the sentence-wise encoding previously
defined as a DTD in listing 2.15.
Listing 2.22: div1.xsd
<xsd:schema xmlns="http://www.language-explorer.org/XTE/div1"
xmlns:xsd="http://www.w3.org/2001/XMLSchema"
xmlns:xte="http://www.language-explorer.org/XTE"
targetNamespace="http://www.language-explorer.org/XTE/div1"
elementFormDefault="qualified">
<xsd:import namespace="http://www.language-explorer.org/XTE"
schemaLocation="XTE.xsd"/>
<xsd:annotation>
<xsd:documentation xml:lang="en">
An external encoding which can be used with the XTE Schema version 0.1
This encoding divides the text into up to three divisions (e.g. chapter,
section, subsection) where each of these divisons contains paragraphs and
the paragraphs contain sentences.
</xsd:documentation>
</xsd:annotation>
<Definition of the div1 element and type - see Listing 2.21 on page 32>
Dissertation der Fak. f. Informations- u. Kognitionswissenschaften, Univ. Tübingen - 2004
33
34
Chapter 2
·
A new markup scheme for text
Listing 2.22: div1.xsd (continued)
<xsd:complexType name="div2">
<xsd:choice maxOccurs=’unbounded’>
<xsd:element name="p" type="p"/>
<xsd:element name="div3" type="div3"/>
</xsd:choice>
<xsd:attributeGroup ref="xte:defaultAttributes"/>
<xsd:attribute name="name"/>
</xsd:complexType>
<xsd:complexType name="div3">
... Definition of div3 which contains paragraph elements p ...
</xsd:complexType>
<xsd:complexType name="p">
... Definition of p which contains sentence elements s ...
</xsd:complexType>
<xsd:complexType name="s">
<xsd:attributeGroup ref="xte:defaultAttributes"/>
</xsd:complexType>
</xsd:schema>
The elements and types defined in the schema will not be discussed in depth here because
they directly correspond to the elements with the same names in the corresponding DTD.
As a second example of constructing a custom XTE encoding, a schema definition for the
line- and page-wise encoding previously presented as a DTD in listing 2.16 will be given in
the next listing:
Listing 2.23: pages.xsd
<xsd:schema xmlns="http://www.language-explorer.org/XTE/pages"
xmlns:xsd="http://www.w3.org/2001/XMLSchema"
xmlns:xte="http://www.language-explorer.org/XTE"
targetNamespace="http://www.language-explorer.org/XTE/pages"
elementFormDefault="qualified">
<xsd:import namespace="http://www.language-explorer.org/XTE"
schemaLocation="XTE.xsd"/>
<xsd:annotation>
<xsd:documentation xml:lang="en">
An external encoding which can be used with the XTE Schema version 0.1
This encoding divides the text into pages and lines as present in a
certain edition of a printed version of the text.
</xsd:documentation>
</xsd:annotation>
<xsd:element name="pages" type="pages" substitutionGroup="xte:encoding"/>
Dissertation der Fak. f. Informations- u. Kognitionswissenschaften, Univ. Tübingen - 2004
2.4
·
XTE - A new standoff markup scheme
Listing 2.23: pages.xsd (continued)
<xsd:complexType name="pages">
<xsd:complexContent>
<xsd:extension base="xte:encoding">
<xsd:sequence maxOccurs=’unbounded’>
<xsd:element name="page" type="page"/>
</xsd:sequence>
<xsd:attributeGroup ref="xte:defaultAttributes"/>
</xsd:extension>
</xsd:complexContent>
</xsd:complexType>
<xsd:complexType name="page">
<xsd:sequence maxOccurs=’unbounded’>
<xsd:element name="line" type="line"/>
</xsd:sequence>
<xsd:attributeGroup ref="xte:defaultAttributes"/>
</xsd:complexType>
<xsd:complexType name="line">
<xsd:attributeGroup ref="xte:defaultAttributes"/>
</xsd:complexType>
</xsd:schema>
Again, all the elements defined in this schema directly correspond to the elements with the
same name in the DTD version of the encoding.
Finally, the two custom encodings defined in listing 2.22 and 2.23 respectively, can be
combined and merged together with the base XTE Schema as shown in listing 2.24. In
fact it is just a matter of importing the desired partial encodings into one schema file.
The base XTE Schema has to be imported into the final schema file only because the default.attributes attribute group is used in the definition of the complex types latin and
french. Otherwise this would not have to be done explicitly, because the base XTE schema
is already imported into the partial encodings (see for example listing 2.23).
Listing 2.24: div1pages.xsd
<xsd:schema xmlns="http://www.language-explorer.org/XTE/div1pages"
xmlns:xsd="http://www.w3.org/2001/XMLSchema"
xmlns:xte="http://www.language-explorer.org/XTE"
xmlns:div1="http://www.language-explorer.org/XTE/div1"
xmlns:pages="http://www.language-explorer.org/XTE/pages"
targetNamespace="http://www.language-explorer.org/XTE/div1pages"
elementFormDefault="qualified">
<xsd:import namespace="http://www.language-explorer.org/XTE"
schemaLocation="XTE.xsd"/>
<xsd:import namespace="http://www.language-explorer.org/XTE/div1"
schemaLocation="div1.xsd"/>
<xsd:import namespace="http://www.language-explorer.org/XTE/pages"
schemaLocation="pages.xsd"/>
Dissertation der Fak. f. Informations- u. Kognitionswissenschaften, Univ. Tübingen - 2004
35
36
Chapter 2
·
A new markup scheme for text
Listing 2.24: div1pages.xsd (continued)
<xsd:annotation>
<xsd:documentation xml:lang="en">
A collection of external encodings which can be used with
the XTE Schema version 0.1
This collection combines the ’div1’ and the ’pages’ encoding.
</xsd:documentation>
</xsd:annotation>
<xsd:complexType name="sentence.with.parts">
<xsd:complexContent>
<xsd:extension base="div1:s">
<xsd:choice maxOccurs=’unbounded’>
<xsd:element name="latin" type="latin"/>
<xsd:element name="french" type="french"/>
</xsd:choice>
</xsd:extension>
</xsd:complexContent>
</xsd:complexType>
<xsd:complexType name="latin">
<xsd:attributeGroup ref="xte:defaultAttributes"/>
</xsd:complexType>
<xsd:complexType name="french">
<xsd:attributeGroup ref="xte:defaultAttributes"/>
</xsd:complexType>
</xsd:schema>
The interesting point about listing 2.24 is how it is possible for the user to refine the definition of the sentence element s which was initially defined in listing 2.22. This is achieved
with the help of the derivation mechanism provided by the XML Schema language. Because the complex type sentence.with.parts is derived from the sentence type s, it becomes
possible to create sentence elements in a document instance which are in fact of type sentence.with.parts in places where sentence elements of type s are expected by the paragraphand sentence-wise encoding previously shown in listing 2.22. The only requirement for this
substitution to work is to denote the actual type of an s element by using a type attribute
from the http://www.w3.org/2001/XMLSchema-instance namespace. While default sentence elements which contain no child elements could still be declared without type attribute, the
declaration of a sentence element which contains a latin element could be achieved as
shown in the following listing:
<s start="82" end="91" link="1" style="title2" xsi:type="sentence.with.parts">
<latin start="85" end="88"/>
</s>
<s start="91" end="298" link="2" style="title3" />
Notice that the creator of the schema for the paragraph- and sentence-wise encoding did
not had to take special care to make the sentence element s customizable by the user as this
Dissertation der Fak. f. Informations- u. Kognitionswissenschaften, Univ. Tübingen - 2004
2.4
·
XTE - A new standoff markup scheme
had to be done in the DTD case (compare with listing 2.15). Instead this extensibility feature
is provided by the XML Schema language. On the other hand, the XML Schema language
also allows the creator of an encoding to use the final attribute on a type to specify which
element types should not be further refined by derivation.
Finally, the customized XTE XML Schema created in listing 2.24 could be used to validate a document instance by including the attributes shown in the following listing into the
root element of the document:
Listing 2.25: An example XML file which uses the XML Schema defined in listing 2.24
<?xml version="1.0" encoding="UTF-8"?>
<XTE xmlns="http://www.language-explorer.org/XTE"
xmlns:xsi="http://www.w3.org/2001/XMLSchema-instance"
xsi:schemaLocation="resources/div1pages.xsd">
...
</XTE>
The XTE XML Schema realized with derivation
Besides the possibility of realizing the XTE Schema extensibility with substitution groups,
it is also possible to achieve the same results by using the XML Schema derivation mechanism. This mechanism has been used already in the last section to make elements defined
in a partial encoding customizable by other users. In the case of the base XTE XML Schema,
derivation will be applied to the body element. The type of the body element has to be defined
as follows:
Listing 2.26: The definition of the body type for the XTE Schema realized with derivation
<xsd:complexType name="body">
<xsd:attribute name="encodingName" use="required"/>
<xsd:attribute name="type" use="required">
<xsd:simpleType>
<xsd:restriction base="xsd:string">
<xsd:enumeration value="default"/>
<xsd:enumeration value="auxiliary"/>
</xsd:restriction>
</xsd:simpleType>
</xsd:attribute>
<xsd:attribute name="view" use="required"/>
</xsd:complexType>
The only change with respect to the old definition of the body type (see listing 2.20) is the fact
that body now contains no other elements. By default there are just a few attributes defined
for this element. However in document instances, the plain body element type will be not
used. Elements which have a type derived from body will be used instead. The sentence- and
page-wise encoding already presented in listing 2.23, would have to be defined as follows
to work with the new schema:
Listing 2.27: Definition of the page-wise encoding for the XTE Schema realized with derivation
...
<!-- derive a new body type from the abstract ’body’ type in XTE.xsd which
uses the ’pages’ encoding schema -->
Dissertation der Fak. f. Informations- u. Kognitionswissenschaften, Univ. Tübingen - 2004
37
38
Chapter 2
·
A new markup scheme for text
Listing 2.27: Definition of the page-wise encoding for the XTE Schema realized with derivation
(continued)
<xsd:complexType name="pagesBody">
<xsd:complexContent>
<xsd:extension base="xte:body">
<xsd:sequence>
<xsd:element name="pages" type="pages"/>
</xsd:sequence>
</xsd:extension>
</xsd:complexContent>
</xsd:complexType>
<xsd:complexType name="pages">
...
</xsd:complexType>
...
Notice that a new type called pagesBody has been introduced, which is derived from body.
Also, the div type no longer has to be derived from encoding. In fact the auxiliary element
encoding which was previously used is not necessary any more.
Merging different encodings together with the base XTE Schema and customizing them
can be done in exactly the same way as shown in listing 2.24 in the previous section. However, in the document instance which uses the new schema for validation purpose, the body
elements will have to be supplemented with an XML Schema Instance type attribute which
denotes the actual type of the body element. For a body element which contains elements of
the page-wise encoding shown in listing 2.27, this looks as follows:
Listing 2.28: Example of a body element which is of type pagesBody
<body encodingName="Default" type="default" view="native" xsi:type="pagesBody">
<div1 link="1">
<p link="1">
<s start="0" end="44" link="1" style="title1" />
...
</body>
Notice that the body element also contains another type attribute for the target namespace.
This is not to be confused with the type attribute defined in the XML Schema Instance
namespace which was introduced in the root XTE element (see listing 2.25) and which was
bound to xsi: in this example.
Both of the extension mechanisms for the XTE Schema presented in the last two sections
work equally well. However, because of compatibility reasons with the DTD version which
will be explained in more detail in the next section, the actual schema version of XTE uses
substitution groups as extension mechanism.
2.4.3 Using the XTE DTD together with the XTE XML Schema
The last two sections showed in some detail how the XTE can be defined as a DTD as well
as an XML Schema. However these two solutions do not necessarily have to be mutually
exclusive. By taking some special care during the design of the two XTE implementations,
it becomes possible to finally use both of them at the same time for the validation of an
instance document.
Dissertation der Fak. f. Informations- u. Kognitionswissenschaften, Univ. Tübingen - 2004
2.4
·
XTE - A new standoff markup scheme
This approach has several advantages. First of all, a larger number of applications will
be able to validate the instance document because all applications which understand either
a DTD or an XML Schema will be able to validate the document. Further on, the schema
version of XTE can be used to define additional constraints which are not expressible in a
DTD for the elements. In such a case, an application may choose to validate the instance
document just against the weaker DTD, or if capable to do so, also validate against the more
rigorous XML Schema.
The biggest challenge for using a DTD together with an XML Schema is the fact that
DTDs do not understand namespaces (for a discussion see section 2.1.1). This means that
it is not possible to declare attributes or elements to belong to a certain namespace in a
DTD. Therefore, it seems as if it would be impossible to declare a target namespace in the
XTE schema definitions because doing so would require all the elements in an instance
document to be qualified with the same namespace prefix.
However, by applying the techniques already demonstrated in listing 2.9 it becomes
possible to customize the namespace prefixes used in the DTD. While the XML Schema
validator uses the real namespace to which name prefixes are bound to in order to validate
an instance document, the DTD is customized to use the exact namespace prefix as defined
in the XML Schema.
As shown in listing 2.25 and 2.28 there are two places where namespace qualified attributes are necessarily needed if a document instance should be validated against a schema.
The first one is the root element where the location of the corresponding schema has to
be specified with the schemaLocation attribute from the http://www.w3.org/2001/XMLSchemainstance namespace. The second one is every element which may be substituted by an
element of a derived type and which has to explicitly state its actual type by using a type
attribute from the same namespace. The following listing shows the changes which are
necessary to make the XTE DTD from listing 2.9 XML Schema compatible:
Listing 2.29: Changes to the base XTE DTD from listing 2.9 to make it “Schema compatible”
<!ENTITY % xsi.ns.suffix
":xsi">
<!ENTITY % xsi.ns.prefix
"xsi:">
<!ENTITY % namespace.xsi
"xmlns%xsi.ns.suffix;">
<!ENTITY % noNamespaceSchemaLocation "%xsi.ns.prefix;noNamespaceSchemaLocation">
<!ENTITY % schemaLocation
"%xsi.ns.prefix;schemaLocation">
<!ENTITY % typeAttribute
"%xsi.ns.prefix;type">
... more entity definitions ...
<!ELEMENT XTE (text)>
<!ATTLIST XTE
%namespace.xsi; CDATA #FIXED "http://www.w3.org/2001/XMLSchema-instance"
%schemaLocation; CDATA #IMPLIED
%noNamespaceSchemaLocation; CDATA #IMPLIED
%namespace.xte; CDATA #FIXED "http://www.language-explorer.org/XTE"
%namespace.xlink; CDATA #FIXED "http://www.w3.org/1999/xlink"
xmlns CDATA #IMPLIED
>
<!ELEMENT %body; %local.encodings;>
<!ATTLIST %body; encodingName
CDATA #REQUIRED
type
(default|auxiliary) #REQUIRED
view
CDATA #REQUIRED
Dissertation der Fak. f. Informations- u. Kognitionswissenschaften, Univ. Tübingen - 2004
39
40
Chapter 2
·
A new markup scheme for text
Listing 2.29: Changes to the base XTE DTD from listing 2.9 to make it “Schema compatible”
(continued)
%typeAttribute;
CDATA #IMPLIED
xmlns:typeNS
CDATA #IMPLIED
xmlns
CDATA #IMPLIED
>
... more element definitions ...
<!ENTITY % default.attributes "start
end
CDATA #IMPLIED
CDATA #IMPLIED
... more attribute definitions ...
%typeAttribute;
CDATA #IMPLIED
xmlns:typeNS
CDATA #IMPLIED
xmlns
CDATA #IMPLIED"
>
First of all we define entities for the namespace prefix of the http://www.w3.org/2001/XMLSche
ma-instance namespace and entities for attributes from this namespace. For brevity we
will use the default xsi: namespace prefix for this namespace in the following part of
this section. The XTE root element is then extended by the xmlns:xsi attribute the content of which is preset to the fixed value http://www.w3.org/2001/XMLSchema-instance and
the xsi:schemaLocation attribute which will hold the URL of the Schema against which the
instance document should be validated. For the case where the user also wants to validate against an XML Schema which uses no target namespace, we additionally add the
xsi:noNamespaceSchemaLocation attribute.
The second change extends the attribute list of the body element and the default attributes
defined in default.attributes with the xsi:type attribute. This is done in order to support
the user customization of encodings through derivation as demonstrated in listing 2.24.
Because all new encoding elements should use the attributes defined in the parameter entity
default.attributes, they all are customizable by default. If the derived element is defined
in its own namespace, a possibility is needed to make this namespace available before it
can be referenced in the xsi:type attribute. This is exactly the function of the xmlns:typeNS
attribute. It can be used to bind the typeNS: prefix to an arbitrary namespace which can then
be referenced in the xsi:type attribute.
Notice that the additional xsi:type and xmlns:typeNS attributes on the body element are
only necessary if the XTE Schema is defined by means of derivation. The following listing
shows how they would be used in an instance document validated by the custom encoding
div1Body which is defined in the namespace http://www.language-explorer.org/XTE/div1.
Listing 2.30: Usage of the xsi:type and xmlns:typeNS attributes.
...
<xte:body encodingName="Default" type="default" view="native"
xmlns:typeNS="http://www.language-explorer.org/XTE/div1"
xsi:type="typeNS:div1Body">
<div1 xmlns="http://www.language-explorer.org/XTE/div1" link="1">
<p link="1">
<s start="0" end="44" link="1" style="title1" />
</p>
...
Dissertation der Fak. f. Informations- u. Kognitionswissenschaften, Univ. Tübingen - 2004
2.4
2.4.4
·
XTE - A new standoff markup scheme
Encoding facsimile texts with XTE
In this section a short description of an encoding is given which can be used to include
facsimile editions of a document into LanguageExplorer and LanguageAnalyzer. The idea
behind the encoding, which is shown in listing 2.31, is to define a facsimile-book element
which holds an arbitrary number of facsimile pages. Notice how the viewClass attribute
defined initially in the parameter entity default.attributes in the base XTE DTD is refined
and set to the fixed value of the class name which should be used to render elements of that
type.
Listing 2.31: A simple DTD for encoding facsimile documents in LanguageExplorer.
<!-An external encoding which can be used with the XTE DTD version 0.1
This encoding divides the text into pages and lines as present in a certain
edition of a printed version of the text.
-->
<!ELEMENT facsimile-book (facsimile-page+)>
<!ATTLIST facsimile-book viewClass CDATA #FIXED
"com.languageExplorer.text.xml.VBoxView"
%default.attributes;
edition
CDATA #IMPLIED
>
<!ELEMENT facsimile-page ((facsimile-fragment | facsimile-fragments)+)>
<!ATTLIST facsimile-page viewClass CDATA #FIXED
"com.languageExplorer.text.xml.XMLImageView"
%default.attributes;
url
CDATA #IMPLIED
location CDATA #IMPLIED
>
<!ENTITY % fragment.attr "x
CDATA #REQUIRED
y
CDATA #REQUIRED
width
CDATA #REQUIRED
height
CDATA #REQUIRED
type
(glyph|syllable|word|line|paragraph|page|other)
#IMPLIED"
>
<!ELEMENT facsimile-fragments ((facsimile-fragment | facsimile-fragments)+)>
<!ATTLIST facsimile-fragments %default.attributes;
%fragment.attr;
>
<!ELEMENT facsimile-fragment EMPTY>
<!ATTLIST facsimile-fragment %default.attributes;
%fragment.attr;
>
Dissertation der Fak. f. Informations- u. Kognitionswissenschaften, Univ. Tübingen - 2004
41
42
Chapter 2
·
A new markup scheme for text
Each facsimile page, which is represented by the facsimile-page element, has a link to the
facsimile image which may be given as a URL in the url attribute or a local file system resource in the location attribute. Each facsimile page may be composed out of an arbitrary
number of so called facsimile fragments which are represented by the facsimile-fragment element. Each of them describes a rectangular area of the facsimile image. Fragments which
belong together logically can be grouped together in a facsimile-fragments element. Because facsimile-fragments elements can not only contain facsimile-fragment elements but
also other facsimile-fragments elements, they can be used to recursively refine of the description of a facsimile document.
The type attribute of the fragment elements gives a description of the content represents
by the fragment and may contain such values like character, word or line.
This simple encoding may be used for example to represent the results of processing a
scanned text image with an OCR program. Notice that the facsimile-fragment element uses
the start and end attributes defined in default.attributes, that is a text model is constructed
even for a facsimile document. Although the content of this model is not relevant for the
visual representation, it can be used for example to linearize the different fragments and
provide an easier way of navigation and access. See figure 3.9 on page 55 for a picture of
how a facsimile document encoded with this encoding may be represented in LanguageExplorer and LanguageAnalyzer.
Dissertation der Fak. f. Informations- u. Kognitionswissenschaften, Univ. Tübingen - 2004
Chapter 3
The software architecture of
LanguageExplorer and
LanguageAnalyzer
This chapter will give a high level overview of the different software packages which are
part of the LanguageExplorer/LanguageAnalyzer framework. It contains design rationals
and explains how the different modules of the system work together. Finally it outlines
the different extension points, interfaces and plugin mechanisms which can be used to customize and extend the system. Some general support libraries and implementation techniques will be described in chapter 4.
3.1
The Java programming language
Before the start of a new software project, the selection of the appropriate programming
language is one of the first decisions one has to take. And of course we were also faced with
this problem when the project started some years ago. If political questions can be disregarded, there still remain a couple of objective requirements which have to be fulfill by the
languages in question. As our goal was to build an open system, one of the most important
requirements was platform and system independency. We also wanted to use a modern,
object oriented programming language which comes with a rich set of standard libraries.
Finally, we looked for a language for which free compilers/interpreters and development
environments from different sources were available and which has considerable support by
a big user community in order to ensure continuity in the future.
Taking into account these constraints, we finally had the choice between C++ [Str] and
Java [GoJoSt], which both seemed to fulfill the desired requirements. Although C++ has
the reputation of generating faster code and offers more elaborate language concepts like
multiple inheritance and genericity1 compared to Java, we favored Java in the end because
of two main reasons. The first one was the availability of many free, professional integrated
development environments (IDEs) [SAFKKC, BGGSW, JBuil] for Java.
The second and in our eyes the most important advantage of Java, is the tremendous
number of available standard and extension libraries for any imaginable application do1 Starting with version 1.5, the Java programming language will also offer genericity as a language feature.
Although different approaches which extend Java to support generics existed already for a while [CarSt, OdWa,
MyBaLi], we did not used them in the current work. Using generics may be however an option for the future
development of the system, as they are becoming a standardized feature now.
Dissertation der Fak. f. Informations- u. Kognitionswissenschaften, Univ. Tübingen - 2004
44
Chapter 3
·
The software architecture of LanguageExplorer and LanguageAnalyzer
main. And because Java is a language which is translated to byte code and executed by a
virtual machine (JVM) [JVM], all these libraries2 are available on every platform for which
a Java virtual machine is available. This benefit combined with the better tool support outweighs the performance advantage of C++ in our opinion.
3.1.1
The Java APIs
Modern software development is not possible today without the usage of standard libraries.
Especially in the area of graphical user interfaces (GUIs), the needs and expectations of
the users can only be fulfilled by building upon the predefined widgets defined in such
libraries. But also file input and output (IO), processing of XML documents or the handling
of different media types like for example graphics or sound are hard to cope with if there
exist no supporting libraries.
The advantage of Java is the fact that it constantly increased the number of standard
libraries since its appearance in 1995. And, as already mentioned earlier, if these libraries
are implemented in pure Java, they are system independent and run on every hardware and
under every operating system which has support for a JVM. Among others, these are today
libraries for GUIs, IO, networking, image processing, sound, input methods, UNICODE
text processing, help systems, XML processing, cryptography, persistence, remote method
invocation, containers and basic algorithms to name just a few.
During the implementation of LanguageExplorer and LanguageAnalyzer we more or
less used most of these libraries. The two most important ones, on which our system is
directly built on, are the XML libraries commonly known under the name JAXP (Java Api
for XML Processing) [MacLa] and the GUI library commonly known under the name JFC
(Java Foundation Class) or Swing [ELW]. The next sections will introduce these libraries in
some more depth.
Swing and the Java Foundation classes
At the time of its first appearance, it was a big deal that Java offered a system independent, easy to use, widget set for GUI programming. This Abstract Window Toolkit (AWT)
[Zuk97] was implemented as a kind of unification layer for the different, platform specific
widget sets. Every AWT component was in fact just a wrapper class for a concrete counterpart (called peer) provided by the host system. These peers were internally accessed with
the help of the Java Native Interface (JNI) [Lia]. This kind of architecture however made
it particularly hard to port the AWT to new operating systems or native widget sets and
restricted the number and functionality of the widgets provided by the AWT to the lowest
common denominator of all the supported native widget sets.
These problems led to the development of the Java Foundation Classes which are a set
of GUI libraries composed from the old AWT, a new 2D library called Java2D, support
libraries for accessibility and internationalization and Swing, a platform independent, rich
widget set implemented completely in Java. The new libraries are based on modern design
principles and commonly accepted design patterns. The most important ones in this context
are the Model View Controller (see section 4.3.2 for a discussion of the implementation of
the MVC pattern in Swing) and the Observer pattern.
Other features provided by Swing are the pluggable look and feel architecture which
allows a customization of the look and feel, the input method framework which gives the
developer the opportunity to develop system independent input methods for the input
of arbitrary languages through a normal keyboard and accessibility support which allows
2 This is not strictly true, because Java programs may execute platform depended code through the Java Native
Interface (JNI) [Lia]. However most of the available libraries are written in pure Java and rely solely on the services
provided by the Java Runtime Environment (JRE).
Dissertation der Fak. f. Informations- u. Kognitionswissenschaften, Univ. Tübingen - 2004
3.1
·
The Java programming language
45
developers to create applications with assistive technologies which support disabled people
in using the applications.
For LanguageExplorer and LanguageAnalyzer we used for example the pluggable look
and feel architecture to create a new, multi-lingual user interface (see section 4.3) and the input method framework to create input methods for Cyrillic and Hebrew letters (see section
29). Figure 3.1 finally gives an overview of the widgets of the Swing library. Most of them
have been used in our applications and will be subsequently referenced in the description
of LanguageExplorer and LanguageAnalyzer.
java.awt
Component
java.applet
javax.swing
Container
Panel
Window
Applet
JComponent
Dialog
Frame
JApplet
JWindow
JDialog
JFrame
JColorChooser
JCombobox
JFileChooser
JInternalFrame
JLabel
JList
JMenuBar
JOptionPane
JPanel
JPopUpMenu
JProgressBar
JRootPane
JScrollBar
JScrollPane
JSeparator
JSlider
JSpinner
JSplitPane
JTabbedPane
JTable
JTableHeader
JToolBar
JToolTip
JTree
JViewPort
JLayeredPane
JDesktopPane
AbstractButton
JButton
JMenuItem
JTextComponent
JToggleButton
JMenu
JEditorPane
JTextPane
JTextArea
JPasswordField
JTextField
JFormattedTextField
JCheckBoxMenuItem
JRadioButtonMenuItem
JCheckBox
JRadioButton
Figure 3.1: A class diagram of the Swing classes along with the few AWT classes they are built on. Notice that these AWT classes are simple containers or graphic panes, so there is only a minimal system
dependency compared to the AWT widgets, where every single widget depends on the corresponding
system widget.
The Java text package
Java provides an extensive collection of classes for working with text. One of the innovations of Java was the fact that the representation format for all kind of textual data of the
Dissertation der Fak. f. Informations- u. Kognitionswissenschaften, Univ. Tübingen - 2004
46
Chapter 3
·
The software architecture of LanguageExplorer and LanguageAnalyzer
language itself as well as the format of all the textual data types is fully based on the UNICODE [U30] standard. This solves a lot of problems of older programming languages like C
or C++ which usually use an 8-bit character set for the builtin, textual data types and which
therefore always have to use special libraries if they want to process textual data stored in
the UNICODE format.
As already discussed in section 1.1.2, the UNICODE standard not only defines a character encoding for a wide range of modern and ancient languages, it also defines methods for
how to handle collation, directionality, searching and other important language aspects for
texts stored in that encoding.
Figure 3.3 gives an overview of the different text related classes in the standard Java
libraries. As can be seen in the figure, they are split around several packages. Among others, the package java.text contains the class Bidi for determining the writing direction of a
text, collator classes for doing locale-sensitive string comparisons and the class BreakIterator which can be used to find for example word and sentence boundaries in a text. Most
of the tasks performed by these classes seem to be trivial. However, for other languages
than English they can be quit complicated. There are for example languages like Hebrew
which have different writing directions for text (right to left) and numbers or foreign words
(left to right) which can be arbitrary nested. Other languages like for example Thai need
special, dictionary based word iterators because there exist no word separators in the text.
Collation is also not straightforward, because every language has its own collation rules for
accented and other special characters. And finally, as a consequence of the UNICODE standard, letters can have several representations (single character code entries, composition of
several character code entries, part of a character code entry representing a ligature). Therefore even finding single letters in a character stream may be a nontrivial task. Together with
the character class java.lang.Character the classes of the java.text package serve as a base
library for all other classes dealing with text in Java.
With java.util.regex a powerful new regular expression package has been added in Java
1.4. It allows for Perl style regular expressions [Friedl] but also supports the full syntax of
UNICODE regular expressions [UnReEx]. See section 5.4.6 for the usage of regular expressions in LanguageExplorer.
JTextComponent
Model
Controller
Document
EditorKit
TextUI
View
View
Figure 3.2: The high level view of a Swing text component.
Finally, the package javax.swing.text and its sub-packages contain all the classes which
are responsible for the visual representation of textual data on the screen and the interaction
of the user with this data. Many parts of LanguageAnalyzer and LanguageExplorer have
been derived from these classes.
The high level text components like for example JTextPane for styled text which are all
located in the javax.swing package and are all derived from JTextComponent, are in fact just
container classes for the different model, view and controller related classes located in the
javax.swing.text package. The model consists of one or more tree like structures of eleDissertation der Fak. f. Informations- u. Kognitionswissenschaften, Univ. Tübingen - 2004
3.1
·
The Java programming language
47
java.text
java.util.regex
Bidi
BreakIterator
<< abstract >>
Collator
StringCharacterIterator
<< interface >>
CharacterIterator
RuleBasedCollator
uses
<< interface >>
AttributedCharacterIterator
Pattern
Matcher
AttributedString
javax.swing
JComponent
JTextField
JPasswordField
JTextArea
JEditorPane
JTextPane
BasicEditorPaneUI
BasicTextPaneUI
javax.swing.plaf
TextUI
uses
BasicTextUI
BasicTextAreaUI
javax.swing
<< interface >>
Action
AbstractAction
javax.swing.text
DefaultCaret
TextAction
StyledEditorKit.StyledTextAction
<< interface >>
Caret
EditorKit
JTextComponent
has Root View
<< interface >>
Highlighter
creates
View
<< interface >>
ViewFactory
*
children
DefaultHighlighter
PlainView
LabelView
ComponentView
DefaultStyledDocument
<< interface >>
StyledDocument
<< interface >>
Document
ParagraphView
CompositeView
ZoneView
BoxView
WrappedPlainView
AbstractDocument
parent
1..*
*
<< interface >>
AbstractDocument.Content
<< interface >>
Style
<< interface >>
MutableAttributeSet
StyleContext.NamedStyle
1..*
*
<< interface >>
Position
<< interface >>
Element
<< interface >>
Attributeset
0..1
resolvingParent
*
StyledEditorKit
children
rtf
RTFEditorKit
AbstractDocument.AbstractElement
StyleContext
AbstractDocument.BranchElement
DefaultEditorKit
0..1
html
AbstractDocument.LeafElement
HTMLEditorKit
Figure 3.3: An overview of the text related classes and their dependencies in the standard Java APIs.
The shaded classes correspond to the parts with the same names in figure 3.2 which shows a high
level overview of a Swing text component.
Dissertation der Fak. f. Informations- u. Kognitionswissenschaften, Univ. Tübingen - 2004
48
Chapter 3
·
The software architecture of LanguageExplorer and LanguageAnalyzer
ments of type Element over a character data content. The controller part is a combination
of the class TextUI which associates every element of the model with a corresponding view
object and the class EditorKit which is responsible for building and changing the model
and controlling the user interaction. Finally, the view part is a hierarchy of View objects created by the controller which render the different element structures of the model. In order
to support styled text, every element of the model can have associated attributes which in
turn may resolve through global styles.
JAXP - The Java API for XML processing
Since version 1.4, Java comes with a new standard library for XML processing. This library
which is commonly known under its abbreviation JAXP, is in fact just an abstraction layer
for some common, standard XML processing libraries. Different implementations of these
libraries can be easily plugged into JAXP, without the need to rewrite any code which uses
just the abstract functionality provided by JAXP and the standard XML libraries. Currently,
JAXP supports the two XML parser standards SAX and DOM and XSLT, the ’Extensible
Stylesheet Language Transformations’.
org.xml.sax
org.w3c.dom
<< interface >>
ErrorHandler
<< interface >>
Comment
ext
helpers
<< interface >>
DTDHandler
DefaultHandler
<< interface >>
ContentHandler
<< interface >>
XMLReader
<< interface >>
DeclHandler
<< interface >>
Node
<< interface >>
LexicalHandler
javax.xml.parsers
SaxParserFactory
creates
SaxParser
+ parse ():
DocumentBuilderFactory
<< interface >>
Text
<< interface >>
Element
<< interface >>
Entity
<< interface >>
Attr
<< interface >>
EntityReference
<< interface >>
Document
<< interface >>
ProcessingInstruction
creates
creates
DocumentBuilder
creates
+ parse ():
<< interface >>
DOMImplementation
<< interface >>
DocumentType
creates
Figure 3.4: The parser part of the Java API for XML processing together with the SAX and DOM
interfaces.
SAX [Broe] is the abbreviation for Simple API for XML. It was developed in a public
review process on the xml-dev mailing list at http://xml.org3 and was one of the first
libraries available for XML parsing. Initially a Java only library, there now exist language
bindings for many other languages like C, C++, Perl, Python and others. Meanwhile SAX
is widely adopted and a de facto standard for XML parsing.
SAX is an event-driven, serial-access mechanism that does element-by-element processing of the XML file. It therefore does not need to read the whole file into memory before
processing it which may be a considerable performance advantage for big XML files or files
read from a network connection. It should be noticed, that SAX itself provides just interfaces for the most part and there exist many different parser implementations which adhere
to these interfaces. SAX however offers unified methods for setting and querying features
and properties like for example if the parser should be validating or namespace aware on
the underlying parser implementations.
Users who wish to use SAX have to implement the different event handler interfaces like
for example ContentHandler or DTDHandler (see figure 3.4), create an XMLReader instance, which
3 Today
the xml-dev mailing list is hosted by OASIS [OASIS]
Dissertation der Fak. f. Informations- u. Kognitionswissenschaften, Univ. Tübingen - 2004
3.2
·
The LanguageExplorer text classes
is the interface for the SAX parser and call the pares() method on the XMLReader object with
the implemented event handler as argument. The parser will than call the user defined callback methods every time when a corresponding part in the XML source was found. JAXP,
on its part, defines a factory class which facilitate the creation and configuration of different
SAX parsers.
DOM, the Document Object Model library, is the second parser interface offered by
JAXP. The DOM API creates a complete in-memory, tree representation of an XML file or
allows the user to build up a such a model from scratch. Once the DOM is created, it can
be navigated, altered and finally saved back as XML file. In contrast to SAX, the DOM API
always works on a complete copy of an XML file. This may be convenient for many applications, however the increased startup time and memory consumption should always be
considered. Notice that also not mandatory, many DOM implementations use internally a
SAX parser to create the in-memory tree representation of an XML file.
The Document Object Model is a platform- and language-neutral interface published by
the W3C consortium as a technical recommendation [DOM]. Just like SAX specifies callback methods for every part of an XML file, DOM specifies interfaces for every XML entity.
As can be seen in figure 3.4, these interfaces are all derived from Node. A DOM is a tree build
up from various Node elements.
The JAXP API again acts just like a wrapper and factory for the different DOM implementations which are available. It also offers the programmer a unified interface for setting
and querying various DOM properties and frees her from the burden of bothering with the
peculiarities of every single implementation. It should be noticed however, that there exist
meanwhile three DOM levels and for example serialization of a DOM to disc is standardized only in DOM level 3 but not before. Therefore it is often necessary in practice to cast
the DOM objects created by the standard factory classes to their real type in order to take
advantage of functionalities provided by the implementors in a non-standard conformant
way.
3.2
The LanguageExplorer text classes
As this work is about “structuring, analyzing and presenting” text, the central component
of the two applications LanguageAnalyzer and LanguageExplorer is of course the text component. Building an the foundations laid by the Swing text package, we created our own
text component XMLEditorPane which is derived from JEditorPane. It uses an instance of the
class XMLDocument which is derived from DefaultStyledDocument and custom elements as document model. Finally, an editor kit of type XMLEditorKit which extends StyledEditorKit is responsible for loading and saving documents for LanguageAnalyzer and LanguageExplorer.
Several new view classes can be used together with the existing ones to render the elements
of the document model hierarchy. An overview of the basic LanguageAnalyzer/LanguageExplorer text classes is given in figure 3.5.
As implied by the different class names, the created text classes are in fact classes which
can handle arbitrary content stored in XML format. However we did not implement a
generic XML editor mainly for two reasons. First of all, there already exist quite a number
of different high quality XML editors. The second and more important reason however is
the fact that we did not pretend to handle every single XML document in a useful way. We
think that XML is just a structured text format with little to no semantics at all. XML only
defines the structure of data, but not its meaning. It makes no sense to try to handle for
example a MathML [MathML] file and a MusicXML [MusicXML] file with the same editor,
although they are both XML formats. It would be the same as if we would use the same
text editor for programming and writing just because our programs and our articles are
both stored as ASCII text. Although this would be possible, it is a lot more comfortable
Dissertation der Fak. f. Informations- u. Kognitionswissenschaften, Univ. Tübingen - 2004
49
50
Chapter 3
·
The software architecture of LanguageExplorer and LanguageAnalyzer
JEditorPane
BasicEditorPaneUI
StyledEditorKit
DefaultHandler
KWICTextArea
XMLEditorPane
XMLEditorPaneUI
XMLEditorKit
XMLReader
DefaultStyledDocument
XMLDocument
XMLWriter
create, read, write
org.w3c.dom.Document
XMLDocument.DefaultTagAction
XMLDocument.BodyTagAction
XMLDocument.TextTagAction
<< interface >>
XMLDocument.SaveAction
*
<< interface >>
ViewFactory
XMLViewFactory
<< interface >>
XMLDocument.LoadAction
*
XMLDocument.IgnoreTagAction
XML
*
XML.Tag
*
View
ImageView
LineView
PageView
XMLFlavour
PagesView
Figure 3.5: An overview of the basic LanguageAnalyzer/LanguageExplorer text classes and their
relation to the standard Java APIs. The shaded classes correspond to the standard Java API classes
with the same names in figure 3.3 and 3.4.
to use a special desktop publishing (DTP) system for writing articles and an integrated
development environment (IDE) for programming purposes.
It is much the same thing with our XTE format defined in section 2.4. A generic XML
editor could be used to have a look at such a file or even to make some small changes in it.
But the meaning of the different linking attributes for example, would be unclear to such an
editor. While this would just complicate the navigation in such a document in the common
case, it could lead to a severe corruption of the internal semantics of the file because the
XML document type definitions and schemas (see sections 2.1 and 2.1.2) can only describe
the structure of the document, not the semantics.
Another aspect is the question of the aesthetics of the presentation. While LanguageAnalyzer is more or less a tool for the structuring and linking of different documents where the
aesthetics of the representation is not the most important thing compared to performance,
LanguageExplorer is used as a viewer and reader for true works of art and as such should
be able to appropriately display them. Therefore the application of techniques like text
anti-aliasing as well as the usage of different, high quality fonts which support hinting and
kerning should be possible to allow a reading experience comparable to that of a printed
book.
3.2.1 The document class
The document model class XMLDocument is the representation of a part of an XTE (refer to section 2.4 for a description of XTE) encoded text in the memory for the purpose of displaying
and editing it. As opposed to the standard DefaultStyledDocument document class, XMLDocument supports an arbitrary number of so called root elements, each of which corresponds to
one of the XTE encodings defined in the XTE file. In fact, every text element nested inside
a group element in the XTE file is represented by a single XMLDocument instance whereas each
of the body elements of a text element in the XTE file is represented by a root element in the
XMLDocument object. Figure 3.6 depicts this relation graphically.
Dissertation der Fak. f. Informations- u. Kognitionswissenschaften, Univ. Tübingen - 2004
3.2
The LanguageExplorer text classes
·
51
XTE elements
XTE
Text classes
Contains
text
Corresponds
Aggregates
group
Additional elements
text
content
Content
text
body
body
pages
div1
page
page
p
p
line
line
s
s
XML element structure
RunElement RunElement
RunElement
BlockElement
BlockElement
BlockElement
BlockElement
BlockElement
BlockElement
root Element
XMLDocument
RunElement
UML class diagram
root Element
XMLDocument
Figure 3.6: The in-memory representation of an XTE encoded text with the help of the various model
related text classes of LanguageAnalyzer and LanguageExplorer. Refer to figure 2.2 for a more detailed picture of the XTE encoding.
As can be seen in figure 3.6, XTE elements will be usually mapped to Element instances in
the XMLDocument. However this is no strict one to one mapping, as the exact relation between
an XTE element and an Element object is determined by the LoadAction object associated with
the corresponding XTE element type (i.e. the XML tag). This association is resolved through
an object of type XML (see figure 3.5). The exact procedure of how this resolving takes place
will be explained in more depth in section 3.2.2. For now it is enough to assume a on to
one relation between the XTE elements and the Element objects in an XMLDocument where the
attributes of the XTE element are stored in the AttributeSet of the Element object. One exception to this rule, which is also visible in figure 3.6, should be mentioned here however: the
content elements of an XTE text element are collapsed and their character data is stored as
the content of the XMLDocument. This is done by a TextTagAction object, which is the LoadAction
usually associated with an XTE content element. The text stored as content in the XMLDocument will be referenced by the elements created in the XMLDocument by translating the start
and end attributes of their corresponding XTE element to the new content representation.
Figure 3.7 shows the XMLDocument class in some more detail along with the inner classes it
defines. The different classes derived from LoadAction as well as the ImageReader class have
to be defined as inner classes, because they are used to built up a new document model and
Dissertation der Fak. f. Informations- u. Kognitionswissenschaften, Univ. Tübingen - 2004
52
Chapter 3
·
The software architecture of LanguageExplorer and LanguageAnalyzer
DefaultStyledDocument
XMLDocument
+ getDefaultRootelement ():
+ setDefaultRootelement ():
+ getRootElements ():
+ getRootElement ():
+ deleteRootElements ():
+ deleteRootElement ():
+ createNewRootElement ():
+ createDefaultRootElement ():
<< interface >>
SaveAction
(from XMLDocument )
DefaultTagAction
(from XMLDocument )
+ makeNode ():
ImageReader
(from XMLDocument )
BodyTagAction
(from XMLDocument )
+ readImages ():
IgnoreTagAction
(from XMLDocument )
<< interface >>
LoadAction
(from XMLDocument )
TextTagAction
(from XMLDocument )
+ start ():
+ end ():
BlockElement
(from XMLDocument )
RunElement
(from XMLDocument )
BranchElement
(from AbstractDocument )
LeafElement
(from AbstractDocument )
AddedNewRootEvent
(from XMLDocument )
ReloadRootViewEvent
(from XMLDocument )
DefaultDocumentEvent
(from AbstractDocument )
Figure 3.7: The UML diagram of the XMLDocument class. Again, shaded classes denote classes from the
standard Java text packages (see figure 3.3).
therefore they need access to protected document methods.
Several methods which deal with the creation, maintenance and removal of the different
root elements, each of which represents a single XTE encoding, have been added to the
document class. There is always a default root element or encoding which is used by the
TextUI class (the controller part of a text component) as the starting point for building up
the view hierarchy. The two event classes AddNewRootEvent and ReloadRootViewEvent have
been added to signal interested listeners that new root elements (i.e. encodings) have been
added to the document or that the default root element has been changed. One of these
listeners is for example the associated TextUI object, which rebuilds the view hierarchy such
that it always corresponds to the default root element.
Notice that document models may be shared between different text components. The
KWIC-Index window of LanguageExplorer (see figure 5.2 on page 119) for example is a
text component of type KwicTextArea (see figure 3.5) which shares the document model with
the corresponding text component for which the KWIC-Index has been created. The KWICIndex on the other hand is just a custom encoding in the text model and as such an ordinary
element hierarchy with an own root element which is created on the fly after a corresponding user request.
3.2.2
The editor kit
The main duty of the editor kit class XMLEditorKit is reading XTE files and transforming them
into the internal representation on the one side and storing documents from the internal
representation as XTE files on the other side. To achieve this functionality, it uses many
of the XML related classes described in section 3.1.1. However not only XTE files can be
loaded. As a bootstrapping process, there exists the possibility to load other formats as well
and translate them to XTE.
If the user requests the loading of a a new file, this request is routed to the corresponding
XMLEditorKit method. The editor kit has to decide how to load the file based on the file
format. All the different input formats supported by LanguageAnalyzer like for example
pure text, image or XTE files are transformed into a uniform internal representation. If the
Dissertation der Fak. f. Informations- u. Kognitionswissenschaften, Univ. Tübingen - 2004
3.2
·
The LanguageExplorer text classes
53
loaded file is not already XTE encoded, the editor kit creates a default document with a
default element structure to allow basic display, navigation and editing of the content.
After the user has finished the editing process, the document is stored as an XTE formatted XML file. Currently LanguageAnalyzer supports pure text, various graphic formats like
JPEG, PNG and GIF and XTE encoded XML files as input formats and XTE encoded XML
files as output format, while LanguageExplorer handles only XTE files. It is easy however to
add new, unsupported input and output formats to LanguageAnalyzer, by using the plugin
mechanism described in section 3.6. In fact, these plugins just have to build an appropriate
document model for the desired input formats or serialize the internal document model to
the desired output format.
Reading other XML formats is especially easy because the loading of XTE documents
is already designed to be highly customizable. This is necessary, because XTE is an open
encoding which is intended just as a starting point for users who wish or need to define
their own encodings (see 2.4). It is therefore necessary to give these users a possibility to
influence the way how their proprietary encodings will be loaded, transformed into the
internal representation and and finally displayed on the screen.
This mapping between XTE elements and XMLDocument elements is handled by the XML
class and its descendant XMLFlavour which are shown in figure 3.8. The XML class maps
document type definitions (DTDs) to XMLFlavour objects. For every DTD, it instantiates an
XMLFlavour object, associates it with the name of the DTD and stores in a static map from
where it can be queried by the user.
XMLEditorKit
MediaReader
(from XMLDocument )
ImageReader
ImageView
+ getContentType ():
+ read ():
View
create
+ getMinimumSpan ():
+ getMaximumSpan ():
+ getPreferredSpan ():
+ paint ():
+ modelToView ():
+ viewToModel ():
LineView
PageView
+ read ():
+ write ():
+ getViewFactory ():
+ createDefaultDocument ():
+ getContentType ():
XMLViewFactory
+ create ():
XMLDocument
XMLWriter
XMLReader
+ createXMLRepresentation ():
+ makeDocumentNode ():
+ makeNode ():
+ startDocument ():
+ endDocument ():
+ startDTD ():
+ endDTD ():
+ startElement ():
+ endElement ():
+ characters ():
*
PagesView
create, read, write
XML
*
<< interface >>
SaveAction
(from XMLDocument )
+ makeNode ():
DefaultTagAction
(from XMLDocument )
*
<< interface >>
LoadAction
(from XMLDocument )
+ startElement ():
+ endElement ():
BodyTagAction
(from XMLDocument )
+ registerTagSet ():
+ getTagSet ():
+ addTag ():
+ getLoadActions ():
+ getSaveActions ():
+ getViews ():
Tag
(from XML)
* + getAttributes ():
+ getName ():
XMLFlavour
TextTagAction
(from XMLDocument )
IgnoreTagAction
(from XMLDocument )
Figure 3.8: The class XMLEditorKit and the various helper classes used by XMLEditorKit to load, store
and display an XTE file.
The XMLFlavour class maps the tags of the DTD to special action and view classes which
are responsible for loading, saving and displaying the corresponding elements. For this
purpose it uses simple, textual configuration files with the base name of the DTD which
conform to the Java property file format. This file format contains key/value pairs separated by an ’=’ character. In our case the key represents the tag name while the value part
Dissertation der Fak. f. Informations- u. Kognitionswissenschaften, Univ. Tübingen - 2004
54
Chapter 3
·
The software architecture of LanguageExplorer and LanguageAnalyzer
contains the fully qualified class name of the corresponding action or view class. Once
an XMLFlavour object has read its configuration files, it searches the specified classes on the
class path, loads them dynamically into the running JVM and stores them in a local map
from where they can be queried by using the corresponding tag name. These settings from
the configuration file can be overridden by the special loadClass, saveClass and viewClass
attributes on every element in the XTE file.
The final process of loading an XTE file into LanguageAnalyzer or LanguageExplorer is
as follows: The editor kit creates an object of type XMLReader which is a SAX event handler.
As soon as the document type of the file and the types of the different XTE encodings in
the file are available during the parsing of the DTD, the corresponding XMLFlavour objects
are created and associated with the encoding names. Finally, at the time when the first
ordinary element is reported by the SAX parser to the XMLReader, it can query the XML object
with the tag name of the element for the proper load action and execute it with the current
element as argument. This load action will than initiate the creation of the appropriate
model representation in the XMLDocument object.
Saving goes exactly the other way round with the only difference that the DOM API is
used instead of the SAX API used in the loading case. Depending on the chosen output
format, the editor kit queries the appropriate save action objects for every element. The
duty of these save action objects is to create the necessary nodes in the DOM tree for the
XMLDocument element they are responsible for. Once the whole document is translated into
the DOM representation, the DOM can be written to a XML-file by using its builtin write
method.
3.2.3 The view classes
One of the responsibilities of the editor kit not discussed in the previous section is to create and provide a so called view factory. The view factory is responsible for creating the
view objects which render the different elements of the document model on the screen. For
performance reasons, the view classes are lightweight objects not derived from any of the
standard Swing components shown in figure 3.1. They just render a part of the model to
the appropriate part of the text component.
Usually every element is represented by a view object, however there is again no strict
one to one mapping between them. A view object which represents a branch element may
for example decide not to act just as a container for the view objects of its child elements
but instead to render the child elements directly. In fact, every view object can be thought
of as kind of TEX box [Kn91a] and boxes representing child elements are nested inside the
box of their parent element. Every box lays out and renders its child boxes depending on
their layout attributes thus finally representing the whole document model.
The second task of the view classes beside participating in the layout process and rendering the model is to translate between the view coordinate space and model positions and
vice versa. This is a crucial and no trivial task in order to enable comfortable navigation and
editing of the represented documents.
Also the Swing library already comes with quite a few view classes, we still had to
develop new ones to cover our special needs. We developed for example the ImageView
class which represents a bit-mapped version of text (facsimile) and allows to display child
elements as arbitrary, possibly nested regions which can easily be navigated with the usual
cursor keys (see the left part of figure 3.9). Refer to section 2.4.4 for a description of how
facsimile texts are encoded in XTE.
Another example of custom view classes are the LineView and PageView classes which can
be used to display a text line- and page-wise, much the same way as in a printed edition.
The lines and pages can be augmented with additional meta-information like for example
page and line numbers which do not belong to the text model (see right side of figure 3.9).
Dissertation der Fak. f. Informations- u. Kognitionswissenschaften, Univ. Tübingen - 2004
3.3
·
The LanguageExplorer file formats
Figure 3.9: The left picture shows how the model of a facsimile text (in this case words and lines) is
rendered as gray blocks onto the image of the text by the ImageView class. The cursor is displayed as
a blue rectangle at the current model position. The right side shows a picture produced by PageView
class view which internally uses the LineView objects. Notice the line and page numbers which do
not belong to the text model but are added as a kind of decoration by the view classes.
Other view classes may be defined at any time by the user. Because XMLViewFactory which
is the view factory used by the XMLEditorKit also uses the XML class for resolving the appropriate view classes for every element, it is straightforward to add the new classes to the
system. This can be done by editing the corresponding configuration files or by inserting
the names of the desired view classes as attributes directly into the XTE documents.
3.3
The LanguageExplorer file formats
LanguageExplorer and LanguageAnalyzer use two sort of files. The first, and most important one, is the leb file format which is used to store XTE documents along with related data
files. The second one is the file format used by LanguageExplorer and LanguageAnalyzer
to store user preferences between different executions of the program. The formats of these
two files will be defined in the next sections.
3.3.1
The LanguageExplorer book format
As described in full detail in section 2.4, LanguageExplorer and LanguageAnalyzer documents are stored as XML files using the XTE encoding scheme. Although this scheme is
quite flexible and extensible, there exist situations where even more functionality is needed.
This is especially the case if third party content like for example data from dictionaries and
encyclopedias should be bundled with an XTE document, if facsimile pictures and sound
files need to be stored with the document or if the XTE document should be encrypted.
For this purpose an additional container format has been defined which is based on Java
Dissertation der Fak. f. Informations- u. Kognitionswissenschaften, Univ. Tübingen - 2004
55
56
Chapter 3
·
The software architecture of LanguageExplorer and LanguageAnalyzer
Name
Name
Book-ID
Encrypted
Encryption-Provider
Encryption-Algorithm
Titlen
Authorn
Languagen
Dictionary
Dictionaryn
Encyclopedia
Encyclopedian
Description
Main LanguageExplorer attributes.
The name of the XTE encoded XML file.
A string which contains no white space and which should be
unique across all the different leb files. Used as key into the
personal preferences file where user settings like for example
the font family and size can be stored on a per book basis (see
section 3.3.3).
Encryption attributes.
Indicates whether the XTE XML file is encrypted (yes | no).
If the XTE XML file is encrypted, this attribute may be used to
specify the provider of the encryption engine used to encrypt
this file. See section 3.3.2 for more information.
If the XTE XML file is encrypted, this attribute may be used to
specify the encryption algorithm used for encryption.
Bibliographic attributes.
The title of the nth book in the XTE file.
The author of the nth book in the XTE file.
The ISO-639 [ISO639] two letter language code of the language
of the nth book in the XTE file.
Extension attributes.
Indicates whether the leb file contains dictionaries for the
books encoded in the XTE file (yes | no | partial).
The name of the nth dictionary file. The name should begin
with the hyphen separated ISO-639 two letter language codes
of the languages provided by the dictionary.
Indicates whether the leb file contains encyclopedias for the
books encoded in the XTE file (yes | no | partial).
The name of the nth encyclopedia file. The name should begin
with the ISO-639 two letter language code of the encyclopedia
language.
Table 3.1: Custom attributes defined for the leb file format. Inside the manifest file, keys and values
are separated by a combination of a colon character and a space ’: ’. Keys have to begin at the first
column of a line. Values can span several lines. Continuation lines are signaled by a space character
at the beginning of a line.
archive (jar) files. The jar file format itself [CaWaHu] is based on the popular zip file format
which uses a combination of the Lempel-Ziv algorithm [LeZi] and Huffman coding [Huff]
to compress files. The innovation of the jar format is to define and add meta-information
to the archive in a well defined way. This information can be used for example to cryptographically sign the archive or to improve the processing of the file in certain, common
cases like for example when loading classes from it.
All the meta-information available for a jar file is located inside the archive in a special
subdirectory called META-INF. The most prominent file in this directory is the so called manifest file MANIFEST.MF that can be used to specify different, arbitrary attributes as key/value
pairs. There exist several standard attributes like for example Manifest-Version which gives
the version of the manifest file format and Main-Class which can be used to specify the main
class file if the archive stores Java class files. It is however also possible to define custom
attributes which can consist of arbitrary key/value pairs. Together with the various classes
Dissertation der Fak. f. Informations- u. Kognitionswissenschaften, Univ. Tübingen - 2004
3.3
·
The LanguageExplorer file formats
offered by the standard Java API in the java.util.jar package which can be used to easily
create and access jar files, the jar file format can be handled quite comfortable within own
applications.
For the jar file format used here, the standard .jar file suffix has been replaced by the
suffix .leb which stands for “LanguageExplorer book” in order to simplify the identification
of the documents in the filesystem. Moreover, new LanguageExplorer specific attributes
have been defined which can be divided in different groups as shown in table 3.3.1.
The main attributes are used to identify the XTE document. The bibliographic attributes
are used to get a quick overview of the contents of the XTE file without the need to parse
the XTE file itself. They are used for example in the accessory component of the LanguageExplorer file open dialog (see figure 5.3 on page 121) but they can also be useful in the case
where the content of the XTE file is encrypted. The extension attributes can be used to
declare the names of certain extension files like for example dictionaries or encyclopedias
which are packed together with the XTE file in the archive.
3.3.2
Encryption of LanguageExplorer books
Works of literary are protected by copyright for a certain amount of time. The details of
how the copyright rules apply to different works in different countries should not be the
subject of this work, however the tools presented here are designed in a way to allow the
encryption of the content in question. This way it becomes possible to license and distribute
even copyright protected material.
But encryption could also be desirable to protect the encoding, not the content, which
may be already freely available. Consider for example an edition which combines a novel
which is sentence-wise aligned with several different versions in other languages and possibly augmented with additional historical informations and dictionaries. It may very well
be worth while to protect such an editorial work independent of the underlying content.
Usually only the XTE file in a leb archive will be encrypted, but is also possible to encrypt the extension files like dictionaries or encyclopedias. For the encryption of the files
the Triple-DES-EDE algorithm is used. Triple-DES-EDE is the usual DES [DES] algorithm,
applied three times in turn to encrypt, decrypt and again encrypt the data source in question with three different keys. DES is a symmetric block cipher cryptosystem which means
that it uses the same key for encryption and decryption. Standard DES uses 64-bit keys,
Triple-DES uses three 64-bit keys.
Our system currently varies only one of the three 64-bit Triple-DES keys on a per user
and book basis. That is, for every combination of a user and book a new 64-bit key is
generated and this key is used together with the two other, currently hard wired 64-bit keys
to encrypt the content of the book with the Triple-DES algorithm. In the future however, the
remaining two 64-bit key could come for example from a license-server or from a license
file.
To safe the user from remembering a randomized 64-bit key value for every encrypted
book a so called password based encryption algorithm (PBE) [PKCS5] is applied to encrypt
the key with a user supplied, secret password. PBE works by generating a message digest
from the user supplied password with a one-way hash function and then uses the created
hash value as a key for a symmetric block cipher to encrypt the requested content. Our system currently uses PBE with SHA1 [SHA] as hash function and triple DES as block cipher,
however the applied algorithm can be configured with the Encryption-Algorithm attribute
(see table 3.3.1) in the leb file.
In order to decrypt an encrypted LanguageExplorer book, the user has to supply the
encrypted key and his secret password. The password will be used to decrypt the encrypted
key which is a part of the 192-bit Triple-DES key and finally the Triple-DES algorithm will
be used to decrypt the encrypted XTE file. Notice that the encrypted key has to be entered
Dissertation der Fak. f. Informations- u. Kognitionswissenschaften, Univ. Tübingen - 2004
57
58
Chapter 3
·
The software architecture of LanguageExplorer and LanguageAnalyzer
Password
PBEwithSHA1andTripleDES
Key
64−bit key1 64−bit key2 64−bit key3
plain
XTE
file
Triple−DES−EDE
encryption
PBEwithSHA1andTripleDES
64−bit key1 64−bit key2 64−bit key3
encr.
XTE
file
Triple−DES−EDE
user data
decryption
plain
XTE
file
Figure 3.10: Encryption and decryption of leb books. The user gets only the data which is marked
as user data. Notice that decryption happens fully inside the LanguageExplorer application, so the
plain content will be only available within the application. Also, because the user has just a part of
the triple DES key, he can not gain access to the encrypted content by manually decrypting it.
only one time into the system. Afterwards it will be persistently stored and associated with
the corresponding LanguageExplorer book in the users preferences file (see section 3.3.3). If
the same, encrypted book will be loaded the next time, the public key will be available from
the users preference file and only the password will have to be supplied (see section 5.4.1).
Notice that it is also possible to store the password in the users preference file, however
this is not absolutely safe, because although the password will be stored in an encrypted
form, the system password used to encrypt and decrypt the users password is currently
hard-wired into the application.
Figure 3.10 shows how the encryption and decryption of LanguageExplorer books takes
place. In a Web-Shop scenario, a user which orders a copyright protected book would
be queried for a password. A new 64-bit key would be generated and used to encrypt
the desired book using the Triple-DES algorithm as described above. Then the 64-bit key
would be processed with a PBE algorithm and the user supplied password resulting in an
encrypted version of the key. The user would receive the encrypted book along with the
encrypted key. If he likes to read the book, he would have to provide the encrypted key
which he received and his secret password in order to decrypt the encrypted key first and
then the whole book with the help of the now decrypted key.
For the implementation of the cryptographic features described so far we used the Java
Cryptographic Architecture (JCA) and the Java Cryptographic Extension (JCE) [GaSo], both
of them standard Java APIs which define an abstract interface for cryptographic algorithms
and providers of cryptographic services. Libraries of different providers can be easily
plugged into the architecture and their algorithms can used in a consistent way.
3.3.3 LanguageExplorer configuration files
Complex applications with many configuration options need a possibility to persistently
store these options across different program executions to free the user from the burden
to adjust them again every time he starts the application. For this purpose, LanguageExplorer supports personal configuration files which are stored in the home directory of
every user. The format of this file which is named .LanguageExplorer for LanguageExplorer and .LanguageAnalyzer for LanguageAnalyzer is a simple text format where each line
corresponds to a user preference and each user preference is composed of a name and a
Dissertation der Fak. f. Informations- u. Kognitionswissenschaften, Univ. Tübingen - 2004
3.4
·
The design of LanguageAnalyzer
value which are separated by an equal sign ’=’.
Currently many characteristics of the GUI like for example the window geometry are
automatically stored in the preference file. But the preference file is also used to store certain
attributes like the font family and font size on a per book basis. In the font selection dialog
for example (see figure 5.11 on page 133), the user can select if he wants to save the settings
in the preference file for the current book, if he wants to save them as the default settings
which are applied to every book for which no custom settings are available or to keep them
just local in the running application.
As mentioned before, the preference file is also used to store the keys of encrypted books
after they have been decrypted for the first time. It is also possible to store the users passwords there, however, even though they are encrypted before they are written to the preference file, this is not very save, because the password used for encryption is hard-coded
into the application.
The actual preference implementation is sufficient for the current needs of LanguageExplorer and LanguageAnalyzer. However a more powerful approach for the storage of
preferences may be appropriate in the future. This could use for example the preferences
package java.util.prefs which has been newly introduced in Java 1.4. It stores the preferences as XML files instead of plain text, it separates user from system properties and it
organizes them in a tree like structure. This could be an advantage over the actual flat
storage model especially for the different plugins and extensions that need to store own
configuration data.
3.4
The design of LanguageAnalyzer
LanguageAnalyzer, the editor part of the system described in this work, is intended as an
application which can be used to create and edit the various encodings of a text and to
establish links between the elements of one encoding and elements of other encodings in
the same or even in another document.
The main considerations taken into account during the design process have been to
make the above mentioned tasks as comfortable as possible for the user to achieve, but
also to keep the application as simple as possible. This resulted in the decision to allow at
most two text documents to be worked on simultaneously. Therefore, the main window
of LanguageAnalyzer is horizontally split into two main parts. Each of these two parts is
vertically split into a text window which displays the actual content of a document and a
window which shows the different encodings of the content. Notice that the text window
must not necessarily contain an electronically encoded text. It may also be the facsimile
picture of a text or the sound file of a text displayed as a wave graph.
The different encodings are displayed as tree views where every encoding is represented
by its own tree and every tree is located in its own tab. As indicated by the dashed lines in
figure 3.11, the size of the two main windows as well as the size of a text window and the
corresponding encoding window may be adjusted relatively to each other.
Different tolls will have the opportunity to plug into the menu- and the toolbar. These
tools will usually operate on the content and/or the encodings of one or of both documents
and as a result will produce new encodings or change the actual encodings. Depending on
the available input plugins, different media formats like text, graphics and sound files may
be loaded. The document windows can be saved and loaded either together or separately,
depending on the users requirements. More usage instructions on LanguageAnalyzer can
be found in chapter 6.
The text windows in figure 3.11 are implemented with the help of the text classes described in section 3.2. The tree views in the encoding windows in figure 3.11 are implemented by using a customized version of the standard JTree class and placed into a tab of
Dissertation der Fak. f. Informations- u. Kognitionswissenschaften, Univ. Tübingen - 2004
59
60
Chapter 3
·
The software architecture of LanguageExplorer and LanguageAnalyzer
Menubar
Toolbar
Tree view of a
text encoding
Text window
Tree view of a
text encoding
Text window
Statusbar
Figure 3.11: A schematic view of the main application window of LanguageAnalyzer. Dashed lines
indicate draggable frame borders in the final realization.
type JTabbedPane. Menu-, tool- and status-bars are wrapped in a container of type ScrollabelBar (see section 4.4) to prevent them from cluttering the GUI if they grow because they
are unexpectedly extended by many client plugins. The encoding window and the corresponding text window are coupled by listeners so each of the windows will be notified
and updated if the encoding structure on the one side or the content on the other side will
change.
Notice that it is very well possible to create editions with more than two parallel document versions by using tools and plugins which are supplied with LanguageAnalyzer. It
was just a design decision too restrict the number of parallel text versions which are visible
in the GUI to two.
3.5
The design of LanguageExplorer
LanguageExplorer is the viewer and browser component of the system described in this
work. Because usually by far more people will use LanguageExplorer to work with an
edition created with LanguageAnalyzer than people have been involved in creating it, one
of the main requirements during the design process have been to achieve a maximum of
user friendliness.
Besides the menu- and toolbar, the whole area of the application window is occupied
by the different text windows. Notice that LanguageExplorer supports an arbitrary number of parallel document versions which is only restricted by the physical extent of the
screen. Initially the available space is equally distributed between the different text windows. However, as indicated by the dashed lines in figure 3.12, the text windows can be
arbitrary resized with respect to each other.
Because many of the available actions and tools need a target document on which they
will operate (e.g. searching), each of the text windows is equipped with a local toolbar. The
encoding chooser, which can be used to choose the default encoding responsible for the
display of the document content, is a prominent entry in this local toolbar. Other tools are
free to plugin in the local as well as in the main toolbar. The navigation bar which is located
in the lower part of each text area, offers the possibility of a structural navigation in the
Dissertation der Fak. f. Informations- u. Kognitionswissenschaften, Univ. Tübingen - 2004
3.5
·
The design of LanguageExplorer
61
Menubar
Toolbar
Local Toolbar
Local Toolbar
Local Toolbar
Text window
Text window
Text window
Navigationbar
Navigationbar
Navigationbar
Statusbar
Figure 3.12: Layout of the main LanguageExplorer application window. The figure shows three text
windows but an arbitrary number of parallel text windows is supported.
document based on the current default encoding (i.e. the encoding which has been chosen
with the encoding chooser).
But just reading the aligned, parallel document versions is not the only job that LanguageExplorer has been designed for. Many other tools like for example dictionaries or
index generators can be build in. The data generated or found by these tools can be presented in two additional, so called extension areas, which can be opened in the upper and
the lower area of the application window (see figure 3.13). The size of both these windows
can be individually adjusted by the user and both of them can be closed with a single click
if the information presented by them is not necessary anymore.
Each of these extension windows can contain a number of different tabs which are creMenubar
Toolbar
Upper extension area
Text area
Text area
Text area
Lower extension area
Statusbar
Figure 3.13: The LanguageExplorer application window with the upper and lower extension areas.
Dissertation der Fak. f. Informations- u. Kognitionswissenschaften, Univ. Tübingen - 2004
62
Chapter 3
·
The software architecture of LanguageExplorer and LanguageAnalyzer
ated by the different tools on user request. They can be by removed separately by the user.
The upper extension area is intended for tools like dictionaries or encyclopedias, but also
for displaying annotations or other out of band data. In general it is designed to display
external, static data which is not strictly contained in the analyzed document.
The lower extension area instead is intended for data which can be generated from the
document content on the fly like a KWIC index (see section 5.4.3) or a word frequency list.
Every newly requested KWIC index for example will open a new tab in the lower extension
area. The user can choose which of the indices he wants to keep and which he wants to
remove. Closing the whole extension area effectively only hides the available tabs. They
are still accessible when the extension area will be opened once again.
3.6
The plugin concept
Our framework offers three different extension points which differ in their complexity and
satisfy different needs. This section will describe each of them in some more detail. The
common thing among all these extensions is that they have to be realized as Java classes
which implement certain interfaces. To make them available to the applications they have
to be accessible on the system classpath. This can be achieved for example by bundling
related extension classes into a jar-file and copying this jar-file into the extensions/ directory
of the LanguageAnalyzer or LanguageExplorer installation directory. The applications will
automatically load these jar-files on start-up and inspect the classes which are available
there with the help of the Java Reflection API [CaWaHu] in order to make them available.
3.6.1
Handling new XTE elements
First of all there exists the possibility to extend the system to support new element types.
This will be the most common extension requested by the user because potentially every
new element introduced in a customized XTE encoding can require special handling. In
order to support such a new element in LanguageAnalyzer and LanguageExplorer three
different classes would have to be supplied.
If the element requires a customized loading procedure, a new load and probably also
a new save class should be implemented. Doing this is simply a matter of implementing
the two public interfaces LoadAction and SaveAction which are defined inside the XMLDocument
class (see section 3.2.2). The implementation of the standard save and load classes which
are implemented as inner classes of XMLDocument can serve as a boilerplate for new classes.
Some elements also may require special handling when they will be displayed on the
screen. In such a case, customized view classes can be implemented for the corresponding
elements. The only convention that new view classes have to adhere to is that they have
to be derived from the abstract class javax.swing.View or one of its numerous child classes.
Again, the available view classes may serve as a starting point for new experiments.
Notice that the mapping of the new elements to the corresponding load, save and view
classes can be established either in the textual configuration files described in section 3.2.2
or directly in the XTE files by using the loadClass, saveClass and viewClass attributes defined
in the base XTE DTD (see listing 2.13 in section 2.4).
3.6.2
Support for new media types
Supporting new media types like for example sound files requires an additional effort compared to the handling of new elements which was described in the previous section. Of
course new media types will almost surely require new element types, but that is not
Dissertation der Fak. f. Informations- u. Kognitionswissenschaften, Univ. Tübingen - 2004
3.6
·
The plugin concept
enough. Because they are not available in an XML format initially, they have to be converted in a bootstrapping process into an XTE format. This is exactly the task performed
by a media reader object. Media readers have to extend the abstract MediaReader class, an
XMLDocument inner class (see figure 3.8 on page 53), which declares two methods:
public abstract String getContentType();
public abstract void read(XMLDocument doc, File[] files);
The read method will be called by the editor kit to load the files specified in the files argument into the document doc, if the media type of the files corresponds to the mime-type
returned by the getContentType() method of the media reader class.
ImageReader is a default media reader supplied with LanguageAnalyzer which reads
bitmap files and creates an XTE document from them. It can serve as an example for the
support of other media types like for example sound files.
3.6.3
Adding new tools
Finally it is possible to extend LanguageAnalyzer and LanguageExplorer with new functionality by adding new tools to the applications. Tools operate on the content and the
currently available encodings and possibly alter the encodings, create new encodings or
simply present the results of their computations in one of the LanguageExplorer extension
windows.
These tools, which are referred to as plugins in section 6.3.5 of the LanguageAnalyzer
tutorial, are usually accessible from the toolbars and menus of the corresponding application. In order to make this possible, they implement the Swing Action interface. They get
access to the different documents and extension windows through the MainWindow interface
which is implemented by LanguageAnalyzer as well as by LanguageExplorer. A reference
to the corresponding MainWindow object is passed to every plugin object when it gets installed
in the application at program startup.
Usually, the tools or plugins will show an options dialog when they get called which
can be used for example to specify on which logical document they should operate on, how
the created output should be named and of course for setting parameters needed for the
internal operation of the plugin.
The implementation of the numerous plugins described in section 6.3.5 which is located
in the com.languageExplorer.text.actions package can serve as a good starting point for new
tools.
Dissertation der Fak. f. Informations- u. Kognitionswissenschaften, Univ. Tübingen - 2004
63
64
Chapter 3
·
The software architecture of LanguageExplorer and LanguageAnalyzer
Dissertation der Fak. f. Informations- u. Kognitionswissenschaften, Univ. Tübingen - 2004
Chapter 4
Implementation techniques
and libraries
During the planing and creation of the framework presented in this work, a lot of thoughts
have been spent about how to properly describe and document the evolving system in a
way to make it useful and usable by others. Besides the application of established methods
of object oriented design [Meyer] and the use of well known software patterns [GHJV], the
author felt the need for a more precise description of the lower level implementation details. This is particularly useful because one of the main features of the described system is
adaptability and extensibility, both of which are impossible without a good documentation.
In order to solve this problem and to fill the gap which is still left by the high level
Unified Modeling Language (UML) diagrams [BRJ1, BRJ2] and the automatically created
API documentation, a new software documentation system has been developed which will
be introduced in the first two sections of this chapter. The application of the described
system can be seen for example in section 2.4.
The third and fourth section of this chapter describe some parts of the developed framework which are of general use and can be incorporated into arbitrary other applications as
well. The resulting libraries are also documented with the new software documentation
system.
4.1
Program documentation with ProgDOC
Though programming languages and programming styles evolve with remarkable speed
today, there is no such evolution in the field of program documentation. And although there
exist some popular approaches like Knuth’s literate programming system WEB [Kn92], and
nowadays JavaDoc [GoJoSt] or Doxygen [Hee], tools for managing software development
and documentation are not as widespread as desirable.
This section analyses a wide range of literate programming tools available during the
past two decades and introduces ProgDOC, a new software documentation system. It is
simple, language independent, and it keeps documentation and the documented software
consistent. It uses LATEX for typesetting purposes, supports syntax highlighting for various
languages, and produces output in Postscript, PDF or HTML format. ProgDOC has been
used to document the software packages described in this chapter and the XTE encoding
presented in section 2.4. A part of this section has been published in [Sim03].
Dissertation der Fak. f. Informations- u. Kognitionswissenschaften, Univ. Tübingen - 2004
66
Chapter 4
·
Implementation techniques and libraries
4.1.1 Introduction
The philosophy of ProgDOC is to be as simple as possible and to pose as less requirements
as possible to the programmer. Essentially, it works with any programming language and
any development environment as long as the source code is accessible from files and the
programming language offers a possibility for comments. It is non-intrusive in the sense
that it leaves the source code untouched, with the only exception of introducing some comment lines at specific places.
The ProgDOC system consists of two parts. A so called weaver weaves the desired parts
of the source code into the documentation, and a highlighter performs the syntax highlighting for that code. Source code and documentation are mutually independent (in particular
they may be processed independently). They are linked together through special handles
which are contained in the comment lines of the source code and may be referenced in the
documentation.
ProgDOC is a good choice for writing articles, textbooks or technical white papers which
contain source code examples and it proved especially useful for mixed language projects
and for documenting already existing programs and libraries. Some examples of output
produced by ProgDOC are available at [Sim].
4.1.2
Some words on Literate Programming
With an article published 1984 in the Computer Journal [Kn84] Donald Knuth coined the
notion of “Literate Programming”. Since those days for many people literate programming
is irrevocable interweaved with Knuth’s WEB [Kn92] and TEX [Kn91] systems.
Knuth justifies the term “literate programming” in [Kn84] with his belief that “... the
time is ripe for significantly better documentation of programs, and that we can best achieve
this by considering programs to be works of literature.” To support this programming style,
he introduced the WEB system which is in fact both a language and a suite of utilities. In
WEB, the program source code and the documentation are written together into one source
file, delimited by special control sequences. The program source can be split into parts
which can be presented in arbitrary order. The tangle program extracts these code parts
from the WEB file and assembles them in the right order into a valid source file. Another
program called weave combines the documentation parts of the WEB files with pretty printed
versions of the code parts into a file which thereupon can be processed by TEX.
This system has many advantages. First of all, it fulfills the “one source” property. Because source code and documentation reside in one file, they are always consistent with
each other. Second, the programmer is free to present the code he writes in arbitrary order,
thus simplifying it for a human reader to understand the program. This can be done by
rearranging code parts, but also by using macros inside the code parts, which can be defined later on in the WEB file. This way a top-down development approach is supported, in
which the structure of a program as a whole is presented in the beginning and then subsequently refined, as well as a bottom up design, in which a program is assembled out of low
level code fragments defined before. tangle will always expand these macros at the right
place when constructing the source file out of the WEB file.
Another feature of the WEB system is the automatic construction of exhaustive indexes
and cross references by weave. Every code part is accompanied by references which link
it to all other parts which reference or use it. Also, an index of keywords with respect
to code parts is created and the source code is pretty printed for the documentation part.
The best way to convince yourself of WEB’s capabilities is to have a look at Knuth’s TEX
implementation [Kn91a]. It was entirely written in WEB and is undoubtfully a masterpiece
of publishing and literate programming.
Dissertation der Fak. f. Informations- u. Kognitionswissenschaften, Univ. Tübingen - 2004
4.1
·
Program documentation with ProgDOC
WEB and its descendants
Besides its many advantages, the WEB system also has a couple of drawbacks. Many of
them apply only to the original WEB implementation of Knuth and have been corrected or
worked around in numerous WEB clones implemented thereafter. In this section we will
present some of them1 and discuss their enhancements.
One of the biggest disadvantages of WEB was the fact that it was closely tied to TEX as
typesetting system and to Pascal as implementation language. So one of the first flavors of
WEB was CWEB [KnLe] which extended WEB to C/C++ as implementation languages. It
was implemented by Knuth himself together with Silvio Levy. CWEBx [Leeu] is an alternative CWEB implementation with some extensions by Marc van Leeuwen. They both suffer
from the same problems like WEB, as they are closely coupled to TEX and the C programming language.
To overcome these language dependencies, noweb [Ram] (which evolved from spiderWEB) and nuweb [Brig] have been developed by Norman Ramsey and Preston Briggs, respectively. They are both language independent concerning the programming language,
whereas they still use LATEX for typesetting. Nuweb is a rather minimalistic but fast WEB
approach with only four control sequences. Both noweb and nuweb offer no pretty printing by default, but noweb is based on a system of tools called filters which are connected
through pipes. The current version comes with pretty printing filters for C and Java (see
the actual documentation).
Another descendant of an early version of CWEB is FWEB [Krom]. FWEB initially was
an abbreviation for “Fortran WEB”, but meanwhile FWEB supports not only Fortran, but
C, C++, Ratfor and TEX as well. These languages can be intermixed in one project, while
FWEB still supports pretty printing for the different languages. On the other hand, FWEB
is a rather complex piece of software with a 140 page user’s manual.
Ross Williams’ funnelWEB [Wil] is not only independent of the programming language,
but of the typesetting language as well. It defines own format macros, which can be bound
to arbitrary typesetting commands (currently for HTML and LATEX).
General drawbacks of WEB based literate programming tools
Though many of the initial problems of the WEB system have been solved in some of the
clones, their sheer number indicates that none of them is perfect.
One of the most controversial topics in the field of literate programming is pretty printing where pretty printing stands for syntax highlighting2 and code layout and indentation.
There are two questions here to consider: Is pretty printing desirable at all, and if yes, how
should the pretty printed code look like? The answer is often a matter of personal taste,
however there also exist some research results in this area like for example [BaeMa].
From a practical point of view it must be stated that doing pretty printing is possible for
Pascal, although a look at the WEB sources will tell you that it is not an easy task. Doing
it for C is even harder3 . Taking into account the fact that weave usually processes only a
small piece of code, which itself even does not have to be syntactically correct, it should
be clear that pretty printing such code in a complex language like for example C++ will be
impossible.
To overcome these problems, special tags have been introduced by the various systems
to support the pretty printing routines. But this clutters the program code in the WEB file
1 Only systems known to the authors will be mentioned here.
A more complete overview may be
found at the Comprehensive TEXArchive Network (CTAN) under http://www.ctan.org/tex-archive/web or at
http://www.literateprogramming.org.
2 Syntax highlighting denotes the process of graphically highlighting the tokens of a programming language.
3 The biggest part of CWEB consists of the pretty printing module. Recognition of keywords, identifiers, comments, etc. is done by a hard coded shift/reduce bottom up parser.
Dissertation der Fak. f. Informations- u. Kognitionswissenschaften, Univ. Tübingen - 2004
67
68
Chapter 4
·
Implementation techniques and libraries
and even increases the problem of the documentation looking completely different than
the source. This can be annoying in a develop/run/debug cycle. As a consequence, the
use of pretty printing is discouraged. The only feasible solution could be simple syntax
highlighting instead of pretty printing, as it is done by many editors nowadays.
Even without pretty printing and additional tags inserted into the program source, the
fact that the source code usually appears rearranged in the WEB file with respect to the
generated source file makes it very hard to extend or debug such a program. A few lines of
code laying closely together in the source file may be split up to completely different places
in the WEB file.
Once this could be called a feature, because it gave the programmer new means of structuring his program code for languages like Pascal which offered no module system or object
hierarchy. As analysed in [ChSa] it could be used to achieve a certain amount of code and
documentation reuse. However the WEB macro system could also be misused by defining
and using macros instead of defining and using functions in the underlying programming
language.
Another problem common to WEB systems is their “one source” policy. While this may
help to hold source code and documentation consistent, it breaks many other development
tools like debuggers, revision control systems and make utilities. Moreover, it is nearly
impossible for a programmer not familiar with a special WEB system to debug, maintain or
extend code devolved with that WEB.
Even the possibility of giving away only the tangled output of a WEB is not attractive.
First of all, it is usually unreadable for humans4 , and second this would break the “one
source” philosophy. It seems that most of the literate programming projects realized until now have been one man projects. There is only one paper from Ramsey and Marceau
[RamMar] which documents the use of literate programming tools in a team project. Additionally, some references can be found about the use of literate programming for educational
purpose (see [Child] and [ShuCo]).
The general impression confirms Van Wyk’s observation in [VanWyk] “... that one must
write one’s own system before one can write a literate program, and that makes [him] wonder how widespread literate programming is or will ever become.” The question he leaves
to the reader is whether programmers are in general too individual to use somebody else’s
tools or if only individual programmers develop and use (their own) literate programming
systems. The answer seems to lie somewhere in between. Programmers are usually very
individual and conservative concerning their programming environment. There must be
superior tools available to make them switch to a new environment.
On the other hand, integrated development environments (IDEs) evolved strongly during the last years and they now offer sophisticated navigation, syntax highlighting and
online help capabilities for free, thus making many of the features of a WEB system, like
indexing, cross referencing and pretty printing become obsolete (see section 4.1.3). Finally
the will to write documentation in a formatting language like TEX using a simple text editor
is constantly decreasing in the presence of WYSIWYG word processors.
Other program documentation systems
With the widespread use of Java a new program documentation system called JavaDoc was
introduced. JavaDoc [GoJoSt] comes with the Java development kit and is thus available
for free to every Java programmer. The idea behind JavaDoc is quite different from that of
WEB, though it is based on the “one source” paradigm as well. JavaDoc is a tool which
extracts documentation from Java source files and produces formatted HTML output. Con4 NuWEB is an exception here, since it forwards source code into the tangled output without changing its
format.
Dissertation der Fak. f. Informations- u. Kognitionswissenschaften, Univ. Tübingen - 2004
4.1
·
Program documentation with ProgDOC
sequently, JavaDoc is tied to Java as programming and HTML as typesetting language5 . By
default JavaDoc parses Java source files and generates a document which contains the signatures of all public and protected classes, interfaces, methods, and fields. This documentation can be further extended by specially formatted comments which may even contain
HTML tags.
Because JavaDoc is available only for Java, Roland Wunderling and Malte Zöckler created DOC++ [WunZoe], a tool similar to JavaDoc but for C++ as programming language.
Additionally to HTML, DOC++ can create LATEX formatted documentation as well. Doxygen [Hee] by Dimitri van Heesch, which was initially inspired by DOC++, is currently the
most ambitious tool of this type which can also produce output in RTF, PDF and Unix
man-page format. Both DOC++ and Doxygen can create a variety of dependency-, call-,
inclusion- and inheritance graphs, which may be included into the documentation. Notice
that customized versions of tools like DOC++ and Doxygen may be used as preprocessors
for the documentation extensions which will be proposed in section 4.2.
C# [CSharp], Microsoft’s answer to Java, comes with its own documentation system as
well. In principle it works in the same way as JavaDoc. The only difference is the resulting
output format which is XML. This is a big advantage compared to JavaDoc, because the
output is not tied to a special typesetting language. Instead the produced XML format is
specified in the Appendix E of the C# language definition [CSharp]. Additional tools like
NDoc [Diam] must be used to produce printable or displayable versions from the XML
output of the C# documentation generator.
Synopsis [DaSe] by Stephen Davies and Stefan Seefeld is another similar tool. Written
mainly in Python [Lutz] it supports an architecture of pluggable parsers and formatters
for various source languages and output formats. Currently it supports Python, IDL and
C++ as programming languages and among others HTML, DocBook and TexInfo as output
formats. The interesting thing about Synopsis is the fact that it really parses the whole
source code and builds an internal abstract syntax tree (AST) of the code. With the help of
this AST exhaustive cross references can be build like for example linking every variable to
the place where it was declared or to the place where its type is defined. Moreover, Synopsis
can produce highlighted listings of the source files which are linked to the generated API
documentation.
The new documentation tools presented so far are mainly useful for creating hierarchical, browesable HTML documentations of class libraries and APIs. They are intended for
interface descriptions rather than the description of algorithms or implementation details.
Although some of them support LATEX, RTF or PDF output, they are not particularly well
suited for generating printed documentation.
Another approach which must be mentioned in this chapter is Martin Knasmüller’s “Reverse Literate Programming” system [Knasm]. In fact it is an editor which supports folding
and so called active text elements [MoeKo]. Active text elements may contain arbitrary documentation, but also figures, links or popup buttons. All the active text is ignored by the
compiler, so no tangle step is needed before compilation. Reverse Literate programming
has been implemented for the Oberon system [WirGu].
The GRASP [Hend] system relies on source code diagramming and source code folding
techniques in order to present a more comprehensible picture of the source code, however
without special support for program documentation or literate programming. In GRASP,
code folding may be done according to the programming language control structure boundaries as well as for arbitrary, user-selected code parts.
5 Starting with Java 1.2, JavaDoc may be extended with so called “Doclets”, which allow JavaDoc to produce
output in different formats. Currently there are Doclets available for the MIF, RTF and LATEX format (see [Docl]).
Dissertation der Fak. f. Informations- u. Kognitionswissenschaften, Univ. Tübingen - 2004
69
70
Chapter 4
·
Implementation techniques and libraries
4.1.3 Software documentation in the age of IDEs
Nowadays, most software development is done with the help of sophisticated IDEs (Integrated Development Environments) like Microsoft Visual Studio [VisSt], IBM Visual Age
[VisAge], Borland JBuilder [JBuil], NetBeans [BGGSW] or Source Navigator [SouNav] to
name just a few of them. These development environments organize the programming
tasks in so called projects, which contain all the source files, resources and libraries necessary to build such a project.
One of the main features of these IDEs is their ability to parse all the files which belong
to a project and build a database out of that information. Because the files of the project
can be usually modified only through the builtin editor, the IDEs can always keep track of
changes in the source files and update the project database on the fly.
With the help of the project database, the IDEs can offer a lot of services to the user
like fast, qualified searching or dependency-, call-, and inheritance graphs. They allow fast
browsing of methods and classes and direct access from variables, method calls or class
instantiations to their definitions, respectively. Notice that all these features are available
online during the work on a project, in contrast to the tools like JavaDoc or Doxygen mentioned in the previous section which provide this information only off-line.
The new IDEs now deliver under such fancy names like “Code Completion” or “Code
Insight” features like syntax directed programming [KhUr] or template based programming which have been proposed already in the late seventies by [TeRe, MoSch]. In the past,
these systems couldn’t succeed because of two main reasons: they where to restrictive in
the burden they put on the programmer and the display technology and computing power
have not been good enough6 . However, the enhancements in the area of user interfaces and
the computational power available today allow even more: context sensitive prompting of
the user with the names of available methods or with the formal arguments of a method,
syntax highlighting and fast recompilation of affected source code parts.
All this reduces the benefits of a printed, highly linked and indexed documentation of a
whole project. What is needed instead, additionally to the interface description provided by
the IDE, is a description of the algorithms and of certain complex code parts. One step into
this direction was Sametinger’s DOgMA [Samet, SamPom] tool which is an IDE that also
allows writing documentation. DOgMA, like modern IDEs today, maintains an internal
database of the whole parsed project. It allows the programmer to reference arbitrary parts
of the source code in the documentation while DOgMA automatically creates and keeps the
relevant links between the source code parts and the documentation up to date. These links
allow a hypertext like navigation between source code and documentation.
While it seems that modern IDEs adopted a lot of DOgMA’s browsing capabilities,
they didn’t adopted its literate programming features. However, systems like NetBeans
[BGGSW], SourceNavigator [SouNav] or VisualAge [Sor]) offer an API for accessing the internal program database. This at least would allow one to create extensions of these systems
in order to support program documentation in a more comfortable way.
The most ambitious project in this context in the last few years was certainly the “Intentional Programming” project lead by Charles Simonyi [Simo96, Simo99] at Microsoft. It
revitalized the idea of structured programming and propagated the idea of programs being just instantiations of intentions. The intentions could be written with a fully fledged
WYSIWYG editor which allowed arbitrary content to be associated with the source code.
Of course, this makes it easy to combine and maintain software together with the appropriate documentation. Some screen-shots of this impressive system can be found in chapter 11
of [CzEi], which is dedicated solely to Intentional Programming. Unfortunately, this system
was never made publicaly available.
6A
good survey about the editor technology available at the beginning of the eighties can be found in [MeyDa].
Dissertation der Fak. f. Informations- u. Kognitionswissenschaften, Univ. Tübingen - 2004
4.1
4.1.4
·
Program documentation with ProgDOC
Software documentation and XML
With the widespread use of XML [XML] in the last few years it is not surprising that various
XML formats have been proposed to break out of the “ASCII Straitjacket” [Abr] in which
programming languages are caught until now. While earlier approaches to widen the character set out of which programs are composed like [Abr] failed mainly because of the lack
of standards in this area, the standardization of UNICODE [U30] and XML may change the
situation now.
There exist two concurring approaches. While for example JavaML [Bad] tries to define
an abstract syntax tree representation of the Java language in XML (which, by the way, is not
dissimilar from the internal representation proposed by the early syntax directed editors)
the CSF [San] approach tries to define an abstract XML format usable by most of the current
programming languages. Both have advantages as well as disadvantages. While the first
one suffers from it’s dependency on a certain programming language, the second one will
always fail to represent every exotic feature of every given programming language.
A third, minimalistic approach could ignore the syntax of the programming language
and just store program lines and comments into as few as two different XML elements. Such
an encoding has been proposed by E. Armstrong [Arm].
However, independent of the encoding’s actual representation, once that such an encoding would be available, literate programming and program documentation systems could
greatly benefit from it. They could reference distinct parts of a source file in a standard
way or they could insert special attributes or even elements into the XML document which
could be otherwise ignored by other tools like compilers or build systems. Standard tools
could be used to process, edit and display the source files, and internal as well as external
links could be added to the source code.
Peter Pierrou presented in [Pier] an XML literate programming system. In fact it consists of an XML editor which allows one to store source code, documentation and links
between them into an XML file. A tangle script is used to extract the source code out of
the XML file. The system is very similar to the reverse literate programming tool proposed
by Knasmüller, with the only difference that it is independent of the source language and
stores its data in XML format. An earlier, but very similar effort described in [Ger] used
SGML as markup language for storing documentation and source code.
Anthony Coates introduced xmLP [CoRe], a literate programming system which uses
some simple XML elements as markup. The idea is to use these elements together with
other markup elements, for example those defined in XHTML [XHTML], MathML [MathML]
or DocBook [DocB]. XSLT [XSLT] stylesheets are then used in order to produce the woven
documentation and the tangled output files. A similar system has also been presented by
Norman Walsh [Walsh], the Author of DocBook. He introduces a few elements for source
fragments which are located in their own namespace. Thus every XML vocabulary which
allows the inclusion of new elements from a different namespace may be used to write
the literate program. Finally XSLT stylesheets are used to weave and to tangle the literate
program.
Oleg Kiselyov suggested the representation of XML as an s-expression in Scheme called
SXML [Kisel]. SXML can be used to write literate XML programs. Different Scheme programs (also called stylesheets in this case) are available to convert from SXML to LATEX,
HTML or pure XML files.
Recently the Boost Initiative [Boost], an effort to provide free, peer-reviewed and portable
C++ source libraries has started a new project called BoostDoc [Greg]. The goal of the project
is to document all the Boost libraries in a consistent way and to keep the documentation
synchronised with the constantly developing libraries. BoostDoc uses various tools like
Doxygen [Hee] or Synopsis [DaSe] to create an API documentation in XML format out of
the library source files. This API documentation is later merged with the BoostBook docDissertation der Fak. f. Informations- u. Kognitionswissenschaften, Univ. Tübingen - 2004
71
72
Chapter 4
·
Implementation techniques and libraries
umentation written by the programmer, where BoostBook is an extension of the DocBook
[WaMu] format specially tailored for C++ library documentation.
Some of the approaches presented in this section are quite new, but the wide acceptance
of XML also in the area of the source code representation of programming languages could
give new impulses to the literate programming community. A good starting point for more
information on literate programming and XML is the Web site of the OASIS consortium,
which hosts a page specifically dedicated to this topic [OASLit].
4.1.5
Overview of the ProgDOC system
With this historical background in mind, ProgDOC takes a completely different approach.
It releases the “one source” policy, which was so crucial for all WEB systems, thus giving
the programmer maximum freedom to arrange his source files in any desirable way. On
the other hand, the consistency between source code and documentation is preserved by
special handles, which are present in the source files as ordinary comments7 and which
can be referenced in the documentation. pdweave, ProgDOC’s weave utility incorporates the
desired code parts into the documentation.
But let’s first of all start with an example. Suppose we have a C++ header file called
ClassDefs.h which contains some class declarations. Subsequent you can see a verbatim
copy of the file :
class Example1 {
private :
int x;
public :
explicit Example1(int i) : x(i) {}
};
class Example2 {
private :
double y;
public :
explicit Example2(double d) : y(d) {}
explicit Example2(int i) : y(i) {}
explicit Example2(long i) : y(l) {}
explicit Example2(char c) : y((unsigned int)c) {}
};
It is common practice until now, especially among programmers not familiar with any literate programming tools, that system documentations contain such verbatim parts of the
source code they want to explain. The problem with this approach is the code duplication
which results from copying the code from the source files and pasting it into the text processing system. From now on every change in the source files has to be repeated in the
documentation. This is reasonable of course, but the practice tells us that the discipline
among programmers to keep their documentation and their source code up to date is not
very high.
At this point, the ProgDOC system enters the scene. It allows us to write ClassDefs.h as
follows :
// BEGIN Example1
class Example1 {
private :
7
As far as I know, any computer language offers comments, so this seems to be no real limitation.
Dissertation der Fak. f. Informations- u. Kognitionswissenschaften, Univ. Tübingen - 2004
4.1
Program documentation with ProgDOC
·
int x;
// Integer variable
public :
explicit Example1(int i) : x(i) {} // The constructor
};
// END Example1
// BEGIN Example2
class Example2 {
// ...
private :
double y;
// ...
public :
explicit Example1(double d) : y(d) {}
explicit Example2(int i) : y(i) {}
explicit Example2(long i) : y(l) {}
explicit Example2(char c) : y((unsigned int)c) {}
};
// END Example2
The only changes introduced so far are the comments at the beginning and at the end of each
class declaration. These comments, which of course are non-effective for the source code,
enable us to use the new \sourceinput[options]{filename}{tagname} command in the LATEX
documentation. This will results in the inclusion and syntax highlighting of the source code
lines which are enclosed by the “// BEGIN tagname” and “// END tagname” lines respectively.
Consequently the following LATEX code:
‘‘.. next we present the declaration of the class {\mytt Example1}:
\sourceinput[fontname=blg, fontsize=8, listing, linenr,
label=Example1]{ClassDefs.h}{Example1}
as you can see, there is no magic at all using the {\mytt \symbol{92}sourceinput}
command ..’’
will result in the following output:
“.. next we present the declaration of the class Example1:
Listing 4.1: ClassDefs.h [Line 2 to 7]
class Example1 {
private :
int x;
// Integer variable
public :
explicit Example1(int i) : x(i) {} // The constructor
};
as you can see, there is no magic at all using the \sourceinput command ..”
First of all, we observe that the source code appears nicely highlighted, while its indentation is preserved. Second, the source code is preceded by a caption line similar to the one
known from figures and tables. In addition to a running number, the caption also contains
the file name and the line numbers of the included code. Furthermore this code sequence
can be referenced everywhere in the text through a usual \ref command (like for example
Dissertation der Fak. f. Informations- u. Kognitionswissenschaften, Univ. Tübingen - 2004
73
74
Chapter 4
·
Implementation techniques and libraries
here: see Listing 4.1). Notice however that the boxes shown here are used for demonstrational purpose only and are not produced by the ProgDOC system.
After we got an impression of how ProgDOC’s output looks like, it’s time to explain the
way how it is produced. First of all the style file ’progdoc.sty’ has to be included into the
latex source file. Among some definitions and default settings (see section 4.1.12) ’progdoc.sty’ contains an empty definition of \sourceinput. If LATEX will process any file with this
command, it will only print out the following warning:
WARNING !!! Run pdweave on this file before processing it with LATEX. Then you will see the
sourcecode example labeled Example1 from the file ClassDefs.h instead of this message.
The reason for this behavior is shown in Figure 4.1: ProgDOC isn’t implemented in pure
LATEX. Instead, the weaver component pdweave is an AWK [AKW] script while the syntax
highlighter pdhighlight is a program generated with flex [Flex]. It was originally based on
a version of Norbert Kiesel’s c++2latex filter. It not only marks up the source code parts for
LATEX, but also inserts special HTML markup into the LATEX code it produces such that an
HTML-version of the documentation may be created with the help of Nikos Drakos’ and
Ross Moore’s latex2html [DrMo] utility. However, pdweave is not restricted on pdhighlight
as highlighter. It may use arbitrary highlighters which conform to the interface expected
by the weaver. And indeed, ProgDOC provides a second highlighter, called pdlsthighlight,
which is in fact just a wrapper for the LATEX listings package [Heinz].
.pd
file
.tex
pdweave
file
pdhighlight
pdhighlight
pdhighlight
.cpp
file
.java
.xml
file
file
latex
.dvi
file
pdflatex
.pdf
file
latex2html
.html
file
Figure 4.1: Overview of the ProgDOC system.
The main idea behind ProgDOC is to write the documentation into so called ’.pd’ files
which contain pure LATEX code and, as an extension to ordinary LATEX, some additional commands like the above mentioned \sourceinput. These ’.pd’ files are processed by pdweave
which extracts the desired parts out of the source files, highlights them and finally merges
them with the ordinary parts of the documentation. The file generated this way is an usual
LATEX source file which in turn can be passed to the LATEX text processor.
Usually, all this steps are simplified by the use of a special Makefile which also keeps
track of dependencies between source files and the documentation itself (see section 4.1.13
for an example).
In the next sections a brief description of the different commands available in ’.pd’ files
will be given. The format of the handles required in the source files will be explained and
finally an example Makefile which automates the generation of the program documentation
will be presented.
Dissertation der Fak. f. Informations- u. Kognitionswissenschaften, Univ. Tübingen - 2004
4.1
4.1.6
Program documentation with ProgDOC
·
The \sourceinput command
Now that we have an idea of the general mechanism of the ProgDOC system, let’s have a
closer look on the \sourceinput command. Its syntax is similar to that of other LATEX commands though, as we know by now, it will be normally processed by pdweave and not by
LATEX. The general form of the command is:
“sourceinput[options]{filename}{tagname}
Like in LATEX, arguments in {}-brackets are required whereas the ones in []-brackets are
optional.
\sourceinput Arguments
filename
tagname
label=name
fontname=name
fontenc=encoding
fontsize=pt
linesep=length
type=language
tab=value
8 For
Absolute or relative pathname of the source file. This may be
internally preceded by a base path if the command \sourceinputbase{filename} (see section 4.1.10) has been used.
This is an arbitrary string which uniquely identifies a part of
source code in the file specified by filename. A special tagname
“ALL” is available, which includes a whole file.
(See section 4.1.11 for a detailed description of the comment
format in the source files).
\sourceinput Options
An ordinary LATEX label name which will be declared inside
of the produced source listing and which can be used subsequently as parameter for the \ref command.
The name of the base font used for highlighting the source
listing. It is desirable here to specify a mono spaced font of
which italic, bold and bold italic versions exist, since they are
used to emphasize keywords, comments, string constants and
so on8 . (The default is the initial setting for \ttdefault, usually
cmtt)
The encoding of the font chosen with the fontname option
above. (The default is OT1.)
The fontsize in point used for highlighting the listings. Since
mono spaced fonts are usually some wider compared to proportional counterparts, a somewhat smaller size is recommended here. (The default is 8pt.)
The line separation used for the source listings. (The default
is 2.5ex.)
This option controls the type of language assumed for the
source file. The language argument will be handed over to the
actual highlighter (see the option highlighter). Currently the
default highlighter pdhighlight supports the values c, cpp, java,
xml, scm, el or text. If not set, the default language is cpp. If
type is set to text no syntax highlighting will be done at all.
Notice that this option also affects the way in which comments
are recognized in the source files (see also the option comment
and chapter 4.1.11 about the source file format 4.1.11 on page
79).
The value of tab indicates the number of space characters used
to replace a tab character (’\t’). The dafault is 8.
more information on choosing the right base font see the ProgDOC manual [Sim]
Dissertation der Fak. f. Informations- u. Kognitionswissenschaften, Univ. Tübingen - 2004
75
76
Chapter 4
comment=’string’
listing[=noUnderline]
linenr
center
underline
caption=’captiontext’
wrap=column
highlighter=program
useLongtable
D EPRECATED
·
Implementation techniques and libraries
\sourceinput Options
If you use one of the supported languages listed in the table
on page 79, the tag names will be recognized automatically.
If you however include parts of a file in an unsupported language, it may be necessary to set the string which denotes the
beginning a comment in that language with this option.
If the listing option is present, a heading will be printed above
the listing, which contains at least the running number of the
listing and the name of the file it was extracted from. By default, this heading will be underlined. You can change this
behavior by using the optional noUnderline argument
If the linenr option is set, the heading additionally will contain
the line numbers of the code fragment in its source file.
The special tagname “ALL” always turns line numbers off.
With this option set, the listing will appear centered, without
it will be left justified.
If this option is set, pdhighlight will underline keywords instead of setting them in bold face. This is useful for fonts for
which there exists no bold version (e.g. cmtt).
If this option is set, then the caption produced by the listing option will contain captiontext instead of the file name and possibly the line numbers. Notice that captiontext must be enclosed
between apostrophe signs “ ’ ”.
With this option, you can instruct pdweave to wrap the lines of
the source code you include at the specified column. pdweave
uses a heuristics in order to find a “good” break position, so
the column argument supplied with column is just a maximum
value which will be not exceeded. Lines broken by pdweave,
will be marked by an arrow (“←-”) at the breaking point. This
option is especially useful in two-column mode. For en example see Listing 4.4.
This option controls which program is used to highlight the
source code. The default highlighter is pdhighlight. Currently
the only additional highlighter is pdlsthighlight. Refer to section 4.1.8 for further information.
This is a compatibility option which forces the default highlighter pdhighlight to arrange the source listings in a longtable
environment. Because of layout problems which resulted
from the interaction of longtables with other float objects, the
use of the longtable environment has been abandoned. This
option is only for people who want to typeset a document
in exactly the same way it was done with older versions of
ProgDOC.
Apart from whitespace, the \sourceinput command must be the first to appear in a line
and it must end in a line of its own. However the command itself can be split over up to
five different lines. (This number can be adjusted by setting the variable DELTA in the script
pdweave.awk.). It may also be necessary to quote some option arguments between apostrophe
signs “ ’ ”, if they contain white space or special characters like angle or curly brackets.
Some of this options like fontname or fontsize can be redefined globally in the ’.pd’ file.
See section 4.1.12 on page 81 for more information.
Dissertation der Fak. f. Informations- u. Kognitionswissenschaften, Univ. Tübingen - 2004
4.1
·
4.1.7
Program documentation with ProgDOC
Using ProgDOC in two-column mode
Starting with version 1.3, ProgDOC can be used in the LATEX two-column or multicolumn
mode. However some restrictions apply in these modes which will be discussed here. We
will switch now to two-column mode by using the multicols environment with the command \begin{multicols}{2}:
First of all, there is no two-column support when using the deprecated useLongtable
option, because the longtable environment
doesn’t work in the two-column mode.
Otherwise, the two-column mode set
with the twocolumn option of the documentclass command or inside the document with
the \twocolumn command is supported as
well as the two- or multicolumn mode of the
multicols environment (see [Mitt]), however
with some minor differences.
Listing 4.2: A short Python example
#
# QuickSort and Greatest Common Divisor
# Author: Michael Neumann
#
<see Listing 4.3 on page 77>
4.1.8
<see Listing 4.4 on page 77>
print "Hello World"
print quicksort([5,99,2,45,12,234,29,0])
Because of incompatibilities between the
multicols environment and the afterpage package, the caption “Listing x: ...
(continued)” on subsequent columns or
pages is not supported for listings inside
the multicols environment (as can be seen
in Listing 4.2 to 4.4 which are printed inside
a multicols environment). If in twocolumn
mode, columns are treated like pages for the
caption mechanism of ProgDOC (see section
C in the ProgDOC manual [Sim] for an example printed in twocolumn mode). Therefore
the “Listing x: ... (continued)” captions are
repeated on the top of each new column the
listings spans on, just as if it was a new page.
Using the alternative highlighter pdlsthighlight
pdlsthighlight also works in both, single
and two-column mode, however it doesn’t
support the “Listing x: ... (continued)” captions at all. The benefits of the new highenvironment of Carsten Heinz (see [Heinz]). lighter are the many supported language for
which the listings package performs synListing 4.3: test.py [Line 8 to 12] (Referenced in
tax highlighting. One of the main drawListing 4.2 on page 77)
backs is the fact that you can not produce
def ggd(a, b):
an HTML version of the document because
if a < b: a,b = b,a
LATEX2HTML doesn’t support the package.
while a%b != 0:
Notice furthermore that you have to set
a,b = b,a%b
the type option of the \sourceinput command
return b
to a value recognized by the listings environment if you use pdlsthighlight as highTo use this highlighter the listings.sty
lighter (e.g. type=C++ instead of type=cpp).
package has to be installed and manually
Refer to [Heinz] for a complete list of suploaded into the document with \usepackported languages.
age{listings}. The Listings 4.2 to 4.4 are
typeset using pdlsthighlight with the fol- Listing 4.4: test.py [Line 16 to 21] (Referenced in
lowing options: [linenr, listing, wrap=40, Listing 4.2 on page 77)
In addition to the default highlighter
pdhighlight ProgDOC comes now with an
additional highlighter called pdlsthighlight
which is in fact a wrapper for the listings
fontname=blg, highlighter=’pdlsthighlight’,
type=Python].
def quicksort(arr):
if len(arr) <= 1: return arr
Dissertation der Fak. f. Informations- u. Kognitionswissenschaften, Univ. Tübingen - 2004
77
78
Chapter 4
·
Implementation techniques and libraries
m = arr[0]
i>j, arr))
return quicksort(filter(lambda i,j=m: ←i<j, arr)) + \
filter(lambda i,j=m: i==j, ←arr) + \
quicksort(filter(lambda i,j=m: ←-
In this context it may also be necessary to
use the comment option to specify the comment characters of a language not known to
pdweave.
4.1.9 The \sourcebegin and \sourceend commands
Beneath the \sourceinput command there exists another pair of commands, which can be
used to highlight source code written directly into the ’.pd’ file. Of course they are pseudo
LATEX commands as well and will be processed by the pdweave utility rather than by LATEX.
Their syntax is as follows:
“sourcebegin[options]{ header}
source code
“sourceend
The \sourcebegin command has the same options like the \sourceinput command, but no
filename and tagname options, since the source code begins in the line that follows the command. For compatibility reasons with older ProgDOC versions there is an optional header
argument. It will be printed instead of the filename in the header of the listing if the option
listing is set. The recommendation for new users however is to use the caption option instead. Notice that in contrast to the usual LATEX conventions, this is an optional argument.
The source code will be terminated by a line which solely contains the \sourceend command.
This commands are useful if some code must be presented in the documentation which
is not intended to appear in the real source code. Consider for example the following code:
.. we don’t use void pointers and ellipsis for our function {\mytt func}
\sourcebegin[fontname=blg, fontsize=8, listing, center]{Just an example ..}
void func(void *p, ...) {
cout << "A function with an arbitrary number of arguments\n";
..
}
\sourceend
since they are bad programming style and can lead to unpredictable errors ..
which will result in the following output:
“.. we don’t use void pointers and ellipsis for our function func
Listing 4.5: Just an example ..
void func(void *p, ...) {
cout << "A function with an arbitrary number of arguments\n";
..
}
since they are bad programming style and can lead to unpredictable errors ..”
The same restrictions that apply for the \sourceinput command hold good for \sourcebegin and \sourceend as well. Additionally, if present, the opening brace of the optional header
Dissertation der Fak. f. Informations- u. Kognitionswissenschaften, Univ. Tübingen - 2004
4.1
·
Program documentation with ProgDOC
79
argument must start in the same line like the closing bracket of the options argument.
4.1.10
The \sourceinputbase command
If you want to present to the reader a certain view of the source code, relative and absolute
path names may be not enough for the \sourceinput command. In this case you can use the
command:
“sourceinputbase{pathname}
It defines a global path prefix for all \sourceinput commands which follow in the same file.
You can reset this path prefix by calling \sourceinputbase{} with a zero length argument.
Like the \sourceinput command, the \sourceinputbase command must be in its own line and
may be preceded only by whitespace. This command has file scope.
Notice that automatic references between nested code sequences (see section 4.1.11) will
work only if the code sequences have been included with the same path prefix. This is because of the algorithm which automatically generates the labels for nested code sequences.
It uses the pathname of the file from which a code sequence has been included as a part of
the generated label name.
4.1.11 The source file format
As shown in the first section, arbitrary parts of a source file can be made available to
ProgDOC by enclosing them with comment lines of the form ’// BEGIN tagname’ and ’//
END tagname’ respectively where in this and the following examples we will use the C++
comment syntax. However ProgDOC also supports a number of other languages.
When speaking about supported languages, one has to distinguish between highlighting support for a language which comes from pdhighlight and the support to extract code
snippets out of files of a given language, which is provided by pdweave. The following table
lists the supported languages with respect to both these tools. In general, any file may be
used as input source, even if not listed here, by specifying “text” as type argument and the
corresponding comment character(s) as comment argument to the \sourceinput command
(see table on page 75).
type
c
cpp
java
xml
scm
el
vb
py
text
Language
C
C++
Java
XML
Scheme
ELisp
VisualBasic
Python
Text
Comment character(s)
// , /∗
// , /∗
// , /∗
<! − −
; , ;; , ;;; , ;;;;
; , ;; , ;;; , ;;;;
’
#
# , // , -
pdweave
√
√
√
√
√
√
√
√
√
pdhighlight
√
√
√
√
√
√
−
−
−
Hiding code parts
An arbitrary even number of ’// ... [text]’ comments may appear inside a ’BEGIN/END’ code
block. All the code between two of these comment lines will be skipped in the output and
replaced by a single “dotted line” (...) or a line of the form “... text ...” if the optional
text argument was present in the first comment line. text may be an arbitrary LATEX string
(not containing double quotes) enclosed between double quotes. This feature is useful for
example, if you want to show the source code of a class, but don’t want to bother the reader
Dissertation der Fak. f. Informations- u. Kognitionswissenschaften, Univ. Tübingen - 2004
80
Chapter 4
·
Implementation techniques and libraries
with all the private class stuff.
Recall the header file from section 4.1.5, which will be reprinted here for convenience, by
using the following command: “\sourceinput[fontname=blg, fontsize=8, listing]{ClassDefs.h}{ALL}
”. Notice the use of the special tag name “ALL”, which includes a source file as a whole.
Listing 4.6: ClassDefs.h
// BEGIN Example1
class Example1 {
private :
// Integer variable
int x;
public :
explicit Example1(int i) : x(i) {} // The constructor
};
// END Example1
// BEGIN Example2
class Example2 {
// ... some private stuff
private :
double y;
// ...
public :
// BEGIN Constructors
explicit Example2(double d) : y(d) {}
explicit Example2(int i) : y(i) {}
explicit Example2(long l) : y(l) {}
explicit Example2(char c) : y((unsigned int)c) {}
// END Constructors
void doSomething(); // do something
};
// END Example2
In the way described until now we can include the class definition of the class “Example2” by issuing the command: “\sourceinput[fontname=ul9, fontenc=T1, fontsize=7, listing, linenr, label=Example2]{ClassDefs.h}{Example2}”.
Listing 4.7: ClassDefs.h [Line 11 to 24]
class Example2 {
...
public :
<see Listing 4.8 on page 81>
void doSomething(); // do something
};
As you can see however, the private part of the class definition is replaced by the mentioned
“dotted line” which stands for as much as “there is some hidden code at this position in the
file, but this code is not important in the actual context”.
Dissertation der Fak. f. Informations- u. Kognitionswissenschaften, Univ. Tübingen - 2004
4.1
·
Program documentation with ProgDOC
Displaying nested code sequences
Another possibility of hiding code at a specific level, is to nest several “BEGIN/END” blocks
where nested BEGIN lines may also have an optional text argument as described in the previous section. If a “BEGIN/END” block appears inside another block, then it will be replaced
by a single line of the form “¡[text] see Listing xxx on page yyy¿”. xxx denotes the listing number
in which the code of the nested block actually appears and yyy the page number on which
that listing begins. Of course this is only possible, if the mentioned nested block will be or
already has been included by a \sourceinput command.
In turn, if a nested block will be included through a \sourceinput command, his heading
line will additionally contain the listing and page number of his enclosing block. You can
see this behavior in the following example where we show the constructors of the class Example2 by issuing the following command: “\sourceinput[fontname= ul9, fontenc=T1, fontsize=7, listing, linenr, label=Constructors]{ClassDefs.h} {Constructors}”.
Listing 4.8: ClassDefs.h [Line 18 to 21] (Referenced in Listing 4.7 on page 80)
explicit Example2(double d) : y(d) {}
explicit Example2(int i) : y(i) {}
explicit Example2(long l) : y(l) {}
explicit Example2(char c) : y((unsigned int)c) {}
This hiding of nested code parts can be thought of as a kind of code folding as it is available
in many programmer editors today [Knasm, Hend].
So lets finally state more precisely the difference between hiding code through ’// ...’
comment lines and the nesting of code blocks. While ’// ...’ comments always match the
following ’// ...’ line, a nested ’BEGIN tagname’ always matches its correspondent ’END tagname’ and can potentially contain many ’// ...’ lines or even other nested chunks. Another
difference is the fact that nested chunks can be presented later on in the documentation and
will be linked together by references in that case , while parts masked out by ’// ...’ lines
will simply be ignored. Nevertheless, ’// ...’ lines can be useful for example if a part of
a source file contains many lines of comments which aren’t intended to be shown in the
ProgDOC documentation. If you want to use nested “BEGIN/END” chunks together with the
\sourceinputbase command, be sure to read the comments on this topic in section 4.1.10.
One last word on the format of the comments processed by the ProgDOC system. They
must be in a line on their own. The comment token, BEGIN/END and the tagname must be
separated by and only by whitespace. The comment token must not necessarily begin in
the first column of the line as long as it is preceded only by whitespace. The tagname should
consist only of characters which are valid in a LATEX \label statement.
4.1.12 LATEX customization of ProgDOC
Some of the options available for the ’\sourcebegin’ and the ’\sourceinput’ command (see
section 4.1.6 on page 75) can be set globally by redefining LATEX commands. Additional
commands can be used to adjust the appearance of the generated output even further. Following a list of the available commands:
\pdFontSize
\pdLineSep
The font size used for printing source listings. The default is 8pt.
This command is the global counterpart of the fontsize option of
’\sourcebegin’ and ’\sourceinput’.
The line separation used for printing source listings. The default is
2.5ex. This command is the global counterpart of the linesep option
of ’\sourcebegin’ and ’\sourceinput’.
Dissertation der Fak. f. Informations- u. Kognitionswissenschaften, Univ. Tübingen - 2004
81
82
Chapter 4
\pdBaseFont
\pdFontEnc
\pdCommentFont
\pdKeywordFont
\pdPreprFont
\pdStringFont
\ProgDoc
\pdULdepth
\pdPre9
D EPRECATED
\pdPost9
·
Implementation techniques and libraries
The font family which is used to print source listings. The default is
’\ttdefault’.This command is the global counterpart of the fontname
option of ’\sourcebegin’ and ’\sourceinput’.
The encoding of the font family chosen with \pdBaseFont or with the
fontname option of the ’\sourcebegin’ or ’\sourceinput’ commands.
The default is OT1. This command is the global counterpart of the
fontenc option of ’\sourcebegin’ and ’\sourceinput’.
The font shape used for highlighting comments in the source listing.
The default setting is ’\itshape’.
The font shape used to highlight the key words of a programming
language. The default is ’\bfseries’.
The font shape used to highlight preprocessor commands in C or
C++. The default is ’\bfseries\itshape’.
The font used to highlight string constants in source listings. The
default setting is ’\slshape’.
Command to print the ProgDOC logo.
This is a length command which controls the depth of the line under
a listing caption. ProgDOC uses the ulem.sty package for underlining which does a pretty good job in guessing a reasonable value for
this purpose. However it may sometimes be necessary to manually fine tune it, depending on the used font. The length may be
set with the \setlength command. Resetting \pdULdepth to 0pt reactivates the initial ulem.sty algorithm. (This tutorial for example uses
\setlength{\pdULdepth}{2.5pt}.)
This and the following three length commands correspond to the
longtable commands \LTpre, \LTpost, \LTleft and \LTright respectively. For more information see the documentation of the longtable
package [Car]. \pdPre sets the amount of space before a listing. The
default is \bigskipamount.
\pdPost sets the amount of space after a listing. The default is 0cm.
D EPRECATED
\pdRight9
The margin at the right side of the listing. The default is \fill.
D EPRECATED
\pdLeft9
D EPRECATED
\pdLeft sets the amount of space at the left side of a listing. Usu-
ally the listing is left justified or centered (see also section 4.1.6, The
\sourceinput command). But because listings are typeset inside a
longtable environment, they aren’t indented for example inside list
environments. In that case it can be useful to set \pdLeft to \leftmargin. If the listing will be insight a nested list environment, you
can use \renewcommand{\pdLeft}{x\leftmargin} where x is the nesting
level. The default is 0cm.
All these commands can be redefined. If you want to typeset string constants in italic,
you could insert the following line in the preamble of your ’.pd’ file: ’\renewcommand{\pdString
Font}{\slshape}’. The words used to built up the header of each listing also can be set by the
user according to his preferences (though this is intended mainly to permit a certain kind
of localization). They are defined in ’progdoc.sty’ as follows:
9 Because ProgDOC internally used the longtable environment in older versions to render the program listing,
some of the longtable options have been made available to ProgDOC users. As new versions of ProgDOC don’t
use longtable anymore, this options have no effect. (See the useLongtable option of the \sourceinput command
on page 4.1 for a compatibility option to enable the old style mode which uses the longtable environment).
Dissertation der Fak. f. Informations- u. Kognitionswissenschaften, Univ. Tübingen - 2004
4.1
Program documentation with ProgDOC
·
\ListingName
\LineName
\toName
\ReferenceName
\PageName
\ListingContinue
\NextPage9
D EPRECATED
The name used to name listings. The default is “Listing”.
The name of a line. The default setting is “Line”.
The word for “to” in “Line xxx to yyy”. Defaults to “to”.
The sentence “Referenced in”.
The words “on page”.
A word to indicate that the current listing is a continuation from
a previous page. Defaults to “continued”.
This should be a small symbol to indicate that a listing is not finished, but will be continued on the next page. The default setting
is ’\ding{229}’ which is the ’➥’ symbol.
You could customize these entries for the german language by inserting the following
lines into the preamble of your ’.pd’ file:
\def\LineName{Zeile}
\def\toName{bis}
\def\ReferenceName{Referenziert in}
\def\PageName{auf Seite}
\def\ListingContinue{Fortsetzung}
4.1.13
An example Makefile
In this chapter a makefile will be presented which simplifies the task of calling all the scripts
in the right order and keeps track of dependencies between source and documentation files.
For the sake of simplicity, the makefile used to build this documentation will be shown:
Listing 4.9: Makefile
dvi
: tutorial.dvi
ps
: tutorial.ps
pdf
: tutorial.pdf
html
: tutorial/tutorial.html
out
: example
clean :
rm -rf *.dvi *.ps *.pdf *.log *.aux *.idx *˜ part1.tex tutorial.tex \
*pk *.out pdweave.tmp pd html.html tutorial
tutorial.dvi : tutorial.tex part1.tex
tutorial.pdf : tutorial.tex part1.tex progdoc.pdf
progdoc.pdf : progdoc.eps
epstopdf progdoc.eps
part1.tex
:
ClassDefs.h test.xml test.py version.el
example : example.cpp ClassDefs.h
g++ -o example example.cpp
tutorial/tutorial.html: tutorial.dvi
latex2html -html version 4.0 -show section numbers -image type gif \
Dissertation der Fak. f. Informations- u. Kognitionswissenschaften, Univ. Tübingen - 2004
83
84
Chapter 4
·
Implementation techniques and libraries
Listing 4.9: Makefile (continued)
-up title "ProgDoc Home Page" -up url "../progdoc.htm" \
-no footnode -local icons -numbered footnotes tutorial.tex
# We generate ps from pdf now in order to depend only on pdfLaTeX!
# %.ps
#
%.ps
: %.dvi
dvips -D 600 -o $@ $<
: %.pdf
acroread -toPostScript -binary $<
%.dvi : %.tex
latex $< && latex $<
%.pdf : %.tex
rm -f $*.aux && pdflatex $< && pdflatex $<
%.tex : %.pd
pdweave $<
Of course this file can be included with the \sourceinput command as well. Because
syntax highlighting for makefiles is not supported yet, the file was included by using the
type option set to text. But even in this case, there are still benefits in using the \sourceinput
command. First of all, the documentation will always contain the actual makefile. Second,
this makefile can be referenced throughout the documentation like every other source file
(see Listing 4.9). And last but not least, ProgDOC may be extended in the future to highlight
various other file formats, so you may improve your documentation by simply rebuilding
it with a new version of ProgDOC.
Now lets have a closer look on the makefile. The first five lines define shortcuts for the
different targets, namely the dvi, ps, pdf and html versions of the documentation and the
example executable. clean, the last target removes all files created during a build process.
Notice that ’ pdweave.tmp’ and ’ pd html.html are temporary files created by pdweave.
In the next lines, the dependencies are defined. The dvi output depends on the tex files
of the documentation which in turn depend on the source code of the files they document.
Therefore the documentation will be rebuild not only if the documentation source files will
change, but also if the source code files change.
The next two rules tell make utility how to build the example executable and the html
version of the documentation. The latter will be created by LATEX2HTMLin its own subdirectory.
The last four parts of the makefile contain generic actions which tell the make utility
how to generate ’.ps’ files out of ’.dvi’ files, ’.dvi’ files out of ’.tex’, ’.pdf’ files out of ’.tex’
files and finally ’.tex’ files out of .pd-files. As you can see, for the last step the pdweave utility
will be used.
Using this example as skeleton, it should be straightforward how to write makefiles for
your own projects.
Dissertation der Fak. f. Informations- u. Kognitionswissenschaften, Univ. Tübingen - 2004
4.2
4.2
·
Program documentation with XDoc
Program documentation with XDoc
Traditionally program documentation has never been treated as a first class citizen of computer programs and as such has not received wide support by language designers. Comment lines which are ignored by the compiler have been the broadest common denominator
in virtually all programming languages. In this section a universal documentation extension will be proposed which may be applied non-intrusively to any arbitrary programming
language. It may be used for automatic interface documentation generation as well as for
linking external documentation with parts of the actual source code. The benefits of this
new documentation scheme are: synchronized code and documentation, different levels of
compiler support for program documentation and wider tool support due to the independence from the actual programming language and a standardized output format. A prototype implementation of the new approach is presented for the Java programming language
and the DocBook system.
4.2.1
Introduction
From the very beginning programming languages knew the concept of comments. Because
comment lines were completely ignored by the compiler they could contain arbitrary content. So it became good programming practice to use comments in order to document the
most important and the most intricate parts of a program in prose. However, documenting a program in such a way has a number of serious drawbacks. First of all, the intended
reader needs full access to the source code. Sometimes a subject may be most easily explained by a picture or a formula which is extremely hard to do by using merely ASCII
characters. Finally, excessive documentation with comment lines can make the program
code itself hard to read and edit.
These problems lead to the development of the concept of Literate Programming by D.
Knuth [Kn84] where the source code and the documentation are written into a single file
using TeX [Kn91]. This way the full power of the TeX typesetting system can be used for the
documentation. However, before compiling the program the source code has to be extracted
from the documentation first (see also section 4.1.2).
In recent days, Java [GoJoSt] introduced a new documentation system called JavaDoc.
It is based on API documentation which is automatically generated by the compiler and
which can be augmented by the programmer with the help of special comments which are
inserted into the source code. However only high level, interface documentation can be
achieved this way.
All these three mentioned approaches do not handle program documentation in its entirety. Therefore a new, universal and language independent documentation scheme which
can be applied non-intrusively to any programming language will be proposed here.
The language extension is non-intrusive because it is completely transparent to any compiler which is unaware of the extension. Therefore, as a first step before compiler support
will be available, the extension may also be handled by an external preprocessor.
The documentation scheme is language independent because it may be used with any
programming language which offers simple comments. It is universal because it offers a
uniform interface and output format no matter with which programming language it is
actually used. Finally it is new in the sense that it combines well known and approved
techniques in a new and innovative way.
4.2.2
The new XDoc approach
The usefulness and necessity of a good software documentation is generally accepted by
every programmer. However there is no such unity when it comes to the question what is
Dissertation der Fak. f. Informations- u. Kognitionswissenschaften, Univ. Tübingen - 2004
85
86
Chapter 4
·
Implementation techniques and libraries
a good documentation and there is even less agreement upon how to produce such a documentation. Nevertheless, the following features seem to be crucial for every documentation
system:
1. Documentation and source code should always be consistent and synchronized.
2. The system should be easy to use in order to be accepted by the programmer. (I.e.
programming should not be constrained and documenting should be as easy as just
writing with a usual word processor.)
3. Different levels of documentation like interface or implementation documentation for
different audience should be possible.
4. The documentation should be legible, appealing and equally well suited for various
output formats like printed manuals, books or online browsing.
5. Interoperability, team and tool support are crucial today because projects tend to use
more than one programming language, support more then one platform and are being
worked on by many people simultaneously.
The previous sections about the ProgDOC program documentation system already alnalyzed and categorized the majority of the program documentation systems available today
with respect to these criteria (see pages 66 to 72). The next sections will introduce the new
XDoc system which is based on two simple properties fulfilled by virtually every programming language.
• Every programming language is based on a formal grammar and every compiler or
interpreter internally builds a parse tree of a program when parsing it. Therefore it
would be easy for each such tool to dump the parse tree in a XML format standardized
on a per language basis.
• Every programming language offers line comments. Defining some of these comments to have a special semantic would enable the compiler to produce additional
markup in the XML version of the parsed file. This comment format should also be
standardized on a per language basis.
Once the two requirements postulated above are fulfilled it becomes easy to produce interface as well as implementation documentation from the resulting XML source code representation by using standard tools like XInclude [XInc] or XSLT [XSLT] processors.
Taking into account the XML elements introduced by the programmer with the special
comments presupposed before, it is possible to address arbitrary code parts and include
them into the documentation. Given the standardized XML format, it becomes trivial to
include source code into the documentation based on syntactic information (e.g. including
a class or method definition by name). And finally an API documentation could be generated automatically by extracting the interface part together with possible documentation
comments (eg. JavaDoc, C# or Doxygen style comments) from the XML representation.
The key point is in fact the per language standardization of the proposed special comment scheme and the XML representation of the source code because it will permit the
development of documentation tools with respect to a standardized interface. How such a
tool may look like will be demonstrated in section 4.2.3 while the following two subsections
will discuss the special comment format and the representation of the sourc code in XML.
Dissertation der Fak. f. Informations- u. Kognitionswissenschaften, Univ. Tübingen - 2004
4.2
·
Program documentation with XDoc
The comment format
For the semantics of the special line comments we propose the following simple extension
to usual line comments:
line-comment-token ’<’|’>’|’<>’ element-name {attribute=value}*
where line-comment-token is the token which introduces a line comment in the specific programming language (e.g. ’//’ in C++/Java or ’#’ in AWK) and element-name denotes the
name of the resulting XML element. If the character following the comment token is ’<’,
the result will be an opening tag for the corresponding element, if the character is ’>’ the
compiler will generate a closing tag for the corresponding element, and finally a ’<>’ after
the comment token will introduce an empty element. All the additional text after elementname will be copied verbatim into the resulting element tag and should contain valid XML
attributes in order to produce a well-formed XML document.
Notice that introducing opening and closing tags for an element has to be done in such a
way that they do not intersect with the opening and closing tags produced by the compiler
for certain programming language constructs. So for example placing a comment which
will produce an opening tag just before a while loop and the comment for the closing tag
inside that loop will in general produce a XML document which is not well formed because
the introduced tags will overlap with the opening and closing tags of the while loop. Such
errors however can be detected easily by the compiler.
The advantage of the fact that comments for opening and closing tags have to align with
the structure of the program is that they can be used also as anchors for user defined code
folding [Hend, Knasm]. For example jEdit [Pest], a cross platform, programmer’s text editor
written by Slava Pestov uses ’//{{{ text’ and ’//}}}’ line comments to specify the beginning
and the end of a text fold. Unifying these notations would enable code folding for source
code marked up with documentation comments as well as inclusion of arbitrary predefined
code folds into the documentation. Notice that although the opening and closing comments
may not overlap they may be nested.
The XML representation
Because most programming languages are defined by a grammar anyway, the simplest approach would be to define a XML DTD or a XML Schema [XMLSch0] based on that grammar. There also exist already a number of XML mappings for various programming languages like for example JavaML [Bad] for Java or the generic approaches of Armstrong
[Arm] and Sandø [San]. Like for the syntax of the documentation comment, the crucial
point here is that is is highly desirable for the XML representation to be standardized together with the corresponding programming language in order to enable compatibility of
code and interoperability of tools.
It has to be stressed however that we do not necessarily need a full compiler in order to
create the XML representation. Tools like DOC++ [WunZoe] or Doxygen [Hee] which only
partially parse the source file may be fully adequate. The advantage of using a full fledged
compiler for this purpose would be the additional information which could be gathered like
overload resolution or exact type information for every identifier in the source code. This
information could be used for example for cross linking in the generated documentation.
Also, it is not strictly necessary to store the XML representation in files corresponding
to the underlying source files. It can be useful storing this information in a database which
may save time in the face of recompilation or it may simplify querying the information for
big projects.
Dissertation der Fak. f. Informations- u. Kognitionswissenschaften, Univ. Tübingen - 2004
87
88
Chapter 4
·
Implementation techniques and libraries
Advantages and drawbacks of the new approach
The proposed documentation system fulfills the first three properties postulated in section
4.2.2. The code and the documentation can be kept synchronized although they are mutually independent. Only the syntax of the new documentation comment has to be learned
by the programmer. And finally, as stated before, the generated XML representation can be
used to produce interface as well as implementation documentation.
Legibility, appealing look and eligibility for different output formats which was the
fourth property from section 4.2.2, are mainly dependent on the typesetting system actually used. However, XML based documentation system are widely used and the prototype
presented in section 4.2.3 which is based on DocBook [WaMu] demonstrates the strength of
this approach. Finally, interoperability and team and tool support is granted through the
wide acceptance and support of XML and XML related technologies as industry standards.
One last benefit of the proposed documentation style is its applicability to multilingual
documentation because once the relevant code parts have been identified and marked they
can be included in the same way into arbitrary documents. With the Literate Programming
approach described in section 4.1.2 several versions of the same documentation in different
languages are not possible without duplication of the source code which is embedded inside the documentation. Also, even if possible, embedding all the documentation into the
source code as for example with the JavaDoc style would become confusing already with
the second language because the source code would contain more comments than actual
program code. These arguments of course apply not only to multilingual documentation,
but also for the case where different kinds of documentation (e.g. user documentation,
developer documentation) have to be created for the same code.
There are two major drawbacks of the new documentation system. First of all, standardizing a computer language is a complicated and intricate task. Therefore adding the
proposed extensions to the definition of already existing languages will be not easy. However there may be a good chance for the user community of each programming language to
establish a De-facto standard for these extensions.
For some programming languages like C/C++ which use a preprocessor it may be difficult to reconstruct the source representation from the abstract syntax tree available to the
compiler because the preprocessor step can potentially replace and change the source code.
In particular the C/C++ preprocessor simply strips all the comments from the source code
before feeding it to the compiler. Therefore tools like GCC-XML [King], an extension of
the GNU C++ compiler [GCC] by Brad King which generates an XML description of a C++
program from GCC’s internal representation, does not handle comments at all. However
other tools like Synopsis [DaSe] or techniques similar to the ones described in [BaNo] may
be used to overcome this problem.
4.2.3 A prototype implementation
This section will present a prototype implementation of the ideas presented in the last section. The prototype works for the Java programming language and uses DocBook for writing the documentation along with the DocBook XSL-FO stylesheets and a FO [XSL] processor to produce PDF documentation. Two pages of a resulting document are shown in
Figure 4.2.3 and 4.2.3, respectively. Notice that the two pages were in A4 format initially
and have been shrinked by a factor of 0.6 in order to fit the layout of this journal.
For the prototype the Java compiler which is available as a part of the Java Specification
Request 14 [JSR14] dedicated to adding Generics to the Java programming language has
been used and extended. As XSLT processor version 6.5.2 of Michael Kay’s Saxon [Kay]
has been choosen. Furthermore, version 4.1.2 of the DocBook DTD and version 1.60.1 of
the DocBook XSL-FO stylesheets [Walsh2] have been used and extended. As a last step the
Dissertation der Fak. f. Informations- u. Kognitionswissenschaften, Univ. Tübingen - 2004
4.2
1
2
3
4
5
6
7
8
9
10
11
12
13
14
15
16
17
18
19
20
21
22
23
24
25
26
27
28
29
30
31
32
33
34
35
36
37
38
39
40
41
42
43
44
45
46
47
48
49
·
Program documentation with XDoc
/**gX};
* A quick sort demonstration algorithmgX};
*gX};
* @author James GoslinggX};
* @author Kevin A. SmithgX};
* @version 1.3, 29 Feb 1996gX};
*/gX};
public class QSortAlgorithm {gX};
gX};
/** A generic version of C.A.R Hoare’s Quick Sort algorithm.gX};
* It handles sorted arrays, and arrays with duplicate keys.gX};
*gX};
* If you think of a one dimensional array as going fromgX};
* the lowest index on the left to the highest index on the rightgX};
* then the parameters to this function are lowest index orgX};
* left and highest index or right. The first time you callgX};
* this function it will be with the parameters 0, a.length - 1.gX};
*gX};
* @param a
an integer arraygX};
* @param lo0
left boundary of array partitiongX};
* @param hi0
right boundary of array partitiongX};
* @return
returns nothing, just for demonstration purposegX};
*/gX};
//< Include ID="QSMethod" label=’The whole "QuickSort" method.’gX};
public static void QuickSort(int a[], int lo0, int hi0) {gX};
int lo = lo0;gX};
int hi = hi0;gX};
int mid;gX};
gX};
if ( hi0 > lo0) {gX};
// Arbitrarily establishing partition element as the midpoint ofgX};
// the array.gX};
//gX};
mid = a[ ( lo0 + hi0 ) / 2 ];gX};
gX};
//< Include ID="whileLoop" label="Loop through the array until indices cross"gX};
while( lo <= hi ) {gX};
// find the first element that is greater than or equal togX};
// the partition element starting from the left Index.gX};
//gX};
while( ( lo < hi0 ) && ( a[lo] < mid ) ) {gX};
++lo;gX};
}gX};
gX};
// find an element that is smaller than or equal togX};
// the partition element starting from the right Index.gX};
//gX};
while( ( hi > lo0 ) && ( a[hi] > mid ) ) --hi;gX};
gX};
Figure 4.2: The first part of the example program QSortAlgorithm.java.
resulting XML document was run through the RenderX Formatting Object engine [XEP]
to produce the final PDF version. The next three subsections will describe the extensions
in more detail and explain how the mentioned systems work together to produce the final
documentation.
In order to demonstrate the possibilities of the system a slightly modified version of a
Quicksort class written by James Gosling and Kevin Smith which is presented verbatim in
the Figures 4.2 and 4.3 will be used. Along with the implementation of the prototype it is
available for download from http://www.progdoc.org/xprogdoc.
Extending the Java compiler
The decision to use the JSR 14 prototype compiler was made because of two main reasons.
First of all it offers the chance to immediately support the Generic Java constructs which will
be added to the Java programming language in version 1.5 of the Java Development Kit. The
second reason was the fact that the compiler is implemented in a clear and well structured
Dissertation der Fak. f. Informations- u. Kognitionswissenschaften, Univ. Tübingen - 2004
89
90
Chapter 4
52
53
54
55
56
57
gX};
//If the right index has not reached the left side of arraygX};
// must now sort the left partition.gX};
//gX};
if( lo0 < hi ) QuickSort( a, lo0, hi );gX};
59
60
61
62
63
64
65
66
67
68
69
70
71
72
73
74
75
76
77
78
79
80
81
82
83
84
85
86
87
88
89
90
91
92
93
94
95
96
97
98
Implementation techniques and libraries
// if the indexes have not crossed, swapgX};
if( lo <= hi ) {gX};
swap(a, lo, hi);gX};
++lo;gX};
--hi;gX};
}gX};
}gX};
//> IncludegX};
50
51
58
·
gX};
// If the left index has not reached the right side of arraygX};
// must now sort the right partition.gX};
//gX};
if( lo < hi0 ) QuickSort( a, lo, hi0 );gX};
gX};
}gX};
}gX};
//> IncludegX};
gX};
public static void sort(int a[]) {gX};
QuickSort(a, 0, a.length - 1);gX};
}gX};
gX};
private static void swap(int a[], int i, int j) {gX};
int T;gX};
T = a[i];gX};
a[i] = a[j];gX};
a[j] = T;gX};
}gX};
gX};
private static void print(int a[]) {gX};
for(int i = 0; i < a.length; i++) {gX};
if (i > 0) System.out.print(", ");gX};
System.out.print(a[i]);gX};
}gX};
System.out.println();gX};
}gX};
gX};
public static void main(String argv[]) {gX};
int test[] = new int[] { 9, 5, 2, 6, 2, 7, 5, 1, 0, 4};gX};
print(test);gX};
sort(test);gX};
print(test);gX};
}gX};
}gX};
Figure 4.3: The second part of the example program QSortAlgorithm.java.
way and contains a nice, easy to understand recursive descend parser. The compiler source
code is available for free download at [JSR14].
The compiler was extended to support the new command line option ’-x’, which instructs the compiler to dump the Java files given on the command line in XML format. An
example of how this output looks like is presented in Figure 4.4. Notice the Include element at line 101 in Figure 4.4 which was introduced by the special comment at line 36 in
QSortAlgorithm.java. The label attribute of this element is used in Listing 1 in Figure 4.2.3
in order to denote the content omitted from the listing. Also notice the fact that empty lines
of the Java source file are represented by special XML comments like the one at line 100 in
Figure 4.4. Though not strictly necessary, this information is preserved in order to simplify
the production of the formatted Java output in a later step.
The mapping of the Java language to XML elements is straightforward. General language constructs are mapped to corresponding XML elements. Sometimes additional attributes are used to further describe the construct (e.g. the operator attribute for the binaryDissertation der Fak. f. Informations- u. Kognitionswissenschaften, Univ. Tübingen - 2004
4.2
100
101
102
103
104
105
106
107
108
109
110
111
112
113
114
·
Program documentation with XDoc
<!-- empty-line -->gX};
<Include ID="whileLoop" label="Loop through the array until indices cross" line="38" colum="7">gX};
<while-loop line="39" colum="7">gX};
<condition line="39" colum="7">gX};
<binary-expression operator="<=" line="39" colum="17">gX};
<var name="lo" line="39" colum="14"/>gX};
<var name="hi" line="39" colum="20"/>gX};
</binary-expression>gX};
</condition>gX};
<body single="false" line="39" colum="7">gX};
<comment value=" find the first element that is greater than or equal to " line="40" colum="9"/>gX};
<comment value=" the partition element starting from the left Index." line="41" colum="9"/>gX};
<comment value="" line="42" colum="9"/>gX};
<while-loop line="43" colum="9">gX};
<condition line="43" colum="9">gX};
Figure 4.4: Some lines of the compiler generated file QSortAlgorithm.xml. These lines correspond to
the Java source from line 35 to the first opening brace at line 41 in Figure 4.2.
expression element (see Figure 4.4 line 104) or the visibility attribute for method, var-def
and class elements). Additionally, every element has a line and a column attribute which
denotes the exact position of the corresponding construct in the Java source file.
The first step in order to achieve these results was the introduction of two new tokens
into the scanner part of the Java compiler. One token for line comments and one for empty
lines. Notice that the scanner originally skipped all comments except the special JavaDoc
comments. They where just stored in a symbol table along with the class definition or
variable declaration they belong to and not reported directly to the parser.
The parser was changed to accept the new tokens. Therefore the production rule for
BlockStatement [GoJoSt, §14.2] was changed to accept line comments and empty lines alternatively to usual language statements. The productions for ClassBodyDeclaration [GoJoSt,
§8.1] and InterfaceMemberDeclaration [GoJoSt, §9.1] were changed to additionally accept line
comments and empty lines.
The parser builds an abstract syntax tree of the source code which is processed and augmented in turn by various transformers which perform task like resolving names, doing
flow analysis, optimization and code generation. All these transformers where changed
to simply ignore the subtrees representing line comments and empty lines. Finally, a new
transformer was written which dumps the abstract syntax tree in XML format. This transformer will be prepented to the chain of transformers right after parsing has been finished
if the compiler is given the new ’-x’ command line option.
Extending DocBook
The DocBook DTD was extended by two new elements as shown in Figure 4.5. The first
one, SourceBase, has the single, required attribute xml:base. It can be used to specify a
base path under which source files considered for inclusion will be searched. Listing, the
second element, can be used to include parts of a source file into the documentation. It has
several attributes which will be described briefly now. The href attribute which is required
denotes the file from which the code will be included. It will be interpreted relatively to
the path which was set by the last SourceBase element if there was one at all. The type attribute which is also a required one is used to specify the kind of listing to produce. Setting
the value of this attribute to include will tell the stylesheet by which the DocBook document will be processed to include all the code contained in the Include element with an ID
attribute which is equal to the anchor attribute of the actual Listing element. Remember
that such elements can be introduced by the programmer with the special documentation
comments described in section 4.2.2 (e.g. line 24 and 36 in Figure 4.2). The first listing of the
Dissertation der Fak. f. Informations- u. Kognitionswissenschaften, Univ. Tübingen - 2004
91
92
Chapter 4
1
2
3
4
5
6
7
8
9
10
11
12
13
14
15
16
17
18
19
20
21
22
23
24
25
26
27
28
29
30
31
32
33
34
35
36
37
38
39
40
·
Implementation techniques and libraries
<!--gX};
ProgDocBook DTD version 0.1gX};
gX};
This DTD module is identified by the PUBLIC and SYSTEM identifiers:gX};
gX};
PUBLIC "-//OASIS//DTD DocBook XML V4.1.2 Extension ProgDoc V0.1//EN">gX};
SYSTEM "http://www.progdoc.org/xdoc/dtd/ProgDocBook.dtd"gX};
-->gX};
gX};
<!--========== Add ’Listing’ and ’SourceBase’ elements to the DTD ==========-->gX};
gX};
<!ENTITY % local.formal.class "| Listing | SourceBase">gX};
gX};
gX};
<!--========== Define the new ’Listing’ and ’SourceBase’ elements ==========-->gX};
gX};
<!ELEMENT SourceBase EMPTY>gX};
<!ATTLIST SourceBase xml:base CDATA #REQUIRED>gX};
gX};
<!ELEMENT Listing EMPTY>gX};
<!ATTLIST Listing recursive-include (true|false) "false"gX};
java-doc (true|false) "false"gX};
type (include|select|api) "include"gX};
href CDATA #REQUIREDgX};
anchor ID #REQUIREDgX};
kind CDATA #IMPLIEDgX};
name CDATA #IMPLIEDgX};
>gX};
gX};
<!--=== Allow SourceBase and Listing inside chapter or section elements ===-->gX};
gX};
<!ENTITY % local.divcomponent.mix "| SourceBase | Listing">gX};
gX};
<!--========================== Import DocBook DTD ==========================-->gX};
gX};
<!ENTITY % DocBookDTD PUBLICgX};
"-//OASIS//DTD DocBook XML V4.1.2//EN"gX};
"http://www.oasis-open.org/docbook/xml/4.0/docbookx.dtd">gX};
gX};
%DocBookDTD;gX};
Figure 4.5: The extension of the DocBook DTD.
example document shown in Figure 4.2.3 was included by the following command:
<Listing href="QSortAlgorithm.java" type="include" anchor="QSMethod"
recursive-include="false" java-doc="false"/>
Because the recursive-include attribute is set to false the nested Include element which
spans the lines 36 to 57 in Figure 4.2 and 4.3 is not included into the documentation. Instead
it is replaced by a link to the listing which contains these lines if the author decides to also
include them, as it has been done in Listing 2 of Figure 4.2.3. Otherwise, a notice that the
lines are not shown in the actual documentation will be printed.
Notice the use of the label attribute which can be declared in the documentation comment of the programming language (line 36 in Figure 4.2). It is used internally by the
stylesheet during the transformation as a short description of nested code parts and does
not have to be specified in the extended DocBook DTD.
java-doc, the last attribute in the example given above, instructs the stylesheet not to
show JavaDoc comments which appear in the included source code. As a second example
consider the following line which has been used to include Listing 4 into the document
shown in Figure 4.2.3:
<Listing href="QSortAlgorithm.java" type="select" kind="class"
name="QSortAlgorithm" anchor="classQSortAlgorithm"
Dissertation der Fak. f. Informations- u. Kognitionswissenschaften, Univ. Tübingen - 2004
4.2
686
687
688
689
690
691
692
693
694
695
696
697
698
699
700
701
702
·
Program documentation with XDoc
<xsl:template match="/">gX};
<!-- First of all we do the inclusion stage -->gX};
<xsl:variable name="doc1">gX};
<xsl:copy>gX};
<xsl:apply-templates select="@*|node()|comment()" mode="IncludeMode"/>gX};
</xsl:copy>gX};
</xsl:variable>gX};
<!-- In a second step we pretty-print and link the included source code -->gX};
<xsl:variable name="doc2">gX};
<xsl:copy>gX};
<xsl:apply-templates select="$doc1" mode="PrettyPrint"/>gX};
</xsl:copy>gX};
</xsl:variable>gX};
<!-- Finally we hand over control to the original rule from ’docbook.xsl’ -->gX};
<!-- which will be applied now to the new root element.
-->gX};
<xsl:apply-templates select="$doc2" mode="originalRootRule"/>gX};
</xsl:template>gX};
Figure 4.6: The main transformation rule of the XSL-FO stylesheet in ProgDocBookFO.xsl.
recursive-include="false" java-doc="true"/>
It sets the type attribute to select thus including not a range of code specified by the programmer, but a syntactic entity of the programming language which is specified by the
additional attributes kind and name. Consequently, this example includes the source code of
the whole QSortAlgorithm class. Notice that this time the JavaDoc comments which belong
to the class are shown because the JavaDoc attribute is set to true. The recursive-include
attribute is still set to false which prevents the inclusion of the Quicksort method because
it is embedded into special documentation comments by the programmer. Instead it is replaced by a line with a link to the actual listing and the short description given with the
label attribute in the source code (line 24 in Figure 4.2).
The last example shown below demonstrates how API documentation in JavaDoc format can be included into the documentation by setting the type attribute to api:
<Listing href="QSortAlgorithm.java" type="api" kind="method"
name="QuickSort" anchor="QuickSortAPI"/>
The result of this example can be seen in Listing 5 in Figure 4.2.3. It contains the JavaDoc
API documentation (lines 10 to 23 in Figure 4.2) for the QuickSort method in a nicely formatted way. Notice furthermore that the anchor attribute can additionally be used as a
target for cross referencing, no matter of the value of the type attribute. In the PDF version
of the example document, references like for example “see Listing 2” are true hyperlinks
which can be navigated.
Extending the DocBook XSL-FO stylesheets
While the extension of the DocBook DTD required only a few lines of code, extending the
DocBook XSL-FO stylesheets which produces formatting objects output from an input file
which conforms to the newly defined DTD, proved much harder.
All the functionality of the new DocBook elements and attributes described in the previous section is effectively implemented in the extended stylesheet. It uses an XSLT 1.1
feature which treats result tree fragments as real node sets and different modes to implement a three step policy during the XSL transformation. As shown in Figure 4.6, the first
step is used to include source code parts identified by corresponding Listing elements. In
this step all the original DocBook elements are just copied recursively to a temporary tree
and the document() function is used to replace the Listing elements with the actual source
code from the source files in XML format.
Dissertation der Fak. f. Informations- u. Kognitionswissenschaften, Univ. Tübingen - 2004
93
94
Chapter 4
·
Implementation techniques and libraries
The second step uses the newly constructed tree and transforms the XML version of the
Java source code into valid DocBook elements. Like in the first step the original DocBook
elements are just copied to the new tree. The second step is also used to establish the automatic links between nested code parts. It is the most elaborate step with more than 500
lines of code because a transformation rule for every single element which can appear in
the XML version of the source file is needed.
In the third and last step, the root rule of the original XSL-FO stylesheet is called with the
second intermediate tree as argument. At this stage the tree contains only valid DocBook
elements an can be transformed into a formatting object file.
Finally the XSL-FO stylesheet also contains some local customizations and some rules
for a new DocBook element called listing. This element is effectively handled in the same
way as the DocBook example element. It was only necessary to introduce it because listings
have their own label, referencing style and numbering. Because the listing elements are
created only in the second temporary tree during the transformation, they do not have to
be declared in the extended DocBook DTD.
4.2.4 Conclusion
The new documentation style complies to the five demands postulated in section 4.2.2. It
combines and uses well known and established techniques for documentation purpose in
a new and effective way and proposes the standardization of the comment style together
with the format of the XML representation as a an integral part of every programming
language. Therewith, documenting becomes vendor and implementation independent in
the same way as programming became vendor and implementation independent by the
standardization of programming languages.
Dissertation der Fak. f. Informations- u. Kognitionswissenschaften, Univ. Tübingen - 2004
4.2
·
Program documentation with XDoc
Software Documentation Test
Volker Simonis
This is just a test article in order to demonstrate the software documentation style proposed in
the article "A Universal Documentation Extension for Arbitrary Programming Languages". It
was written in XML using the DocBook DTD, transformed to Formatting Objects and finally
translated into PDF by a FO engine. More information can be found in the enclosing article.
An implementation of the Quicksort algorithm
In this section we will present an implementation of the Quicksort algorithm in the Java programming language.
Listing 1 gives an overview of the sort method.
Listing 1. QSortAlgorithm.java [Lines 25 to 70]
public static void QuickSort(int[] a, int lo0, int hi0) {
int lo = lo0;
int hi = hi0;
int mid;
if(hi0 > lo0) {
// Arbitrarily establishing partition element as the midpoint of
// the array.
//
mid = a[(lo0 + hi0) / 2];
<Loop through the array until indices cross (see Listing 2)>
//If the right index has not reached the left side of array
// must now sort the left partition.
//
if(lo0 < hi) QuickSort(a, lo0, hi);
// If the left index has not reached the right side of array
// must now sort the right partition.
//
if(lo < hi0) QuickSort(a, lo, hi0);
}
}
Because of brevity, some details of the algorithm have been omitted in Listing 1. They will be presented in the
next program listing:
Listing 2. QSortAlgorithm.java [Lines 37 to 56] (Referenced in Listing 1)
while(lo <= hi) {
// find the first element that is greater than or equal to
// the partition element starting from the left Index.
//
while((lo < hi0) && (a[lo] < mid)) {
++lo;
}
// find an element that is smaller than or equal to
// the partition element starting from the right Index.
//
while((hi > lo0) && (a[hi] > mid)) --hi;
// if the indexes have not crossed, swap
if(lo <= hi) {
swap(a, lo, hi);
++lo;
--hi;
}
}
The Quicksort class also contains a small test program to verify the algorithm:
Figure 4.7: The first page of the example document.
Dissertation der Fak. f. Informations- u. Kognitionswissenschaften, Univ. Tübingen - 2004
95
96
Chapter 4
·
Implementation techniques and libraries
Listing 3. QSortAlgorithm.java [Lines 92 to 97]
public static void main(String[] argv) {
int[] test = new int[] { 9, 5, 2, 6, 2, 7, 5, 1, 0, 4 };
print(test);
sort(test);
print(test);
}
Listing 4 shows the whole source file one more time:
Listing 4. QSortAlgorithm.java [Lines 8 to 98]
/**
* A quick sort demonstration algorithm
*
* @author James Gosling
* @author Kevin A. Smith
* @version 1.3, 29 Feb 1996
*/
public class QSortAlgorithm {
<The whole "QuickSort" method. (see Listing 1)>
public static void sort(int[] a) {
QuickSort(a, 0, a.length - 1);
}
private static void swap(int[] a, int i, int j) {
int T;
T = a[i];
a[i] = a[j];
a[j] = T;
}
private static void print(int[] a) {
for(int i = 0;i < a.length;i++) {
if(i > 0) System.out.print(", ");
System.out.print(a[i]);
}
System.out.println();
}
public static void main(String[] argv) {
int[] test = new int[] { 9, 5, 2, 6, 2, 7, 5, 1, 0, 4 };
print(test);
sort(test);
print(test);
}
}
Listing 5 finally presents the JavaDoc documentation of the QuickSort method shown already in Listing 1.
Listing 5. Method QuickSort: A generic version of C.A.R Hoare's Quick Sort algorithm
A generic version of C.A.R Hoare's Quick Sort algorithm. It handles sorted arrays, and arrays with duplicate keys.
If you think of a one dimensional array as going from the lowest index on the left to the highest index on the right
then the parameters to this function are lowest index or left and highest index or right. The first time you call this
function it will be with the parameters 0, a.length - 1.
public static void
QuickSort(int[] a, int lo0, int hi0);
Parameters:
a
an integer array
lo0
left boundary of array partition
hi0
right boundary of array partition
Return Value:
returns nothing, just for demonstration purpose
Figure 4.8: The second page of the example document.
Dissertation der Fak. f. Informations- u. Kognitionswissenschaften, Univ. Tübingen - 2004
4.3
·
4.3
A Locale-Sensitive User Interface
A Locale-Sensitive User Interface
For the two applications LanguageExplorer (see chapter 5) and LanguageAnalyzer (see
chapter 6) developed for this thesis a special graphical user interface has been developed
which allows the user to switch the language of the user interface at run time without the
need to restart the application.
Although LanguageExplorer and LanguageAnalyzer have been implemented in Java
and its GUI library Swing which provides software developers with a highly customizable
framework for creating truly “international” applications, the Swing library is not localesensitive10 to locale switches at run time.
Taking into account Swings elaborate Model-View-Controller architecture, this section
describes how to create GUI applications which are sensitive to locale changes at runtime,
thus increasing their usability and user friendliness considerably. The content of this section
has been published in [Sim02].
4.3.1
Introduction
Sometimes GUI applications are created with internationalization11 in mind, but are not
immediately fully localized12 for all target languages. In such a case a user native to an
unsupported language would choose the language he is most familiar with from the set of
supported languages. But the ability to easily switch the language at run time could still be
desirable for him if he knows more than one of the supported languages similarly well.
Other applications like dictionaries or translation programs are inherently multi-lingual
and are used by polyglot users. Such applications would greatly benefit if the user interface
language would be customizable at runtime.
Unfortunately, this is not a builtin feature of the Java Swing GUI library. However this
article will sketch how it is easily possible to customize Swing such that it supports locale
switching at runtime. Therefore a new Look and Feel called the MLMetalLookandFeel will be
created, where ML is an abbreviation for “multi lingual”. This new Look and Feel will extend
the standard Metal Look and Feel with the ability of being locale-sensitive at runtime.
As an example we will take the Notepad application which is present in every JDK distribution in the demo/jfc/Notepad/ directory. It is localized for French, Swedish and Chinese,
as can be seen from the different resource files located in the resources/ subdirectory. Depending on the locale of the host the JVM is running on, the application will get all the
text resources visible in the GUI from the corresponding resource file. The loading of the
resource file is achieved by the following code:
Listing 4.10: Notepad.java [Line 59 to 65]
try {
resources = ResourceBundle.getBundle("resources.Notepad",
Locale.getDefault());
} catch (MissingResourceException mre) {
System.err.println("resources/Notepad.properties not found");
System.exit(1);
}
10 locale-sensitive:
A class or method that modifies its behavior based on the locale’s specific requirements. (All
definitions taken from [DeiCza].)
11 internationalization: The concept of developing software in a generic manner so it can later be localized for
different markets without having to modify or recompile source code.
12 localization: The process of adapting an internationalized piece of software for a specific locale.
Dissertation der Fak. f. Informations- u. Kognitionswissenschaften, Univ. Tübingen - 2004
97
98
Chapter 4
·
Implementation techniques and libraries
The ResourceBundle class will try to load the file resources/Notepad XX YY.properties where XX
is the two letter ISO-639 [ISO639] language code of the current default locale and YY the
two letter ISO-3166 [ISO3166] country code, respectively. For more detailed information
about locales have a look at the JavaDoc documentation of java.util.Locale. The exact
resolution mechanism for locales if there is no exact match for the requested one is described
at java.util.ResourceBundle. In any case, the file resources/Notepad.properties is the last fall
back if no better match is found.
You can try out all the available resources by setting the default locale at program startup
with the two properties user.language and user.country13 . To run the Notepad application
with a Swedish user interface you would therefore type:
java -Duser.language=sv Notepad
However, a user interface internationalized in this way is only customizable once, at program startup. After the resources for the default locale are loaded, there is no way to switch
the locale until the next start of the program. We will call this type of internationalization
static internationalization. Throughout this paper we will change Notepad.java to make it
dynamically internationalized, i.e. locale-sensitive at run time. We will call this new application IntNotepad.
4.3.2 The Java Swing architecture
A GUI application is composed out of many UI components like labels, buttons, menus,
tool tips and so on. Each of these components has to display some text in order to be useful.
Usually, this text is set in the constructor of the component for simple components like
labels or buttons. Additionally, and for more complex components like file choosers, the
text can be set or queried with set and get methods.
Internationalized applications like the Notepad application do not hard code these text
strings into the program file, but read it from resource files. So instead of:
JFrame frame = new JFrame();
frame.setTitle("Notepad");
they use the following code:
JFrame frame = new JFrame();
frame.setTitle(resources.getString("Title"));
where resources denotes the resource bundle opened in Listing 4.10.
Basically, we could just reset all these strings at run time every time the user chooses a
different locale. But for an application which uses tens to hundreds of different components
it would not be practicable to manually do this. Even worse, some components like JFileChooser do not even offer accessory methods for all the strings they display. So we have to
come up with another solution which requires a closer look at the architecture of the Swing
GUI library.
The design of the Swing library is based on a simplified Model-View-Controller [GHJV]
pattern, called Model-Delegate [ZuStan]. Compared to the classical MVC pattern, the ModelDelegate pattern combines the View and the Controller into a single object called the Delegate (see figure 4.9). In Swing, these delegates, which are also called the user interface
(UI) of a component, are Look and Feel specific. They are derived from the abstract class
ComponentUI. By convention have the name of the component they are the delegate for with
13 Be
aware that setting the default locale on the command line with help of the mentioned properties does not
work with all JDK versions on all platforms. Refer to the bugs 4152725, 4179660 and 4127375 in the Java Bug
Database [JDB].
Dissertation der Fak. f. Informations- u. Kognitionswissenschaften, Univ. Tübingen - 2004
4.3
·
A Locale-Sensitive User Interface
99
the J in the component class name replaced by the name of the specific Look and Feel and
UI appended to the class name. So for example the UI delegate for JLable in the Metal Look
and Feel has the name MetalLabelUI.
JButton
DefaultButtonModel
Model
Model
MetalButtonUI
Delegate
View
View
Controller
Controller
Figure 4.9: The left side shows the common Model-View-Controller pattern, whereas the right side
shows the Model-Delegate pattern used in Swing along with the class realizations for JButton.
One of the tasks the UI delegate is responsible for is to paint the component it is tied to.
In contrast to the AWT library, in Swing it is not the paint() method of every component
which does the work of painting itself. Instead, the component’s paint() method just calls
the paint() method of its delegate along with a reference to itself.
4.3.3
The solution - idea and implementation
After knowing the internals of the Swing architecture, we are ready to make the Swing components aware of locale switches at runtime. To achieve such a behavior, we will introduce
one more level of indirection. Instead of just setting a text field of a component to the real
string which should be displayed, we set the field to contain a key string instead. Then we
override the UI delegate in such a way that instead of just painting the string obtained from
its associated component, it will look up the real value of the string to paint depending on
the actual locale.
Let us substantiate this in a small example. Listing 4.11 shows how a JLabel is usually created and initialized, followed by a code snippet taken from the BasicLabelUI.paint()
method which is responsible for rendering the label’s text:
Listing 4.11: Creating a usual JLabel and a part of the BasicLabelUI.paint() method.
// Create a label.
JLabel label = new JLabel();
label.setText("Hello");
// Taken from javax.swing.plaf.basic.BasicLabelUI.java
public void paint(Graphics g, JComponent c)
{
JLabel label = (JLabel)c;
String text = label.getText();
// Now do the real painting with text.
...
}
Dissertation der Fak. f. Informations- u. Kognitionswissenschaften, Univ. Tübingen - 2004
100
Chapter 4
·
Implementation techniques and libraries
We will now create a new UI delegate for JLable called MLBasicLabelUI which overrides the
paint() method such that it not simply queries the text from the JLable and renders it. Instead it interprets the string received from its associated JLable as a key into a resource file
which is of course parameterized by the current Locale. Only if it doesn’t find an entry in
the resource file for the corresponding key, it will take the key text as the string to render.
Thus, the changes in the UI are fully transparent to the component itself.
Getting the localized resource strings
Because this procedure of querying the localized text of a component from a given resource
file will be common for all UI delegates which we will create for our Multi Lingual Look
and Feel, we put the code into a special static method called getResourceString():
Listing 4.12: ml/MLUtils.java [Line 35 to 44]
public static String getResourceString(String key) {
if (key == null || key.equals("")) return key;
else {
String mainClass = System.getProperty("MainClassName");
if (mainClass != null) {
return getResourceString(key, "resources/" + mainClass);
}
return getResourceString(key, "resources/ML");
}
}
This method builds up the name of the resource file which is searched for the localized
strings. Therefore it first queries the system properties for an entry called MainClassName. If
it succeeds, the resource file will be a file with the same name in the resources/ subdirectory.
If not, it will assume ML as the default resource file name. This file name along with the original key argument are passed to the second, two parameter version of getResourceString(),
shown in Listing 4.13.
Listing 4.13: ml/MLUtils.java [Line 50 to 76]
private static Hashtable resourceBundles = new Hashtable();
public static String getResourceString(String key, String baseName) {
if (key == null || key.equals("")) return key;
Locale locale = Locale.getDefault();
ResourceBundle resource =
(ResourceBundle)resourceBundles.get(baseName + " " + locale.toString());
if (resource == null) {
try {
resource = ResourceBundle.getBundle(baseName, locale);
if (resource != null) {
resourceBundles.put(baseName + " " + locale.toString(), resource);
}
}
catch (Exception e) {
System.out.println(e);
}
}
Dissertation der Fak. f. Informations- u. Kognitionswissenschaften, Univ. Tübingen - 2004
4.3
A Locale-Sensitive User Interface
·
Listing 4.13: ml/MLUtils.java [Line 50 to 76] (continued)
if (resource != null) {
try {
String value = resource.getString(key);
if (value != null) return value;
}
catch (java.util.MissingResourceException mre) {}
}
return key;
}
This method finally does the job of translating the key text into the appropriate localized
value. If it can not find the corresponding value for a certain key it just returns the key
itself, consequently not altering the behavior of a component which isn’t aware of the multi
lingual UI it is rendered with.
Notice that for performance reasons, getResourceString() stores resource files in a static
map after using them for the first time. Thus, any further access will use this cached version,
without the need to reload the file once again.
Overloading the paint() method of the UI delegates
After having understood the way how localized strings can be queried with the functions
introduced in Listing 4.12 and 4.13, the overloaded version of the paint() method in MLBasicLabelUI (Listing 4.14) should be no surprise. Additionally, the label is now initialized
to "MyApplication.HelloString" which is a key into the possibly localized resource file resources/MainClassName XX YY.properties.
Listing 4.14: A locale-sensitive JLabel and the paint() method of MLBasicLabelUI.
// Create a locale-sensitive label which has a MLBasicLabelUI delegate.
JLabel label = new JLabel();
label.setText("MyApplication.HelloString");
// Taken from MLBasicLabelUI.java which inherits from BasicLabelUI.
public void paint(Graphics g, JComponent c)
{
JLabel label = (JLabel)c;
String text = MLUtils.getResourceString(label.getText());
// Now do the real painting with text.
...
}
Notice that a string which will not be found in the resource file will be displayed “as is” in
the label. So our example would work perfectly fine even with the usual component UI, it
only would not respond to locale changes at run time.
If we want to make the GUI of a whole application locale-sensitive at runtime, we have
to create new UI classes for each Swing component we use in our GUI. This sounds like a
lot of work to do, but in fact we just have to redefine the methods which query text data
from the component they are associated with.
One problem which we may encounter is the fact that in Swing actual Look and Feels
like the Metal Look and Feel or the Windows Look and Feel use their own UI classes which
are not directly derived from ComponentUI (see figure 4.10). Instead all the different UI classes
Dissertation der Fak. f. Informations- u. Kognitionswissenschaften, Univ. Tübingen - 2004
101
102
Chapter 4
·
Implementation techniques and libraries
for a single component inherit from a class called BasicXXXUI where XXX stands for an arbitrary component name. This is done to factor out all the functionality which is common to
all the different Look and Feels into one base class.
MLBasicLabelUI
MLMetalLabelUI
paint(...);
...
...
package ml.basic
package ml.metal
ComponentUI
LabelUI
BasicLabelUI
MetalLabelUI
paint(...);
...
...
paint(...);
...
...
package javax.swing.plaf
package javax.swing.plaf.basic
package javax.swing.plaf.metal
WindowsLabelUI
...
package javax.swing.plaf.windows
Figure 4.10: The class hierarchy of the component UI classes of Swing for JLabel. In this diagram,
Label may be substituted by any other Swing component like Button, Tooltip and so on. The two
classes in the upper part of the diagram from the package ml are the locale-sensitive UI classes developed in this paper.
This makes our job more difficult, because usually we would like to override the UI’s of
a distinct Look and Feel, but often the task of querying and painting the actual text is done
only or at least in part in the BasicXXXUI base classes. Therefore we need to specialize two
classes. First we have to specialize the BasicXXXUI class for our component and redefine the
methods which query the text fields of our component. We will call this class MLBasicXXXUI.
Then we have to copy and rename the actual component UI belonging to our desired Look
and feel from MetalXXXUI to MLMetalXXXUI and change the base class from which it inherits
from BasicXXXUI to MLBasicXXXUI which is the name of our overloaded version of BasicXXXUI.
Again, Metal is just an example here. It could be just as well Windows, Motif or any other Look
and Feel. Additionally, if necessary, we have to redefine the methods in MLMetalXXXUI which
display text attributes from our associated component.
After having implemented all the needed UI delegates, we have to tell our application
in some way to use the new delegates instead of the old, default ones. This can be done in
two ways. The first one, which is perhaps more simple, is to just register our delegates with
the component names at program startup as shown in Listing 4.15.
Listing 4.15: Associating Swing components with their UI delegates.
UIManager.put("ToolTipUI",
"ml.mllf.mlmetal.MLMetalToolTipUI");
UIManager.put("LabelUI",
"ml.mllf.mlmetal.MLMetalLabelUI");
UIManager.put("MenuUI",
"ml.mllf.mlbasic.MLBasicMenuUI");
UIManager.put("MenuItemUI",
"ml.mllf.mlbasic.MLBasicMenuItemUI");
UIManager.put("ButtonUI",
"ml.mllf.mlmetal.MLMetalButtonUI");
UIManager.put("RadioButtonUI", "ml.mllf.mlmetal.MLMetalRadioButtonUI");
UIManager.put("CheckBoxUI",
"ml.mllf.mlmetal.MLMetalCheckBoxUI");
UIManager.put("FileChooserUI", "ml.mllf.mlmetal.MLMetalFileChooserUI");
UIManager.put("ToolBarUI",
"ml.mllf.mlmetal.MLMetalToolBarUI");
The second, perhaps more elegant way is to define a new Look and Feel for which the new
Dissertation der Fak. f. Informations- u. Kognitionswissenschaften, Univ. Tübingen - 2004
4.3
·
A Locale-Sensitive User Interface
UI delegates which have been created by us are the default ones. This approach is shown
in Listing 4.16.
Listing 4.16: ml/mllf/mlmetal/MLMetalLookAndFeel.java [Line 22 to 44]
public class MLMetalLookAndFeel extends MetalLookAndFeel {
public String getDescription() {
return super.getDescription() + " (ML Version)";
}
protected void initClassDefaults(UIDefaults table) {
super.initClassDefaults(table); // Install the metal delegates.
Object[] classes = {
"MenuUI",
"ml.mllf.mlbasic.MLBasicMenuUI",
"MenuItemUI",
"ml.mllf.mlbasic.MLBasicMenuItemUI",
"ToolTipUI",
"ml.mllf.mlmetal.MLMetalToolTipUI",
"LabelUI",
"ml.mllf.mlmetal.MLMetalLabelUI",
"ButtonUI",
"ml.mllf.mlmetal.MLMetalButtonUI",
"RadioButtonUI", "ml.mllf.mlmetal.MLMetalRadioButtonUI",
"CheckBoxUI",
"ml.mllf.mlmetal.MLMetalCheckBoxUI",
"FileChooserUI", "ml.mllf.mlmetal.MLMetalFileChooserUI",
"ToolBarUI",
"ml.mllf.mlmetal.MLMetalToolBarUI",
};
table.putDefaults(classes);
}
}
Finally, after each locale switch we just have to trigger a repaint of the dynamically internationalized components. This can be achieved by a little helper function as presented in
Listing 4.17 which takes a root window as argument and simply invalidates all the necessary child components.
Listing 4.17: ml/MLUtils.java [Line 106 to 112]
public static void repaintMLJComponents(Container root) {
Vector validate = recursiveFindMLJComponents(root);
for (Enumeration e = validate.elements(); e.hasMoreElements();) {
JComponent jcomp = (JComponent)e.nextElement();
jcomp.revalidate();
}
}
It uses another method named recursiveFindMLJComponents which recursively finds all the
child components of a given container. In the form presented in Listing 4.18, the method
returns all components which are instances of JComponent, but a more sophisticated version
could be implemented which returns only dynamically internationalized components.
Listing 4.18: ml/MLUtils.java [Line 154 to 173]
private static Vector recursiveFindMLJComponents(Container root) {
// java.awt.Container.getComponents() doesn’t return null!
Dissertation der Fak. f. Informations- u. Kognitionswissenschaften, Univ. Tübingen - 2004
103
104
Chapter 4
·
Implementation techniques and libraries
Listing 4.18: ml/MLUtils.java [Line 154 to 173] (continued)
Component[] tmp = root.getComponents();
Vector v = new Vector();
for (int i = 0; i < tmp.length; i++) {
if (tmp[i] instanceof JComponent) {
JComponent jcomp = (JComponent)tmp[i];
if (jcomp.getComponentCount() == 0) {
v.add(jcomp);
}
else {
v.addAll(recursiveFindMLJComponents(jcomp));
}
}
else if (tmp[i] instanceof Container) {
v.addAll(recursiveFindMLJComponents((Container)tmp[i]));
}
}
return v;
}
Notice that the version of repaintMLJComponents shown in Listing 4.17 only works for applications with a single root window. If an application consists of more than one root window
or if it uses non-modal dialogs, they also have to be repainted. This can be done by defining
a static method registerForRepaint (Listing 4.19) for registering the additional windows and
dialogs and by extending repaintMLJComponents in a way to take into account these registered
components.
Listing 4.19: ml/MLUtils.java [Line 142 to 146]
private static Vector repaintWindows = new Vector();
public static void registerForRepaint(Container dialog) {
repaintWindows.add(dialog);
}
The new version of repaintMLJComponents() is shown in Listing 4.20:
Listing 4.20: ml/MLUtils.java [Line 116 to 138]
public static void repaintMLJComponents(Container root) {
Vector validate = recursiveFindMLJComponents(root);
Iterator it = repaintWindows.iterator();
while (it.hasNext()) {
Container cont = (Container)it.next();
validate.addAll(recursiveFindMLJComponents(cont));
// Also add the Dialog or top level window itself.
validate.add(cont);
}
for (Enumeration e = validate.elements(); e.hasMoreElements(); ) {
Object obj = e.nextElement();
if (obj instanceof JComponent) {
JComponent jcomp = (JComponent)obj;
Dissertation der Fak. f. Informations- u. Kognitionswissenschaften, Univ. Tübingen - 2004
4.3
·
A Locale-Sensitive User Interface
Listing 4.20: ml/MLUtils.java [Line 116 to 138] (continued)
jcomp.revalidate();
}
else if (obj instanceof Window) {
// This part is for the Dialogs and top level windows added with the
// ’registerForRepaint()’ method.
Window cont = (Window)obj;
cont.pack();
}
}
}
The Locale Chooser
After we discussed in detail the techniques necessary to make Swing components aware
of locale switches at runtime there remains as last step the presentation of a widget which
displays all the available locales to the user and allows him to choose from this list a new
default locale.
Figure 4.11 and 4.12 show the new IntNotepad application with the builtin locale chooser.
Additionally, the original Notepad was extended by a permanent status bar to demonstrate
locale switches for labels. The first figure shows the application with the English default
locale while the user is just switching it to Russian.
Figure 4.11: A screen shot of the IntNotepad application. The user just selects Russian as the default
locale with the new locale chooser, which is located on the right side of the tool bar.
Figure 4.12 shows the application after the switch to Russian. Menus, labels, buttons
and even tool tips are now displayed with Cyrillic letters in Russian language. Notice that
the size of the menus has been resized automatically in order to hold the longer Russian
menu names.
The class LocaleChooser is a small extension of a JComboBox with a custom renderer which
displays each available Locale with a flag and the name of the corresponding language.
The language name is displayed in its own language if available and in English otherwise.
Please notice that there is no one to one mapping between languages and country flags,
as many languages are spoken in more than one country and there are countries in which
more then one language is spoken. Therefore one must be careful when choosing a flag as
representation for a language to not hurt the feelings of people who speak that language in
Dissertation der Fak. f. Informations- u. Kognitionswissenschaften, Univ. Tübingen - 2004
105
106
Chapter 4
·
Implementation techniques and libraries
Figure 4.12: This screen shot shows the IntNotepad application after the default locale has been
switched to Russian. Labels, menus and even tool tips appear in Russian now.
a different country. After all, the flags should be just visual hints to simplify the selection of
a particular language.
The LocaleChooser constructor expects as parameters a String which denotes the resource
directory of the application and a Container which will be the root component passed to the
repaintMLJComponentes() method presented in Listing 4.17 when it comes to a repaint of the
application caused by a locale switch.
For every language or language/country combination the resource directory passed to
the LocaleChooser constructor should contain a subdirectory named by the two letter language code or the two letter language code plus an underscore plus the two letter country
code, respectively. Each of this subdirectories should contain a file flag.gif which will be
the image icon displayed by the LocaleChooser for the corresponding language.
Thus, adding more locales to the list of locales displayed by LocaleChooser is merely a
fact of adding the corresponding directories and files to the resource directory and does
not require a recompilation of LocaleChooser. Remember however that for a locale switch to
show any effects a resource file with the localized component strings has to be available as
well.
Putting it all together
Finally, after the discussion of all the details involved in making Swing components aware
of locale switches at runtime, we will summarize the important steps and show how they
fit into the big picture of a real application.
First of all the new component UI delegates have to be created for all the components
which should be dynamically internationalizable. These UI delegates should be packed
together into a new Look and Feel which is derived from an already existing Look and Feel.
This way we don’t have to create UI delegates for the full set of Swing components at the
very beginning, but we have the possibility to stepwise extend our new Look and Feel for
new components. Creating the UI delegates has been extensively described in section 4.3.3.
Once our new Look and Feel is available, we can start to modify our application to make
it locale-sensitive at run time. The first step is to set the system property MainClassName to
the name of our application. This information will be needed by the getResourceString()
method (see Listing 4.12) presented in section 4.3.3. Then we have to set our new Look and
Feel as the standard Look and Feel for our application. These two steps can be achieved by
the following two lines of code:
Dissertation der Fak. f. Informations- u. Kognitionswissenschaften, Univ. Tübingen - 2004
4.3
·
A Locale-Sensitive User Interface
System.setProperty("MainClassName", "IntNotepad");
UIManager.setLookAndFeel(new MLMetalLookAndFeel());
As a third step, we have to install an instance of the LocaleChooser presented in section 4.3.3
somewhere in our application. Usually this will be the tool bar, but it can also be installed
in a menu or in a special options window along with other configuration options. The
LocaleChooser has to be instantiated with a reference to the main application window, in
order for the repaint method shown in Listing 4.17 to work properly.
That’s all. From now on, whenever we create a new Swing component, we have the
choice of setting its string attributes to either a concrete string or just to a key value. If
the string attribute is available in the applications resource file as a key, its value will be
displayed instead, according to the current default locale. Otherwise, the string attribute
itself will be displayed.
4.3.4
Conclusion
This paper presented a technique to make Swing components locale-sensitive at run time.
It works by simply creating a new Look and Feel, without changing any code in the components themselves. As example the IntNotepad application was derived from the Notepad example application available in every JDK distribution. IntNotepad is aware of local changes
and rebuilds the whole user interface every time such a change occurs at run time. Together
with all the other source code presented in this paper it is available for download at [Sim02].
Notice that by using the techniques presented here, it would be possible to lift the entire
Swing library and make it locale-sensitive for run time locale switches without any compatibility problems with older library versions.
Finally I want to thank Roland Weiss and Dieter Bühler for their assistance and for reviewing this paper.
Dissertation der Fak. f. Informations- u. Kognitionswissenschaften, Univ. Tübingen - 2004
107
108
Chapter 4
4.4
·
Implementation techniques and libraries
Scrolling on demand A scrollable toolbar component
Modern GUI programs offer the possibility to easily access status informations and functionalities by means of various menus, toolbars and information panels. However, as a
program becomes more complex, or in the case where users have the possibility to configure and extend these components, they often tend to get overfilled. This leads to scrambled
or even truncated components.
This section introduces a new container component called ScrollableBar, which can be
used as a wrapper for any Swing component. As long as there is enough place to layout
the contained component, ScrollableBar is completely transparent. As soon as the available
space gets too small however, ScrollableBar will fade in two small arrow buttons on the left
and the right side (or on the top and the bottom side if in vertical mode), which can be used
to scroll the underlying component, thus avoiding the above mentioned problems.
ScrollableBar is a lightweight container derived from JComponent which uses the standard
Swing classes JViewport and JButton to achieve its functionality. It fills a gap in the set of the
standard Swing components and offers the possibility to create more robust and intuitive
user interfaces. The content of this section has been published in [Sim04].
4.4.1 Introduction
Every professional applications comes with a fancy graphical user interface today and with
Swing, the standard widget set of Java, it is quite easy to create such applications. However, the design and implementation of a robust and user friendly GUI is not a trivial task.
One common problem is the fact that the programmer has no knowledge about the clients
desktop size. This may vary today from the standard notebook and flat panel resolution
of 1024x768 to 1900x1200 for high end displays. Even worse, Java applications can run on
many other devices like for example mobile phones, which have an even more restricted
resolution.
Another challenge arises from the extensibility of applications. While having the possibility to extend an application with various plugins may be a nice feature for the user,
the fact that these plugins will populate the menus and toolbars in an unpredictable way
imposes new problems on the programmer.
One possibility to solve these problems is to limit the size of the GUI components to
a certain minimal size. However, this may impose unnecessary restrictions on the user.
(Think for example of somebody who by default works with such an application, which
needs at least a resolution of 1024x768 but who occasionally gives demo talks with a beamer
which only supports an 800x600 resolution.) Furthermore, if an application with a graphical
user interface pretends to be resizable by displaying a resizable frame, than the user expects
he will be able to resize it based on his needs, not the programmer ones.
The second possibility is to do nothing and wait what happens. This is the way how
most of the GUI applications are written today. Just compare the right picture from figure
4.13 with figure 4.15 and see how parts of the status- and toolbars are cut of if the window
is shrinked beyond its optimal size. In the best case, the user could just reenlarge the application if this happens. In the worst case, if she is working on a device with a restricted
resolution, it may be impossible to access the desired functionality. In any case such an
application looks highly unprofessional!
Dissertation der Fak. f. Informations- u. Kognitionswissenschaften, Univ. Tübingen - 2004
4.4
·
Scrolling on demand
Figure 4.13: The left picture shows the Stylepad application from figure 4.15 with scrollable menu,
tool and status bars while the right picture shows the same application with truncated tool and status
bars.
4.4.2
Scrollable menus and toolbars!
The solution for all the above mentioned problems would be scrollable menus and toolbars.
However Swing, as many other widget sets, does not offer such kind of components. Using
the standard JScrollPane component as a container for menus and toolbars is not an option
here, because JScrollPane is too heavy weight. Its scrollbars are simply too big. But there is
another Swing component which can serve us as a template: since version 1.4, the JTabbedPane class offers the possibility to scroll its panes instead of wrapping them on several lines
if they do not fit on a single line. As can be seen in figure 4.14, arrow buttons for moving
the tabs have been added at the upper right part (for more information see [Zuk]).
Figure 4.14: Example of a JTabbedPane with the tab layout policy set to SCROLL TAB LAYOUT.
We now want to achieve the same behavior for menus, toolbars and other status bars and
information panels. To get a visual impression of how the modified components will look
like compare the two pictures in figure 4.13. They both show a screen-shot of the Stylepad
demo application shipping with every JDK which has been extended by a vertical toolbar
and a useful status bar (see figure 4.15). While the menu, status bar and the toolbars are
truncated and partially inaccessible in right picture, they can be scrolled and are fully functional in the left picture by using the arrow buttons which have been faded in.
Dissertation der Fak. f. Informations- u. Kognitionswissenschaften, Univ. Tübingen - 2004
109
110
Chapter 4
·
Implementation techniques and libraries
Figure 4.15: The Stylepad application at preferred size.
4.4.3 The implementation
We will now describe how to implement a class called ScrollableBar, which can serve as a
container for a java.awt.Container object or any other object derived from it. Most of the
time, ScrollableBar objects are completely transparent. Only if the place required by the
wrapped component for layout becomes too small, the ScrollableBar object will fade in two
arrow buttons at the left and right side of the component (or on the top and the bottom side
if in vertical mode) which can be used to scroll the wrapped component. As soon as there
will be again enough place for the layout of the enclosed component, these arrow buttons
will disappear immediately.
The Swing architecture
For a better understanding of the ScrollableBar implementation, it is helpful to revisit the
architecture of Swing which has been explained already in section 4.3.2. The Swing library
is a modern widget set based on the Model-View-Controller (MVC) pattern [GHJV]. But
while the classical MVC pattern consists of three independent parts, namely the model, the
Dissertation der Fak. f. Informations- u. Kognitionswissenschaften, Univ. Tübingen - 2004
4.4
Scrolling on demand
·
view and the controller, Swing uses a simplified version of this pattern where the view and
the controller part are combined in a so called Delegate [ZuStan, ELW] (see figure 4.9).
One of the main responsibilities of the UI delegate is to paint the component it is tied
to. In contrast to the AWT library, in Swing it is not the paint() method of every component
which does the work of painting itself. Instead, the component’s paint() method just calls
the paint() method of its delegate with a reference to itself.
The ScrollableBar class
Figure 4.16 shows the class diagram of the ScrollableBar class. As already mentioned, it is
derived from JComponent. It also implements the SwingConstants interface in order to easily
access the constants HORIZONTAL and VERTICAL which are defined there.
ScrollableBar has 4 properties. The two boolean properties horizontal and small store the
orientation of the component and the size of the arrows on the scroll buttons. The integer
property inc stores the amount of pixels by which the enclosed component will be scrolled
if one of the arrow buttons is being pressed. Smaller values lead to a smoother but slower
scrolling. Finally, the wrapped component is stored in the comp property. While horizontal is
a read-only property which can only be set in the constructor, the other three properties are
read/write bound properties in the sense described in the Java Beans specification [JaBean].
The following listing shows the two-argument constructor of the ScrollableBar class:
Listing 4.21: ScrollableBar.java [Line 30 to 41]
public ScrollableBar(Component comp, int orientation) {
this.comp = comp;
if (orientation == HORIZONTAL) {
horizontal = true;
}
else {
horizontal = false;
}
small = true; // Arrow size on scroll button.
inc = 4;
// Scroll width in pixels.
updateUI();
}
Notice the call to updateUI() in the last line of the constructor. As can be seen in listing
4.22, updateUI() calls the static method getUI() from the class UIManager to query the right UI
delegate and associates it with the current ScrollableBar object.
Listing 4.22: ScrollableBar.java [Line 45 to 52]
public String getUIClassID() {
return "ScrollableBarUI";
}
public void updateUI() {
setUI(UIManager.getUI(this));
invalidate();
}
UIManager.getUI() calls getUIClassID() (see listing 4.22) to get the key which is used to query
the actual UI delegate from a Look and Feel dependent internal table. Usually, the association of the standard Swing components to the appropriate UI classes is done by the different
Dissertation der Fak. f. Informations- u. Kognitionswissenschaften, Univ. Tübingen - 2004
111
112
Chapter 4
Implementation techniques and libraries
·
« interf ace»
j av ax . s w i n g . ev en t . C h an g eL i s t en er
« interf ace»
j av ax . s w i n g . Sw i n g C on s t an t s
« interf ace»
j av a. aw t . ev en t . M ou s eL i s t en er
j av ax . s w i n g . J C om p on en t
« interf ace»
j av a. bean s . P rop ert y C h an g eL i s t en er
« interf ace»
j av ax . s w i n g . Sw i n g C on s t an t s
j av ax . s w i n g . p laf . C om p on en t U I
ScrollableBar
j av a. aw t . C om p on en t
1
- h oriz ontal : boolean
- s mall : boolean
- inc : int
- comp : Component
+ScrollableBar(in comp : Component)
+ScrollableBar(in comp : Component, in orientation : int)
+g etU I Clas s I D ()
+u pd ateU I ()
+g etComponent() : Component
+s etComponent(in comp : Component)
+g etI ncrement() : int
+s etI ncrement(in inc : int)
+is SmallA rrow s () : boolean
+s etSmallA rrow s (in s mall : boolean)
+is H oriz ontal() : boolean
ScrollableBarU I
1
1
- s b : ScrollabeleBar
- s croll : J V iew port
- s crollF : J Bu tton
- s crollB : J Bu tton
- pres s ed : boolean
- inc : int
+createU I (in c : J Component) : ComponentU I
+ins tallU I (in c : J Component)
+u nins tallU I (in c : J Component)
+property Ch ang e(in e : P roperty Ch ang eE v ent)
+s tateCh ang ed (in e : Ch ang eE v ent)
+mou s eE x ited (in e : M ou s eE v ent)
+mou s eR eleas ed (in e : M ou s eE v ent)
+mou s eP res s ed (in e : M ou s eE v ent)
# createBu tton() : J Bu tton
j av ax . s w i n g . J Bu t t on
2
1
j av ax . s w i n g . J V i ew p ort
Figure 4.16: The UML class diagram of ScrollableBar and ScrollableBarUI.
Look and Feels while they are initialized. However, as we are writing a new component,
we have to establish this link manually, as shown in the following listing:
Listing 4.23: ScrollableBar.java [Line 19 to 22]
static {
UIManager.put("ScrollableBarUI",
"com.languageExplorer.widgets.ScrollableBarUI");
}
Notice that linking a component to its UI delegate in this way results in one and the same
UI class being used independently of the actual Look and Feel.
Besides the getter and setter methods for the corresponding properties, there is no more
functionality in the ScrollableBar class. All the painting and user interaction is handled by
the UI delegate ScrollableBarUI.
The ScrollableBarUI class
One of the most important methods of the UI classes is installUI() which is called every
time when a component is being associated with its UI delegate. This gives the UI delegate
a chance to properly initialize itself and the component it is responsible for.
Listing 4.24: ScrollableBarUI.java [Line 51 to 106]
public void installUI(JComponent c) {
sb = (ScrollableBar)c;
inc = sb.getIncrement();
boolean small = sb.isSmallArrows();
// Create the Buttons
int sbSize = ((Integer)(UIManager.get( "ScrollBar.width" ))).intValue();
scrollB = createButton(sb.isHorizontal()?WEST:NORTH, sbSize, small);
Dissertation der Fak. f. Informations- u. Kognitionswissenschaften, Univ. Tübingen - 2004
4.4
·
Scrolling on demand
Listing 4.24: ScrollableBarUI.java [Line 51 to 106] (continued)
scrollB.setVisible(false);
scrollB.addMouseListener(this);
scrollF = createButton(sb.isHorizontal()?EAST:SOUTH, sbSize, small);
scrollF.setVisible(false);
scrollF.addMouseListener(this);
int axis = sb.isHorizontal()?BoxLayout.X AXIS:BoxLayout.Y AXIS;
sb.setLayout(new BoxLayout(sb, axis));
scroll = new JViewport() {
... see source code ...
};
Component box = sb.getComponent();
scroll.setView(box);
sb.add(scrollB);
sb.add(scroll);
sb.add(scrollF);
// Install the change listeners
scroll.addChangeListener(this);
sb.addPropertyChangeListener(this);
}
In our case, the UI delegate queries and stores the components properties along with a reference to the component itself as private instance variables. Further on, it creates two arrow
buttons and an object of type JViewport which is used to wrap the scrollable component.
Based on the orientation of the associated ScrollableBar object, the newly created elements
are then being added to it by using a vertical or horizontal box layout. Notice that the
scroll buttons are initially set to be invisible. Finally, the UI object registers itself as property
change listener on the associated component, as a change listener on the viewport and as a
mouse listener on the arrow buttons.
The UI delegate gets informed about every size change of the ScrollableBar object and
the wrapped component, by a receiving a ChangeEvent from the viewport object. Depending
on the new sizes, it can change the visibility state of the arrow buttons and relayout the
component. Property changes in the ScrollableBar object are signaled to the UI delegate by
a PropertyChangeEvent. Based on these events, it can update the internally cached values of
these properties.
Finally, the events resulting from the user interactions on the scroll buttons are handled
by the different mouse listener methods. The UI delegate keeps a private boolean instance
variable pressed which is set to true if a button was pressed and which is reset to false
as soon as the button is released or the mouse pointer leaves the button. As can be seen in
listing 4.25, pressing one of the buttons also starts a new thread which scrolls the underlying
component by inc pixels in the corresponding direction and than sleeps for a short amount
of time. These two actions are subsequently repeated in the thread as long as the value of
the instance variable pressed is true, while the amount of sleeping time is reduced in every
iteration step. This results in a continuously accelerating scrolling speed, as longer the user
keeps on pressing the arrow button.
Dissertation der Fak. f. Informations- u. Kognitionswissenschaften, Univ. Tübingen - 2004
113
114
Chapter 4
·
Implementation techniques and libraries
Listing 4.25: ScrollableBarUI.java [Line 174 to 238]
public void mousePressed(MouseEvent e) {
pressed = true;
final Object o = e.getSource();
Thread scroller = new Thread(new Runnable() {
public void run() {
int accl = 500;
while (pressed) {
Point p = scroll.getViewPosition();
... Compute new view position ...
scroll.setViewPosition(p);
try {
Thread.sleep(accl);
if (accl <= 10) accl = 10;
else accl /= 2;
} catch (InterruptedException ie) {}
}
}
});
scroller.start();
}
It should be noticed that we need no special paint method for the ScrollableBarUI class, because painting occurs naturally from the standard Swing button and viewport components
which we used.
After we have discussed the main parts of the implementation, it should be evident
why the advantages of dividing the functionality of the ScrollableBar class into two classes
outweigh the coding overhead. First of all we cleanly separated the properties of the component from the way how it is displayed and how it interacts with the user. Secondly, it is
very easy now to define a new UI delegate which renders the component in a different way
or to just derive a new UI delegate from the existing one which slightly adopts appearance
or user interaction properties to a specific look and feel.
4.4.4 Using the ScrollableBar class
Using the ScrollableBar class is very easy and straight forward. In fact we can wrap every
arbitrary Swing component inside a ScrollableBar object by passing it as argument to the
constructor when creating the object. For the example application shown on the left side of
figure 4.13 it was only necessary to change a single line:
JToolBar toolbar = new JToolBar();
...
panel.add("North", toolbar);
from the original Stylepad application into:
JToolBar toolbar = new JToolBar();
...
panel.add("North", new ScrollableBar(toolbar));
in order to make the horizontal toolbar scrollable if the space becomes too small to render
it as a whole.
Dissertation der Fak. f. Informations- u. Kognitionswissenschaften, Univ. Tübingen - 2004
4.4
·
Scrolling on demand
In general, the ScrollableBar class is more recommended for wide and not very high
components in horizontal mode and narrow and high components in vertical mode. If
used for other components the scroll buttons would get too big and take up too much space
to be really useful.
Menu bars in JFrame objects
As shown in the last section it is very easy to use the ScrollableBar class in your own applications. Even upgrading existing applications is not very hard. The only problem which
may arise is in the case where a ScrollableBar should be used as a wrapper for a menu bar
which will be added directly to a JFrame object. (Notice that in our example application, the
menu bar has been added to a JPanel object before the whole panel has been added to the
JFrame object.)
The problem arises because JFrame provides a specialized setJMenuBar() method for adding
menu bars and this method expects an argument of Type JMenuBar. At a first glance, we
could just use one of the generic add() methods defined in JFrame’s ancestor classes instead.
However, if we take a closer look, we will see that the problem is a little bit more complex.
First of all, in the case of JFrame, children are not being added to the component directly,
but to the so called “root pane”, which is a special child component of every JFrame. However, we also can not add the menu bar directly to the root pane, because the root pane
itself also has a special method called setJMenuBar() which expects a JMenuBar object as argument. Using this method for adding menu bars is essential, because only if it is used the
RootLayout layout manager used by the JRootPane class will honor the presence of the menu
bar. RootLayout, which is a protected inner class of JRootPane, uses the protected JRootPane
property menuBar which has been set by JRootPane.setJMenuBar() for layout calculations.
To cut a long story short, we have to create a new SMJFrame class (which stands for
Scrollable Menu JFrame) which overrides the createRootPane() method to return a new, customized root pane class. For this purpose we just derive an anonymous class from JRootPane
which overrides the two methods setJMenuBar() and createRootLayout().
setJMenuBar(), the first one of this two methods wraps the menu bar into our ScrollableBar class, before storing it as a protected instance variable and adding it to the layered pane
which is a part of the root pane.
The second method createRootLayout() returns an anonymous class which inherits from
the JRootPane protected inner class RootLayout. It overrides the layout methods in that class in
such a way, that they use the ScrollableBar instance variable for layout calculations instead
of using the bare menu bar, as it was done by the original version of the methods.
These modifications finally give the desired result. A call to setJMenuBar() on a SMJFrame
object will be forwarded to the customized root pane. There, the menu bar will be wrapped
into a ScrollabelBar object before it will be actually added to the frame. Because the customized root pane uses a customized layout manager, it will handle the scrollable menu bar
in the same way in which a JFrame object handles an ordinary menu bar. With respect to all
other concerns, SMJFrame behaves exactly like its ancestor JFrame.
Limitations
The only limitation for the use of the ScrollableBar class so far is that it can not handle
floating tool bars. This is because JToolBar objects have to be laid out into a container whose
layout manager is of type BorderLayout if they want to be floatable. Additionally, no other
children can be added to any of the other four ”sides”. This is obviously not the case, if the
toolbar is wrapped inside a ScrollableBar object.
Fixing this problem would require extensive changes in BasicToolBarUI, the UI delegate
of JToolBar. Unfortunately, because not all the methods which need to be customized are
Dissertation der Fak. f. Informations- u. Kognitionswissenschaften, Univ. Tübingen - 2004
115
116
Chapter 4
·
Implementation techniques and libraries
declared public or protected, in fact a complete rewrite of the delegate would be necessary.
4.4.5 Conclusion
This section presented a quite small and simple, yet very powerful container class which
fills a gap in the set of standard Swing components. Using it involves no overhead, neither
at development time nor at run time but yields a lot of benefits. The most important ones
are: better usability and user friendliness and more robust and intuitive GUI applications.
Dissertation der Fak. f. Informations- u. Kognitionswissenschaften, Univ. Tübingen - 2004
Chapter 5
LanguageExplorer
5.1
Introduction
LanguageExplorer is a new program for reading texts in electronic form. However, in contrast to other, similar book readers, LanguageExplorer is specialized in displaying several
versions of a text in parallel. This may be for example an original text along with its translation or several different translations of a certain text. Therefore LanguageExplorer may be
characterized as an electronic synopsis1 which offers comfortable navigation capabilities.
Additionally, given a certain text position in one text, it allows to access the corresponding
locations in the parallel versions of the text.
Furthermore LanguageExplorer serves as platform for the integration of arbitrary tools
for text reception and analysis. Currently these are dictionaries, powerful search and indexing capabilities and tools for statistical text analysis. New features like bookmarks, user
annotations and text apparatuses are currently implemented.
Another highlight of LanguageExplorer is its ability to cope with texts in virtually any
language. Besides the common Western and Eastern European languages he supports languages like Greek and Russian, but also languages written from right to left like Hebrew
and languages written with ideographic scripts like Chinese and Japanese. In fact even
facsimile reproductions and sound can be handeled by LanguageExplorer, thus allowing
uniform access to texts available in any arbitrary form.
LanguageExplorer stores its texts in a modern XML-based file format (see section 2.4
on page 22). Optionally he supports strong encryption of the content he displays, thus
effectively preventing illegal duplication of protected materials.
LanguageExplorer has been designed and implemented using cutting edge software
technology. It offers a high degree of functionality and user-friendliness. System independence was one of the main goals during development, so today LanguageExplorer is
available for the Linux, Windows and Mac OS X operating systems.
Together with LanguageExplorer, which is intended for reading and analysing texts, a
second system called LanguageAnalyzer has been developed. LanguageAnalyzer allows
the user to create sophisticated, linked editions suitable as input for LanguageExplorer out
of simple text based sources. More information about LanguageAnalyzer is available in
chapter 6. While LanguageExplorer may be seen as the viewer part of the project LanguageAnalyzer is in fact the editor part which allows the composition of editions for LanguageExplorer.
1 synopsis:
from Greek, “literally, comprehensive view, to be going to see together”. A comparative juxtaposition of similar text version. Traditionally used for the juxtaposition of the four gospels.
Dissertation der Fak. f. Informations- u. Kognitionswissenschaften, Univ. Tübingen - 2004
118
Chapter 5
5.2
·
LanguageExplorer
Overview
In this section the basic functionality of LanguageExplorer will be demonstrated based on
some screen-shots. Figure 5.1 shows LanguageExplorer after loading a book. The main
part of the program are the text areas which display the different versions of the text: in
this example, the original German version of the novel “Die Verwandlung” by Franz Kafka
together with an English and a Russian translation.
Figure 5.1: LanguageExplorer after loading a book. By clicking the left mouse button on a sentence
in the left text area this sentence as well as the corresponding sentences in the other text areas are
highlighted.
But LanguageExplorer consists of more than the menu and the text areas. In the region
marked with A in figure 5.1, LanguageExplorer has a tool bar. It can be used to execute most
of the commands offered by LanguageExplorer in a fast and comfortable way. Additionally,
every text area has its own navigation bar (marked with B in figure 5.1) with the aid of
which the books may be navigated section- and chapter-wise. While navigating, all the
other text areas may be synchronized reciprocally with the actual one. More information
about navigation can be found in section 5.4.2 on page 122.
Figure 5.2 shows LanguageExplorer with opened dictionary (region C) and KWIC-Index2
window (region D). The size of both of these windows may be adjusted by the user according to his preferences and they may be opened or closed individually. If a dictionary query
is triggered or if a KWIC-Index is generated by the user, the corresponding window will
open automatically to the size previously adjusted by the user.
2 KWIC-Index
is an abbreviation for “KeyWord In Context”-Index. It denotes an index which not only contains
every occurrence of the key word, but also a certain amount of the text before and after the key word. KWICIndex generation is described in-depth in chapter 5.4.3 on page 126.
Dissertation der Fak. f. Informations- u. Kognitionswissenschaften, Univ. Tübingen - 2004
5.3
·
Installation
Figure 5.2: LanguageExplorer with opened dictionary and KWIC-Index window. The KWIC-Index
visible in the region marked with D in the figure was produced by simultaneously pressing the Shift
key and the left mouse button on the word “back”. The dictionary (visible in the part C of the window) was opened by simultaneously pressing the Ctrl key along with the left mouse button on the
same word.
After the basic functionality of LanguageExplorer has been demonstrated in this section,
the next sections will present and explain every single feature in more detail.
5.3
Installation
This chapter covers the installation of LanguageExplorer. Because there are graphical installers available for all the platforms supported by LanguageExplorer the installation is
usually a matter of a few minutes. Therefor the next sections will mainly focus on the peculiarities of the different platforms.
5.3.1
Installation under Windows
Insert the LanguageExplorer CD-ROM into the CD-ROM drive and Choose Run... from the
Start-Menu. Type the command D:\windows\setup.exe into the appearing text field. Notice
that it may be necessary to replace D:\ with the real name of your CD-ROM drive. Thereafter
follow the instructions given by the installation program. By default LanguageExplorer
will be installed into the folder C:\Program Files\LanguageExplorer however the target folder
may be changed by the user. Please be aware that under Windows NT, Windows 2000 or
Dissertation der Fak. f. Informations- u. Kognitionswissenschaften, Univ. Tübingen - 2004
119
120
Chapter 5
·
LanguageExplorer
Windows XP Professional you may need Administrator privileges in order to install LanguageExplorer into the default C:\Program Files folder.
After successful installation there will be a new LanguageExplorer menu entry in the
Programs sub menu of the Start-Menu. Under this new menu the entry LanguageExplorer can
be used to start LanguageExplorer and the entry Uninstall to remove LanguageExplorer
from the system.
5.3.2 Installation under Linux
Insert the LanguageExplorer CD-ROM into the CD-ROM drive and mount it. The following instructions assume that your CD-ROM drive is available under /mnt/cdrom. Start the
program /mnt/cdrom/linux/setup.bin and follow the instructions given by the installation
program. Depending on which target directory you choose for installation you may be
required to have root-privileges.
After the installation completed successfully LanguageExplorer can be started with the
command /opt/LanguageExplorer/LanguageExplorer where /opt/LanguageExplorer may have to
be replaced with the actual installation path chosen during installation. With the Uninstall
program, which is located in the same directory, LanguageExplorer can be removed from
the system.
Changing the hotkey for the input method activation
As described in chapter 29 on page 137 LanguageExplorer supports input methods for the
input of characters not available on the keyboard. Such an input method may be selected
from the input method menu which can be activated by pressing a certain hotkey combination. By default this is the F4 key. However, this hotkey may be changed by setting the environment variables INPUTMETHOD SELECTKEY and INPUTMETHOD SELECTKEY MODIFIERS. By appending
the line export INPUTMETHOD SELECTKEY=VK F8 to the end of the .bashrc configuration file, the
hotkey can be changed to F8. The file .bashrc is located in the users home directory. The
environment variable INPUTMETHOD SELECTKEY can be set to the values VK F1 to VK F12 and VK A
to VK Z corresponding to the keys available on the keyboard.
Additionally, the second environment variable INPUTMETHOD SELECTKEY MODIFIERS may be
set to the value of a modifier key, which has to be pressed together with the key defined
before, in order to activate the input method selection menu. The actual values for the
three modifier keys can be SHIFT MASK, CTRL MASK or ALT MASK. Setting this variable can also be
omitted, in which case pressing the hotkey defined before will be enough to activate the
input method selection menu.
5.3.3
Installation under Mac OS X
Insert the LanguageExplorerCD-ROM into the CD-ROM drive. In the folder macosx of CDROM click on the archive setup.sit. This will expand the installer program and create the
application setup in the folder you chose. By executing setup the actual installation process
will be started.
By default LanguageExplorer will be installed into the application folder which may
require administrator privileges. However an arbitrary installation folder can be selected
during the installation process. After completing the installation, LanguageExplorer can be
started by clicking the LanguageExplorer icon on the desktop.
Dissertation der Fak. f. Informations- u. Kognitionswissenschaften, Univ. Tübingen - 2004
5.4
5.4
·
Handling
Handling
This chapter will give a brief description of every single function available in LanguageExplorer. Functions are grouped together into section based on their subject, where every
sections starts with the description of the most important functions for a given area. Subsections contain the description of special auxiliary functions.
5.4.1
Loading books
After starting LanguageExplorer, the first thing to do, before any meaningful work will be
possible, is opening a book. This can be achieved by choosing Open Book from the File menu
or by clicking the Open Book button (see left margin) on the tool bar.
Figure 5.3: The open book dialog. After the file verw prev meta.leb has been chosen in the region
marked with B, the accessory component visible in region C displays the bibliographic data of the
selected book.
Like every menu entry available in LanguageExplorer, the Open Book menu entry may be
reached by using a keyboard shortcut. For the Open Book menu entry this so called accelerator is the combination of pressing the Control key together with the O key on the keyboard.
It will bring up the open book dialog shown in figure 5.3.
The open book dialog is a default file dialog extended by a custom accessory component
tailored specially for LanguageExplorer (see region C in figure 5.3). While region A of the
dialog shows the actual folder, region B displays all the available files in that folder. If a file
is chosen which is in LanguageExplorer book format, the accessory component displays
the bibliographic data of the corresponding book. It consists of the author’s name, the
languages of the different book versions, and the titles of each version in the corresponding
language.
One additional information displayed in the accessory is the availability of dictionaries
for the selected book. LanguageExplorer supports two kinds of dictionaries: global ones
and builtin dictionaries. While global dictionaries are available to all books, builtin dictionaries are packed together with the books into the LanguageExplorer book files. They can
be used only by the corresponding book and they usually contain only the words occurDissertation der Fak. f. Informations- u. Kognitionswissenschaften, Univ. Tübingen - 2004
121
122
Chapter 5
·
LanguageExplorer
ring in that book. If both dictionaries are present for a certain book, LanguageExplorer uses
a two step algorithm when looking up a word in the dictionary where the builtin dictionary will always be favored against to the global one. More information on the dictionary
function may be found in section 5.4.4 on page 128.
Finally, a book file may be opened by double clicking on the corresponding book file or
by pressing the Open button for an already selected book file.
If the text areas contain some strange character glyph or don’t display any characters
at all after the loading of a new book, this indicates that the actual font is not capable of
displaying that text. It may be necessary to select a new font by using the LanguageExplorer font selection dialog which is described in section 5.4.8 on page 132.
Encrypted books
As already mentioned in chapter 5.1, LanguageExplorer also supports encrypted books.
They have the same file suffix like usual, unencrypted book (namely .leb) and they are
displayed in the same fashion like usual books in the open file dialog. However when
opened for the first time, a so called authentication dialog as shown in figure 5.4 is presented
to the user.
Figure 5.4: The authentication dialog with a key entered by the user.
It prompts the user for a key and a password for the selected book. This key/password
combination is usually user and book dependent and was created by the publisher of the
book for every user who bought that book. If you didn’t receive your personal key and
password combination for an encrypted book when buying it, please contact your dealer or
the publisher of the book.
If the “Remember Password” check box is selected when entering the password, LanguageExplorer will store an encrypted version of the password in the personal preference
file of the actual user in order to avoid the password dialog the next time the same book will
be loaded again. Because the key for every encrypted book is stored by LanguageExplorer
automatically, it has to be entered only when loading an encrypted book for the very first
time.
5.4.2 Navigation
After loading a book as described in the previous chapter, LanguageExplorer looks as
shown in figure 5.1 on page 118. By dragging the drag bar which is located between the
different text areas, the size available to each of them can be customized. This makes sense
if one text area contains a more condensed version of a text than the other ones for example.
By adjusting their width, the text areas can be usually customized in such a way to hold
approximately the same amount of information per window.
Pressing the left mouse button on an arbitrary sentence in one of the text areas will
Dissertation der Fak. f. Informations- u. Kognitionswissenschaften, Univ. Tübingen - 2004
5.4
·
Handling
highlight that sentence and all the corresponding sentences in the other text areas as well.
It must be noticed that in the other text areas more then one sentence may correspond to
the sentence selected first. Under certain circumstances it may also be possible that there
is no corresponding sentence in a particular text version in one of the other text windows.
Pressing the right mouse button in one of the text areas will remove the highlighting in each
of them again.
The cursor keys (see left margin) as well as the PageUp and PageDown keys can be used to
navigate the text inside the text areas. While the cursor keys scroll the text line by line the
PageUp and PageDown keys (see left margin) may be used to scroll the text page wise, where a
page always corresponds to the currently visible text in the corresponding text area. Page
wise scrolling is done in such a way that there will be always at least one line of overlap
between the page which was displayed last and the new one.
The actions just described can be initiated with the mouse as well. For it, the mouse
has to be pressed on the scrollbar (see left margin) located on the right side of every text
area. In doing so, clicking the small arrows of the scroll bar corresponds to the line by line
scrolling done with the cursor keys while just clicking inside the scrollbar area is equivalent
to the page wise scrolling done with the PageUp and PageDown keys. By dragging the scrollbar
with the mouse to a fixed position, it is possible to directly navigate to the text position
which corresponds to the relative location of the scroll bar. Independently of the navigation
method used, the scrollbar position always signals the relative position of the displayed
page in relation to the whole text.
Figure 5.5: A picture of the navigation bar. The text area belonging to this navigation bar just displays
the first section in the second chapter in the first part of its book.
As a last possibility the navigation bar (see figure 5.5) located at the bottom of every text area
(see region B in figure 5.1) may be used for a structural navigation of the text. By clicking the
corresponding arrow buttons with the mouse, the text may be navigated section, chapter
or part wise back and forward. It is also possible to jump to a certain of these structures by
entering its number into the appropriate text field.
Additionally it is possible to jump to the very first and the very last element of the
before mentioned structures (e.g. the first or the last section of a chapter) with the help of
the Begin and the End buttons (see left margin). Similarly to the scrollbars, the navigation
bars are always synchronized with their corresponding text area. They always show the
element which is displayed in the upper left corner of the text area, no matter which means
of navigation is used.
Synchronizing the text areas
One of the main features of LanguageExplorer is its ability to show different versions of
a text in parallel where always the corresponding part of each version is visible. Usually
the synchronization is done automatically. Even if navigating in one of the text areas as
described in the previous section, the other text areas are always updated to show the corresponding parts.
However sometimes this synchronization may be not necessary or even hindering. For
example when searching in one of the text areas (see section 5.4.5 on page 128) it may be
helpful to temporarily disable the synchronization. And indeed this is possible in LanguageExplorer. Every text area may be individually synchronized or unsynchronized with
the other ones.
Dissertation der Fak. f. Informations- u. Kognitionswissenschaften, Univ. Tübingen - 2004
123
124
Chapter 5
·
LanguageExplorer
Synchronization for two text areas By clicking the left synchronization button on the
tool bar (region A in figure 5.1 on page 118) the left text window will be unsynchronized
from the right one. This means that the right window will not follow any navigation in the
left window. Notice that the synchronization buttons are so called toggle buttons. Clicking
the left button once again will reconnect the left text area to the right one such that all
movements done in the first one will be followed by the second one respectively. The state
of the button is indicated by the small check mark in the lower right side of the button. If
the check mark is present, the corresponding window is connected to its sibling window. If
the check mark is absent as shown in the right icon on the left margin, then the navigation
in the corresponding text area is independent of the second one.
The hot key Ctrl-L or the menu entry Options→SyncLeft may be used instead of the
synchronization button located on the tool bar to configure the synchronization behavior of
the left text area.
The right window may be synchronized with the left one in the same manner like the
left window with the right one. The user may choose between the right synchronization
button from the tool bar (see left margin), the menu entry Options→SyncRight and the hot
key Ctrl-R.
Synchronization for several text areas The synchronization buttons on the tool bar automatically switch their appearance in the way shown on the left margin if a book with more
then two version of a text is loaded. Because now it is not possible anymore to represent the
synchronization status of every single window by its own button, a different approach was
taken. The left synchronization button has the duty to synchronize a single window with
all the other windows, while the right button may decouple a window from the other ones.
Clicking on the left synchronization button changes the cursor to the shape shown on
the left margin. After the cursor has changed, it is possible to synchronize an arbitrary text
area with all th other ones by simply clicking with the mouse into that text area. After
clicking, the mouse cursor changes back to its default shape. If the mouse will be clicked
outside of a text area, it will also resume to its default shape and no action will be taken at
all. Notice that after a book has been loaded all the text areas are synchronized by default.
Clicking on the left synchronization button changes the cursor to the shape shown on
the left margin. Subsequent clicking with this mouse cursor into a text area decouples the
movements in that window from all the other windows. As with the left synchronization
button, clicking into any other part of the application than a text area leads to no action at
all. After the first click, the mouse cursor changes back to its initial shape.
For books with several text versions the same hot keys and menu entries for text synchronization are available like for two version books. The menu entry Options→Synchronize
Window and the hot key Ctrl-L have the same effect like pressing the left synchronization
button whereas the functionality of the right synchronization button is also covered by the
menu entry Options→Unsynchronize Window and the hot key Ctrl-R.
Interchanging the text areas
Right after a book has been loaded into LanguageExplorer the different versions of the book
are displayed from left to right in the text areas in the same order in which they are stored
in the book file. This is also the order in which the dictionaries appear in the dictionary
view (region C in figure 5.2 on page 119) of LanguageExplorer. The order of the different
text versions may be changed however by the user while the order of the dictionaries will
be automatically updated to always reflect the text area order.
Dissertation der Fak. f. Informations- u. Kognitionswissenschaften, Univ. Tübingen - 2004
5.4
·
Handling
Figure 5.6: A picture of LanguageExplorer displaying a document marked up with multiple encodings. The encoding chooser from the toolbar in the upper part of the text areas can be used the select
the active encoding.
Interchanging with two text areas If a book consists only of two version, interchanging
theirs text areas can be done simply by clicking the swap button on the tool bar (see left
margin). Alternatively the menu entry Options→Swap Windows or the hot key Ctrl-S may be
used.
Interchanging with several text areas If a book contains more than two different version of a text, pressing the swap button on the tool bar does not automatically interchanges
two text areas but instead changes the mouse cursor to the shape shown on the left margin.
Now interchanging two arbitrary text areas is simply a matter of subsequently clicking with
the mouse into the two windows. Notice that after successfully clicking into the first window the mouse cursor will slightly change again into the form shown on the left margin.
Clicking with this changed mouse cursor on any other region than a text area will abort
the interchanging operation and reset the mouse cursor to its original form. The menu entry
Options→Swap Windows as well as the hot key Ctrl-S may be also used to start the interchanging operation for several text areas.
Aligning the text areas
Usually text layout is done in every text area, independently of the other text areas. However LanguageExplorer offers the possibility to align the text in all text areas section wise.
This will give all corresponding sections in all text areas the same vertical extent. It may
be useful for example to get a quick overview of parallel text versions. Especially for synopses where there are no analogous parts for some structures of a given text in the parallel
versions, it may help to identify the gaps faster.
The default setting after starting LanguageExplorer is normal, not aligned text layout.
By pressing the align text button on the tool bar, this may be changed by the user at any
time. The align text button is a toggle button. Its state is displayed by a small check mark in
its lower right corner. If this check mark is present, the sections of the different text versions
are aligned, otherwise they are laid out normally.
Dissertation der Fak. f. Informations- u. Kognitionswissenschaften, Univ. Tübingen - 2004
125
126
Chapter 5
·
LanguageExplorer
The align text action may also be reached from the menu entry Options→Align View and
by pressing the hotkey combination Ctrl-A.
Choosing the text encoding
Starting with version 2.0, LanguageExplorer can handle documents which are marked up
by different encodings. If a document comes with different encodings, the corresponding
text area will have an additional toolbar with an encoding chooser element as shown in
figure 5.6. The user has the possibility to select an active encoding by using this encoding
chooser. The layout and the part of the content visible in the text window may change
depending on the currently active encoding. Notice that the navigation bar at the bottom
of every text window which can be used to easily navigate within the document always
adopts to and shows the structures of the active encoding.
5.4.3 The KWIC-Index
One of the most helpful features provided by LanguageExplorer is its ability to create arbitrary KWIC-Indices on the fly. As explained in chapter 5.1, KWIC-Index is an abbreviation
for “KeyWord In Context”-Index. It denotes an index which not only contains every occurrence of the given key word, but also a certain amount of text before and after that key
word. Usually the index is sorted alphabetically based on the suffix of the key word. The
advantage of such an index is the ability to see at once the different context in which the
key word appears in the text.
With LanguageExplorer the KWIC-Index for a word can be created by holding down the
Shift key and pressing the left mouse button on the desired word in the text. Thereafter the
KWIC-Index window as shown in part D of figure 5.2 on page 119 will open and display
the generated index. For systems which already define the mentioned key combination, an
alternative way for generating KWIC-Indices is available. Simultaneously pressing the Alt
and the K key on the keyboard will augment the mouse cursor with a small K in its lower
right corner (see left margin). Clicking a word with this mouse cursor will now generate a
KWIC-Index of the corresponding word as well. After the KWIC-Index has been generated
or after the mouse cursor leaves the original text window, the cursor will be restored to its
default shape.
The generation of a KWIC-Index automatically opens the KWIC-Index window. However this window may be closed and reopened at any time by using the KWIC-Index button
on the tool bar. The content of the KWIC-Index window will be conserved until a new index for another word will be created. Similarly to the Synchronization buttons described in
chapter 5.4.2 on page 123 the KWIC-Index button has a small check mark on its lower right
corner which indicates whether the KWIC-Index window is opened or closed. Opening
and closing this window may also be performed with the hot key Ctrl-K or by executing the
Options→KWIC menu entry.
Another characteristic of the KWIC-Index button compared with the other buttons of
the tool bar described until now is the small arrow on the lower left side of the button. It
indicates that a context menu is reachable from this button by pressing (not clicking) it for
a while. As shown in figure 5.7 the context menu pops down right under the button and
allows further customization of the KWIC-Index creation process.
In the upper part of the context menu the user may choose how the KWIC-Index will be
created out of the key word selected by the user. The default is to use just the plain word as
keyword. It is however possible to create a KWIC index not only for the simple word which
has been selected, but for all the words which begin, end or contain the selected word. This
can be achieved by selecting the options “With Right Context”, “With Left Context”, and
“With Left and Right Context” respectively. For example a KWIC-Index for the word “in”
Dissertation der Fak. f. Informations- u. Kognitionswissenschaften, Univ. Tübingen - 2004
5.4
·
Handling
127
Figure 5.7: Opening the KWIC-Index context menu.
with the option “Without Context” would contain just the word “in”. Together with the
option “With Right Context” it could also contain the word “inside”, with the option “With
Left Context” it could additionally contain the word “within” and finally if the option “With
Left and Right Context” had been chosen, all the words which contain “in”, like for example
“running” or “window” would appear in the index.
In the lower part of the context menu it is possible to choose how the entries of the
index will be sorted. Alphabetic sorting means that the entries of the index will be sorted
alphabetically with respect to the trailing context of the key word. It must be taken into
account that key word suffixes which can occur with the option “With Right Context” are
counted as trailing context when sorting. So for example a sorted KWIC-Index with right
context for the word “in” would contain the sentence “inadequate clothing...” sorted before
the sentence “in both cases...”.
In LanguageExplorer KWIC-Indices can also be created from the Find-Dialog. It offers
more sophisticated possibilities like for example ignoring the case of a words or creating
KWIC-Indices for arbitrary patterns described by regular expressions. More information
on this can be found in section 5.4.5 on page 128 the Find-Dialog is described.
Once the KWIC-Index has been generated, it contains a single line for every occurrence
of the key word. In this line, the keyword will be highlighted and centered so all the key
words will be displayed one beneath the other. Notice that highlighting will be done only
for the original key word and not for possible suffixes or prefixes of the keyword which
may be present because of the various context options.
Navigation in the KWIC-Index window is the same like in the usual text windows (see
section 5.4.2 on page122) with the only difference that clicking with the left mouse button
on a sentence in the KWIC-Index window will highlight that sentence in the text window
out of which the KWIC-Index has been created. Additionally, the corresponding sentences
in all the other windows will be highlighted as well and all the sentences will be made
visible in theirs windows. All this happens independently of the synchronization settings
for the different windows.
In addition to the usual means of navigation, the KWIC-Index window supports the
left and right cursor keys to move the whole content of the window to the left or to the
right. The size of the KWIC-Index window is customizable in the same way like the size of
the different text areas: by dragging the corresponding drag bar (see left margin) with the
mouse to the desired position. Clicking the small arrows on the left side of the drag bar is
another possibility of opening and closing the whole window.
Dissertation der Fak. f. Informations- u. Kognitionswissenschaften, Univ. Tübingen - 2004
128
Chapter 5
·
LanguageExplorer
5.4.4 The dictionary
As already mentioned in the introduction, one feature of LanguageExplorer is its ability to
integrate and use different dictionaries. It is possible to use general dictionaries which will
be available to all the books in the corresponding languages or special dictionaries which
are integrated into the books and usually contain only the vocabulary used in them. If
dictionaries exist for a book at all, and if they are global or builtin may be determined at
load time by using the accessory component of the File-Dialog (see figure 5.3 on page 121).
If at least one dictionary is present, it is possible to query it for a certain word by simply
clicking with the left mouse button on that word while simultaneously pressing the Ctrl
key. As with the KWIC-Index generation there is a second way to query the dictionary.
Pressing the Alt-D key combination will change the cursor by adding a small D to its lower
right corner as shown in the picture on the left margin. Now querying the dictionary is a
simple matter of clicking the desired word with this mouse cursor.
If at least one entry will be found in the dictionary for the selected word, the dictionary
window in the upper part of LanguageExplorer will open automatically and display the
matching results. By using the dictionary button from the tool bar it is possible to open and
close the dictionary window as desired. The buttons functionality, which conforms to that
of the the KWIC button described in the last section, may also be reached from the menu
entry Options→Dictionary or by using the keyboard shortcut Ctrl-D.
Figure 5.8: Opening the dictionary context menu.
The size of the dictionary window may be adjusted in the same way like the size of the
KWIC-Index window: by moving around the corresponding drag bar. The arrows on the
left side of the drag bar can be used as an alternative for opening and closing the window.
The only difference during navigation in the dictionary window compared to the other
LanguageExplorer windows is the fact that clicking with the mouse has no effect in this
window.
Pressing the dictionary button for a while will open a context menu which allows some
customization of the dictionary look up process. As can be seen from figure 5.8 it not only
resembles the KWIC-Index context menu, it also has the same options concerning the context of the word to query. The only difference compared with the KWIC-Index generation
is the fact that dictionary look up is always case insensitive.
5.4.5 Searching
The find dialog (see figure 5.9) is currently the most complex dialog supported by LanguageExplorer. It can be used to search the text of the loaded book for arbitrary strings or
regular expressions3 . Instead of scanning for individual occurrences of the search item it is
3 Regular
expressions are search patterns which may contain control characters with a special meaning during
searching. More information about regular expressions can be found in section 5.4.6 on page 130.
Dissertation der Fak. f. Informations- u. Kognitionswissenschaften, Univ. Tübingen - 2004
5.4
·
Handling
129
also possible to generate a KWIC-Index (see section 5.4.3 on page 126) which contains all
the appearances of that item.
Figure 5.9: The Find-Dialog.
The Find part of the find dialog contains a text field for entering the desired word or
expression to search for and two buttons. The arrow button may be used to open a pull
down menu with the history of the last few search terms while the clear button can be used
to clear the text field. A search item will be entered into the history list of the pull down
menu only after it was searched at least one time.
In the Options part of the dialog it is possible to choose how to search for the search
item. The “Case Sensitive” check box selects whether the search will be case sensitive, the
“Whole words only” check box selects whether the search will only find the search item as
a single word and finally the “Regular Expression” check box selects whether the search
item should be interpreted as a regular expression.
Finally the window which will be searched for the search term entered by the user may
be specified in the Window part of the dialog by simply selecting it from the corresponding
pull down menu.
After all the search options have been specified, the search process may be started with
the buttons located in the lower part of the dialog. It is possible to search forward in the
corresponding text area as well as backward. The search process always starts in the upper
left corner of the visible part of the text area for the forward search and in the lower right
corner of the visible part of the text window for the backward search. Thereafter searching
continues relative to the last occurrence of the search item.
However several peculiarities have to be taken into account. The find dialog is a so
called “non-modal dialog” with the consequence that it is possible to navigate in any of the
LanguageExplorer windows while the dialog is displayed, create a KWIC-Index or even
look up a word in the dictionary. If no sentence has been marked in the corresponding
search window before the search is resumed, the search will continue as described above.
If however a sentence had been selected in between, forward searching will continue at the
beginning and backward searching at the end of the last selected sentence respectively.
The Reset button can be used to reposition the visible part of the actual text area to the
position valid before the find dialog was called or before the target window in the find
dialog was changed for the last time. The Cancel button quits the find dialog, however
without repositioning the current view position.
Finally, the KWIC button can be used to create a KWIC-Index of the search item. Because
the search item can be interpreted as a regular expression, the KWIC-Indices generated this
way can be much more complex than the ones created in section 5.4.3. If the KWIC-Index
is generated for a regular expression, the whole text string that matches the expression will
be taken as key word. And because of the properties of regular expression, these key words
may well be different text strings for the same regular expression. Sorting is done based
Dissertation der Fak. f. Informations- u. Kognitionswissenschaften, Univ. Tübingen - 2004
130
Chapter 5
·
LanguageExplorer
on the suffix which follows the text string that was matched by the regular expression and
based on the settings made in the KWIC-Index context menu (see section 5.4.3 on page 127).
Notice that it is possible to generate a KWIC-Index which is case insensitive with respect to
the key word by simply unselecting the “Case Sensitive” check box.
5.4.6 Regular expressions
Regular expressions are search patterns which can contain special control characters. These
special characters are called meta characters. They must be quoted with a preceding \
character to treat them as usual characters. There are a lot of different idioms for regular expression which usually differ in the kind of the meta characters and the extensions
they add to the classical regular expressions. LanguageExplorer uses a syntax similar to
the one known from Perl regular expressions [PeReEx] with some extensions for Unicode
processing [UnReEx]. Following, inside the quotes, all the meta characters available in the
LanguageExplorer flavor of regular expressions: “()[]{}\ˆ$.|?*+”.
The following table lists the most important meta characters and explains their semantics. Finally, the section will be ended by some examples. More informations about regular
expressions can be found for example in J. Friedels book “Regular Expressions” [Friedl].
Pattern
x
\x
\uhhhh
[abc]
[ˆabc]
[a-z]
[a-m[v-z]]
[a-o&&[l-z]]
[a-z&&[ˆl-o]]
.
\p{InBlock}
\P{InBlock}
\p{IsCat}
\P{IsClass}
XY
Matches the following text:
Single letters and characters
the character “x”. “x” may be any character except a meta character.
the special character “x” where “x” has to be a meta character (e.g. “\.”
for the dot sign “.”).
the Unicode letter with the hexadecimal value hhhh (e.g. “\u0416” for the
Russian letter “”).
Character classes
one of the characters “a”, “b” or “c”. A simple character classes.
any character except “a”, “b” or “c”. A negated character classes.
all the characters between “a” and “z”. A simple character range.
all the characters between “a” and “m” or between “v” and “z”. The
union of two character classes.
all the characters between “l” and “o”. The intersection of two character
classes.
all the characters between “a” and “k” and between “p” and “z”. The
subtraction of two character classes.
Predefined character classes
any single character.
a character in the Unicode block “Block”. “Block” can be for example
“Greek”, “Cyrillic” or “Arabic”4 .
any character except the ones defined to be in the Unicode block with
the name “Block”.
any character with the Unicode category “Cat”. For example \p{IsLu}
for uppercase letters5 .
any characters except the ones with the Unicode category “Cat”.
Logical operators and quantifiers
the regular expression X followed by the regular expression Y. The simple
concatenation.
...to be continued on the next page ➥
4 Block
may be any Unicode block name with the white space characters removed from the name. Table A.1 in
appendix A lists all the valid Unicode block names
5 The Unicode character categories are listed in table A.2 in appendix A.
Dissertation der Fak. f. Informations- u. Kognitionswissenschaften, Univ. Tübingen - 2004
5.4
Handling
·
Pattern
X|Y
(X)
\n
X?
X*
X+
X{n}
X{n,}
X{n,m}
131
Matches the following text:
the regular expression X or the regular expression Y. The simple alternation. The regular expression he|she for example matches “he” as well as
“she”.
the regular expression X. The parenthesis are used to delimit a capturing group (see next operator). They also override normal operator precedence. While the expression r(unn)|(ead)er for example will
match all the words containing either “runn” oder “eader” the pattern
r(unn|ead)er will only match the words “runner” and “reader”.
the text corresponding to the n-th capturing group. Every text that
matches the part of a regular expression enclosed by parenthesis is called
a capturing group. Capturing groups are stored during pattern matching from left to right and numbered from 1 to 9. The expression \1 for
example matches exactly the same text that was previously matched by
the first capturing group.
the regular expression X once or not at all. The expression s(ing)? for
example would match “s” and “sing” but not “singing”.
the regular expression X zero or more times. The expression s(ing)* for
example would match “s”, “sing” and “singing”.
the regular expression X one or more times. The expression s(ing)+ for
example would match “sing” and “singing” but not “s”.
the regular expression X exactly n times. The expression s(ing){2} for
example would match only “singing” but not “s” or “sing”.
the regular expression X at least n times. The expression s(ing){1} for
example would match “sing” and “singing” but not “s”.
the regular expression X at least n times but not more than m times.
Even if regular expressions seem to be quite complicated to understand at first glance,
it may be nevertheless useful to learn how to use them. As a motivation, the following
paragraphs contain some interesting examples.
The regular expression[\p{InCyrillic}&&[\p{IsLl}]] matches all the Cyrillic lower case
characters. It is the intersection of the set of the Cyrillic characters with the set of the lower
case characters.
The regular expression6 ( \p{IsL}+)( \p{IsL}+){2,3}\1 matches every repetition of an
arbitrary word which is separated by at least two but no more than three other words (e.g
“..to pay attention to..” or “...he felt as if he...”). In the example the first parenthesized part
( \p{IsL}+) matches a space character followed by at least one letter. This corresponds
to a word. Notice that because of the fact that the expression is parenthesized, it will be
stored as the first capturing group. The second part of the original regular expression
( \p{IsL}+){2,3} therefore matches at least two but not more than three single words. Finally the last part \1 matches the first capturing group, that is the first word which has
been matched, followed by a last space character.
5.4.7
Audio output
Starting with version 2.0, LanguageExplorer supports the audio output of the document
content. Two different forms of audio output is supported. Some LanguageExplorer books
may be bundled and linked with audio files which contain a spoken version of the whole
book. If this is not the case, there is still a chance that the language of the book is supported
by the speech synthesizer built into LanguageExplorer. While the quality of this synthesizer
6 In
this example the
readability.
-character will be used instead of the usual space character in order to increase the
Dissertation der Fak. f. Informations- u. Kognitionswissenschaften, Univ. Tübingen - 2004
132
Chapter 5
·
LanguageExplorer
is not comparable with that of a professional speaker, it nevertheless gives the reader an idea
how a sentence will sound in the corresponding language.
If either of the two conditions just described are true, the speaker button in the local
toolbar of every text window (see figure 5.6) will be active. Pressing this active speaker
button will read the currently selected text.
5.4.8
Configuration
This chapter will discuss the various configuration properties offered by LanguageExplorer
which don’t apply to special functions but to the program and its user interface as a whole.
For convenience, most of these configuration options will be stored persistently between
subsequent execution of the program, so they will have to be adjusted only once.
Look and Feel
LanguageExplorer offers the possibility of changing the Look and Feel of an application at
run time. Different Look and Feels are provided and every Look and Feel may be used
with different color themes. The Look and Feel, as well as the current color scheme can be
changed by invoking the Look and Feel sub menu of the Options menu as shown in figure
5.10.
Figure 5.10: Setting the Look and Feel and the color scheme.
The user is adviced to try the available Look and Feels and color themes and choose
the combination which is most convenient for him. As other settings, the Look and Feel
settings are preserved in the personal preferences files between different LanguageExplorer
sessions.
Font selection
The font dialog shown in figure 5.11 offers the possibility to select the fonts used to display
the LanguageExplorer books on the screen. Font selection is usually made based on several
criteria first of which is the personal taste of the user. However usability should be taken
into account as well, and fonts which are readable well on the screen should be preferred.
The most important aspect when speaking about font selection is the question which
character glyph are supported by the given font and if a font is capable of displaying all
the characters available in a book. This is not a trivial task taking into account that LanDissertation der Fak. f. Informations- u. Kognitionswissenschaften, Univ. Tübingen - 2004
5.4
·
Handling
133
guageExplorer books may contain arbitrary UNICODE7 characters [UNI]. The UNICODE
standard defines about 60.000 characters today. Starting with the well known Latin characters defined in ASCII, it also defines, among others, the letters for the Arabia, Hebrew,
Cyrillic, Indic, Thai or Ethiopian scripts but also Chinese, Korean and Japanese ideographs.
Unfortunately, there exist few fonts which contain all the characters defined in UNICODE.
Therefore LanguageExplorer offers the possibility to select different fonts for every single
text window. That way it will be possible to read different versions of a book in parallel
even if there is no single font available which contains all the needed characters. Different
fonts which contain only the characters needed for a single version will suffice.
Figure 5.11: The font selection dialog.
In the Window part, in the upper left corner of the font selection dialog the window
for which the font selection will be done can be selected. It is possible to select a single
window here or to select all the windows in order to set the same font for all windows
simultaneously.
Basically it is preferable to use the same font for all windows because this leads to more
balanced presentation. However in the above mentioned case where a font doesn’t cover
all the required characters, different fonts have to be used. The Preview part of the font
dialog displays the title of every text version of the current book, each in its own text field.
These text lines may be used to check if the desired font supports the characters needed by
the corresponding text version.
It is also possible to choose the window for which the font should be changed by simply clicking into the text field with the corresponding title. Clicking into the Preview area
outside of any of the text fields will select all the windows for font change.
7 UNICODE
is a consortium which developed a character encoding system for most of the languages used
in the world today. This coding system has been approved as an international standard under the number
ISO/IEC-10646.
Dissertation der Fak. f. Informations- u. Kognitionswissenschaften, Univ. Tübingen - 2004
134
Chapter 5
·
LanguageExplorer
Finally, a new font can be selected in the Font part of the font selection dialog. Clicking
on one of the displayed font names will select the font and update the Preview panel in
order to reflect the font change. Depending on whether a single window or all the windows
have been selected for update, only one or all the text fields will change. The same holds
true if a new font size will be selected in the Font panel.
There are small editable text fields above the font name and font size selection lists. They
can be used to manually enter the desired font name or font size. For the font name, it is
sufficient to enter the first unique letters a name in order to select it. While the new input
for the font name has to be present already in the name list in order to be acceptable, it is
possible to enter size values not offered in the size list. Such new values will be inserted
into the list.
The Color part of the font dialog offers pull down menus for the selection of the foreground, background, and underline color respectively. Any changes made in this panel will
be reflected immediately in the Preview panel as well.
The Reset button can be used to undo the changes made so far in the font dialog box.
Pressing it will only reset the settings changed in the font dialog since the dialog was
opened. If a single window has been selected in the Window part of the dialog, only
changes for that particular window will be undone, otherwise, all the font attributes for
all the windows will be reseted to their initial values.
It is possible to make the actual changes persistent between different LanguageExplorer
executions by selecting one of the options in the “Save Options” part of the font dialog. If
neither of the two check boxes is selected, the changes will be effective only for the current
LanguageExplorer session. They will be lost when LanguageExplorer will be started the
next time. With the Book option, the actual settings will be saved for the current book. If
at any later time the book will be reloaded, the current font settings will be immediately
applied to the corresponding text windows. Using the Global option when leaving the
dialog will save the current settings as the default LanguageExplorer settings which will be
loaded every time at program start up and for books for which there exist no font settings
until now.
The save options just mentioned apply only if the dialog is left by pressing the OK
button. This will store the font settings in the desired way and update the text windows
to reflect the changes as well. All the windows will be updated simultaneously in the way
displayed by the preview panel of the font dialog, no difference which window was selected
in the dialog when the OK button was pressed.
Leaving the font dialog with the Cancel button discards all the changes done so far and
leaves the text areas of LanguageExplorer unchanged.
The user interface language
One of the nice features of LanguageExplorer is its ability to switch the language of the user
interface elements at run time, without the need to restart the whole program.
Figure 5.12: The LanguageExplorer locale chooser.
Dissertation der Fak. f. Informations- u. Kognitionswissenschaften, Univ. Tübingen - 2004
5.4
·
Handling
Switching the user interface language at run time can be easily done with the locale
chooser shown in figure 5.12. The locale chooser is a pull down menu which can be opened
by clicking the small arrow on its right side. In the closed state it displays the current
language while it offers a list of available languages in the open state. LanguageExplorer
is fully localized8 for German, English, Russian and French. If switching to a language not
fully supported by LanguageExplorer until now, all the string resources not localized will
be displayed by using their English default values.
The online help system
LanguageExplorer comes with a fully fledged and comfortable online help system with
searchable index (see figure 5.13). The whole user’s manual is available in electronic form
during program execution. It can be accessed at any time through the menu bar (Help→Tutorial) or by pressing the F1 key. Additionally, most of the LanguageExplorer dialogs
have an auxiliary Help button which was not mentioned until now. Pressing such a Help
button will automatically open the help system and jump to the corresponding place in the
manual where the description of the dialog is located.
Figure 5.13: The online help system of LanguageExplorer.
8 Localization
is the process of adapting a program to conform to the language, formatting rules, and cultural
nuances of a specific region of the world.
Dissertation der Fak. f. Informations- u. Kognitionswissenschaften, Univ. Tübingen - 2004
135
136
Chapter 5
·
LanguageExplorer
5.4.9 System dependencies
LanguageExplorer has been developed from the very beginning to be platform independent. Due to the significant differences of the target platforms supported by LanguageExplorer it is unavoidable however, that minor differences in the handling may occur. This
chapter is devoted to explaining and working around these system dependencies.
Copying and pasting text
While copying and pasting text between other applications and LanguageExplorer works
as expected under Windows and Mac OS X, there are some peculiarities to be considered
under Linux. While the before mentioned systems have just one clipboard, the Linux’s X
Windows system9 has two of them: a primary clipboard and a secondary clipboard. Selecting text with the left mouse button under the X Windows system automatically copies
this selected text into the primary clipboard. Thereafter it can be pasted by pressing the
middle mouse button. The problem with this kind of clipboard is that every text selection
automatically replaces the old content of the clipboard with the new selection.
That’s why X Windows additionally supports the secondary clipboard. Like under the
Windows, text is not implicitly inserted into the clipboard by simply selecting text. Instead
this has to be done explicitly. However how this is achieved varies between applications.
Nowadays most X Windows applications support the Ctrl-C and Ctrl-V hot keys respectively for copying and pasting text.
LanguageExplorer supports only the secondary clipboard together with the Ctrl-C and
Ctrl-V hot keys under the X Windows system. Therefore it is not enough to simply select
text in another application with the left mouse button in order to paste it into LanguageExplorer. Instead the desired text has to be moved into the secondary clipboard. If this is not
supported by the source application, the standard X Windows tool xclipboard (see figure
5.14) may be used to help.
Figure 5.14: The X Windows helper application xclipboard.
Using xclipboard is quite simple. Executing xclipboard on the command line opens the
window shown in figure 5.14. Text may now be selected in an arbitrary application with
the left mouse button and pasted into the xclipboard window with the middle button. Pasting the text into the xclipboard program automatically enters this text into the secondary
clipboard. Now it can be pasted into LanguageExplorer by simply pressing the Ctrl-V hot
key.
Pasting text from LanguageExplorer into a Linux application which does not support the
secondary clipboard also works well with the xclipboard application. Copying text into the
clipboard in LanguageExplorer by using the Ctrl-C hot key, automatically inserts that text
into the xclipboard window. Thereafter it can be selected with the left mouse button, thus
implicitly inserting it into the primary clipboard, and subsequently pasted into arbitrary
other applications by pressing the middle mouse button.
9X
Windows is the graphical windowing system of Linux and virtually any Unix based operating system. For
more information see http://www.x.org.
Dissertation der Fak. f. Informations- u. Kognitionswissenschaften, Univ. Tübingen - 2004
5.4
·
Handling
137
xclipboard is also useful because it supports a history of the last few entries of the clipboard. More information about xclipboard can be obtained at the command line by typing
the command man xclipboard.
Input methods
Especially when working with texts in different languages the problem arises that not all
letters can be typed with the keyboard attached to the computer because it usually offers
only keys for one language. Therefore several different systems have been developed in the
last years which allow not only the input of letters not present on the keyboard, but also the
input of ideographs for languages like Chinese or Japanese. These systems are commonly
called input methods. Input methods range from simple systems which implement a new
keyboard mapping for the input of Cyrillic or Greek characters on a Latin keyboard to
highly complex programs which allow the comfortable and fast construction of thousands
of different ideographs with a usual computer keyboard.
LanguageExplorer not only supports the generic input methods offered by the native
operating system, but also custom input methods specific to LanguageExplorer. Because
the invocation of these input methods is system dependent, they will be discussed in the
following subsections. Basically, every input method belongs to a top level window and
all the widgets inside that window. However different top level windows may well have
different input methods associated with them. So it would be possible for example for the
open book dialog to use the default system input method while the search dialog uses a
Cyrillic input method.
Figure 5.15: The input method selection menu under Linux.
Input method invocation under Linux To activate a different input method for a top
level window under the Linux operating system it is necessary to first click into that window in order to give the window the input focus. Thereafter the F410 function key can be
used to bring the input method selection menu on the screen (see figure 5.15).
While the first line denotes the default system input method, the last line of the menu
which reads “LanguageExplorer Input methods” opens a sub menu with the input methods
specific to LanguageExplorer.
Input method invocation under Windows
The Windows operating system offers a stan-
10 F4
is just the predefined default key for calling the input method selection menu. This key may be configured
as described in section 5.3.2 on page 120.
Dissertation der Fak. f. Informations- u. Kognitionswissenschaften, Univ. Tübingen - 2004
138
Chapter 5
·
LanguageExplorer
dard way to open a input method for an application. If the application supports input
methods, its context menu (as shown in figure 5.16), offers an additional menu entry for the
input method selection menu.
Figure 5.16: The default context menu of LanguageExplorer under windows gives access to the input
method selection menu.
Finally the input method selection menu looks exactly the same like the one shown for
the Linux operating system shown in figure 5.15.
Input methods under Mac OS X Under Mac OS X LanguageExplorer currently only
supports the system input methods provided by the operating system. Thy are invoked
through the keyboard menu of the application. Notice that the keyboard menu will be visible only if there is more than one input method available. It is possible to install additional
system input methods by choosing the “Keyboard Menu” tab from the “International” section of the “System Preferences” window.
Using the LanguageExplorer input methods After a certain LanguageExplorer input
method has been selected for a top level window, a small helper window as shown in figure
5.17 will be displayed in the lower right side of the screen while the top level window has
the keyboard focus. This helper window displays the language of the associated input
method in its title bar and a picture of the new keyboard bindings. The bindings may
change if certain modifier keys (e.g. the Shift key) is pressed on the keyboard, but they will
always display the characters currently available.
Figure 5.17: The help windows displayed by the LanguageExplorer input method for Russian. On
the left side the new default keyboard configuration, on the right side the keyboard layout valid when
holding down the Shift key.
As long as an input method is valid for a window, any keyboard action will result in the
input of the corresponding characters shown in the helper window instead of the characters
visible on the real keyboard. Switching back to the original keyboard layout is just a matter
of selecting the system input method for the corresponding top level window.
In LanguageExplorer input methods are especially useful in the find dialog if searching
a text version written in a language that contains letters which are not directly accessible
from the keyboard.
Dissertation der Fak. f. Informations- u. Kognitionswissenschaften, Univ. Tübingen - 2004
Chapter 6
LanguageAnalyzer
.
6.1
Introduction
LanguageAnalyzer is the editor part of the LanguageExplorer text reader presented in the
previous chapter. It is a comfortable tool for editing text documents with the focus being laid on analysis, segmentation and mark-up of already existing texts. Like LanguageExplorer, LanguageAnalyzer can handle texts in any language supported by the Unicode
[U30] standard. Furthermore facsimile reproductions and sound files can be processed and
tagged in a uniform way. Finally, the single documents can be linked together and saved in
the XTE XML format which has been described in section 2.4 and which is the native input
format for LanguageExplorer.
LanguageAnalyzer and LanguageExplorer have been developed in parallel and a big
part of the architectural characteristics and classes described in chapter 3, mainly the text
related classes, are shared by both projects. Many general features extensively described
in the previous chapter like the input method framework, the help system or the configurable look and feel are also available and supported in LanguageAnalyzer and will not be
described in full detail once again. Like LanguageExplorer, LanguageAnalyzer is currently
available for the Linux, Windows and Mac OS X operating systems.
6.2
Overview
In this section the basic functionality of LanguageAnalyzer will be demonstrated based
on a screen-shot of the application. Figure 6.1 shows LanguageAnalyzer after loading the
Russian and the English version of Franz Kafkas novel “The Metamorphosis”. Below the
menu and tool bar the two equally sized main windows which contain the two text versions
are horizontally arranged one above the other. Each of these two main windows is further
subdivided vertically into a tree view which represents the structure of the text on the left
side and a text area which contains the text content on the right side.
Notice that the text area is fully synchronized with the associated tree view. Clicking
on a tree node underlines the content in the text area which is described by the selected
element (as can be seen in the lower window in Figure 6.1) and clicking into the text area
selects the corresponding element node in the associated tree view.
Each node in the element tree has several attributes. Some of them like for example
the linking information and the start and end positions of the text content described by
each element are displayed by default. All the attributes can be viewed and edited by
Dissertation der Fak. f. Informations- u. Kognitionswissenschaften, Univ. Tübingen - 2004
140
Chapter 6
·
LanguageAnalyzer
Figure 6.1: LanguageAnalyzer after loading two versions of a text. The upper and the lower part of
the application each contain a vertically split window which contains the text in the right side and a
tree control representing the structure of the text on the left side.
clicking with the right mouse button onto the corresponding node (as shown in the left,
upper window in Figure 6.1).
Each of the two main windows may be loaded and saved independently of the other
window. However, the usual procedure is to load a single, plain text version into each of
the two windows respectively, edit and link them together and finally save them as one file
in the XTE XML format (see section 2.4 on page 22).
6.3
Handling
This chapter will give a brief description of the functions available in LanguageAnalyzer.
Notice that general, user interface related functions like for example the resizing of the
internal windows are described in section 5.4.
6.3.1
Loading content
Currently, the source files may be in an untagged character format (e.g ASCII, UTF8, ..), in
the LanguageExplorer XTE format or in a bitmap format like JPG, GIF or PNG. However, as
already noticed in section 3.6, loading documents in other formats like sound files or texts
encoded in other XML formats is just a question of writing the corresponding load and save
plugins.
Dissertation der Fak. f. Informations- u. Kognitionswissenschaften, Univ. Tübingen - 2004
6.3
·
Handling
The open file dialog of LanguageAnalyzer shown in figure 6.2 is a standard open file
dialog with a customized accessory component on the right side. In this accessory component it is possible to choose the character encoding of the file which should be loaded and
to choose the window(s) in which the file(s) should be loaded into.
Figure 6.2: The customized open file dialog of LanguageAnalyzer.
Choosing the correct character encoding is especially important for text files because it
is not possible to determine the encoding from the files automatically. LanguageAnalyzer
supports a huge number of encodings beginning with the standard UTF-8, UTF-16 and ISO8859 encodings, including the various Windows, Macintosh and IBM code-pages, up to the
more exotic encodings for Japanese, Korean or Thai to name just a few of them.
For XML files LanguageAnalyzer tries to determine the character encoding from the
encoding attribute of the XML declaration if this is present. In case of success and if the
encoding mentioned in the XML file differs from the chosen one, the file is reopened with
the proper encoding.
Text and graphic files can always be loaded only into one of the two windows at a
time, while XTE files, which can contain two documents can be loaded such that each of
the documents will be loaded into one of the text windows. It is however also possible to
load just one document out of an XTE file with two documents. This way it is possible for
example to combine single documents from different XTE files into new XTE files.
Notice that it is also possible to select more than one file in the open file dialog. This
is especially useful if a set of bitmap files which contain the facsimile pages of an edition
should be assembled into a new XTE document or if the text content of a document is split
over several files.
6.3.2
Saving XTE files
The dialog for saving the current documents which is shown in figure 6.3 has similar options like the open file dialog described above.
It is possible to choose the character encoding of the output file and the user has the
possibility to store the content of a single text window or to save both of the two documents
from within the two text windows into one XTE file. Currently only the XTE format is
supported, but new formats my be added in the future.
Dissertation der Fak. f. Informations- u. Kognitionswissenschaften, Univ. Tübingen - 2004
141
142
Chapter 6
·
LanguageAnalyzer
Figure 6.3: The customized save file dialog of LanguageAnalyzer.
6.3.3 Working with multiple documents and encodings
As described in section 2.4, one of the features of the XTE encoding is its ability to support
an arbitrary number of independent encodings. In LanguageAnalyzer, each of these encodings is represented by its own tab in the encoding window on the left side of every main
window (see figure 6.4).
The tab contains a label with the name of the encoding and a tree view which represents
the encoding. All the different encodings of a document refer to the same content, however
every encoding may encode just a part of the complete character content or may encode
the content in a different way1 . Clicking on a tab will select the corresponding encoding as
the active encoding. The text displayed in the text area on the right side of the encoding
window is always a view of the currently active encoding.
Because every element may be visually represented by its own view class, the same text
may be displayed quite differently depending on the currently active encoding even if the
different encodings encode the same part of the content. The consequences of this feature
can be seen by comparing figure 6.4 with figure 6.5 which both display the same content,
however with a different active encoding.
1 One nice example of an unusual encoding is the KWIC Index produced by LanguageExplorer (see figure 5.2).
It presents the same content like the associated text component, however in a completely different order. If the key
word appears more than one time in a sentence, this sentence may even appear multiple times in the encoding .
Figure 6.4: One of the LanguageAnalyzer main windows with the encoding window on the left side.
Dissertation der Fak. f. Informations- u. Kognitionswissenschaften, Univ. Tübingen - 2004
6.3
·
Handling
Figure 6.5: The same main window as the one shown in figure 6.4, with a different active encoding.
While figure 6.4 is displaying the text based on the default sentence- and paragraphwise encoding selected in that figure, figure 6.5 is showing the same text based on a lineand page-wise encoding which corresponds to the layout of the original edition of the text.
Notice however once again that these are two different views of the same underlying
text content. This can be seen for example by selecting a line of text in one view (as done
in figure 6.5) and then switching to another encoding as done in figure 6.4. Still the same
part of text will be selected, although the selection does not correspond to an element in the
new encoding anymore. Nevertheless the corresponding element (or elements if necessary)
which contains the selected text in the new encoding is highlighted in the encoding window.
The same argumentation applies if the content would have been edited in one view: the
changes would have been automatically propagated to all other views. Notice that this
may remove some elements of an encoding if the text contained in that elements would
have been deleted completely.
Many of the plugins and tools which will be described in the next sections operate on the
text content as well as on one or more of the currently available encodings. Some of them
even create new encodings. If a document is saved as an XTE file as described in section
6.3.2, all the encodings will be saved in the file. However, the user has the possibility to
remove any of the available encodings from a document before saving it by clicking on the
small cross which is located on the right side of every tab.
Clicking the right mouse button on an element in the encoding window opens a dialog
which may be used to edit the attributes of the corresponding element. Depending on the
Figure 6.6: A main window with an open context menu on the text area and an open attribute window
for an element of the encoding window.
Dissertation der Fak. f. Informations- u. Kognitionswissenschaften, Univ. Tübingen - 2004
143
144
Chapter 6
·
LanguageAnalyzer
DTD, only certain values may be possible for some attributes as shown on the left side
of figure 6.6. If the right mouse button is pressed on the text area, a context menu will
appear which allows the insertion of new elements at the current cursor position based
on the actual DTD. These tool are intended for the fine-tuning of encodings. It should be
mentioned however that LanguageAnalyzer is not a general, fully-fledged XML editor. The
intention is to generate new encodings and linking structures automatically by plugins but
still give the user the possibility to fine-tune the results if necessary.
6.3.4 Tools
Right after an XTE file has been loaded, the different documents which have been present
in the file are displayed in the two main windows corresponding to their position in the
file. This order can be changed by pressing the swap button (see left margin) on the tool
bar. Notice that the tools and plugins which need a window argument always operate with
the logical window positions currently visible in the application.
Searching and font selection work in the same way as described in the corresponding
sections (5.4.5 and 5.4.8) of the LanguageExplorer manual. The only difference is the fact
that the creation of a KWIC index from the find dialog will not open a new extension window but instead create a new encoding for the corresponding document. If this encoding
will be selected as the active encoding, the KWIC index will be displayed in the text area.
6.3.5 Plugins
LanguageAnalyzer already comes with several default plugins which can be used to segment and link two documents, create word lists or copy existing encodings. These standard
plugins will be presented and explained in detail in this section.
Segmenting text
The “Segment text” plugin which is accessible from the tool bar or from the Plugins menu
is a simple, text segmentation tool which uses common heuristics to divide a plain text into
different components. It can work in two modes. By default it takes a text and segments it
into words, sentences and paragraphs. The plugin is based on the BreakIterator class from
the java.text package which defines locale dependent character-, word-, line- and sentenceiterators.
The plugin is for example configurable with respect to the handling of newlines and
how they are mapped to paragraph, section, or chapter breaks. These settings are of course
dependent on the format of the input files. Usually, one line-break character is ignored
during the detection of sentence boundaries, two line-breaks are interpreted as paragraph
boundaries, three line breaks as section boundaries and so on.
The “Segment text” plugin may also be used to detect line and page breaks. This is especially useful if the text sources have been created by an OCR (optical character recognition)
program, because in such a case the source contains the pagination information of the initial
edition. One important point to consider here is the correct handling of hyphen characters
at the end of lines. These pagination and hyphenation informations may be used later on
by the view classes to improve the appearance of the texts.
Every invocation of the “Segment text” plugin operates solely on the text content of the
document and generates a new encoding for the document which will be represented by a
new tab in the encodings window of the document.
Dissertation der Fak. f. Informations- u. Kognitionswissenschaften, Univ. Tübingen - 2004
6.3
·
Handling
Segmenting facsimile documents
The second plugin which is available from the tool bar is the “Segment facsimile” plugin.
It can be used to divide a facsimile picture of a page into character-, word- and line-boxes.
Currently the “Segment facsimile” plugin is based on GOCR [GOCR], an open source OCR
program which emits positional informations of the recognized character boxes.
At the time of writing, the “Segment facsimile” plugin is basically being used to automatically get geometrical informations about word occurrences in old, Gothic type facsimile
pages. Because there still exist no practical OCR solutions for the recognition of such texts,
we simply ignore the recognized characters. This procedure may be also viable for the segmentation of other facsimile editions like for example old, hand-written manuscripts which
can not be recognized by OCR programs at all. Although the real text information still has
to be extracted by transcription in this case, it is nevertheless helpful to automatically get
the geometrical information.
Figure 6.7: Segmentation of a facsimile document into words and lines. The character boxes have not
been created in this case for clarity reasons.
Notice that is is possible to manually resize and move the generated boxes (see figure
6.7) by using the mouse. It is also possible to remove boxes or add new boxes this way.
Once a facsimile document is completely segmented, the elements representing the boxes
can be subsequently linked automatically with the corresponding text elements on a word
and sentence level which may be an interesting option for historical and critical editions.
As with the “Segment text” plugin, the invocation of the “Segment facsimile” plugin creates a new document encoding which is represented by a new tab in the encodings window
of the document.
Linking two documents together
One of the most powerful and potentially most complex plugins is the “Link documents”
plugin. It takes two encodings and links the elements of these encodings together. Currently the linking is performed based on the structural properties of the involved encodings. In the easiest case this means that elements with the same name are linked together,
but this procedure can also be parameterized such that for example an facsimile-fragment
element with a type attribute set to line from a facsimile document will be linked with a
line element of a page- and line-wise encoded text document.
Because of restrictions in the text synchronization mechanism in LanguageExplorer, the
linking information is currently stored in the link attribute of every element. This however
Dissertation der Fak. f. Informations- u. Kognitionswissenschaften, Univ. Tübingen - 2004
145
146
Chapter 6
·
LanguageAnalyzer
somewhat restricts the ability to link one encoding to an arbitrary number of other encodings, although this is possible by mangling the different links into one attribute. But this
procedure unnecessarily complicates the parsing of the link attributes. In the future, linking
should be done based on the link base mechanism provided by the XLink specification as
described in section 2.1.3 and 2.4.1 and stored independently from the elements.
Another challenge for the future development of the system would be the implementation of more advanced aligning techniques which also take into account semantic information about the content referenced by the two involved encodings such as dictionary lookup
or the methods described in [HoJo].
Duplicating encodings
Sometimes it may be useful to copy an existing encoding. This may be achieved with “Duplicate encoding” plugin. Duplicating an encoding makes sense for example before an encoding is edited or adjusted manually to keep a copy of the original encoding. Duplicating encodings may also be appropriate in consideration of the linking problems described
above if an encoding should be linked to just one single other encoding.
Creating word lists
The last plugin presented in this section does not operate on encodings. Instead, it creates a
word list of the underlying text content of a document. The word list can be stored in a file
in a simple, customizable text format. Besides the character encoding of the file, the user
has the possibility to choose if the word list should be sorted alphabetically or based on the
word occurrence frequency. Finally, the words may be preceded by their frequency count.
In the absence of linguistic and morphological libraries, these word lists can be used
together with other tools like automatic text translation programs to create dictionaries for
LanguageExplorer which cover all the words in a text.
6.4
Command line tools
Some useful tools for the creation of books for LanguageExplorer have not been built into
LanguageAnalyzer until now but exist only as command line tools. This section will describe these tools which hopefully will be integrated into LanguageAnalyzer soon.
6.4.1 Merging XTE files
As already noticed in the design section 3.4, LanguageAnalyzer can handle only two documents at a time. However LanguageExplorer can handle books with an arbitrary number
of parallel documents. How is it possible to create such kind of books?
This task is currently accomplished by the command line tool MergeBooks which can operate in two different modes. In the first mode, given two XTE files each with two properly
interlinked documents from which one of the documents is available in both files, say the
documents A and B in the first XTE file and the documents A and C in the second XTE
file, MergeBooks can be used to create a new XTE file which contains the properly interlinked
documents B and C. The following line shows the formal calling syntax of the program:
MergeBooks [-v] -s Book1.xte Book2.xte NewBook.xte
The optional -v argument can be used to get a more verbose output while the three file attributes denote the two input XTE files where each of them must contain two documents
and the name of the output file respectively.
Dissertation der Fak. f. Informations- u. Kognitionswissenschaften, Univ. Tübingen - 2004
6.4
·
Command line tools
Given for example a properly linked XTE file with the German and English version of
a novel and a second, properly linked XTE file with the German and Russian version of
the same novel, it is possible to automatically create a linked XTE file which contains the
English and Russian version of that novel.
Notice that the automatically generated linking in the created file is always correct if the
linking in the two base files has been correct. It may be possible however, that the linking
in the created file is not as exact as it might be. This case may occur if one element in the
common document is mapped to several different elements in the sibling documents. The
solution for the problem is to load the created XTE file into LanguageAnalyzer and refine
the linking manually.
MergeBooks [-v] -m Book1.xte .. Bookn.xte NewBook.xte
In the second operation mode, the command line syntax of which is given above, MergeBooks
can be used to create an XTE file which contains n documents out of (n2 −n)/2 XTE files with
two documents respectively. So for example to create 4-document XTE file (42 − 4)/2 = 6
two document files have to be given on the command line where for every two documents
A and B there must exist exactly one properly interlinked two document file which contains
the two documents.
In the second operation mode, MergeBooks does not create any links at all. It just collects
the n documents and their linking information from the different input files and assembles
them in the output file in which every element will have the information on how it is linked
to every of the other n − 1 documents.
6.4.2
Encrypting XTE files
As already described in section 3.3.2, LanguageExplorer supports the encryption of its content. There are several command line tools available which can be used to create keys,
passwords and to finally encrypt the files. For a better understanding of this section it may
be helpful to refer to figure 3.10 on page 58 which graphically summarizes the LanguageExplorer encryption schema.
The first program which is named GenerateDESKey can be used to generate a DES key. The
first, mandatory argument specifies the file in which the key should be stored into.
GenerateDESKey Key-File [ Algorithm = DES [ Provider = SUN ]]
The second and the third argument which are optional may give the algorithm name which
is used to create the key and the provider name of the employed cryptographic engine.
The second utility which is called GeneratePBEDESKey can be used to encrypt the key file
which has been created in the first step with the help of a user supplied password.
GeneratePBEDESKey Key-File Enc-File Password [ Algorithm = PBEandDES [ Provider = SUN ]]
The first argument specifies the name of a file which contains a previously generated key.
The second argument specifies the name of the file which should be used for the encrypted
key and the last mandatory argument gives the password which should be used for the
encryption. By using the two optional arguments it is also possible to change the employed
algorithm or cryptographic engine.
Finally the EncryptFile command can be used to encrypt an XTE file with a given key.
The first argument specifies the source XTE file while the second argument denotes the
name of the encrypted file which will be created. The third argument specifies the name of
file which contains a key as generated with GenerateDESKey
EncryptFile Input-File Output-File Key-File [ Algorithm = DESede [ Provider = SUN ]]
Again, the optional arguments can be used to specify an alternative encryption algorithm
or cryptographic engine provider. Notice that if changed, these values have to be recorded
in the Manifest of the final leb file as described in section 3.3.1.
Dissertation der Fak. f. Informations- u. Kognitionswissenschaften, Univ. Tübingen - 2004
147
148
Chapter 6
·
LanguageAnalyzer
Dissertation der Fak. f. Informations- u. Kognitionswissenschaften, Univ. Tübingen - 2004
Chapter 7
Summary and outlook
This work has presented an extensible framework for the processing and presentation of
multi-modal, parallel text corpora. XTE, a simple but powerful XML standoff annotation
scheme has been developed and realized as a DTD and as an XML Schema. XTE is especially suited for the encoding of multiple, overlapping hierarchies in multi-modal documents and for the cross linking of the elements of these encodings across several documents.
As such, it is especially well suited for the creation of electronic synopses.
Together with XTE, sophisticated editor and browser applications have been developed
which allow the comfortable creation and presentation of XTE encoded documents. However, LanguageExplorer, the browser component and LanguageAnalyzer, the editor component are not monolithic, completed applications. Because they are both build around a
flexible software framework they can be easily customized and extended. In the same way
in which XTE can be extended by new encodings, the two applications are extendable by
new components which can handle new encoding elements in an optimal way. Additionally, it is also possible to plug in arbitrary other tools into the system which operate on the
textual content as well as on the different encodings.
This combination of a classical textual synopsis with the supplementary options of dictionaries, encyclopedias, multi-media extensions and powerful tools opens a wide area of
applicability ranging from text analysis and language learning to the creation of critical
editions and electronic publishing.
As a prove of concept, several multilingual editions of fiction (e.g. “The Metamorphosis”, by F. Kafka in German, English and Russian) non-fiction (e.g. “The universal declaration of human rights” in English, Japanese, Yiddish and Greek) and historical texts (“Der
Sprachkampf in Siebenbürgen”, by St. L. Roth as facsimile and transcription) have been prepared and combined with dictionaries and other tools. LanguageExplorer, which is available as a ready to run application for Windows, Linux and MacOS X, has qualified for the
finals of the famous “Multimedia Transfer” contest 2004 in Karlsruhe/Germany [MM04]
and finally placed in the top ten there.
7.1
Outlook
Although the system presented in this work is quite mature, there always remains place for
improvements. One of the main areas of extension is of course the creation of new tools
and plugins. Currently we are developing for example a tool which displays the semantic
neighborhood of a given word in a text corpus, that is the words which most often occur in a
fixed distance around the given word [Her]. The results should be displayed as a graph-like
structure in the lower extension area as shown in figure 7.1. The graph should be navigable,
Dissertation der Fak. f. Informations- u. Kognitionswissenschaften, Univ. Tübingen - 2004
150
Chapter 7
blood
rose
colour
·
wheel
Summary and outlook
driving
red
car
accident
fast
painting
love
driver
Figure 7.1: Conceptual design of the output of a tool which which display the semantic neighborhood
of a word. Clicking on the word “car” in the text would produce the star visible on the right side
of the window. Clicking on the word “red” in the graph would reveal the words occurring in its
neighborhood. (The words and connections shown in this example are hypothetical.)
such that clicking on a word in the graph will recursively reveal its semantic context.
For the improvement of such a kind of tools, but also for more accurate dictionary and
encyclopedia look ups, it would be highly desirable to incorporate linguistic and morphologic libraries like for example the WMTrans libraries from Canoo [Canoo] into the system.
They could also help to improve the automatic alignment process of parallel texts which is
currently based on structural and statistical information only.
Besides the many tools and plugins which may be desirable, it could be also interesting
to create bigger corpora of aligned, multilingual texts. In order to avoid copyright problems
it would be possible for example to use works of fictions whose authors are dead already
more than 70 years, because these texts are usually copyright free in most countries. There
already exist numerous such works in electronic from, for example from the project Gutenberg [Gutb]. With our tools they could be easily aligned, augmented with supplementary
information and published electronically.
Another project which could be rewarding is the reimplementation of the whole system
on top of an existing application platform like for example NetBeans [BGGSW] or Eclipse
[SAFKKC]. These platforms offer a lot of common functionality like user interface management, configuration management, wizard frameworks, abstract storage management
which unifies the data access to local and remote files, version control systems and unified
database access. Because such a big refactoring and reimplementation would require quite
a lot of resources it seems to be feasible only within the scope of a new, big project.
7.2
Related work
Because the system presented in this thesis potentially covers such a wide range of application areas, it is hard to compare it with other projects. In this section we will discuss other
systems which can be used to achieve results which are at least in part comparable with the
ones provided by our system.
7.2.1 Synopses and e-books
Synopses are already in use for a very long time. The oldest known synopsis is the famous
Rosetta stone shown in figure 1.1 on page 2. There exist printed synopses of the gospels
which are as old as the first printed books. Today, synopses which show parallel versions of
the gospels in Hebrew, Greek, Latin and other translations of contemporary languages are a
Dissertation der Fak. f. Informations- u. Kognitionswissenschaften, Univ. Tübingen - 2004
7.2
·
Related work
common tool for every theologian (see [Aland] and [PeWiKr] for two examples of modern,
printed synopses).
But synopses are not only used in theology, also jurists use synopses to highlight the
changes between different versions of laws. In the European Community for example, all
the laws and regulations have to bee translated in up to 20 different languages and the
United Nations have to make their resolutions available in even more languages. These are
all potential application areas which could be successfully covered by synopses.
Globalization and the opportunity of a higher education have also led to a growing interest in language learning which in turn resulted in a growing market for bilingual editions,
that is books which show both, the original and the translated version of a text in parallel. A
query for “bilingual editions” at the online book store Amazon for example returned more
than 10.000 hits.
Despite this apparent interest in synopses and multilingual editions, there seem to be
no general tool support for the creation and publication of such works. One system known
to the author which directly supports the creation of synopses is TUSTEP, the “Tübinger
System of Text-processing Programs”. One of the highlights of this system, beneath the
production of high-quality postscript output, is the fact that it supports a lot of ancient
languages, which is essential for many historical and text-critical editions and not widely
supported by other systems. However, TUSTEP is more or less an authoring tool comparable with LanguageAnalyzer, it has no browser and viewer component, which can be used
by an end user to work with the created editions.
Another ambitious system for the creation of critical editions which also supports synopses is CTE, the Classical Text Editor [CTE]. CTE is a windows only application. It supports the Unicode standard and can produce HTML, postscript and TEI output. One of the
specialties of CTE is its ability to handle an arbitrary number of apparatus. CTE is a specialized word-processor however which does not support the integration of tools and is not
extendable by the user.
Today more and more e-books (electronic books), that is digital versions of printed
books, especially digital versions of ancient books, appear on the market and on the web. A
prominent example for this process is for example the digital version of the “ Arden Shakespeare” edition [Arden] which not only contains the complete works of Shakespeare in a
searchable text database combined with a lot of additional materials but also links the text
to the facsimile pictures of the first Quarto and Folio editions which have been published
around 1600. Another example is a complete version of the fourth edition of the German
encyclopedia “Meyers Konversationslexikon” which was published in Leipzig in the years
1888 and 1889. The more than 16000 pages of the 16 volumes have been scanned and processed by an optical character recognition (OCR) software. The extracted text which is
linked to the corresponding facsimile pages can be searched and browsed on-line [Meyers].
The problem with these editions is that they either use proprietary software and data
formats as in the first of the two examples above, or they use simple web interfaces based
on HTML as in the second case which unnecessarily reduces their helpfulness. The system
presented in this thesis tries to fill this gap.
Another interesting system from this category is the NOVeLLA e-book reader described
in [HSJDNB]. It is implemented in Java, supports the Open Ebook document structure
[OeB] and has support for an aural user interface, text to speech output and audio-annotations.
This system, as well as the well known e-book readers from Adobe and Microsoft are pure
software solutions which run on every computer and do not need specialized hardware.
Although reading a book on the computer is not very comfortable today, we believe that
the advances in computer technology, especially in the area of miniaturization, display resolution and battery power will finally boost the e-book market.
Dissertation der Fak. f. Informations- u. Kognitionswissenschaften, Univ. Tübingen - 2004
151
152
Chapter 7
·
Summary and outlook
7.2.2 Natural language processing systems
In the last decade one of the fastest growing fields in the area of information technology is
the sector of natural language processing (NLP). NLP is a subfield of artificial intelligence
and linguistics and studies areas such as speech recognition, machine translation, question
answering and information retrieval and extraction. Many commercial and free tools have
been developed to support the work and research in this area and some of them are comparable with LanguageAnalyzer, the editor component of our application framework.
One of the most prominent and most mature tools from this category is certainly GATE,
the General Architecture for Text Engineering [GATE] from the NLP group of the University of Sheffield. It is a multi platform framework for natural language engineering (NLE)
written completely in Java with many built-in NLE components and tools for tagging, information extraction and retrieval, summarization and ontology editing to name just a few
of them. It supports arbitrary, multilingual text resources and processes and exports data
in many standard XML formats.
Another tool which has architectural similarities with our system is the MATE workbench [KIMMGK], an annotation tool for XML encoded speech corpora. Also written entirely in Java, it is primarily designed to annotate and align parallel speech and text corpora.
It can handle arbitrary XML annotation schemes (even non-hierarchical ones by using the
concept of standoff annotation described in [ThMcK]) through configurable editors and
display formats and offers an extensible architecture for third-party annotation tools. As
noted in [MueStr], especially the concept of the customizable display objects for the different annotation elements which is realized by a stylesheet mechanism may cause serious
performance problems. MMAX [MueStr], another tool for the annotation of multi-modal
corpora which uses an annotation scheme similar to the one used in MATE, is a system
which pretends to address this problems.
Translation corpora
In this section we will present some tools which can be used to create and process translation corpora, that is multilingual, parallel text corpora. Such corpora can be used for a wide
variety of different applications ranging from the research of linguistic phenomena and the
extraction of data for machine translation and lexicography to the application in foreign
language learning and translator training.
In [HoJo] a so called “Translation Corpus Aligner”, that is a program which automatically aligns a text which is available in two different languages is described. Despite the
well known statistical and structural approaches [Che93, Chu93, Mel97, SiPl96], the paper
describes how anchor words, i.e. words which are reasonably frequent in the two languages in question and have straightforward equivalents in both languages, can be used to
improve the alignment.
While the before mentioned translation corpus aligner only produces an XML output
of the two aligned texts, Ebeling [Ebel] describes an interactive browser for parallel texts
which is called TCE (for Translation Corpus Explorer). It takes an already aligned text
corpus in a TEI format and stores it in an internal database which can be used subsequently
to search and browse the texts. Olsson and Borin describe a web-based system for exploring
translation equivalents on word and sentence level in a multilingual, parallel corpora in
[OlBo]. They developed a query and visualisation tool for corresponding entries in a corpus
with two aligned text versions which has a HTML- and a Java-Applet-based front end.
More informations and references on parallel, multilingual text corpora research and
processing can be found in [JoOk, Ver].
Dissertation der Fak. f. Informations- u. Kognitionswissenschaften, Univ. Tübingen - 2004
7.2
·
7.2.3
Related work
Related standards
Our system and its goals are also related to some existing standards and ongoing projects.
There is for example the ambitious HyTime standard [HyTime] which pretends to be able
to “link everything with everything”, i.e. to interconnect any kind of media and specify its
intended placement in space and time. In [DeRoDu] the authors state that among others,
HyTime could be used for:
“Managing documents that are studied and discussed in fine detail, such as
Biblical, Classical, legal or medical texts. Such documents may exist in many
editions or translations, as well as variant manuscript or print versions, which
can be viewed in parallel, compared, and searched as needed”.
This is exactly what we want to achieve with our system. The problem with the HyTime
standard is that it is overall complex and even to a greater extent than this is the case with
SGML, there are no tools or applications available which support the standard. This is however crucial for a standard like HyTime, which is a so called “enabling standard”, that is an
abstract standard which defines how to address, link, align, and synchronize hyper-media
documents, but no concrete encoding schemes or element structures for such documents.
Nevertheless it is interesting and highly instructive to see how the problems are solved in
HyTime. After all, HyTime strongly influenced the XLink standard which tries to extend
the linking functionality of XML and which is partially used in XTE (see 2.4.1).
One application of HyTime are the so called Topic Maps [TopMa] as specified in the ISO
standard 13250. Topic Maps are an effort to establish a standard way for the specification of
semantic relations between information fragments, where these smallest parts of information are called topics in this context. Topic Maps are build on SGML and HyTime. They use
SGML as a data exchange format and HyTime as a means of creating links and associations
between the different elements of the standard. XTM which stands for XML Topic Maps
[XTM] is an attempt to port the Topic Maps standard to XML.
A similar standard defined by the W3C consortium is the Resource Description Framework (RDF) [RDF]. RDF defines an XML vocabulary for the representation of information about resources on the World Wide Web. Every resource may be described by several
statements where each statement is a triple consisting of a subject (the resource), a predicate and an object. As described in [WiMue], Topic Maps are a more general approach for
building semantic networks, however RDF is the key technology behind the Semantic Web
propagated by Tim Berners-Lee and the W3C consortium (see [BeHeLa]) and as such will
probably receive a great deal of attention in the next years.
Topic Maps and RDF both can be used to build so called ontologies, that is hierarchical
data structures which containing all the relevant entities and their relationships and rules
within a domain. The W3C consortium also specified its own ontology language called
OWL Web Ontology Language [OWL] which is based on RDF. Well known ontologies are
provided for example by the Cyc [Cyc] and the WordNet [WordNet] projects.
Although the relation of LanguageExplorer and LanguageAnalyzer to the standards
mentioned in this section may be not obvious at a first glance, some interesting parallels
can be found: on the one hand, our tools could be used to export the processed data in one
of the above mentioned formats, on the other hand, data in the above mentioned formats
and tools based on such data could be used to considerably extend the functionality of our
system.
Dissertation der Fak. f. Informations- u. Kognitionswissenschaften, Univ. Tübingen - 2004
153
154
Chapter 7
·
Summary and outlook
Dissertation der Fak. f. Informations- u. Kognitionswissenschaften, Univ. Tübingen - 2004
Appendix A
Constants
Predefined character blocks in Unicode 3.0
BasicLatin
LatinExtended-A
IPAExtensions
CombiningDiacriticalMarks
Cyrillic
Hebrew
Syriac
Devanagari
Gurmukhi
Oriya
Telugu
Malayalam
Thai
Tibetan
Georgian
Ethiopic
UnifiedCanadianAboriginalSyllabics
Runic
Mongolian
GreekExtended
SuperscriptsandSubscripts
CombiningMarksforSymbols
NumberForms
MathematicalOperators
ControlPictures
EnclosedAlphanumerics
BlockElements
MiscellaneousSymbols
BraillePatterns
KangxiRadicals
CJKSymbolsandPunctuation
Katakana
HangulCompatibilityJamo
BopomofoExtended
CJKCompatibility
CJKUnifiedIdeographs
YiRadicals
HighSurrogates
Latin-1Supplement
LatinExtended-B
SpacingModifierLetters
Greek
Armenian
Arabic
Thaana
Bengali
Gujarati
Tamil
Kannada
Sinhala
Lao
Myanmar
HangulJamo
Cherokee
Ogham
Khmer
LatinExtendedAdditional
GeneralPunctuation
CurrencySymbols
LetterlikeSymbols
Arrows
MiscellaneousTechnical
OpticalCharacterRecognition
BoxDrawing
GeometricShapes
Dingbats
CJKRadicalsSupplement
IdeographicDescriptionCharacters
Hiragana
Bopomofo
Kanbun
EnclosedCJKLettersandMonths
CJKUnifiedIdeographsExtensionA
YiSyllables
HangulSyllables
HighPrivateUseSurrogates
..to be continued on the next page ➥
Dissertation der Fak. f. Informations- u. Kognitionswissenschaften, Univ. Tübingen - 2004
156
Appendix A
·
Constants
Predefined character blocks in Unicode 3.0
LowSurrogates
CJKCompatibilityIdeographs
ArabicPresentationForms-A
CJKCompatibilityForms
ArabicPresentationForms-B
HalfwidthandFullwidthForms
PrivateUse
AlphabeticPresentationForms
CombiningHalfMarks
SmallFormVariants
Specials
Specials
Table A.1: LanguageExplorer supports the character block names defined in Unicode 3.0 when constructing certain regular expressions (see section 5.4.6 on page 130). Notice that these names omit
the space characters which are used in the Unicode standard as word separators (e.g. “BasicLatin” is
defined as “Basic Latin”).
The character categories defined Unicode 3.0
Category
Explanation
L
Lu
Ll
Lt
Lm
Lo
Letter.
Uppercase letter.
Lowercase letter.
Title case letter.
Modifier letter.
Any other letter.
N
Nd
Nl
No
Number.
Decimal digit.
Letter number.
Any other number.
S
Sm
Sc
Sk
So
A symbol.
A mathematical symbol.
A currency symbol.
A modifier symbol.
Any other symbol.
Characters
Numbers
Symbols
P
Pc
Pd
Ps
Pe
Pi
Pf
Po
Z
Zs
Zl
Zp
M
Mn
Mc
Me
C
Punctuation marks
A punctuation mark.
A connector.
A dash.
An opening punctuation mark.
A closing punctuation mark.
An initial quote.
A final quote.
Any other punctuation mark.
Separators
A separator.
A space separator.
A line separator.
A paragraph separator.
Combining marks
A combining mark.
A nonspacing mark.
A spacing combining mark.
An enclosing mark.
Other characters
Any other characters.
..to be continued on the next page ➥
Dissertation der Fak. f. Informations- u. Kognitionswissenschaften, Univ. Tübingen - 2004
157
Category
Explanation
Cc
Cf
Cs
Co
Cn
Control character.
Format character.
Surrogate character.
Private use character.
Not assigned character.
Table A.2: The character categories defined Unicode 3.0. In Unicode every character is assigned a
general one letter category value. Each category may be subdivided into several, non-overlapping
sub-categories which can be identified by a second letter in the category name. For more information
consult the Unicode standard [UNI].
Dissertation der Fak. f. Informations- u. Kognitionswissenschaften, Univ. Tübingen - 2004
158
Appendix A
·
Constants
Dissertation der Fak. f. Informations- u. Kognitionswissenschaften, Univ. Tübingen - 2004
Bibliography
[Abr]
P. W. Abrahams. Typographical Extensions for Programming Languages: Breaking
out of the ASCII Straitjacket. ACM SIGPLAN Notices, Vol. 28, No. 2, Feb. 1993
[AKW]
A.W. Aho, B.W. Kernighan and P. J.Weinberger. The AWK Programming Language. Addison-Wesley, 1988
[Aland]
Kurt Aland (ed.) Synopsis Quattuor Evangeliorum Württembergische
Bibelanstalt Stuttgart, 1964
[Arden]
William Shakespeare; Bate Jonathan (ed.) Arden Shakespeare CD-ROM Texts
and sources for Shakespeare studies, Thomas Nelson and Sons Ltd., 1997
[Arm]
E. Armstrong. Encoding Source in XML - A strategig Analysis.
http://www.treelight.com/software/encodingSource.html
[Bad]
G. J. Badros. JavaML: A Markup Language for Java Source Code. 9th Int. WWWConference, Amsterdam, May 2000
[BaNo]
G. J. Badros and D. Notkin. A Framework for Preprocessor-Aware C Source Code
Analyses. Software - Practice & Experience, Vol. 30, No. 8, July 2000
[Ba95]
Winfried Bader, Lehrbuch TUSTEP Max Niemeyer Verlag, Tübingen, 1995
[BaeMa]
Ronald M. Baecker, Aaron Marcus. Human Factors and Typography for More
Readable Programs. Addison-Wesley, 1990
[BE60]
R.W.Bemer, Survey of coded character representation Commun. ACM 3, No. 12,
639-641, 1960 Dec
[BE63]
R.W.Bemer, The American standard code for information interchange, Datamation
9, No. 8, 32-36, 1963 Aug, and ibid 9, No. 9, 39-44, 1963 Sep
[BeHeLa]
Tim Berners-Lee, James Hendler and Ora Lassila, The Semantic Web Scientific
American, May 2001
[BGGSW]
T. Boudreau, J. Glick, S. Greene, V. Spurlin, J. Woehr. NetBeans: The Definitive
Guide. O Reilly & Associates, 2002, http://www.netbeans.org/download/
books/definitive-guide/
[Boost]
The Boost Library. http://www.boost.org
[BRJ1]
Grady Booch, James Rumbaugh, Ivar Jacobson, The Unified Modeling Language
User Guide Addison-Wesley, 1999
[BRJ2]
Grady Booch, James Rumbaugh, Ivar Jacobson, The Unified Modeling Language
Reference Manual Addison-Wesley, 1998
Dissertation der Fak. f. Informations- u. Kognitionswissenschaften, Univ. Tübingen - 2004
160
BIBLIOGRAPHY
[Brig]
Preston Briggs. nuWeb, http://ctan.tug.org/tex-archive/web/nuweb
[Bryan]
Martin Bryan SGML - An authors guide to the standard generalized markup language, Addison-Wesley, 1988
[Broe]
David Brownell SAX2, O’Reilly, 2002
[BSW]
R.W.Bemer, H.J.Smith, Jr., F.A.Williams, Design of an improved transmission/data
processing code, Commun. ACM 4, No. 5, 212-217, 225, 1961 May
[Canoo]
Canoo Technology AG, Basel, Switzerland WMTrans - Multilingual Morphology Software, available at: http://www.canoo.com/wmtrans
[Car]
David Carlisle The longtable package, available at:
ftp://ftp.dante.de/tex-archive/help/Catalogue/entries/longtable.html
[CarSt]
Robert Cartwright and Guy Steele, Compatible Genericity with Run-time Types
for the Java(tm) Programming Language, Proc. of the 13th ACM Conf. on Object
Oriented Programming, Systems and Applications, Vancouver, B.C., October
1998. http://www.cs.rice.edu/˜javaplt/papers/oopsla1998.pdf
[CaWaHu]
Mary Campione, Kathy Walrath, Alison Huml, et. al. The Java Tutorial Continued: The Rest of the JDK. Addison-Wesley, 1998
[Che93]
S.F. Chen. Aligning sentences in bilingual corpora using lexical information. Proc.
of the 31st Annual Meeting of the Association for Computational Linguistics, Columbus, Ohio, 1993 available at: http://acl.ldc.upenn.edu/P/P93/
P93-1002.pdf
[Chu93]
K. Church. Char align: A Program for Aligning Parallel Texts at the Character
Level. Proc. 31st Ann. Conf. of the Association for Computational Linguistics (ACL), Columbus, Ohio, 1993 available at: http://acl.ldc.upenn.edu/
P/P93/P93-1001.pdf
[Child]
Bart Childs Literate Programming, A Practitioner’s View TUGboat, Volume 13,
No. 2, 1992, http://www.literateprogramming.com/farticles.html
[ChSa]
B. Childs and J. Sametinger. Analysis of Literate Programs from the Viewpoint
of Reuse. Software - Concepts and Tools, Vol. 18, No. 2, 1997, http://www.
literateprogramming.com/farticles.html
[CoRe]
A. B. Coates and Z. Rendon xmLP - a Literate Programming Tool for XML &
Text. Extreme Markup Languages, Montreal, Quebec, Canada, August 2002,
http://xmlp.sourceforge.net/2002/extreme/
[CSharp]
ECMA 334, ISO/IEC 23270 C# Language Specification. http://www.
ecma-international.org/publications/standards/ecma-334.htm
[CSS]
H. Lie, B. Bos. Cascading Style Sheets. W3C Recommendation, Dec. 1996, available at: http://www.w3.org/Style/CSS
[CTE]
Stefan Hagel. CTE: The Classical Text Editor available at: http://www.oeaw.
ac.at/kvk/cte/
[Cyc]
Cycorp, Inc. OpenCyc: The Project available at: http://opencyc.org/
[CzEi]
K. Czarnecki and U. W. Eisenecker. Generative Programming. Addison-Wesley,
2000
Dissertation der Fak. f. Informations- u. Kognitionswissenschaften, Univ. Tübingen - 2004
BIBLIOGRAPHY
161
[DaSe]
Stephen Davies and Stefan Seefeld. Synopsis. http://synopsis.sourceforge.
net
[DeiCza]
Andrew Deitsch and David Czarnecki Java internationalization, O’Reilly & Associates, 2001
[DeRoDu]
Steven DeRose and David G. Durand Making Hypermedia Work - A users’s guide
to HyTime Kluwer Academic Publisher, 1994
[DES]
National Institute of Standards and Technology (NIST). Data Encryption Standard. FIPS Publication 46-2, December 1993
[Diam]
Jason Diamond. NDoc. http://ndoc.sourceforge.net/
[DuOD01]
Patrick Durusau, Matthew B. O’Donnell Implementing Concurrent Markup in
XML Extreme Markup Languages 2001, Montreal, Canada, Aug 2001 online
at: http://www.sbl-site2.org/Extreme2001/Concur.html
[DuOD02]
Patrick Durusau, Matthew B. O’Donnell Just-In-Time-Trees (JITTs): Next Step in
the Evolution of Markup? Extreme Markup Languages 2002, Montreal, Canada,
Aug 2002 online at: http://www.sbl-site2.org/Extreme2002/JITTs.html
[DocB]
Norman Walsh (Editor), The DocBook Document Type online at: http://www.
oasis-open.org/committe/docbook
[Docl]
Sun Microsystems,
javadoc/
[DOM]
A. Le Hors, P. Le Hégaret, L. Wood et. al. (ed.) Document Object Model - Level
1,2 and 3 W3C Recommendation, 1998, 2000 and 2004 available at: http://
www.w3.org/DOM/DOMTR
[DrMo]
by Nikos Drakos and Ross Moore. Latex2HTML. http://saftsack.fs.
uni-bayreuth.de/˜latex2ht/ or: http://ctan.tug.org/ctan/tex-archive/
support/latex2html
[DSSSL]
ISO/IEC 10179:1996, DSSSL - Document Style Semantics and Specification Language. online at: http://www.oasis-open.org/cover/dsssl.html
[dtd2xsA]
Syntext, Inc Syntext dtd2xs, Ver. 1.4 available at: http://www.syntext.com
[dtd2xsB]
Joerg Rieger and Ralf Schweiger dtd2xs, Ver. 1.6 available at: http://www.
lumrix.de/dtd2xs/
[DuCo]
Diane I. Hillmann Using Dublin Core Dublin Core Metadata Initiative, Apr.
2002 online at: http://dublincore.org/documents/
[Ebel]
Jarle Ebeling, The Translation Corpus Explorer: A browser for parallel texts. In
Johansson, S. and Oksefjell, S. (eds.), Corpora and Cross-linguistic Research:
Theory, Method, and Case Studies. Amsterdam: Rodopi, 1998
[ELW]
R. Eckstein, M. Loy and D. Wood “Java Swing”, O’Reilly, 1998
[ECMA]
European Computer Manufacturer’s Association, online at: http://www.
ecma.ch
[EP87]
Sandra L. Emerson and Karen Paulsell, TROFF Typsetting for for UNIX Systems, Prentice-Hall, 1987
Inc. The Doclets API. http://java.sun.com/j2se/
Dissertation der Fak. f. Informations- u. Kognitionswissenschaften, Univ. Tübingen - 2004
162
BIBLIOGRAPHY
[Flex]
Free Software Foundation The Fast Lexical Analyzer. http://www.gnu.org/
software/flex/
[Friedl]
Jeffrey E. F. Friedl Mastering Regular Expressions, O’Reilly and Associates, 1997
[GaSo]
Jess Garms and Daniel Sommerfield, Java Security Wrox Press Ltd., 2001
[GATE]
The Sheffield NLP group, GATE - General Architecture for Text Engineering The
University of Sheffield, Computer Science Departement, available from: http:
//gate.ac.uk
[GCC]
Free Software Foundation The GNU Compiler Collection. http://gcc.gnu.org
[GHJV]
E. Gamma, R.Helm, R. Johnson and J. Vlissides Design Patterns: Elements of
Reusable Object-Oriented Software, Reading, MA, Addison-Wesley, 1995
[Ger]
D.M. German, D.D. Cowan and A. Ryman. SGML-Lite – An SGML-based
Programming Environment for Literate Programming. ISACC, Oct. 1996, http:
//www.oasis-open.org/cover/germanisacc96-ps.gz
[Go81]
C. F. Goldfarb, A generalized approach to document markup Proceedings of the
ACM SIGPLAN SIGOA symposium on Text manipulation, SIGPLAN Notices, June 1981
[Go90]
C. F. Goldfarb, The SGML Handbook Oxford University Press, 1990
[GoJoSt]
J. Gosling, B. Joy and G. Steele “Java Language Specification” Addison-Wesley,
1996
[GJ]
Johannes Gutenberg, Die 42-zeilige lateinische Bibel
che Staats- und Universitätsbibliothek Göttingen,
http://www.gutenbergdigital.de
[GOCR]
Joerg Schulenburg, GOCR available from: http://jocr.sourceforge.net/
[Greg]
Douglas Gregor. The BoostBook Documentation Format, http://www.boost.
org/doc/html/boostbook.html
[Gutb]
Project Gutenberg, Literary Archive Foundation, Oxford, MS, USA. online at:
http://www.promo.net/pg/
[Hee]
Dimitri van Heesch. Doxygen. http://www.doxygen.org
[Heinz]
Carsten Heinz “The Listings package”, ftp://ftp.dante.de/tex-archive/help/
Catalogue/entries/listings.html
[Hend]
T. D. Hendrix, J. H. Cross II, L. A. Barowski and K. S. Mathias. Visual Support
for Incremental Abstraction and Refinement in Ada95. SIGAda Ada Letters, Vol.
18, No. 6, 1998
[Her]
Hans Jörg Heringer, Das höchste der Gefühle - Empirische Studien zur distributiven Semantik Stauffenberg Verlag, Tübingen, 1999
[HoJo]
K. Hofland and S. Johansson, The Translation Corpus Aligner: A program for
automatic alignment of parallel texts. In Johansson, S. and Oksefjell, S. (eds.),
Corpora and Cross-linguistic Research: Theory, Method, and Case Studies.
Amsterdam: Rodopi, 1998
Niedersächsisavailable at:
Dissertation der Fak. f. Informations- u. Kognitionswissenschaften, Univ. Tübingen - 2004
BIBLIOGRAPHY
[HSJDNB]
J.S. Hodas, N. Sundaresan, J. Jackson, B.L. Duncan, W.I Nissen and J. Battista.
NOVeLLA: A Multi-Modal Electronic-Book Reader With Visual and Auditory Interfaces International Journal of Speech Technology Vol. 4, Issue: 3/4, July - October 2001, pp. 269-284 online at: http://citeseer.ist.psu.edu/416147.html
[HTML]
Dave Raggett, Arnaud Le Hors, Ian Jacobs (Editors), The HyperText Markup
Language. W3C Recommendation, Dec. 1999, available at: http://www.w3.
org/MarkUp
[Huff]
D. A. Huffman, A Method for the Construction of Minimum Redundancy Codes
Proc. of the Inst. of Radio Engineers, 1952, Volume 40, Number 9
[HyTime]
Charles F. Goldfarb, Steven R. Newcomb, W. Eliot Kimber, Peter J. Newcomb (eds.) Hypermedia/Time-based Structuring Language (HyTime) - 2nd edition
ISO/IEC 10744:1997, available at: http://www.y12.doe.gov/sgml/wg8/
document/1920.htm
[ISO]
International Standards Organisation, online at: http://www.iso.ch
[ISO639]
ISO The ISO-639 two letter language codes, available at: http://www.unicode.
org/unicode/onlinedata/languages.html
[ISO3166]
ISO The ISO-3166 two letter country codes, available at: http://www.unicode.
org/unicode/onlinedata/countries.html
[Jade]
James Clark, Jade – James’ DSSSL Engine available at: http://www.jclark.com
or: http://openjade.sourceforge.net
[JaBean]
Graham Hamilton (Ed.) JavaBeans Sun Microsystems, Version 1.01-A, August
1997 available at: http://java.sun.com/beans
[JBuil]
Borland Software Corporation. Borland JBuilder. http://www.borland.com/
jbuilder
[JDB]
Sun Microsystems, Inc. The Java Bug Database, available at: http://developer.
java.sun.com/developer/bugParade
[JILT]
Sun Microsystems, Inc. Java Internationalization and Localization Toolkit 2.0,
available at: http://java.sun.com/products/jilkit
[JoOk]
S. Johansson and S. Oksefjell (eds.), Corpora and Cross-linguistic Research: Theory, Method, and Case Studies. Amsterdam: Rodopi, 1998
[JSR14]
Java Community Process - Java Specification Request 14. Adding Generics to the Java Programming Language. http://jcp.org/aboutJava/
communityprocess/review/jsr014/index.html
http://developer.java.
sun.com/developer/earlyAccess/adding˙generics
[Kay]
Michael Kay. XSLT Programmer’s Reference Wrox Press Ltd., Birmingham, UK,
2002 http://saxon.sourceforge.net
[Ke78]
Brian Kernighan, A TROFF Tutorial Bell Laboratories Murray Hill, New Jersey, 1978, available at: http://citeseer.nj.nec.com/78143.html
[KhUr]
A. A. Khwaja and J. E. Urban. Syntax-Directed Editing Environments: Issues and
Features. ACM SIGAPP Symposium on Applied Computing, Indianapolis, Indiana, 1993
Dissertation der Fak. f. Informations- u. Kognitionswissenschaften, Univ. Tübingen - 2004
163
164
BIBLIOGRAPHY
[KIMMGK]
D. McKelvie, A. Isard, A. Mengel, M.B. Møller, M. Grosse, M. Klein. The
MATE Workbench - an annotation tool for XML coded speech corpora Speech
Communication 33 (1-2) (2001) pp 97-112. available at: http://www.iccs.
informatics.ed.ac.uk/˜dmck/Papers/speechcomm00.ps
[King]
Brad King. GCC-XML, the XML output extension to GCC! http://www.
gccxml.org/HTML/Index.html
[Kisel]
O. Kiselyov. SXML Specification. ACM SIGPLAN Notices, Volume 37, Issue 6,
June 2002 http://pobox.com/˜oleg/ftp/Scheme/xml.html
[Knasm]
M. Knasmüller. Reverse Literate Programming. Proc. of the 5th Software Quality
Conference, Dundee, July 1996
[Kn84]
Donald E. Knuth Literate Programming The Computer Journal, Vol. 27, No. 2,
1984
[Kn91]
Donald E. Knuth, The TEXbook Addison-Wesley, Reading, Mass., 11. ed., 1991
[Kn91a]
Donald E. Knuth TEX: The Program Addison-Wesley, Reading, Mass., 4. ed.,
1991
[Kn92]
Donald E. Knuth Literate Programming CSLI Lecture Notes, no. 27, 1992 or
Cambridge University Press
[KnLe]
Donald. E. Knuth and Silvio Levy The CWEB System of Structured Documentation Addison-Wesley, Reading, Mass., 1993
[Krep]
Uwe Kreppel. WebWeb. http://www.progdoc.de/webweb/webweb.html
[Krom]
John Krommes. fWeb. http://w3.pppl.gov/˜krommes/fweb.html
[Leeu]
Marc van Leeuwen.
˜maavl/CWEBx/
[La86]
Leslie Lamport, LATEX: A Document Preparation System Addison-Wesley, Reading, Mass., 1986
[LDP]
The Linux Documentation Project, online at: http://www.tldp.org
[LeZi]
A. Lempel and J. Ziv A Universal Algorithm for Sequential Data Compression
IEEE Transactions on Information Theory, Vol. 23, No. 3
[JVM]
Tim Lindholm, Frank Yellin, The Java Virtual Machine Specification. Addison
Wesley, 1999
[MacLa]
Brett MacLaughlin, Java & XML O Reilly & Associates, 2nd. ed., 2001
[Lia]
Sheng Liang The Java Native Interface Addison Wesley, 1999
[Lutz]
Mark Lutz. Programming Python. O Reilly & Associates, 2nd. ed., 2001
[MathML]
D. Carlisle, P. Ion, R. Miner and N. Poppelier (Editors), Mathematical Markup
Language (MathML). W3C Recommendation, Oct. 2004, available at: http://
www.w3.org/TR/MathML2
[Mel97]
I. Dan Melamed, A Portable Algorithm for Mapping Bitext Correspondence. Proc.
35st Ann. Conf. of the Association for Computational Linguistics (ACL),
Somerset, New Jersey, 1997 available at: http://acl.ldc.upenn.edu/P/P97/
P97-1039.pdf
CWebx.
http://wwwmathlabo.univ-poitiers.fr/
Dissertation der Fak. f. Informations- u. Kognitionswissenschaften, Univ. Tübingen - 2004
BIBLIOGRAPHY
[MeyDa]
N. Meyrowitz and A. van Dam. Interactive Editing Systems: Part I and II. Computing Surveys, Vol. 14, No. 3, Sept. 1982
[Meyer]
Bertrand Meyer Object-oriented software construction. Prentice Hall, 2nd. ed.,
1997
[Meyers]
Meyers Konversationslexikon Bibliographisches Institut, 4th. ed., Leipzig, 18881889, available at: http://susi.e-technik.uni-ulm.de:8080/meyers/servlet/
index
[MIF]
Adobe Systems Incorporated FrameMaker 7.0 - MIF Reference Online
Manual available at:
http://partners.adobe.com/asn/framemaker/
onlinemanuals.jsp
[Mitt]
Frank Mittelbach “An environment for multicolumn output”, available at:
ftp://ftp.dante.de/tex-archive/help/Catalogue/entries/multicol.html
[MM04]
Universität Karlsruhe, Rechenzentrum, Multimedia Transfer 2004 online at:
http://www.mmt.uni-karlsruhe.de/transfer2004
[MoeKo]
H. Mössenböck and K. Koskimies. Active Text for Structuring and Understanding Source Code. Software - Practice and Experience, Vol. 27, No. 7, July 1996
[MoSch]
J. Morris and M. Schwartz. The Design of a Language- Directed Editor for BlockStructured Languages. SIGLAN/SIGOA Symp. on text manipulation, Portland, 1981
[MueStr]
Christoph Müller and Michael Strube. MMAX: A tool for the annotation
of multi-modal corpora. Proc. of the 2nd IJCAI Workshop on Knowledge
and Reasoning in Practical Dialogue Systems, Seattle, Wash., USA, August
5, pp.45-50. available at: http://www.eml-research.de/english/homes/
strube/downloads/ijcai01-ws.ps.gz
[MusicXML] Michael Good, MusicXML: An Internet-Friendly Format for Sheet Music. XML
Conference & Exposition 2001, Orlando, Florida available at: http://www.
idealliance.org/papers/xml2001/papers/html/03-04-05.html
[MW]
Merriam-Webster’s Collegiate Dictionary Merriam-Webster, 10. ed. 1998, available at: http://www.m-w.com
[MyBaLi]
Andrew C. Myers, Joseph A. Bank, Barbara Liskov, Parameterized Types for
Java POPL 1997, Paris, France, http://www.cs.cornell.edu/andru/slides/
popl97.ps.gz
[OASIS]
The Organization for the Advance of Structured Information Standards (OASIS) online at: http://www.oasis-open.org
[OASLit]
The Oasis Consortium. SGML/XML and Literate Programming. http://www.
oasis-open.org/cover/xmlLitProg.html
[OeB]
The Open eBook Forum Open eBook Publication Structure, avaialble at: http:
//www.openebook.org/oebps/index.htm
[OdWa]
M. Odersky and P. Wadler Pizza into Java: Translating Theory into Practice Proc. of the 24th ACM Symposium on Principles of Programming
Languages 1997, Paris, France http://homepages.inf.ed.ac.uk/wadler/
papers/pizza/pizza.ps
Dissertation der Fak. f. Informations- u. Kognitionswissenschaften, Univ. Tübingen - 2004
165
166
BIBLIOGRAPHY
[OeBF]
The Open eBook Forum, online at: http://www.openebook.org
[OlBo]
Leif-Jöran, Olsson and Lars Borin. A web-based tool for exploring translation equivalents on word and sentence level in multilingual parallel corpora.
Erikoiskielet ja kännösteoria - Fackspråk och översättningsteori - LSP and
Theory of Translation. 20th VAKKI Symposium. 2000, Vasa 11.-13.2.2000. Publications of the Research Group for LSP and Theory of Translation at the University of Vaasa, No. 27, 2000. available at: http://svenska.gu.se/˜svelb/
pblctns/VAKKI00.pdf
[Os76]
J. F. Ossanna, NROFF/TROFF User s Manual Bell Laboratories Computing Science Technical Report 54, 1976
[OWL]
D. MCGuinness and F. van Harmelen(eds.) OWL Web Ontology Language W3C
Recommendation, 10 February 2004 available at: http://www.w3.org/TR/
owl-features/
[Park]
Richard Parkinson, Cracking Codes - The Rosetta Stone and Decipherment British
Museum Press, London, 1999
[PDF]
Adobe Systems Incorporated PDF Reference, Version 1.4, 3rd Ed. AddisonWesley, 2001 available at: http://partners.adobe.com/asn/developer/
technotes/acrobatpdf.html
[PeReEx]
Perl 5 Perl Regular Expressions’, available at: http://www.perldoc.com/
perl5.6/pod/perlre.html
[Pest]
Slava Pestov, jEdit - Open Source programmer’s text editor. http://www.jedit.
org
[PeWiKr]
R. Pesch, U. Wilckens and R. Kratz Synoptisches Arbeitsbuch zu den Evangelien
Benziger Verlag/Güterlsoher Verlagshaus, 1980
[Pier]
P. Pierrou. Literate Programming in XML. Markup Technologies, Philadelphia, Pensylvania, US, Dec. 1999, http://www.literateprogramming.com/
farticles.html
[PKCS5]
RSA Laboratories, PKCS #5 v2.0: Password-Based Cryptography Standard available at:http://www.rsasecurity.com/rsalabs/pkcs/
[PS]
Adobe Systems Incorporated PostScript Language Reference Manual AddisonWesley, 1985 available at: http://partners.adobe.com/asn/developer/
technotes/postscript.html
[Ram]
Norman Ramsey Literate Programming Simplified IEEE Software, Sep. 1994, p.
97 http://www.eecs.harvard.edu/˜nr/noweb/intro.html
[RamMar]
N. Ramsey and C. Marceau Literate Programming on a Team Project Software
- Practice & Experience, 21(7), Jul. 1991, http://www.literateprogramming.
com/farticles.html
[RDF]
Beckett, Brickley, Manola, Klyne, Hayes, et.al (eds.) Resource Description
Framework (RDF) W3C Consortium available at: http://www.w3.org/RDF/
[Relax]
ISO/IEC FDIS 19757-2 James Clark, MURATA Makoto (ed.) RELAX NG Specification online at: http://www.relaxng.org/spec-20011203.html
Dissertation der Fak. f. Informations- u. Kognitionswissenschaften, Univ. Tübingen - 2004
BIBLIOGRAPHY
[ReMyDu]
Allen Renear, Elli Mylonas, David Durand Refining our Notion of What Text
Really Is: The Problem of Overlapping Hierarchies Research in Humanities Computing, Oxford University Press, 1996 available at: http://www.stg.brown.
edu/resources/stg/monographs/ohco.html
[RFC2413]
S. Weibel, J. Kunze, C. Lagoze, M. Wolf Dublin Core Metadata for Resource Discovery, RFC 2413, Sep. 1998. http://www.ietf.org/rfc/rfc2413.txt
[RFC2046]
N. Freed and N. Borenstein Multipurpose Internet Mail Extensions (MIME) Part
Two: Media Types, RFC 2046, Nov. 1996. http://www.ietf.org/rfc/rfc2046.txt
[RTF]
Microsoft Corporation Rich Text Format (RTF) Specification available at: msdn.
microsoft.com/library/en-us/dnrtfspec/html/rtfspec.asp
[Samet]
J. Samtinger DOgMA: A Tool for the Documentation & Maintenance of Software
Systems. Tech. Report, 1991, Inst. f¨ur Wirtschaftsinformatik, J. Kepler Univ.,
Linz, Austria
[SamPom]
J. Samtinger and G. Pomberger A Hypertext System for Literate C++ Programming. JOOP, Vol. 4, No. 8, SIGS Publications, New York, 1992
[San]
S. E. Sandø, The Software Development Foundation CSF Specification. http:
//sds.sourceforge.net
[SAFKKC]
S. Shavor, J. D’Anjou, S. Fairbrother, D. Kehn, J. Kellerman, P. McCarthy The
Java Developer’s Guide to Eclipse http://www.eclipse.org
[SHA]
National Institute of Standards and Technology (NIST), Secure Hash Standard
Federal Information Processing Standards Publication 180-2, Aug. 2002 available at: http://csrc.nist.gov/publications/fips/fips180-2/fips180-2.pdf
[ShuCo]
Stephan Shum and Curtis Cook Using Literate Programming to Teach Good
Programming Practices 25th. SIGCSE Symp. on Computer Science Education,
1994, p. 66-70
[Sim]
Volker Simonis The ProgDOC Program Documentation System http://www.
progdoc.org
[Sim02]
Volker Simonis International Swinging: Making Swing Components LocaleSensitive, Java Solutions, ”C/C++ Users Journal”, Vol 20/No 8, August 2002, available at:
http://www.cuj.com/documents/s=7961/
cujjsup2008simonis/ sourcecode at: ftp://ftp.cuj.com/pub/2002/2008˙
java/simonis.zip
[Sim04]
Volker Simonis Scrolling on demand - A scrollable toolbar component, ”Java Developer Journal”, Volume 9/Issue 7, July 2004 http://sys-con.com/java
[Sim03]
Volker Simonis and Roland Weiss ProgDOC - A New Program Documentation
System, LNCS 2890, Andrei Ershov 5rd. Intern. Conf. ”Perspectives of System
Informatics”, July 9-12, 2003, Novosibirsk, Russia
[SiPl96]
M. Simard and P. Plamondon. Bilingual Sentence Alignment: Balancing Robustness and Accuracy. In Proceedings of AMTA-96, Montréal, Canada, 1996 available at: http://www-rali.iro.umontreal.ca/Publications/spAMTA96.ps
[Szy]
Clemens Szyperski Component Software, 2.ed. Addison-Wesley, 2002
Dissertation der Fak. f. Informations- u. Kognitionswissenschaften, Univ. Tübingen - 2004
167
168
BIBLIOGRAPHY
[Simo96]
C. Simonyi. Intentional Programming - Innovation in the Legacy Age. IFIP WG
2.1 meeting, june 4th, 1996
[Simo99]
C. Simonyi. The future is intentional. IEEE Computer Magazine, Vol. 32, No. 5,
May 1999
[Sor]
D. Soroker, M. Karasick, J. Barton and D. Streeter. Extension Mechanisms in
Montana. Proc. of the 8th Israeli Conf. on Computer Based Systems and Software Engineering, 1997
[SouNav]
Red Hat, Inc. Source Navigator. http://sourcenav.sourceforge.net
[SpHu99]
C. M. Sperberg-McQueen and Claus Huitfeldt Concurrent Document Hierarachies in MECS and SGML Litarary and Linguistic Computing, Vol. 14, Issue
1, 1999 available at: http://lingua.arts.klte.hu/allcach98/abst/abs47.htm
[SpHu00]
C. M. Sperberg-McQueen and Claus Huitfeldt GODDAG: A Data Structure for
Overlapping Hierarchies Principles of Digital Document Processing, München,
Sep. 2000 available at: http://www.hit.uib.no/claus/goddag.html
[SperBu]
C. M. Sperberg-McQueen and Lou Burnard (eds) Guidelines for Text Encoding
and Interchange. TEI Consortium and Humanities Computing Unit, University
of Oxford, 2002, ISBN 0-952-33013-X available at: http://www.tei-c.org/
[Str]
Bjarne Stroustrup, The C++ Programming Language. Addison-Wesley, Special
Edition, 2000
[TEISO]
David Durand (chair) TEI Stand-Off Markup Workgroup. TEI Consortium,
available at: http://www.tei-c.org/Activities/SO/
[TeRe]
T. Teitelbaum and T. Reps. The Cornell Program Synthesizer: A Syntax-Directed
Programming Environment. Communications of the ACM, Vol. 24, No. 9, Sept.
1981
[ThMcK]
Henry S. Thompson and David McKelvie Hyperlink semantics for standoff
markup of read-only documents Proceedings of SGML Europe ’97, Barcelona,
Spain, 1997 available at: http://www.ltg.ed.ac.uk/˜ht/sgmleu97.html
[TopMa]
Michel Biezunski, Martin Bryan, Steve Newcomb Topic Maps - 2nd edition
ISO/IEC 13250:1999, available at: http://www.y12.doe.gov/sgml/sc34/
document/0058.htm
[Trex]
James Clark TREX - Tree Regular Expressions for XML online at: http://www.
thaiopensource.com/trex/
[TU01]
Universität Tübingen, Zentrum für Datenverarbeitung, TUSTEP - Das Handbuch, 2001 online at: http://www.uni-tuebingen.de/zdv/tustep
[U30]
The Unicode Consortium The Unicode Standard 3.0 Addison-Wesley, 2000
available at: http://www.unicode.org
[UNI]
The Unicode Consortium, online at: http://www.unicode.org
[URI]
T. Berners-Lee, R. Fielding, L. Masinter RFC 2396: Uniform Resource Identifiers
(URI): Generic Syntax. IETF (Internet Engineering Task Force), 1998 available
at: http://www.ietf.org/rfc/rfc2396.txt
Dissertation der Fak. f. Informations- u. Kognitionswissenschaften, Univ. Tübingen - 2004
BIBLIOGRAPHY
[UnReEx]
The Unicode Consortium Unicode Regular Expression Guidelines, Unicode
Technical Report #18, http://www.unicode.org/unicode/reports/tr18
[VanWyk]
Christopher J. Van Wyk Literate Programming Column. Communications of the
ACM, Volume 33, Nr. 3, March 1990. p. 361-362
[Ver]
Jean Véronis (ed.) Parallel Text Processing Kluwer Academic Publishers, Dordrecht, 2000
[VisAge]
IBM Corporation. Visual Age C++. http://www-3.ibm.com/software/ad/
vacpp
[VisSt]
Microsoft Corporation. Visual Studio. http://msdn.microsoft.com/vstudio
[Walsh]
Norman Walsh Literate Programming in XML. XML 2002, Dec. 8-13, 2002, Baltimore, USA. http://www.nwalsh.com/docs/articles/xml2002/lp/
[Walsh2]
Norman Walsh DocBook XSL Stylesheets. http://docbook.sourceforge.net/
projects/xsl
[WaMu]
Norman Walsh and Leonard Muellner DocBook: The Definitive Guide O’Reilly
& Associates, 1999, available at: http://www.docbook.org
[Wil]
Ross N. Williams. funnelWeb. http://www.ross.net/funnelweb/
[WiMue]
Richard Widhalm und Thomas Mück, Topic Maps Springer-Verlag, Berlin Heidelberg, 2002
[Wir77]
Niklaus Wirth, What can we do about the unnecessary diversity of notation for syntactic definitions? Communications of the ACM, Volume 20, Issue 11, November 1977
[WirGu]
N. Wirth and J. Gutknecht. The Oberon System. Software - Practice & Experience, 19(9), 1989, p. 857-893
[WunZoe]
R. Wunderling and M. Zöckler. DOC++. http://www.zib.de/Visual/
software/doc++/
[WordNet]
Piek Vossen and Christiane Fellbaum The Global WordNet Association available
at: http://www.globalwordnet.org/
[WWW]
The World Wide Web Consortium, online at: http://www.w3.org
[XEP]
RenderX, Inc. XEP Rendering Engine. http://www.renderx.com/FO2PDF.
html
[XHTML]
The Extensible HyperText Markup Language. W3C Recommendation, Jan. 2000,
available at: http://www.w3.org/MarkUp
[XInc]
Jonathan Marsh, David Orchard (Editors), XML Inclusions (XInclude) Version
1.0 W3C Working Draft, Nov. 2003, available at: http://www.w3.org/TR/
xinclude
[XLink]
Steve DeRose, Eve Maler and David Orchard (Editors) XML Linking Language (XLink) W3C Recommendation, June. 2001, available at: http://www.
w3.org/TR/xlink
Dissertation der Fak. f. Informations- u. Kognitionswissenschaften, Univ. Tübingen - 2004
169
170
BIBLIOGRAPHY
[XML]
T. Bray, J. Paoli, C. M. Sperberg-McQueen, E. Maler (Editors), Extensible
Markup Language. W3C Recommendation, Oct. 2000, available at: http://
www.w3.org/XML
[XML-Na]
T. Bray, D. Hollander, A. Layman (Editors), Namespaces in XML.
W3C Recommendation, Jan. 1999, available at: http://www.w3.org/TR/
REC-xml-names/
[XMLSch0]
David C. Fallside (Editor) XML Schema Part 0: Primer W3C Recommendation,
May 2001, available at: http://www.w3.org/TR/xmlschema-0/
[XMLSch1]
Thompson, Beech, Maloney, Mendelsohn (Editors) XML Schema Part 1: Structures W3C Recommendation, May 2001, available at: http://www.w3.org/
TR/xmlschema-1/
[XMLSch2]
Biron, Malhotra (Editors) XML Schema Part 2: Datatypes W3C Recommendation, May 2001, available at: http://www.w3.org/TR/xmlschema-2/
[XPath]
James Clark and Steve DeRose (Editors) XML Path Language (XPath) W3C
Recommendation, Nov. 1999, available at: http://www.w3.org/TR/xpath
[XPoint]
Grosso, Maler, Marsh, Walsh (Editors), XPointer Framework W3C Recommendation, Mar. 2003, available at: http://www.w3.org/TR/xptr-framework/
[XSL]
S. Adler, A. Berglund, J. Caruso, et. al. Extensible Stylesheet Language (XSL)
W3C Recommendation, Oct. 2001, available at: http://www.w3.org/TR/xsl
[XSLT]
James Clark (Edt.) XSL Transformations (XSLT) Vers. 1.0, W3C Recommendation, Nov. 1999, available at: http://www.w3.org/TR/xslt
[XTM]
Steve Peppe and Graham Moore (eds.) XML Topic Maps (XTM) 1.0 available
from: http://www.topicmaps.org/xtm/index.html
[Zuk97]
John Zukowski Java AWT Reference Addison-Wesley, 1997
[Zuk]
John Zukowski “Magic with Merlin: Scrolling tabbed panes”, available at: http:
//www-106.ibm.com/developerworks/java/library/j-mer0905/
[ZuStan]
John Zukowski and Scott Stanchfield Fundamentals of JFC/Swing, Part
II, MageLang Institute, available at: http://developer.java.sun.com/
developer/onlineTraining/GUI/Swing2
Dissertation der Fak. f. Informations- u. Kognitionswissenschaften, Univ. Tübingen - 2004