1
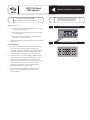
NXQ™ Flat-Panel
Wall Speaker
>>>
Start your system installation with the
“System Installation” section of the User Manual
Step 1: Selecting Speaker Mounting Location
One NXQ™ Flat Panel Wall Speaker is designed for rooms less than
1200 sq. ft. and with a ceiling height of 9–12 feet.
>>>
All LightSPEED speakers should be installed in
accordance with Uniform Building Code, state
and local building department requirements.
>>>
Room Installation: Top View
figure 1:
Before starting the system installation, speaker placement needs to
be decided. This speaker is designed to be centered on the long wall of
the classroom (figure 1). Ceiling height must be 9 feet or higher and the
speaker should be mounted 6.5–7 feet from the floor (figure 2).
If the classroom is not rectangular, or has a ceiling that is not horizontal
(flat), call LightSPEED Technical Support (800.732.8999) to determine
optimum speaker placement.
Step 2: Mounting the Speaker
A.
B.
Measure 6.5–7 feet up on the center of one of the long walls to
determine approximate speaker location. The speaker comes with
standard picture hangers. Attach the hangers to the wall in the
same manner as if hanging a picture. The speaker has a wire on the
back that will allow it to hang on the wall. Do not hang the speaker
until after “B” is completed.
Locate the coil of speaker wire. To connect the wire to the
speaker, press down on the colored terminals on the back of the
speaker, insert the wire, and release the tab to hold it in place. Using
the end with the two colored wires, insert the black wire into the
black-tabbed terminal, and the red wire into the red-tabbed
terminal. Hang the speaker on the hanger in the same manner as
hanging a picture.
Step 3: Connect Speakers and Wire to the Receiver/Amplifier
A.
Run the wire by best route from the speaker to the receiver/
amplifier. For permanent installations it is usually best to route
wire overhead when possible. It is common practice to run speaker
wire above suspended ceiling tiles. NOTE: wiring should be installed
and secured according to state and local school building codes.
B.
Connect the other end of the speaker wire to the receiver/amplifier
in the following manner based on the system type:
750iR (see figure 3)
i. Unscrew the red and black caps on the binding
post connectors.
ii. Insert the bare red wire into the red hole that was revealed
by unscrewing the red cap and the black wire into the hole
on the black connector.
iii. Screw the caps back down onto the wires until they
are secure.
iv. Make sure the speaker on/off switch next to the jack is
switched to the “on” position.
>>>
Side View
figure 2:
9 ft
6.5 - 7 ft
>>>
Connection of Speaker Wire to Back of 750iR
figure 3:
BLACK
RED
1
2
>>>
>>>
Speaker Installation Instructions
NXQ™ Flat-Panel
Wall Speaker
All LightSPEED speakers should be installed in
accordance with Uniform Building Code, state
and local building department requirements.
>>>
>>>
Start your system installation with the
“System Installation” section of the User Manual
780iR (see figure 4)
>>>
i. Insert the 1/4” plug into the SPEAKER OUTPUT 1 jack on the
back of the receiver/amplifier.
>>>
>>>
Speaker Installation Instructions
Connection of Speaker Wire to Back of 780iR
figure 4:
SPEAKERS
ADJ
FM OUT
VOLUME
ii. The speaker volume knob should be left at the 12:00 position
for most applications.
1
3
2
5
4
6
DC
POWER
MIC CHARGE
SPEAKER
OUTPUT
iii. Make sure the corresponding speaker on/off switch on the
front panel is set to the “on” position.
C.
Speaker wire should be secured to the wall and concealed if desired
with wire mold.
>>>
Step 4: Equalization
A.
1
figure 5:
Each receiver/amplifier includes an 8-band equalizer that allows
MIXED AUDIO
ADJ
4
2
3
users to fine-tune
their classroom
based on different
roomOUT OUT
characteristics.
Figure 5 shows the factory recommended settings
SPEAKER OUTPUT
POWER
for the NXQ speaker. Since all rooms are different,DCthis
is onlyCHARGE
meant as a starting point and may require some adjustment.
ON
OFF
ON
ON
OFF
ON
C.
Return to “Step 4: Receiver/amplifier” of the install section of
the user manual to complete the remaining steps of the
system installation.
B.
OFF
Factory Recommended EQ Settings
OFF
The ideal sound is a crisp, clear sound with no feedback. Volume
levels should be set to a point you can barely hear your own voice.
The goal is to try to replicate the sound of your voice as if the
child is sitting directly in front of you, not to amplify your voice at
high volumes. Because of the classroom size and constant
proximity to the speaker, the system can product feedback
(squealing) if the volume level is set too high.
250
ADJ
AUX
IN 1
400
600
1K
1K6
2K5
4K
6K3
+10
0
AUX
IN 2
-10
EQUALIZER
SENSOR
SHORT
SENSOR INP