1
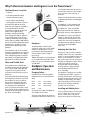
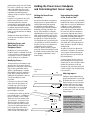
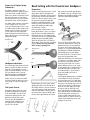
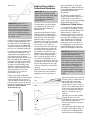
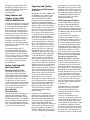
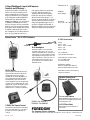
Using the
Foredom
®
PowerGraver
®
For Stone Setting and Engraving
by George Bennett
Contents
Why Professional Jewelers and Engravers
use the PowerGraver
The K.2293 Kit and Components
Page
2
2–3, 8
Modifying Gravers to Fit Handpiece
3
Holding Handpiece and Determining Graver Length
3
Adjusting Handpiece Impact
3–4
Proper Use of Duplex Spring Connection
4
Handpiece Lubrication
4
Optional Foot On/Off Control
4, 8
Bead Setting
4 –5
Bright Cutting
5
Polishing the Cutting Surface
5–6
Channel and Hammer Setting
6
Surface Texturing
6
Engraving and Carving
Helpful Bench Accessories for Engraving Work
6–7
7
FOREDOM
®
The Foredom Electric Company
16 Stony Hill Road, Bethel, CT 06801 USA
203-792-8622 • Fax: 203-796-7861
Getting the Best Performance and Results
7–8
www.foredom.com
Why Professional Jewelers and Engravers use the PowerGraver ®
to hold shaft behind chuck nut and one to
loosen chuck nut. Remove collet in handpiece, insert new collet, and screw on
chuck nut.
The PowerGraver is used for:
•
engraving
•
bead setting and bright cutting
•
channel and hammer setting
•
texture and florentine finishing
•
carving figures and initials on jewelry
Always use both wrenches when loosening
or tightening chuck nut to avoid damaging
handpiece.
and many other applications where
hand tools such as gravers and beading
tools might normally be used. The
PowerGraver can help the professional
jeweler in these applications by
providing a controlled hammering
action through the handpiece which can
accept a wide variety of tools. The user
controls the hammering action by adjusting the strokes per minute (SPM) with the
speed control and by adjusting the impact
intensity from a very light to a heavy
impact with the adjusting ring on the
handpiece.
The PowerGraver can also be used with
Foredom rotary handpieces for low speed,
high torque applications such as drilling
holes, cutting bearings with a setting bur,
wax carving or other applications where
high speed is not required or desirable.
Motor and Flexible Shaft
The PowerGraver motor (M.PGX) was
specifically developed for this application.
It is a low speed (500–2,800 rpm) high
torque DC motor. It provides smooth
acceleration and holds the preset speed
under load.
The permanently lubricated ball bearings
and heavy duty construction can provide
almost infinite life even in continuous
duty operation. The flexible shaft and
sheath are more flexible than those on
the standard Foredom flexible shaft
power tools because the sheath is made
from a special and more pliable neoprene
material. This provides greater control and
less “drag” on the handpiece.
The HP604 1/8″ collet is generally used
with engraving tools with 1/8″ shanks.
The HP602 1/16″ collet can hold thin,
hardened points with 1/16″ shanks for
decorating and stone setting applications.
The HP603 3/32″ collet is used with the
hammer or anvil point (A-10177P) and
carbide stylus (A-10215) that have 3/32″
shanks. These come in the kit. Optional
Pavé diamond point (A-R15G) and beading tools also work with HP603
3/32″ collet.
Illustration
No. 1
Handpiece*
The H.9D handpiece (shown below)
converts the rotary motion of the flexible
shaft into a hammering action on the
tool holder. The chuck nut tightens the
collet around the shank (or tang) of
the accessory.
Adjusting the Palm Rest–
*Note: This handpiece is not intended for
use on standard Foredom flexible shaft
power tools, as it has a maximum speed
of 3,000 RPM.
Handpiece Operation
and Maintenance
Changing Collets –
The handpiece is designed to be used like
a traditional graver handle or push tool.
Generally, the flat surface of the palm rest
should be positioned at the bottom of the
handpiece in relationship to the cutting
edge of the graving tool. This provides a
flat surface for the fingers and better
clearance over the work area.
Four different size collets are provided so
that different size tools can be held in the
chuck:
HP602
1/16″
(.0625″/1.6mm)
HP603
3/32″
(.0937″/2.35mm)
HP604
1/8″
(.125″/3.17mm)
HP605
3mm
Installing and Holding Tools –
An optional 1/32″/.8mm collet (HP601) is
also available from Foredom.
To change collets unscrew the chuck nut
using the two wrenches provided-use one
Connector
Aligning Tab
The palm rest can be rotated around the
handpiece barrel to the most comfortable
position or removed completely when you
wish to use the handpiece in a “pencil
grip” manner. Just loosen the set screw in
the palm rest and tighten it at the desired
position. The palm rest can also be
moved part way down the handpiece
barrel if required to align your thumb
and index finger with the chuck tool
more comfortably.
Palm
Rest
Oil Hole
Select a collet that has the closest fit with
the tool’s shank. (If too large a collet is
used on a thin tool, the collet jaws or
fingers can be distorted or broken when
Set Screw
Tool Holder
Chuck Nut
Illustration No. 2
Duplex Spring
Cover
Impact Adjusting
Ring
2
Wrench Flats
Oil Hole
tightened.) The shank of the tools should
be at least 1″ (25mm) long so that it will
make contact with the bottom of the
collet holder. This is important because
it maximizes the hammering action
efficiency and the tool will not “slip back”
in the collet.
Insert the tool or graver into the collet
until it touches the bottom of collet
holder, then tighten the chuck nut
securely with one wrench while holding
the collet holder shaft with the other. Do
not tighten chuck nut without using a
wrench on the flats in collet holder shaft.
Failure to use both wrenches can damage
the handpiece.
Retighten the chuck nut periodically as
you work since extended use may loosen
the chuck nut.
Modifying Gravers and
Other Tools To Fit the
Handpiece Chuck –
Modifying tools to fit securely in the
handpiece chuck is not difficult. The shank
or tang end of the tool must be ground or
cut so that it is at least 1″ (25mm) long
and 1/8″ (3mm) or less in diameter.
Holding the Power Graver Handpiece
and Determining Best Graver Length
Holding the PowerGraver
Handpiece –
Determining the Length
of the Graver or Tool –
Because the PowerGraver is designed to
help the jeweler or engraver with bead
setting, bright cutting and engraving,
the handpiece should be held like a
conventional graver. Hold the handpiece
by placing your hand, palm down, over
the top of the handpiece. Locating the
adjustable palm rest in the center of your
palm, extend your thumb to the left side
of the chuck nut, put your index finger to
the right side or on top of the chuck nut.
Your other fingers can go around the palm
rest until they rest on the flat underside of
the palm rest. This is a very natural and
comfortable position to hold the
handpiece, similar to holding a regular
graver. The only time the handpiece would
be held like a pencil would be when using
it for applying a texture finish or doing
channel setting.
Having the graver or tool at a comfortable
length from the chuck is very important. A
graver that is too long feels awkward and
is difficult to control. To determine a
workable graver length first insert a
graver with the tang end modified into
the collet. Then, place the handpiece in
your hand as suggested above. Extend
your thumb along the length of the graver
blade while still holding the handpiece
comfortably in your hand. Mark the graver
at about 3/4″ (19mm) past the end of
your thumb. This is the length where the
graver should be to provide an efficient
working length.
To shorten a graver use the corner of a
bench grinding wheel to first grind half
way through one side of the graver where
marked. Then grind most of the way
through the other side of the graver until
it is thin enough to snap off after placing
it in a bench vice.
Modifying Gravers –
The tapered tang on the traditional style
gravers need to be ground as shown in
Illustration 3. A new graver’s tapered tang
(Fig. A) can be ground with a bench
grinder or grinding wheel in a flexible
shaft handpiece until it is straight (see
Fig. B) and 1″ (25mm) long and 1/8″
(3mm) wide. Then grind the corners off
(see Fig. C) making it as round
as possible.
If the taper is less than 1/8″ (3mm)
at the end of the tang, grind a 1/2″
(12.5mm) long section (see Fig. D)
behind the heel into a 1/8″ (3mm)
diameter. This is the section held
by the handpiece collet jaws.
For smaller gravers and tools, grind the
tang or shank end to a 1″ (25mm) long
by 3/32″ (2.35mm) or 1/16″ (1.6mm)
diameter for use in the smaller collets.
Try to keep the 1″ long section in line
with the top, bottom and sides of the
graver as much as possible for better
control of the cutting edge. Remove all
burs or sharp edges on the tang or
shank end to prevent damage to the
collet or inside of the collet holder.
The palm rest can also be adjusted forward about 1/4″ (6mm) to accommodate
a longer graver and moved back up the
grip as the graver becomes shorter from
repeated sharpening.
Illustration No. 3
Fig. A
Tang
Heel
Adjusting Impact –
1/8″
(3mm)
Fig. B
1″
(25mm)
Fig. C
Turning the impact adjustment ring
(page 2, Illustration No. 2) to the right
(clockwise) will reduce or soften the
impact. Turning it to the left (counterclockwise) will increase the impact
force. The ring can be rotated while
the motor and handpiece are running
so that you can “feel” and “hear” the
change in impact.
1″ (25mm)
Remove all
four corners
1/8″
(3mm)
Section held
by collet
Fig. D
1/8″ (3mm)
3
1″
(25mm)
Helpful Hint For even lighter
impact when doing very delicate
work or to avoid damaging small
stones when doing setting work,
grab the chuck nut with your thumb
and index finger and pull back
slightly while handpiece is running.
This will reduce or “cushion” the
impact even more.
Proper Use of Duplex Spring
Connection –
Bead Setting with the PowerGraver Handpiece
Preparation
The duplex connection consists of a
double wound flat wire spring which acts
as the drive shaft or spindle inside the
duplex cover which is made with a round
wire spring. The purpose of the duplex
spring connection is to give you very free,
unrestricted control over the handpiece.
The most commonly used graver is a round
graver. (A #52 graver is provided in the
K.2293 Kit. See Illustration 6.) First, prepare
the graver tang as previously instructed to
fit the 1/8″ collet (see page 3). Next, secure
the graver by its tang in an adjustable
handle like a millgraining handle or a file
handle to provide a safe way to hold the
graver while grinding its cutting edge
(see Illustration 5, Fig. A).
The duplex spring connection is designed
for use at angles of 45º or less from
center (see Illustration No. 4). If it is used
in a tighter radius the drive spring can be
damaged or the connection can get hot.
You can replace the drive spring (P/N
HP76) if it breaks from being used at too
tight a radius. Directions are included with
replacement springs.
Place a container of water next to your
bench grinder wheel to use as a coolant to
keep the graver cool while grinding. This
will prevent the loss of the temper (hardness) of the steel due to overheating. While
grinding the graver, repeatedly dip the
graver into the water. It is a good idea to
dip the graver in the water after each grinding pass. Always wear eye protection
when using any grinding tool.
Illustration No. 4
Center
Line
Illustration No. 5
Fig. A
2mm
The sleeve bearing in the back end of the
duplex connection should be oiled every
40 hours of use by putting one or two
drops of Foredom handpiece oil in the oil
hole (see Illustration No. 1). Use the
Hypodermic Dispenser (P/N MS10005)
which is included in the K.2293 Kit.
20mm
Fig. C
Another oil hole is located in the handpiece barrel under the palm rest. Put one
or two drops of oil in it every 40 hours
of use.
Grind away the top of the graver, always
grinding from the front to the back (tip to
the handle). Grind in a smooth, continuous
motion. Grind away a small amount with
each pass. (Remember to dip the graver in
the coolant after each pass.) Grind a taper
into the graver approximately .08″ (2mm)
Dial Speed Control
The bench mounted dial speed control
(C.EMGX) is calibrated to correspond
to the motor RPM’s. You can set and
maintain the desired speed for each
application using the dial control.
If you use the optional On/Off foot
switch (C.FCGX), it will then start
and stop the motor at whatever
speed is set on the dial.
Illustration No. 6
#52
Round
#3
Onglette
Illustration No. 7
The face of the graver should be sharpened at the bench with an oil stone (an
Arkansas hard stone is recommended).
The graver can be held by hand for this
operation, or in a graver sharpening fixture
(See Illustration 7) available through most
jewelry supply tool stores and catalogs.
The angle on the face of the #52 round
graver can vary depending on the
application and what you are accustomed
to using. The most common angle used is
45°. Move the graver back and forth
slowly along the length of an oil stone
while holding the graver at a 45° angle.
Do this until the face is established across
the width and height of the graver tip.
(See Illustration No. 5, Fig. C.) Remove
graver from handle and secure in
handpiece chuck.
Fig. B
Handpiece Lubrication –
high at the tip, then back approximately
3/4″ (20mm) to the top of the graver. (See
Illustration 5 Fig. B.) Remove any burs on the
sides of the graver left by the grinding.
#40
Flat
4
#2
Bevel
Set the impact adjusting ring to a medium
to hard impact. To create a bead, place
the graver about 1/32″ (.75–1mm) away
from the inside wall of the bearing. Raise
the graver so the bottom edge is at a 45°
angle from the surface. (See Illustration
No. 8.) Do not push, apply just enough
pressure to keep the graver tip in the
metal. This will take some practice, and
may require breaking old habits. With the
graver in this position, set the speed
control at 2,200–2,400 S.P.M. For even
better results use an optional on/off foot
switch. Let the hammering action of the
handpiece do the work.
Illustration No. 8
Bright Cutting with the
PowerGraver Handpiece
Helpful Hint The secret to successful
bright cutting is polishing all cutting
surfaces of the graver. A polished cutting
surface will create a “Bright Cut”.
An unpolished cutting surface will
create a dull cut.
Helpful Hint By guiding the tool
instead of pushing it as you must do
with a beading tool in a handle, you
have much more control of the operation. You will not get tired and thus, lose
your “feel” for the work. And, there is
far less chance of slipping and damaging
the metal or a stone.
It will be necessary to adjust the SPM and
the degree of impact depending on the
size of bead to be created and the hardness of the metal you are working with.
Try different settings to find which works
best for you on a particular jewelry piece.
For removing the metal around the beads
and for general excavating work, a #3
onglette graver (see Illustration No. 6) is
most commonly used. This graver is
prepared the same way as the #52 round
with a 2mm high tip and a 20mm long
taper. A 45° face angle is used, but with
the addition of a slight angle (8°–10°) to
the right or left side depending on the
application of the graver. The forward
edge of this angle will work like a chisel,
allowing the metal to peel off to the
opposite side for ease of removal.
(See Illustration No. 9.)
A higher speed (2,400–2,800 SPM) is
recommended for this procedure. A lighter
impact setting will also give you more
control around the beads and stones. The
point of the graver needs to be set in the
metal before activating the on/off switch.
Don’t push, let the handpiece
do the work for you.
For bright cutting or the final finishing
of a setting use a flat graver like the
#40 included in the K.2293 kit (see
Illustration No. 6).
Preparing the #40 flat graver is a little
different from the other gravers. After
preparing the tang end and cutting it to
length, grind the same 2mm high by
20mm long taper to the graver (see
Illustration 5, Fig. B page 5). Then use the
bench oil stone to establish the following
surfaces. First, a “foot” needs to be
created on the bottom of the graver. This
foot raises the bottom of the graver off
the working surface and provides necessary clearance around the beads and
adjoining surfaces. Place the graver in a
handle or a graver sharpening fixture.
Place the graver bottom flat on the oil
stone, raise the handle/fixture 10°–15°
to create a foot approximately 1mm long.
(See Illustration 10, Fig. A). The face of the
graver is then sharpened at a 45° angle
to the foot of the graver. (See Illustration
10, Fig. B.)
Additional clearance for working around
the beads and stone can be gained by
grinding the top of the graver tip to a
The advantage of bright cutting the
surfaces around the beads and stones is
to eliminate the need to polish these
surfaces and thus wearing away (polishing
off) the beads holding the stones.
Polishing the Cutting Surface –
To create a polished cutting surface you
use a small piece of polishing or emery
paper (#4/0 or #6/0) approximately 2″x 2″
(50mm x 50mm); a small piece of
smooth, hard paper (such as a business
card) and jeweler’s rouge (such as a yellow rouge). After establishing the graver
angles described above and with the
graver still mounted in the adjustable
handle, place the face of the graver on
the polishing paper at the same angles
and pull (draw) the graver across the
paper. The polishing paper and the hard
Helpful Hint Lubricating the graver tip
is recommended for all graver work and
especially bright cutting. Polished
(bright cutting) gravers require liberal
lubrication to keep the metal being cut
from sticking to the graver and keep the
graver sharper longer. Lubricate your
gravers with oil of wintergreen. Place
a piece of cotton in a small glass or
metal dish and saturate it with oil of
wintergreen. Touch the cutting edge of
the graver frequently to the oil while
using it.
paper need to be placed on a very hard,
flat surface (glass or polished stone) to
support them. This procedure will
remove (polish) the oil stone marks
from the surface. A couple of drops of
light oil on the polishing paper will create an even smoother surface. Prepare
the piece of hard paper by rubbing a
light coat of the yellow rouge on a
small area.
Illustration No. 10
Fig. A
Fig. B
8° - 10°
Illustration No. 9
peak (see Illustration 10, Fig. C), back
approximately 1/4″ (6mm) from the face.
Use a small hand held grinding wheel in
your flexible shaft power tool for
this procedure.
Repeat the same procedure of pulling
(drawing) the graver across the
prepared paper to remove the polishing
paper marks. This will produce a
smooth, polished surface on the graver
cutting surface.
1-2mm
Fig. C
After preparing the #40 flat graver, and
inserting it in the handpiece chuck, set
the dial control to a 2600-2800 SPM
setting. This speed and a light impact
Peak
1/4″ (5mm)
5
setting will create the smoothest cuts.
Remember, the “Bright Cutting” tool is
used for the final finished cut and is not
meant for heavy removal or
excavating work.
Doing Channel and
Hammer (Gypsy) Work
with the PowerGraver
For channel setting the professional jeweler will find the PowerGraver an invaluable
tool. By selecting the appropriate graver,
the PowerGraver can be used to cut a
bearing or clean up an existing one. The
anvil or hammer tip in the PowerGraver
handpiece can be used to fold (hammer)
the metal down around the sides of the
stone. (Prongs and bezels can also be
turned over a stone with the anvil point.)
By using the controlled power of the
PowerGraver, the setter will find that the
work becomes less fatiguing while quality
and production go up.
For maximum striking power it is
recommended that the SPM be set at
2200-2400 with the impact adjustment
ring set at hard. Be sure that the workpiece is held very securely on a solid base
to achieve maximum movement or “flow”
of the metal. Experiment with a similar
piece of metal to determine the best
speed and impact.
Surface Texturing with
the PowerGraver
Florentine (Italian) Finish –
The PowerGraver works very well for
doing florentine finishes by providing
controlled power that can be started and
stopped instantly with the on/off switch.
The elimination of the need to “push”
through the first set of lines gives the
operator the control that produces quality
work. The lining gravers used for this finish are modified and sharpened in the
same manner as regular gravers.
Pavé and other
Decorative Work –
The PowerGraver will accept a variety of
texturing points including the carbide
point provided in the K.2293 kit and the
Pavé diamond point. This is an application
where the handpiece should be held like a
dart or a pencil. Remember to check the
angle of the duplex spring when texturing
to avoid using it with a sharp bend.
Engraving and Carving
Preparation and Maintenance
of Gravers –
Many gravers are used for engraving and
carving but the most common are the
bevel and square gravers. A #2 bevel
graver is included in the K.2293 kit.
Preparing the graver is similar to preparing them for bead setting and bright
cutting. After grinding in the 2mm high by
20mm long taper on the front (cutting)
end of the graver, a “foot” needs to be
put on the bottom (or belly) of the graver
with a 10°-15° angle (see Illustration
No. 10, Fig. A) from the working surface
to provide clearance so the graver bottom
doesn’t drag across the surrounding
surface. This foot should be about 1/16″
(1–1.5mm) long. By hand or by using a
graver sharpening fixture, re-sharpen the
face at a 45° angle to the foot of the
graver, (see Illustration No. 10, Fig. B). The
45° face, as viewed from the side of the
graver should also have a slight angle
(See Illustration 9) to the right or left
depending on application. A face angled
to the left, with the forward edge being
on the right will allow for straight line
engraving and also for making clean
curves to the left. A graver set up with a
face angled to the right with the forward
edge to the left will allow for straight line
engraving and curves to the right. A bevel
graver can also be set up with no face
angle (or at 90° to the gravers’ sides), but
this is not advisable since it has the tendency to push the metal being removed
directly in front of the graver. This creates
an unnecessary load that makes the
graver difficult to move and control.
The bevel graver’s cutting surfaces should
now be polished smooth as described on
page 5 in “Polishing the Cutting Surface”.
The polishing not only provides a nice
bright cut, but also the smooth surface
of the graver will move through the
metal with less resistance than an
unpolished graver.
Remember to use a lubricant (oil of
wintergreen) on the graver tip. The graver
tip should be lubricated after every cut
while engraving. The lubricant will help
the graver cut and also keeps the metal
being engraved from sticking to the
graver’s cutting surfaces. Even while using
a lubricant some residue from the metal
being cut may adhere to the graver. If
allowed to build up this residue will take
the “edge” off the graver by rounding off
6
the cutting edge. To remove this residue
draw (pull) the graver across the rouged
hard paper at the established angles. For
thicker deposits it may be necessary to go
back to the polishing paper and then the
rouge paper. Maintaining the polished
surfaces of the graver is essential for
creating quality engraving.
Good Engraving Techniques –
For most metals and most engraving
procedures a high 2600-2800 SPM is
recommended with a light to medium
impact setting. These settings will provide
a smooth continuous cut without choppy
or hammering marks. The faster the SPM
the smoother the cut.
To start a cut, place the tip (point) of
the graver into the metal. This can be
accomplished by holding the graver at a
30°– 45° angle to the working surface,
then exerting a little downward pressure
on the graver tip while making a slight
twisting motion with your hand. Lower
your hand and the graver with the point
still in the metal until the foot of the
graver is almost parallel to the surface.
Make sure the point of the bevel graver
is at the absolute bottom. Don’t push.
Apply only enough pressure to
maintain the graver in the metal.
Now start the PowerGraver using the
on/off foot switch. Immediately (as soon
as the graver starts to move) lower the
graver angle until the bottom surface of
the foot (at the 10°–15° angle) is parallel
with the surface. The graver will maintain
the depth throughout the cut. If you want
to make a deeper cut, raise your hand
(graver angle) until the desired depth is
reached, then level off the graver again as
it moves forward. To make a shallower
cut, lower your hand (graver angle) until
the desired depth is reached, then level
off the graver.
For deeper cutting or for working with
harder metals, it may be necessary to
increase the impact adjustment to a
harder impact. Experiment to find the
setting that works best.
So far we’ve described how to cut a
straight, fine line (thread line). Other cuts
can be make with the bevel graver. To cut
a wider line, immediately after starting
and determining the desired depth, rotate
your hand (graver) slightly to introduce
the side of the graver face into the metal,
not just the point. This will create a wider
line (shade line). (See Illustration No. 11.)
The further the graver is rotated the wider
surface of graver.
Illustration No. 11
Thread
Line
Shade
Line
the line. Never use the entire side of the
bevel graver, a flat graver is used to make
this type of cut.
Using an Engravers Block –
To engrave curves, scrolls, lines, etc. the
piece to be engraved should be secured in
an engravers block. The engravers block
and its accessories are designed for this
purpose and should be considered an
absolute necessity for doing fine engraving work. (It is also a very helpful device
for the stone setter as well for holding
and positioning rings, bracelets, etc.)
With the piece secured in the engravers
block, start the cut. To cut a curve, rotate
the block, while keeping your hand and
graver in the same position. Curved
thread line and shade lines can be
cut in this manner.
Helpful Hint The PowerGraver can
help the beginning or experienced
engraver by providing controlled power
and eliminating the need to push a
graver. When learning, pushing too hard
is a main cause of slipping and the
frustration that comes with it.
Helpful Bench Accessories
for Engraving Work are
Available from Jewelry
Supply Distributors
1. Chinese White Chinese white can be
applied to the surface of the metal to be
engraved so that you can draw the letters,
figures, or design with a pencil on the
surface. It is applied with a wet, soft
hair brush or your finger.
2. Eye Loupe, Spectacle Loupes or
Clip-on Magnifiers These are available in
2x up to 10x magnification power.
3. Flex Arm Lamps Good lighting is
essential for engraving and stone setting.
4. Crocker Graver Sharpener A sharpening jig used with sharpening stones.
5. Arkansas Oil Stone Used with a
light oil to sharpen gravers.
6. Polishing Paper (Emery Paper) #4/0
(or 6/0) and hard, flat surface (glass or
polished stone) for polishing cutting
7. Rouge and Hard Paper Yellow rouge
on hard paper for final polishing operation on cutting surface.
8. Millgrain Handle or File Handle
with Chuck Used to hold gravers
while sharpening.
9. Templates Used to draw scroll
designs and patterns on surfaces to
be engraved.
10. Engraving Block with Work
Holding Pins and Fixtures This is a
good investment for any jeweler and
essential for engraving work.
11. Foredom Texturing Points
Available for the H.9D Handpiece –
Pavé Point with diamond A-R15G point
and 3/32″ (2.35) shank
Carbide Stylus with 3/32″ A-10215
(2.35mm) shank. This stylus is used to
shade and texture surfaces around or
between engraved lines.
Getting the Best Results
and Performance from your
Foredom PowerGraver
Don’t Push –
Traditionally it has been necessary to push
and then push harder to get a graver to
move. With the PowerGraver pushing
actually reduces the effectiveness of the
handpiece. The harder you push the less
effective it becomes. The tool requires the
freedom to work. This freedom to work is
achieved by applying just enough force to
keep the graver in contact with the metal
while you guide it where you want the tip
of the tool to cut or hammer. A light touch
provides control which will result in better
quality work.
Use a Light Touch –
Try to develop a light touch. Unless
required, a huge bead over a stone is
unnecessary. Large beads over the stone
have a tendency to cover it up and detract
from the size and character of the stone.
When bright cutting, remember the cut
should never expose the girdle of the
stone. This necessitates a shallow, smooth
cut to enhance the size and beauty of
the stone.
Fine quality engraving does not require
deep cuts. Deep engraving, because of its
inherent size, takes away from the fine
detail that can be gained by cutting a
lighter line. Try a lighter touch.
7
Secure Work Pieces on a Solid Base –
Whenever possible secure the piece to be
worked in a rigid, solid holding device.
For engraving and most setting, texturing,
florentine and carving, an engraver’s
block is a valuable asset. Other jobs can
be done in a bench mounted fixture such
as a ring clamp or work holding vise if it
is mounted on a solid surface or
bench top.
The objective is to eliminate the “shock
absorbing” effect of a hand held project.
The more solidly mounted the work the
less impact is needed to accomplish
the work.
Maintain and Sharpen Your Gravers –
Whether bead setting, bright cutting,
carving, or any work using a graver, the
maximum efficiency and highest quality
are achieved by a sharp, clean graver.
Once the graver has dulled or become
coated with residue from the metal being
cut, the chance of slipping increases and
the cuts become crude. Keep the gravers
maintained and the work will go faster
and look better.
Experiment –
The PowerGraver is a very versatile tool
capable of producing quality work in
many different application. Experiment
with different speed settings (strokes per
minute) and impact adjustments as you
are using the PowerGraver. Find the
settings that work best for each job. You
may want to mark certain speed settings
on the dial control face or make a card
showing different settings for
different tools or jobs.
Use Your Other Foredom
Handpieces with the
PowerGraver –
Because the PowerGraver motor has much
more torque (or turning power) at low
(under 2,800 RPM) speed than a standard
Series SR, TX or LX Foredom flexible shaft
power tool, you will find it excellent for
doing certain work with rotary handpieces
such as the H.30® or H.8 Foredom handpieces. You can set the speed on the dial
and start/stop the handpiece with an
optional on/off foot switch. Wax carving is a
good example of work done better at a
lower speed. Polishing, cleaning and drilling
are also done better at low speed in
many applications.
A Good Workbench Layout will Improve
Comfort and Efficiency –
A jewelers bench with a solid, flat work
surface is ideal. The PowerGraver motor
can be suspended from a Foredom motor
hanger (See Illustration No. 12) attached
to the side (right for right handed/left for
left handed) of the bench with clamp
(MAMH-3 or MAMH-5), or it can be bolted
on (MAMH-4 or MAMH-6). Each can be
raised or lowered to the most comfortable
height for you. Their special motor bracket
hook reduces motor twisting when started
at medium to high speed. Each one also
has a handpiece rest to hold the 9D handpiece out of your way when not in use.
Illustration No. 12
Some jewelers benches are made with
lower (30″ high) work surfaces for
engraving work done with engraving
blocks since they raise the workpiece
above the work surface about 8″– 12″.
You can also mount the block on a shelf or
extension table below the bench surface.
Chairs with adjustable height are also a
good idea. A flexible arm light (with or
without a magnifier) is almost essential for
doing stone setting and engraving work.
MAMH-4
Motor Hanger
Handpiece
Rest
PowerGraver ® Kit K.2293 Contains:
K.2293 Accessories –
Collets
H.9D Handpiece
Chuck type handpiece comes with 4 interchangeable collets (1⁄16″, 3/ 32″, 1 / 8″, and
3mm) for holding different sizes and shapes of
popular gravers, as well as beading and setting
tools. Adjusting ring changes impact force. The
palm rest provides the comfort and "feel" of a
hand engraving tool. This handpiece has a
special quick disconnect which fits only the
PGX Motor sheath.
HP602 – 1/16″
HP603 – 3/32″ (2.35mm)
HP604 – 1/8″
HP605 – 3mm
Set of 4 Gravers
Square, Onglette, Round, Oval
Points with 3/32″ (2.35mm) shanks
A-10215 Carbide Stylus
A-10177P Anvil Point
Maintenance Supplies
MS10005 Handpiece Oil in Dispenser
MS10006 Flexible Shaft Grease in Tube
M.PGX Motor
A DVD with 32 minutes of instruction for
using the PowerGraver
Permanently lubricated ball bearing motor for
quiet, trouble free performance. This smooth
running, high torque motor is designed
specifically for use with the 9D handpiece for
power assisted engraving and stone setting.
The M.PGX Motor can be used with other
Foredom handpieces for low speed, high torque
operations such as polishing. Motor also comes
equipped with a special, extra flexible neoprene
sheath and a six foot long power cord. The
M.PGX Motor has a Full Two Year Warranty.
Optional PowerGraver ®
Equipment and Accessories
C.FCGX Foot Switch
Optional On/Off foot switch turns motor on at
the speed set on the EMGX dial speed control.
six foot long power cord.
K.2293 – for 115V AC
K.2293-2 – for 230V AC
A-R15G Pavé Point
C.EMGX Dial Speed Control
Solid state dial control in plastic housing. Motor
speed can be varied from 500 to 2,800 strokes
per minute and set at the optimum speed
or the job.
Form 920b
n 6/08
FOREDOM
®
Optional Diamond Point mounted on
3/32″ shank.
The Foredom Electric Company
16 Stony Hill Road, Bethel, CT 06801 USA • (203)792-8622 • Fax: 203-796-7861 • www.foredom.com
Printed in USA