1
User Manual
CAMS Platform
Table of Contents
Table of Contents
Chapter 1 Overview.................................................................... 1-1
1.1 Background .................................................................... 1-1
1.2 Product Features ............................................................ 1-2
1.3 Product Functions ........................................................... 1-4
1.4 Networking...................................................................... 1-5
1.5 Backing Up Data............................................................. 1-6
1.6 Requirements ................................................................. 1-6
1.6.1 System Software Requirements ............................ 1-6
1.6.2 Client Requirements ............................................. 1-6
1.6.3 Network Requirements.......................................... 1-7
Chapter 2 Service Operations.................................................... 2-1
2.1 Introduction to CAMS ...................................................... 2-1
2.1.1 Login and Logout .................................................. 2-1
2.1.2 CAMS Configuration Console Page ...................... 2-3
2.2 User Management .......................................................... 2-5
2.2.1 Account Management ........................................... 2-5
2.2.2 Card Management .............................................. 2-24
2.2.3 User for Device Management.............................. 2-32
2.2.4 User Account Batch Operation............................ 2-35
2.2.5 Blacklist Management......................................... 2-46
2.2.6 Auxiliary Feature-Preregistered User Management
.................................................................................... 2-49
2.2.7 Auxiliary Feature-Additional Information
Management .............................................................. 2-54
i
User Manual
CAMS Platform
Table of Contents
2.2.8 Auxiliary Feature-Batch Account File................... 2-59
2.3 User Data Query & Export............................................. 2-62
2.3.1 User Info............................................................. 2-62
2.3.2 Exporting Task.................................................... 2-65
2.4 Roaming Management.................................................. 2-67
2.5 LDAP Component ......................................................... 2-70
2.5.1 LDAP Server Management ................................. 2-70
2.5.2 LDAP Synchronization Configuration................... 2-76
2.5.3 LDAP User Export .............................................. 2-82
2.5.4 Configuration Example........................................ 2-87
2.6 Operator Management .................................................. 2-91
2.6.1 Role Management .............................................. 2-91
2.6.2 Operator Management ........................................ 2-95
2.6.3 Change Password ............................................ 2-100
2.6.4 ACL Management............................................. 2-100
2.7 System Management .................................................. 2-103
2.7.1 Log Query......................................................... 2-103
2.7.2 Connection Track.............................................. 2-109
2.7.3 Popup Ad.......................................................... 2-112
2.7.4 User Notification ............................................... 2-115
2.7.5 Client Upgrade.................................................. 2-116
2.7.6 Mail Configuration............................................. 2-119
2.7.7 System Configuration........................................ 2-123
2.7.8 Online User....................................................... 2-137
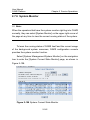
2.7.9 System Monitor................................................. 2-142
2.8 Statistic Report ........................................................... 2-143
2.9 User Self-service......................................................... 2-168
2.9.1 User Preregistration .......................................... 2-170
2.9.2 Query and Maintain User Information................ 2-172
ii
User Manual
CAMS Platform
Table of Contents
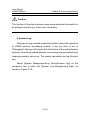
Chapter 3 Routine Maintenance ................................................ 3-1
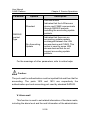
3.1 Overview......................................................................... 3-1
3.2 Maintenance Suggestions ............................................... 3-2
iii
User Manual
CAMS Platform
Chapter 1 Overview
Chapter 1 Overview
1.1 Background
With network development, how to operate and manage the
existing broadband networks, make full use of and profit from
networks become the new challenges to broadband operators.
In the process of informatization and automatization, many
enterprises have invested a lot in constructing their intranets, thus
improving efficiency. However, these intranets also put forward new
requirements
of
information
management,
hierarchical
user
management, dynamic address allocation and anti-hacker protection.
With the increasing popularity of network applications, emerging
services challenge the old service management systems. Resource
sharing and delivery, and unlimited network access bring on security
vulnerability.
To meet the operation, management, and security requirements
arising in the present intranets, operators and enterprises demand a
comprehensive network solution besides communication devices.
Note that the solution must be coordinate and compatible with the
existing networks.
Huawei-3Com
launches
the
comprehensive
access
management server (CAMS). This system, networking with other
devices, meets these urgent demands appropriately.
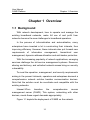
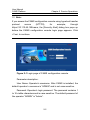
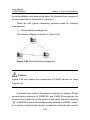
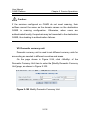
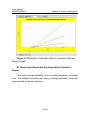
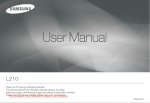
Figure 1-1 depicts the deployment of CAMS on the network.
1-1
User Manual
CAMS Platform
Chapter 1 Overview
Figure 1-1 Deployment of CAMS on the network
As the service management core on the network, CAMS can be
deployed, together with LAN access devices, to complete the
authentication,
authorization,
accounting
(AAA)
and
right
management on end users. This implements manageable and
operable networks, and secures network and user information.
1.2 Product Features
The main features of CAMS are given below.
l
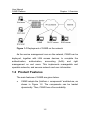
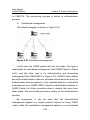
CAMS adopts the “platform + components” architecture, as
shown in Figure 1-2. The components can be loaded
dynamically. Thus, CAMS has a fine scalability.
1-2
User Manual
CAMS Platform
Chapter 1 Overview
CAMS Software
Service
Components
Accounting
Component
Portal Service
Component
EAD Security Policy
Component
LAN Access Service Component
Platform
OS + DB
PC Server
CAMS Platform
Windows + SQL Server
PC Server
Figure 1-2 CAMS system architecture
l
CAMS is based on TCP/IP, and supports RADIUS and the
extended RADIUS developed by Huawei Technologies.
l
CAMS supports multiple authentication modes: PPPoE
(Point to Point Protocol over Ethernet), IEEE 802.1x, and
“DHCP (Dynamic Host Configuration Protocol) + WEB”.
l
CAMS employs the “user + service” operation mode,
allowing users to utilize services flexibly.
l
CAMS provides multiple accounting templates and supports
accounting by duration and by traffic, thus making
accounting flexible.
l
CAMS provides powerful log functions, allowing you to
query and analyze various logs.
l
CAMS provides enhanced security guarantee. It encrypts
interaction packets and sets the operators’ rights flexibly to
ensure that the system is running securely.
l
CAMS provides self services for end users, such as
querying bills and balances, and changing password.
l
CAMS provides satisfactory online helps.
1-3
User Manual
CAMS Platform
l
Chapter 1 Overview
The server adopts the platform of “PC server + Windows +
SQL Server” and thus is cost-effective; the client only needs
browsers, eliminating the need to install software.
l
CAMS supports redundant arrays of independent disks
(RAID) and database backup.
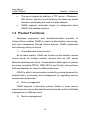
1.3 Product Functions
Seamless cooperation with telecommunication products of
Huawei-3Com enables CAMS to support authentication, accounting,
and user management through various devices. CAMS implements
the following primary functions.
1)
Comprehensive access control
As its name implies, CAMS can function as the network access
control server for multiple network devices such as H3C series
Ethernet switches and routers. It implements multiple types of network
accesses (including PPPoE, IEEE 802.1x and Portal), and performs
AAA and statistics on users for different services.
CAMS is able to accommodate constantly growing demands for
authentication, accounting, and management by upgrading service
components dynamically.
2)
Policy management
CAMS supports customizing policies flexibly to meet various
network access, accounting and discount demands, and thus facilitate
management on different users.
3)
Service management
1-4
User Manual
CAMS Platform
Chapter 1 Overview
Besides traditional services such as account users and card
users, CAMS supports new services including blacklist, user attribute
binding, broadband access, “DHCP + Web” authentication and so on.
In addition, CAMS associates network traffic with end users, and
thus breaks the limit of traditional single accounting mode. On this
basis, it provides more flexible accounting policies, and more detailed
analysis and decision-making information for access manufacturers,
enterprise networks and intelligent communities. Other supported
functions include information statistics, call detail record (CDR)
statistics and export, and customized interfaces.
4)
End user self service
End users can visit the self service website to check their network
utilization information and manage the personal information. For
example, they can query the overall and detailed information of
access duration, traffic, and fee, as well as modify the login password.
5)
LDAP server binding
CAMS can export data such as account information saved on the
LDAP server, and thus provides services integrating CAMS
authentication and LDAP authentication. CAMS also provides
excellent compatibility with existing authentication system on the
network.
1.4 Networking
LAN access services for campus and community networks are
implemented through Ethernet switches. The typical networking
diagram is shown in Figure 1-1. CAMS mainly uses 802.1x to perform
authentication and accounting on users on those networks.
1-5
User Manual
CAMS Platform
Chapter 1 Overview
1.5 Backing Up Data
You can back up the CAMS system data in the following ways:
l
Using disks to implement RAID1 to avoid data loss in case of
single disk failure.
l
Having tape device so that the text file exported from the
database can be saved to the device. To export the file from
the database, you can execute the database backup
command periodically or use the data exporting function on
CAMS. The file saved to the device helps CAMS to restore
the settings in case of faults.
l
Employing automatic backup on CAMS to implement
database backup. A full database backup is executed daily.
Note that the system only saves the backup data within the
latest week.
To ensure enough disk space and availability of other storage
devices, CAMS cleans up files periodically, mainly including system
data, database data, and system logs.
1.6 Requirements
1.6.1 System Software Requirements
Windows operating system: Windows 2000 Server or Windows
Server 2003.
Database: SQL Server 2000
1.6.2 Client Requirements
l
Windows 98 or later
l
Microsoft Internet Explorer (IE) 5.5 or later
1-6
User Manual
CAMS Platform
Chapter 1 Overview
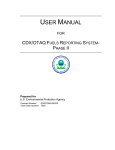
1.6.3 Network Requirements
To secure CAMS, you can place it behind the firewall that filters
illegitimate packets, or set special routes to prohibit external devices
from accessing CAMS directly.
1-7
User Manual
CAMS Platform
Chapter 2 Service Operations
Chapter 2 Service Operations
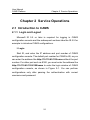
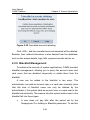
2.1 Introduction to CAMS
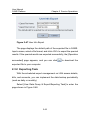
2.1.1 Login and Logout
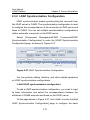
Microsoft IE 5.5 or later is required for logging in CAMS
configuration console and the subsequent sections take the IE 5.5 for
example to introduce CAMS configurations.
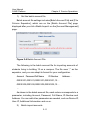
I. Login
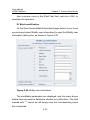
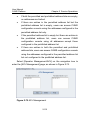
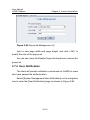
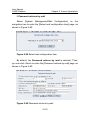
Start IE, and enter the IP address and port number of CAMS
configuration console. The default port number for CAMS is 80, so you
can enter the address like http://10.110.45.159/cams without the port
number. For other port such as 8180, you must enter the address like
http://10.110.45.159:8180/cams to enter the login window of CAMS
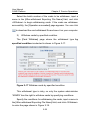
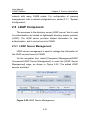
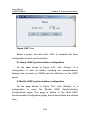
configuration console, as shown in Figure 2-1. You can perform
configurations only after passing the authentication with correct
username and password.
2-1
User Manual
CAMS Platform
Chapter 2 Service Operations
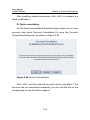
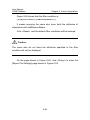
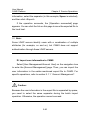
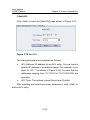
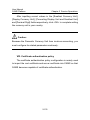
& Note:
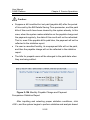
If you access the CAMS configuration console using hypertext transfer
protocol
secure
(HTTPS),
for
example,
through
https://10.110.45.159/cams, the [Security Alert] dialog box pops up
before the CAMS configuration console login page appears. Click
<Yes> to continue.
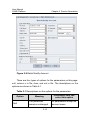
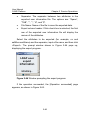
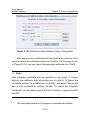
Figure 2-1 Login page of CAMS configuration console
Parameter description:
User Name: Operator’s username. After CAMS is installed, the
default operator’s username is “ADMIN” and is not case sensitive.
Password: Operator’s login password. The password contains 1
to 16 visible characters and is case sensitive. The default password of
the operator “ADMIN” is “Admin”.
2-2
User Manual
CAMS Platform
Chapter 2 Service Operations
& Note:
Although the operator “ADMIN” cannot be deleted, you can select
[Operator Management/Change Password] to modify its password.
II. Logout
After logging in, you can click <Logout> at the top right corner to
log out of the CAMS configuration console.
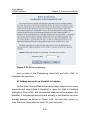
Caution:
l
When the operator’s idle time reaches the threshold defined in the
[Operator Max. Idle Time] field, the operator will log out of the
CAMS configuration console automatically. For this parameter’s
description, refer to section 2.7.7 I. “System Configuration”.
l
If the access control list (ACL) is configured, an operator who uses
an IP address prohibited in the ACL will be refused to log in.
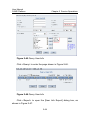
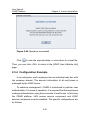
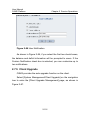
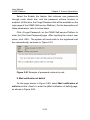
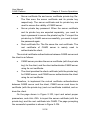
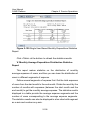
2.1.2 CAMS Configuration Console Page
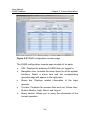
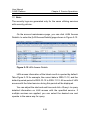
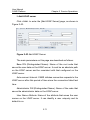
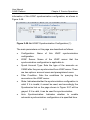
Figure 2-2 illustrates the CAMS configuration console page.
2-3
User Manual
CAMS Platform
Chapter 2 Service Operations
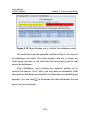
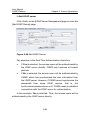
Figure 2-2 CAMS configuration console page
The CAMS configuration console page consists of six parts:
l
URL: Displays the address of CAMS that you logged in.
l
Navigation tree: Includes the menu items for all the system
functions. Select a menu item and the corresponding
operation page will appear in the right pane.
l
Status bar: Displays related information of the login
operator.
l
Tool bar: Contains the common links such as: Online User,
System Monitor, Help, About, and Logout.
l
Query section: Allows you to query the information of the
current operation.
2-4
User Manual
CAMS Platform
l
Chapter 2 Service Operations
Operate section: Contains function buttons and links related
to the current operation.
& Note:
Clicking <Help> in the tool bar brings up the system help information,
while clicking <Help> on a page brings up help information specific to
the current function.
2.2 User Management
CAMS provides the operation mode of “user + services”. A user,
either an account user or a card user, has basic information such as
balance. Services, which decide how the user can get access to the
network, contain predefined accounting policies, binding information
and so on.
A user can apply for more than one service with different suffixes.
The CAMS administrator manages services uniformly.
User management involves account management, card number
management, user for device management, user account batch
operations, user blacklist management and auxiliary feature
management (preregistered user management, user additional
information management and batch account file management).
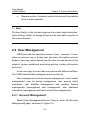
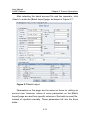
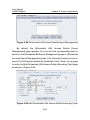
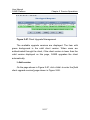
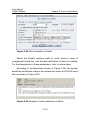
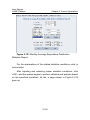
2.2.1 Account Management
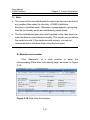
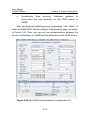
Select [User Management/Account User] to enter the [Account
Management] page, as shown in Figure 2-3.
2-5
User Manual
CAMS Platform
Chapter 2 Service Operations
Figure 2-3 Account Management
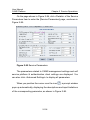
The [Account Management] page consists of three parts from top
to bottom.
In the upper part, input proper parameters in the [Account] and
[Full Name] fields, select proper parameters from the Account Type,
Service Name, and Account State drop-down lists, and click <Query>.
The account users that satisfy the query conditions will be listed in the
lower part of the page. Note that the [Account] and [Full Name] fields
support backward fuzzy matching. For example, if you input wan in
the [Account] field and click <Query>, all account users whose
account names start with “wan” will be listed.
The account user list is displayed in the lower part of the page
and you can click <Prev> and <Next> to switch between pages. A
drop-down list is present at the upper left corner of the list, allowing
you to select how many items to be displayed on one page. The
2-6
User Manual
CAMS Platform
Chapter 2 Service Operations
default number is 15. By clicking
or
of the column headers, you
can sort the items in ascending or descending order.
Above the user list and just in the middle part of the window,
some buttons are provided for different functions. You can click
<Help> to view the CAMS online help on a pop-up page, or click
<Reset> to restore the initial page by clearing all parameters you have
inputted. <Help> and <Reset> are common buttons in CAMS
windows.
The layout style of the [Account Management] page is common
for CAMS windows. For similar interfaces in the later sections, the
layout description will not be repeated.
Operations involved in account management are: adding an
account, batch import, batch modification, maintaining an account,
and advanced query.
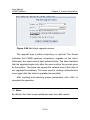
I. Add an account user
Click <Add> to enter the [Add Account] page shown in Figure 2-4.
2-7
User Manual
CAMS Platform
Chapter 2 Service Operations
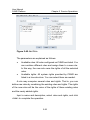
Figure 2-4 Add Account
Account user adding requires three kinds of information: login
information,
additional
information
and
service
information,
corresponding to the three areas on the page.
l
Parameters in the [Login Information] area are available for
any user. You can click <Help> at the bottom of the page to
view description of the parameters.
2-8
User Manual
CAMS Platform
l
Chapter 2 Service Operations
The [Additional Information] area is present only when any
additional information item is available. Besides, the
parameters vary based on the existing items, which can be
set on the [User Additional Information Management] page
displayed when you select [User Management/Auxiliary
Feature/Additional Information]. For related description,
refer to section 2.2.7
“Auxiliary Feature-Additional
Information Management”.
l
The [Service Information] area lists all services (added after
you select [Service Management/Service Config]) available
for the user to apply for. You can click <Query> of a specific
service to view its details.
& Note:
Parameters with a * symbol at the start are mandatory.
After inputting and selecting proper parameters, click <OK>. If the
operation succeeds, the [Operation Succeeded] page appears. Click
<Print>, and the [Account User Info] dialog box appears, as shown in
Figure 2-5.
2-9
User Manual
CAMS Platform
Chapter 2 Service Operations
Figure 2-5 Account User Info
The basic information, additional information and subscribed
service of the new account user are displayed. You can click <Print> to
output the information to a printer.
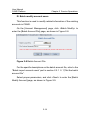
II. Batch import account users
The [Account Management] page provides the batch account
user import function, allowing the system to add a group of account
users by reading account data from a text file of the specific format.
Batch import operations involve selecting the batch account file,
matching the user data and applying for services. CAMS adds batch
imported account users in the similar processing method as that of
adding an account user.
2-10
User Manual
CAMS Platform
1)
Chapter 2 Service Operations
Set the batch account file
Batch account file settings includes [Batch Account File] and [File
Column Separator], which are on the [Batch Account File] page
displayed after you click <Batch Import> on the [Account Management]
page.
Figure 2-6 Batch Account File
The following is the batch account file for importing accounts of
students living in building 12 on a campus. The file uses “;” as the
separator, and you can adopt its format for your configuration.
Account Password Full Name
ID Number
Address…
02030101;030101;02030101;02030101;12…
02030102;030102;02030102;02030102;12…
…
As shown in the batch account file, each column corresponds to a
parameter, including Account, Password, Full Name, ID Number and
Address. You can add other parameters as needed, such as Device IP,
User IP, Additional Information and so on.
2)
Batch import accounts
2-11
User Manual
CAMS Platform
Chapter 2 Service Operations
After selecting the batch account file and the separator, click
<Next> to enter the [Batch Import] page, as shown in Figure 2-7.
Figure 2-7 Batch Import
Parameters on this page are the same as those for adding an
account user. However, values of some parameters on the [Batch
Import] page are read from specific columns of the batch account file,
instead of inputted manually. These parameters fall into the three
kinds:
2-12
User Manual
CAMS Platform
Chapter 2 Service Operations
Must be read from the file: [Account], [Full Name], [ID
l
Number], [Address], [Email] and so on.
Can be specified to read from the file: [Password], [Prepaid
l
Money] and all parameters in the [Additional Information]
area can be configured to read from specified columns in the
file. For any of them, you can also select Not in File from the
drop-down list and then set it manually.
Cannot be read from the file: [Account Type], [Online Limit],
l
[Max. Idle Time] and so on can only be set manually.
After setting account information and selecting services, click
<Import>, and the [Account Batch Import Information] dialog box pops
up, prompting the import process. As the import completes, the
[Operation succeeded] page appears.
Caution:
l
The batch account file must be text files, regardless of the file
suffix.
l
Each column of values imported from the file must follow the
specific format or range required by CAMS. Otherwise, the import
will fail or the generated account cannot work normally. Therefore,
be sure to check the correctness of the data in the batch account
file before importing them.
2-13
User Manual
CAMS Platform
Chapter 2 Service Operations
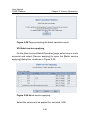
III. Batch modify account users
This function is used to modify related information of the existing
accounts in CAMS.
On the [Account Management] page, click <Batch Modify> to
enter the [Batch Account File] page, as shown in Figure 2-8.
Figure 2-8 Batch Account File
For the specific descriptions on the batch account file, refer to the
“Batch import account users” part in section 2.2.1 II. 1)”Set the batch
account file”.
Select proper parameters, and click <Next> to enter the [Batch
Modify Account] page, as shown in Figure 2-9.
2-14
User Manual
CAMS Platform
Chapter 2 Service Operations
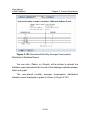
Figure 2-9 Batch Modify Account
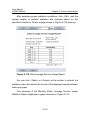
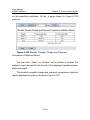
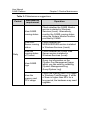
There are four types of options for the parameters on this page:
null, column n in file, clear, and not in file. The descriptions on the
options are shown in Table 2-1.
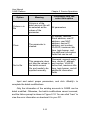
Table 2-1 Descriptions on the options for the parameters
Option
Null
Meaning
Parameters that can
select this option
The parameter
remains unchanged.
All parameters except the
account name
2-15
User Manual
CAMS Platform
Option
Chapter 2 Service Operations
Meaning
Parameters that can
select this option
Column n of the
batch account file will
be selected as the
values of the
parameter.
All parameters
Clear
The parameter is
cleared.
ID number, address,
Email address, user IP
address, user MAC
address, device IP
address, port number,
VLAN ID, maximum idle
time, login banner, and
the additional information
fields that can be null
Not in file
This parameter does
not take the values in
the batch account
file, and needs to be
inputted manually.
Password, account expiry
time, device IP address,
port number, VLAN ID,
online limit, maximum idle
time, login banner, and all
additional information
fields
Column n in
file
Input and select proper parameters, and click <Modify> to
complete the batch modifications.
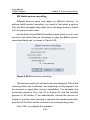
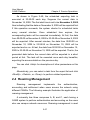
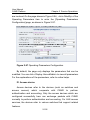
Only the information of the existing accounts in CAMS can be
batch modified. Otherwise, the batch modifications cannot succeed,
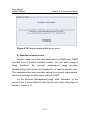
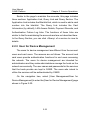
and the failure prompt is shown in Figure 2-10. You can click “here” to
view the error information or download it to your PC.
2-16
User Manual
CAMS Platform
Chapter 2 Service Operations
Figure 2-10 Page prompting that errors occur
IV. Maintain account users
Account users carry the core information in CAMS, and CAMS
provides a lot of functions related to them. For your easy usage of
these
functions,
the
account
maintenance
page
provides
corresponding links, which are intended for a specific account user.
The navigation tree also provides options for account maintenance,
which are intended for all account users in CAMS.
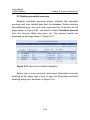
On the [Account Management] page, click <Maintain> of the
account user to be modified to enter the [Account User Info] page, as
shown in Figure 2-11.
2-17
User Manual
CAMS Platform
Chapter 2 Service Operations
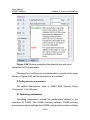
Figure 2-11 Page for maintaining an account user
The page consists of three parts. The first line from the top
contains several application links for different maintenance operations.
Below them are query links for displaying specific account information
in the following [Query Section] area.
Application links are described as follows:
l
Modify: Click <Modify> to open the [Modify] dialog box,
where you can modify information of the current account and
applied services.
l
Settle: For ordinary accounts, you can click <Settle> for
manual settlement. This link functions the same as the
Settle
link
displayed
Management/User Fee].
2-18
when
you
select
[Charges
User Manual
CAMS Platform
l
Chapter 2 Service Operations
Pay: Click <Pay> to pay for the current account user. This
link functions the same as the Payment link displayed when
you select [Charges Management/User Fee].
l
Suspend: A suspended account cannot access the network.
For information about what effect account suspending has
on accounting and how to restore a suspended account,
refer to the system prompt or online help.
l
Blacklist: Click <Blacklist> to open the [Blacklist] dialog box.
You can add the current account to the blacklist or remove it
from the blacklist as needed. For related operations, refer to
2.2.5 “Blacklist Management”.
l
Pay Method: Click this link to change the account type of the
current account. Two account types are available: prepaid
account and ordinary account. This link functions the same
as the Change Account Type link displayed when you select
[Charges Management/User Fee].
l
Force
Logout:
CAMS enables
the
administrator
to
disconnect an online user. This function can be used when
you find that a user operates abnormally, with a heavy traffic,
for example. You can click <Force Logout> to inform CAMS
to send control packets to the access device, which then will
disconnect with the specific user. This link functions the
same as the Force Logout link in the [Force Logout] field
displayed when you select [System Management/Online
User].
2-19
User Manual
CAMS Platform
l
Chapter 2 Service Operations
Online Delete: Users that logged out and stopped being
charged but are still displayed in the online user list are
called suspension users. You can click <Online Delete> to
delete the current user.
Caution:
Deleting an online user may cause accounting faults, so you must use
this function cautiously. Besides, an online user may still use the
subscribed services for a while after being deleted. You can delete
some online users who cannot utilize services normally due to system
faults.
l
Cancel: Click <Cancel> to delete an unused or unneeded
account. For information on related accounting rules, refer to
the system prompt or online help.
Query links are described as follows:
l
Information: By default, the account maintenance page
displays account user information, including the basic
information, additional information (if any), and subscribed
service information. In the [Subscribed Service Information]
area, you can click <Query> of a service to view its details.
l
Current Fee: This link is available when the current user is
an ordinary user. It is used to display a list of settled but
unpaid bills and other fee-related information.
2-20
User Manual
CAMS Platform
l
Chapter 2 Service Operations
LAN Access Details: This link functions the same as the
page shown after you select [User Data Query & Export/LAN
Access Details]. However, operations on the two pages vary.
Refer to Figure 2-12 for details.
l
User Bill: Click <User Bill> to display all bills of the current
account saved in CAMS. In the list, you can click <Details>
of a bill to view its details including the network access
records. The function of querying user bills is also provided
on the page shown after you select [User Data Query &
Export/Bill Query].
l
Payment Records: Click this link to view all payment records
in CAMS of the current user. The function of querying
payment records is also provided on the page shown after
you select [User Data Query & Export/Payment Record].
l
Authentication Failure Log: Click this link to view all
authentication failure log items in CAMS of the current user.
The function of querying authentication failure logs is also
provided on the page shown after you select [System
Management/Log Query/Authentication Failure Log].
l
Security Log: Click this link to view the security logs of the
current user in CAMS. The function of querying security logs
is also provided on the page shown after you select [Security
Management/Security Log].
2-21
User Manual
CAMS Platform
Chapter 2 Service Operations
& Note:
The security logs are generated only for the users utilizing services
with security policies.
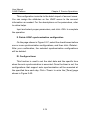
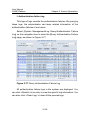
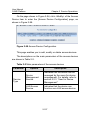
On the account maintenance page, you can click <LAN Access
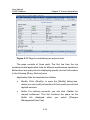
Details> to enter the [LAN Access Details] page shown in Figure 2-12.
Figure 2-12 LAN Access Details
LAN access information of the latest month is queried by default.
Take Figure 2-12 for example, the current date is 2005-11-12, and the
default queried period is 2005-10-12 to 2005-11-12. All records of LAN
access with the listed service during this period will be displayed.
You can adjust the start and end time and click <Query> to query
detailed information on LAN access with the specified service. If
multiple services are applied, you can select the desired one and
operate in the same way for query.
2-22
User Manual
CAMS Platform
Chapter 2 Service Operations
& Note:
LAN access details are related with a specific service the user utilizes.
On the query result page, you can click <Details> of a record to
view its details.
V. Query account users
Through the advance query function, you can make accurate
query with more query conditions. You can click <Advanced> in Figure
2-3 to enter the [Advanced Query] page shown in Figure 2-13.
Figure 2-13 Advanced Query
2-23
User Manual
CAMS Platform
Chapter 2 Service Operations
With advanced query, you can set query conditions by combining
account basic information with customized additional information
flexibly. The Account parameter supports wildcard * and all
parameters of the string type support backward fuzzy matching. You
can perform query by inputting and selecting proper query conditions
and clicking <OK>.
& Note:
l
A null parameter can be matched by any value.
l
CAMS provides other similar pages, where all parameters that
default to “*” support query by the wildcard.
2.2.2 Card Management
Card users are like temporary account users. The cards can be
withdrawn automatically within a period of time to ensure sufficient
user resources. Card users provide fewer functions than account
users.
On the navigation tree, select [User Management/Card User] to
enter the [Card Number Management] page shown in Figure 2-14.
2-24
User Manual
CAMS Platform
Chapter 2 Service Operations
Figure 2-14 Card Number Management
The card number management allows you to generate, withdraw,
and maintain card numbers.
I. Generate card number
Click <Generate> to enter the [Generate Card Number] page, as
shown in Figure 2-15.
2-25
User Manual
CAMS Platform
Chapter 2 Service Operations
Figure 2-15 Generate Card Number
There are two areas on this page from top to bottom: Card Basic
Information and Service Information. For the explanation of the
parameters in the [Card Basic Information] area, refer to online helps.
In the [Service Information] area, the applicable services are listed.
You can click <Query> of a service to view its details.
Input and select proper parameters, select the services to be
applied for, and click <OK> to generate card numbers. After the card
numbers are generated successfully, the [Operation succeeded] page
appears. Click
to download the card number file and save it to
your computer. Meanwhile, you can see that the newly generated card
numbers are displayed on the [Card Number Management] page.
2-26
User Manual
CAMS Platform
Chapter 2 Service Operations
& Note:
l
If a card user applies for services with binding configurations, they
will be implemented through self-learning. That is, the user is
bound to the related information of the first access.
l
The card number file records important information such as
passwords. Thus, CAMS provides the link for downloading the file
only on the [Operation succeeded] page after the card numbers
are generated successfully. This ensures the security of the card
number file.
Note the following when applying for services for a batch of card
numbers:
l
A batch of card numbers applies for the same services.
l
A batch of card numbers needs to apply for at least one
service.
II. Withdraw card number
The withdrawal types include: specified batch of cards, and by
specified condition. The information of these withdrawn cards will be
exported to a file and backed up. You can download the file and save it
to your computer.
2-27
User Manual
CAMS Platform
Chapter 2 Service Operations
& Note:
l
You can input the withdrawal file name without the file path
information, and the generated file will be saved under <CAMS
installation directory>\camsfiles\card\ on the server.
l
The card withdrawal file records important information. To ensure
the security of the file, CAMS provides the link for downloading the
file only on the [Operation succeeded] page after the card numbers
are withdrawn successfully.
On the page shown in Figure 2-14, click <Withdraw> to enter the
[Card Withdraw] page shown in Figure 2-16.
Figure 2-16 Withdraw specified batch of cards
The operations for the two withdrawal types are as follows:
1)
Withdraw specified batch of cards
The [Card Withdraw] page where the withdrawal type specified
batch of cards is selected is shown in Figure 2-16.
If there is no batch of cards in the current system, the specified
batch of cards option will not be available on this page.
2-28
User Manual
CAMS Platform
Chapter 2 Service Operations
Select the batch number of the cards to be withdrawn, input a
name in the [After-withdrawal Exporting File Name] field, and click
<Withdraw> to begin withdrawing cards. If the cards are withdrawn
successfully, the [Operation succeeded] page appears. You can click
to download the card withdrawal file and save it on your computer.
2)
Withdraw cards by specified condition
The [Card Withdraw] page where the withdrawal type by
specified condition is selected is shown in Figure 2-17.
Figure 2-17 Withdraw cards by specified condition
This withdrawal type is risky, so only the system administrator
“ADMIN” has the right to withdraw cards by specifying conditions.
Specify the conditions for withdrawing the cards, input a name in
the [After-withdrawal Exporting File Name] field, and click <Withdraw>
to enter the page shown in Figure 2-18.
2-29
User Manual
CAMS Platform
Chapter 2 Service Operations
Figure 2-18 Page allowing you to confirm the withdrawn cards
The cards that meet the specified conditions (that is, the cards to
be withdrawn) are listed. The cards already used are in yellow; the
cards being used are in red. Note that the cards being used (in red)
cannot be withdrawn.
Click <Withdraw>, and a dialog box appears, asking you to
confirm the deletion. Click <OK>, and the cards are withdrawn. After
the cards are withdrawn successfully, the [Operation succeeded] page
appears. You can click
to download the card withdrawal file and
save it on your computer.
2-30
User Manual
CAMS Platform
Chapter 2 Service Operations
& Note:
l
The name of the card withdrawal file cannot be the same as that of
any existing files under the directory <CAMS installation
directory>\camsfiles\card\. Otherwise, a page appears, prompting
that the file already exists and withdrawing cards failed.
l
The two withdrawal types are mainly applied to the case when the
card numbers are generated incorrectly. This usually occurs before
the cards are sold. If the cards are sold already, you are not
recommended to withdraw them using the two types.
III. Maintain card number
Click <Maintain>
of
a card number
to enter the
corresponding [Card User Information] page, as shown in Figure
2-19.
Figure 2-19 Card User Information
2-31
User Manual
CAMS Platform
Chapter 2 Service Operations
Similar to the page to maintain the accounts, this page includes
three sections: Application Link, Query Link and Query Section. The
Application Link includes the Blacklist link, which is used to add a card
number into the blacklist. The Query Link includes the Card
Information (by default), LAN Access Details, Payment Records, and
Authentication Failure Log links. The functions of these links are
similar to that for maintaining the accounts and are not described here.
In the Query Section, you can click <Query> of a service to view its
details.
2.2.3 User for Device Management
The users for device management are different from the account
users and card users. The reasons are as follows: The account and
card users provide authentication functions for end users accessing
the network. The users for device management are intended for
administrators and they make administrators manage the hosts on the
network conveniently. The user names and passwords for the services
that the hosts provide are kept in CAMS. The users who intend to
utilize the services will be authenticated by CAMS.
On the navigation tree, select [User Management/User for
Device Management] to enter the [User for Device Management] page
shown in Figure 2-20.
2-32
User Manual
CAMS Platform
Chapter 2 Service Operations
Figure 2-20 User for Device Management
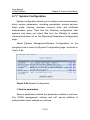
I. Add user for device management
Click <Add> to enter the [Add Account] page shown in Figure
2-21.
Figure 2-21 Add Account
The upper area on the page allows you to perform the user, host,
and service settings, while the lower area enables you to configure the
binding information. As shown in Figure 2-21, a user “admin” is added.
2-33
User Manual
CAMS Platform
Chapter 2 Service Operations
The host start address and end IP address are specified, and the
service type Telnet is selected. In this way, end users can telnet to the
hosts within the IP addresses from 192.168.4.1 to 192.168.4.200
using the user name “admin” and the corresponding password.
Caution:
When configuring users for device management, you must configure
the corresponding access device on the [Access Device Configuration]
page. To enter this page, select [System Management/System
Configuration] on the navigation tree. On the [System Configuration]
page, click <Modify> of the Access Device item. The service type of
the access device must be “Device Management Service”.
To enhance security, you can set binding information for the users
for device management. As shown in Figure 2-21, end users can
telnet to the corresponding hosts only through port 2 on the access
device at 192.168.4.2.
2-34
User Manual
CAMS Platform
Chapter 2 Service Operations
& Note:
The user for device management “admin” is different from the CAMS
default system administrator “ADMIN”. The former has the right to
access the hosts on the network through telnet (or other services).
The user “admin” and its corresponding password are saved in CAMS,
and the user is authenticated by CAMS when wanting to utilize
services. The latter has the right to administrate CAMS, but does not
have the right to use related services of the hosts on the network.
II. Query user for device management
Click <Details> of a user on the [User for Device Management]
page to view the details.
III. Delete user for device management
On the [User for Device Management] page, click <Delete> of a
user to enter the [Delete User] page. Click <Delete>, and the user is
deleted.
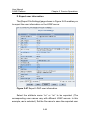
IV. Modify user for device management
Click <Modify> of a user to enter the [Modify User] page, where
you can modify related information of the user except the user name.
2.2.4 User Account Batch Operation
The account batch operations refer to querying, charging,
modifying, and cancelling accounts in batches and so on. You can
2-35
User Manual
CAMS Platform
Chapter 2 Service Operations
query the accounts using different conditions as needed and perform
batch operations on them.
On the navigation tree, select [User Management/User Account
Batch Operation] to enter the [User Account Batch Operation] page,
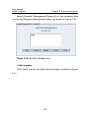
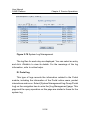
as shown in Figure 2-22.
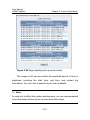
Figure 2-22 User Account Batch Operation
The functional links for batch operations are listed in the upper
area. The queried accounts are listed below and up to 1000 accounts
can be displayed on one page. You can click <Details> of an account
to view the details.
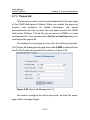
I. Batch query
To perform batch operations, you need to query the accounts first.
Select [Query user] in the upper area to open the [Query user] dialog
box, as shown in Figure 2-23.
2-36
User Manual
CAMS Platform
Chapter 2 Service Operations
Figure 2-23 Query user
There are three parts on this dialog box. The upper part includes
the basic information of the accounts. The middle part displays the
additional information of the accounts. (This part varies with different
settings.) The lower part allows you to set the subscribed service and
the state of forbidding list. You can input or select the parameters as
needed and click <Query> to return to the [User Account Batch
Operation] page shown in Figure 2-22. The accounts that meet the
specified conditions will be listed on the page.
2-37
User Manual
CAMS Platform
Chapter 2 Service Operations
Caution:
l
If you do not input or select a parameter, it means that the
parameter is unlimited.
l
All parameters support backward fuzzy matching. For example, if
you input a in the [Full Name] field, all account users with full
names starting with “a” will be displayed.
l
All inputted parameters except the full name are case insensitive.
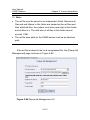
II. Batch charging
On the [User Account Batch Operation] page, select one or more
accounts and then select [Charging] to open the [Charging] dialog box,
as shown in Figure 2-24. Note that you can also select the check box
before the Account column header to select all accounts on the
current page.
Figure 2-24 Charging
2-38
User Manual
CAMS Platform
Chapter 2 Service Operations
Input a proper value in the [Paid Fee] field, and click <OK> to
complete the operation.
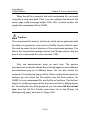
III. Batch modification
On the [User Account Batch Operation] page, select one or more
accounts and select [Modify user information] to open the [Modify user
information] dialog box, as shown in Figure 2-25.
Figure 2-25 Modify user information
The modifiable parameters are displayed, and the check boxes
before them are used to determine whether to modify them. The field
marked with “*” cannot be left empty once the corresponding check
box is selected.
2-39
User Manual
CAMS Platform
Chapter 2 Service Operations
After modifying related parameters, click <OK> to complete the
batch modification.
IV. Batch cancellation
On the [User Account Batch Operation] page, select one or more
accounts and select [Account Cancellation] to open the [Account
Cancellation] dialog box, as shown in Figure 2-26.
Figure 2-26 Account Cancellation
Click <OK>, and the selected accounts will be cancelled. If the
accounts are not cancelled successfully, you can click the link on the
prompt page to view the failure reasons.
2-40
User Manual
CAMS Platform
Chapter 2 Service Operations
Caution:
l
The online accounts can also be cancelled.
l
Once an account is cancelled forcibly, it cannot be used anymore,
and its nonpayment cannot be reclaimed.
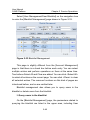
V. Batch postponing
For related descriptions of postponing, refer to Figure 2-27.
On the [User Account Batch Operation] page, select one or more
accounts, select [Postponing], and the [Batch postponing] dialog box
appears, as shown in Figure 2-27.
2-41
User Manual
CAMS Platform
Chapter 2 Service Operations
Figure 2-27 Batch postponing
Input a value in the [Postponing time] field, and click <OK> to
complete the operation.
VI. Adding accounts to blacklist in batches
On the [User Account Batch Operation] page, select one or more
accounts and select [Add to blacklist] to open the [Add to blacklist]
dialog box. Click <OK>, and the selected accounts will be added to the
blacklist. If the selected accounts are already in the blacklist, an error
prompt appears, as shown in Figure 2-28. You can click <here> to
view the error information or save it to your computer.
2-42
User Manual
CAMS Platform
Chapter 2 Service Operations
Figure 2-28 Page prompting the batch operation result
VII. Batch service applying
On the [User Account Batch Operation] page, select one or more
accounts and select [Service applying] to open the [Batch service
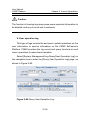
applying] dialog box, as shown in Figure 2-29.
Figure 2-29 Batch service applying
Select the services to be applied for, and click <OK>.
2-43
User Manual
CAMS Platform
Chapter 2 Service Operations
VIII. Batch service cancelling
Different account users may apply for different services. To
perform batch service cancelling, you need to first select a service
from the Service applied drop-down list on the page shown in Figure
2-23 to query account users.
On the [User Account Batch Operation] page, select one or more
accounts and select [Service canceling] to open the [Batch service
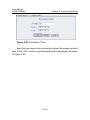
canceling] dialog box, as shown in Figure 2-30.
Figure 2-30 Batch service canceling
The services used by all selected users are displayed. If the Cash
returning check box is selected, the remaining monthly payment will
be returned to users after service cancellation. For example, the
accounting period is from July 20 to August 20, and the monthly
payment is 60 dollars. If the administrator cancels the service on
August 5, and the cash returning is required, the remaining monthly
payment of 30 dollars will be returned to the corresponding users.
Click <OK> to complete the operation.
2-44
User Manual
CAMS Platform
Chapter 2 Service Operations
IX. Deleting cancelled accounts
Deleting cancelled accounts means deleting the cancelled
accounts and their related data from the database. Before deleting
cancelled accounts, you must query accounts first. To do this, on the
page shown in Figure 2-23, you need to select Cancelled account
from the Account State drop-down list. The queried results are
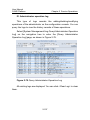
displayed on the page shown in Figure 2-31.
Figure 2-31 User Account Batch Operation
Select one or more accounts, and select [Cancelled accounts
deleting] at the upper right corner to open the [Cancelled accounts
deleting] dialog box, as shown in Figure 2-32.
2-45
User Manual
CAMS Platform
Chapter 2 Service Operations
Figure 2-32 Cancelled accounts deleting
Click <OK>, and the cancelled accounts selected will be deleted.
Besides, their related information is also deleted from the database,
such as the access details, logs, bills, payment records and so on.
2.2.5 Blacklist Management
To enhance the security of system applications, CAMS provides
blacklist management, allowing you to query the account users and
card users that are disabled temporarily or delete them from the
blacklist.
A user can be added to the blacklist in two ways: The
administrator can add an account user or a card user manually (note
that this kind of blacklist users can only be deleted by the
administrator.); the system adds an account user or a card user to the
blacklist automatically. The reasons why the system adds a user to the
blacklist fall into three types:
l
A user does not pay bills after the period set by the
Nonpayment For Adding to Blacklist parameter. To set this
2-46
User Manual
CAMS Platform
parameter,
Chapter 2 Service Operations
select
[System
Management/System
Configuration] to enter the [System Configuration] page. For
the Service Parameters item, click <Modify> to enter the
[Service Parameters Configuration] page. Then, input a
desired value in the [Nonpayment For Adding to Blacklist]
field. After the user pays the nonpayment, the system will
delete the user from the blacklist automatically.
l
A user fails to recharge the corresponding account/card for
more than the times set by the Charge Failure Times
parameter. To set this parameter, enter the [Service
Parameters Configuration] page first. Then, input a desired
value in the [Charge Failure Times] field. The system will
delete this user automatically from the blacklist at daybreak
the next day.
l
A user tries to log in maliciously for more than the times set
by the Auth. Failure Threshold parameter. To set the
parameter, enter the [Service Parameters Configuration]
page first. Then, input a desired value in the [Auth. Failure
Threshold] field. Similar to the second case, the system will
delete this user automatically from the blacklist at daybreak
the next day.
& Note:
If a user who has applied for multiple services is added to the blacklist,
these services will become unavailable.
2-47
User Manual
CAMS Platform
Chapter 2 Service Operations
Select [User Management/User Blacklist] on the navigation tree
to enter the [Blacklist Management] page shown in Figure 2-33.
Figure 2-33 Blacklist Management
This page is slightly different from the [Account Management]
page in that there is a check box before each entry. You can select
multiple entries and perform operations on them at the same time.
Two buttons Select All and Clear are added. You can click <Select All>
to select all entries on the current page. You can click <Clear> to clear
all selected entries. The common functions on this kind of pages are
introduced before, and so are omitted later.
Blacklist management also allows you to query users in the
blacklist or delete users from the blacklist.
I. Query users in the blacklist
On the [Blacklist Management] page, the parameters related to
querying the blacklist are listed in the upper area, including User
2-48
User Manual
CAMS Platform
Chapter 2 Service Operations
Name, Reason, Login IP, and so on. Input or select proper parameters,
click <Query>, and all queried users will be displayed. You can click
<Details> of a user to view the basic information of the user and the
reason why the user is added to the blacklist.
Note that: If a user inputs an incorrect password during
authentication, the system will add the user to the blacklist
automatically for the administrator to monitor the user. At this time, the
user is displayed on the [Blacklist Management] page, but the user
can still use services normally. Then, if the user logs in successfully,
the system will delete the user from the blacklist automatically.
However, if the failure times reach the times set by the Auth. Failure
Threshold parameter, the user will be added to the blacklist formally,
and the user cannot continue using services temporarily.
You need to select Too many login faults from the Reason
drop-down list to query the users who are added to the blacklist
temporarily. Then, you can click <Details> of a user to view the login
failure times.
II. Delete users from the blacklist
The administrator can delete users from the blacklist manually.
On the [Blacklist Management] page, select one or more users and
click <Delete>. After your confirmation, the selected users are deleted
from the blacklist.
2.2.6 Auxiliary Feature-Preregistered User
Management
To reduce the workload when adding account users, especially
when there is additional information, CAMS provides preregistered
user management. The end users can click <User Preregistration> on
2-49
User Manual
CAMS Platform
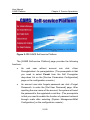
Chapter 2 Service Operations
CAMS Self-service Platform to enter the [User Preregistration] page
shown in Figure 2-34.
Figure 2-34 User Preregistration
Input the necessary information (both the basic and additional
information is included),
and
click
<OK>
to complete the
preregistration. Note that the accounting- and service- related
information does not need to be inputted. The end users can apply for
formal registration within a valid period after preregistration. The
information specified during preregistration will be displayed on the
[Add Account] page for formal registration, so the administrator just
needs to set the accounting- and service- related information, thus
improving efficiency.
2-50
User Manual
CAMS Platform
Chapter 2 Service Operations
& Note:
To
enable
the
Management/System
Preregistration
Configuration]
function,
to
enter
select
[System
the
[Service
Configuration] page. For the Service Parameters item, click <Modify>
to enter the [Service Parameters Configuration] page. Select Permit
from
the
Self
Preregister
drop-down
list.
Then,
the
User
Preregistration link is available on CAMS Self-service Platform.
If a preregistered user is not registered formally after the time set
by the Preregistration Information Saving Time parameter, the system
deletes it automatically. To set the parameter, select [System
Management/System
Configuration]
to
enter
the
[System
Configuration] page. For the Service Parameters item, click <Modify>
to enter the [Service Parameters Configuration] page. Input a desired
value in the [Preregistration Information Saving Time] field.
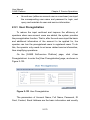
Select [User Management/Auxiliary Feature/Preregistered User]
on the navigation tree to enter the [Preregistered User Management]
page, as shown in Figure 2-35.
2-51
User Manual
CAMS Platform
Chapter 2 Service Operations
Figure 2-35 Preregistered User Management
You can click the buttons and links on the [Preregistered User
Management] page to perform related operations.
I. Query preregistered users
Click <Query> of a preregistered user to enter the [Query
Preregistered User] page, where you can view the details.
II. Advanced query
On
the
[Preregistered
User
Management]
page,
click
<Advanced> to open the [Advanced Query] dialog box. The function is
similar to the advanced query in account management (refer to the
[Account Management] page shown in Figure 2-3). The Account
parameter supports the wildcard “*”, and all parameters support
backward fuzzy matching.
III. Batch import
Click <Batch Import> to enter the [Batch Account File] page. The
operations are similar to the batch import in account management
2-52
User Manual
CAMS Platform
Chapter 2 Service Operations
(refer to the [Account Management] page shown in Figure 2-3), and
are omitted here.
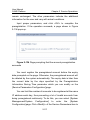
IV. Batch registration
On [Preregistered User Management] page, select the accounts
for batch registration. Then, click <Batch Register> to enter the [Batch
Register Preregistered Users] page, as shown in Figure 2-36.
Figure 2-36 Batch Register Preregistered Users
The administrator does not need to input the users’ basic
information, and only needs to select an account type and the service
information. Click <OK> and preregistered users are registered in
batches. This operation improves efficiency greatly, because it can
register in batches the preregistered users with the same account type
and service information.
2-53
User Manual
CAMS Platform
Chapter 2 Service Operations
V. Delete preregistered users
The administrator can manually delete the preregistered users.
On the [Preregistered User Management] page, select one or more
preregistered users, and click <Delete>. After your confirmation, the
selected preregistered users will be deleted.
VI. Formal registration
Click <Formally Register> of a preregistered user to begin formal
registration. The operation page is similar to the [Add Account] page
except that the specified preregistration information is displayed. The
administrator only needs to set the information related to accounting
and services. In addition, the Password parameter becomes optional.
If the [Password] field is empty, the preregistered password will
become the formal one. Input and select proper parameters, and click
<OK> to complete the formal registration.
2.2.7 Auxiliary Feature-Additional Information
Management
For flexible user management, CAMS allows you to customize
user additional information. User additional information refers to the
user information other than the basic information such as account,
password, full name, ID, address, and E-mail. The administrator can
customize, manage and maintain the additional information.
2-54
User Manual
CAMS Platform
Chapter 2 Service Operations
& Note:
Up to 20 additional information fields can be added. Make reasonable
plans before adding additional user information, since too many
additional information fields may cause management confusion.
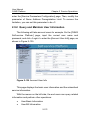
Select
[User
Management/Auxiliary
Feature/Additional
Information] on the navigation tree to enter the [User Additional
Information Management] page, as shown in Figure 2-37.
Figure 2-37 User Additional Information Management
This page lists all the defined user additional information fields.
You can query, modify, delete, add, and sort the entries as needed.
I. Add user additional information field
On the [User Additional Information Management] page, click
<Add> to enter the [Add User Additional Information Field] page. The
page varies with different filed types, as shown in Figure 2-38, Figure
2-39, and Figure 2-40.
2-55
User Manual
CAMS Platform
Chapter 2 Service Operations
Figure 2-38 Add User Additional Information Field (1)
Figure 2-39 Add User Additional Information Field (2)
2-56
User Manual
CAMS Platform
Chapter 2 Service Operations
Figure 2-40 Add User Additional Information Field (3)
Input and select proper parameters and click <OK> to complete
the operation.
& Note:
If the field type is set to Letters, numbers or characters like {-_.@}
or Any character, the pages appear similar. If the field type is set to
Decimal fraction with no more than five digits can be inputted or
Integer only, the pages appear similar.
II. Modify user additional inforamtion field
On the [User Additional Information Management] page, click
<Modify> of a field to modify the user additional information field
except the field type.
2-57
User Manual
CAMS Platform
Chapter 2 Service Operations
III. Delete user additional information field
On the [User Additional Information Management] page, click
<Delete> of a field and confirm your operation to delete it.
Caution:
When a user additional information field is deleted, its related user
additional information is also deleted, so you must use this function
cautiously.
IV. Query user additional informaiton field
On the [User Additional Information Management] page, click
<Query> of a field to view its details.
V. Sort user additional information field
On the [User Additional Information Management] page, click
and
to adjust the order of the entries displayed on the [Add Account]
page, as shown in Figure 2-41.
2-58
User Manual
CAMS Platform
Chapter 2 Service Operations
Figure 2-41 Add Account
2.2.8 Auxiliary Feature-Batch Account File
This function allows you to generate batch account files
conveniently. With the batch account files, you can add accounts in
batches using the batch import function in account management.
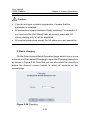
Select [User Management/Auxiliary Feature/Batch Account File]
on the navigation tree to start generating a batch account file. The [Set
2-59
User Manual
CAMS Platform
Chapter 2 Service Operations
the number of the sections that form the account name] page appears,
as shown in Figure 2-42.
Figure 2-42 Set the number of the sections that form the account
name
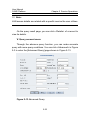
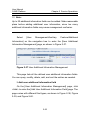
An account may contain a lot of information, so you must
determine the number of sections that form an account. On the page
shown in Figure 2-42, input a number (for example, 4) in the field and
click <Next> to enter the [Batch account file generation] page, as
shown in Figure 2-43.
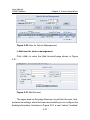
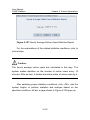
Figure 2-43 Batch account file generation
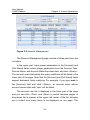
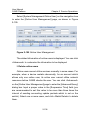
Click <Help> to view the description on the parameters.
Figure 2-43 illustrates how to generate a batch account file for
students in a department. There are three classes in this department,
2-60
User Manual
CAMS Platform
Chapter 2 Service Operations
and there are 100 students in each class. The account comprises four
sections, two of which are constant (“class” and “no.”) and two are
numbered. Thus, the generated accounts are in the format of
Constant (class) + Numbered (two digits) + Constant (no.) +
Numbered (five digits). Select the Random password check box and
specify the related information. Then, passwords are generated
randomly, each having 6 digits. The accounts and passwords in the
generated batch account file are separated by space. Accordingly,
when batch importing accounts, you need to select Space from the
File Column Separator drop-down list on the [Batch Account File]
page, as shown in Figure 2-6.
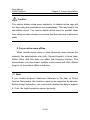
After setting the parameters, click <Generate>. If the batch
account file is generated successfully, the [Operation succeeded]
page appears. Click <here> to download the file on your computer.
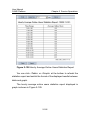
The file contents are as follows:
class01no.00001 558978
class01no.00002 970697
…
class01no.00100 819548
class02no.00001 767036
class02no.00002 799987
…
class02no.00100 323040
class03no.00001 480396
…
class03no.00099 936823
class03no.00100 650745
2-61
User Manual
CAMS Platform
Chapter 2 Service Operations
The account file consists of two columns. The first column
corresponds to the account name, and the second column the
password. The file contains a total number of 300 accounts. It is
concluded that the amount of the accounts is the product of the total
number of each numbered value.
2.3 User Data Query & Export
CAMS allows you to query a lot of information and export it
periodically in the form of tasks. The information may be user
information, LAN access details, bills, and payment records. The
operations about how to query and export various information are
similar to each other, so the following illustrates how to query and
export the user information only. For the description on related
parameters, refer to online helps.
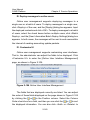
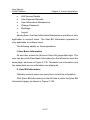
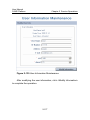
2.3.1 User Info
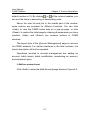
The administrator can query the necessary user information with
different conditions. On the navigation tree, select [User Data Query &
Export/User Info] to enter the [Query User Info] page, as shown in
Figure 2-44.
2-62
User Manual
CAMS Platform
Chapter 2 Service Operations
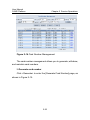
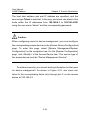
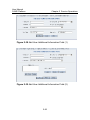
Figure 2-44 Query User Info
Input and select proper parameters as needed to query the user
information. Note that you can select the Designate Output check box
to specify the parameters to be outputted. If it is not selected, all the
related information except the password will be outputted.
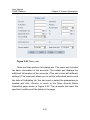
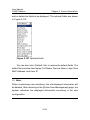
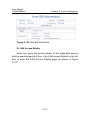
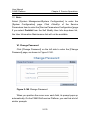
For example, to query the ordinary accounts that apply for the
“hotel” service, you need to select Ordinary account from the
Account Type drop-down list; select hotel from the Service Name
drop-down list; specify the parameters to be outputted, as shown in
Figure 2-45.
2-63
User Manual
CAMS Platform
Chapter 2 Service Operations
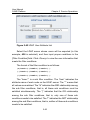
Figure 2-45 Query User Info
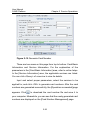
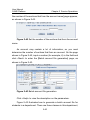
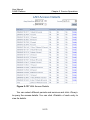
Click <Query> to enter the page shown in Figure 2-46.
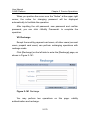
Figure 2-46 Query User Info
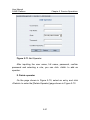
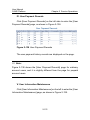
Click <Export> to open the [User Info Export] dialog box, as
shown in Figure 2-47.
2-64
User Manual
CAMS Platform
Chapter 2 Service Operations
Figure 2-47 User Info Export
The page displays the default path of the exported file in CAMS.
Input a name, select a file format, and click <OK> to export the queried
results. If the queried results are exported successfully, the [Operation
succeeded] page appears, and you can click
to download the
exported file to your computer.
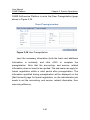
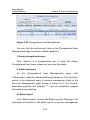
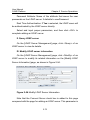
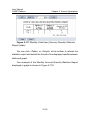
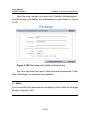
2.3.2 Exporting Task
With the scheduled export management on LAN access details,
bills, and accounts, you can implement the data backup periodically
(such as daily or monthly).
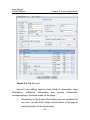
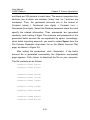
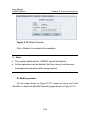
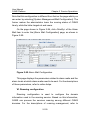
Select [User Data Query & Export/Exporting Task] to enter the
page shown in Figure 2-48.
2-65
User Manual
CAMS Platform
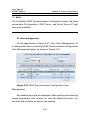
Chapter 2 Service Operations
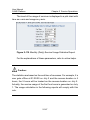
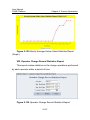
Figure 2-48 Scheduled LAN Access Details Export Management
By default, the [Scheduled LAN Access Details Export
Management] page appears. You can click the corresponding links to
switch to the [Scheduled Bill Export Management] page or [Scheduled
Account Export Management] page. The following introduces how to
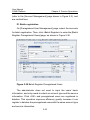
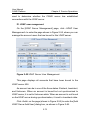
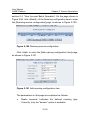
export the LAN access details as scheduled. Click <Add> on the page
to enter the [Add Scheduled LAN Access Details Exporting Task] page,
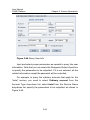
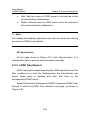
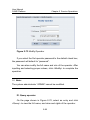
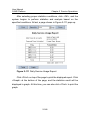
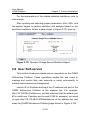
as shown in Figure 2-49.
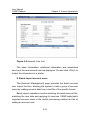
Figure 2-49 Add Scheduled LAN Access Details Exporting Task
2-66
User Manual
CAMS Platform
Chapter 2 Service Operations
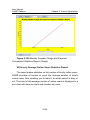
As shown in Figure 2-49, the scheduled exporting task is
executed at 23:50:00 each day. Suppose the current date is
November 16, 2005. The first start time is set to be November 9, 2005,
thus indicating that the data on November 9, 2005 will be exported first.
If this operation succeeds, the system checks for scheduled tasks
every
several
minutes.
Once
scheduled
time
expires,
the
corresponding tasks will be executed immediately. At first, the data
from 00:00:00 on November 9, 2005 to 23:59:59 on November 9, 2005
will be exported. After several minutes, the data from 00:00:00 on
November 10, 2005 to 23:59:59 on November 10, 2005 will be
exported and so on. At last, the data from 00:00:00 on November 15,
2005 to 23:59:59 on November 15, 2005 will be exported. That is, the
generated data before the current date will be exported in a short
period at first. The task will be executed once each day hereafter,
exporting the access details on the previous day.
You can click <Help> for descriptions of other parameters on this
page.
Alternatively, you can select a task form the export list and click
<Modify>, <Delete>, or <Query> to perform related operations.
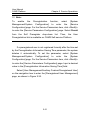
2.4 Roaming Management
Roaming
management
implements
the
authentication,
accounting and settlement when users access the network using
different CAMSs. The following example illustrates the application of
roaming management.
A university has three campuses A, B, and C, each having a
CAMS system to perform authentication and accounting on the users
who use campus network resources. Roaming management is used
2-67
User Manual
CAMS Platform
Chapter 2 Service Operations
for authentication and accounting when the students from campus A
access networks on campus B or campus C.
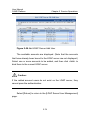
There are two typical networking solutions used for roaming
management.
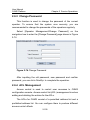
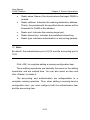
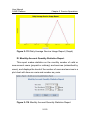
1)
Decentralized management
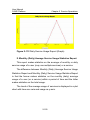
The network diagram is shown in Figure 2-50.
Figure 2-50 Decentralized management
Caution:
Figure 2-50 only shows the connections of CAMS servers, so does
Figure 2-51.
A student from campus A accesses networks on campus B (the
access device connects to CAMS B), and CAMS B recognizes the
account from campus A by the service suffix name (the part following
“@”). CAMS B forwards the authentication packets to CAMS A, which
is to perform authentication and to forward the authentication results
2-68
User Manual
CAMS Platform
Chapter 2 Service Operations
to CAMS B. The accounting process is similar to authentication
process.
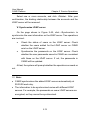
2)
Centralized management
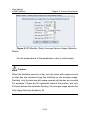
The network diagram is shown in Figure 2-51.
Figure 2-51 Centralized management
In this case, the CAMS system falls into two types: One type is
responsible for centralized management (like CAMS Center in Figure
2-51), and the other type is for authentication and accounting
management (like CAMS A/B/C in Figure 2-51). CAMS Center neither
saves the authentication data nor provides normal services (such as
authentication and accounting). It only forwards data as a centralized
management core. CAMS A/B/C forwards authentication packets to
CAMS Center for further operation when it detects the users from
other areas. The accounting process is similar to the authentication
process.
By comparison, it can be seen that the decentralized
management applies to a simple network without too many CAMS
nodes, while the centralized management applies to a complicated
2-69
User Manual
CAMS Platform
Chapter 2 Service Operations
network with many CAMS nodes. For configuration of roaming
management, refer to related configurations in section 2.7.7 “System
Configuration”.
2.5 LDAP Component
The accesses to the directory server (LDAP server) that is used
for authentication are based on lightweight directory access protocol
(LDAP). The LDAP server provides related information for user
authentication, and it can be bound to CAMS.
2.5.1 LDAP Server Management
LDAP server management is used to manage the information of
the LDAP servers bound to CAMS.
On the navigation tree, select [Component Management/LDAP
Component/LDAP Server Management] to enter the [LDAP Server
Management] page, as shown in Figure 2-52. The added LDAP
servers are listed.
Figure 2-52 LDAP Server Management
2-70
User Manual
CAMS Platform
Chapter 2 Service Operations
I. Add LDAP server
Click <Add> to enter the [Add LDAP Server] page, as shown in
Figure 2-53.
Figure 2-53 Add LDAP Server
The main parameters on this page are described as follows:
Base DN (Distinguished Name): Name of the root node that
saves the user data on the LDAP server. It must be an absolute path
on the LDAP server and be consistent with that configured on the
LDAP server.
Auto-connect Interval: CAMS initiates connection requests to the
LDAP server after this period of time since the connection failed last
time.
Administrator DN (Distinguished Name): Name of the node that
saves the administrator data on the LDAP server.
User Name Attribute: Name of the attribute that saves the user
names on the LDAP server. It can identify a user uniquely and its
default is cn.
2-71
User Manual
CAMS Platform
Chapter 2 Service Operations
Password Attribute: Name of the attribute that saves the user
passwords on the LDAP server. It defaults to userPassword.
Real Time Authentication: If Yes is selected, the LDAP users will
be authenticated by the LDAP server directly.
Select and input proper parameters, and then click <OK> to
complete adding an LDAP server.
II. Query LDAP server
On the [LDAP Server Management] page, click <Query> of an
LDAP server to view its details.
III. Modify LDAP server information
On the [LDAP Server Management] page, click <Modify> of an
LDAP server to modify its related information on the [Modify LDAP
Server Information] page, as shown in Figure 2-54.
Figure 2-54 Modify LDAP Server Information
Note that the Connect Server check box is added to this page
compared with the page for adding an LDAP server. This parameter is
2-72
User Manual
CAMS Platform
Chapter 2 Service Operations
used to determine whether the CAMS server has established
connections with the LDAP server.
IV. LDAP user mangement
On the [LDAP Server Management] page, click <LDAP User
Management> to enter the page shown in Figure 2-55, where you can
manage the account users that are bound to this LDAP server.
Figure 2-55 LDAP Server User Management
This page displays all accounts that have been bound to the
LDAP server 426.
An account can be in one of the three states: Existent, Inexistent,
and Unknown. When an account is bound but not synchronized to
LDAP server, it is set to Unknown state. When an account is not found
on the LDAP server during synchronization, it is set to Inexistent state.
Click <Add> on the page (shown in Figure 2-55) to enter the [Add
LDAP Server Add User] dialog box, as shown in Figure 2-56.
2-73
User Manual
CAMS Platform
Chapter 2 Service Operations
Figure 2-56 Add LDAP Server Add User
The available accounts are displayed. (Note that the accounts
that have already been bound to the LDAP server are not displayed.)
Select one or more accounts to be added, and then click <Add> to
bind them to the current LDAP server.
Caution:
If the added account users do not exist on the LDAP server, they
cannot pass the authentication.
Select [Return] to return to the [LDAP Server User Management]
page.
2-74
User Manual
CAMS Platform
Chapter 2 Service Operations
Select one or more accounts, and click <Delete>. After your
confirmation, the binding relationship between the accounts and the
LDAP server will be removed.
V. Synchronize LDAP server
On the page shown in Figure 2-52, click <Synchronize> to
synchronize the user information on the LDAP server. Two operations
are involved:
l
Check the status of users on the LDAP server: Check
whether the users added for the LDAP server on CAMS
exist on the LDAP server.
l
Synchronize the passwords on the LDAP server: Check
whether the user passwords saved in CAMS are consistent
with those on the LDAP server. If not, the passwords in
CAMS will be updated.
At last, the system will prompt whether the operation succeeds or
not.
& Note:
l
CAMS synchronizes the added LDAP servers automatically at
00:30:00 each day.
l
The information to be synchronized varies with different LDAP
servers. For example, the passwords on some LDAP servers are
encrypted, so they cannot be synchronized.
2-75
User Manual
CAMS Platform
Chapter 2 Service Operations
2.5.2 LDAP Synchronization Configuration
LDAP synchronization means synchronizing the accounts from
the LDAP server to CAMS. The synchronization configuration is used
to configure the correspondence of the accounts on LDAP server and
those in CAMS. You can set multiple synchronization configurations
(either automatic or manual) on the LDAP server.
Select
[Component
Management/LDAP
Component/LDAP
Synchronization Configuration] to enter the [LDAP Synchronization
Configuration] page, as shown in Figure 2-57.
Figure 2-57 LDAP Synchronization Configuration
You can perform adding, deleting, and other related operations
on LDAP synchronization configurations.
I. Add LDAP synchronization configuration
To add a LDAP synchronization configuration, you need to input
its basic information and select the correspondence between the
attributes of CAMS accounts and those on the LDAP server.
On the page shown in Figure 2-57, click <Add> to enter the [Add
LDAP Synchronization Configuration] page to configure the basic
2-76
User Manual
CAMS Platform
Chapter 2 Service Operations
information of this LDAP synchronization configuration, as shown in
Figure 2-58.
Figure 2-58 Add LDAP Synchronization Configuration (1)
The main parameters on this page are described as follows:
l
Configuration:
Name
of
this
LDAP
synchronization
configuration.
l
LDAP Server: Name of the LDAP server that the
synchronization configuration is applicable to.
l
Synch Account Type: Sets the type of the accounts on
CAMS after they are synchronized from LDAP server. There
are two options: account users and preregistered users.
l
Filter Condition: Sets the conditions for querying the
accounts on the LDAP server.
l
State: Indicates whether the synchronization configuration is
valid. If it is invalid, it cannot be used, and accordingly the
Synchronize link on the page shown in Figure 2-57 will be
grayed. If it is valid, it can be used for synchronization.
l
Auto
Synchronization:
Indicates
whether
to
enable
automatic synchronization configuration at a specified time.
2-77
User Manual
CAMS Platform
l
Synchronize
Chapter 2 Service Operations
New
Account:
Indicates
whether
to
synchronize the new accounts on the LDAP server to
CAMS.
After inputting and selecting proper parameters, click <Next> to
enter the [Add LDAP Synchronization Configuration] page, as shown
in Figure 2-59. Then, you can set the correspondence between the
account information on CAMS and the attributes on the LDAP server.
Figure 2-59 Add LDAP Synchronization Configuration (2)
2-78
User Manual
CAMS Platform
Chapter 2 Service Operations
This configuration is similar to the batch import of account users.
You can assign the attributes on the LDAP server to the account
information as needed. For the descriptions on the parameters, refer
to online helps.
Input and select proper parameters, and click <OK> to complete
the operation.
II. Delete LDAP synchronization configuration
On the page shown in Figure 2-57, select the check boxes before
one or more synchronization configurations, and then click <Delete>.
After your confirmation, the selected synchronization configurations
will be deleted.
III. Configure timer
This function is used to set the start date and the specific time
when the auto synchronization is executed. Once the timer is set, the
configurations that support auto synchronization will be executed at
the specified time each day. Click <Timer> to enter the [Timer] page
shown in Figure 2-60.
2-79
User Manual
CAMS Platform
Chapter 2 Service Operations
Figure 2-60 Timer
Select a proper time and click <OK> to complete the timer
configuration for auto synchronization.
IV. Query LDAP synchronization configuration
On the page shown in Figure 2-57, click <Query> of a
configuration to view its details, including the correspondence
between the accounts on CAMS and the attributes on the LDAP
server.
V. Modify LDAP synchronization configuration
On the page shown in Figure 2-57, click <Modify> of a
configuration
to
enter
the
[Modify
LDAP
Synchronization
Configuration] page. This page is similar to the [Add LDAP
Synchronization Configuration] page, and its descriptions are omitted
here.
2-80
User Manual
CAMS Platform
Chapter 2 Service Operations
& Note:
On the [Modify LDAP Synchronization Configuration] page, the three
parameters (Configuration, LDAP Server, and Synch Account Type)
cannot be modified.
VI. User management
On the page shown in Figure 2-57, click <User Management> of
a configuration item to enter the [LDAP Synchronization Configuration
User Management] page, as shown in Figure 2-61.
Figure 2-61 LDAP Synchronization Configuration User
Management
All available accounts are displayed. After inputting and selecting
proper parameters, click <Query> to view the desired accounts. You
can also add or delete an account as needed.
2-81
User Manual
CAMS Platform
l
Chapter 2 Service Operations
Add: Sets the users on LDAP server to be involved in this
synchronization configuration.
l
Delete: Sets the users on LDAP server not to be involved in
this synchronization configuration.
& Note:
The adding and deleting operations here will not cause the existing
accounts in CAMS to be deleted.
VII. Synchronize
On the page shown in Figure 2-57, click <Synchronize> of a
configuration item to perform synchronization manually.
2.5.3 LDAP User Export
LDAP user export means exporting the LDAP users that meet the
filter conditions to a local file. Subsequently, the administrator can
import these users in batches and then bind them to the
corresponding LDAP server.
Select [Component Management/LDAP Component/LDAP User
Export] to enter the [LDAP User Attribute List] page, as shown in
Figure 2-62.
2-82
User Manual
CAMS Platform
Chapter 2 Service Operations
Figure 2-62 LDAP User Attribute List
Select the LDAP server whose users will be exported (in this
example, 426 is selected), and then input proper conditions in the
[Filter Condition] field. Click <Query> to view the user information that
meets the filter conditions.
The format of the filter condition is as follows:
(&(item1=*)(item2=*)(item3=*)…)
(|(item1=*)(item2=*)(item3=*)…)
(!(item1=*)(item2=*)(item3=*)…)
The “item=*” is a sub filter condition. The “item” indicates the
attribute name of each node on the LDAP server. The “*” means that
all values are matched. The “&” indicates the AND relationship among
the sub filter conditions, that is, all these sub conditions must be
satisfied simultaneously. The “|” indicates that the OR relationship
among the sub filter conditions, that is, only one of these sub
conditions needs to be satisfied. The “!” indicates the NOT relationship
among the sub filter conditions, that is, neither of these sub conditions
needs to be satisfied.
2-83
User Manual
CAMS Platform
Chapter 2 Service Operations
Figure 2-62 shows that the filter condition is:
(&(objectclass=*)(saMAccountName=*))
It means querying the users who have both the attributes of
objectclass and saMAccountName.
Click <Reset>, and the default filter conditions will be restored.
Caution:
The users who do not have the attributes specified in the filter
condition will not be displayed.
On the page shown in Figure 2-62, click <Query> to enter the
[Export File Settings] page shown in Figure 2-63.
2-84
User Manual
CAMS Platform
Chapter 2 Service Operations
Figure 2-63 Export File Settings
The information of the first user that meets the filter conditions will
be displayed and the main parameters are described as follows:
l
Attribute: The names of all attributes that are included in the
user information.
l
Sample: One example of the attribute.
l
Sort: You can click
or
to sort the attributes. The
attributes will be ordered in this manner when they are
exported.
2-85
User Manual
CAMS Platform
l
Chapter 2 Service Operations
Separator: The separator between two attributes in the
exported user information file. The options are: “Space”,
“TAB”, “,”, ”;”, “#”, and “$”.
l
File Name: Name of the file to save the exported data.
l
Export column header: If this check box is selected, the first
row of the exported user information file will display the
names of the attributes.
Select the attributes to be exported (for example, cn and
saMAccountName) and the separator, input a file name, and then click
<Export>. The prompt window shown in Figure 2-64 pops up,
displaying the export progress.
Figure 2-64 Window prompting the export progress
If the operation succeeded, the [Operation succeeded] page
appears, as shown in Figure 2-65.
2-86
User Manual
CAMS Platform
Chapter 2 Service Operations
Figure 2-65 Operation succeeded
Click
to view the exported data, or save them to a local file.
Then, you can click <OK> to return to the [LDAP User Attribute List]
page.
2.5.4 Configuration Example
In an enterprise, each employee has an individual mail box with
the company domain. The account information of all mail boxes is
managed by the LDAP server.
To enhance management, CAMS is introduced to perform user
authentication. For ease of operation, it is required that the employees
undergo authentication using their accounts of mail boxes. In this case,
the CAMS platform, LAN access service component and LDAP
service component must be installed. The specific configurations are
as follows:
2-87
User Manual
CAMS Platform
Chapter 2 Service Operations
I. Add LDAP server
Click <Add> on the [LDAP Server Management] page to enter the
[Add LDAP Server] page.
Figure 2-66 Add LDAP Server
Pay attention to the Real Time Authentication check box.
l
If Yes is selected, the access users will be authenticated by
the LDAP server directly. CAMS only functions to forward
packets.
l
If No is selected, the access users will be authenticated by
CAMS, which has synchronized the user information from
the LDAP server. However, if CAMS cannot synchronize the
passwords from
some LDAP servers,
that is, the
synchronized passwords are null, CAMS needs to establish
connections with the LDAP server for authentication.
In this example, Yes is selected. Thus, the access users will be
authenticated by the LDAP server directly.
2-88
User Manual
CAMS Platform
Chapter 2 Service Operations
II. Export user information
The [Export File Settings] page shown in Figure 2-63 enables you
to export the user information on the LDAP server.
Figure 2-67 Export LDAP user information
Select the attribute name “cn” or “sn” to be exported. (The
corresponding user names vary with different LDAP servers. In this
example, sn is selected.) Set the file name to save the exported user
2-89
User Manual
CAMS Platform
Chapter 2 Service Operations
information, select the separator (in this example, Space is selected),
and then click <Export>.
If the operation succeeds, the [Operation succeeded] page
appears. You can click the link on this page to save the exported file to
the local host.
& Note:
Some LDAP servers identify users with a combination of multiple
attributes (for example, cn and sn), but CAMS does not support
authentication through these LDAP servers.
III. Import user information to CAMS
Select [User Management/Account User] on the navigation tree
to enter the [Account Management] page. Then, you can import the
user information in the earlier-mentioned export file to CAMS. For
specific operations, refer to section 2.1.1 “Account Management”.
Caution:
Because the user information in the export file is separated by space,
you need to select the same separator during the batch import
operation. Otherwise, the operation cannot succeed.
2-90
User Manual
CAMS Platform
Chapter 2 Service Operations
IV. User authentication
The success of user authentication depends on the LDAP server.
l
When the LDAP server runs normally, users can pass the
authentication after inputting the correct e-mail account
names and passwords.
l
When the LDAP server cannot be connected, the
authentication will not succeed.
2.6 Operator Management
Operator management controls roles, operators, passwords and
ACL to ensure that CAMS runs securely.
2.6.1 Role Management
& Note:
Because the relationship among the functions of CAMS is complex,
the administrator is not recommended to assign rights for the roles too
subtly.
The roles correspond to different groups of rights, and the rights
of the operators are determined by the selected roles. According to the
classification of the rights, CAMS provides four default roles: Security
administrator, Service administrator, System administrator and User
administrator. They cover almost all rights in CAMS and correspond to
the nodes of [Operator Management], [Charges Management] +
[Service Management] + [User Data Query & Export], [System
2-91
User Manual
CAMS Platform
Chapter 2 Service Operations
Management] + [Statistic Report], and [User Management] + [User
Data Query & Export] respectively.
You can add new roles and modify/delete/query them as needed.
Select [Operator Management/Role] to enter the [Role Management]
page, as shown in Figure 2-68.
Figure 2-68 Role Management
I. Add role
Click <Add> to enter the [Add Role] page shown in Figure 2-69.
2-92
User Manual
CAMS Platform
Chapter 2 Service Operations
Figure 2-69 Add Role
The parameters are explained as follows:
l
Available roles: All roles configured on CAMS are listed. You
can combine different roles and assign them to a new role.
In this way, the new role owns the rights of all the selected
roles.
l
Available rights: All system rights provided by CAMS are
listed in a tree structure. You can select them as needed.
A role may comprise several roles and rights. That is, you can
define new roles by combining the existing roles and rights. The rights
of the new roles will be the union of the rights of those existing roles
and the newly added rights.
Input a name and description, select roles and rights, and click
<Add> to complete the operation.
2-93
User Manual
CAMS Platform
Chapter 2 Service Operations
Caution:
If neither existing roles nor rights are selected for a new role, the role
cannot be added successfully.
II. Delete role
On the page shown in Figure 2-68, select the roles to be deleted
and click <Delete>. After your confirmation, the selected roles will be
deleted.
Caution:
If a role is assigned to some operator or other roles, it cannot be
deleted. For the explanations of the operators, refer to section 2.6.2
"Operator Management “.
2-94
User Manual
CAMS Platform
Chapter 2 Service Operations
III. Modify role
Caution:
You are not recommended to modify the default roles predefined by
the system.
On the page shown in Figure 2-68, select the role that you want to
modify and click <Modify> to modify its roles and rights included.
IV. Query role
On the page shown in Figure 2-68, select a role and click
<Query> to query its description, roles, and rights.
& Note:
If you assign another role to a new role, the new role will own all rights
that are owned by the role assigned to it. When you delete, modify or
query the new role, these rights will not be displayed in the [Available
rights] list.
2.6.2 Operator Management
Apart from the default operator “ADMIN”, you can also add
operators with different rights to facilitate management.
2-95
User Manual
CAMS Platform
Chapter 2 Service Operations
Select [Operator Management/Operator] on the navigation tree
to enter the [Operator Management] page, as shown in Figure 2-70.
Figure 2-70 Operator Management
I. Add operator
Click <Add> to enter the [Add Operator] page, as shown in Figure
2-71.
2-96
User Manual
CAMS Platform
Chapter 2 Service Operations
Figure 2-71 Add Operator
After inputting the user name, full name, password, confirm
password and selecting a role, you can click <Add> to add an
operator.
II. Delete operator
On the page shown in Figure 2-70, select an entry, and click
<Delete> to enter the [Delete Operator] page shown in Figure 2-72.
2-97
User Manual
CAMS Platform
Chapter 2 Service Operations
Figure 2-72 Delete Operator
Click <Delete> to complete the operation.
& Note:
l
The system administrator “ADMIN” cannot be deleted.
l
Online operators can be deleted, but they cannot continue any
management operations after being deleted.
III. Modify operator
On the page shown in Figure 2-70, select an entry and click
<Modify> to enter the [Modify Operator] page shown in Figure 2-73.
2-98
User Manual
CAMS Platform
Chapter 2 Service Operations
Figure 2-73 Modify Operator
If you select the Set operator password to the default check box,
the password will default to “password”.
You can also modify the full name and role of the operator. After
inputting and selecting proper values, click <Modify> to complete the
operation.
& Note:
The system administrator “ADMIN” cannot be modified.
IV. Query operator
On the page shown in Figure 2-70, select an entry and click
<Query> to view the full name, and roles and rights of the operator.
2-99
User Manual
CAMS Platform
Chapter 2 Service Operations
2.6.3 Change Password
This function is used to change the password of the current
operator. To ensure that the system runs securely, you are
recommended to change the passwords of the operators regularly.
Select [Operator Management/Change Password] on the
navigation tree to enter the [Change Password] page shown in Figure
2-74.
Figure 2-74 Change Password
After inputting the old password, new password and confirm
password, you can click <Modify> to complete the operation.
2.6.4 ACL Management
Access control is used to control user accesses to CAMS
configuration console. Access control list (ACL) management involves
adding and deleting the entries for the ACLs.
The ACLs for CAMS consist of a permitted address list and a
prohibited address list. You can configure them to produce different
access control effects.
2-100
User Manual
CAMS Platform
l
Chapter 2 Service Operations
If both the permitted and prohibited address lists are empty,
no addresses are limited.
l
If there are entries in the permitted address list but the
prohibited address list is empty, users can access CAMS
configuration console using the addresses configured in the
permitted address list only.
l
If the permitted address list is empty but there are entries in
the prohibited address list, users can access CAMS
configuration console using all addresses except those
configured in the prohibited address list.
l
If there are entries in both the permitted and prohibited
address lists, users can access CAMS configuration console
using the addresses configured in the permitted address list
but not configured in the prohibited address list.
Select [Operator Management/ACL] on the navigation tree to
enter the [ACL Management] page, as shown in Figure 2-75.
Figure 2-75 ACL Management
2-101
User Manual
CAMS Platform
Chapter 2 Service Operations
I. Add ACL
Click <Add> to enter the [Add ACL] page shown in Figure 2-76.
Figure 2-76 Add ACL
The main parameters are explained as follows:
l
ACL Address: IP address for an ACL entry. You can input a
specific IP address or an address range. For example, if you
input 10.110.*.* (as shown in Figure 2-76), it means that the
addresses ranging from 10.110.0.0 to 10.110.255.255 are
specified.
l
ACL Type: The options include Permit and Prohibit.
After inputting and selecting proper parameters, click <Add> to
add an ACL entry.
2-102
User Manual
CAMS Platform
Chapter 2 Service Operations
& Note:
l
If you input “*” in one of the first three fields for the ACL address,
you must input “*” in all the subsequent fields.
l
The ACL entries in CAMS do not limit the accesses from the local
server. That is, you can log into CAMS from the local server no
matter what ACL entries are configured.
II. Delete ACL
On the page shown in Figure 2-75, select an ACL entry, and then
click <Delete>. After the confirmation, the ACL entry is deleted.
2.7 System Management
The system management involves the functions of Log Query,
Connection Track, Popup Ad, User Notification, Client Upgrade, Mail
Configuration, System Configuration, Online User and System
Monitor.
2.7.1 Log Query
CAMS
enables
you
to
query
various
logs,
including
authentication failure logs, system logs, Portal logs, administrator
operation logs and user operation logs. In this way, you can trace the
CAMS running status and the operations of the end users and the
administrators, thus enhancing system management.
2-103
User Manual
CAMS Platform
Chapter 2 Service Operations
I. Authentication failure log
This type of logs records the authentication failures. By querying
these logs, the administrator can learn related information of the
authentication failures of end users.
Select [System Management/Log Query/Authentication Failure
Log] on the navigation tree to enter the [Query Authentication Failure
Log] page, as shown in Figure 2-77.
Figure 2-77 Query Authentication Failure Log
All authentication failure logs in the system are displayed. You
can click <Details> of an entry to view the specific log information. You
can also click <Clear Log> to clear all the queried logs.
2-104
User Manual
CAMS Platform
Chapter 2 Service Operations
Caution:
The function of clearing logs may cause some important information to
be deleted, and thus you must use it cautiously.
II. System Log
This type of logs records related information about the operation
of CAMS protocol processing module. If the log level is set to
“Debugging”, the logs will include the information of the authentication
packets, accounting update packets, accounting request packets and
response packets, and so on. The system generates one log file each
day.
Select [System Management/Log Query/System Log] on the
navigation tree to enter the [System Log Management] page, as
shown in Figure 2-78.
2-105
User Manual
CAMS Platform
Chapter 2 Service Operations
Figure 2-78 System Log Management
The log files for each day are displayed. You can select an entry
and click <Details> to view its details. For the meanings of the log
information, refer to online helps.
III. Portal log
This type of logs records the information related to the Portal
module, including the information of the Portal online users, packet
interactions and so on. Select [System Management/Log Query/Portal
Log] on the navigation tree to enter the [Log Management] page. This
page and the query operation on this page are similar to those for the
system log.
2-106
User Manual
CAMS Platform
Chapter 2 Service Operations
IV. Administrator operation log
This type of logs records the adding/deleting/modifying
operations of the administrator on the configuration console. You can
query the logs to view the history records of these operations.
Select [System Management/Log Query/Administrator Operation
Log] on the navigation tree to enter the [Query Administrator
Operation Log] page, as shown in Figure 2-79.
Figure 2-79 Query Administrator Operation Log
All existing logs are displayed. You can click <Clear Log> to clear
them.
2-107
User Manual
CAMS Platform
Chapter 2 Service Operations
Caution:
The function of clearing logs may cause some important information to
be deleted, and so you must use it cautiously.
V. User operation log
This type of logs records the end users’ update operations on the
user information or service information on the CAMS Self-service
Platform. CAMS provides the log record and query functions on end
users’ operations to make them traceable.
Select [System Management/Log Query/User Operation Log] on
the navigation tree to enter the [Query User Operation Log] page, as
shown in Figure 2-80.
Figure 2-80 Query User Operation Log
2-108
User Manual
CAMS Platform
Chapter 2 Service Operations
All existing logs are displayed. You can click <Clear Log> to clear
them.
Caution:
The function of clearing logs may cause some important information to
be deleted, and so you must use it cautiously.
& Note:
The saving time of all logs in the system is determined by the
parameter “Log Saving Time” configured on the [Service Parameters]
page which you can enter by selecting [System Management/System
Configuration] on the navigation tree. The logs which are saved longer
than this time will be deleted by the system automatically.
2.7.2 Connection Track
Connection track enables you to query the access processes of
the end users and thus learn the network usage of a specific user
within a specified period of time.
Select
[System
Management/Connection
Track]
on
the
navigation tree to enter the [Connection Track] page, as shown in
Figure 2-81.
2-109
User Manual
CAMS Platform
Chapter 2 Service Operations
Figure 2-81 Connection Track
Input the user name to be queried and select the proper period of
time. Click <OK>, and the queried results will be displayed, as shown
in Figure 2-82.
2-110
User Manual
CAMS Platform
Chapter 2 Service Operations
Figure 2-82 Page displaying the queried results
The usage of all services within the specified period of time is
displayed, including the start time, end time, and related log
information. You can click a specific log to view its details.
& Note:
In order not to affect the system performance, you are recommended
to set the period of time to be no more than three days.
2-111
User Manual
CAMS Platform
Chapter 2 Service Operations
2.7.3 Popup Ad
This function is used to set the advertisements for the login page
of the CAMS Self-service Platform. When you enable the popup ad
function
and
configure
its
related
information,
the
proper
advertisements will pop up when the end users access the CAMS
Self-service Platform. The ad file can be saved on CAMS or in local
compressed file. You may also select Ad file set last time when you
reconfigure the popup ad.
The settings for the popup ad vary with the ad file saving path.
The [Popup Ad Management] page where On CAMS is selected from
the Ad File Position drop-down list is shown in Figure 2-83.
Figure 2-83 Popup Ad Management (1)
You need to configure the ad file save path, ad main file name,
page width, and page height.
2-112
User Manual
CAMS Platform
Chapter 2 Service Operations
& Note:
l
The ad file must be saved in an independent folder. Because all
files and sub folders in this folder are treated as the ad files and
their attached files, the system must have read right to this folder
and all files in it. The total size of all files in this folder cannot
exceed 1 MB.
l
The ad file save path on the CAMS server must be an absolute
path.
If the ad file is saved in the local compressed file, the [Popup Ad
Management] page is shown in Figure 2-84.
Figure 2-84 Popup Ad Management (2)
2-113
User Manual
CAMS Platform
Chapter 2 Service Operations
When the ad file is saved in the local compressed file, you need
to specify a local save path. Then, you can configure the ad main file
name, page width and page height. Click <OK>, and the system will
upload the compressed file to CAMS.
Caution:
The compressed file must in .zip format, which can be generated with
the help of compression tools such as WinZip. Ensure that the main
file must be under the root directory of the compressed package. The
files in the compressed package cannot use Chinese names, and the
size of the compressed file cannot exceed 1 MB.
Only one advertisement pops up each time. The service
providers can modify the related files of the ad pages to make different
advertisements pop up at different times. You can also modify the
contents of a configured popup ad file. When modifying the popup ad
settings, you can select the file position from the three options: On
CAMS, In local compressed file, and Ad file set last time. The first two
pages for modifying popup ad are the same as that for adding popup
ad. To modify the size of the popup ad, you can select Ad file set last
time from the Ad File Position drop-down list on the [Popup Ad
Management] page, as shown in Figure 2-85.
2-114
User Manual
CAMS Platform
Chapter 2 Service Operations
Figure 2-85 Popup Ad Management (3)
Input a new page width and page height, and click <OK> to
modify the size of the popup ad.
You can also clear the Enable Popup Ad check box to cancel the
popup ad.
2.7.4 User Notification
The client will prompt notification customized on CAMS for users
who have passed the authentication.
Select [System Management/User Notification] on the navigation
tree to enter the [User Notification] page, as shown in Figure 2-86.
2-115
User Manual
CAMS Platform
Chapter 2 Service Operations
Figure 2-86 User Notification
As shown in Figure 2-86, if you select the first two check boxes,
the balance and deficit information will be prompted to users. If the
Custom Notification check box is selected, you can customize up to
two notifications.
2.7.5 Client Upgrade
CAMS provides the auto-upgrade function on the client.
Select [System Management/Client Upgrade] on the navigation
tree to enter the [Client Upgrade Management] page, as shown in
Figure 2-87.
2-116
User Manual
CAMS Platform
Chapter 2 Service Operations
Figure 2-87 Client Upgrade Management
The available upgrade versions are displayed. The item with
green background is the valid client version. When users are
authenticated through the client, if the client version is lower than the
valid version displayed on this page, CAMS upgrades the client
automatically.
I. Add version
On the page shown in Figure 2-87, click <Add> to enter the [Add
client upgrade version] page shown in Figure 2-88.
2-117
User Manual
CAMS Platform
Chapter 2 Service Operations
Figure 2-88 Add client upgrade version
The upgrade type is either compulsory or optional. The former
indicates that CAMS performs compulsory upgrade on the client.
Otherwise, the users cannot pass authentication. The latter indicates
that the upgrade begins only after the users confirm the prompt given
by the system. The users can access the network even if the client is
not upgraded immediately. The users need to undergo authentication
once again after the client is upgraded successfully.
After inputting and selecting proper parameters, click <OK> to
complete the operation.
& Note:
By default, the client newly added becomes the valid version.
2-118
User Manual
CAMS Platform
Chapter 2 Service Operations
II. Determine the current valid version
On the page shown in Figure 2-87, select a client version and
click <Validate> to validate it. Its background will turn to green, and the
old valid version will be invalidated.
You can click <Invalidate> to invalidate all displayed versions.
That is, the system does not check the client version when the users
are authenticated.
III. Delete version
On the page shown in Figure 2-87, select a client version and
click <Delete>. After the confirmation, the selected version will be
deleted.
& Note:
After the valid version is deleted, no other versions become valid
immediately.
2.7.6 Mail Configuration
Mail configuration provides a means for the users to interact with
CAMS. With the mail configuration, the password can be retrieved and
the deficit can be notified.
2-119
User Manual
CAMS Platform
Chapter 2 Service Operations
I. Password retrieve by mail
Select
[System
Management/Mail
Configuration]
on
the
navigation tree to enter the [Select mail configuration item] page, as
shown in Figure 2-89.
Figure 2-89 Select mail configuration item
By default, the Password retrieve by mail is selected. Then,
you can click <Next> to enter the [Password retrieve by mail] page, as
shown in Figure 2-90.
Figure 2-90 Password retrieve by mail
2-120
User Manual
CAMS Platform
Chapter 2 Service Operations
Select the Enable the feature that retrieves user passwords
through mails check box, and the password retrieve function is
enabled. (At this time, the Forget Password link will be available on the
login page of the CAMS Self-service Platform.) For the descriptions of
these parameters, refer to online helps.
Click <Forget Password> on the CAMS Self-service Platform to
enter the [Get User Password] page. After inputting the correct user
name, click <OK>. The system will send mails to the registered mail
box automatically, as shown in Figure 2-91.
Figure 2-91 Example of password retrieve by mail
II. Mail notification of deficit
On the page shown in Figure 2-89, select Mail notification of
deficit and click <Next> to enter the [Mail notification of deficit] page,
as shown in Figure 2-92.
2-121
User Manual
CAMS Platform
Chapter 2 Service Operations
Figure 2-92 Mail notification of deficit
Select the Enable sending mails to notify account users of
nonpayment check box, and the mail notification of deficit is enabled.
For the descriptions of these parameters, refer to online helps.
According to configurations shown in Figure 2-92, the system
sends the notification mails to all nonpayment users at 22:00:00 each
day, as shown in Figure 2-93.
Figure 2-93 Example of mail notification of deficit
2-122
User Manual
CAMS Platform
Chapter 2 Service Operations
2.7.7 System Configuration
System configuration allows you to configure service parameters,
policy service parameters, operating parameters, access devices,
alarm mails, roaming, domestic currency units, and certificate
authentication policy. Note that the Roaming configuration item
appears only when you select Yes from the Whether to enable
roaming drop-down list on the [Operating Parameters Configuration]
page.
Select [System Management/System Configuration] on the
navigation tree to enter the [System Configuration] page, as shown in
Figure 2-94.
Figure 2-94 System Configuration
I. Service parameters
Service parameters include the parameters related to services.
The CAMS management settings and self service platform &
authentication client settings are involved.
2-123
User Manual
CAMS Platform
Chapter 2 Service Operations
On the page shown in Figure 2-94, click <Details> of the Service
Parameters item to enter the [Service Parameters] page, as shown in
Figure 2-95.
Figure 2-95 Service Parameters
The parameters related to CAMS management settings and self
service platform & authentication client settings are displayed. You
can also click <Advanced Settings> to display all parameters.
When you position the cursor over the icon
, a prompt window
pops up automatically, displaying the descriptions and input limitations
of the corresponding parameter, as shown in Figure 2-96.
2-124
User Manual
CAMS Platform
Chapter 2 Service Operations
Figure 2-96 Window prompting the descriptions and input
limitations of the parameters
The page for modifying service parameters is similar to the page
shown in Figure 2-95 and its descriptions are omitted.
II. Policy service parameters
For related descriptions, refer to CAMS EAD Security Policy
Component User Manual.
III. Operating parameters
Operating parameters include the parameters related to the
operation of CAMS. The CAMS common settings, CAMS protocol
processing module settings and CAMS configuration module settings
2-125
User Manual
CAMS Platform
Chapter 2 Service Operations
are involved. On the page shown in Figure 2-94, , click <Modify> of the
Operating Parameters item to enter the [Operating Parameters
Configuration] page, as shown in Figure 2-97.
Figure 2-97 Operating Parameters Configuration
By default, the page only displays the parameters that can be
modified. You can click <Display Unmodifiable> to view all parameters.
For the explanations of the parameters, refer to online helps.
IV. Access device
Access devices refer to the devices (such as switches and
access
servers)
which
cooperate
with
CAMS
to
perform
authentication and accounting. Only the access devices which are
configured successfully here can exchange packets with CAMS
normally to perform authentication and accounting. For LAN access
services, the devices refer to various switches that support related
features.
2-126
User Manual
CAMS Platform
Chapter 2 Service Operations
On the page shown in Figure 2-94, click <Modify> of the Access
Device item to enter the [Access Device Configuration] page, as
shown in Figure 2-98.
Figure 2-98 Access Device Configuration
This page enables you to add, modify or delete access devices.
The descriptions on the main parameters of the access devices
are shown in Table 2-2.
Table 2-2 Main parameters of the access devices
Parameter
Service
Type
Options
Description
Device
Management
Service
Indicates that the device can be
managed by the users for device
management. For details, refer to
section 2.2.3 “User for Device
Management”.
LAN Access
Service
Indicates that the device can
function as a LAN access device.
2-127
User Manual
CAMS Platform
Chapter 2 Service Operations
Parameter
Options
Description
Recommended
Standard
RADIUS
packet
type
No Accounting
Update
Indicates that the LAN access
device and CAMS communicate
through RADIUS packets,
including the accounting update
packets.
Indicates that there are no
accounting update packets
exchanged between the LAN
access device and CAMS. This
option is used by some LAN
access devices that do not
support accounting update
packets.
For the meanings of other parameters, refer to online helps.
Caution:
The port used for authentication must be inputted first and then that for
accounting. The ports 1812 and 1813 are respectively the
authentication port and accounting port used by standard RADIUS.
V. Alarm mail
This function is used to set related information of the alarm mails,
including the alarm level and the mail information of the administrator.
2-128
User Manual
CAMS Platform
Chapter 2 Service Operations
Note that this configuration is different from that on the page which you
can enter by selecting [System Management/Mail Configuration]. The
former makes the administrator learn the running status of CAMS
timely, while the latter targets at end users.
On the page shown in Figure 2-94, click <Modify> of the Alarm
Mail item to enter the [Alarm Mail Configuration] page, as shown in
Figure 2-99.
Figure 2-99 Alarm Mail Configuration
This page displays the parameters related to alarm mails and the
alarm levels at which alarm mails need to be sent. For the descriptions
of these parameters, refer to online helps.
VI. Roaming configuration
Roaming configuration is used to configure the domain
information used in the roaming service. Based on this information,
CAMS can process the services roaming among different CAMS
domains. For the descriptions of roaming management, refer to
2-129
User Manual
CAMS Platform
Chapter 2 Service Operations
section 2.4 “User Account Batch Operation”. On the page shown in
Figure 2-94, click <Modify> of the Roaming configuration item to enter
the [Roaming service configuration] page, as shown in Figure 2-100.
Figure 2-100 Roaming service configuration
Click <Add> to enter the [Add roaming configuration item] page,
as shown in Figure 2-101.
Figure 2-101 Add roaming configuration item
The parameters on this page are explained as follows:
l
Realm keyword: Indicates the defined roaming type.
Currently, only the “domain” option is available.
2-130
User Manual
CAMS Platform
l
Chapter 2 Service Operations
Realm name: Name of the domain where the target CAMS is
located.
l
Realm address: Indicates the roaming destination address.
That is, the packets with the specified domain names will be
forwarded to CAMS at this address.
l
Realm port: Indicates the roaming target port.
l
Realm shared key: Indicates the predefined shared key.
l
Realm type: Indicates authentication or accounting packets.
& Note:
By default, the authentication port is 1812, and the accounting port is
1813.
Click <OK> to complete adding a roaming configuration item.
The modifying operations are basically the same as the adding
operations, and are omitted here. You can also select an item and
click <Delete> to delete it.
The accounting and authentication are indispensable to a
complete roaming operation. Thus, when adding a roaming service
configuration item, you must configure both the authentication item
and the accounting item.
2-131
User Manual
CAMS Platform
Chapter 2 Service Operations
Caution:
If the services configured on CAMS do not need roaming, their
suffixes cannot the same as the domain names on the destination
CAMS in roaming configuration. Otherwise, when users are
authenticated locally, the packets may be forwarded to the destination
CAMS, thus leading to authentication failures.
VII. Domestic currency unit
Domestic currency unit is used to set different currency units for
accounting as needed in different countries and areas.
On the page shown in Figure 2-94, click <Modify> of the
Domestic Currency Unit item to enter the [Modify Domestic Currency
Unit] page, as shown in Figure 2-102.
Figure 2-102 Modify Domestic Currency Unit
2-132
User Manual
CAMS Platform
Chapter 2 Service Operations
After inputting correct values in the [Smallest Currency Unit],
[Display Currency Unit], [Converting Display Unit and Smallest Unit]
and [Decimal Digit] fields respectively, click <OK> to complete setting
the currency unit in your country.
Caution:
Because the Domestic Currency Unit item involves accounting, you
must configure its related parameters cautiously.
VIII. Certificate authentication policy
The certificate authentication policy configuration is mainly used
to import the root certificate and server certificate into CAMS so that
CAMS becomes capable of certificate authentication.
2-133
User Manual
CAMS Platform
Chapter 2 Service Operations
Caution:
The CA type of the certificate server corresponding to the root
certificate and server certificate must be an independent root CA. That
is, when installing the certificate server, you must select the
independent root CA rather than the enterprise root CA. For the
installation instructions on the certificate server, refer to materials of
related products that provide the certificate service. For the specific
operations to obtain the root certificate and server certificate, refer to
the descriptions on LAN access service configuration examples in
CAMS LAN Access Service Component User Manual.
On the page shown in Figure 2-94, click <Modify> of the
Certificate Authentication Policy Configuration item to enter the
[Certificate Authentication Policy Configuration] page, as shown in
Figure 2-103.
2-134
User Manual
CAMS Platform
Chapter 2 Service Operations
Figure 2-103 Certificate Authentication Policy Configuration
After applying for a certificate from the certification authority (CA),
you can export the certificate and save it to a file. On the page shown
in Figure 2-103, you can import the exported certificate into CAMS.
& Note:
The complete certificate can be exported in two ways: 1) Export
directly the certificate with the private key to a file A; 2) Export the
certificate without the private key to a file B1, and export the private
key of the certificate to another file B2. To import the complete
certificate, you can either import the file A directly or import both B1
and B2.
The main parameters on the page are explained as follows:
2-135
User Manual
CAMS Platform
l
Chapter 2 Service Operations
Server certificate file and server certificate private key file:
The files save the server certificate and its private key
respectively. The server certificate and its private key are
used to ensure the validity of CAMS server.
l
Server private key password: When the server certificate
and its private key are exported separately, you need to
input a password to secure the private key file. To import the
private key to CAMS server successfully, you need to input
the password again.
l
Root certificate file: The file saves the root certificate. The
root certificate of CAMS server is mainly used to
authenticate the client.
The mutual certificate authentications between CAMS server and
the client is as follows:
l
CAMS server provides the server certificate (with the private
key) for the client, and the client authenticates CAMS server
using its root certificate.
l
The client provides the client certificate (with the private key)
for CAMS server, and CAMS server authenticates the client
using its root certificate.
Therefore, to implement the mutual certificate authentications
between CAMS server and the client, CAMS server must have its
certificate (with the private key) and root certificate installed, and so
does the client.
On the page shown in Figure 2-103, input and select proper
parameters, and click <OK> to import the server certificate (with the
private key) and the root certificate into CAMS. The page prompting
the successful operation is shown in Figure 2-104.
2-136
User Manual
CAMS Platform
Chapter 2 Service Operations
Figure 2-104 Page prompting that the certificate authentication
policy configuration succeeded
After that, click <Validate> on the page shown in Figure 2-94. In
this way, CAMS server becomes capable of certificate authentication.
2.7.8 Online User
& Note:
When the operators who are able to manage online users log into
CAMS normally, they can select [Online User] at the upper right corner
of the page at any time to view online users.
To facilitate maintenance on CAMS and management on end
users, the system can list all online end users. As long as a user
utilizes the services managed by CAMS, the administrator can view
related information of the service usage in the list of online users.
2-137
User Manual
CAMS Platform
Chapter 2 Service Operations
Select [System Management/Online User] on the navigation tree
to enter the [Online User Management] page, as shown in Figure
2-105.
Figure 2-105 Online User Management
The related information of online users is displayed. You can click
<Advanced> to customize the information to be displayed.
I. Delete online users
Online users cannot utilize services normally in some cases. For
example, when a device restarts abnormally, for an account which
allows only one online user, its online user cannot utilize network
resources before CAMS checks the user. You can click <Advanced>
on the [Online User Management] page to enter the [Advanced Query]
dialog box. Input a proper value in the [Suspension Time] field (you
are recommended to set this value to be more than three times the
interval of sending accounting update packets which is set on the
switch). Select one or more users, and click <Batch Delete> to delete
them.
2-138
User Manual
CAMS Platform
Chapter 2 Service Operations
Caution:
You cannot delete online users randomly. A deleted online user will
not stop using the specified service immediately. This may lead to fee
calculation errors. You cannot delete online users to prohibit them
from using services unless you are sure that the users are in abnormal
state.
II. Force online users offline
When unauthorized users or other abnormal users access the
network, the administrator can click <Forced Logout> to force them
offline. Note that this does not affect the charging function. The
administrator can also select multiple online users and click <Batch
Logout> to force them offline in batches.
& Note:
If you enable Endpoint Admission Defense in the item of Policy
Service Parameters, this function needs to be supported by devices.
Before using the function, you must check whether the device support
it. If not, the logout operation cannot succeed.
2-139
User Manual
CAMS Platform
Chapter 2 Service Operations
III. Deploy messages to online users
Online user management supports deploying messages to a
single user or a batch of users. To deploy messages to a single user,
click <Deploy> of the user, and the [Deploy] dialog box appears. Input
the deployed contents and click <OK>. To deploy messages to a batch
of users, select the check boxes before multiple users, click <Batch
Deploy>, and the [User Information Batch Deploy Settings] dialog box
appears. In both cases, the messages will be sent to end users within
the interval of sending accounting update packets.
IV. Customize UI
Online user management supports customizing user interfaces.
That is, the administrator can adjust the fields to be displayed. Click
<Customize UI> to enter the [Online User Interface Management]
page, as shown in Figure 2-106.
Figure 2-106 Online User Interface Management
The fields that are displayed currently are listed. You can adjust
the order of these fields displayed on the page shown in Figure 2-105
by clicking the
or
in the Position column. Select the Column
Order check box for a field, and then you can click the
or
to sort
the displayed information. You can also click <Add> or <Delete> to
2-140
User Manual
CAMS Platform
Chapter 2 Service Operations
add or delete the fields to be displayed. The optional fields are shown
in Figure 2-107
Figure 2-107 Optional fields
You can also click <Default List> to restore the default fields. The
default list includes User Name, Full Name, Service Name, Login Time,
MAC Address, and User IP.
& Note:
When customizing user interfaces, the old displayed information will
be deleted. After returning to the [Online User Management] page, the
system refreshes the displayed information according to the new
configuration.
2-141
User Manual
CAMS Platform
Chapter 2 Service Operations
2.7.9 System Monitor
& Note:
When the operators that have the system monitor right log into CAMS
normally, they can select [System Monitor] on the upper right corner of
the page at any time to view the current running status of the system.
To learn the running status of CAMS itself and the current usage
of the background system resources, CAMS configuration console
provides the system monitor function.
Select [System Management/System Monitor] on the navigation
tree to enter the [System Current State Monitor] page, as shown in
Figure 2-108.
Figure 2-108 System Current State Monitor
2-142
User Manual
CAMS Platform
Chapter 2 Service Operations
The information of online operators is listed at the bottom of the
page (the seven ADMINs shown in the figure). You can click <Offline>
of other operators to make them offline.
Click <Test Now> to view the running status of the CAMS
background. Click <Stop> to stop the tasks of exporting the bills and
access details (including the tasks being executed). Meanwhile, the
button turns to Start. You can click it to start the tasks once again if
necessary. The parameters of Current/supported maximum user
number and Number of used account/card number/anonymous users
shows the statistics about the current users in the system.
& Note:
l
When the anonymous account is enabled, the number of occupied
users = anonymous user online limit + the number of accounts
except the anonymous account + the number of card users.
l
When the anonymous account is disabled, the number of occupied
users = the number of accounts except the anonymous account +
the number of card users.
2.8 Statistic Report
The statistics report management implements generating,
printing and exporting various tables (graphs). Its main purposes
include: make statistics on the maximum number of online users at
each hour to get the busy hours; make statistics on the service usage
each day to get the busy days; make statistics on the user expenditure
each month to find important customers; make statistics on the service
2-143
User Manual
CAMS Platform
Chapter 2 Service Operations
usage each month to learn the service operation status; make
statistics on the number of existing accounts and that of newly added
accounts to comprehend the service development trend.
It functions to display common service information in tables or
graphs, which include:
l
Monthly (Daily) Service Usage Statistics Report
l
Monthly (Daily) Average Service Usage Statistics Report
l
Monthly Account Quantity Statistics Report
l
Single User Based Monthly Expenditure Statistics Report
l
Monthly Average Expenditure Distribution Statistics Report
l
Monthly Payable Charge and Payment
Comparison
Statistics Report
l
Hourly Average Online Users Statistics Report
l
Operator Toll Record Statistics Report
All of these statistics results can be printed and exported.
Currently, the supported export file formats are TXT, EXCEL
(comma-separated CSV), XML, and JPEG.
2-144
User Manual
CAMS Platform
Chapter 2 Service Operations
Caution:
l
The monthly statistics reports are generated automatically by the
system at the end of each month, while the daily statistics reports
are processed in real time. Therefore, the latter may respond
slower than the former.
l
The statistics reports are generated based on the information
recorded in CAMS during operations, such as account users, card
users, access details, user bill details. If some data source is lost
for some reason (for example, the cards are withdrawn forcedly),
the monthly and daily statistics reports do not include these lost
data.
l
If the system has already generated the monthly statistics data and
saved them, the deletion of the data source (such as accounting
details and bill details) will not affect the generated data.
l
The start time and end time for daily statistics must be within 31
days, and that for monthly statistics must be within three years.
Select [Statistic Report] on the navigation tree to enter the
[Statistics Report] page, as shown in Figure 2-109.
2-145
User Manual
CAMS Platform
Chapter 2 Service Operations
Figure 2-109 Statistic Report
The names of reports and the supported display forms (marked
with a ”√”) are displayed on the page. When you position the cursor
over
, a prompt window pops up automatically, displaying
descriptions of the report and its common purposes.
Click the links on the page to configure the corresponding
reports.
I. Monthly (Daily) Service Usage Statistics Report
This report makes statistics on the monthly or daily service usage
of a single user, all accounts, all cards or all users (including account
users and card users) from the start time to the end time by money,
duration, traffic or usage times. It can also make statistics based on
the payment type (prepaid and ordinary).
2-146
User Manual
CAMS Platform
Chapter 2 Service Operations
The trend of the usage of services is displayed in a plot chart with
time as x-axis and usage as y-axis.
Figure 2-110 Monthly (Daily) Service Usage Statistics Report
For the explanations of these parameters, refer to online helps.
Caution:
The statistics are based on the end time of accesses. For example, if a
user gets offline at 01:00:00 on July 2 and the access duration is 5
hours, the 5 hours will be treated as the access duration on July 2.
Actually, the service usage of the first four hours is generated on July
1. The usage calculation in the following reports will comply with this
rule.
2-147
User Manual
CAMS Platform
Chapter 2 Service Operations
After selecting proper statistics conditions, click <OK>, and the
system begins to perform statistics and analysis based on the
specified conditions. At last, a page shown in Figure 2-111 pops up.
Figure 2-111 Daily Service Usage Report
Click <Print> on top of the page to print the displayed report. Click
<Graph> at the bottom of the page, and the statistics result will be
displayed in graph. At this time, you can also click <Print> to print the
graph.
2-148
User Manual
CAMS Platform
Chapter 2 Service Operations
& Note:
The print operation in this system is implemented through the print
function of IE. By default, IE will add header (such as pages) and
footer (such as URL links) in the printed result. To delete the header
and footer, you can select [File/Page Setup…] to enter the [Page
Setup] page. Then, delete the contents in the [Header] and [Footer]
fields respectively and click <OK>.
Click <Export As:>, and you can download the statistics result to
the local host with different formats. Currently, the supported export
file format are TXT, EXCEL (comma-separated CSV), XML, and JPEG
(it is used only when the statistics report can be displayed in graph).
You can select them from the drop-down list.
& Note:
The same functions mentioned previously exist on the pages of all
types of statistics reports, and thus are omitted hereafter.
You can click <Table> or <Graph> at the bottom to refresh the
statistics report and switch the format of the displayed results between
table and graph.
One example of the Monthly (Daily) Service Usage Statistics
Report displayed in graph is shown in Figure 2-112.
2-149
User Manual
CAMS Platform
Chapter 2 Service Operations
Figure 2-112 Daily Service Usage Report (Graph)
II. Monthly (Daily) Average Service Usage Statistics Report
This report makes statistics on the average of monthly or daily
service usage of a user (may use multiple services) or a service.
The difference between Monthly (Daily) Average Service Usage
Statistics Report and Monthly (Daily) Service Usage Statistics Report
is that the former makes statistics on the monthly (daily) average
usage of a user (or a service) within a period of time and the latter
makes statistics on the total usage.
The trend of the average usage of services is displayed in a plot
chart with time as x-axis and usage as y-axis.
2-150
User Manual
CAMS Platform
Chapter 2 Service Operations
Figure 2-113 Monthly (Daily) Average Service Usage Statistics
Report
For the explanations of the parameters, refer to online helps.
Caution:
When the statistics period is a day, only the users with usage records
on that day are counted during the statistics on the average usage.
Similarly, only the services with usage records on that day are counted.
For example, if there are 50 registered users in the system, and only
30 users access the networks that day, the average usage equals the
total usage that day divided by 30.
2-151
User Manual
CAMS Platform
Chapter 2 Service Operations
After selecting proper statistics conditions, click <OK>, and the
system begins to perform statistics and analysis based on the
specified conditions. At last, a page shown in Figure 2-114 pops up.
Figure 2-114 Daily Average Service Usage Report
You can click <Table> or <Graph> at the bottom to refresh the
statistics report and switch the format of the displayed results between
table and graph.
One example of the Monthly (Daily) Average Service Usage
Statistics Report displayed in graph is shown in Figure 2-115.
2-152
User Manual
CAMS Platform
Chapter 2 Service Operations
Figure 2-115 Daily Average Service Usage Report (Graph)
III. Monthly Account Quantity Statistics Report
This report makes statistics on the monthly number of valid or
new account users (prepaid or ordinary) and services (subscribed by
users), and displays the trend of the number of users and services in a
plot chart with time as x-axis and number as y-axis.
Figure 2-116 Monthly Account Quantity Statistics Report
2-153
User Manual
CAMS Platform
Chapter 2 Service Operations
The statistics conditions are explained as follows:
Stat. Type: Includes Valid account (service) and New account
(service).
l
The valid accounts refer to all valid accounts within the
statistics period (including those cancelled before the end
month).
l
The valid services refer to all valid services within the
statistics period (including those cancelled before the end
month).
The new accounts and services refer to the accounts and
services added within the statistics period.
Caution:
l
By default, the statistics results are displayed by month. Each row
of the statistics data represents the month, the number of prepaid
accounts, the number of ordinary accounts and the number of
services respectively.
l
This report does not count the card users and their used services.
After selecting proper statistics conditions, click <OK>, and the
system begins to perform statistics and analysis based on the
specified conditions. At last, a page shown in Figure 2-117 pops up.
2-154
User Manual
CAMS Platform
Chapter 2 Service Operations
Figure 2-117 Monthly Valid User (Service) Quantity Statistics
Report (table)
You can click <Table> or <Graph> at the bottom to refresh the
statistics report and switch the format of the displayed results between
table and graph.
One example of the Monthly Account Quantity Statistics Report
displayed in graph is shown in Figure 2-118.
2-155
User Manual
CAMS Platform
Chapter 2 Service Operations
Figure 2-118 Monthly Valid User (Service) Quantity Statistics
Report (Graph)
IV. Single User Based Monthly Expenditure Statistics
Report
This report makes statistics on the monthly expense of a single
user. The statistics include user name, average expense, maximum
expense and minimum expense.
2-156
User Manual
CAMS Platform
Chapter 2 Service Operations
Figure 2-119 Single User Based Monthly Expenditure Statistics
Report
For the explanations of the related statistics conditions, refer to
online helps.
Min. Expenditure and Max. Expenditure: Used to set the expense
range. For example, if you input 100 and 1000 in the two fields
respectively, the related information of users with the expense
between 100 dollars and 1000 dollars will be displayed. If both the
fields are empty, it means the two parameters are not limited.
After inputting and selecting proper statistics conditions, click
<OK>, and the system begins to perform statistics and analysis based
on the specified conditions. At last, a page shown in Figure 2-120
pops up.
2-157
User Manual
CAMS Platform
Chapter 2 Service Operations
Figure 2-120 Single User Based Monthly Expenditure Statistics
Report
Click <Table> at the bottom to refresh the statistics results.
V. Monthly Average Expenditure Distribution Statistics
Report
This report makes statistics on the distribution of monthly
average expenses of users, and thus you can learn the distribution of
users in different segments of expense.
Define several segments of expense first. Get the total expenses
of users from the start month to the end month. Divide the result by the
number of months with expenses (between the start month and the
end month) to get the monthly average expense. The statistics results
displayed in a table provide the average expense segments and the
number of users corresponding to the average expense segments.
The statistics results can also be displayed in a bar chart with segment
as x-axis and number as y-axis.
2-158
User Manual
CAMS Platform
Chapter 2 Service Operations
Figure 2-121 Monthly Average Expenditure Distribution
Statistics Report
For the explanations of the related statistics conditions, refer to
online helps.
After inputting and selecting proper statistics conditions, click
<OK>, and the system begins to perform statistics and analysis based
on the specified conditions. At last, a page shown in Figure 2-122
pops up.
2-159
User Manual
CAMS Platform
Chapter 2 Service Operations
Figure 2-122 User-based Monthly Average Consumption
Distribution Statistics Report
You can click <Table> or <Graph> at the bottom to refresh the
statistics report and switch the format of the displayed results between
table and graph.
The user-based monthly average consumption distribution
statistics report displayed in graph is shown in Figure 2-123.
2-160
User Manual
CAMS Platform
Chapter 2 Service Operations
Figure 2-123 User-based Monthly Average Consumption
Distribution Statistics Report (Graph)
VI. Monthly Payable Charge and Payment Comparison
Statistics Report
The report makes statistics on the monthly payable charges and
payments of all users, and displays the results in a plot chart.
The payable charge refers to all used money in the payable bill.
The payment refers to all money in the paid bill. The payable charge is
based on the billing date. For example, if the accounting period for a
service is due on June 20, and the billing date is the fifth day of each
month, the bill will be settled on July 5 and the payable charge for this
bill will be counted as that on July.
2-161
User Manual
CAMS Platform
Chapter 2 Service Operations
Caution:
l
Suppose a bill is settled but not paid (payable bill) after the period
of time set by the Bill Details Saving Time parameter, and the paid
bills of this month have been cleared by the system already. In this
case, when the system makes statistics on the payable charge and
the payment regularly, the data of this month will not be refreshed.
That is, even if the payable bill is paid later, the payment will not be
reflected in the statistics report.
l
If a user is cancelled forcibly, its nonpayment bills will not be paid,
and thus the payable charge will not be reflected in the statistics
report.
l
The bills for prepaid users will be changed to the paid state when
they are being settled.
Figure 2-124 Monthly Payable Charge and Payment
Comparison Statistics Report
After inputting and selecting proper statistics conditions, click
<OK>, and the system begins to perform statistics and analysis based
2-162
User Manual
CAMS Platform
Chapter 2 Service Operations
on the specified conditions. At last, a page shown in Figure 2-125
pops up.
Figure 2-125 Monthly Payable Charge and Payment
Comparison Statistics Report
You can click <Table> or <Graph> at the bottom to refresh the
statistics report and switch the format of the displayed results between
table and graph.
The monthly payable charge and payment comparison statistics
report displayed in graph is shown in Figure 2-126.
2-163
User Manual
CAMS Platform
Chapter 2 Service Operations
Figure 2-126 Monthly Payable Charge and Payment
Comparison Statistics Report (Graph)
VII. Hourly Average Online Users Statistics Report
The report makes statistics on the number of hourly online users.
CAMS provides a function to count the average number of hourly
online users, thus enabling you to learn if a certain period is busy or
not. The trend of the average number of online users is displayed in a
plot chart with time as x-axis and number as y-axis.
2-164
User Manual
CAMS Platform
Chapter 2 Service Operations
Figure 2-127 Hourly Average Online Users Statistics Report
For the explanations of the related statistics conditions, refer to
online helps.
Caution:
The hourly average online users are calculated in this way: The
system makes statistics on the number of online users every 15
minutes. After an hour, it divides the total number of online users by 4.
After selecting proper statistics conditions, click <OK>, and the
system begins to perform statistics and analysis based on the
specified conditions. At last, a page shown in Figure 2-128 pops up.
2-165
User Manual
CAMS Platform
Chapter 2 Service Operations
Figure 2-128 Hourly Average Online Users Statistics Report
You can click <Table> or <Graph> at the bottom to refresh the
statistics report and switch the format of the displayed results between
table and graph.
The hourly average online users statistics report displayed in
graph is shown in Figure 2-129.
2-166
User Manual
CAMS Platform
Chapter 2 Service Operations
Figure 2-129 Hourly Average Online Users Statistics Report
(Graph)
VIII. Operator Charge Record Statistics Report
This report makes statistics on the charge operations performed
by each operator within a period of time.
Figure 2-130 Operator Charge Record Statistics Report
2-167
User Manual
CAMS Platform
Chapter 2 Service Operations
For the explanations of the related statistics conditions, refer to
online helps.
After inputting and selecting proper parameters, click <OK>, and
the system begins to perform statistics and analysis based on the
specified conditions. At last, a page shown in Figure 2-131 pops up.
Figure 2-131 Operator Charge Record Statistics Report
2.9 User Self-service
This section introduces related service operations on the CAMS
Self-service Platform. These operations enable the end users to
manage and control their own accounts or cards conveniently to
achieve real autonomous management.
Launch IE in Windows and input the IP address and port of the
CAMS Self-service Platform at the address bar. For example,
http://10.110.89.67/selfservice, and this indicates that the default port
80 is used here. If another port is used (8180 for example), you need
to input http://10.110.89.67:8180/selfservice at the address bar and
enter the [CAMS Self-service Platform] page shown in Figure 2-132.
2-168
User Manual
CAMS Platform
Chapter 2 Service Operations
Figure 2-132 CAMS Self-service Platform
The [CAMS Self-service Platform] page provides the following
functions:
l
An
end
user
without
account
can
click
<User
Preregistration> for preregistration. (The prerequisite is that
you need to select Permit from the Self Preregister
drop-down list on the [Service Parameters Configuration]
page on the configuration console.)
l
An account user who forgets password can click <Forget
Password> to enter the [Get User Password] page. After
inputting the user name of the account, the system will send
the password to the registered e-mail box. (The prerequisite
is that you need to enable the function of password retrieval
through mails after selecting [System Management/Mail
Configuration] on the configuration console.)
2-169
User Manual
CAMS Platform
l
Chapter 2 Service Operations
An end user (either an account user or a card user) can input
the corresponding user name and password to login, and
query and maintain its user and service information.
2.9.1 User Preregistration
To reduce the input workload and improve the efficiency of
operators when new account users are added, the system provides
the preregistration function. That is, after the end users input the basic
and additional information of the account to be applied for, the
operator can turn the preregistered users to registered users. To do
this, the operator only needs to set some related service information,
thus simplifying operations.
On the [CAMS Self-service Platform] page, click <User
Preregistration> to enter the [User Preregistration] page, as shown in
Figure 2-133.
Figure 2-133 User Preregistration
The parameters of Account Name, Full Name, Password, ID
Card, Contact, Email Address are the basic information and usually
2-170
User Manual
CAMS Platform
Chapter 2 Service Operations
remain unchanged. The other parameters indicate the additional
information for the user and vary with actual conditions.
Input proper parameters, and click <OK> to complete the
preregistration. If the operation succeeds, a page shown in Figure
2-134 pops up.
Figure 2-134 Page prompting that the account preregistration
succeeds
You must register the preregistered account before the expiry
date prompted on the page. Otherwise, the preregistered account will
be deleted by the system automatically. The expiry date is later than
the current date by the days specified by the Preregistration
Information Saving Time parameter which you can modify on the
[Service Parameters Configuration] page.
You can limit the number of accounts to be registered at the same
IP address each day, thus preventing a lot of invalid accounts from
being preregistered maliciously. To do this, you can select [System
Management/System
Configuration]
to
enter
the
[System
Configuration] page. Click <Modify> of the Service Parameters item to
2-171
User Manual
CAMS Platform
Chapter 2 Service Operations
enter the [Service Parameters Configuration] page. Then, modify the
parameter of Same Address Preregistration Limit. To remove the
limitation, you can set this parameter to be –1.
2.9.2 Query and Maintain User Information
The following will take account users for example. On the [CAMS
Self-service Platform] page, input the correct user name and
password, and click <Login> to enter the [Account User Info] page, as
shown in Figure 2-135.
Figure 2-135 Account User Info
This page displays the basic user information and the subscribed
service information.
With the menus on the left side, the end users can query related
information and perform other operations:
l
User Basic Information
l
User Bill Information
2-172
User Manual
CAMS Platform
Chapter 2 Service Operations
l
LAN Access Details
l
User Payment Records
l
User Information Maintenance
l
Change Password
l
Recharge
l
Logout
Among them, the User Information Maintenance operation is only
applicable to account users. The User Bill Information operation is
only applicable to ordinary users.
The following details on these operations.
I. User Basic Information
An end user enters the [Account User Info] page after login. The
user can also click [User Basic Information] on the left side to enter the
same page, as shown in Figure 2-135. The basic user information and
the subscribed service information are displayed.
II. User Bill Information
Ordinary account users can query their current fee information.
Click [User Bill Information] on the left side to enter the [User Bill
Information] page, as shown in Figure 2-136.
2-173
User Manual
CAMS Platform
Chapter 2 Service Operations
Figure 2-136 User Bill Information
III. LAN Access Details
Users can query the access details of the subscribed service
within a specified period of time. Click [LAN Access Details] on the left
side to enter the [LAN Access Details] page, as shown in Figure
2-137.
2-174
User Manual
CAMS Platform
Chapter 2 Service Operations
Figure 2-137 LAN Access Details
You can select different periods and services and click <Query>
to query the access details. You can click <Details> of each entry to
view its details.
2-175
User Manual
CAMS Platform
Chapter 2 Service Operations
IV. User Payment Records
Click [User Payment Records] on the left side to enter the [User
Payment Records] page, as shown in Figure 2-138.
Figure 2-138 User Payment Records
The user payment history records are displayed on the page.
& Note:
Figure 2-138 shows the [User Payment Records] page for ordinary
account users, and it is slightly different from the page for prepaid
account users.
V. User Information Maintenance
Click [User Information Maintenance] on the left to enter the [User
Information Maintenance] page, as shown in Figure 2-139.
2-176
User Manual
CAMS Platform
Chapter 2 Service Operations
Figure 2-139 User Information Maintenance
After modifying the user information, click <Modify Information>
to complete the operation.
2-177
User Manual
CAMS Platform
Chapter 2 Service Operations
& Note:
Select [System Management/System Configuration] to enter the
[System Configuration] page. Click <Modify> of the Service
Parameters item to enter the [Service Parameters Configuration] page.
If you select Prohibit from the Self Modify User Info drop-down list,
the User Information Maintenance link will not be available.
VI. Change Password
Click [Change Password] on the left side to enter the [Change
Password] page, as shown in Figure 2-140.
Figure 2-140 Change Password
When you position the cursor over each field, its prompt pops up
automatically. On the CAMS Self-service Platform, you can find a lot of
similar prompts.
2-178
User Manual
CAMS Platform
Chapter 2 Service Operations
When you position the cursor over the “Notice” at the upper right
corner, the notice for changing password will be displayed
automatically to facilitate the operation.
After inputting the old password, new password and confirm
password, you can click <Modify Password> to complete the
operation.
VII. Recharge
Except the monthly payment card users, all other users (account
users, prepaid card users) can perform recharging operations with
recharge cards.
Click [Recharge] on the left side to enter the [Recharge] page, as
shown in Figure 2-141.
Figure 2-141 Recharge
You may perform two operations on this page: validity
authentication and recharge.
2-179
User Manual
CAMS Platform
Chapter 2 Service Operations
Input the card number only and click <Validity Authentication>,
and the system will display the authentication result shown in Figure
2-142.
Figure 2-142 Recharge card validity authentication
You must input the user name, card number and password. Then,
click <Recharge> to complete the operation.
& Note:
You can modify the user name to recharge for other users on the page
shown in Figure 2-142.
2-180
User Manual
CAMS Platform
Chapter 2 Service Operations
VIII. Logout
Click [Logout] on the left side, and you can exit the current page
and return to the login page.
Besides, if users do not perform any operations for 10 minutes
after login, the system will log them out automatically. In this case, if
users want to continue related operations, they must login again.
2-181
User Manual
CAMS Platform
Chapter 3 Routine Maintenance
Chapter 3 Routine Maintenance
3.1 Overview
Routine maintenance refers to the description of frequently used
operations, troubleshooting, data backup, and other operations of the
device in normal running status. During system running, the
maintenance personnel need to maintain and check devices regularly.
They can check the system alarm information and operation
information such as various logs. Besides, they can analyze system
operations, detect problems, and solve them in time to ensure the
reliable running of the system. The following contents provide some
suggestions of routine maintenance on devices, as well as
troubleshooting and FAQ.
3-1
User Manual
CAMS Platform
Chapter 3 Routine Maintenance
3.2 Maintenance Suggestions
Caution:
You are not recommended to modify the system time. SQL Server
may obtain the system time at any time to execute its own
maintenance tasks. Besides, CAMS also use the system time when
maintaining user online information and charging users, and the jobs
that are executed regularly must trace the system time promptly.
Therefore, if the system time is modified, users may not login/logout
normally, accounting errors may occur, and even some unexpected
results such as that CAMS is down may be caused.
The specific maintenance suggestions are shown in Table 3-1.
3-2
User Manual
CAMS Platform
Chapter 3 Routine Maintenance
Table 3-1 Maintenance suggestions
Period
Daily
Maintenance
requirement
Operation
View CAMS
running status
Check whether the CAMS Monitor
service is started in Windows
Services (Local). Alternatively,
monitor the CAMS running status
using the System Monitor function
provided by CAMS.
View SQL
Server running
status
Check whether the
MSSQLSERVER service is started
in Windows Services (Local).
View the
running status
of Tomcat
Check whether the CAMS Web
Server service is started in
Windows Services (Local).
View CAMS
logs
Query log information on the
[System Log Management] page
which you can enter by selecting
[System Management/Log
Query/System Log].
View the
memory and
CPU usage
Check the memory and CPU usage
in Windows Task Manager. If either
of them is higher than 90% for a
long period, the hardware may need
upgrade.
3-3
User Manual
CAMS Platform
Period
Weekly
Chapter 3 Routine Maintenance
Maintenance
requirement
Operation
Export
database
backup files
Export the database backup files to
tapes or other storage devices in
time.
Backup CAMS
running logs
Backup the CAMS running logs to
tapes or other storage devices.
Clean
equipment room
Mainly includes 6S (seiri, seiton,
seiso, seiketsu, shitsuke, and
safety).
Clean disk
spaces
Check the disk usage in My
Computer. If it is higher than 80%,
invalid files on the disk must be
cleared immediately. The log files
that have been backed up and all
other invalid files must be deleted.
Delete invalid
operators
Check the configuration console for
invalid operators. If yes, delete
them.
Change
password
Change the password of the
Windows administrator to ensure
that the operating system runs
securely.
Update system
patch and
antivirus
software
Check whether the operating
system and the software (such as
IE and Outlook) are updated timely.
Besides, the virus definition file of
the antivirus software must be
updated timely.
Monthly
Regularly
3-4