1
User Manual of Wireless Full Touch Color Screen Alarm System
Ⅰ. FOREWORD
Thank you for buying and using 7 inch color screen full touch alarm host. This is a high performance intrusion
alarm system, which can provide you with safer environment and better family protection.
In order to use this alarm system properly and efficiently, please read the following information before use.
Ⅱ. SYSTEM CONFIGURATION
System components: (Basically includes alarm host and optional accessories)
alarm host
original packaged accessories
7 inch color
screen
touch
full
alarm
host
wireless remote controller, wireless door sensor series, wireless wide angle PIR sensor series,
wireless indoor siren series, wireless smoke detector, wireless keypad, wireless gas detector,
wireless doorbell button, wireless repeater, wireless emergency button, etc.
Ⅲ. SYSTEM INTRODUCTION
FEATURES
1.
Full touch screen alarm system, friendly interface 7 inch color screen displays icons and words;
2.
Preloaded multi-optional system languages: traditional\simplified Chinese, English, German, French,
Russian, Hebrew… can meet different market requirements;
3.
Alarm info transferring by GSM network (3 Bands or 4 Bands), or PSTN network, or dual-network in the
form of phone call, SMS;
4.
System has 31 wireless zones (each zone supports max 4 wireless sensors), compatible with optional
wireless siren and 8 wired zones;
5.
In system can preset max 5 groups phone numbers, alarm call will be in first priority if a normal call is going;
GSM module will send alarm info once the landline cable is cut; Every group telephone number can be
individually set to transfer alarm info by SMS or phone call;
6.
Zone detection notification in disarm status, system can monitor the kids’ track;
7.
In system menu you can set Pass By ON/OFF, zone type, Entry Delay ON/OFF for each zone;
8.
Smart-logical analysis technology, zone name, installation position and sensor name will be displayed when
system alarms;
9.
Learn sensors into alarm host by friendly interface;
10.
System has non-volatile chip, information will be stored automatically if power is off;
11.
Optional smart functions, including check door\window status or voltage status automatically, low voltage of
host or sensor alarm, uploads low voltage status to CMS;
12.
Support optional wireless “ding-dong” doorbell;
13.
Dual network and GSM network alarm host can send alarm info by SMS or phone call; PSTN network alarm
host can only send alarm info by phone call;
14.
Dual network and GSM alarm host can arm/disarm system by phone call, or SMS, or wireless remote
controller, or host keypad, or wireless operation keypad; PSTN alarm host can arm/disarm system by phone
call, or wireless remote controller, or host keypad, or wireless operation keypad;
15.
System works with AC\DC power supply and built-in high energy lithium battery, system will give
notification when low voltage, landline is cut and low power supply happen;
16.
“Black Box” functions, system can store max 99 alarm records and 100 operation records
17.
Host is compatible with Contact ID protocol, suitable to build CMS (Central Monitoring Station);
TECHNICAL PARAMETERS
1.
Power supply: 100VAC~240VAC
2.
Static current: ≤140Ma, alarm current: ≤500Ma
3.
Working condition: temperature -10℃~50℃ Humidly <80%
4.
Support max 8 wireless remote controllers, and max 116pcs wireless sensors, like door/window sensor, PIR
sensor, and wireless gas detector;
5.
System wireless frequency 433.92MHz or 868.35MHz;
6.
Backup battery: rechargeable lithium battery 7.4V1200mAH;
7.
3 Bands 900/1800/1900MHz or 4 Bands 850/900/1800/1900MHz is optional for GSM host and dual-network
host;
8.
Product dimension: 230mm*140mm*22mm
DRAFT
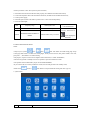
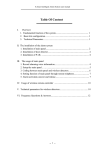
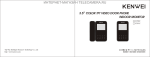
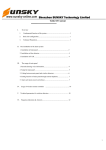
● STANDBY INTERFACE
1
2
3
4
5
Panic Alarm
6
Home Arm
7
8
Home Disarm
9 10
System disarm
Menu
INTRODUCTION ABOUT STANDBY SCREEN IN STATUS BAR
1. “GSM signal level” icon: max 5 level;
2. “SIM card status” icon: SIM card icon will be displayed if the SIM card is installed; On the contrary, the SIM
card icon won’t be displayed if the SIM card isn’t installed;
3. “Sensor triggered” icon: the sensor name and zone No. will be displayed for 4 seconds in disarm status;
4. “Zone monitoring notification” icon: this icon will be displayed when this zone is triggered if the zone
monitoring notification function is activated;
5. “Arm/Disarm status” icon: this icon
will be displayed when Arm Away is enabled; icon
will be
displayed when Arm Home is enabled; no display in Disarm status;
6. “To be checked emergency” icon: this icon will flash frequently if any emergency record needs to be checked, it
will disappear if you click it and finish checking this record;
7. “Sensor in low voltage” icon: this icon will come if the sensor, which has low voltage emitting function, sends
the low voltage signal to the alarm host when it is in low voltage; this icon will disappear if you click and finish
browsing this records;
8. “Door/Window status” icon: this icon will be displayed when door/window opens after smart sensor function is
enabled; it won’t be displayed when door/window is closed;
9. “Landline cable offline” icon: this icon will be displayed when the landline is cut, won’t be displayed when the
landline is connected; if the landline offline notification function is enabled;
10. Status bar: Status Bar lays on the top of the standby screen
● DEFENSE LINES AND INTRODUCTION
Defense lines include 1st defense line, 2nd defense line and 24H defense line
<Note: In system page, they are short for 1st Line, 2nd Line and 24H Line sometimes>
Definitions:
1.
1st defense line: it is a line, through which the intruder will pass (like the door, or window), usually in this
area wireless door\window sensor, wireless PIR curtain sensor are installed.
2.
2nd defense line: it is an area, into which the intruder will enter (like living room, aisles and bedrooms, etc.),
usually wireless wide angle PIR sensor is installed.
3.
24H defense line: it is an area, 24H means this area is under monitoring all day, such as, emergency call,
medical rescue, gas leakage and fire alarm, etc. Usually wireless emergency button, wireless gas sensor,
wireless smoke sensor are installed.
● ARM TYPE AND INTRODUCTION
1.
“Arm Away” mode: This mode is used when nobody is home, if any detectors in 1st Defense Line and 2nd
Defense Line get triggered, the host will alarm immediately and dial the alarm number\send SMS
automatically at the same time.
2.
“Arm Home” mode: This mode is set when family member is home, if any detectors in 1st Defense Line get
triggered, the host will alarm immediately and dial “Panic” automatically. It will not alarm if any detectors in
2nd Defense Line are triggered now.
HOW TO OPERATE THE ALARM HOST
A. PREPARATION BEOFRE USE
*Do this procedure 1 and 2 when system in power off status;
1. Insert SIM card in the back of the alarm host properly (For GSM host and dual-network host);
2. Connect the telephone cable in the back of the alarm host (For PSTN host and dual-network host);
3. Connect power supply;
4. Switch the power button in the back to position “ON” to turn on the backup battery;
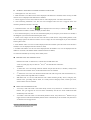
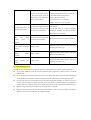
5. Check the GSM signal;
Host
Frequency range
GSM signal is OK
3 Bands
900MHz/1800MHz/1900MHz
Indicator flashes every 2 seconds
Signal is bad or SIM card
is not installed well
1. Indicator flashes every 1
second; 2. SIM card icon
4 Bands
850MHz/900MHz/1800MHz/19
00MHz
Indicator flashes every 3 seconds
will be displayed in
Status Bar;
B. ABOUT PROGRAM SETTING
NOTE:
* Major keys in system:
ESC,
DEL,
ENT. ESC button can make setting page escape
to last page; DEL button is to delete the existing digits, mostly used to set time, date, phone number, zone code,
group code …; ENT button is to confirm setting.
*The progress, we pair a wireless sensor together with an alarm host, is called “LEARNING”;
*The host will get back to standby screen if no operation is processed within 40 seconds
*All operation will be enabled after you get into the SYSTEM MENU;
*If you enlist in the user codes by mistake for 3 times, the host will get back to the standby screen;
*Please click
ENT or
ESC button to escape/confirm this setting after each “type in”;
1. System Menu
NO
Menu
Introduction
1
Date & Time
2
Phone Numbers
3
Delay Time
Current Year/Month/Day/Week/Hour/Minute/Second setting;
Alarm call/SMS setting, 5 groups; Group 1 for CID protocol CMS, group 2~5
for personal use;
Arm delay and alarm delay setting, host will beep one DI every second in delay
duration;
Alarm time setting, individually set the alarm time for 24H defense line, 1st
4
Alarm Time
defense line,2nd defense line; System will give notification or not when system
is Armed/Disarmed;
Zone Code, sensor type, installation position, defense line type, zone function
5
Zone Attribute
6
Smart Zone
7
Program Sensor
8
Doorbell
9
Revise Code
User Code setting, default code is 8888;
10
Cut Wire Alarm
Only can be enabled for dual-network and PSTN network alarm host;
11
History
12
CMS Setting
Set network alarm, includes User Code, Arm/Disarm uploads
13
E. Control
To be added
14
Linked Alarm
To be added
15
Remote Care
To be added
and alarm delay setting;
Set Zone Code, Activate Sensor, Default Door Status and Door Chime;
For adding/deleting sensors, includes Zone Code, Group Code, You want to
(adding/deleting) setting
Wireless doorbell sensor is set in Zone 30, includes Zone Code, Group, You
want to (adding/deleting) setting
Record 99 previous working records and alarm records, includes NO, Zone
NO, Sensor Name, Installation Location, Time setting;
NOTE:
2. Preview of Zone Info
Zone Code
Group Code
Zone Type
00、01
0、1、2、3
wireless
02 ~ 10
0、1、2、3
wireless
Defense Line
Available sensors
Type
——
24H Defense
Line
Wireless remote controller, wireless keypad,
etc.
Wireless emergency button, wireless gas
sensor, wireless smoke sensor, etc.
Wireless door/window sensor, wireless smart
11 ~ 20
0、1、2、3
wireless
st
1 Defense Line
door/window sensor, wireless curtain PIR
sensor, etc.
nd
2 Defense
21 ~ 29
0、1、2、3
wireless
30
0、1、2、3
wireless
——
31 ~ 33
——
wired
1st Defense Line
Line
Wireless wide angle PIR sensor, etc.
Wireless doorbell button
Wired door/window sensor, wired curtain
PIR sensor, etc.
34 ~ 35
——
wired
36 ~ 38
——
wired
2nd Defense
Line
24H Defense
Line
Wired wide angle sensor, etc.
Wired emergency button, wired gas sensor,
wired smoke sensor, etc.
NOTE: Each wireless zone can accept 4 groups (group 0, group 1, group 2, group 3), one wireless sensor takes one
group; each wired zone can accept one wired sensor;
C. Detailed program setting
How to get into Program Setting Page: In standby screen, click “MENU”, enlist the user code 4 digits xxxx,
and click ENT, now you are in program setting page. Default user code is 8888;
How to set “Date & Time”: In program setting page, click Date & Time, in the new page, click white blank
under Time, Date and Week to make correction.
NOTE: Please delete existing digits by DEL button before you enlist the new digits.
How to set “Phone Numbers”: In program setting page, click Phone Numbers, in the new page, enlist phone
number for each group by clicking corresponding white blank. And select “Phone#’” or “MS” for each
group.
NOTE: If you select “Phone#’”, the phone number owner will get the alarm call once system alarms; if you
select “SMS”, the phone number owner will get SMS once system alarms.
* The first group phone number is fixed for CMS, in C ID protocol;
* The 2-5 groups are for personal phone numbers;
How to set “Delay Time”: In program setting page, click Delay Time, in the new page enlist new digits for
“Exit Delay” or ”Entry Delay”. Press
to confirm new setting;
NOTE: Default setting is 10 seconds, digit range from 00~59.
How to set “Alarm Time”: In program setting page, click Alarm Time, in the new page enlist new digits by
clicking the white blank for “Siren in Emergency Zone”, ”Siren in 1st Defense Zone” or ”Siren in 2nd
Defense Zone” after deleting old records. In bellowing setting “Arm/Disarm Beep”, if YES, system will give
beep notification when you Arm/Disarm alarm system; if NO, system won’t give beep notification when you
Arm/Disarm system.
For example, if you enlist 02 Minutes for “Motion Siren”, the siren will alarm for 2 minutes when the
sensors in 2nd Defense Line are triggered.
NOTE: Default alarm time is 1 minute, digit range from 00~59.
How to set “Zone Attribute”: In program setting page, click Zone Attribute, in the new page click white
blank of each item to make correction. You can redefine wireless sensor and the corresponding zone
properties. Including Sensor type and Installation position, zone type and zone function.
* This is to change zone properties and sensor properties, including changes of Zone Code, Sensor type,
Installation position, Zone type, Zone function and Alarm Delay Setting;
* For more details, please refer to “Preview of Zone Info”.
How to set “Smart Zone”: In program setting page, click Smart Zone, in the new page click the white blank
to enlist the Zone Code, which you want to set as Smart Zone. Then select Activate YES/NO, if you select
YES, this smart zone will be enabled; and select default door status CLOSE/OPEN, if you select OPEN, it
means the default status of door/window is OPEN in smart zone, usually we define the default of
door/window status is closed; and select Door Chime YES/NO, default is YES.
*In smart zone, the default door status is Close. If you set the default status of door as Open, a “Window Icon”
will appear on the Status Bar on the top of screen. It means in this mode you can’t arm system unless you
select “Arm by Force” in the new page after you click the “Window Icon”;
*Please refer “Preview of Zone Info” for more details about zone attribute.
How to set “Program Sensor”: In program setting page, click Program Sensor, in the new page click the
white blank of Zone Code, Group and {You want to} to set corresponding zone info and sensor info. If you
click “Activate Sensor” after all info is settled, it will show “Learning” on screen, now trigger the sensor. If
you see a “Success” on screen, the learning progress is successful; If you see a “Failed”, the learning
progress isn’t successful, now you need repeat the learning progress;
* Zone Code: it is selectable from 00~29 for sensor installation, you need input corresponding Zone Code for
a certain sensor;
* Group: In system totally have 4 groups to select, group 0, group 1, group 2, group 3. It means maximum
4pcs wireless sensors are acceptable in one zone; if you enlist other Group Codes, except 0, 1, 2, 3, it is
null.
* You want to: Here you need select the operation type, “Activate Sensor is for learning a new sensor into the
alarm system”; “Delete Sensor” is for deleting a sensor from a certain zone.
* The corresponding relationship between Zone Code and sensor type, please check Table “Preview of Zone
Info”.
How to set “Doorbell”: In program setting page, click Doorbell, in the new page, click white blank of
“Group” and “You want to” to set doorbell info.
Operation Guide: If you want to learn a new doorbell sensor into a system: Zone Code 30 <30 can’t be
changed> + new Group Code 0/1/2/3 + ENT + Activate Sensor + ENT + Trigger doorbell sensor by pressing
the doorbell button 2~3 times quickly, if a “Success” appears on the screen, the learning progress is
successful;
If you want to delete a doorbell sensor in Group 3 of a system: Zone Code 30 + new Group Code 3 < chosen
from 0/1/2/3> + ENT + choose Delete Sensor + ENT, if a “Success” appears on the screen, it means
operation is successful;
* Zone code of doorbell is fixed to 30;
* In an alarm system, you may learn 4pcs wireless doorbell, separately in zone 0, 1, 2, 3;
How to set “Revise Code”: In program setting page, click Revise Code, in the new page, input the old code
xxxx + ENT + input the new code xxxx + ENT + repeat the new code xxxx again + ENT, the operation is
successful if a “Success” appears on the screen;
*System code is 4 digits;
How to set “Cut Wire Alarm”: In program setting page, click Cut Wire Alarm, in the new page select “YES”
or “NO” to enable/disable cut wire alarm function. If you choose YES, system will beep DiDi when the
landline is cut; If you choose NO system won’t give beep notification if landline cable is cut.
*The system will beep DiDi every 7 seconds if the landline cable is cut;
*This setting is valid for PSTN alarm system and dual-network alarm system; it is null for pure GSM alarm
system;
How to check “History”: In program setting page, click History to check the history records.
*Each page, 5 records. You can go to second page by clicking “
“
” or “
”, or escape by clicking
”
How to set “CMS Setting”: In program setting page, click CMS Setting, in new page, you can set user code
and Upload Status or not.
*User code is selectable from 0001~9999;
*If you choose YES to Upload Status, status info of alarm system will be sent to CMS; if NO to Upload
Status, status info of alarm system won’t be sent to CMS;
E. Control: Full name is “Electrical Equipment Control”, introduction is to be added.
Linked Alarm: Introduction is to be added.
Remote Care: Introduction is to be added.
D. Important system operations
1. Record
Keep pressing “record button” on the back of the alarm host, talk to the speaker, then release, the voice will be
recorded. Record time maximum can be 10 seconds.
2. Arm system
By wireless remote controller: press the arm button on the wireless remote controller, the host will beep Di to
confirm your successful arm operation;
By host button: Press arm button on the host screen to arm the system;
NOTE:
① Arm away is usually used when nobody stays in the monitored space; System will alarm if any sensor
triggered;
② Arm home is usually used when somebody still stay in the monitored space; System will alarm if only sensor is
triggered in 1st Defense Line;
By SMS: Edit SMS text “user code + 1” (if the user code is 6666, then you edit 66661) in your mobile phone
and send it to enlisted phone number in host SIM card. The host will arm automatically if the SMS is
received, at the same time host will send a reply “Arm successfully” to you; The SMS option can be only
used for arm away of system. <This SMS arm option is ready for GSM network alarm host and dual-network
alarm host>;
By phone call: make a call to enlisted phone number in host SIM card; about 30s later you will hear a Di,
now input the “user code+#” and digit 1 or 2, system will be armed successfully after giving a Di; 1 means
Arm Away, 2 means Arm Home; <Arm system by phone call is ok for all network alarm hosts>;
3. Disarm system
By wireless remote controller: press the disarm button on the wireless remote controller, the host will beep
DiDi to confirm your successful disarm operation;
By Disarm button: Press disarm button on the host screen, enlist user code xxxx + ENT to disarm the system;
By SMS: Edit SMS text “user code + 0” (if the user code is 6666, then you edit 66660) in your mobile phone
and send it to enlisted phone number in host SIM card. The host will disarm automatically if the SMS is
received, at the same time host will send a reply “Disarm successfully” to you; The SMS option can be only
used for arm away of system. <This SMS arm option is ready for GSM network alarm host and dual-network
alarm host>;
By phone call: make a call to enlisted phone number in host SIM card; about 30s later you will hear a Di,
now input the user code and digit 3, system will disarm successfully; <Phone call Arm option can be only
used for arm away mode of system. <Phone call arm option is ready for all network alarm hosts>
4. Emergency Help
Alarm system will send alarm info to enlisted phone number holders for emergency help.
By remote controller: Press button on the wireless remote controller, the alarm system will alarm right now.
By clicking the Emergency button on the screen of alarm host, the alarm system will alarm right now, and
make calls/send SMS to enlisted phone number holders.
5. What can you do when you get an alarm call?
You will hear the recorded voice immediately after receiving alarm call, the recorded voice will be played for 30
seconds repeatedly, and then you can make the following operations:
Input digit “8” to let alarm host enter into the 20s Monitoring Status automatically, you will hear if anybody
talks in the monitored space; At the same time when alarm host enters into Monitoring Status, the alarm
sound will stop; The alarm sound will start again when Monitoring Status is finished;
Input “#” to repeat the recorded voice; (this function is better in CMS appliance, because the monitoring staff
in CMS can get your recorded voice message repeatedly, like “Hi, xxx CMS, this is Tina in Building A, Floor
21th, Room 2112, please help me”. If the first time the CMS man does not get your position clearly, the
second or third time he can get your location info clearly);
Input “*” to cancel alarm call finally from the alarm host, the host won’t send any alarm call;
If you hang off the phone, the alarm host will stop to dial next group Phone Number;
7. What can you do if you get the alarm SMS?
In Phone Number setting, if you set, your phone number will get the SMS once alarm system is triggered, then
your phone number will get a SMS like “SSSS alarm system xx zone xxxx alarming”. In this phrase, SSSS stands
for user code, xx stands for the Zone Code, xxxx stands for the sensor name;
8. Remote operations
Make a call to SIM card in alarm host, after a Di enlist user code + # (xxxx+#), then after second Di, you can
Enlist digit “1” to enable “Arm Away”;
Enlist digit “2” to enable “Arm Home”;
Enlist digit “3” to enable “Disarm”;
Enlist digit “4” to start remote monitoring 20 seconds;
Enlist digit “6” to retrieve recorded message;
Enlist symbol “*” to hang off the phone;
NOTE: The alarm host will hang off your call automatically if no operation is made in 20 seconds;
9. Monitor door/window status function
This is a smart function of our alarm system, monitor door/window status function will be enabled if smart
door/window sensor is installed and corresponding setting is enabled.
NOTE AND EXAMPLE:
Firstly, a smart sensor (for example, we call it sensor α) should be learned into a zone (For example, we call
it zone β);
Go to Zone Attribute in System Menu, enlist Zone Code β, select sensor type、installation position、zone
type、select ON for zone function (this is to enable the smart zone function)、select alarm delay, then press
to confirm;
Go to Smart Zone in system menu, enlist Zone Code β, select ON for Activate, Close for Door Status, Yes for
Door Chime, press
to confirm;
Now the smart function is activated. If now you arm alarm system by remote controller or alarm host, but a
door/window is open, a winking “Half-open” icon will be displayed in Status Bar, at the same time alarm
host will give beep “DiDiDiDi”, and status indicator of door/window will light itself all the time;
Click the “Half-open” icon, in the new page, click Arm by Force to arm the system; Or disable this smart
function for this zone;
NOTE:
A. This smart zone function needs smart door/window sensor, like wireless smart sensor、wireless smart
control door/window sensor…
B. If you want to arm alarm system, which has smart zone, by SMS or phone call, it is an ordinary operation
like common arm operation, one time will work;
C. If you want to arm alarm system, which has smart zone, by wireless remote controller or wireless keypad,
you need operate twice to arm alarm system;
D. When this “Half-open” icon appears, close the two parts of door/window sensor will make this icon
disappear, indicator of door/window status will go out;
10. Wireless doorbell function
Press the doorbell button on the wireless doorbell sensor, the alarm host will give two “Dingdong”;
NOTE:
A. This is an optional function, Dingdong doorbell function will be realized with the help of wireless Doorbell
sensor;
B. This doorbell will work only if power supply of alarm host is connected;
11. Zone indicator
This function can be individually set for each zone. If this function is enabled for zone β, the alarm host will give
DiDiDiDiDi once this zone βis triggered in disarm status; Normally, system will give no notification if any zone is
triggered in disarm status;
NOTE: This function is valid for wireless sensors in 1ST Defense Line and 2nd Defense Line;
12. How to cancel low voltage icon and alarm icon in Status Bar?
Click and check icon info in the Status Bar will cancel the icons;
13. How to reset password?
One press on the RESET button and release, then long press on the RESET button for 5 seconds and release, alarm
host will give a long Di beep for 5 seconds, now the password has been reset;
NOTE: Default password is 4 digits, 8888;
E. Attention in operation
1. About Alarm call:
① In Phone Numbers setting, choose “By SMS” for one number means alarm host will send alarm info “by SMS”,
this choice is only valid for the GSM network alarm host and dual-network alarm host; Choose send alarm info
“By call” is valid for all network alarm hosts;
② If you choose to send alarm info by call, when alarm system is triggered, the host will make calls to the
enlisted phone numbers from the first group to the fifth Group Code, if the enlisted phone number is empty, this
number will be ignored; Every enlisted number will get the alarm call 3 times repeatedly unless you deal with this
alarm call rightly by pressing * to terminate it;
③ Alarm call in first priority: If the alarm call comes when you are answering a call, your call will hang up for
you to handle the alarm call;
*About Arm Delay notification:
① The host will beep Di every second in Arm Delay is triggered;
*About Alarm Delay notification
① The host will beep Di every second in Alarm Delay is triggered;
*Alarm info sending in first priority:
① If the alarm call comes when you are answering a call, your call will be cut. The alarm system will give you the
alarm call in first priority to let you deal this alarm status;
② If the alarm host is making a dingdong doorbell notification while the triggering info is received by the alarm
host, the host will give the alarm sound instead of the dingdong doorbell sound, and make the alarm call to the
property owner;
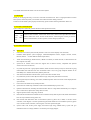
F. System beep notification
No.
Status
How is the beep
1
Arm Delay
One Di every second in Delay
2
Alarm Delay
One Di every second in Delay
3
Arm
One Di
4
Disarm
Two Di
5
Landline is off
6
AC is OFF / AC is ON
One Di
7
Sensor is in low voltage status
One Di
8
Sensor is triggered in disarm status
Two Di every 30 seconds <Cut Wire Alarm setting should be
enabled >
Continuous Five Di <In Alarm Time setting, Arm/Disarm
Beep should be ON>
Continuous Four Di<In Smart Zone setting, Activate of
9
Arm system when door/window opens
corresponding zone should be ON; In Zone Attribute setting,
Zone function of corresponding zone should be ON>
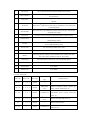
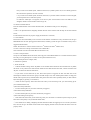
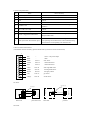
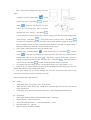
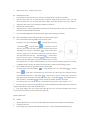
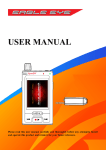
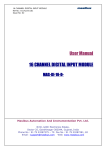
G. How to connect wired sensors
(2.2K balance resistor is necessary; please refer this info if you want to connect wired sensors)
1
Red
+
Black
sensor +12V power output
-
GND
White
Zone 31
door sensor
Yellow
Zone 32
curtain PIR sensor
Blue
Zone 33
curtain PIR sensor
Green
Zone 34
wide angle PIR sensor
Purple
Zone 35
wide angle PIR sensor
Brown
Zone 36
emergency button
Grey
Zone 37
gas sensor
Orange
Zone 38
smoke sensor
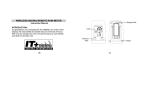
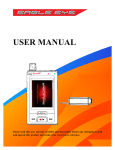
10
NC sensor
外加平衡电阻
GND
Alarm host
NO sensor
2.2K
VALARM
V1
A1
ZONE
powerless sensor
无
源
传
感
器
V1
GND
A1
*
2.2K
ZONE
alarm host
powered
XSJ-888主控板
V+
XSJ-8888主控板
有
源
传
感
器
ALARM
外加平衡电阻
外加平衡电阻
GND
A1
2.2K
ALARM
V1
V-
Alarm host
ZONE
powerless sensor
无
源
传
感
器
*
V1
GND
2.2K
alarm host
A1
ZONE
XSJ-8888主控板
V+
XSJ-8888主控板
有
源
传
感
器
ALARM
外加平衡电阻
powered
Ⅳ. ABOUT PERIPHERAL SENSORS
*This chapter includes two parts: introduction of wireless sensors, and how to learn/delete wireless sensors
into/from alarm system.
Wireless Remote Controller
Features
1.
To control the alarm host to arm home/arm away/disarm the alarm system.
2.
Press emergency button to send emergency alarm for urgent help
Specifications
1.
Power supply: disposable alkaline battery 12V27A
2.
Emitting distance: ≥100m (in open area)
3.
Service life of battery: ≤ 1 year
4.
Static current: N/A working current: 15mA
5.
Wireless frequency: 433MHz or 868MHz
Installation and Usage
1.
For taking along with yourself;
2.
Generally,
A.
press the “Away” key to arm the alarm system before
leaving detected space;
B.
press “Disarm” key to disarm the alarm system when
system is alarming;
C.
press “Home” key to disarm the alarm system partly to
make all sensors in 2nd Defense Line free when you stay in
detected space. When you press Home key, it means you will stay in detected space, and now only
sensors in 1ST Defense Line (like door sensor, curtain PIR sensor) and sensors in Emergency zone (like
Gas sensor, Smoke sensor, Glass sensor, Emergency button) are enabled.
3.
Please change the batteries in one year, if you notice the control distance is getting shorter and shorter.
How to learn\delete wireless remote controller into\from alarm system
1.
How to learn wireless remote controller into alarm system:
In standby screen, press Menu Button
Sensor
+ Enlist program code xxxx + ENT Button
+ Program
+ Click Zone Code and enlist YY <Zone Code is the code of target zone, where the wireless remote
controller will stay> + ENT Button
+ Click Group Code to enlist X <Group Code is the code of target group,
where the wireless remote controller will stay> + ENT Button
ENT Button
+ Click Activate Sensor in item You want to +
to confirm. Now press any button on the wireless remote controller 2~3 times, if it displays
Success on screen, it means the learning operation is successful; if it displays Failed, it means your operation isn’t
successful, you need repeat the learning progress;
2.
How to delete wireless remote controller from alarm system:
In standby screen, press Menu Button
Sensor
+ Enlist program code xxxx + ENT Button
+ Program
+ Click Zone Code and enlist YY <Zone Code is the code of target zone, where the wireless remote
controller stays>+ ENT Button
+ Click Group to enlist X <Group Code is the code of target group, where the
wireless remote controller stays> + ENT Button
+ Click Delete Sensor in item You want to + ENT Button
to confirm. Usually the deletion operation is successful;
3.
YY stands for Zone Code, 2 digits, including 00 and 01; X stands for Group Code, 1 digit, includes 0, 1, 2, 3;
4.
Each time only 1pc wireless remote controller can be learned\deleted into\from alarm system, an alarm
system supports maximum 8pcs wireless remote controllers;
5.
Each group supports only 1pc wireless sensor, the first learned wireless sensor will be covered if the second
wireless sensor is learned into same group.
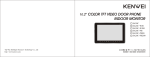
Wireless Intelligent Door Sensor
Features
1.
Generally used in 1ST Defense Line to monitor the door/window status;
2.
This is a smart door/window sensor; it will monitor the door/window status while you are arming the system.
The system will send notification on its screen if any door/window sensor opens, now you can arm the
system by force.
Specifications
1.
Power supply: rechargeable lithium battery 3.7v200mAH
2.
Wireless frequency: 433MHz or 868MHz
3.
Emitting distance: ≥100m (in open area)
4.
Service life of lithium battery: ≤3 year (rechargeable)
5.
Alarm distance: <4cm
6.
Static current: 15μA
Installation and Usage
1.
The suggested installation position is on the top of
working current: 15mA
the door frame;
2.
Fix the small magnetic part onto the moving part of the door;
3.
Then fix the emitting part onto door frame, distance to ground should be higher than 1.6m to prevent from
children touch;
4.
The space between the two parts shall be less than 10mm;
5.
If the LED indicator flashes frequently in red, please recharge the built-in lithium battery;
How to learn\delete wireless intelligent door sensor into\from alarm system
1.
How to learn wireless intelligent door sensor into alarm
system:
In standby screen, press Menu Button
+ Enlist
program code xxxx + ENT Button
Sensor
+ Program
+ Click Zone Code and enlist YY <Zone
Code is the code of target zone, where the wireless
intelligent door sensor will stay> + ENT Button
+ Click Group Code to enlist X <Group Code is the code of target group, where the wireless intelligent door
sensor will stay> + ENT Button
+ Click Activate Sensor in item You want to + ENT Button
to confirm. Now separate the main part and magnetic part, put them together and repeat this progress 2~3
times, if it displays Success on screen, it means the learning operation is successful; if it displays Failed, it
means your operation isn’t successful, you need repeat the learning progress;
2.
How to delete wireless intelligent door sensor from alarm system:
In standby screen, press Menu Button
Sensor
+ Enlist program code xxxx + ENT Button
+ Program
+ Click Zone Code and enlist YY <Zone Code is the code of target zone, where the wireless
intelligent door sensor stays>+ ENT Button
+ Click Group to enlist X <Group Code is the code of
target group, where the wireless intelligent door sensor stays> + ENT Button
item You want to + ENT Button
+ Click Delete Sensor in
to confirm. Usually the deletion operation is successful;
3.
YY stands for Zone Code, 2 digits, from 11 to 20; X stands for Group Code, 1 digit, includes 0, 1, 2, 3;
4.
Each time only 1pc wireless intelligent door sensor can be learned\deleted into\from alarm system, each zone
supports maximum 4pcs wireless intelligent door sensors;
5.
Each group supports only 1pc wireless intelligent door sensor, the first learned wireless sensor will be
covered if the second wireless sensor is learned into same group.
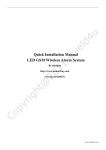
Wireless Intelligent Wide Angle PIR Sensor
Features
1.
Mainly detect indoor space, generally set in 2nd Defense Line;
2.
When body enters into the detected area, the PIR sensor will send a signal to the alarm host, then the host
will give alarm sound;
3.
Power supply type is optional, with disposable battery type, or with rechargeable lithium battery type;
Specifications
1.
Power supply: disposable battery/rechargeable lithium battery 3.7v800mAH
2.
Emitting distance: ≥100m (in open area)
3.
Service life of disposable battery ≤1 year, of lithium battery ≤3 years
4.
Detecting distance: 110°, 10m*10m
5.
Wireless frequency: 433MHz or 868MHz
6.
Static current: 50uA working current: 15mA
Installation and Usage
1.
Fix the bracket onto the wall surface or wall corner at a height of 2m~2.4m above the ground;
2.
Open the sensor back cover to check the battery connection, adjust jumper line (short circuit “5S”: The
sensor will detect once every 5 seconds; short circuit “5MIN”: The sensor will detect once every 5 minutes);
3.
Suggestion: short circuit “5S” for testing and “5MIN” for normal use;
4.
Fix the sensor onto the bracket;
5.
Adjust the sensor to a proper angle and then slide the power switch on the side to “ON”, and it will enter into
the normal working state after 30 seconds;
6.
Upon the working light flashes frequently in green, please replace/recharge the batteries.
How to learn\delete wireless wide angle PIR sensor into\from alarm system
1.
How to learn wireless wide angle PIR sensor into alarm system:
In standby screen, press Menu Button
+ ENT Button
+ Enlist program code xxxx
+ Program Sensor
+ Click Zone Code and
enlist YY <Zone Code is the code of target zone, where the wireless wide
angle PIR sensor will stay> + ENT Button
+ Click Group Code to
enlist X <Group Code is the code of target group, where the wireless
wide angle PIR sensor will stay> + ENT Button
Sensor in item You want to + ENT Button
+ Click Activate
to confirm. Now trigger
wireless wide angle PIR sensor by waving your hands in front of Fresnel
lens of PIR sensors 2~3 times, if it displays Success on screen, it means the learning operation is successful;
if it displays Failed, it means your operation isn’t successful, you need repeat the learning progress;
2.
How to delete wireless wide angle PIR sensor from alarm system:
In standby screen, press Menu Button
Sensor
+ Enlist program code xxxx + ENT Button
+ Program
+ Click Zone Code and enlist YY <Zone Code is the code of target zone, where the wireless
wide angle PIR sensor stays>+ ENT Button
+ Click Group to enlist X <Group Code is the code of
target group, where the wireless wide angle PIR sensor stays> + ENT Button
item You want to + ENT Button
+ Click Delete Sensor in
to confirm. Usually the deletion operation is successful;
3.
YY stands for Zone Code, 2 digits, from 21 to 29; X stands for Group Code, 1 digit, includes 0, 1, 2, 3;
4.
Each time only 1pc wireless wide angle PIR sensor can be learned\deleted into\from alarm system, each zone
supports maximum 4pcs wireless wide angle PIR sensors;
5.
Each group supports only 1pc wireless wide angle PIR sensor, the first learned wireless sensor will be
covered if the second wireless sensor is learned into same group.
Wireless Indoor Siren
Features
1.
Works with alarm host, receives wireless alarm signals from alarm host; spot alarm with sound and flash;
2.
Usually for indoor use.
3.
Power supply type is optional, with disposable battery type, or with rechargeable lithium battery type;
4.
Maximum alarm time 3 minutes;
Specifications
1.
Power supply: 100VAC~240VAC+rechargeable lithium battery 3.7v800mAH or 100VAC~240VAC;
2.
Receiving distance: ≥100 M(In open area);
3.
Service life of lithium battery ≤3 years;
4.
Static current: <15mA
5.
Wireless frequency: 433MHz or 868MHz;
6.
Charging time: ≤12H;
7.
Product size: 105mm*65mm*35mm;
Installation and Usage
1.
Plug the wireless indoor siren into suitable power socket;
2.
Suggested installation height is about 1.8M from the ground;
How to learn\delete wireless indoor siren into\from alarm system
1.
How to learn wireless indoor siren into alarm system:
working current: <200mA;
A. Connect the indoor siren to the power source, you will find the LED light on the siren will flash 4
times;
B. Press the learning button on side of the siren, now the LED light of the siren will be ON, it means I am
waiting;
C. Press Emergency Alarm Button on the host screen more times to trigger the alarm host and make host
send signal.
D. If LED light on indoor siren flashes 5 times, then goes off, it means learning operation is successful;
Otherwise, you need repeat the progress;
2.
3.
How to delete wireless indoor siren from alarm system:
A.
Connect the indoor siren with the power source, one press the learning button on side of siren;
B.
Keep pressing the “Learning button” for 5 seconds and release;
C.
If LED light on siren flashes 1 time and then goes off, it means the deletion is successful;
Each time only 1pc wireless indoor siren can be learned into alarm system. One siren can be learned into max
10 wireless alarm hosts, but one wireless alarm host can hold as many as wireless indoor sirens;
4.
If you want to confirm whether this siren has been learned into alarm system, just press the Emergency
Button on the panel. If now the indoor siren alarms, it means they are paired; if not, it means learning operation
was failed;
How to add or delete other wireless sensors
NOTE:
1. All operation should be started in standby screen
2. Here is an operation sequence of adding sensor: Setting stage: make corresponding setting in alarm host→
Trigger-learning stage: trigger sensor to send wireless signal to alarm host→Confirmation stage: alarm host
receives signal, learning operation is successful;
Sensor Type
How to add sensor
1. Operation is same to learning
Wireless wide angle
operation of wireless intelligent wide
PIR sensor
angle PIR sensor;
2. Zone code is optional from 21~29
1. Operation is same to learning
wireless door sensor
operation of wireless intelligent door
sensor;
2. Zone code is optional from 11~20
Wireless intelligent
control door sensor
How to delete sensor
1. Operation is same to deleting operation of
wireless intelligent wide angle PIR sensor;
2. Zone code is optional from 21~29
1. Operation is same to deleting operation of
wireless intelligent door sensor;
2. Zone code is optional from 11~20
1. Operation is same to deleting
1. Operation is same to deleting operation of
operation of wireless door sensor;
wireless door sensor;
2. Zone code is optional from 11~20
2. Zone code is optional from 11~20
1. Operation is same to learning
operation of wireless wide angle PIR
sensor;
Wireless
gas
detector
2. In trigger-learning stage, trigger gas
sensor by releasing gas close to it, to
make gas sensor send wireless signal to
1. Operation is same to deleting operation of
wireless wide angle PIR sensor;
2. Zone code is optional from 02~10
alarm system;
3. Zone code is optional from 02~10
1. Operation is same to learning
operation of wireless wide angle PIR
sensor;
Wireless
smoke
detector
2. In trigger-learning stage, trigger
1. Operation is same to deleting operation of
smoke sensor by pressing button on side
wireless wide angle PIR sensor;
of sensor more times, to make gas
2. Zone code is optional from 02~10
sensor send wireless signal to alarm
system;
2. Zone code is optional from 02~10
wireless
outdoor
siren
Operation is the same to learning
Operation is the same to deleting operation
operation of wireless indoor siren;
of wireless indoor siren;
1. Same to the learning operation of
Wireless
button
panic
wireless wide angle PIR sensor;
2. In trigger-learning stage, trigger
wireless panic button by pressing button
on sensor more times
Operation is the same to deleting operation
of wireless indoor siren;
3. Zone code is optional from 02~10
1. Prepare wireless keypad into learning
status;
Wireless keypad
2. Trigger wireless keypad more times
Refer to user manual of wireless keypad
by press Siren button on screen;
V. PROBLEMS AND SOLUTIONS
Symptom of problems
The alarm host can’t fully
record
Possible cause
Solution
Did not keep pressing the
Keep pressing the record button all the time
record button all the time while
while recording is going, and finish recording
recording
in 10 seconds
Follow the operation instruction after call is
picked up and recorded message is over:
1. Input digit “8” to enter into 20s monitoring
status;
Repeatedly receive alarm
Fail to follow the operation
call
instruction about alarm call
2. Input symbol “#” to repeat the recorded
message;
3. Input symbol “*” to stop alarm phone call
finally from the host, the host won’t call your
phone number anymore;
4. Hang off the alarm call, the host will dial
next group No.
Can’t
receive
alarm
SMS or can’t receive
SMS reply after made arm
or disarm operation by
SMS
1. SIM card is not inserted
properly;
2. GSM signal is not good
enough;
3. The SIM card is full with
SMS;
1. Adjust SIM card installation properly
2. Adjust alarm host’s installation position, or
use optional extension antenna to reach better
signal till the signal status is “OK”;
3. Delete the SMS in the SIM card manually if
the SIM card is used for the first time; In future
use, the SMS deletion will be automatically;
1. In “Arm Away” mode: system will alarm
when any sensor is triggered;
The host does not alarm
1. Caused by arm mode (Armed
after
Away and Armed Home);
the
detector
is
triggered in arm state
2. In “Arm Home” mode: system will alarm
when any sensor in 1st Defense Zone is
triggered, system won’t alarm if any sensor in
2. System is in delay status
2nd Defense Zone is triggered;
3. Program to adjust the time for Entry Delay
or Exit Delay
The PIR sensor doesn’t
work
1. The disposable battery or
1. Open the back cover, check the installation
lithium battery is disconnected;
position of battery, adjust its connection;
2. The battery died;
2. Replace the exhausted battery with a new
3.
The
PIR
sensor
self-check progress;
is
in
one;
3. Wait for 30s when the self-check progress is
4. The PIR sensor was not
finished;
learned into the alarm system;
4. Relearn the PIR sensor into the alarm host;
5. The power supply switch of
5. Switch the button to ON position;
lithium battery type PIR sensor
Meaning of jumper position:
stays at “OFF” position;
“5S”: detect once every 5 seconds;
“5MIN”: detect once every 5 minutes;
1. Test PIR sensor in a normal temperature
The detecting distance of
PIR sensor gets shorter
The ambient temperature in the
circumstance;
detecting area is too high, it will
2. If the PIR sensor is in higher or unstable
affect the detection distance;
temperature condition, the detection distance
gets shorter can’t be avoided;
The host does not alarm
after
newly
wireless
added
sensor
is
The sensor was not learned into
the alarm host successfully
Relearn the wireless sensor into the alarm host
triggered
The LED light of PIR
sensor flashes frequently
Battery is dying
in green
The
door
sensor’s
indicator
flashes
Battery is dying
frequently.
The
distance
remote
of
the
controller
gets
shorter
Battery is dying
Replace the battery with a new one, please pay
attention to the battery type
Replace the battery with a new one, please pay
attention to the battery type
Replace the battery with a new one, please pay
attention to the battery type
VI. DAILY MAINTENANCE
To make the alarm system work for a long time stably and to prolong his service life, it is recommended that
Try to put the alarm host in the dry and well-ventilated places, suggested in a higher position to avoid the
children touch.
Do not put the host and wireless sensors in too cold、too hot or dusty places, to prevent from curtailing the
service life of electric elements, and prevent the plastic shell from distorting and accelerating to be aged.
Do not put the host in too exposed places to prevent from being found by intruders, we suggest you to buy a
wireless operation keypad to remote control the alarm host. Wireless operation keypad is recommended to
installed at the door, install the alarm host in a hidden place, like bedroom, avoid being found and destroyed;
Regular testing is necessary for finding and resolving problems in advance.
Regularly check the battery status of alarm host and all wireless sensors is necessary. Replace the batteries,
which are to be run out, to ensure they are working normally.