1
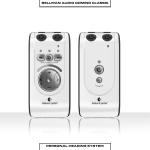
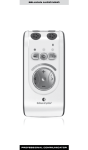
14
Bellman® Audio Maxi Digital Communication Aid, BE2020
Thank you for choosing products from Bellman & Symfon.
Bellman Audio is an assistive listening system. The system consists of a number of units which
facilitate listening under different circumstances. Bellman Audio products make everyday life
easier for many people and give them the freedom to freely pursue their interests.
Read through the entire user manual first before starting to use the product.
Refer to the diagram showing the accessories and connection options on the inside of the cover.
Getting started
Unpacking, installing and testing the unit
1.
Open the battery cover (17) by pressing the battery cover lock (16) in the direction of the arrow. Fit the batteries and make sure they have been inserted the right way round. Follow the
markings in the battery compartment (14). Only use AA alkaline type batteries. Do not use
force to press down the batteries. Close the battery cover (17) and check that the lock (16)
locks with a click.
2.
Connect BE9122 Bellman Headphones, BE9128 Bellman Neck Loop, BE9125 Bellman
Stetoclip, BE9124 Bellman Ear Phones or another product recommended by Bellman &
Symfon to the green headphone output (12) on the right-hand side.
3.
Give one short press on the On/Off button h (5) to start Maxi. The LEDs (3 and 4) above the
Microphone selection button a (6) and the Telecoil selection button d (7) will blink while
Maxi starts.
Maxi always starts with the internal microphone (2) selected as a sound source. In addition, the
volume control is always set to low volume to avoid unpleasant sound levels.
Use the volume control bc (9) to control the sound level. c increases and b reduces the volume.
The Volume and Tone LED Indicator (8) shows the sound level. The more LEDs that are lit the
higher the volume. The LED indicator goes out 3 seconds after the sound volume has been set.
Use the tone control fg (10) to adjust the sound quality. g increases and f reduces the treble.
The Volume and Tone LED Indicator (8) shows the tone setting. The LED indicator goes out 3
seconds after the sound quality has been set.
When you have finished, you can switch off Maxi by giving a short press on the On/Off button h (5).
Please note: The BE2020 Bellman® Audio Maxi digital communication aid is not a hearing
instrument. Bellman & Symfon AB recommend that anyone who is experiencing hearing loss
should consult a doctor.
Warning! The BE2020 Bellman® Audio Maxi digital communication aid has a very powerful
amplifier and the sound level can cause discomfort or, in serious cases, endanger hearing if the
product is used carelessly. Always turn the volume down to a low level before putting on the headphones!
Warning! If the BE2020 Bellman® Audio Maxi digital communication aid is used together with
a neck loop, e.g. BE9128 (accessory), the inductive loop (T position) should not be selected as a
15
•
The user can manually choose between the internal microphone (M position) or built-in
telecoil (T position) by pressing the buttons a (6) and d (7) on the front. When switching
between these, the volume control will be set to a low level to avoid unpleasant sound levels.
•
If something is connected to the external sound source input, Maxi automatically selects
this. When you remove it, Maxi is automatically connected to the internal microphone (M
position).
External sound source
If the user connects an audio cable (accessory BE9126) between the red 2.5 mm tele jack and
a sound source (SCART connector, hi-fi equipment, MP3 player etc.), this sound source is
selected instead. The input sensitivity is automatically adjusted to adjust the signal strength to
these sound sources. The internal microphone (2) is switched off in this position.
Combined signal sources
When you have connected a sound source to the External sound source input (1), this sound
source can be combined with the sound that the internal microphone (2) receives. This is done
by holding down the a button (6).
The sound from the sound source connected to the External sound source input (1) is reduced
and the internal microphone is connected so that you can, for example, perceive sound or converse with somebody else. The Microphone LED (3) blinks while the button is held down.
DE
DK
EN
ES
FI
FR
GR
HU
Selecting the signal source
It is easy to select the sound source.
IT
The T position can be used in premises where an inductive loop (or hearing loop) has
been fitted. Look for the inductive loop symbol or ask staff whether there is an
inductive loop if you are unsure.
NL
Telecoil
The built-in telecoil is angled at 45 degrees in order to catch inductive signals from an inductive
loop in both the horizontal position (in the hand or on a table) and vertical position (on a clip or
neck strap).
NO
The microphone is an omnidirectional one.
PL
Built-in microphone
The built-in microphone (2) is located under the rubber cap on the top of the front panel.
PT
The BE2020 Bellman® Audio Maxi Digital Communication Aid is a digital amplifier which has
been specifically developed to provide an exceptional sound experience even in demanding situations. Maxi works extremely well for speech and music with the built-in microphone, with an
external microphone (accessory) or with other external sound sources.
SE
Function
APP
Warning! The Bellman® Audio Maxi digital communication aid uses AA alkaline type batteries.
Do not expose batteries to fire or direct sunlight.
CZ
signal source, because this can cause powerful inductive feedback. Feedback together with a high
sound level can cause discomfort or, in serious cases, endanger your hearing.
16
When you want to return to listening to the signal source connected to the External sound
source input (1), release the a button (6). The internal microphone is then disconnected and the
external sound source returns to normal volume again.
Clip
Place the clip against the battery cover and press firmly so that it locks on.
Remove the clip by using
the small round handles and
pressing out from the sides.
Indicators and settings
Volume and Tone LED Indicator
The Volume and Tone LED Indicator (8) is used as an indicator for the volume and tone controls.
The Volume and Tone LED Indicator goes out after about 3 seconds to save power.
Low battery LED
The Low battery LED (11) is normally off, but comes on when the battery level falls below
about 10 hours’ remaining operating time. This time depends, of course, on the sound volume
and type of listening accessories used.
When the Low battery LED (11) blinks every seven seconds, the batteries should be replaced
with new ones. Only use AA alkaline type batteries.
Volume control
Maxi has a digital volume control bc (9), which means that you can increase or reduce the
volume with the pushbuttons bc (9). Each press results in an increase or reduction in volume
by one increment.
If you hold one of the volume buttons down for more than 1 second, the volume will increase or
reduce by one increment per second as long as the button is held down or until the minimum or
maximum position is reached.
By pressing the c button (9), the volume is increased by one increment at a time until the maximum volume is reached. At full volume all the LEDs of the Volume and Tone LED Indicator (8)
are illuminated.
By pressing the b button (9), the volume is reduced by one increment at a time until the minimum volume is reached, although Maxi never becomes totally silent. At minimum volume only
the left LED of the Volume and Tone LED Indicator (8) is illuminated.
17
Symptom
Solution
Nothing happens when you try to start Maxi
using the On/Off button.
• Change the batteries. Only use AA alkaline type batteries.
No sound can be heard in the headphones
when Maxi is switched on.
• Check that the correct signal source has
been selected, e.g. internal microphone
(M position).
10.
11.
12.
13.
14.
15.
16.
17.
18.
Tone control fg
Low battery LED
Headphone output 3.5 mm tele jack
Neck strap attachment
Battery compartment
Setting button
Battery cover lock
Battery cover
Clip
DE
DK
EN
ES
SE
2.
3.
4.
5.
6.
7.
8.
9.
External sound source input 2.5 mm tele
jack
Internal microphone
Microphone LED
Telecoil LED
On/Off button h
Microphone Selection Button a
Telecoil Selection Button d
Volume and Tone LED Indicator
Volume control bc
APP
1.
PT
PL
NO
NL
For further information about the product in English, refer to the Appendix.
FI
Troubleshooting in brief
FR
When the centre LED of the Volume and Tone LED Indicator (8) is illuminated, treble is deactivated.
GR
By pressing the f button (10), the treble is reduced by one increment at a time until minimum
treble is reached. At minimum treble, the LED at the far left of the Volume and Tone LED
Indicator (8) is illuminated.
HU
By pressing the g button (10), the treble is increased by one increment at a time until maximum treble is reached. At maximum treble, the LED at the far right of the Volume and Tone
LED Indicator (8) is illuminated.
IT
If you hold one of the tone buttons down for more than 1 second, the treble will increase or
reduce by one increment per second as long as the button is held down or until the minimum or
maximum position is reached.
CZ
Tone control
BE2020 has a digital tone control fg (10), which means that you can increase or reduce the
treble with the pushbuttons fg (10). Each press results in an increase or reduction in treble by
one increment.