1
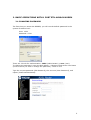
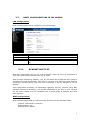
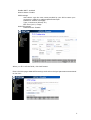
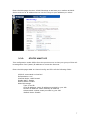
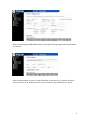
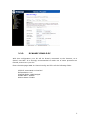
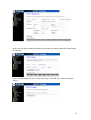
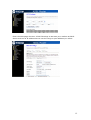
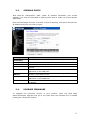
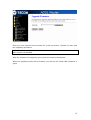
BASIC CONFIGURATION GUIDE
FOR 1 PORT ETH- ADSL2+
OBSERVA TELECOM - AR1061
Version 1.2, 2008-07-31
INDEX
1. INTRODUCTION ...............................................................3
2. BASIC OPERATIONS WITH 1 PORT ETH-AR1061 MODEM
2.1. CHANGING PASSWORD ........................................... 4
2.2. BASIC CONFIGURATIONS IN THE MODEM
2.2.1 DYNAMIC MULTI-PC......................................... 5
2.2.2 STATIC MULTI-PC ............................................ 7
2.2.3 DYNAMIC SINGLE-PC ....................................... 9
2.2.4 STATIC SINGLE-PC......................................... 11
2.3.
OPENING PORTS ................................................ 13
2.4.
UPGRADE FIRMWARE ......................................... 13
2
1. INTRODUCTION
This document offers an orientation to configure the Router 1 Port Ethernet
ADSL/ADSL2+ Observa Telecom-AR1061, through the Web page.
To configure the ADSL service provided by your ISP, we strongly recommend you
to follow the indications is the User’s Manual included in this kit. This guide is a
complement to the User’s Manual, explaining how to perform the different tasks
using the Web Configuration Tool, instead of using the Wizard Configuration Tool
included in the kit for Windows O.S. (ONLY FOR ADVANCED USERS).
It is recommended to use the Wizard for Configuration.
WARNING: Before using the tools that the manufacturer provides you regarding
this product, and regarding which Telefonica informs you with merely orientative
purpose, we remind you that Telefonica Spain won’t offer any technical support
upon them.
3
2. BASIC OPERATIONS WITH 1 PORT ETH-AR1061 MODEM
2.1. CHANGING PASSWORD
The first time you access the MODEM, you will use the default password in the
system for admin level:
User: 1234
Password: 1234
There are 2 levels for authentication: 1234 (administrator) y user (user).
To change the password, enter the Web Admin-->Password and select User Name
(level to which you wish to change the password): 1234 or user
Type the current password (Old Password), the new one (New Password), and
repeat (Confirmed Password):
4
2.2.
BASIC CONFIGURATIONS IN THE MODEM:
LAN Configuration:
Enter the Web page LAN to configure your LAN settings:
Field
IP Address
Subnet Mask
Secondary IP
DHCP pool
2.2.1.
Description
The IP address your LAN hosts use to identify the device’s LAN port.
LAN subnet mask.
The secondary IP address assignment for the device’s LAN port.
Click where you want to apply the DHCP pool: on Primary or Secondary
LAN
DYNAMIC MULTI-PC
Multi-PC configuration will let you create network made of a set of Computers in
your LAN, with internet access from any of them.
With dynamic addressing (PPPoE), your PC will obtain the IP address that needs to
access the Internet dynamically, each time it connects, and during the time that the
connection remains active. The next time it connects, it will be assigned a new IP
address.
This configuration provides you advantage regarding security, because using NAT
(Network Address Translation), the private addresses of the PCs in your network
are not seen outside, but are translated into a single public IP address and valid
from Internet.
WAN Configuration:
Enter the Web page WAN Channel Config and fill in all the following fields:
VPI/VCI: associated to that PVC
Encapsulation: LLC
Channel Mode: PPPoE
5
Enable NAPT: enabled
Admin Status: Enable
PPP Settings:
User Name: type the user name provided by your ISP to name your
connection. Default is adslppp@telefonicanetpa
Password: default is adslppp
Type: Continuous (Always on)
Idle Time (min): empty
WAN IP Settings:
Default Route: Enable
When you fill in all the fields, click Add button.
Enter the Web page WANATM Settings and select the QoS parameters associated
to the PVC:
6
Enter the Web page Services DHCP Settings to activate your modem as DHCP
Server and act as IP address Server into the range or pool address you select:
2.2.2.
STATIC MULTI-PC
This configuration mode differs from the previous one in that your group of PCs will
be assigned a fixed (static) IP address to access the Internet.
Enter the Web page WAN Channel Config and fill in all the following fields:
VPI/VCI: associated to that PVC
Encapsulation: LLC
Channel Mode: 1483 Routed
Enable NAPT: Enable
Admin Status: Enable
WAN IP Settings:
Type: Fixed IP
Local IP Address: static IP address provided by your ISP
Remote IP Address: static Gateway IP address
Subset Mask: subnet mask provided by your ISP
Default Route: Enable
7
Enter the Web page WANATM Settings and select the QoS parameters associated
to that PVC:
Enter the Web page Services DHCP Settings to activate your modem as DHCP
Server and act as IP address Server into the range or pool address you select:
8
2.2.3.
DYNAMIC SINGLE-PC
With this configuration your PC will be directly connected to the Internet, as it
doesn’t use NAT. It is strongly recommended to make use of some protection as
firewall, antivirus in your PC.
Enter the Web page WAN Channel Config and fill in all the following fields:
VPI/VCI: associated to that PVC
Encapsulation: LLC
Channel Mode: 1483 Bridged
Enable NAPT: Disable
Admin Status: Enable
9
Enter the web page WANATM Settings and select the QoS parameters associated
to that PVC:
Enter the Web page Services DHCP Settings to disable your modem as DHCP
Server.
10
2.2.4.
STATIC SINGLE-PC
Enter the Web page WAN Channel Config and fill in all the following fields:
VPI/VCI: associated to that PVC
Encapsulation: LLC
Channel Mode: 1483 Routed
Enable NAPT: Disable
Admin Status: Enable
WAN IP Settings:
Type: Fixed IP
Local IP Address: static IP address provided by your ISP
Remote IP Address: Gateway static IP address
Subset Mask: subnet mask provided by your ISP
Default Route: Enable
Enter the web page WANATM Settings and select the QoS parameters associated
to that PVC:
11
Enter the Web page Services DHCP Settings to activate your modem as DHCP
Server and act as IP address Server into the range or pool address you select:
12
2.3.
OPENING PORTS
With Multi-PC configuration (NAT, public IP address translation into private
address), you may be interested in opening some port to make use of any specific
application.
Enter the Web page Services Firewall Port Forwarding, and select the Protocol,
IP address and ports you wish to open:
Field
Enable Port
Forwarding
Protocol
Enable
Local IP Address
Port
Remote IP
Address
External Port
Interface
2.4.
Description
Check this item to enable the port-forwarding feature.
There are 3 options available: TCP, UDP and Both.
Check this item to enable this entry.
IP address of your local server that will be accessed by
Internet.
The destination port number that is made open for this
application on the LAN-side.
The source IP address from which the incoming traffic is
allowed. Leave blank for all.
The destination port number that is made open for this
application on the WAN-side
Select the WAN interface on which the port-forwarding rule is to
be applied.
UPGRADE FIRMWARE
To upgrade the Firmware version in your modem, enter the Web page
AdminFirmware Upgrade and go to the path were the firmware file is located
pushing the “Examinar” button:
13
Once you have selected the firmware file, press the button “Upload” to start with
the upgrading procedure.
IMPORTANT: DO NOT POWER OFF THE DEVICE DURING THE UPLOAD BECAUSE IT
MAY CRASH THE SYSTEM
After the firmware file upgrade, the modem will restart automatically.
When the upgrade process will be finished, you will see the frontal LED indicators in
green.
14