1
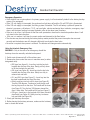
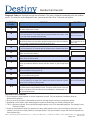
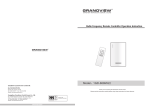
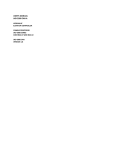
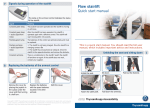
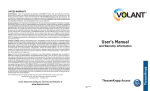
Residential Elevator
User’s Manual
and Warranty Information
ThyssenKrupp Access
Residential Elevator
Welcome to your Destiny
ThyssenKrupp Access would like to thank you for choosing the Destiny Residential Elevator. You have purchased
one of the finest residential elevator packages available on the market today.
What you should know about your Destiny.
Your Destiny was acquired through a factory trained and authorized dealer. The normal operation and function of
your elevator’s features will be described and demonstrated to you. We recommend that you obtain a scheduled
maintenance agreement from your dealer in order to increase the longevity and reliability of your investment.
Scheduled maintenance should be performed every 6 months. Any warranty claim may be denied due to
improperly maintained equipment.
OPERATING COMPENENTS:
Elevator Controller: The PLC (programmable logic controller) is located in the machine room. A “self diagnostic
system” is provided which utilizes diagnostic codes displayed in hall and car acknowledgement lights to supply
information in the event the elevator will not operate.
Drive System: Your elevator is equipped with one of two drive systems. It is either a 1:2 roped hydraulic or a
winding drum inverter controlled drive.
Car Control Buttons: These buttons are located inside the car on the car operating panel (C.O.P.). Press and
release a floor number in order to move the elevator to the desired floor. The button will stay lit until it reaches
the floor.
Hall Call Buttons: These buttons are located on the outside of each hoistway door. Press and release the “call”
button to call the elevator to that floor. The button stays lit until the elevator reaches the floor, then the “car
here” light will illuminate.
Safety Switches: Car gate switch and hoistway interlocks are provided to monitor the car gate and hoistway
doors to ensure they are closed before the car moves in the hoistway.
Emergency Stop Switch: The switch is located on the C.O.P. in case of an emergency, where the elevator
needs to be stopped, the switch should be pulled. By pushing the switch in, the elevator will resume movement.
Emergency Alarm Button: This button is located on the C.O.P. and sounds an alarm when pushed.
Telephone Jack: A telephone jack is provided inside the elevator. Installing a telephone in the car is required by
code for emergency purposes.
©2011 ThyssenKrupp Access Manufacturing, LLC • 4001 East 138th Street • Grandview, MO 64030 • Phone: 800-925-3100 • Fax: 816-763-4467
Page 2 of 6 REV A 05.10.11
Residential Elevator
Helpful Hints
If the elevator will not work,
see the Diagnostic Codes
table on page 5.
Winding drum without
battery backup
If power failure occurs:
1. Emergency car light
automatically turns on.
2. Elevator will not move.
Hydraulic and winding
drum with battery backup
If power failure occurs
while elevator is in use:
1. Elevator will stop.
2. Emergency car light automatically turns on.
3. After a pause, the
elevator will descend to the next lower landing.
4. Elevator will respond to calls from the car or hallway to any lower level.
5. Doors will unlock, but will not open automatically.
If power failure occurs
while elevator is at rest:
1. Emergency car light
automatically turns on.
2. Elevator will respond to calls from the car or
hallway to any lower level.
3. Doors will unlock, but will not open automatically.
Standard Operation:
• Press the “call” button. The car will come to the landing and/or the door will unlock. The “car here” light will
illuminate (if so equipped).
• Upon entering the car, close the outer door securely.
Close the car gate(s) securely. Press the desired floor(s) on the C.O.P.
• After exiting the car, secure the gate and door. The car will be ready to receive a call from another floor.
• The car may be sent to another floor(s) by pressing the corresponding floor number on the C.O.P. before exiting.
• Elevators equipped with automatic door operators may be opened manually in the event of a power failure.
• The car may self adjust up or down when at a floor to automatically stay aligned with the floor.
• If the car’s upward travel is interrupted by opening a gate or activating the emergency stop, the car will descend to the floor below when the gate is closed or the emergency stop is deactivated. The elevator will then return to normal operation.
Manual Lowering:
• The manual lowering of an unoccupied elevator should only be conducted by trained personnel in the course of routine maintenance and repairs.
• If a malfunction occurs, which prohibits a car’s
occupant from manually releasing the door lock and exiting the car safely, a trained emergency personnel or professional must be contacted immediately.
Hall Call
Car Operating
Panel
• The electrical service disconnect(s) located in the elevator equipment room/
area must be switched to the “off” position before manually lowering the car. The “off” position may be verified by closely observing the disconnects labeling. The disconnects are lockable in the “off” position.
• Opening the circuit breaker supplying the disconnect will not deactivate all of the elevator’s circuits.
©2011 ThyssenKrupp Access Manufacturing, LLC • 4001 East 138th Street • Grandview, MO 64030 • Phone: 800-925-3100 • Fax: 816-763-4467
REV A 05.10.11
Page 3 of 6
Residential Elevator
Emergency Operation:
• If the elevator has an interruption in its primary power supply, it will automatically default to the battery backup system (if so equipped).
• If the 115 volt supply is interrupted, the overhead car light turns off and the 24 volt COP light is illuminated.
• If the 230 volt supply is interrupted, the lifting system is disabled. The 24 volt battery system will power the elevator’s processor, call buttons, C.O.P., car here lights, electro-mechanical door interlocks, emergency stop/
alarm, and the down leveling low speed hydraulic valve or the down travel functions.
• If the car is at a floor, it will remain at the floor until operated as described in standard operation above. It will only travel in the down direction.
• If the car is in motion, it will stop its current motion and descend to the floor below.
• The elevator may be used during the battery backup mode provided the power interruption has occurred
recently and the batteries are still charged sufficiently to activate the door locks.
• No action is required when power is restored. The elevator will change modes automatically.
Using the Interlock Emergency Key:
WARNING – Only in the case of an emergency should the
hoistway doors be manually unlocked and opened.
1. Switch main disconnect off in lift machine room.
2. Remove key from control box cover in machine room (or other
designated area).
• DMI type (see figure A) - Insert key into the key hole
located near the top of the door. Gently pull key down
to lift the interlock pin and hold.
• GAL type (see Figure B) - Insert key into the key hole
located near the top of the door. Gently turn key to
release lock and hold.
• EL1 and ML1 type (see Figure C) - Insert key into the
key hole located near the top of the door.
• Gently push key into lock until it stops (see Figure D).
Turn key 180 degrees. Continue to push the key until
the key stop rests on the door. The handle will be down
(see Figure E). Turn the key 180 degrees toward the
door’s strike side. The handle will be up (see Figure F).
• ESI type - Insert key in the keyhole of the door interlock
dead latch (see Figure G). Gently turn key to release
lock and hold (see Figure H).
3. Slowly pull hoistway door open.
4. Before leaving the hoistway entrance, make sure the hoistway
door is closed and locked.
©2011 ThyssenKrupp Access Manufacturing, LLC • 4001 East 138th Street • Grandview, MO 64030 • Phone: 800-925-3100 • Fax: 816-763-4467
Page 4 of 6 REV A 05.10.11
Residential Elevator
Diagnostic Codes are displayed through the call buttons. The code is displayed immediately after the problem
occurs. To review the current diagnostic code, press and hold the call for 2 seconds and release.
NUMBER OF
FLASHES
PROBLEM
SOLUTION
1
Safety Chain Fault
The main safety chain is open.
Call dealer for service
2
Gate/Stop Switch Fault
A call was placed for 10 seconds but the car gate showed to be open or the
in-car stop switch showed to be activated.
Make sure the car gate is
closed and the in-car stop
switch is not activated
3
Door Lock Fault
The hoistway door lock was either opened during travel or the lock contacts
did not match up before the elevator left the door zone.
Make sure the door is
fully closed allowing the
door to lock
4
Door Close Fault
A call was placed for 10 seconds but the hoistway door showed to be open.
Call dealer for service
5
Upper Terminal Limit Fault
Upper terminal limit activated.
Call dealer for service
6
Lower Terminal Limit Fault
Lower terminal limit activated.
Call dealer for service
7
Fault Contact
Run or up contractor failed to release, the door closed, or gate E-stop inputs
failed.
Call dealer for service
8
Up Run Timer
Timed out while running up (low oil).
Call dealer for service
9
Down Run Timer
Timed out while running down.
Call dealer for service
10
Battery Lowering Mode
A call was placed to an upper floor, however the elevator could not respond
because it is in battery lowering mode.
Check the power
source to the elevator
11
Sensor Fault
Any failed sensor could initiate this error. This error will also occur if the unit
passes or stops at a floor and the sensor combination is showing that it is
not the anticipated floor.
Call dealer for service
Maintenance and Precautions:
1. Do not attempt to enter hoistway or service components yourself. Call your authorized installation dealer for
professional assistance.
2. Do not use harsh chemicals or flammable products for cleaning elevator surfaces or equipment controls.
3. Depending on cab finishes, mild cleaning agents or polishes should keep your Destiny looking like new.
4. This is a passenger elevator. Do not exceed the weight capacity or use it for unintended purposes. For example: heavy furniture or freight.
5. Under no circumstances should you attempt to by-pass safety features such as, but not limited to: door locks, gate switches, pit or top of car safety switches, slack rope safeties. They are installed to comply with codes and protect you from personal injury.
©2011 ThyssenKrupp Access Manufacturing, LLC • 4001 East 138th Street • Grandview, MO 64030 • Phone: 800-925-3100 • Fax: 816-763-4467
REV A 05.10.11
Page 5 of 6
Residential Elevator
It is recommended that you keep a list of emergency phone numbers near the phone in your elevator car. In the unlikely event that the elevator stops between floors, use the phone in the cab to call for assistance. Pushing the alarm button will ring the emergency bell and alert any person within the proximity of the elevator.
Please take a moment to read the warranty and complete the included product warranty registration card.
Any comments you care to provide will assist us in our continuing quest for product excellence.
ThyssenKrupp Access warrants the Destiny Residential Elevator for three years to the original
purchaser only. The warranty commences with the date of shipment. The Destiny Residential Elevator
shall be free of defects in material and workmanship. The warranty card must be returned to
ThyssenKrupp Access within 20 days from the date of original purchase in order for this limited
warranty to go into effect. This limited warranty will not be applicable if the Destiny Residential
Elevator has not been installed by a ThyssenKrupp Access factory authorized dealer.
No warranty is extended, expressed or implied whether of merchantability of fitness for a particular
purpose after expiration of three years from the date of the original shipment of the unit.
ThyssenKrupp Access and its dealers shall not be liable for any consequential, special or incidental
damages arising out of the purchase of use of the unit of resulting from the breach of the limited
warranty or any implied warranty. The limit of liability of ThyssenKrupp Access and its dealer
hereunder shall be the unit’s purchase price. In states where limitations on how long an implied
warranty lasts or the exclusion or limitation of incidental or consequential damages or legal remedies,
the above mentioned limitations may not apply.
When making a claim, immediately send the dealer who sold you the unit a notice of your claim. All
claims must be received within the warranty time period. Any parts with defects in materials or
workmanship will be replaced without charge. This is a materials only replacement. Labor and/or
service charges incurred in the repair or replacement of a defective part are not included in the limited
warranty. All parts used to replace defective materials must be genuine ThyssenKrupp Access parts in
order to be covered by the limited warranty.
The following are examples of items not covered by this limited warranty:
1. Damage during shipment, which is the responsibility of the carrier.
2. Damage due to misuse, neglect, improper assembly, installation, operation, care or
maintenance.
3. Damage due to fire, floods or other natural disasters or ordinary wear and tear.
4. Minor mechanical adjustments such as tightening of nuts, bolts and screws.
In the event you have questions regarding features or operation of your Destiny, please contact your authorized dealer
first. ThyssenKrupp Access supports its dealer network with expert technical, engineering and sales personnel. The best
way to show your appreciation for this fine residential elevator is to demonstrate it to your friends or tell your colleagues
about it. Thank you!
©2011 ThyssenKrupp Access Manufacturing, LLC • 4001 East 138th Street • Grandview, MO 64030 • Phone: 800-925-3100 • Fax: 816-763-4467
Page 6 of 6 REV A 05.10.11