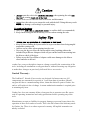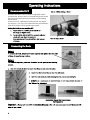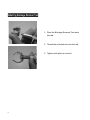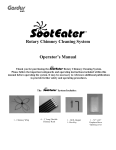
1
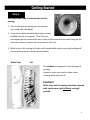
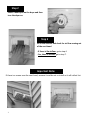
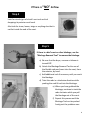
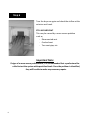
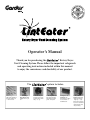
/PERATORS-ANUAL
4HANKYOUFORPURCHASINGTHE
2OTARY$RYER
6ENT#LEANING3YSTEM0LEASEFOLLOWTHEIMPORTANTSAFEGUARDS
ANDOPERATINGINSTRUCTIONSINCLUDEDWITHINTHISMANUAL
TOENJOYTHECONVENIENCEANDDURABILITYOFOURPRODUCT
The
,ONGmEXIBLE
RODS screw together to
reach into vents up to
12' from one end.
3ELFFEEDING
!UGER"RUSH makes
multiple turns in your
vent.
System includes:
6ACUUM!DAPTER
Connect to a shop vac
to collect the lint while
rotary brushing.
"LOCKAGE2EMOVAL
4OOL Removes heavy
blockages and clears
gutter downspouts.
,ARGEDIA
,INT"RUSH with
Exceptional 42" Reach
when connected to
one flexible rod.
$RYER"LOWER
!DAPTER Safeguards
the blower wheel by
stopping the Auger
Brush when using the
dryer air or a blower to
remove the lint while
rotary brushing.
Important Safeguards!
• Read all safety & operating instructions before use.
• All warnings in the manual should be strictly adhered to.
• Failure to comply with the instructions & safety rules may result in
property damage or personal injury.
• Retain the safety & operator’s manual for future use.
• Not all vents can be cleaned. It is sometimes necessary to replace or reroute the vent system due to improper material or installation.
Important Tips
1. To ensure safe operation of your dryer, it is recommended that the
dryer vent system be cleaned 3 to 4 times per year.
2. It is also recommended that lint and other debris be cleaned from
behind the dryer, the back of the dryer, underneath the dryer and the
entire area surrounding the dryer 3 to 4 times a year or more often if
necessary.
3. The lint screen should be cleaned before every load
4. The lint screen should also be washed with hot soapy water and an old
toothbrush (or other brush) at least every six months to remove the
film created by dryer sheets.
5. The lint screen duct, (the area that the lint screen slides or rests into),
should be cleaned once a week.
1
•
rotate the rods in the
when spinning the rods
& coming
• Failure to do so will cause the rods to un-screw and disconnect.
•
force the rods or over-torque the rods with the drill. Doing this may result
in property damage, rod breakage or personal injury.
1. Only use a
. (a cordless drill is recommended)
2. Keep clutch setting on drill at halfway or lower when rotating the rods.
•
• Keep all loose clothing & objects tucked in to prevent them from being tangled
around the rotating rods.
• Add one rod at a time when spinning into the vent.
• Never use the dryer to blow the lint out while rotary brushing without the
included Dryer/Blower Adapter which will prevent the brush from rotating into
the blower wheel of the dryer.
• Failure to use the Dryer/Blower Adapter could cause damage to the blower
wheel and also to the tool.
Gardus, Inc. reserves the right to improve, change or modify the construction of the
tools, including all attachments or any part thereof, without incurring any obligation
to make these changes on previously delivered kits or accessories.
Limited Warranty:
The LintEater™ kit and all accessories are designed for homeowner use. All
components are warranted for a period of 1 year from date of purchase. Should
any part fail due to a manufacturing defect, return the defective part to Gardus, Inc.
and we will replace it free of charge. A return authorization number is required prior
to returning any item.
Gardus, Inc. does not warranty failure of any part due to operator error. Be sure to
read all operating instructions and safety precautions before operating any of the
tools.
Manufacturer accepts no liability for property damage or personal injury due to the
operation of these tools and accessories. This is the full extent of the warranty made
by Gardus, Inc. There is no other expressed warranty. All implied warranties are
hereby excluded.
2
A cordless drill with a ½” or 3/8” chuck and adjustable clutch is
recommended. However, there are a handful of drills with smaller
than normal 3/8” chucks that may prevent the rods from fitting
into the chuck.
In these rare cases, a drill adapter will be required. The adapter
can simply be a 1 ½” long x 5/16-18 threaded stud or bolt with the
head cut off. Gardus can also provide upon request.
1. The fittings on the rods are designed to fit into most types of drills without an
adapter. However, as mentioned earlier, there are a handful of drills with smaller
than normal 3/8” chucks that may prevent the rods from fitting into the chuck.
In these rare cases, a drill adapter will be required. The adapter can simply be a
1 ½” long x 5/16-18 threaded stud or bolt with the head cut off. Gardus can also
provide upon request.
1. Place the Blockage Removal Tool onto
the rod.
2. Thread the included nut onto the rod.
3. Tighten with pliers or wrench.
5
Step1
Determinewhattypeofmaterialwasusedfor
venting.
1. This can be done by looking into the exterior
vent hood with a flashlight.
2. It can also be determined by placing the end of a
FlexRod into the vent approx. 12 to 18 inches
and tapping on the inside of the vent. Listen to the sound that the steel fitting on the
rod makes when it contacts the inner walls of the vent.
3. White vinyl or foil venting will make a dull sound while rigid or semi-rigid venting will
have a positive metal to metal sound and feel.
WhiteVinylFoil
The LintEater is designed to clean all types of
venting.
However, extra care must be taken when
cleaning white vinyl or foil.
Caution!
WhiteVinylandFoilventingshouldbereplaced
withrigidorsemiͲrigidAllMetalventingif
possible.
6
Step2
Selectaheatcycleonthedryerandthen
turnthedryeron.
Step3
Gototheexteriorandcheckforairflowcomingout
oftheventhood.
ͲIfthereis NoairflowͲ go to step 4.
ͲYes,thereisairflowͲ go to step 7.
ImportantNote:
If there is a screen over the vent hood, remove it and do not re-install as it will collect lint.
7
IfThereis“NO”Airflow
Step4
Look for visual signs of a bird’s nest such as bird
droppings by exterior vent hood.
Also look for straw, leaves, twigs or anything else that is
not lint inside the end of the vent.
Step5
Ifthereisabird’snestorotherblockage,usethe
“BlockageRemovalTool”toremovetheblockage.
a) Be sure that the dryer, vacuum or blower is
turned OFF.
b) Attach the Blockage Removal Tool to one of
the flexible rods and insert into the vent, from
the exterior, by hand.
c) Add additional rods if necessary until you reach
the blockage.
d) Twist the rods in a clockwise direction while
pushing the rods & tool into the blockage.
e) When you have grabbed the
blockage, continue to twist the
rods clockwise while you pull
the blockage out of the vent.
f) Repeat this process until the
Blockage Tool can be pushed
freely past the problem area.
8
Step6
Turn the dryer on again and check the airflow at the
exterior vent hood.
STILLNOAIRFLOW?
This may be caused by a more severe problem
such as;
- Disconnected vent
- Crushed vent
- Torn vent pipe, etc.
ImportantNote
Ifsignsofamoresevereproblemexist,itisrecommendedthataprofessionalbe
calledtotestthesystemwithspecializedtools.Oncetheproblemisidentified,
theywillbeabletomakeanynecessaryrepairs.
9
IfThere“IS”Airflow
Step7
Tape or clip damper on hood in the
open position or remove louvers on
louvered vent hood.
Remove the louvers by bending them slightly in the
middle.
Caution!
Be careful not to break the plastic pin on the ends of
the louvers.
Step8
Gobackinsidetothedryer;
a) Turn dryer OFF & UNPLUG.
b) Pull dryer out carefully, especially if gas.
10
Step9
Clean area behind dryer as well as the back of the
dryer itself using the Lint Trap brush and a vacuum
Step10
a) Remove vent from the back of the dryer.
b) Hook-up a shop vac using the included
“Vacuum Adapter” or attach an electric leaf
blower to vent. Attachment can be made by
using a piece of duct tape.
c) Be sure that the outside vent hood is taped
open before turning vacuum on!
Caution!
If vent compresses when the vacuum is turned on, turn vacuum
off immediately. This indicates a blockage or restriction in the
vent and should be checked by a professional.
11
CLEANINGFROMOUTSIDEWITHACORDLESSDRILL
Step11
Cleaning From Outside:
1. Thread 4” Auger Brush
onto flexible rods.
2. With the vacuum/blower running, go to the
exterior and begin spinning the rods & brush
into the vent.
Important:
a) Be sure the clutch is set on in the mid range
(or lower). (See drill operation)
b) ALWAYSspinthedrillinthe“CLOCKWISE”direction.
c) Use duct tape on all Brush/Rod connections.
3. Connect one rod at a time until you reach the opposite end.
Note: If your vent is longer than the included length of rods, finish cleaning from the
opposite end. (Included rods will clean up to 18’ of venting when used from each end.
4. It is recommended that you spin the drill at a
moderate to high speed while using a back &
forth motion.
5. If the brush binds up, stop immediately.
ImportantNote: Use caution and take your time
to avoid breaking the rods or damaging the vent.
NeverForcetheRods!
AlwaysSpinDrillClockwise!
12
CLEANINGFROMOUTSIDEWITHACORDLESSDRILL
Step11(cont)
6. Once you feel you have reached the end, go to the
interior, disconnect the vacuum or blower and look inside
the vent to see if the brush has reached the end.
If the brush is not visible, and you felt the brush binding up
when you were rotary cleaning, it may be necessary to
finish cleaning from the inside toward the outside.
Step12
RemovingtheRodsfromtheVent:
Method1:
1. Continue to spin the rods in a clockwise direction as
you pull the rods out of the vent.
2. Disconnect one rod at a time making sure not to
loosen the rods that are still inside the vent.
3. Attach the drill after disconnecting each rod to
continue spinning the rods as you remove.
Note: If you need to finish cleaning the vent from the
inside, count the number rods used so you can
estimate how far you have reached from the outside.
13
Step 12
Optional Method for Removing the Rods from the Vent:
Method 2:
It’s also possible to remove all of the rods at one
time by spinning the rods (always in the clockwise
direction) and pulling them out of the vent as you
walk away from the vent hood. (providing you
have the room to do so and it does not present a
safety hazard to you or the surrounding area)
Try to stop when the brush reaches the vent
hood. This will keep the rods & brush from falling
and will prevent possible damage to the
surrounding area.
Step 13
Cleaning from “Inside” toward outside:
This can be done by spinning the auger brush and rods from the
inside toward the outside.
Attach the Vacuum Adapter as shown.
With the vacuum running, the loosened lint will be pulled back
toward you and collected in the vacuum.
Once you feel confident that you have cleaned the vent
completely, you can remove the rods and brush from the vent
as mentioned earlier.
Important Note: The Vacuum Adapter is designed to fit a shop
vac having a 2 ½” hose only. It is not recommended to use a
shop vac or household vac having a 1 ½” hose (or smaller) since
the lint being collected will continually clog the the hose.
14
Step14
Remove the tape or clip from the damper or re-install the
louvers if you have a louvered vent hood. Be careful not to
break the pins on the ends of the louvers.
Step15
Once the vent system is cleaned, connect the vent
to the back of the dryer using the proper material.
(Seefollowingsection)
Step16
Slide the dryer into place and plug the electrical cord into the outlet.
Step17
Turn the dryer on and then go to the exterior and check for
air flow. You should feel a higher volume of air coming out
of the vent hood.
15
Connecting Dryer Vent
Replaceallwhitevinylorfoilventingwithallmetalventing.
If you have white vinyl or foil venting behind the dryer or throughout the venting system
it should be replaced with flexible metal or rigid metal venting.
The following are some tips to help you install flexible metal venting from your dryer to
the wall or ceiling.
This section of venting is called the transitionduct.
InstallationNote:
When installing venting components, the male
end or (crimped end) must always face toward
the exterior. This holds true for the entire
venting system.
Note: The following are only tips to help you
with the installation.
It may be necessary to call a professional to
ensureproperinstallation.
Example of All-Metal Venting Components
Used for Proper Installation
“Loop”Method:
When used with the proper materials, this method
will allow you to connect the venting to the dryer
while it is pulled away from the wall. It will form a
rounded transition from the dryer to the connection
point of your venting system which, in many cases, is
in the wall or floor.
16
Additional Cleaning Methods
Method 1
Using the dryer to blow the lint out while rotary brushing
The “Dryer Adapter” has a built-in guard to prevent the
rotating Auger Brush from entering the dryer thus
preventing damage to the blower wheel within the
dryer.
Pic of Dryer Adapter Hookup from page 20 of current
manual
Pic of Dryer Adapter Hookup from page 20 of current
manual
a) Place the Dryer Adapter on the back of the dryer.
b) Connect the vent to the adapter and secure with duct
tape.
c) With the dryer running, go to the exterior and begin
rotary brushing from outside as described earlier.
Important: Be sure to remove the Dryer Adapter when
you have completed the cleaning as it will collect lint if
left in place during normal operation of the dryer.
Note: Eye protection & a respirator must be worn as the
loosened lint will be blown out toward you.
17
AdditionalCleaningMethods
Method2
UsinganElectricLeafBlowertoblowtheloosenedlintoutoftheventwhile
rotarybrushingfromoutside
An electric blower can also be attached to the vent on
the inside to blow the lint out while you rotary brush
from the outside toward the inside.
ImportantNote:
a) Connect the Dryer Adapter between the blower
& vent to prevent the brush from entering into
the blower.
b) Always wear eye protection & a respirator.
Method3
Rotarybrushingfromoutsidewith
vacuumconnectedoutside
This is not a preferred method but the cleaning
can be done this way.
ImportantNote:Only use this method with the
DryerAdapterinstalled at the opposite end of
the vent on the interior. This will stop the brush
when it reaches the end of the vent.
18
Additional Cleaning Methods
Method 4
Rotary brushing from inside with vacuum
connected outside
a) Connect the vacuum hose to the exterior vent
hood.
b) Rotary brush from the inside toward the exterior
while the vacuum collects the loosened lint on
the outside.
Method 5
Cleaning by Hand from the Inside or Outside
a) Thread 4” Auger Brush onto flexible rods.
4. Rotate rods in a clockwise direction while using a
back and forth motion to remove the lint from the
dryer vent.
Included rods will clean 18’ of venting when used from
each end.
Note: A shop vac, electric leaf blower or the air from
the dryer should be used to remove the loosened lint
while brushing the vent.
19
Cleaning Lint Trap & Lint Screen Duct
Works for dryers with lint screens in the
“Top” of the dryer (as shown) & for dryers with
lint screens inside the front door!
1. Always “scoop” the lint up toward you when
clean the lint trap area.
2. Use a vacuum to remove the lint from the
brush as you pull the lint up & out of the Lint
Trap.
Bend brush for more versatility
Clean the Dryer Interior
Although cleaning the dryer vent
system is extremely important, it
is equally important to clean the
inside of the dryer as well.
Only attempt this if you are
familiar with taking dryers apart.
Otherwise, it is recommended that
a professional be called to
periodically clean & inspect the
interior of your dryer.
20
Cleaning baseboard heat or under refrigerator with the Lint Brush
Baseboard Heat:
Works great to remove the dust buildup on the fins inside your
baseboard heat. Simply run the brush over the fins while
brush clockwise. Use a vacuum to clean the brush as you go.
Be careful not to damage the fins.
the
Under the Refrigerator:
When
to one or more FlexRods, the lint brush also works great for
cleaning out the debris from under the refrigerator or any hard to reach
areas around your home.
Use Blockage Removal Tool for clearing
er Downspouts”
a)
h the Blockage Removal Tool to a rod as
earlier
b) Feed the first rod with the tool up into the
of the downspout.
to add rods un l you reach the blockage.
c)
d) Use your hand or the drill to rotate “Clockwise” into the blockage
it is cleared.
The tool can also be used from the top as well.
What to do if the rods disconnect in the vent
If you accidently reverse the drill or rotate the rods “counter clockwise”
by hand, the rods may disconnect leaving some of the rods and the
brush inside the vent.
Although this rarely happens, we have designed a “Retrieval Tool” to
grab the brush and pull it out. It aches to your remaining rods and is
used by hand without the drill.
To obtain this tool, please contact us at:
[email protected]
Phone: 203.985.0208
21
Additional Products from
12' Extension Kit
Adds to your
longer than 12 feet.
Rotary Dryer Vent Cleaning System for vent runs
Includes: 4 - 3' long Flexible Rods
LintCatcher
®
System!
Captures loosened lint from the dryer vent while rotary brushing with the
Simply attach the LintCatcher™ to the exterior vent hood, turn
on your blower or dryer and begin rotary brushing the vent
system.
As the loosened lint is blown out by the blower or dryer air, it is
collected in the LintCatcher™ making your job clean and hassle
free.
Works great when cleaning from the outside or from the inside!
Easy to use
Attach the clips
Position LintCatcher
over the vent
Secure with
drawstring
How to Purchase Accessories & Spare Parts
If you would like to purchase additional accessories or spare parts, please go to
www.linteater.com then click on the “Where to Buy” tab.
Thank You
22
Gardus, Inc.
888-985-0208 (toll free) ͼ [email protected] ͼ www.gardusinc.com
Made in China