1
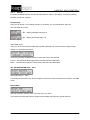
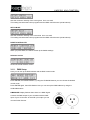
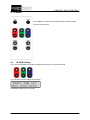
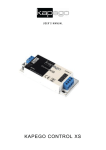
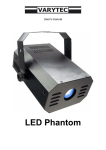
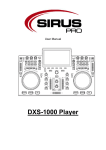
USER’S MANUAL
Uni - Control
KAPEGO UNI-CONTROL
Table of contents
1.
Safety instructions........................................................................................................................... 3
2.
Front View....................................................................................................................................... 4
2.1.
3.
Connection Side..................................................................................................................... 4
Connecting...................................................................................................................................... 4
3.1.
3.1.1.
Set up ............................................................................................................................ 5
3.1.2.
DMX Setup .................................................................................................................... 6
3.1.3.
Automatic mode............................................................................................................. 8
3.1.4.
Sound mode .................................................................................................................. 9
3.1.5.
Colour select.................................................................................................................. 9
IR Mode .................................................................................................................................... 10
4.
5.
Menu ...................................................................................................................................... 4
4.1.
IR RGB Settings................................................................................................................... 10
4.2.
IR automatic program........................................................................................................... 11
4.3.
IR music control ................................................................................................................... 11
Technical data .......................................................................................................................... 12
2 / 13
KAPEGO UNI-CONTROL
1. Safety instructions
FOR SAFE AND EFFICIENT OPERATION
Be careful with heat and extreme temperatureAvoid exposing it
to direct rays of the sun or near a heating appliance.
Not put it in a temperature bellow 41°F /5°C, or exceeding 95°F /35°C.
Keep away from humidity, water and dust
Do not place the set in a location with high humidity or lots of dust.
Containers with water should not be placed on the set.
Keep away from sources of hum and noise
Such as transformer motor, tuner, TV set and amplifier.
To avoid placing on un-stable location
Select a level and stable location to avoid vibration.
Do not use chemicals or volatile liquids for cleaning
Use a clean dry cloth to wipe off the dust, or a wet soft cloth for stubborn dirt.
If out of work, contact sales agency immediately
Any troubles arose, remove the power plug soon, and contact with an engineer for repairing,
do not open the cabinet by yourself, it might result a
danger of electric shock.
Take care with the power cable
Never pull the power cable to remove the plug from the receptacle, be sure
to hold the plug. When not using the player for an extended period of time
be sure to disconnect the plug from the receptacle.
3 / 13
KAPEGO UNI-CONTROL
2. Front View
1. Enter Button- to confirm the setting
2. UP Button – to higher the value +1
3. Down button – to lower the value -1
4. ESC button – to leave the menu
5. LC Display
2.1.
Connection Side
1. DMX out – XLR 3 Pole
2. DMX in – XLR 3 pole
3. Data connector for software updates
4. Power connector – DC 12-24V 10A
max(+/-)
5/6 Connector for LED fixtures
(RGB, V+, V+, V+)
3. Connecting
-
follow this instructions: Connect the 4 wires which are signed with R;G;B and V+ to the
corresponding terminals on the Uni-Control.
-
Connect the fitting power switching supply to the power connector of the Uni-Control. Take
care of the poles! Don not use more then 10A! According to the LED fixture consumption you
should size your power switching supply a bit higher then the fixture, that means when your
fixtures needs 6A, then you should use a power supply with 7A.
3.1.
Menu
You can control the Uni Control manual ore by using DMX. Use the buttons ENTER, UP, DOWN and
ESC.
4 / 13
KAPEGO UNI-CONTROL
3.1.1.
Set up
Press the UP/DOWN buttons until SETUP SETTINGS is visible in the display. Confirm by pressing
ENTER, to enter the submenu.
Setup display
Here you can decide, if your display remains in ON mode, or if it is shutting down after 10s.
SET UP DISP ON or OFF
Display backlight everytime on
Display shuts down after 10s
Setup DMX signal
Here you can choose when the DMX signal is failing whether you want the fixture to keep the last
setting or to shut down the fixture.
Choose by pressing UP/DOWN freeze or black and confirm with ENTER.
Freeze – the last known DMX signal will be freezed when the DMX failed.
Black – The LED fixture will be in the blackout mode when the DMX failed.
SET UP MASTER DIM 000% - 100%
Manual dimming 0 – 100%
This setting will overwrite every built in program and the max output of the dimmer channel in the DMX
mode.
SETUP RED
Sets the maximum intensity of the colour red from 0 to 100%
This setting overwrites the built in programs and the DMX controlchannel. (white balance)
5 / 13
KAPEGO UNI-CONTROL
SETUP GREEN
Sets the maximum intensity of the colour green from 0 to 100%
This setting overwrites the built in programs and the DMX controlchannel. (white balance)
SETUP BLUE
Sets the maximum intensity of the colour blue from 0 to 100%
This setting overwrites the built in programs and the DMX controlchannel. (white balance)
RESET CONTROLLER
When you press Enter, the fixture will set up the default settings.
Software Version
Shows the actual software version
3.1.2.
DMX Setup
Here you can set up the DMX address and the DMX control mode.
Press ENTER, then MODE flashes, by using the UP/DOWN buttons you can choose the desired
control mode.
Press ENTER again, then ADD flashes. Now you can set up the DMX address by using the
UP/DOWN buttons.
DMX MODE: Display flashes when there is no DMX Signal.
Connect the DMX output of your controller with the DMX
Input of your Uni Control. At the XLR 3 pin output you can
connect further fixtures.
6 / 13
KAPEGO UNI-CONTROL
DMX MODE 1
Channel
Value
Function
1
0-255
0 =OFF , 1-255 = several colourmacros (36)
DMX MODE 2
Channel
Value
Function
1
0-255
0 =OFF , 1-255 = several colourmacros (36)
2
0-255
0 = OFF, 1-255 = Dimmer 1-100%
DMX MODE 3
Channel
Value
Function
1
0-255
RED: 0 =OFF, 1-255 = DIMMER 1-100% OUTPUT
2
0-255
GREEN: 0 = OFF, 1-255 = DIMMER 1-100% OUTPUT
3
0-255
BLUE: 0 = OFF, 1-255 = DIMMER 1-100% OUTPUT
DMX MODE 4
Channel
Value
Function
1
0-255
RED: 0 =OFF, 1-255 = DIMMER 1-100% OUTPUT
2
0-255
GREEN: 0 = OFF, 1-255 = DIMMER 1-100% OUTPUT
3
0-255
BLUE: 0 = OFF, 1-255 = DIMMER 1-100% OUTPUT
4
0-255
STROBE: 0-15 =OFF,16-255 = 1Hz – 12Hz
5
0-255
MASTER: 0 = OFF, 1-255 = DIMMER 1-100% OUTPUT
DMX MODE 5
Channel
Value
Function
1
0-255
RED: 0 =OFF, 1-255 = DIMMER 1-100% OUTPUT
2
0-255
GREEN: 0 = OFF, 1-255 = DIMMER 1-100% OUTPUT
3
0-255
BLUE: 0 = OFF, 1-255 = DIMMER 1-100% OUTPUT
4
0-255
STROBE: 0-15 = OFF, 16-255 = 1Hz – 12Hz
5
0-255
MASTER: 0 = OFF S, 1-255 = DIMMER 1-100% OUTPUT
7 / 13
KAPEGO UNI-CONTROL
Special functions
0-31 = OFF
32-63 = Automatic Dimming (upwards)
64-95 = Automatic Dimming (downwards)
6
0-255
96-127 = Automatic Dimming (up and downwards)
128-159 = Automatic colour fade
160-191 = random colour change 3 colours
192-223= random colour change 7 colours
224-255= activation of sound control
DMX MODE 6 (compatibility mode)
Channel
Value
Function
1
0-255
RED: 0 =OFF, 1-255 = DIMMER 1-100% OUTPUT
2
0-255
GREEN: 0 = OFF, 1-255 = DIMMER 1-100% OUTPUT
3
0-255
BLUE: 0 = OFF, 1-255 = DIMMER 1-100% OUTPUT
4
0-255
0 = OFF, 1-255 = several colour macros (32)
5
0-255
STROBE: 0-15 = OFF, 16-255 PULSE, slow - fast
Special functions
0-31 = OFF
32-63 = Automatic Dimming (upwards)
6
0-255
64-95 = Automatic Dimming (downwards)
96-127 = Automatic Dimming (up and downwards)
128-159 = Automatic colour fade
160-191 = random colour change 3 colours
7
3.1.3.
0-255
MASTER: 0 = OFF, 1-255 = DIMMER 1-100% OUTPUT
Automatic mode
Press ENTER to enter the automatic mode. Press ENTER again to choose which value you want to
change, with UP/DOWN buttons you can change the value. With ESC you can leave the submenu.
Under PROG you can choose the desired programs, and under SPEED you can choose the desired
speed.
8 / 13
KAPEGO UNI-CONTROL
Program
Function
001
colourchange Sequenz 1 (3 colours)
002
colourchange Sequenz 1 (7 colours)
003
colourfade (3 colours)
004
colourfade (7 colours)
005
Strobe Program (3 colours)
006
colourchange Sequenz 2 (3 colours)
007
colourchange Sequenz 2 (7 colours)
008
Colourfade (6 colours)
3.1.4.
Sound mode
Press ENTER to enter the sound mode. Press ENTER again to choose which value you want to
change, with UP/DOWN buttons you can change the value. With ESC you can leave the submenu.
Under SOUND you can choose the desired programs, and under SENS you can choose the desired
sensitivity.
3.1.5.
Colour select
Press ENTER to enter the sound mode. Press ENTER again to choose which value you want to
change, with UP/DOWN buttons you can change the value. With ESC you can leave the submenu.
Under R you can adjust the desired Intensity for red
Under G you can adjust the desired Intensity for green
Under B you can adjust the desired Intensity for blue
9 / 13
KAPEGO UNI-CONTROL
4. IR Mode
Press ON/OFF to activate the IR Mode and to control the fixture
with the remote control
4.1.
IR RGB Settings
If you use the following three buttons to adjust the intensity for red green and blue
You can see this on the display of the fixture:
No adjust the intensity as you desire
10 / 13
KAPEGO UNI-CONTROL
4.2.
IR automatic program
If you use the following buttons to choose the program and to adjust the speed
You can see this in the display of the fixture
Now choose the program and adjust the speed as you desire
4.3.
IR music control
If you use the following buttons to choose the sound to light programs
You can see this in the display of the fixture’
Press the sound button to activate the sound to light function. With the +/- buttons you can choose the
desired program.
11 / 13
KAPEGO UNI-CONTROL
5. Technical data
Power supply
12V/ 24V DC
Power consumption
Max 10A
Measurements (LxBxH):
275 x 280 x 455mm
DMX Input:
3pin XLR male socket
DMX aoutput:
3pin XLR female socket
DMX wiring:
Pin 1: Schirm / Pin 2: - / Pin 3: +
DMX channel:
1/7
PWM
1450Hz
Output connector
RGBV+V+V+
12 / 13
KAPEGO UNI-CONTROL
Importeur:
B&K Braun GmbH
Industriestraße 1
D-76307 Karlsbad-Ittersbach
www.bkbraun.com
[email protected]
13 / 13