1
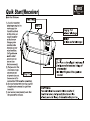
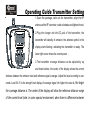
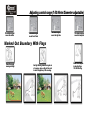
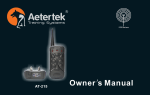
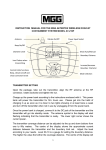
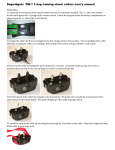
User’s Manual for Aetertek Wireless
Dog/Cat Fence System AT-216F
0-50 Diameters
www.aetertek.com
AT-216F
Index
Quick Start-----------------------------------------------1-2
Operating Guide-------------------------------------3-4-5-6
Adjusting Control Range-----------------------------------6-7
Terms of Use & Litation of Liability----------------------8-9
Contact us-------------------------------------------------9
Quik Start(Transmitter)
Quik Start(Receiver)
Operating Guide Transmitter Setting
1.Open the package, take out the transmitter, align the RF
antenna at the RF connector, rotate clockwise and tighten the nut.
2.Plug the charger into the DC jack of the transmitter, the
transmitter will standby of emission; the antenna symbol in the
display starts flashing, indicating the transmitter is ready. The
lower right corner shows the current power. 。
3.The transmitter coverage distance can be adjusted by up
and down buttons; the center of the display shows the current
distance between the emission level and reference signal coverage. Adjust the level according to user
needs. Level 00-10 is the strength level display of coverage signal; the higher the value is, the larger
the coverage distance is. The center of the display will show the reference distance range
of the current level (note: in some special environment, when there is difference between
the reference distance range and the actual distance, the signal coverage range can be
adjusted by intensity increase/decrease according to user needs.). 00 level is the way of
turning off electric shock.
4.To enter or exit menu setting by pressing M button. On the menu, the BB sound,
vibration and shock function can be selected by left and right buttons. When setting menu
icon flashes, the BB sound, vibration and shock can be programmed by pressing the up
and down buttons. (ON means relevant function selected, OFF means relevant function
deselected). Two Shock modes: AUTO and MANUAL. In Auto Mode, transmitter emits
certain level shock intelligently, while in the mode of MANUAL, user can set the desired
shock levels. As soon as function and level is set, press the menu button can save the
setting and exit programming.
Receiver setting
Open the package, take out the receiver and install the
metal prongs; charges the receiver for the first use. To
prolong battery life, recommend to charge the receiver
about 3-5 hours for the first few charges.
1.When receiver is connected to the wall charger, it will
beep and vibrate once and the red LED light will be on. This is to indicate the receiver is in
charging status. Receiver will be charged in full after 3-4 hours with the blue LED light on.
When unplugged, receiver will beep and vibrate once. (Note: please don’t forget to replace
the charge port cover lid).
2.Press and hold Power button for 3 seconds, receiver will beep and vibrate once to
indicate receiver is powered on. If the transmitter is on standby, the receiver will pair/sync
with the transmitter automatically. At this point, the system is on working status.
3.Do a self-test by pressing the power button 3 times. The receiver will beep, vibrate and
discharge shock. Now it is ready to let your dog wear the receiver.
Thread the collar straps through the clasps, adjust the length to fit the dog’s neck so it will
not make the dog feel uncomfortable. To ensure ideal shock effect, the collar’s prongs
should have direct contacts with the dog’s skin.
Adjusting control range (1-50 Meter Diameter adjustable)
The emission signal
covers the middle
The emission signal
covers the left side
The emission signal
covers the right side
The emission signal
covers the backyard
Marked Out Boundary With Flags
Detect the signal
coverage strength
Red light flashing means the signal out
of coverage, place a flag at this point
to mark the periphery of the coverage.
Refer to the diagram
to place the flags.
150-300CM a flag
Training the dogs to stay inside the control zone:
Set the transmission level, test the receiver based on reference distance range; when it is
near the periphery, the red LED starts flashing; the closer to the periphery, the faster the
beep sound will be made, and then triggers the vibration; if the pet is near the boundary
even further, the electric shock will be discharged. If the pet returns to the control zone,
corrections will stop. Place the flags where the warning is sent, which will set a boundary
of the control zone with all the warning spots flagged. Dogs will learn to respond after
training. Please be advised the actual range may differ from theoretical range. User should
adjust the emission level based on actual environment as wireless signals may be affected
by environmental factors. Therefore it is not unusual if the displayed distance differs to
some extend from the actual distance in some surroundings.
Additional Information for terms of use and limitation of
liability
1. Terms of Use
This product is offered to you conditioned upon your acceptance without modification of
the terms, conditions, notices contained herein. Usage of this product implies acceptance
of all such terms, conditions, and notices.
2. Proper Use
This product is designed for use with dogs where training is desired. The specific
temperament of your dog may not work with this product. We recommend that you not
use this product if your dog is less than 8 pounds or if your dog is aggressive. If you are
unsure whether this is appropriate for your dog, please consult your veterinarian, certified
trainer or contact our customer support.
3. No Unlawful or Prohibited Use
This product is designed for use with dogs only. This dog training device is not intended
to harm, injure, or provoke. Using this product in a way that is not intended could result in
violation of Federal, State or local laws.
4.Limitation of Liability
In no event shall Aetertek be liable for any direct, indirect, punitive, incidental, special or
consequential damages, or any damages whatsoever arising out of or connected with the
use or misuse of this product. Buyer assumes all risks and liability from the use of this
product.
5. Modification of Terms and Conditions
Aetertek reserves the right to change the terms, conditions, and notices under which this
product is offered.
For par ts and warranty, contact with authorized dealer shown in
warranty card