1
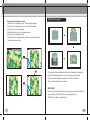
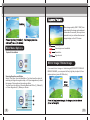
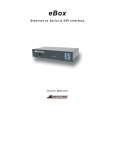
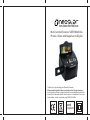
Multi-function Scanner USER MANUAL
Photos, Slides and Negatives to Digital
Thank you for purchasing your Neostar Scanner.
Please read and retain these instructions for future reference.
Extra 3-packs of Slide or Negative Holders are available to purchase
directly from the www.neostar-electronics.co.uk website or from your
local retailer, or call us to place order 0845 555 4444.
RoHS
Compliant
Safety Precautions............................................1
Package Contents.............................................2
View of Parts…………………………………………..3
Loading Slides..................................................4
Loading Negatives.............................................5
Loading Photographs.........................................6
Quick Start Guide...............................................7
Quick Menu Guide…………………………………….7
Capture Picture………………………………………..8
Mirror Image / Rotate Image................................8-9
Main Menu Options .......................................9-13
Connect to PC.............................................13-14
Product Specification........................................14
Warranty, Environmental Protection
and Customer Services.....................................15
Important: Do not expose this product to rain or moisture.
Caution: Do not disassemble this unit. To prevent this risk of
electric shock, do not remove cover.
Ventilation: The device should be situated so that its location
or position does not interfere with its proper ventilation. For
example, the unit should not be situated on a bed, sofa, rug or
similar surface that may block the ventilation openings. It is
recommended that you use the scanner on a flat hard surface
such as a desk or coffee table.
Heat: The device should be situated away from sources of high
heat such as radiators or fires etc.
Cleaning: We strongly suggest using a clean, dry, non-alcohol
cotton swab to clean the glass surface periodically to produce
a clear image; we include a cleaning brush. You can wipe the
exterior with a dry cloth.
Non use period: The USB cord for the device should be unplugged
from the computer when the unit is left unused for a long period
of time.
USB overloading: Do not overload the USB connections on
your computer. If you have too many devices connected to your
computer such as a wireless mouse, Media player, Mobile phone
or other USB powered devices. There may not be enough power
for the film scanner to operate properly.
Servicing: The user should not attempt to service the device
beyond those means described in the operating instructions.
All other servicing should be referred to qualified person.
Warranty, Environmental Protection
and Customer Services
This product is fully-warranted against defective materials and
manufacturing faults for a period of Twelve Months from
The date of registered purchase under the following provisions:
1. This warranty is non-transferable and does not cover damage
to products caused by accident, rental, abuse and other public
disturbances in any way.
2. This warranty becomes invalid if the serial number has been
removed, defaced, changed or alterations have been made
and equipment is repaired or alteration changed by any other
unauthorized dealers.
3. The dealer's invoices and this warranty card take effect when
they have been Verified.
This warranty invalid under following conditions:
A. Warranty card is altered or defaced;
B. Serial Number sticker don't accord with its original state;
C. Unauthorized repair or modifications to the product.
D. Accidents, abuse, improper installation, any improper manner
and unauthorized repair.
E. using unmatched power supply / voltage;
F. Using mismatch operation manual
G. Abnormal worn and tear;
H. Corrosion, rusting or stains;
I. Any losses, damages, defects and malfunctions caused force
majeure, fire and civil unrest.
The warranty enter into effect once the customers agree to abide
by the terms and conditions of warranty
Environmental protection: do not dispose in the normal household
waste, Dispose directly with the purchaser, us as the manufacturer
or take to your local recycling centre. Visit www.neostar-electronics.
co.uk or www.recyclenow.com
Customer Service: for technical advice visit the website or call us
on 0845 555 4440 (calls charged at local rate for UK BT customers;
other network charges may vary).
15
◆Mains Power Adapter
◆TV video cable (Av cable)
◆USB cable (for connecting to PC)
◆User’s Manual
◆Cleaning Brush
◆1 x Slide Holder
◆2 x Negative Holder
◆3 x Photograph Holders: 3R (3.5”x5”), 4R (4”x6”), 5R (5”x7”)
BEFORE YOU GET STARTED:
Film Negative Holder: The design of negative holder follows ISO standards.
In some cases the holes on the film will not match exactly to alignment of the
holder. This is caused by a non-standard camera film. In this case, there will
be a small black line on the edge of the frame that can easily be cropped out
using photo editing software (if you require). ISO-international organization
for Standardization
Cleaning your old photos / slides / negatives:
You will achieve more satisfying results if you ensure your slides/negs/photos
are clean. It is recommended that you use compressed air to clean your photos
and that you wear cotton gloves when handling. You can also use the provided
brush to clean the backlight scanner panel:
◆Place the film scanner on the side and insert the end of the brush into the
door on the right side
◆Clean the backlight panel placed in the film scanner
C: Preview and read picture on PC. You can now drag / transfer your
image files from the SD memory card to your PC.
View of parts:
Photo
FILM SCAN
PHOTO SCAN
SD
USB/Power In
3.5" x 5"
TV Out
4" x 6"
5" x 7"
Brush
Function
Sensor
Support Photo size
Resolution
External memory card
File
LCD
USB Port
Photo Types
Language
Operation System
Product Size(LxWxH)
Photo / Slide / 35mm Negatives
CMOS 5 Mega Pixel
5’’*7’’. 4’’*6’’. 3.5’’*5’’
5.0 Mega Pixels/10Mega Pixels(interpolated)
MMC/SD/SDHC card
Picture: JPEG
Color 2.4〞TFT LCD
USB2.0
B&W,Slides,Negatives,Photo
S-Chinese/T-Chinese/English/French/Deutsch
Italian / Espanol/ Japanese
Windows XP SP /Windows7/Windows2000/
Vista
L230×W224×H147
14
(1)Hold up the slide toward the light. Face
the trademark slide of the slide away
from you. Look through the slide and it
should appear normally (not a mirror image).
Now turn the slide so the image is upside
down while looking at the same side.
Language
(2)Open the slide holder at the marked spot
on the top. With the slide holder laid open
place the slide into recessed area in the
holder — the slide should fit perfectly.
Note: Handle slides with care. Any dust,
Scratches or finger prints will show up on
your saved images. If possible, use cotton
gloves when handing slides. It is recommended
to use compressed air to remove any dust
on the slides. This is not included with the
film scanner but can be purchased from an
office supply or electronics retailer.
Note: Choosing English, German, Italian, Spanish, Traditional Chinese,
Simplified Chinese, Japanese, French according to user’s need
5M or 10M can be chosen after entering into Resolution Menu. 10 mega
pixel is interpolated but still gives good quality scans. 10 mega pixel files
are useful if you wish to print a large size photograph (A4 for example).
Otherwise 5MP is recommended.
(3)Close the slide holder and press the edges
so that it locks in place.
Pc connect
Connect to PC
A: Connect the main unit to PC using USB lead supplied and turn on
scanner, then enter into main menu. Your PC should identify new
‘hardware’ (the scanner); use Windows to view images saved on the
SD card.
B: Otherwise select USB MSDC from main menu (once scanner and
PC are connected) .
13
SD
USB/Power In
TV Out
(4) Insert the slide holder into the left side of the
main body as pictured by arrow on scanner
body. Push the holder through the main body
one slide at a time pressing the ‘scan’ button
as you progress. The holder will emerge out
of the right hand side of the main body of
scanner as pictured in image (4) left.
IMPORTANT
On the main scanner body at the top, ensure you have selected the
correct mode: either PHOTO (to scan photographs) or
FILM (to scan slides / negative film).
(1)Hold up the negative toward the light.
As you look through the negative, you
should be able to read the small negative
numbers normally (not a mirror image).
If there are pictures that you have scanned but would like to delete, then
select playback mode from main menu, scroll through images using the
left/right arrows, select chosen image; when you are viewing chosen
image press Menu button and scroll through options until you see Delete.
Select Delete and then press OK. The image will be removed from the
SD memory card.
(2) Open the negative holder as shown in image (2)
above. With the negative holder laid open
place the negative into holder so the notches
line up with the notches on the holder, and
that each image being scanned fits in the space
provided. This may take a little practice (five
minutes) but once you have aligned 2/3 rows
of negatives you will understand!
Note: Handle negatives with care. Any dust,
scratches or finger prints will show up on your
saved images. If possible use cotton gloves
when handling negatives. It is recommended
to use compressed air to remove any dust on
the negatives.
This is not included with the film scanner but
can be purchased from an office supply or
electronics retailers.
(3)Close the negative holder and press the edges
so that it locks in place. It works best with the
negative strip occupying the middle sections
of the negative holder.
(4)Insert the negative holder into the slot on the
side of the film scanner as shown by the arrow
pointing into the scanner (on the left side of
scanner). As you then move through the
negative strip to scan them all you will push
the negative holder through the main body
(right direction) and the holder will exit the
main body on the right hand side (as pictured
in image (4) above.
SD
USB/Power In
TV Out
12
Options within playback mode
1.Rotation +90: capture picture, then rotate 90 degree
2.Rotation -90: capture picture, then rotate 90 degree
3.Press OK to confirm changes
4.Delete: Delete picture from memory card
5.Exit: return to playback mode
6.Return: back to capture picture mode from playback mode
7.Adjust and save picture
Loading Photographs
(1)Hold up the Photo Holder so that the front of the photo is facing you.
(2)Insert the photograph into correct size holder as pictured.
(3)The photo should now be perfectly visible in the holder.
(4)Insert the holder into the scanner.
IMPORTANT
On the main scanner body at the top, ensure you have selected the
correct mode: either PHOTO (to scan photographs) or
FILM (to scan slides / negative film).
11
Quick Start Guide
1.Power the scanner by connecting to the mains electric (cable supplied)
or you can power directly from
the USB connection to your PC (cable also supplied). Switch scanner on
using the power button.
2.Load negatives / slides / photos into holder as described on previous pages.
3.Insert holder into scanner as described on previous pages.
4.Select the correct ‘Mode’ on the top of main body of scanner (either for
negatives/slides or photographs). The default mode is ‘Film Mode’ for
scanning negatives/slides; press ‘Mode’ key to change between PHOTO
mode and FILM mode.
5.Press Menu Button and select Shooting Mode (see below: colour / black
and white; or to adjust exposure)
6.Press Scan to Convert to Digital
7.When you have finished scanning images to SD card, you can then connect
the scanner to PC using the USB cable supplied and ‘drag’ saved images
to your computer.
Quick Menu Guide
1.Capture Picture Mode: A (select either slide, negative, or black and white)
B: exposure compensation (see page10 for details on exposure
compensation).
2.Playback mode: playback images and view on LCD screen.
3.Resolution: Select either 5 mega pixel or 10 mega pixel (interpolated)
4.Language setting:English, French, German, ltalian, Spanish,
Traditional Chinese, Simplified Chinese,Japanese.
5. Storage: MSDC mode (mass storage SD memory card)
1.B&W photos/slides/negatives: choose B&W (black and white) if you
are scanning black and white negatives/slides.
2. Select 2 (Slides) if you are scanning Slides.
3.Colour negatives: choose negative film if you are scanning negatives.
NOTE –When Scanning Photographs:
If you are scanning photographs (not slides or negatives) then press Menu button
to enter main menu. Then scroll left or right until you find symbol of scissors (Cut –
see image below). Then press Enter. Then select the size of photograph to be scanned
(5R, 4R or 3R). You can now begin scanning photographs.
5R(5”*7”)
4R(4”*6”)
3R(3.5”*5”)
Positive Film
Cut
Press menu key to enter into main menu – select Capture Picture
Mode – select EV option to choose exposure compensation, then
set exposure compensation by using the left and right arrows on
top of scanner.
After you enter into playback mode from main menu, image will be
shown on TFT LCD screen. Images can be scrolled through using
left key / right keys.
10
When image quality (5MP / 10MP) has
been selected, the image can be captured
(takes about 3 seconds). Once you have
pressed ‘scan’ you will see the scanned
image display on the LCD screen.
Main Menu Options
Capture Picture Mode
Shooting mode
Scanning amount available
Resolution
Sign to card
Mirror Image / Rotate Image
Scanning Negatives and Slides:
Select ‘Film types’ from the Main Menu. You then have the option of
selecting an image of a negative strip, or EV (see image above): select
the image of the negative strip and press Enter.
You then have the option of choosing Black and White (1), Slides (2),
or Colour Negatives (3). Make your choice.
9
If you need ‘mirror’ image or ‘rotate’ image BEFORE PICTURE HAS
BEEN SCANNED, you can press left key/ right key to adjust it, then
capture picture (press SCAN button).
8