1
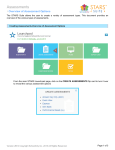
INTRODUCTION..............................................................................................................3
LICENSES AND HOW THEY WORK..................................................................................4
LOGGING INTO THE SYSTEM AS THE SCHOOL ADMINISTRATOR .................................4
THE SCHOOL ADMINISTRATOR CONSOLE .....................................................................4
MANAGING YOUR SCHOOL.............................................................................................6
TO EDIT A SCHOOL.......................................................................................................... 6
DISABLING FEATURES FOR A SCHOOL .............................................................................. 6
ADD/EDIT SCHOOL ADMIN ............................................................................................... 6
MANAGING TEACHERS ...................................................................................................8
ADD A TEACHER ACCOUNT............................................................................................... 8
TO ADD A TEACHER INDIVIDUALLY .............................................................................. 8
TO ADD MULTIPLE TEACHERS AT ONE TIME.................................................................. 8
EDIT A TEACHER ACCOUNT.............................................................................................. 9
MOVE TEACHER BETWEEN SCHOOLS ................................................................................ 9
DELETE A TEACHER ACCOUNT.......................................................................................... 9
MANAGING STUDENTS .................................................................................................10
UNASSIGNED STUDENTS................................................................................................ 10
ADDING STUDENTS ....................................................................................................... 10
TO ADD AN INDIVIDUAL STUDENT ............................................................................. 10
VIEW PASSWORD .......................................................................................................... 10
MAKE STUDENT INACTIVE.............................................................................................. 11
DISABLE STUDENT FEATURES ........................................................................................ 11
SELECT STUDENT’S SCHOOL .......................................................................................... 11
SELECT STUDENT’S TEACHER ......................................................................................... 11
SELECT STUDENT’S GRADE ............................................................................................ 11
TO ADD MULTIPLE STUDENTS AT ONE TIME ............................................................... 11
EDITING STUDENT ACCOUNTS ....................................................................................... 12
EDIT A SINGLE STUDENT ............................................................................................... 12
BULK EDIT - EDIT MULTIPLE STUDENTS ..................................................................... 12
MAKE A STUDENT INACTIVE........................................................................................... 13
ASSIGINING AN UNASSIGNED STUDENT ......................................................................... 13
DELETE A STUDENT ....................................................................................................... 13
STUDENT LISTS............................................................................................................. 13
PASSWORD LISTS .......................................................................................................... 13
DISK USAGE..................................................................................................................15
UTILITIES .....................................................................................................................15
CHANGE PASSWORD ...................................................................................................... 15
SUPPORT ...................................................................................................................... 15
EMAIL SUPPORT ............................................................................................................ 15
USER MANUALS ............................................................................................................. 16
STUDENT AND VISITOR WELCOME PAGE ........................................................................ 16
LOGIN PAGE .................................................................................................................. 16
REQUEST ADDITIONAL LICENSES ................................................................................... 16
LOGOUT........................................................................................................................ 16
2
INTRODUCTION
Pupil Pages is a web based application that enables students to produce professional looking
websites without having to know HTML or web design skills. These sites allow students to publish
samples of their school work so that they can develop a stylized and organized online portfolio.
While Pupil Pages sites can be used for a variety of purposes, they have been designed with the
online portfolio in mind. To this end, they include the ability to categorize and present samples of
work. There are optional features that can be enabled or disabled by site administrators, such as
a resume page, commenting utility and web journal page.
Pupil Pages has been developed with security in mind. There are many levels of security built into
the system, along with utilities that allow schools a high level of control.
There are several types of users. Each type of user will login to the system and have varying
levels of control. Types of users include:
1.
2.
3.
4.
5.
District Administrator
School Administrator
Teacher Administrator
Student Administrator
General Viewer
There are User Manuals available for all of these users with the exception of the General Viewer.
General Viewers are the people who can view student sites and submit comments if this feature
has been enabled.
User Manuals are available on our website at www.os4e.com/support/documentation.html.
3
LICENSES AND HOW THEY WORK
When you purchase Pupil Pages, you purchase a specific number of licenses. These licenses are
purchased by annual subscription. Licenses are ONLY ASSIGNED TO STUDENT USERS and NOT
to schools or teachers. Each student site that is created uses one license. When you add a
student, one license is subtracted from the total licenses available to your district. When you
delete a student, a license is then added to the available number. In this way, licenses are
transferable between students.
As you manage accounts within your district, you will see information relating to number of
licenses used and number of licenses available by district, school and teacher. This information is
useful when determining where and how your licenses are being used.
LOGGING INTO THE SYSTEM AS THE SCHOOL
ADMINISTRATOR
The School Administrator has access and control over all students and teachers assigned to their
school.
Your District Administrator (DA) has assigned a username and password to you. To log into the
system, go to this web page:
http://www.pupilpages.com/login.aspx
Enter your username and password and click the GO button. You will be redirected to your
admin console.
THE SCHOOL ADMINISTRATOR CONSOLE
The School Administrator (SA) has the ability to manage all teachers and students in their school
from this one console. When the SA logs in for the first time, they may not have any teachers or
students in their system. The SA can create teacher and student accounts for their school
When the SA logs in, the first screen they see is the TEACHER LIST screen. This screen provides
information about the teachers assigned to your school along with the number of students
assigned to each teacher. The available licenses are the number of licenses left that can be
assigned to students.
The SA can edit or delete school, teacher and student information from this screen..
The menu on the left of the screen gives the DA access to the following features:
1. Search – A quick way to find student users.
2. Edit School Account– Clicking the EDIT link will open the screen for modifying school
information. Some of this information will be pre-filled on your first visit, and some may
not.
3. Teachers
4
a. Add New Teacher – This is where the SA will add Teacher Accounts to the
system
b. View All Teachers– Allows the SA to view and access all information related to
the teachers in their district
c. Import Teacher Data - Allows SA to import multiple teachers at one time.
4. Student Accounts
a. Add New Students – This is where the SA will add Student Accounts to the
system
b. View All Students - Allows the SA to view and access all information related to
the students in their district
c. Unassigned Students – Unassigned students are students that have accounts,
but are not associated with a teacher. These accounts are not visible to the
public or accessible to the student (more on this below).
d. Import Student Data - import multiple student users
e. Bulk Student Edit - change the school, teacher and grade assignment for a
group of students, or delete a group of students.
5. Disk Usage – Information about disk space usage can be found here.
6. Utilities
a. Create Password Lists
b. Help – Clicking this link brings you to the Online Solutions For Educators
Support Area on our website where you can find documentation, FAQ’s and other
information.
c. Email Support – A quick way to send technical support your questions.
d. User Manual – View or download the user manual
e. Student and Visitor Welcome Page – This page allow for a simple way of
linking your student sites to your district or school websites. This is the page that
students and site visitors will enter from.
You will notice that clicking on a link on the left panel, brings up different screens on the right
side of the page. You will find information about each of these screens within this document.
5
MANAGING YOUR SCHOOL
You can edit information for your school by clicking the EDIT link under the SCHOOL menu
TO EDIT A SCHOOL
To EDIT your school, click the EDIT link beneath SCHOOL on the left navigation menu. The
screen on the right will change to the EDIT SCHOOL screen.
Fill in the following information for the school (some of this information will appear on the
students Pupil Pages websites).
Fill in:
•
•
•
•
•
•
•
School Name
Phone Number
School Address
City
State
Zip
Website – This is the school’s web address. Enter this in this format
http://www.sitename.com
The LICENSE section is there for your information. It tells you how many licenses were
purchased by the district and how many are in use and the number currently available.
DISABLING FEATURES FOR A SCHOOL
Note: Disabling these features on this screen will disable them for all students in your school. You
may also disable or enable these features for individual students. In this way, you can customize
settings for different aged students.
Hide Student Emails – If you would like to hide student emails addresses so that they don’t
appear on the student sites, check this box.
Disable Commenting – Check this box to disable commenting for student sites within this
school.
Disable Journals – Checking this box will disable the Journal page for all students in this
school.
Disable Resume - Checking this box will disable the Resume page for all students in this
school.
ADD/EDIT SCHOOL ADMIN
The School Administrator (SA) has their own username and password that was assigned by the
District Administrator. The SA can change all the SA information with the exception of the
6
username. Overwrite any information that you wish to change.When all the information has been
entered, click the SAVE SCHOOL button.
7
MANAGING TEACHERS
You may add an unlimited number of teachers to your system. Teachers are assigned to a school
when they are created, however, you may reassign teachers at any time. Students are assigned
to teachers, and they too can be reassigned to other teachers at any time.
When a school account is created, a School Administrator (SA) is assigned to that school school.
Your DA may retain the responsibility of creating teachers and students, or that task may be
assigned the you as the SA.
ADD A TEACHER ACCOUNT
There are two ways to add teachers to the system. You may add teachers individually, or you
may import a large number of teachers at one time.
TO ADD A TEACHER INDIVIDUALLY
To ADD a teacher to a school, click the ADD link beneath TEACHERS on the left navigation
menu. The screen on the right will change to the ADD/EDIT TEACHER screen.
Fill in the following information for the teacher:
Fill in:
• First Name
• Last Name
• Email
• Username – This is the username the teacher will use to log into the system.
• Password – This is the password the teacher will use to log into the system. You will be
asked to enter the password twice.
• Select a School – Choose the school this teacher will be assigned to from the drop down
menu. NOTE: You CAN assign teachers to schools other than your own,
however if you do so, you will not be able to access that teachers account.
This feature is handy in case you need to reassign a teacher to a new school.
The LICENSE INFORMATION section is there for your information. It tells you the name of the
school the teacher is currently assigned to and the number of students currently assigned to this
teacher. This information will be blank when you are first creating a new teacher account.
TO ADD MULTIPLE TEACHERS AT ONE TIME
To add multiple teachers at one time, you must use the spreadsheet that we have provided to
you. RIGHT CLICK on the link “TEACHER DATA IMPORT SHEET” to download the file to your
computer. YOU SHOULD USE A SEPARATE SHEET FOR EACH SCHOOL. Fill in the data on
the sheet making certain that you do not use any special characters or use spaces in your
usernames. Save your sheet on your computer.
To import the teacher data, click the IMPORT TEACHER DATA link on your main navigation of the
administrative console. Choose the school you want to place these teachers in. Browse to find
the file on your computer and click UPLOAD TEACHER DATA.
8
When the upload is complete, you will see the IMPORT TEACHER DATA RESULT screen. Any data
that was not imported will be listed on this screen. You can either correct the data here and click
the SAVE button, or choose the DOWNLOAD TEACHER ERROR DATA RECORDS link. Choosing
this link will allow you to save a new spreadsheet that contains ONLY the data that had errors. It
is best to save this file with a new name so you do not overwrite your original file. Once the
errors have been corrected you can upload your new data sheet with the corrected data. Your
teachers will now appear in the school you assigned them to.
EDIT A TEACHER ACCOUNT
To EDIT a teacher account, click the VIEW ALL link on the left navigation menu under
TEACHERS. You will see the TEACHER LIST appear on the right screen. Locate the teacher you
wish to from the list. Click the EDIT link next to this teacher to open the ADD/EDIT TEACHER
screen. Make any changes desired on this screen and click the SAVE TEACHER button.
MOVE TEACHER BETWEEN SCHOOLS
To move a teacher to a different school, simply select the school you wish to move the teacher to
on the SELECT A SCHOOL drop down menu on the ADD/EDIT TEACHER screen. All students
assigned to this teacher, will become UNASSIGNED. You will not be able to access the teacher
account from your school once you reassign them to a different school.
DELETE A TEACHER ACCOUNT
To delete a teacher, simply click the DELETE link next to the teacher’s name on the TEACHER
LIST page. Deleting a teacher will NOT delete the student accounts assigned to that teacher.
Students will become UNASSIGNED.
9
MANAGING STUDENTS
Student accounts can be added, deleted and managed by School Administrators (SA) or Teacher
Administrators (TA) as well as by the District Administrator (DA). When student accounts are
created, students are assigned to a school and to a teacher.
UNASSIGNED STUDENTS
Student accounts that have been created and are not assigned to a teacher are called
UNASSIGNED students. This happens if a teacher account is deleted or if a teacher is moved to
another school. That teacher’s students become UNASSIGNED. An UNASSIGNED student account
is NOT accessible to that student until it is assigned to a teacher. You will find a list of
UNASSIGNED students from the left navigation menu under STUDENT ACCOUNTS. Clicking this
link will bring up a list of UNASSIGNED STUDENTS in the entire district. You may then EDIT these
student accounts and assign them to schools and teachers.
ADDING STUDENTS
There are two ways to add students to your system. You can add them individually or import a
larger number of students at one time by using the import tool.
TO ADD AN INDIVIDUAL STUDENT
To add a STUDENT ACCOUNT, click the ADD link on the left menu under STUDENT
ACCOUNTS. This will display the ADD/EDIT STUDENT screen. Enter the following information
for the student:
•
•
•
•
•
First Name
Last Name
Email
Username – This is the username the student will use for logging into the system. It
must be a unique name. If the name you select is already in use, you will be prompted to
choose another. Usernames should not contain spaces or special characters. Only letters
and numbers are permitted.
Password – You will be asked to enter the password twice. Students will be able to
change their passwords when they are logged into their accounts. For security reasons,
there is no password retrieval system to email forgotten passwords. Students will need to
ask their teachers or School Administrators to retrieve or change forgotten passwords.
VIEW PASSWORD
If you would like the student’s site to be accessible for viewing by password only, enter a
password. This keeps the site password protected to the public.
10
MAKE STUDENT INACTIVE
Checking this box will make a student inactive. An inactive account is not accessible to the
student or visible to the public. Use this feature if you wish to temporarily disable a student
account without changing any of the student settings.
DISABLE STUDENT FEATURES
Changing these features on the ADD/EDIT STUDENT screen will change them for this student
only.
Hide Student Email – If you would like to hide student’s email addresses so it does not appear
on the student site, check this box.
Disable Commenting – Check this box to disable commenting for this student.
Disable Journals – Checking this box will disable the Journal page for this student.
Disable Resume - Checking this box will disable the Resume page for this student.
SELECT STUDENT’S SCHOOL
You MUST assign the student to a school by selecting the school from the drop down menu. You
can reassign students once they are assigned by editing their account.
SELECT STUDENT’S TEACHER
You MUST select a teacher from the drop down menu. You can easily reassign students by
editing the student account. Students who are not assigned to a teacher are UNASSIGNED.
These student accounts are not accessible to the student.
SELECT STUDENT’S GRADE
Select the grade that this student is in. If no grading system is used, choose N/A from the drop
down menu. Assigning a grade level to a student is helpful when using the bulk edit feature. For
example, you may want to select all students in the 6th grade and assign them to a new school
building at the end of the year.
TO ADD MULTIPLE STUDENTS AT ONE TIME
To add multiple students at one time, you must use the spreadsheet that we have provided to
you. RIGHT CLICK on the link “STUDENT DATA IMPORT SHEET” to download the file to your
computer. YOU SHOULD USE A SEPARATE SHEET FOR EACH TEACHER’S STUDENTS. Fill
in the data on the sheet making certain that you do not use any special characters or use spaces
in your usernames. Save your sheet on your computer.
To import the student data, click the IMPORT STUDENT DATA link on your main navigation of the
administrative console. Choose the school you want to place these students in. Next choose the
teacher these students will be assigned to. Browse to find the file on your computer and click
UPLOAD STUDENT DATA.
11
When the upload is complete, you will see the IMPORT STUDENT DATA RESULT screen. Any data
that was not imported will be listed on this screen. You can either correct the data here and click
the SAVE button, or choose the DOWNLOAD STUDENT ERROR DATA RECORDS link. Choosing
this link will allow you to save a new spreadsheet that contains ONLY the data that had errors. It
is best to save this file with a new name so you do not overwrite your original file. Once the
errors have been corrected you can upload your new data sheet with the corrected data. Your
students will now appear in the school you assigned them to and will be assigned to the teacher
you selected.
You will need to edit the rest of the student information. Tasks such as adding VIEW
PASSWORDS if desired, enabling or disabling features and assigning grade levels can be achieved
using the directions below for EDIT A STUDENT.
EDITING STUDENT ACCOUNTS
You can either edit an individual student or perform bulk edits of student accounts. Bulk edits are
helpful when changing a large number of student information at once, such as assigning
graduating students to a new building or deleting a large number of graduating students.
EDIT A SINGLE STUDENT
To edit a student account, you must navigate to find the student. There are several ways to
locate a particular student account. You can view schools or teachers in the system and click the
STUDENT link next to the name of the school or teacher to list only those students associated
with that school or teacher, or you can locate a student by clicking VIEW ALL on the left
navigation menu under STUDENT ACCOUNTS.
Click the EDIT link next to the name of the student you wish to edit. Make any changes desired
on this screen and click the SAVE STUDENT button.
BULK EDIT - EDIT MULTIPLE STUDENTS
To make changes to a larger number of students at one time, you may want to use the BULK
EDIT tool. To access the BULK EDIT tool, click the BULK STUDENT EDIT link in the STUDENT
ACCOUNTS section of your administrative console.
The first step in performing a bulk edit, is to search for particular students by some criteria. You
may search for students by school assignment, teacher assignment or grade. You can also
narrow your search by selecting multiple criteria, such as all 6th grade students assigned to Ms.
Smith. Select a school, teacher and grade to search by and click the GO button. The students
that fit your search criteria will appear in the left side of your selection boxes. You can narrow
your selection further by CTRL + Click on the names you wish to edit. With the names selected,
click the >> button to move these selected students to the right side of your selection screen.
To select ALL of the students on the left side, click the >>>> button.
Clicking the << button will move all selected students back to the left or “unselected” window. Or
you may select individual students and deselect by clicking the << button.
Once you have selected the students you wish to edit (by having them appear on the RIGHT side
of the selection screen, click the CONTINUE BUTTON.
12
You will now see the REASSIGN STUDENTS screen. Select the new school, teacher or grade and
click the REASSIGN STUDENTS button to complete reassignment. If you are deleting the
students, make certain that the names have a check next to the students you wish to delete and
click the DELETE STUDENTS button. You can select or deselect ALL the students on this list by
checking the top checkbox.
MAKE A STUDENT INACTIVE
To temporarily disable a student account, check the MAKE STUDENT INACTIVE box on the
student edit screen.
ASSIGINING AN UNASSIGNED STUDENT
Unassigned students are students that are not associated with a teacher or school. Students
become unassigned if you delete a teacher account, or move a teacher to a new school. Any
student assigned to a teacher will become UNASSIGNED if that teacher account is moved.
To locate UNASSIGNED STUDENTS, simply click the UNASSIGNED STUDENTS link on the left
menu under STUDENT ACCOUNTS. You will see a list of all students that are not assigned to a
teacher. Click the EDIT link next to the student you wish to assign. From the drop down menus
at the bottom of the screen, select the school and the teacher you wish to assign the student to.
NOTE: UNASSIGNED STUDENTS cannot access their accounts until they are assigned.
DELETE A STUDENT
To delete a student, click the DELETE link next to the students name on the any student list
page. You will be asked to confirm the action. Deleting a student will delete any files associated
with that student.
NOTE: If you accidentally delete a student, and you wish to reinstate the account, you must
contact our support department within 30 days of deleting the account. There is a small fee to
reinstate a deleted student. Contact support at [email protected] .
STUDENT LISTS
Teachers can create and manage lists of students within their school. This utility is only available
to TA users when they are logged in. Please see the Teacher User Manual for more information
about this feature.
PASSWORD LISTS
As the School Administrator you have the ability to create list of students’ usernames and
password for printing. You can create these lists by clicking CREATE PASSWORD LIST on the left
menu. Select CREATE PASSWORD LIST FOR SCHOOL or TEACHER to create a list. Selecting your
school will give you all students that are assigned to that school. Selecting a teacher will display a
list of all students assigned to that teacher. You can VIEW LIST or DOWNLOAD CSV LIST
depending on what you need to do with the list. VIEW LIST displays the information on the
screen. You can print this list using your browsers print function. DOWNLOAD CSV LIST will
13
display the list with commas separating the values. This is useful if you would like to copy and
paste the information into a spreadsheet.
14
DISK USAGE
The DISK USAGE links give you general information about how your district and schools are
utilizing the system. Here you will find information about the number of accounts used and
remaining, as well as information about disk space usage by your district.
DISTRICT STATS
Click the VIEW link next to DISTRICT STATS to see the following information:
•
•
•
•
•
•
Maximum Licenses – This is the number of licenses purchased by your district.
Student Count – This is the number of students currently in the system.
School Count – This is the number of schools currently in the system.
Teacher Count – This is the number of teachers currently in the system.
Disk Space Used – This is the amount of hard disk space in megabytes currently being
used.
Disk Space Left – This is the amount of hard disk space in megabytes the district has
available.
NOTE: Your purchase includes a total of 10 megabytes of hard disk space per student account.
If you exceed the allotted amount of space, you will be charged for the additional disk space
usage.
SCHOOL STATS
Click the VIEW link next to SCHOOL STATS to see the following information for each school in
your district:
•
•
•
Student Count – This is the number of students assigned to each school.
Teacher Count – This is the number of teachers assigned to each school.
Disk Space Used – This is the total amount of hard disk space in megabytes for each
school.
UTILITIES
Here you will find additional utilities to help you manage your sites.
CHANGE PASSWORD
To change your SCHOOL ADMINISTRATOR password, click this link. Enter your current password
and the new password you wish to change to. Click SAVE PASSWORD to change your password.
SUPPORT
Clicking the SUPPORT link will direct you to the support area of the Online Solutions For
Educators™ website.
EMAIL SUPPORT
This is a quick link for sending email to our support department.
15
USER MANUALS
This is a quick link to all the Online Solutions For Educators™ user manuals section of our
website.
STUDENT AND VISITOR WELCOME PAGE
http://www.pupilpages.com/welcome.aspx
This page is the login page that you will use for site visitors. Students may also enter from this
page or directly from the LOGIN page. Visitors must enter a students username to be redirected
to their website. If the individual student site is password protected for viewing, the visitor will be
prompted for a password. You may want to link to this page from your school or district website.
LOGIN PAGE
http://www.pupilpages.com/login.aspx
Use this page to log into all administrator accounts. This page can also be used for students to
log into their sites when they wish to edit.
REQUEST ADDITIONAL LICENSES
If you would like to request additional student licenses, you may use this link to contact us.
LOGOUT
Use this link to logout of the system.
16