1
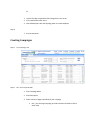
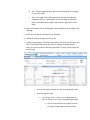
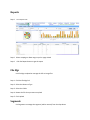
User Manual
Contents
Creating Templates ....................................................................................................................................... 3
Creating Campaigns ...................................................................................................................................... 4
Manage prospects......................................................................................................................................... 6
Reports .......................................................................................................................................................... 7
File Mgr ......................................................................................................................................................... 7
Segments....................................................................................................................................................... 7
Email Manager .............................................................................................................................................. 8
User Manager ............................................................................................................................................... 8
Creating Templates
Step:1
Go to Templates tab
Step: 2
1. Enter the template name
2. Select the type of the template
a. Landing Page – this is the page visitor lands on when they visit PURLs
b. Content Page – This is the second page after the landing page to interact with
the visitor (provide or gather information)
c. Thank you Page – This is typically the third or last page, thanking visitor for their
actions.
3. Enter the description about the page.
Step: 3
1. Use the File Mgr to upload the CSS & image files to the server.
2. Edit your html file to update the URL to point to the CSS image files
a. "/src="/userfiles/muruganexports.com/image/filename.jpg" /"
3. Click the
image to upload the HTML file
4. Click Create button
Or
1. Use the File Mgr to upload the CSS & image files to the server.
2. Click create button after step 2
3. New window opens with the Wysiwyg editor to create templates
Step: 4
1. Preview templates
Creating Campaigns
Step:1
Go to Campaigns tab
Step:2
Fill in all the required fields
1. Enter campaign Name
2. Enter Description
3. Select number of pages (workflow) of your campaign
a. One - just one page campaign (provide information & divert traffic to
other sites)
b. Two - content page (provide or gather information) & Thank you page
for the action taken
c. Three – first page is the landing page which will have Passcode field
enabled(for privacy) , second page is the content page to (provide or
gather information) & third page is the thank you page for the action
taken.
4. Select the templates for the landing page, content page & thank you page of the
campaign
5. Select the start date and end date of the campaign
6. Upload the mailing list (prospects list) csv file
7. Configure Segmentation: Select the segmentation field from the drop down and
click on the segmentation (small icon) icon to configure the segmentation,
when you click the small icon besides segmentation, an alert will pop up like the
below image
i. Click the new segment button to enter the new segment value
ii. Enter the segment value
1. For example: blue , in case if you are segmenting by
color or Honda, in case if you are segmenting by make.
a. The csv file should have the segment value on
the segment field and that value should be
mapped to a particular template on the
segment manager.
2. Choose the template for the segment value. That
particular template will be served when a prospect of
that particular segment visits.
8. Click the create button, It saves the campaign and returns the csv file with the
PURL. Pass this CSV file to the printer to get this PURL on the printed piece.
Manage prospects
Step:1
Go to Prospects Tab
Step:2 Enter the First Name or Enter the Last Name or State or Zip or Campaign
Step: 3 Click the search button
Reports
Step:1
Go to Reports Tab
Step:2 Select campaign or Date range or purl or page visited
Step:3
click Get Report button to get the report
File Mgr
Use File Mgr to upload or manage the CSS or image files
Step: 1 Click the File Mgr link
Step: 2 Select the Resource Type
Step: 3 Select the Folder
Step: 4 Browse the file that you want to upload
Step: 5 Click Upload
Segments
Use Segments to manage the segment (add or remove) from the drop down
Step: 1 Click Segment
Step: 2 Click New Value
Step: 3 Enter a value (segment) for example: color or make or model etc.,
Step: 4 Click save
Step 5: Make sure the value appears on the drop down on the left
Email Manager
Use email manager to add or remove email alert recipients
Step: 1 Click Email Manager
Step: 2 Click New Email
Step: 3 Enter email id & select the type of alerts that the email should receive
Step: 4 Click save
Step 5: Make sure the email appears on the drop down on the left
Step 6: Click Remove to delete email configuration settings
User Manager
Use user manager to add or remove users (admin or reports only user)
Step: 1 Click user Manager
Step: 2 Click New User
Step: 3 Enter user id & password and hint
Step: 4 Choose report only or admin level access and save user
Step 5: Make sure the email appears on the drop down on the left
Step 6: Click Remove to delete email configuration settings