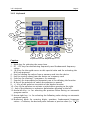
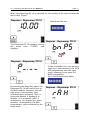
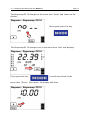
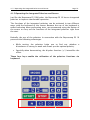
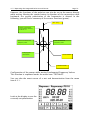
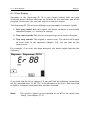
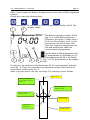
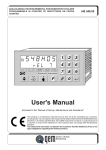
1
Rayocomp PS 10
Portable High-Performance Bio-Resonator
User Manual
Art.-Nr.: 9100EN
In spite of all the information, advice and suggestions for solving problems, this book cannot
replace a visit to an alternative practitioner or a doctor orientated to natural healing. Also,
we must point out that the classic orthodox medicine still does not accept or acknowledge
the interrelations presented in this manual.
1. Contents
Page 2
1. Contents
2
2. Conformity Declaration
4
3. Basics of the Rayocomp PS 10
5
3.1 Volume of Delivery
5
3.2 Technical Data
5
3.3 Safety Instructions as to Operation
6
3.4 Guarantee
6
3.5 Cleaning
6
3.6 Understanding the Device
7
3.6.1
3.6.2
3.6.3
3.6.4
Front View
Rear View
Keyboard
Display
4. User Manual
4.1 General Directions for Operation
4.1.1 Literature Relating to the Bio-Resonance
According to Paul Schmidt
4.1.2 Charging the Integrated Power Pack
4.1.3 Switching the Device On and Off
4.1.4 Selecting the Menu with the Mode Key
4.1.5 Operating the Integrated Polariser and Sensor
4.1.6 Basic Information for RAH ‘Green Card’
4.1.7 Error Display
4.2 Menu Item “Direct“
4.2.1 Testing and Harmonising a Fundamental Frequency
Value with the Integrated Polariser and Sensor
4.2.2 Setting Up Individual Fundamental Frequency Values
4.2.3 Automatic programme sequence by using a RAH ‘
Green Card’
4.3 Menu Item “F1“
4.3.1 Basics Concerning the Use of Integrated Programs
4.3.2 Composing and Harmonising Various
Harmonising Programs
4.3.3 Loading Fundamental Frequency Values from
Memory Cards and Harmonising
4.3.4 Fundamental Frequency Values from the Menu
Item “Test“ - Taking Over and Harmonising
4.3.5 Utilising the Harmonising Programs of the new RAH
7
8
9
10
11
11
11
12
13
14
18
20
21
22
22
23
24
25
25
26
29
29
30
1. Contents
Page 3
4.4 Menu Item “Test“
4.4.1
4.4.2
4.4.3
4.4.4
4.4.5
4.4.6
4.4.7
4.4.8
Testing Range Values
Testing with Memory Card Values
Testing with Integrated Programs
Testing with Integrated Test Programs
RAH-Module 10: Level test
RAH Module 10: Test with integrated test protocols
RAH Module 10: Test with the RAH ‘Green-Card’
Important tips and tricks for testing with the RAHModule 10
4.5 Menu Item “Setup“
4.5.1
4.5.2
4.5.3
4.5.4
4.5.5
Set-Up of Background Illumination
Deleting Double Values in the F1 Programs
Adjusting the ‘Attention’ Sound (Beep)
Pre-Setting the Test Range Values
Presetting the harmonisation time for Fundamental
Frequency Values
4.5.6 Activating and Deactivating Modules
4.5.7 Storing Fundamental Frequency Values on
Memory Cards
4.5.8 Displaying Memory Card Information
4.5.9 Providing Read-Protection for a Memory Card
4.5.10 Providing Write-Protection for a Memory Card
4.5.11 Deleting a Memory Card Completely
4.5.12 Initialising a Memory Card
4.5.13 Motor Test Run of the Frequency Module
35
37
38
38
39
40
44
45
46
49
50
50
51
51
52
53
54
55
56
56
57
57
58
4.6 Menu Item “Info“
59
4.7 Special Function Keys
61
4.7.1 Using the IF-Keys
4.7.2 Using the 10.0-Key
61
61
5. Appendix
5.1
5.2
5.3
5.4
5.5
5.7
5.8
Summary
Summary
Summary
Summary
Summary
Summary
Summary
62
of
of
of
of
of
of
of
the
the
the
the
the
the
the
Integrated Test Programs
Integrated Rayonex Programs
Integrated Acupuncture Programs
Integrated Special Programs
Integrated Programs by Dr. Ulrich
Modules for Integration
Possible Error Messages
6. Private Documents
62
63
64
65
66
67
68
70
2. Conformity Declaration
Page 4
3. Basics of the Rayocomp PS 10
3.
Page 5
Basics of the Rayocomp PS 10
3. 1 Volume of delivery
The delivery volume consists of:
1.
2.
3.
4.
5.
6.
7.
The RAYOCOMP PS 10
Integrated polariser
Integrated power pack
Battery charger
User Manual
Transport case
Cardboard packing box
It is absolutely necessary to keep the packing; in case you have to return the
device for maintenance (e.g. for servicing), please send it back in its
transport case and the cardboard box. We cannot take over the guarantee for
insufficient packing.
If the old packing material gets lost, we can replace it on request, liable to
costs.
When sending back the device, please make sure that all additional parts
and accessories are secured inside the case! In case you intend to send
back the PS10, please always include the appurtenant charging set.
3.2 Technical Data
Weight of the Rayocomp PS 10:
Weight including case and accessories:
Height:
Width:
Depth:
Power supply for charging:
Max. reception capacity for charging:
Operation time with a fully charged
power pack:
Range of the operation temperature:
1.6 kg
9.7 kg
100 mm
160 mm
260 mm
100 – 240 V alternating current,
17V/8.4 V secondary direct
current
24 W
8 hours (at least)
15° C - 35° C
The device should not be exposed to great thermal fluctuations, otherwise
you run the risk of condensation build-up inside.
If the instrument has cooled down (i.e. during transportation) to very low
temperatures (below 5° C), you have to make sure it is sufficiently
acclimatised within the working temperature range mentioned above before
switching it on.
3. Basics of the Rayocomp PS 10
Page 6
3.3 Safety Instructions as to Operation
The Rayocomp PS 10 is charged with a direct current. The charging rate
is 800mA. Please note that the Rayocomp PS 10 may only be used with a
battery charger supplied by Rayonex.
• Therefore, make sure that no humidity can penetrate the power pack
(short-circuit risk).
• Prevent any persons, i.e. children, from poking sharp metal items into
the device (power stroke risk).
• Make sure that the connection cables belonging to the delivery
volume of the detectors are only used for connecting the device with
the detectors.
• Use the Rayocomp PS 10 in power pack mode only and never with the
charging cable plugged in.
When using the detectors (especially the pointed detector for
acupuncture points), be sure to handle them with care (risk of eye injury,
...).
3.4 Guarantee
The warranty period runs for 1 year from the date of delivery on and is only
valid for instruments that have not been opened, with the intact guarantee
seal as evidence. Improper use of the device invalidates the warranty claim.
In conformity to general conditions for inspection, service is liable to costs,
even if this becomes due within the warranty period.
3.5 Cleaning
The surface of the device should be cleaned with a soft cloth and a small
amount of alcohol once a week. Never treat the device with strong cleaning
agents.
The detectors, which come into close contact with the patients (i.e. hand and
foot detectors), need cleaning after every use - preferably with alcohol.
3.6 Understanding the device
Page 7
3.6 Understanding the Device
In the chapters of this user manual, you will often find instructions referring
to keys or segments of the Rayocomp PS 10. In the following, you can see
pictures of the device accompanied by short descriptions in order to simplify
the assignment.
3.6.1 Front View
1
2
3
4
5
6
7
Front view of the Rayocomp PS 10
Caption:
1: Display
2: Keyboard
3: Three exit hubs for connecting the hand, foot or Velcro detectors and the
measuring and protection cups
4: Sensor connection. For a correct connection, please insert the sensor plug
and then fasten it by twisting the knurled screw.
5: Entry hub
6: Memory card
7: Memory card insert
3.6.2 Rear View
Page 8
3.6.2 Rear View
1
2
5
3
4
Rear view of the Rayocomp PS 10
Caption:
1: ON-OFF switch
2: Charging socket
3: Charging plug which is inserted in the charging socket for the charging
process
4: Interface for program updates
5. Sticker indicating the serial number, year of construction etc.
3.6.3 Keyboard
Page 9
3.6.3 Keyboard
1
2
3
4
5
14
6
13
7
12
8
9
10
11
Keyboard of the Rayocomp PS 10
Caption:
1: Mode key for selecting the menu item
2: IF1 – IF3 keys for determining frequently used fundamental frequency
values
3: 10.0 key for the rapid access to this special value and for activating the
M10 test protocol.
4: Key for loading the values from a memory card into the device
5: Key for storing values from the device on a memory card
6: Start key for starting F1 programs, for example
7: Stop key for interrupting an automatic run or for deleting the function
8: N key of the polariser to switch the polariser to neutral
9: +/– key of the polariser to switch on the bipolar function
10: + key of the polariser to activate a polarisation gyrating to the right
11: - key of the polariser to activate a polarisation gyrating to the left
12: Arrow-left key, i.e. for selecting the previous value during an automatic
program course
13: Arrow-right key, i.e. for selecting the following value during an automatic
program course
14: Numerical block for entering digits, numbers, fundamental frequency
values – C deletes, the decimal point indicates a precise value (i.e. 12.75).
3.6.4 Display
Page 10
3.6.4 Display
9
1
2
3
8
4
5
7
6
Display of the Rayocomp PS 10
Caption:
1/2: Numbering the modules. All in all, the Rayocomp PS 10 is intended for
the activation of 12 different modules. If you select the menu item “Info”
the modules already activated in the device are displayed.
3:
Here, the current service state of the device is indicated. After approx.
6000 operation hours or when your device hasn’t been in service for
about three years, it will indicate 100 % (service is due).
4:
In the menu item “F1“, you can read the remaining total harmonising
time here.
5:
This displays the polarisation type which is currently set.
6.
Here you can read, which menu item has been selected.
7.
This symbol shows you the charge status of the battery pack. If all 4
bars can be seen on the display, the accumulator is full. If no bar is
indicated, the accumulator is empty.
8.
During harmonisation with BnPS-programmes, the remaining duration of
the harmonising appertaining to the current basic frequency value will
be shown at this place.
9.
Here, the currently set fundamental frequency value is indicated. We
have selected a large numeral display for better reading comfort.
4. User Manual
Page 11
4. User Manual
4.1 General Directions for Operation
4.1.1 Literature Relating to the Bio-Resonance According to Paul Schmidt
It cannot be the ambition of a user manual to
explain all facets and possibilities of a method
within such a complex area as bio-resonance as
developed by Paul Schmidt.
Meanwhile, there is sufficient literature on the
market from which you can take the application
possibilities of the method. For example, we
recommend the book "Bio-resonance as
developed by Paul Schmidt“ with a total of 424
pages.
This book can be obtained from the publisher.
The address is:
Spurbuchverlag
Am Eichenhügel 4
96148 Braunach, Germany
Phone: +49 (0)9544 1561
Internet: www.spurbuch.de
E-mail: [email protected]
4.1.2 Charging the Integrated Power Pack
Page 12
4.1.2 Charging the Integrated Power Pack
The Rayocomp PS 10 posseses an integrated battery pack to enable the
application of the device without needing to connect it to the mains supply.
As a matter of principle, the Rayocomp PS 10 should never be used while
it is still being charged.
The Rayocomp PS 10 is charged in the quickest way when switched off. An
empty battery pack requires approx. 4 hours for complete charging.
In order to avoid unnecessary electro-magnetic pollution, please unplug the
charging unit when it is not being used.
And this is how you charge the Rayocomp PS 10:
1. Switch off the device
2. Connect the charging unit to the mains supply
3. Plug the charging cable into the rear of the device
(see chapter 3.6.2)
4. The charging unit indicates the various charging
processes. When the LED turns green, the charging
process is complete and you can use the device
again.
5. Please disconnect both the plug from the rear
panel of the device and the charging set from the
electrical outlet.
Function
Standby:
yellow green
charging device in stand-by mode, ready
to charge
Pre-charge: tests whether charging is required
glows
blinks
slowly
blinks
rapidly
blinks
slowly
Rapid charge: power pack is charged with constant current
Maintain:
charging power is reduced
Error:
charging cannot start
Ready:
the Rayocomp PS 10 is ready for use
Wait:
charging device is not ready yet
blinks
rapidly
glows
blinks
slowly
blinks
slowly
Note: The charging status of the power pack is always displayed. This bar
indicator allows you to estimate the length of time left for operation before it
becomes necessary to recharge the device.
4.1.3 Switching the Device On and Off
Page 13
4.1.3 Switching the Device On and Off
On the rear wall of the Rayocomp
PS 10, you will find the switch for
switching the device on and off.
When switching on, please make
sure that no memory card is
inserted in the device. In case your
PS 10 is not under supervision for a
longer period of time (overnight,
for example), make sure that the power pack is charged sufficiently. Total
discharge, even if it happens only once, damages the power pack
permanently.
After the device is switched on, a short trial run is started. A mechanical test
is performed, along with a check of the power pack. If you receive the
message “Er 29”, the power pack must be recharged before you can work
with the device. Then the device switches over to the menu item “Direct” and
is immediately ready for action. The display shows:
It is not necessary to move to a certain menu item before switching off the
device. This means you can switch off the device at any time. Please keep in
mind that the resonance values and the found RAH programmes detected in
the menu item “Test” are lost when the device is switched off. When the
status of the power pack goes down until its functions can no longer be
guaranteed, a ‘blip’ can be heard several times. In this case, the power pack
must be recharged immediately to avoid damage.
Important information:
You cannot damage your device by switching it off arbitrarily. Neither
will the integrated harmonising programs be lost nor will your hardware
suffer damage.
4.1.4 Selecting the Menu with the Mode Key
Page 14
4.1.4 Selecting the Menu with the Mode Key
The Rayocomp PS 10 has a selection of menu items. Every menu item
provides certain application possibilities. Therefore, partitioning into single
menu items serves as a means for simplifying operation. The following menu
items are available:
1. Menu Item "Direct": Use this menu item for the rapid output of single
fundamental frequency values. You could say this
menu item covers the functions of the old Rayometer.
2. Menu Item “F1“:
As a matter of principle, the Menu Item “F1” includes
two separated programmes. On the one hand, the
BnPS programme, which is indicated by “BnPS” on the
display. After a short time, the representation will
switch over to P_.__. By means of the BnPSprogrammes, you can automatically run the
harmonising programmes installed in the device or
prepared by yourself on the memory card, provided
the modules have already been activated in the device.
The RAH programme, which is also found under the
Menu Item F1, is shown only if it has effectively been
activated. The RAH module is marked by the
indication “RAH” in the display. After a short time, the
RAH prompt _ _ . _ _.will appear. In the following
explanations, the menu item RAH will be indicated
with “F1-RAH”, in the same way, the Fundamental
Frequency Values are harmonised in “F1-BnPS”.
3. Menu Item “Test“:
This menu item provides all possibilities for testing
fundamental frequency values. If the M10 module is
activated, RAH-programmes can also be tested. The
display is identic to menu item “F1”. The manual
differentiates between “test-BnPS” and “test-RAH”.
4. Menu Item “Setup“: With this menu item, you can alter pre-settings of the
device, call up information concerning the memory
cards, activate or de-activate modules and perform a
device test.
5. Menu Item “Info“:
Select this menu item to gain information concerning
the serial number of the device. It will also indicate
the current state of the integrated software and the
existing hardware. Particularly important: you can see
directly, which modules are integrated in the
Rayocomp PS 10.
4.1.4 Selecting the Menu with the Mode Key
Page 15
When the Rayocomp PS 10 is switched on, the display of the device shows the
menu item “Direct”:
Now press the key:
The Rayocomp PS 10 changes over to
the menu item “F1-BnPS“ and
displays:
If now the Mode key is not pressed
again for a short moment, the PS10
will automatically start the input
mask, allowing you to enter the
BnPS programmes.
Press the following key again:
By pressing the Mode key again, the
Rayocomp PS 10 will switch over to
the RAH module. However, this will
only occur if the modules have
effectively been activated. Thus, if
either the Module 8, Module 9 or
Module 10 is activated, “RAH” is
indicated in the display for a short
moment. Subsequently, the RAH
programmes can be entered via the
input mask _ _ . _ _.
4.1.4 Selecting the Menu with the Mode Key
Page 16
After having pressed
again, the Rayocomp PS 10 changes
to the menu item “Test” and shows
on the display:
If the module 10 is activated, the menu item “Test RAH” will be shown on the
display after the menu item “Test-BnPS”. By pressing on the key “mode” once
again, this menu item can be selected.
If the key “mode” isn’t pressed once more, after having selected the menu
item “Test-BnPS”, the following prompt will appear:
Here, BnPS fundamental frequency
values can be tested. For further
information take a look at chapter
4.4
Please press again the key:
4.1.4 Selecting the Menu with the Mode Key
Page 17
The Rayocomp PS 10 changes to the menu item “Setup” and shows on the
display:
Once again, press the key:
The Rayocomp PS 10 changes over to the menu item “Info“ and displays:
If you press the key
no
you will move back to the
menu item “Direct“. Once more, the display will show:
4.1.5 Operating the Integrated Polariser and Sensor
Page 18
4.1.5 Operating the Integrated Polariser and Sensor
Just like the Rayocomp PS 1000 polar, the Rayocomp PS 10 has an integrated
polariser to improve comfortable operation.
The functions of the integrated polariser can be activated in two different
ways, with the keyboard or the sensor. Because the use of the keyboard is
rather bothering when performing tests, we recommend using the button of
the sensor to carry out the functions of the integrated polariser right from
the start.
Basically, the use of the polariser in connection with the Raycocomp PS 10
posesses the following advantages:
•
While testing, the polariser helps you to find out, whether a
disturbance is strong or weak and shows you the optimal polarity.
•
Specially when harmonising, the bi-polar function (+/-) intensifies the
effect.
These four keys enable the utilisation of the polariser functions via
keyboard:
4.1.5 Operating the Integrated Polariser and Sensor
Page 19
However, the functions of the polariser can also be set to the sensor directly
while testing. Moving the sensor button in direction of the connection cable
backward, the current polarisation of the frequencies is altered. In the
following, you will find a summary of the sensor functions (green):
Wire spring
Storing a resonance
in the internal memory
of the PS 10
Previous fundamental
frequency value
Changing the
polarisation
Next fundamental
frequency value
Sensor button
Wooden handle
Configuration of the sensor while testing Fundamental Frequency Values.
This function is explained under the menu item “TEST-BnPS”.
You can take the exact course of a test and harmonisation from the menu
item 4.2.1.
Look at the display to see the
currently set polarisation:
4.1.6 Basic Information for the Rayonex ‘Green Card’
Page 20
4.1.6 Basic Information for the Rayonex ‘Green Card’
The idea of the new RAH ‘Green Card’ is as simple as it is brilliant. Previously,
when harmonising programmes were determined with the Rayocomp PS 1000
polar or Rayocomp PS10 by means of RAH, for future use, these had to be
noted or printed. With the new RAH ‘Green Card’ these programme
compilations can now be stored on a special memory card. Thus, it is now
possible to, e.g. , store the tested programmes of the Rayocomp PS 1000
polar on an RAH ‘Green Card’ and to give the RAH ‘Green Card’ to the patient
for his home therapy with the Rayocomp PS 10. Both devices work together
hand in hand.
As the RAH-programmes are often harmonised with different times, an RAH
‘Green Card’ can not only store the RAH-programmes, but also its individual
harmonising times. The RAH ‘Green Card’ works perfectly with the new test
possibilities of the module 10. Just imagine, you want to select and test all
relevant RAH-programmes dealing with hypertension. All RAH-programmes,
that need to be harmonised can be analysed and can be stored on the RAH
‘Green Card’ after the test. While storing, both, the PS 1000 polar and the PS
10, add automatically well-proven harmonising times. Furthermore, the
values stored on the RAH ‘Green Card’ can be read in for a further test. This
saves a lot of time and avoids entering errors.
Up to 200 RAH-programmes with their individual harmonsing times can be
stored on an RAH ‘Green Card’. Of course, you can delete the RAH ‘Green
Card’, store new values on it and alter it with write protection. But, that’s not
all! An RAH ‘Green Card’ combines the Bioresonance according to Paul
Schmidt and RAH seamlessly. As the use of RAH-programmes is often
accompanied by single frequencies of the Bioresonance according to Paul
Schmidt (e.g. from an individual range value test), the Rayonex engineers
found a way, to store single frequencies (up to 500 different values), as well
as RAH-programmes on the RAH ‘Green Card’. In addition, a special function
was created under the main menu item of the Rayocomp PS 1000 polar and
the Rayocomp PS 10. If you insert an RAH ‘Green Card’, an automatic
harmonisation sequence begins. At first, the single frequencies, stored on
the RAH ‘Green Card’, are harmonised with the time according to the setup,
and after that the stored RAH-programmes with their individual harmonising
time.
Thus, an RAH ‘Green Card’, compiled by the therapist, can easily be used by
the patient at home. After inserting the RAH ‘Green Card’ in the menu
“Direct”, the harmonisation run starts automatically.
4.1.7 Error Display
Page 21
4.1.7 Error Display
Operation of the Rayocomp PS 10 is very simple indeed. Still, you may
accidently press a button which has no function for this particular part of the
program. In this case, the user will receive an acoustic signal.
The Rayocomp PS 10 has three different error messages or acoustic signals:
1. One long sound: With this signal, the device confirms a successfully
completed action, i.e. an entry or storage.
2. Two short sounds: The key you are pressing has no current function.
3. Two long sounds: This signals a severe error. The device will supply
an error code. In the appendix (chapter 5.8), you can look up the
current error.
For example, if an error has been detected, the device might indicate the
following:
If you look into the list in chapter 5.8, you will find the following information
for the indicated error “Er 88“ (“Er” is the abreviation for error): you have tried
to read in a memory card which has not been inserted.
Note:
The acoustic signal can be switched on or off in the menu item
“Setup” (see chapter 4.5.3).
4.2. Menu Item “Direct“
Page 22
4.2 Menu Item „Direct“
4.2.1 Testing and Harmonising a Fundamental Frequency Value
with the Integrated Polariser and Sensor
It makes no difference whether you want to test a fundamental frequency
value, an allergen, a parasite, a Chakra etc., the course of testing and
harmonising is always the same.
Here is the description of a liver test (fundamental frequency value 56.00) as
an example.
Before beginning with the testing process, please consider whether you are
testing yourself or another person. For a self-test, connect yourself to the
hand and foot detectors or the Velcro detectors. You hold the sensor in your
right hand for the test, your index finger must touch the knurled screw of the
sensor. The frequency spectra of the device also enter the circulation of your
right arm in this way. If you are testing another person, your patient is
connected to the hand and foot detectors or Velcro detectors, too. In this
case, your index finger must not touch the knurled screw to avoid accidental
testing of your own resonances.
Now set the fundamental frequency value 56.00 (example) in the menu item
“Direct” to the Rayocomp PS 10. The polariser integrated in the device is set
to N. Test with the sensor to find out whether you achieve a rotation (left or
right motion) or a linear movement. A rotation means that the field in the
organism linked to the fundamental frequency value is stable and therefore
does not require treatment. If, however, the achieved motion is linear, this
patient is suffering from an energetic blockade.
If you want to know more precisely, which type of polarisation is most
suitable for helping the organism, or if you want to find out whether the
disturbance is strong or weak, press the button backward after having tested
a linear movement on N. Now the polariser is switched over to polarisation
+/-. If the sensor starts rotating, the disturbance is not very strong. However,
if the linear movement continues when set to +/- polarisation, the
disturbance is stronger. Press the button backward and test whether the +
polarisation, which is now set, leads to a rotation. Rotation indicates that the
+ polarisation is most suitable for harmonisation. If still no rotation is
achieved, press the button of the sensor once more backward. Now you will
see a rotation on the – polarisation.
Harmonisation has been completed as soon as the sensor performs a
rotation when the polariser is set to N.
4.2.2 Setting Up Individual Fundamental Frequency Values
Page 23
4.2.2 Setting Up Individual Fundamental Frequency Values
The menu item “Direct“ provides the Rayocomp PS 10 with the functions of
the former Rayometer. But now, with the new Rayocomp PS 10, it is no longer
necessary to adjust the fundamental frequency value manually. You simply
enter the value with the help of the keyboard and confirm with the OK-key.
The device adjusts the value itself.
Example: setting the fundamental frequency value 56.00
After switching on your device, you arrive in the menu item “Direct”. The
display shows:
Note:
Please note, that entering
commas is, in this case,
optional. However, the
comma can be helpful when
entering one-digit values.
That’s why, the entry of
is interpret as fundemanetal
frequency value of 6.00.
Now press the following keys:
The Rayocomp PS 10 sets the fundamental frequency value 56.00 and
displays:
Beneath the fundamental frequency
value
you
can
see
numerals
indicating the running time (here: 1
minute and 12 seconds).
Now please work according to the
explanations in chapter 4.2.1, to test
the value with the polariser or to
harmonise it.
A new fundamental frequency value
can be set at any time.
4.2.3 Automatic programme sequence when using an RAH ‘Green Card’
Page 24
4.2.3 Automatic programme sequence by using a RAH ‘Green Card’
In chapter 4.1.6, the advantages of an RAH ‘Green Card’ have already been
described. Under the menu item “Direct”, an RAH ‘Green Card’, stored with
frequency values or RAH-programmes, can be used for an automatic
harmonising sequence. Our principal object is, that people, who want to use
this device for harmonisation, can do this in a very simple way.
For the automatic programme sequence under the menu item “Direct”, which
is displayed immediately on switching on the device, you have to do the
following:
1.
2.
3.
4.
Switch on the device and connect it with the detectors
Insert the stored RAH ‘Green Card’ into the memory card slot
Wait until the data have been loaded, then unplug the card
The automatic harmonisation sequence begins
At first, the fundamental frequency values, stored on the RAH ‘Green Card’,
are set-up. The display shows:
After the fundamental frequency
values have been set-up one after the
other, the automatic harmonisation
with the loaded RAH programmes with
their individual stored harmonisation
times begins.
If only RAH-programmes were loaded
from the RAH ‘Green Card’, only RAHprogrammes will be harmonised. This
is also valid for fundamental frequency
values. In the automatic harmonisation
sequence of the RAH-programmes, the display shows:
The display shows “rAH”, so that you
know immediately, that RAHprogrammes are being harmonised
currently.
Note:
Using the sensor, each single
fundamental frequency value or RAHprogramme can be switched forward,
if, e.g., the sensor shows, that the
harmonisation has been finished
ahead of schedule.
4.3 Menu Item “F1“
Page 25
4.3 Menu Item “F1“
4.3.1 Basics Concerning the Use of Integrated Programs
When the Rayocomp devices were first introduced in 1993, it was possible to
set groups of fundamental frequency values – the harmonising programs –
automatically at last. The first Rayocomp PS 1000 devices already had 51
integrated harmonising programs. Later on, three further programs were
added, their validity remains to this very day. For example, if such a program
consists of 100 different fundamental frequency values, the Rayocomp PS 10
sets one fundamental frequency value exactly 100 times.
Due to their simple application, the harmonising programs integrated in the
Rayocomp devices are the ideal means for utilising the potential of many
thousands of individual measurements, because the harmonising programs
contain the resonance values frequently found in a certain regulation area.
For example, if you test many individuals with liver problems, the
comparison of the so-found resonance spots comes up with conspicuous
incidences; this discovery finally lead to the development of the control plan.
The set-up within the harmonising programs always follows the same
pattern. The first fundamental frequency values are the pre-control values
taken from the control plan. Then the programs receive the fundamental
frequency values on the physical level as well as pathological fundamental
frequency values of the corresponding organ. These are concluded by a value
(21.50) to stabilise the body polarities.
In practice, the course of the use of the integrated harmonising programmes
will be that based upon a diagnosis made, e.g. based upon the results of a
check-up test (see Chapter 4.4.4), the organs that are the most affected ones
can be harmonised by means of the integrated programme.
Sure enough you can use the classical therapy programs of the bio-resonance
according to Paul Schmidt with the Rayocomp PS 10 devices, but now we
have a brand new addition – the harmonising programs of the new Rayonex
Analysis and Harmonising System (RAH) in the menu item F1. This requires a
special hardware in your device. If your Rayocomp PS 10 bears the inscription
Evolution on the side, this new hardware is already integrated in the device.
For a detailed description of the utilisation of the new RAH system, look into
chapter 4.3.5.
4.3.2 Composing and Harmonising Various Harmonising Programs
Page 26
4.3.2 Composing and Harmonising Various Harmonising Programs
The menu item “F1-BnPS“ provides a very efficient function for the Rayocomp
PS 10, enabling the composition of harmonising programs integrated in the
device and harmonising their fundamental frequency values with these
compositions.
The Rayocomp PS 10 offers a variety of different harmonising program
groups, you can take them from the appendix (chapters 5.2 to 5.5). Here is a
basic summary:
1.01
2.01
3.01
4.01
to
to
to
to
1.54:
2.14:
3.09:
4.17:
Rayonex harmonising programs
Harmonising programs of acupuncture oscillation medicine
Special programs
Harmonising programs according to Dr. Ulrich:
The function “F1-BnPS“ helps you to compile harmonising programs from the
different groups. For example, you can combine the harmonising program
1.51 – pre-control- with the program 3.02 – scar interference suppression.
The Rayocomp PS 10 will then automatically set up the fundamental
frequency values of the pre-control first, followed by the values for
suppressing scar interference.
Before giving detailed examples for the entry, let us summarise important
information concerning the application of the F1-BnPS programs first:
•
You can compile a total of up to 500 fundamental frequency values in
“F1-BnPS”. If the first program includes 77 fundamental frequency
values and the second 126 values, you have 203 values altogether.
Now there is space left for further 297 values.
•
If you are arranging different programs, it always happens that several
fundamental frequency values are repeated. If you generally want to
avoid harmonising the same fundamental frequency values more than
once, this can be predetermined in the setup, menu item 4.5.2. This
may shorten harmonising time. The original set-up from works allows
double harmonising values. The set-up “deleting double values” is also
valid for double RAH programmes.
•
Please regard: The harmonising program groups listed above must be
enabled, in other words, the corresponding modules must be activated
in the Rayocomp PS 10. More information is available in chapter 4.7.
4.3.2 Composing and Harmonising Various Harmonising Programs
Page 27
The following example will show you how to combine the harmonising
program 1.51 (pre-control) with the harmonising program 1.52 (immune
system) in “F1” and then harmonise.
Activate the key for
, until the menu item “F1“ appears:
Now you can enter the first number of the harmonising program (1.51). Press
the following keys:
The display shows:
Note: Here you can see
the number of fundamental frequency values
already stored; in this
case there are 77.
After this, the Rayocomp PS 10 is ready for the entry of the next harmonising
program, in this example it is the program 1.52. Press the following keys:
4.3.2 Composing and Harmonising Various Harmonising Programs
Page 28
The display shows:
Now that the two desired harmonising programs have been entered, please
press the key
and you can enter the harmonising time. The Rayocomp PS 10 suggests a
standard of 30 seconds. But the time can also be altered individually. for
example, if you want to harmonise each fundamental frequency value for one
minute and thirty seconds, you only have to enter 01:30. For your
convenience, the Rayocomp PS 10 calculates the total harmonising time at
once, to be read in the line underneath (in this case 1 hour, 41 minutes and
30 seconds).
Time for each fundamental
frequency value
Total harmonising time
With the key
, the automatic set-up of all values begins.
With the key
, you can interrupt the harmonising process
This causes the Polariser to leap to (+/-).
(telephon, ...) and continue with the key
.
4.3.3 Loading Fundamental Frequency Values from Memory Cards and Harmonising Page 29
4.3.3 Loading Fundamental Frequency Values from Memory Cards and
Harmonising
We have already explained how the menu function “F1-BnPS” offers all
possibilities to compile fundamental frequency values. Of course, this also
includes the application of memory cards, especially the RAH “Grren-Card”.
For example, if you have stored the resonance values of a range value test on
a memory card, you can use them to harmonise automatically in “F1-BnPS”.
To do so, select the menu item “F1“ with the key
.
The display shows:
Now insert the memory card in the Rayocomp PS 10 and press the following
key:
The Rayocomp PS 10 can now read the values stored on the memory card
and harmonise with them.
Tip 1: You can combine the values of an integrated program with those of a
memory card. For example, you read in the program 1.51 first, then the
memory card and then, if you like, a further program.
Tip 2: You can compile your own memory cards in the menu item “Setup”.
Look this up in the sub-chapter 4.5.6.
4.3.4
Fundamental Frequency Values from the Menu Item “Test“ Taking Over and Harmonising
If you have determined resonance values in the menu item “Test”, you can
use them directly for harmonisation after changing over to the menu item
“F1”. Do so by entering 0.00 in “F1”. A better method, however, is to store
these resonance values on a memory card and read them into the menu item
“F1” whenever they are needed.
4.3.5 Utilising the Harmonising Programs of the new RAH
Page 30
4.3.5 Utilising the Harmonising Programs of the new Rayonex Analysis
and Harmonising System (RAH)
An example illustrates the use of the RAH module. We chose the programs
“Vitalisation, complete” and “Upper respiratory system” for our example.
The RAH module can be found in the menu item “F1-BnPS”, together with the
bio-resonance programs according to Paul Schmidt. Two separate submenu
items (BnPS and RAH) were set to simplify the identification of the menus for
the user. These submenu items are selected with the mode key. You can take
the current program descriptions and program numbers from the special
brochures.
Actuate the mode key several times until you see the menu item “F1-BnPS” in
the display.
Note:
The
Analysis
and
Harmonising system (RAH) will
only work when
there
is
no
memory card in the memory card
slot
before
starting
the
harmonising. In case
this is
forgotten occasionally, the user
will be adverted by the error
message “Er 40”. If the card is
extracted then, the transmission
starts automatically.
The submenu item “BnPS” is indicated by the prompt “BnPS” in the upper part
of the display. Now the mode key is actuated once more to select the RAH
module. The display will show the following image:
“rAH” is the short index for “RAH”, and means in this case the harmonisation
with the Analysis and Harmonising system. If the mode key is not pressed
again, the display changes over to the input mask of the RAH module.
4.3.5 Utilising the Harmonising Programs of the new RAH
Page 31
The illustration below shows the display of the input mask.
The program number
is entered here
The PS 10 is waiting for the entry of a program number now. We choose the
programs “Vitalisation, complete” and “Upper respiratory system” in this case.
Looking at the respective lists, you will see that the program “Vitalisation,
complete” has the number 01.00 and the program “Upper respiratory system”
is assigned to the number 70.16. In order to determine the treatment course
with these programs, please press the following keys
Now the display will look like this:
These values indicate the length of
the harmonising time of the
currently selected program and the
total time needed for the programs
already selected
The next step is for setting the harmonising time. The already set default
value is 10 minutes. This value can be taken over directly with the OK key. As
an option, this value can also be altered in steps of one minute length to suit
your own needs. If this entry is altered, the value is taken over as the new
default value. This simplifies the entry for the user if a harmonising time
other than the given value is required.
4.3.5 Utilising the Harmonising Programs of the new RAH
Page 32
If the time is lengthened to 15 minutes, for instance, the display will change
as follows:
Harmonisation of the first program will now take 15 minutes. The total
harmonisation time will also be 15 minutes because only one program has
been selected so far. Confirm the entry of the harmonisation time with the
OK button.
The following fig. shows the new display.
Now you can enter the second program.
The 2 in front of the harmonising time indicates the second program:
70.16 must be entered as next to select the program “Upper respiratory
system”.
After you have confirmed the entry with OK, the total time changes. The total
time is the sum of harmonising times for the already selected programs and
the currently selected program “Upper respiratory system”.
4.3.5 Utilising the Harmonising Programs of the new RAH
Page 33
If you intend to harmonise program 70.16 for 15 minutes, too, confirm by
pressing the OK button.
Now that all programs have been selected, harmonising can commence.
Harmonising begins as soon as you have actuated the start button. This
triggers the first program. The percent display shows the progress. After 100
% is achieved, the polariser switches over to +/- and the timer for
harmonising starts counting backward. The countdown of the total
harmonising time proceeds in steps of one second while the single programs
are counted backward at minute intervals. The display shows the program
number.
When ever you apply the RAH module, please make sure that no card is
inserted in the card slot. Should this ever happen, the user is informed to
remove the card with error message ‘Er 40’. This applies to all kinds of
memory cards.
4.3.5 Utilising the Harmonising Programs of the new RAH
Page 34
Pause Function and Terminating the Harmonising
The harmonising time is interrupted when you press the stop button once.
The start button restarts the harmonising time. In order to stop
harmonisation and set back the RAH module, the stop button is pressed
twice.
Repeating RAH Programs or Advancing to the Next Position
If you have selected several programs at once, you can choose programs
within the set sequence directly. This is performed with the arrows.
The arrow key pointing to the right or, alternatively, the button of the
Rayotensor moved to the right lets you leap to the next program. Actuating
the arrow pointing to the left or the Rayotensor button pushed left selects
the previous harmonising program.
The sequence of the program run corresponds with the sequence determined
when the program flow was selected. Actuating the button to the left (or the
Rayotensor button to the left) sets the harmonising time of the current
program back to the start value. The previous program is only called up
again if you repeat this step.
Testing a RAH Harmonising Program with the Rayotensor
The harmonising programs of the Rayocomp PS 10 cannot be applied for
harmonising alone, you can also use them for testing.
Simply select a harmonising program as described at the beginning and
press the start button. After the program has been called up, you can test
with the Rayotensor to find out whether harmonisation is required or not.
The polariser is therefore set to neutral (N). A rotation of the Rayotensor cage
shows that harmonisation is not required, a linear motion shows the
necessity to harmonise. The button of the Rayotensor (button down) also
allows you to test with different polarities to find out whether the disorder is
strong or weak.
If harmonising is required, you write down the number of the program before
starting to test the next one. Do so by pressing the stop button twice. Then
you can select the next harmonising program you want to test.
Please note that that the module 8 of the RAH only comprises a selection of
the harmonising programs. Only the modules 9 and 10 comprehend all
available RAH-programmes. The functions of the module M10 are explained
in detail.
4.4 Menu Item “Test“
Page 35
4.4 Menu Item “Test“
The menu item “Test” offers a number of functions for testing fundamental
frequency values. We talk about testing in this context, when we try to find
out whether a certain fundamental frequency value requires harmonisation or
not. The test method was already explained in chapter 4.2.1. If you want to
test single fundamental frequency values, this is easiest to perform in the
menu item “Direct” – as we have described already. It always makes sense to
use the menu item “Test” if you want to test a large number of fundamental
frequency values, one after the other. If you want to test electro-magnetic
disturbance, for example, you have to test six different fundamental
frequency values. In the menu item “Direct”, we could enter these six values,
one after the other, but one can hardly say this method is quick and easy.
However, if you select an already activated test program, i.e. the one for
testing electro-magnetic radiation, from the menu item “Test”, all six
frequencies of this program are already integrated in the storage of the
device and no longer need to be entered. After the first frequency value has
been tested, you must switch to the following program value. Do this by
means of the keyboard (key: arrow to the right), or use the sensor
(pushbutton to the right). The device then automatically sets the selected test
value. Determined resonances can be temporarily stored in the internal
storage of the device for harmonising later on. This is achieved by actuating
the OK key of the keyboard or by pushing the button of the sensor forward.
The temporarily stored values can then be harmonised via the menu item
“F1” with the program number P0.00 (see chapter 4.3.4).
Alternatively the values can be be stored on a memory card with the
following key
The Rayocomp PS 10 allows access to several of these fundamental frequency
value compilations, to be explained in the following.
Select the menu item “Test-BnPS“ with the following key
The display shows:
key
.
Just like the menu item “F1”, “test” is
separated in “BnPS” and “RAH”.
However, the menu item “RAH” can
only be selected, if the module 10 is
activated. Here you enter the number
of the corresponding test program.
On the next page, you can look into
the list of test compositions.
4.4 Menu Item “Test“
Display
P 01
P 02
P 03
P 04
P 05
P 06
P 07
P 08
P 09
P 10
P 11
Page 36
Program name
Test with range values
Test with memory card values
Test with integrated programs
Electro-magnetic pollution test
Geopathy test
Check-up test
Bacteria and viruses test
Parasite test
Acid-base t
Quick test of the 14 channels
Vital substance test
If you enter 01, for example, you can carry out a range value test, with 02,
the fundamental frequency values of a memory card can be read into the
device for subsequent testing. With 03, you can test all programs integrated
in your device as a module. The test programs 04 to 11 are special
compilations of fundamental frequency values. You can use them if module
6, test programs, is activated in your Rayocomp PS 10.
Important information:
The fundamental frequency values tested with resonance can be saved
on an inserted memory card at any time by pressing the key
.
You can read in the fundamental frequency values from a memory card,
test them and save the so determined resonances on the same card
again, for instance. This makes sense for subsequent testing of the
resonances of a range value test. Please keep in mind that you overwrite
all values previously stored on the memory card when you press the key.
So you see that the program number determines the fundamental frequency
values which are going to be tested. As soon as the values intended for
testing are available, the test run is always the same.
4.4 Menu Item “Test“
Page 37
You will see the following picture on your display, if, for example, the testing
range values with the pre-set values are selected.
1
5
4
3
2
With this display, the Rayocomp PS 10 informs you about which fundamental
frequency value is being tested at present (1), how many fundamental
frquency values are going to be tested altogether (2), how many fundamental
frequency values have already been tested (3), how many fundamental
frequency values have caused a resonance (4) and whether the currently
displayed fundamental frequency value is a resonance value (5).
With the help of the sensor, you can find out whether there is any resonance
and if this resonance is strong or weak (compare chapter 4.2.1). As a
practical feature while testing, you can set the next value or store the current
value with the sensor (compare chapter 4.1.5).
4.4.1 Testing Range Values
The idea behind this test is to find out all the fundamental frequency values
in disorder at the moment, then to store and harmonise them. With the bioresonance devices according to Paul Schmidt, it is possible to carry out a
resonance test in a very wide range of fundamental frequency values. In
practice, this is how it works: beginning with the fundamental frequency
value 0.00, you start testing whether this fundamental frequency value is
required for regulation. If this is the case, it is stored in the Rayocomp PS 10.
Carry on by testing the fundamental frequency value 0.50, then 1.00 and so
on.
After the test, precisely those resonance values necessary for regulating the
organism of the patient have been determined. In a way, the detected
resonance spectrum presents the energetic fingerprint.
The complexity of the determined fundamental frequency values reflects the
complexity of the disorder. Therefore, a diagnosis is normally not given after
the first test. But the so found resonance values are used for harmonisation.
This is carried out by transferring the fundamental frequency values to the
tested person via hand and foot detectors or Velcro detectors.
4.4.1 Testing Range Values
Page 38
Another possibility is to transfer the frequencies by means of the large
surface detector, maybe while sleeping at night.
And this is the method for performing the range value test:
Select the menu item “Test“ with the key
.
According to the table (Chapter 4.4), enter the number 01 and confirm the
input with the OK-key. You will see the start value of the test on your display.
If you have made the right choice, please confirm with the OK-key. After
this, the concluding value is displayed, which is confirmed with the OK-key
once again. Now you have the chance to alter the step lengths or to confirm
the indicated length with the OK-key. We recommend the start value 0.00,
the final value 99.99 and a step length of 0.50. With this set-up, 200 values
will be tested. Now you can follow the description for testing fundamental
frequency values to find resonances.
4.4.2 Testing with Memory Card Values
With the Rayocomp PS 10, it is very easy to save fundamental frequency
values on a memory card. The values stored on the card can be used for
harmonisation via menu item “F1”. The values on the card can also be used
for testing. And this is the way it works:
Select the menu item “Test“ with the key
.
Now insert the memory card and, according to the table (Chapter 4.4), enter
the number 02. The Rayocomp PS 10 reads in the values from the memory
card and changes over to the test mode as described before.
4.4.3 Testing with Integrated Programs
The memory cards represent individual compilations of fundamental
frequency values, but you can also test with the programs integrated in your
Rayocomp PS 10. One example: if the programs of the acupuncture
oscillation therapy are integrated in your Rayocomp PS 10, you can test a
complete channel, for instance the kidney channel.
Simply carry out the following steps:
Select the menu item “Test“ with the key
.
4.4.3 Testing with Integrated Programs
Page 39
According to the table (Chapter 4.4), enter the number 03 and confirm the
input with the OK-key.Then you can choose the program you want to test. In
this special case, enter 2.08 for the kidney channel (compare chapter 5.3).
Now you can test the fundamental frequency values belonging to this
channel.
Don’t forget: Only programs activated as a module can be tested. If the
module for the acupuncture oscillation therapy is not activated, you cannot
test with the programs belonging to the module.
4.4.4 Testing with Integrated Test Programs
In addition to the integrated programs, the device also contains a
compilation of test programs which are very frequently required. They are
listed below once more for your convenience.
Display
P 04
P 05
P 06
P 07
P 08
P 09
P 10
P 11
Program name
Electro-magnetic pollution test
Geopathy test
Check-up test
Bacteria and viruses test
Parasite test
Acid-base test
Quick test of the 14 channels
Vital substance test
Taking electro-magnetic pollution as an example, you test as follows:
Select the menu item “Test“ with the key
.
Then enter the number 04 and confirm your entry with the OK key. You will
receive the six most important fundamental frequency values for testing
electro-magnetic pollution.
Of course, the test programs 04 to 10 can only be used if the corresponding
module 6 (compare chapter 5.7) is activated in your Rayocomp PS 10.
4.4.5 RAH Module 10: Level test
Page 40
4.4.5 RAH Module 10: Level test
Basics for the RAH Module M10
For the Rayocomp PS 10, the module M10 is the most effective module,
which has, in addition to the module M9, numerous test functions. The
module M10 offers test protocols. With these protocols, all necessary RAHprogramme numbers can be provided for the user’s test at the push of a
button. The corresponding RAH programme numbers don’t have to be
entered separately. The test results are then available for harmonisations as
well as for storing them on the RAH ‘Green Card’. Furthermore, the module
10 supports the level test, known from the Rayocomp PS 1000 polar. When a
main RAH-programme is chosen, the sub RAH-programmes can be selected
and tested by the use of the sensor’s button. IF you already use a RAHmodule with your Rayocomp PS 10, an upgrade to higher modules is
possible, e.g. from module 9 to module 10.
The level test
The level test supports the user very efficiently in the analysis of energetic
disfunctions. Using the example of electro smog tests, we concretise it as
follows: If there is a general force of electro smog (RAH-No. 04.00), you can
narrow it on level 2 to find out, whether these problems occur from electric
and magnetic alternating fields (RAH-No. 04.10), from pulse-modulated
radiation (RAH-No. 04.20) or from high-energy radiation (RAH-No. 04.30). If
there is, for example, a problem due to pulse-modulated radiation, you can
switch on the third and last level, the detail level. Here, frequency structures
are available to find out in detail, whether forces due to mobile
communications, UMTS, WLAN or Bluetooth are existent. This level structure
is a central theme through the total RAH ( cause, physiology, pathology,
special programmes like Bach flowers, Schüssler salts, …) and enables
indications for energetic disfunctions and a fast and effective testing of
frequency ranges, necessary to be harmonised.
If Module 10 is activated in Rayocomp
PS 10, please press the
key
until you see under the menu item test
the display shown here on the left. The
display shows rAH. The user is then
informed, that he can test RAHprogrammes.
4.4.5 RAH Module 10: Level test
Page 41
After a few seconds the display changes and you can enter a RAH-programme
number
Please press now the following keys:
The Rayocomp PS 10 now adjusts the RAH programme number 04.00. The
display shows:
1
2
The RAH-programme number 04.00
(fig. 2) is a main RAH-programme.
Therefore, the figure 1 shows Level 1.
If, like in this example, level 2 and 3
also appear, the user knows, that
there are respective programmes on
sub and detail levels under the
current selected programme.
3
4
5
6
On the highest RAH-programme level,
45 programmes are available (fig. 6).
The programme 04.00 is the fourth
(fig. 5) of 45 programmes of the highest
level.
For the test, the polariser of the Rayocomp PS 10 is automatically switched
on N (fig. 3). There are currently no programmes selcted, that have to be
harmonised, visible under fig. 4.
Now, using the sensor, the test can begin. The functions are as follows:
Wire spring
Storing a resonance
in the internal store of
the PS 10
Next fundamental
frequency value
Previous fundamental
frequency value
Sensor button
Changing the
polarisation
Wooden handle
4.4.5 RAH Module 10: Level test
1
Page 42
2
If the sensor button is pushed
forward, the second level of the
device is selected (fig. 1). The sub
programme 04.10 appears (fig. 2). As
the third level is not shown, you can
see immediately, that there are no
further sub programmes under the
programme number 04.10.
3
4
5
3 programmes are available on the
shown second RAH-programme level
(fig. 6). The programme 04.10 is the
first (fig. 5) of 3 programmes of the
second level.
6
For the test, the polariser of the Rayocomp PS 10 is automatically switched
on N (fig. 3). There are currently no programmes selected, that have to be
harmonised, visible under fig. 4.
If the sensor shows a linear movement while testing, the sensor button is
pushed down to mark the current programme that has to be harmonised.
This can be seen via the check mark on the right (fig. 7). Now, the counter
for stored resonance values (fig. 4) shows 1.
4
7
If the sensor button is now pushed to the right, the next RAH-programme
(04.20) will be selected. The display shows:
4.4.5 RAH Module 10: Level test
Page 43
1
On the left of the display it is now
shown, that there are further detail
programmes (fig. 1) under the
programme 04.20; visible via the 3
(i.e. for the third detail level).
If the sensor button is pushed forward,
the device selects the first detail
programme 04.21 (fig. 2). Now, the
display shows:
2
The RAH-programme 04.21 is the first
of 7 detail programmes under the
RAH-programme 04.20, which can be
found itself under the main group
04.00.
The whole structure of the RAHprogrammes can be analysed with the
Rayocomp PS 10 as described in this
chapter and – in case there is any need
for harmonisation – can be stored. You
can either first choose a main level, or
start right in the middle. If you had selected right in the beginning RAH
number 04.21, the display would have shown you the same.
Very Important:
Please also read the chapter:
4.4.8 Important tips and tricks for testing with the RAH-Module 10
These listed additional handling advices will faciliate your use of the module
10!
4.4.6 RAH Module 10: Test with integrated test protocols
Page 44
4.4.6 RAH Module 10: Test with integrated test protocols
The idea of the test protocols was born in the “Heilpraktikerschule der PaulSchmidt-Akademie”. There, you can learn among other things, which organ
structures and regulation ranges you have to consider regarding the
respective disease. This is also valid for energetic testings by means of RAH.
For example, in the case of hypertension, you have to necessarily consider
the kidney, as it produces the enzyme renin, which increases the blood
pressure. The hormonal system is important too, as it has a big influence on
the metabolism and the blood pressure. The new analysis support considers
exactly these coherences. For example, if you select the frequency structure
of the RAH-programme 39.60 hypertension, all RAH-programmes that are
linked up with the disease pattern, will be recommended to you directly for
the testing at the push of one button. Sometimes, this can be more than 100
different RAH-programmes.
An RAH-programme with an available test protocol is marked with a 10 (fig.
1) on the right of the display.
This shows immediately that a test
protocol is available. The test protocol
itself is activated by pressing the key
The display then changes to the RAHprogrammes of the test protocol. You
can leave the test protocol again by
pressing the Stop key.
1
2
3
4
5
A check mark will appear behind the
10 on the display (fig. 5), after
activating the test protocol. Then, the
current test protocol is shown. In the
middle of the display, the number of
the test protocol is indicated (fig. 2).
In this case 39.60. The figures 3 and
4 show, that the current RAHprogramme 00.00 is the first of a
total of 53 RAH-programmes. As
already described in chapter 4.4.5, all
respective RAH-programmes can now
be tested and stored.
Please also read the chapter:
4.4.8 Important tips and tricks for testing with the RAH-Module 10
4.4.7 RAH Module 10: Test with the RAH ‘Green Card’
Page 45
4.4.7 RAH Module 10: Test with the RAH ‘Green Card’
In the module 10 of the Rayocomp PS 10 it is not only possible to harmonise
the RAH-programmes stored on a RAH ‘Green Card’, but also to test them. As
an example, the RAH-programmes, that were selected in the last testing and
stored on the RAH ‘Green Card’, could now be checked again. It is also
possible to compile your own RAH-programmes, to store them on the RAH
‘Green Card’ and then to test them.
Please insert a programmed RAH ‘Green Card’ into the Rayocomp PS 10 and
press the following key:
The RAH-programmes stored on the card will now be read into the Rayocomp
PS 10 and are then available for testing. The display shows then for example:
Currently, the RAH-programme 04.22
is selected. It is the first (fig. 2) of 10
RAH-programmes to be tested (fig. 3).
The note: Card (fig. 1) appears on the
display, to show the user immediately,
that currently, the values of a RAH
‘Green Card’ are tested.
1
2
3
As already described in chapter 4.4.5, all respective RAH-programmes can
now be tested and stored.
Please also read the chapter :
4.4.8 Important tips and tricks for testing with the RAH-Module 10
4.4.8 Important tips and tricks for testing with the RAH Module 10
Page 46
4.4.8 Important tips and tricks for testing with the RAH Module 10
The following listed handling advices, tips and tricks are valid for the level
test (chapter 4.4.5), the test with integrated test protocols (chapter 4.4.6)
and the test with the RAH ‘Green Card’ (chapter 4.4.7)
1.
Acoustic signals
The device always creates a double beep, when a RAH-programme was
selected for testing. Only after that, the programme is loaded completely and
is ready for testing.
When an RAH-programme was stored as a resonance, a long beep-signal
sounds after successful storage.
The acoustic signals are very helpful, because the user doesn’t have to look
on the display. The user can concentrate completely on the testing.
2.
It is also possible to perform the handling functions of the sensor
with the keyboard
Wire spring
To the left:
selecting the previous
RAH-programme
number
or with the key:
Forward:
Refining to a lower
level.
or with the key:
Down:
polariser functions
and storing as a
resonance
or with the key:
To the right:
selecting the next
RAH-programme
number.
or with the key:
Sensor
button
4.4.8 Important tips and tricks for the test with the RAH Module 10
Page 47
3. Directly Altering the harmonisation time regarding a stored resonance
value
After storing a resonance value, it is always possible to give it an individual
harmonisation time directly.
Therefore you press the key:
Afterwards, the RAH-programmes can also be related with an individual time
(fig. 1). In front of the double point, the hours are entered, the minutes
behind it. Later on, when you store all found RAH-programmes on a RAH
‘Green Card’, the individual time will be stored under this programme.
1
4. Very important: Deleting the resonance memory
Always, when a new patient is going to be analysed, the resonance memory
has to be deleted. After switching on the device, the memory is empty, and
while testing with RAH-programmes and their harmonisation times, the
memory gets filled.
During the RAH testing, the resonance memory can be deleted by pressing
the key
for a longer time. The device confirms this
with a long beep-signal.
When an RAH ‘Green Card’ is read in for testing, the total resonance memory
will be deleted automatically beforehand, as the user would get confused
otherwise. The same is valid for the test with test protocols.
4.4.8 Important tips and tricks for the test with the RAH Module 10
Page 48
5. Storing the necessary RAH-programmes on a RAH ‘Green Card’
During the RAH testing, all necessary RAH-programmes and their
harmonisation times can be stored on an RAH ‘Green Card’ at any time –
most reasonably at the end of the testing.
Therefore, you have to insert an RAH ‘Green Card’ and press the
key
After pressing the key, the number of RAH-programmes and their
harmonisation times indicated on the display (fig. 1) will be stored.
1
Storing the RAH-programme numbers can also be performed under the menu
item F1. This programme item is best-suited for entering the individual RAHprogramme numbers and individual harmonisation times.
Please keep in mind: Whenever RAH-programmes are stored, the RAH
‘Green Card’ gets deleted and will then be loaded with the new RAHprogramme numbers. Thus, all RAH-programm numbers stored on the
RAH ‘Green Card’ up to then, will be deleted!
Furthermore, RAH-programmes can only be read in and stored on the
RAH ‘Green Card’, when Module M9 or Module M10 is avtivated.
4.5 Menu Item “Setup“
Page 49
4.5 Menu Item “Setup“
The menu item “Setup” was designed to adapt the Rayocomp PS 10 to your
individual intentions by means of presettings. Available besides the alteration
of presets are test functions and important and useful functions in
connection with memory cards.
Select the menu item “Setup“ with the key
.
The display shows:
At this stage, the device is waiting for a setup number to address the desired
setup function. For exmple, if you want to enter the setup number 10, please
press 1, then 0 and confirm your entry with the OK-key. Further actions are
described in the following subchapters.
To simplify orientation, the layout of the setup numbers is large and marked
in red in the corresponding subchapters.
Please note: You run no risk of ruining the device or deleting anything
permanently if you alter the setup. Every setup of the device can be
returned to its original state. Have courage and try it out. It is the best
way to become familiar with your Rayocomp PS 10.
4.5.1 Set-Up of Background Illumination
Page 50
4.5.1 Set-Up of Background Illumination
Setup Number: 10
For reasons of improved legibility, the display of the Rayocomp PS 10 was
provided with background illumination. Because of this feature, the display
remains perfectly visible, even if the light is dim. You can select one of three
different types of background illuminations. Enter the setup number 10 and
you can add one of the following numbers:
0: Background illumination is permanently switched off.
1: Background illumination is permanently switched on.
2: Background illumination is set to automatic. 30 seconds after the last
keyboard action, the background illumination is switched off. The
background illumination turns on again as soon as the keyboard is
used. This saves energy, the battery pack lasts longer. With this setup,
the background illumination is switched off at night if you are
harmonising while you are resting. Your sleep is not disturbed by the
bright light of the illumination in the background.
On delivery, the standard setup of the Rayocomp PS 10 is number 2.
4.5.2 Deleting Double Values in the F1 Programs
Setup Number: 11
If you are arranging different BnPS programs, it is inevitable that several of
the fundamental frequency values are repeated. If you prefer not to
harmonise fundamental frequency values twice, you can set this up here.
This is also valid for RAH-programm compilation. Here, double entered
programmes are disregarded and are not considered multiply during
harmonisation. While testing the RAH programmes, double values ( e.g. from
the memory card) are always rejected and are only selected once.
Enter the setup number 11 and you can add one of the following numbers:
0: Do not delete double values when loading the F1 programmes respectively
RAH-programmes!
1: Delete double values when loading the F1 programmes respectively RAH
programmes
On delivery, the standard setup of the Rayocomp PS 10 is number 0.
4.5.3 Adjusting the Attention Sound (Beep)
Page 51
4.5.3 Adjusting the Attention Sound (Beep)
Setup Number: 12
The Rayocomp PS 10 has been equipped with an acoustic signal. This may
signalise the use of a wrong key or confirm an entry.
The Rayocomp PS 10 has three different error messages or acoustic signals:
1. One long sound: With this signal, the device confirms a successfully
completed action, i.e. an entry or storage.
2. Two short sounds: The key you are pressing has no current function.
3. Two long sounds: This signalises a severe error. The device will
supply an error code. In the appendix (chapter 5.8), you can look up
the current error.
This setup function enables or disables the signal. Enter the setup number
12 and you can add one of the following numbers:
1: The acoustic signal is switched on.
0: The acoustic signal is switched off.
On delivery, the standard setup of the Rayocomp PS 10 is number 1.
4.5.4 Pre-Setting the Test Range Values
Setup Number: 13
One of the most successful methods of bio-resonance according to Paul
Schmidt is the range value test. Beginning with a start value, usually 00.00,
and closing with a final value, usually 99.99, in step lengths of, 00.50 i.e.,
every single fundamental frequency value is tested for a resonance and then
harmonised. These three values can be pre-set in this setup function. After
entering the setup number 13, you can enter the start value first. After
hitting the OK-key, you can enter the final value.
4.5.4 Pre-Setting the Test Range Values
Page 52
As soon as this has been confirmed with the OK-key, the step length can be
pre-set, perhaps to a smaller value of 0.25. As always, the step length is
confirmed with the OK-key.
Here is the standard setup of the Rayocomp PS 10 on delivery:
Initial value:
Final value:
Step length:
4.5.5
00.00
99.99
00.50
The pre-setting of the harmonisation time for fundamental
frequency values
Setup Number: 14
The pre-setting of the harmonisation time for fundamental frequency values
can be very helpful for the use of a BnPS-F1 programme, as well as for the
use of a Rayonex ‘Green Card’. If, e.g., single frequencies and also RAHprogrammes were stored on an RAH ‘Green Card’, the individual
harmonisation times for the RAH-programmes can be stored, but not for the
single frequencies. If an automatic programme sequence is started by the
means of an RAH ‘Green Card’, the default for the single frequencies can be
regulated by the pre-setting of the harmonisation time. Standard is 30
seconds. If the harmonisation time has been changed in this setup item to,
e.g., 1 minute, every existing fundamental frequency value of the Rayocomp
PS 10 is automatically harmonised with 1 minute, when using a RAH ‘Green
Card’.
In the same way, when using the BnPS Programmes, the pre-set
harmonisation time of this setup item will be used.
After selecting setup-number 14, you
confirm it with the key OK. Then the
display shows the illustration, as
demonstrated here on the left.
00.30 means 00 minutes and 30
seconds. At first, the cursor blinks in
the input-box of the minutes. For
example, you can enter 0100 and
confirm this with the key OK, and so
1 minute is pre-set.
The entry 0040 would mean a pre-setting of 40 seconds.
4.5.6 Activating and deactivating modules
Page 53
4.5.6 Activating and Deactivating Modules
Setup Number: 20
At present, a total of ten modules can be activated or deactivated,
respectively, in the Rayocomp PS 10. If, for example, the harmonising
programs of the acupuncture oscillation therapy are not activated on your
device yet, you can use them immediately after activating them with an
enabling code. This sub-item of the menu has the function of activating or
deactivating modules.
After having entered the setup number 20, you can select the number of the
module intended for activation or deactivation. (Please confirm each input
with the OK-key.)
Here is a list of the module numbers:
ModuleNo.
01
02
03
04
05
06
07
08
09
10
Designation
Setup precision of 0.05
54 integrated harmonising programs
14 Acupuncture oscillation therapy
22 Programs according to Dr. Ulrich
9 special programs
11 Test programs
72 B.A.T. acute programmes according to Manfred
Denecke
Rayonex Analysis and Harmonising programme
(RAH), Module 8
Rayonex Analysis and Harmonising programme
(RAH), Module 9
Rayonex Analysis and Harmonising programme
(RAH), Module 10
Your final action is to enter the seven-place code for activating or
deactivating and confirm your command with the OK-key.
4.5.7 Storing Fundamental Frequency Values on Memory Cards
Page 54
4.5.7 Storing Fundamental Frequency Values on Memory Cards
Setup Number: 30
A great advantage for anyone working with the Rayocomp PS 10 is the use of
memory cards. They allow you to store individual frequency compilations
which can be used for testing in the menu “Test” or for harmonising in the
“F1-BnPS” menu. Generate your own memory cards with this setup function.
The frequency compilations can be stored on a normal memory card or a
‘Green Card’.
Insert the memory card in your device and enter the setup number 30. Every
entered fundamental frequency number will now be stored on your memory
card as soon as you have confirmed it with the OK-key.
The display shows:
The red arrow points to the numeral which indicates the number of the
currently stored values on your memory card.
With the key
, you can delete the last value entered on the card.
Should the card contain left-over values which you want to delete, please use
the setup number 43 (see also chapter 4.5.10) to delete memory card
completely.
4.5.8 Displaying Memory Card Information
Page 55
4.5.8 Displaying Memory Card Information
Setup Number: 40
This setup can help you if you have an unknown memory card and have no
idea how many values are stored on it, what kind of a memory card it is and
so on.
As a ‘Green Card’ can comprehend BnPS Fundamental Frquency values, as
well as RAH-programmes, BnPS and RAH storage values are displayed by
turns. A ‘Green Card’ can comprehend maximum 500 BnPS and 200 RAH
values. You can detect the number of RAH-programmes from that figure, that
is shown in the display with the 200 at the same time. ( e.g. 34: 200)
Insert the memory card and enter the setup number 40. The display may
show:
3
1
2
Caption:
1: This number indicates the amount of values already stored on the
memory card.
2: Here you can read the number of values which can be stored on the
memory card. An exception is the ‘green Card’. The ‘Green Card’ can
contain 500 BnPS- and 200 RAH values, which are shown by turns.
3: if you see a 0, the memory card is faulty. A number 1 indicates a memory
card suitable for use when working with the bio-resonance according to
Paul Schmidt. If the displayed numeral is a 2, this memory card can be
used for the B.A.T.-acute programs according to Manfred Denecke. A
‘Green Card’ is indicated with a 3.
4.5.9 Providing Read-Protection for a Memory Card
Page 56
4.5.9 Providing Read-Protection for a Memory Card
Setup Number: 41
This setup function provides a read-protection for the inserted memory card.
If you use a read-protected memory card with a Rayocomp device, i.e. in F1,
the fundamental frequency values are set up but not displayed. This may
make sense when developing and testing new fundamental frequency values.
Please insert the memory card intended for read protection in your Rayocomp
PS 10. On entering the setup number 41, the display will either show 0 (card
is not read-protected) or 1 if the card already has read protection. A RAH
‘Green Card’ cannot be modified with a read protection.
If the card is still without read protection, please enter 1 and confirm your
entry with the OK-key.
Please keep in mind: the read protection of a memory card can only be
reversed by deleting it (see chapter 4.5.10).
4.5.10 Providing Write-Protection for a Memory Card
Setup Number: 42
This setup function provides a write-protection for the inserted memory card.
A memory card with write protection cannot be deleted by accident, nor can
other fundamental frequency values be stored on it.
Please insert the memory card intended for write protection in your
Rayocomp PS 10. On entering the setup number 42, the display will either
show 0 (card is not write-protected) or 1 if the card already has write
protection.
If the card is not write-protected yet, please enter the numeral 1 and confirm
with the OK-key to provide write protection for your memory card.
If the number 1 is displayed to show that your memory card is writeprotected, simply enter 0 and confirm with the OK-key to remove write
protection.
4.5.11 Deleting a Memory Card Completely
Page 57
4.5.11 Deleting a Memory Card Completely
Setup Number: 43
With this setup function, you can delete a memory card completely, thus
preparing it for new writing processes.
Whenever you delete a memory card with this function, you do not only
delete the fundamental frequency values stored on it, but also any read or
write protection added to the contents of the card.
Please insert the memory card you want to delete in your Rayocomp PS 10.
Enter the setup number 43 and wait until a 0 is displayed. For safety reasons,
you must enter a 1 at this stage and confirm with the OK-key.
4.5.12 Initialising a Memory Card
Setup Number: 44
If you should come upon a memory card with illegible sticker, you can test
the card with this setup function and reinitialise it. The function works for
the memory cards of the bio-resonance according to Paul Schmidt and also
for the RAH “Green-Card”.
When initialising the memory card with this function, the system values of
the card are newly determined and written and all the stored fundamental
frequency values are deleted. If the card is read or write protected, this is
also deleted.
Please insert the memory card intended for initialisation in your Rayocomp PS
10. Enter the setup number 44 and wait until a 0 is displayed. For safety
reasons, you must enter a 1 at this stage and confirm with the OK-key.
4.5.13 Motor Test Run of the Frequency Module
Page 58
4.5.13 Motor Test Run of the Frequency Module
Setup Number: 50
The user can test the mechanically driven frequency module of the Rayocomp
PS 10 with this setup function. If your Rayocomp has been subject to jostling
and vibration, perhaps during long transportation, you can make sure that
the frequency module is still in perfect working order with this function.
After you have entered the setup number 50 and confirmed your entry with
the OK-key, the Rayocomp PS 10 starts a trial run. You can read the progress
of the trial run from your display. At the end, the device should display the
following message:
The 1 displayed behind the 50 indicates an optimal functioning of the
frequency module. If you see a 0 in the same place, however, the trial run
was faulty. Please repeat the trial run in this case. If the 0 appears again, your
Rayocomp PS 10 requires servicing and has to be sent back to us.
4.6 Menu item “Info”
Page 59
4.6 Menu Item “Info“
In the menu item “Info“ you can look into all important details concerning the
device, quickly and conveniently.
You arrive in the menu item “Info“ by pressing the key
several times until the display below appears:
1
1
2
10
9
8
3
Caption:
4
5
6
7
1. At present the Rayocomp PS 10 has ten modules. You may recognise
which of the modules are activated in the device by verifying whether a
checkmark is shown following the number (1 to 10). Here is a list of the
modules:
ModulePart No.: Designation
No.
01
2010
Setup precision of 0.05
02
2020
54 integrated harmonising programs
03
2030
14 Acupuncture oscillation therapy
04
2040
22 Programmes according to Dr. Ulrich
05
2050
9 special programmes
06
2070
11 Test programmes
Rayonex Analysis and Harmonising programme
08
2080
(RAH), Module 8
Rayonex Analysis and Harmonising programme
09
2090
(RAH,) Module 9
Rayonex Analysis and Harmonising programme
10
2092
(RAH,) Module 10
Let me mention a detail concerning module 1: the standard step length
precision of the device is 0.25, for instance12.5, 12.75, etc.. If the module 1
is activated, the step lengths between the fundamental frequency values can
be adjusted to the higher precision of 0.05, i.e. 12.5, 12.55, etc..
4.7. Menu Item “Info“
Page 60
2. Here, the current service state of the device is indicated. After approx.
6000 operation hours, or when your device hasn’t been in service for
about three years, it will indicate 100 % (service is due). The device
should be sent to us for service then.
3. Here, the currently set polariser mode is indicated. This is no special
information, the polariser setup is visible in other menus, too. But for the
sake of completeness, this is also displayed here.
4.
This number informs you about the hardware version of the device. In
this case, it is version 02. Devices including the version 02 have already
been prepared in such a way that the RAH module can be activated by
means of an activating code. Devices with the version 01 would first have
to be modified. To this purpose, please contact the Rayonex company.
5. This number informs you about the software version of the device. In this
case, it is version 28.
6. This indicates the currently active menu item.
7. This symbolises the load condition of the battery pack.
8. This number stands for the construction month of the device, in this case
December.
9. This is the construction year of the device. It was the year 2006 in our
example.
10. These four numerals are the serial number of the device. The number, in
our case 22.39, is important for the definite classification of the device.
Rayonex maintains a database with all the information concerning the
device, i.e. the activated modules, the previous service date etc.
If you are thinking of enabling a module in the Rayocomp PS 10, you can
call us and tell us your serial number to receive an enabling code. After
entering this code, you can utilise the module immediately.
A really useful tip in this context:
If you wish to try out a certain module, call us to receive a so-called
temporary enabling code. This code, which can only be used once, allows
the use of the respective module for about 10 hours. The RAH module
can even be tested for 100 hours. The determinant is the runtime of the
device, not the runtime of the module. During this time, you can find out
for yourself whether the module is useful for your purposes or not.
4.8 Special Function Keys
Page 61
4.8 Special Function Keys
The Rayocomp PS 10 has a total of four special keys equipped with certain
functions.
Important: These four keys can only be operated in the menu “Direct”.
1
2
Caption:
1: three IF-keys, IF1, IF2 and IF3
2. the 10.0-key
4.8.1 Using the IF-Keys
You can use the IF-keys (Individual Fundamental Frequency Value) to store
often used fundamental frequency values. They work like the station
selection buttons of a radio. First you tune in to the radio station, then you
keep the key pressed for a while until the station is stored. The function of
the IF-keys is exactly the same. Enter the desired fundamental frequency
value in the menu item “Direct”. Confirm the entry with OK. Then press the
desired IF-key until you hear a signal. Set the desired fundamental frequency
value in the menu item “Direct”. Then press the desired IF-key until you hear
a signal. Now the value is stored and can be called up at any time by pressing
this IF-key. You can store three different fundamental frequency values in
this way (IF1, IF2 and IF3).
4.8.2 Using the 10.0-Key
The key 10.0 is permanently linked to this fundamental frequency value.
This often needed fundamental frequency value (allergen harmonising,
energy, duplicating, ...) is called up rapidly with the special key whenever you
want. Furthermore, this key has a special function in the module M10.
5. Appendix
Page 62
5. Appendix
5.1 Summary of the Integrated Test Programs
Display
P 01
P 02
P 03
Program name
Testing with range values
Test with memory card values
Test with integrated programs
P
P
P
P
P
P
P
P
Electro-magnetic pollution test
Geopathy test
Check-up test
Bacteria and viruses test
Parasite test
Acid-base t
Quick test of the 14 channels
Vital substance test
04
05
06
07
08
09
10
11
5.2 Summary of the Integrated Rayonex Programs
5.2 Summary of the Integrated Rayonex Programs
Display
P 1.01
P 1.02
P 1.03
P 1.04
P 1.05
P 1.06
P 1.07
P 1.08
P 1.09
P 1.10
P 1.11
P 1.12
P 1.13
P 1.14
P 1.15
P 1.16
P 1.17
P 1.18
P 1.19
P 1.20
P 1.21
P 1.22
P 1.23
P 1.24
P 1.25
P 1.26
P 1.27
P 1.28
P 1.29
P 1.30
P 1.31
P 1.32
P 1.33
P 1.34
P 1.35
P 1.36
P 1.37
P 1.38
P 1.39
P 1.40
P 1.41
P 1.42
P 1.43
P 1.44
P 1.45
P 1.46
P 1.47
P 1.48
P 1.49
P 1.50
P 1.51
P 1.52
P 1.53
P 1.54
Program name
Cerebellum
Nerves
Arteries
Veins
Cell components
Hair
Skin
Auditory and vestibular organs
Tongue
Olfactory organ
Visual organ
Brain
Nuclei and tracts of the brain
Lymphatic system
Spleen
Pancreas
Liver
Oesophagus
Lung
Hormone glands
Spinal cord
Larynx
Diaphragm
Pleura
Peritoneum
Male sexual organs
Female sexual organs
Ureter
Stomach
Duodenum
Small intestines
Colon
Gall bladder
Kidneys
Heart
Spinal column
Skeleton-Lower extremities
Feet
Chest
Shoulder
Skull
Skeleton-Upper extremities
Hands
Muskulature-Lower extremities
Muskulature-Upper extremities
Trunk
Neck
Head
Hands
Ganglia
Pre-control
Immune system
Depressions
Teeth
Page 63
5.3 Summary of the Integrated Acupuncture Programs
5.3 Summary of the Integrated Acupuncture Programs
Display
P 2.01
P 2.02
P 2.03
P 2.04
P 2.05
P 2.06
P 2.07
P 2.08
P 2.09
P 2.10
P 2.11
P 2.12
P 2.13
P 2.14
Program name
Lung channel
Colon channel
Stomach channel
Spleen channel
Heart channel
Channel of the small Intestines
Bladder channel
Kidney channel
Liver channel
Channel of the heart and circulation
Sanjiao channel
Gall bladder channel
Channel of the governing vessel
Channel of the conception vessel
Page 64
5.4 Summary of the Integrated Special Programs
5.4 Summary of the Integrated Special Programs
Display
P 3.01
P 3.02
P 3.03
P 3.04
P 3.05
P 3.06
P 3.07
P 3.08
P 3.09
Program name
Check-up
Scar interference suppression
Bacteria / viruses
Parasites
Global screen system
Water veins
Shiftings
Geopathy – complete
Chakras
Page 65
5.5 Summary of the Integrated Programs by Dr. Ulrich
5.5 Summary of the Integrated Programs by Dr. Ulrich
Anzeige
P 4.01
P 4.02
P 4.03
P 4.04
P 4.05
P 4.06
P 4.07
P 4.08
P 4.09
P 4.10
P 4.11
P 4.12
P 4.13
P 4.14
P 4.15
P 4.16
P 4.17
P 4.18
P 4.19
P 4.20
P 4.21
P 4.22
P 4.23
P 4.24
Programmname
Allergy program
Stress program
Ozone protection program
Learning program
Fungal program
Acidosis program
Female hormone program
Male hormone program
After-care program
Tinnitus program
Constants of physics program
Clearing program
Spiritual 1, partnership stress
Spiritual 2, Kundalini
Spiritual 3, protection
Heart program
Diabetes program
Asthma program
Vermin-remedy-programme
Panic-programme
Fructose poisoning-programme
Radiation protection-programme
Page 66
5.6 Summary of the Modules for integration
Page 67
5.6 Summary of the Modules for Integration
ModuleNo.
01
02
03
04
05
06
Part No.:
2010
2020
2030
2040
2050
2070
08
2080
09
2090
10
2092
11
12
-----
Designation
Step precision adjustment of 0.05
54 integrated harmonising programs
14 Acupuncture oscillation therapy
22 Programs according to Dr. Ulrich
9 special programs
11 Test programs
Rayonex Analysis and Harmonising programme
(RAH), Module 8
Rayonex Analysis and Harmonising programme
(RAH), Module 9
Rayonex Analysis and Harmonising programme
(RAH), Module 10
vacant
vacant
5.7 Summary of the Possible Error Messages
Page 68
5.7 Summary of the Possible Error Messages
No. Description
11
12
13
14
15
16
17
18
19
20
21
22
23
24
25
26
27
28
29
30
31
32
33
34
35
36
37
38
39
40
41
42
43
44
45
46
47
54
Wrong memory card type
Invalid memory card
No card inserted
Harmonising time must be at least 1 second
This setup item is vacant
Invalid module enabling code
Card initialising is faulty
Final value must be larger than initial value
Limit switch is faulty
If this is a frequently occurring malfunction, the device must be sent in.
Faulty motor contact
If this is a frequently occurring malfunction, the device must be sent in.
It is not possible to adjust the zero-position correctly.
If this is a frequently occurring malfunction, the device must be sent in.
Card is write-protected
Module is not activated
Number of selected resonance values is too large for the card
It is not possible to provide read and write protection for this card
Maximum capacity of the memory full
This module has already been enabled temporarily
No ‘Green Card’ inserted
Very low current! Charge battery pack!
Service is due
This program group is non-existent
Close current programme first by pressing the stop key twice
Test program is non-existent
Card is faulty
Card cannot be initialised
Storage values contain read-protected values which cannot be stored
Card was removed in storing process
The Polariser does not switch over to the selected mode.
If this is a frequently occurring malfunction, the device must be sent in.
Hardware error of the RAH module
Please remove the card from the card slot
This RAH program can only be called up with module 9 respectively 10
More than 200 RAH-programmes were selected
Double value
Problem occurrence when writing one value
Reading from the ‘Green Card’ only works beginning from module 9
Limitation of up to 200 RAH - programmes
This programme doesn’t existe. An up-date is advisable
Selected programme number is non-existent (see program list)
5.7 Summary of the Possible Error Messages
No.
55
56
65
85
86
87
88
89
90
92
99
Page 69
Description
Wrong code
Module 10 is not active
Only the modules 1 – 10 existing
This RAH program is not available
A maximum of 200 RAH programs can be loaded successively
No values on the memory card
No “valid” memory card inserted. Please check or, if necessary,
reinitialise the card (see Setup Item 40 or 44, respectively)
More than 500 values selected in F1
This F1 program is non-existent (see program list)
This module cannot be activated by the present hardware version. In
case you are interested in the RAH-Module, please contact the Rayonex
company.
Program error
6. Private Documents
6. Private Documents
Page 70
6. Private Documents
6. Private Documents
Page 71
Rayonex Schwingungstechnik GmbH
Sauerland-Pyramiden 1 • 57368 Lennestadt
Tel.: +49 2721 6006–0 • Fax: +49 2721 6006-66
Internet: www.rayonex.de • E-mail: [email protected]
FB-146 • Rev28 • Stand: 15. September 2011