1
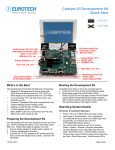
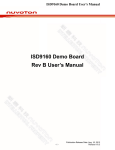
Catalyst EC Development Kit
Quick Start
CTECX3400
CTEC2400
Serial 2 (J16)
Serial 1 (J15)
DC Power Input (J5)
Power LEDs
USB Sockets (J8-J11)
PS/2 Mouse (J21)
Reset Switch (SW1)
On/Off Button (SW2)
PS/2 Keyboard (J20)
Dual Gigabit Ethernet (J7)
VGA Display (J14)
See CTEC4000 and CTECX4000 for development kits with an LCD display.
What’s in the Box?
Booting the Development Kit
The development kit includes the following components:
• Catalyst EC carrier board
• Catalyst Module (CTEC2400) or
Catalyst Module XL (CTECX3400)
• 12 VDC adapter and AC cord
• Power cable
• Three USB keys loaded with Wind River Linux,
Windows® CE, and Windows Embedded Standard
• USB BIOS recovery key
• USB UTILIBOOT key
• Serial port adapter cable (for J15 and J16)
• Maintenance port adapter and black DB9FF cable
(for connection to J4 only)
Complete these steps to boot your development kit:
1. Insert the USB boot drive into any USB socket.
2. Momentarily press the On/Off button (SW2). D8 and
D9 light. After several seconds, the Eurotech logo
appears and the operating system (OS) begins to boot.
Preparing the Development Kit
Your development kit has been designed to work out of the
box. When handling the system, use a wrist strap and/or
ESD mat. Follow these steps to prepare it for use:
1. Connect a keyboard and mouse.
2. Connect a VGA monitor to VGA display socket J14.
3. Connect the power cable to power input header J5.
4. Connect the 12 VDC adapter to the power cable.
Power LED D10 lights when the adapter is connected.
Operating System Details
Windows Embedded Standard
•
•
•
•
Windows CE
•
•
•
110123-4002B
Press CTRL+ALT+DELETE for the login screen.
Log in with user name “Administrator” and no
password.
You can find the version of your OS in Control
Panel→System→General→Support Information.
To shut down, click Start→Shut Down, then select
Shut Down from the OS menu. Wait till the power
LEDs D8 and D9 turn off before disconnecting power.
D10 turns off when the adapter is unplugged.
The system boots to the Windows CE desktop.
CE beta R2 does not reliably support use of USB HID
devices, including the USB-driven touch panel
controller. Use a PS/2 keyboard or mouse.
You can turn off the development kit at any time.
Avoid doing so while files are being written to disk.
March-2010
Wind River Linux 3.0
•
•
•
•
•
•
•
•
This release is based on Linux 2.6.27.35.
During startup, the system presents a grub menu on
the VGA display and accepts input from the keyboard.
You can also access grub from serial port J15 if you
press a key on the terminal during startup. The port
settings are 38400, 8 bits, no parity, and 1 stop bit.
The kernel console is on ttyS0 (J15). You can change
the console to ttyS1 (J16) or tty1 (VGA display and
keyboard) from the grub menu.
You can login from tty1, ttyS0, ttyS1, or remotely using
ssh. The root password is “root”.
To start an X Window session, run “startx”.
To shut down, enter “poweroff” at a shell prompt. Wait
till D8 and D9 turn off before disconnecting power.
D10 turns off when the adapter is unplugged.
This release supports VGA, LCD, PS/2 keyboard and
mouse, PATA drive, Ethernet, USB 2.0, serial ports,
and RTC. It does not support audio and SDIO.
Features
Shutting Down the Development Kit
If the shutdown methods provided by the OS are not
available, press and hold SW2 for about seven seconds to
turn off the system. The same cautions about potential file
corruption from a reset apply to this type of shutdown.
Changing BIOS Settings
BIOS defaults have been selected to enable the
development kit to operate in a standard configuration.
Complete these steps to change the BIOS settings:
1. Remove the OS USB boot drive from the socket.
2. Reset the development kit.
Within a few seconds, the BIOS setup utility appears.
3. Change the applicable BIOS settings.
4. In the Exit tab, select Exit Saving Changes.
5. Reinsert the OS USB boot drive into the USB socket.
6. Reset the development kit.
Connecting to a Network
•
•
Power LEDs
The following LEDs indicate the status of system power:
Power is connected (D10)
Primary Supply (D9)
Normal Operating Power (D8)
Resetting the Development Kit
To reset, press SW1. Press only if there is a catastrophic
fault or hang of the OS. User data can be lost and the
boot media can be corrupted by an unexpected reset.
™
Network settings are configured to operate with a
DHCP network. To connect to your network, connect
your network cable to either Ethernet socket of J7.
CE beta R2 does not support Ethernet.
Troubleshooting
The following are tips for troubleshooting common
problems:
• Maintenance port J4 is not for application use.
• The maintenance port adapter cable does not follow
the EIA-232C standard. If you are directed to use this
port when working with Eurotech staff, use the black
DB9FF cable supplied in this kit.
See the support forums for additional tips.
Everyware Software Framework
Next Steps
The Catalyst EC is available with the Everyware Software
Framework (ESF). Information about ESF is available at:
For additional information about the Catalyst EC, download
the following documents from the support site or contact
your local sales representative.
http://esf.eurotech.com/
Technical Support
The Eurotech support site includes errata reports, the
latest releases of documents, and developer’s forums.
These resources are available to registered developers at:
Document
Catalyst EC User Manual
110123-4000
Catalyst Module Design-In Guide
110122-2003
http://support.eurotech-inc.com/Catalyst.asp
110123-4002B
March-2010