1
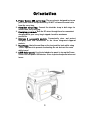
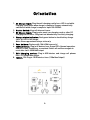
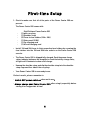
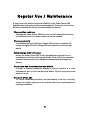
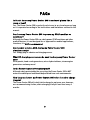
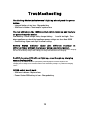
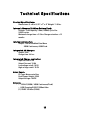
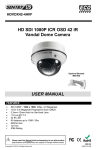
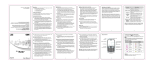
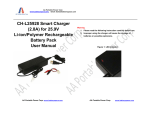
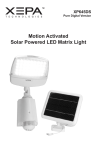
Shelf Reliance
Power Center 200
Table of Contents
Introduction – 1
Safety – 2
Orientation – 3
First-time Setup – 5
Charging Your Power Center – 6
Powering Your Devices – 7
Regular Use / Maintenance – 8
Frequently Asked Questions – 9
Troubleshooting – 10
Technical Specifications – 11
Contact Us – 12
Introduction
The purpose of this user manual is to teach you how to use your Shelf Reliance
Power Center 200, and how to operate it safely. This user manual is intended to
be read through and referenced by anyone intending to use the Power Center
200.
WARNING!
Improper use or operation of a Power Center 200 can present
dangerous electrical and/or fire hazards. Before attempting to use or
operate a Power Center 200, users should have a basic under-standing of
electrical safety and be able to read and understand the directions in this
manual.
The Power Center 200 User Manual is divided into three main parts: Safety
and
orientation;
Operating
Instructions;
FAQs
and
troubleshooting.
Safety and Orientation (pp. 2-3)
· The Power Center 200 contains a high-powered battery pack, which presents
potential safety hazards if misused or operated incorrectly. Following the
Safety and Orientation instructions will help ensure safe and reliable
operation.
Operating Instructions (pp. 5-8)
· Read the Operating Instructions to learn how to safely set-up, charge and use
your Power Center 200. The Operating Instructions includes tips to
maximize the life of your Power Center 200.
FAQs and Troubleshooting (pp. 8-9)
· This section offers answers to the most frequently asked questions about
the Power Center 200, and offers troubleshooting and fixes to the most
commonly encountered technical problems.
1
Safety
WARNING!
•
NEVER attem pt to open or disassem ble the Power Center 200.
Hazardous electrical shock m ay result.
•
NEVER leave the Power Center 200 unattended while charging or
leave the unit plugged into a charging source after charging is
com plete. Overheating and fire m ay result.
•
NEVER let the Power Center 200 get wet or expose to harsh weather
conditions or operating environm ents.
CAUTION!
•
ALW AYS allow adequate ventilation & NEVER obstruct the air vents
on your Power Center 200 during use.
•
ALW AYS follow charging and output voltage ratings as noted on the
faceplate of the Power Center 200.
•
ONLY use 12VDC regulated power sources for charging the Power
Center 200.
2
Orientation
1. Power Center 200 carry-bag: The carry-bag is designed to stay on
your Power Center 200 permanently, DO NOT re-move the metal case
from the carry-bag.
2. Shoulder strap ring: Connect the shoulder strap to both rings for
comfortable, easy carrying.
3. Charging grommet: Run the DC wires through here for convenient
charging while your carry-bag is zipped closed for maximum
protection.
4. Storage / accessory pocket: Conveniently store and protect
charging cords and accessories in the three integrated zippered
pockets.
5. Vent flaps: Unzip the vent flap on the front and the back while using
110VAC appliances to prevent overheating. Do not obstruct the vents
while in use!
6. 2.5W Solar panel: Use the included solar panel to top up the Power
Center 200 and power USB devices. Store in protective pocket when not
in use.
3
Orientation
1. AC Charge input: Plug the wall charging cord in here. LED is red while
charging; turns green when charge is complete. Charger automatically
switches off when charge is complete. Input 100-220VAC.
2. Master Switch: Keep off when not in use.
3. DC Charge input: Plug in solar panel, car-charging cord, or other DC
charging sources here. LED glows red when battery is actively charging.
4. Charge status Indicator: Push green button to check battery charge
state. All LEDs = full charge.
Note: Shows approximate charge state only.
5. Fuse holders: Replace with 10A & 20A fuses only!
6. 120VAC Outlet: Plug in AC devices here. Green LED = Normal operation.
Red LED = fault, low battery, or overload. Switch off and then on again to
reset after fault. 200W MAX output.
7. USB Charging outlets: Plug in USB devices and charge cell phones
here. 5V 1000mA max output.
8. 12VDC: 12V: Plug in 12VDC devices here. (120w Max Output)
4
First-time Setup
1. Check to make sure that all of the parts of the Power Center 200 are
present.
The Power Center 200 comes with:
·
·
·
·
·
·
Shelf Reliance Power Center 200
(1) with carry-bag
(1) Shoulder strap
(2) Fuses in fuse holders (10A + 20A)
(1) Solar panel (2.5W)
(1) Car charging cord
(1) AC wall charging cord
•
Install 10A and 20A fuses in their respective fuse holders by screwing the
fuse holders into the 10A and 20A fuse sockets on the Power Center 200
console.
•
The Power Center 200 is shipped fully charged. Push the green charge
status indicator button on the faceplate to check the battery charge state;
all lights will illuminate to show a full charge.
•
Unwrap the shoulder strap and clip the shoulder strap into the shoulder
strap rings on either side of the carry-bag.
•
Your Power Center 200 is now ready to use.
For best results, please remember to:
· Switch OFF power switches when not in use!
· Always charge your Power Center 200 after using it, especially before
storing it for long periods of time!
5
Charging the
Power Center 200
To charge your Power Center 200 from an AC wall outlet:
· Plug the included AC charging cord into the AC Charge socket on the interface and then plug the cord into the wall outlet.
· The AC Charge LED lights up red while charging and turns green when the
Power Center 200 is fully charged. Unplug charging cord
To charge you’re Power Center 200 from a DC charging source:
· Connect the red and black wires from the DC charging source to the red
and black sides of the DC Charge Input by pressing down on the tabs.
· DC Charge Input LED lights up red when charging– the red LED will NOT turn
off when charge is complete. The Power Center 200 will be completely
charged approximately 45 minutes after LED Charge Status Indicator
shows a full charge.
Car Charging
· Insert the red and black wires of the car charging cord into their respective
sides of the DC Charge Input.
· After wires are securely connected, plug the vehicle power plug into the
power outlet in your vehicle.
Solar Panel
· Insert the black and red wires from the solar panel into the respective sides
of the DC Charge Input.
· For best results, place solar panel in direct sunlight
Warning! Do NOT leave DC charging sources connected to the Power
Center 200 after charging is complete. Overheating and fire may result!
6
Powering Your Devices
The Power Center 200 is compatible with a large range of appliances and
electronic devices. Please verify that the voltage and power requirements of
your appliances and electronic devices are compatible with the power outputs
on the Power Center 200 BEFORE attempting to power them.
AC POWER
· Before switching on the AC outlet, zip open and fold down both vent flaps on
the carry-bag.
· Turn the switch next to the AC outlet ON. The inverter requires a few seconds
to power up; the green LED above the switch will light up when the system
is ready.
· Plug your appliance or electronic device into the AC outlet; use as you
would a regular wall outlet.
Caution! : The output of the 120VAC outlet on the Power Center 200 is MSW
(Modified Sine Wave), and may cause damage to certain appliances / devices.
Check with your device manufacturer to verify that your device is MSW
compatible BEFORE attempting to power it with the Power Center 200.
USB Outlets
· Plug in device(s) and switch on power switch. Switch off power switch
when not in use.
12VDC Outlet
· To use the 12VDC outlet, simply flip open the protective outlet cover, and
plug in your device– the 12VDC outlet is always ON. When you are done
powering your device, unplug your device and close the outlet protective
cover.
7
Regular Use / Maintenance
A long service life and the long term reliability of the Power Center 200
depends upon how well you care for and maintain it. Follow the instructions
below to maximize the service life and reliability of the unit:
· Charge after each use
Charging the Power Center 200 after each use will maximize the battery
life and ensure that it is always ready to use when needed.
· Charge regularly
To maximize the life of the Power Center 200, perform a complete AC
charge (charge until the AC Charge LED turns green) at least once per
month.
· Fully Charge before Storage
Ensure the Power Center 200 is fully charged before storing it for an
extended period of time. Storing your Power Center 200 for an extended
period of time when not fully charged could permanently damage the
battery.
· Keep clean and free from dust and debris
In order to prevent premature damage or failure, operate in a clean
environment that is free from dust and debris. Zip the carry-bag closed
when not in use.
· Keep out of the sun
To receive maximum protection and functionality from the carry-bag,
keep it out of direct exposure to the sun and other harsh environments or
operating conditions.
8
FAQs
Is it safe to use my Power Center 200 in enclosed places like a
room or tent?
Yes. The Power Center 200 is perfectly safe to use in en-closed areas as long
as it is operated according to the instructions and limitations outlined in this
manual.
Can I use my Power Center 200 to power my CPAP machine or
ventilator?
Although the Power Center 200 can safely power CPAP machines and other
medical devices, it is not designed for or approved for medical applications,
therefore, it is NOT recommended.
Can I power a device AND charge my Power Center 200
simultaneously?
Yes. Simply plug in a device and charging source.
What DC charging sources can be used to charge my Power Center
200?
Solar panels; hand-crank generators; micro-hydro turbines; steam engine
generators and many more!
Is the Power Center 200 weatherproof?
Although safely protected by the carry-bag, the Power Center 200 is NOT
water or weatherproof and should be protected from such environments.
How long can I store my Power Center 200 before I need to charge
it again?
The Power Center 200 will safely hold a charge for up to one year, however,
we recommend using it often, and recharging it fully at least once every 3
months.
9
Troubleshooting
The Battery Status Indicator won’t light up when I push the green
button.
· Internal battery is too low– Charge battery
· 20A Fuse is blown– Check and/or replace fuse
The red LED above the 120VAC outlet switch lights up and there is
no power from the outlet.
Low Battery– Check charge state; charge battery.
Load is too high– Turn
down appliance or check that appliance power ratings are less than 200W
· Overheating– Open vent flaps to allow cooling
Battery Status Indicator lights give different readings
different times without charging or using any stored power.
at
Battery Status Indicator provides approximate charge state only; Batteries voltage settles after charging.
For an accurate battery charge state reading, test charge state two hours after charging.
Red DC charging LED will not light up, even though my charging
source is plugged in.
Input polarity is reversed– Reverse input polarity 10A Charging fuse is blown– Replace fuse
Charging source voltage is less than the Power Center 200 battery voltage– Try a different charging
source
12VDC outlet won’t work
· 20A fuse is blown– Replace fuse
· Power Center 200 battery is low– Charge battery
10
Technical Specifications
Product Specifications:
Dimensions: (L x W x H) 10” x 7” x 8” Weight: 11.0 lbs.
Internal Advanced-Lithium Battery Pack:
Voltage: 12.8V Capacity: 10Ah (120Wh) Cycle life:
2,000+ cycles
Minimum charge time: < 2.5 hrs Charge retention: >12
months
Internal AC Inverter:
Output: 120VAC Modified Sine Wave
200W Continuous, 400W Peak
Integrated AC Charger:
Output: 3.0A
Charge time 3.4 hrs.
Integrated Charge controller:
Input Current: 5.0A
Output Current: 10.0A
Low voltage cutoff: 10.5V
High voltage cutoff: 15.0V
Solar Panel:
PV Type: Monocrystalline
Peak Power Output: 2.5W
Output Voltage: 18VDC
Outputs:
• 120VAC (200W / 400W Continuous/Peak)
• USB Charging 5.0VDC 1000mA Max
(1) 12VDC 10A Max (120W)
11
Contact Us
Please contact us for new product
up-dates, usage tips, customer
service or technical support:
Phone: 801.756.9902
Email: [email protected]
Web: www.shelfreliance.com
12