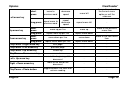
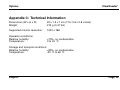
1
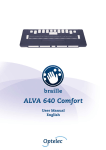
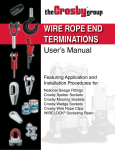
Optelec
ClearReader+
English
Page 0
ClearReader+
Optelec
User Manual
OPN: CR-MAG-FP Version 1.2
© 2011 Optelec, the Netherlands
All rights reserved
Optelec
P.O. Box 399
2990 AJ Barendrecht
The Netherlands
Phone: +31 (0)88 678 34 44
E-mail: [email protected]
Internet: www.optelec.com
English
Page 1
ClearReader+
Optelec
Contents
1.
2.
3.
4.
5.
Introduction........................................................................................................................ 4
1.1 About this manual ...................................................................................................... 4
1.2 What’s in the box........................................................................................................ 4
Getting to know your ClearReader+ Magnification Feature Pack .................................. 5
2.1 Buttons....................................................................................................................... 5
Getting Started................................................................................................................... 8
3.1 Connecting the Magnification Feature Pack to the Optelec ClearReader+ ................. 8
3.2 Turning-on the ClearReader+ ..................................................................................... 8
3.3 Inserting the SD card ................................................................................................. 9
3.4 Standby mode ............................................................................................................ 9
3.5 Turning off the ClearReader+ ................................................................................... 10
Magnification Modes ....................................................................................................... 11
4.1 Photo Mode.............................................................................................................. 11
4.2 Text Mode ................................................................................................................ 11
4.2.1
Navigating in Text Mode ............................................................................... 12
4.2.2
Manual Reading............................................................................................ 13
4.2.3
Automatic Document Reading ...................................................................... 13
The ClearReader+ Menu .................................................................................................. 14
5.1 Activating and closing the menu............................................................................... 14
English
Page 2
Optelec
ClearReader+
5.2 Using the menu ........................................................................................................ 14
5.3 Advanced, Basic and Voice only menu .................................................................... 14
5.4 The menu items ....................................................................................................... 16
5.4.1
Speech on / off.............................................................................................. 16
5.4.2
Voice............................................................................................................. 16
5.4.3
Save a document.......................................................................................... 16
5.4.4
Open a document ......................................................................................... 18
5.4.5
Delete a document........................................................................................ 19
5.4.6
Size............................................................................................................... 19
5.4.7
Mode............................................................................................................. 19
5.4.8
Color ............................................................................................................. 20
5.4.9
Menu............................................................................................................. 20
5.4.10
Font............................................................................................................... 20
5.4.11
Bold............................................................................................................... 20
5.4.12
Word highlight............................................................................................... 21
5.4.13
Restore defaults............................................................................................ 21
Appendix A: Safety .................................................................................................................. 22
Appendix B: Function overview ............................................................................................. 23
Appendix C: Technical Information........................................................................................ 25
Contact information – Optelec Offices Worldwide................................................................ 26
English
Page 3
Optelec
ClearReader+
1. Introduction
Congratulations on choosing the Optelec ClearReader+ Magnification Feature Pack, an intuitive
remote control to listen to, view and magnify text with your ClearReader+.
The ClearReader+ Magnification Feature Pack will add magnification as well as the facility to
save and read text documents with your ClearReader+. Use the ClearReader+ and the Feature
Pack in combination with or without a monitor to listen to or to magnify the captured document
on the screen.
1.1 About this manual
This manual will familiarize you with the features and operation of the ClearReader+
Magnification Feature Pack. Please read this manual carefully before using your Magnification
Feature Pack.
1.2 What’s in the box
The ClearReader+ Magnification Feature Pack packaging contains the following:
- The Optelec ClearReader+ Magnification Feature Pack
- An SD card for saving documents
- This user manual
If any of these items are missing from your package, please contact your Optelec distributor.
English
Page 4
ClearReader+
Optelec
2. Getting to know your ClearReader+ Magnification Feature Pack
2.1 Buttons
The following figure shows the ClearReader+ Magnification Feature Pack buttons:
Left
Photo
Play / Pause
Confirm
English
Up
Menu
Right
Down
Page 5
Optelec
ClearReader+
Play / Pause button:
round button in the centre of the remote control to stop and restart
Automatic Document Reading within the Text Mode. Press and hold
down the button for a short period will spell the current word. Pressing
the Play / Pause button within the menu will cycle through the available
options, confirm the current selection or enter the submenu. Within
Photo Mode the Play button will cycle through the 4 magnification levels.
Left arrow key:
to navigate to the previous word or to the left in Photo Mode. This button
will decrease the reading speed during playback of the text. In the menu
this button will change the value of the current menu option or exit the
submenu.
Right arrow key:
to navigate to the next word or to the right in Photo Mode. This button
will increase the reading speed during playback of the text. In the menu
this button will change the value of the current menu option or enter the
submenu.
Up arrow key:
to navigate a line up in the text or to move to the previous menu item in
the menu. In the Photo Mode this button will navigate up.
English
Page 6
Optelec
ClearReader+
Down arrow key:
to navigate a line down or to move to the next menu item in the menu. In
Photo Mode this button will navigate down.
Photo button:
square button on the left half of the remote control to switch to Photo
Mode and back to Text Mode.
Menu button:
square button marked with the character “M” on the right half of the
remote control to enter and exit the menu.
English
Page 7
Optelec
3.
ClearReader+
Getting Started
3.1 Connecting the Magnification Feature Pack to the Optelec ClearReader+
Connect the Magnification Feature Pack to the ClearReader+ and optionally, a monitor. Locate
the VGA connector at the bottom rear side of the ClearReader+. If the VGA connector is not
visible, you will need to remove the protection cover which will also reveal two USB connectors.
Use a Philips screwdriver to remove the screw which closes the cover. This screw is located in
the middle of the bottom side of the ClearReader+. Connect the monitor to the ClearReader+ by
using a VGA cable. Adjacent to the VGA connector there are two USB ports. Connect the USB
cable of the ClearReader+ Magnification Feature Pack to one of the two USB ports on the rear
side or to the USB port on the right side of the unit.
When the Magnification Feature Pack is connected to the ClearReader+, switch-on and take a
snapshot of a document as described in the ClearReader+ user manual.
3.2 Turning-on the ClearReader+
To switch-on, press the round Power button on the right-hand
side of the ClearReader+. The start-up process will take
approximately 40 seconds. You will hear a series of beeps to
indicate that the ClearReader+ is starting up followed by the
start-up sound. Now the Power indicator on the top side of the
unit beneath the volume dial is lit up and the ClearReader+ is
ready to use.
English
Page 8
Optelec
ClearReader+
Note: In case a not by Optelec supplied SD card or a USB memory stick is being used for
saving documents, please remove the SD card and / or USB stick from the ClearReader+ during
the start-up process. The ClearReader+ may not start properly if a not Optelec SD card or USB
stick is inserted. As soon as the ClearReader+ is started up, the SD card or USB stick can be
inserted again.
3.3 Inserting the SD card
To be able to save documents with the
Magnification Feature Pack, insert the
supplied SD card into the SD slot
above the USB port on the right-hand
side of the ClearReader+. Alternatively
you can use a USB memory stick to
save documents.
3.4 Standby mode
The ClearReader+ will go into standby mode if no button is pressed for 15 minutes on batteries
and 30 minutes if connected to mains power. The standby sound will be played, the Power
indicator will start blinking and the ClearReader+ will go into standby mode. To wake up the
ClearReader+ from standby, press the Power button. When the batteries are fully charged, the
standby time of the ClearReader+ is approximately 40 hours. After 40 hours the ClearReader+
will power down. Please note that switching to standby mode takes approximately 8 seconds
English
Page 9
Optelec
ClearReader+
and that the ClearReader+ will not react to any button press during this time. If switching-on the
ClearReader+ from the standby mode, the start-up process will take approximately 10 seconds.
3.5 Turning off the ClearReader+
Press and hold the Power button to power down the ClearReader+. The power down sound will
be played and the Power indicator led will turn off.
English
Page 10
Optelec
ClearReader+
4. Magnification Modes
With the ClearReader+ Magnification Feature Pack you can view captured documents in two
modes: Photo and Text Mode. To switch between Text and Photo Mode press the Photo button
on the Magnification Feature Pack.
4.1
Photo Mode
In Photo Mode, the original snapshot of the document is displayed in full color.
Press the Play / Pause button to cycle through 4 magnification steps. The first step will show the
full document, the second, third and fourth steps will magnify the document 3 times, 6 times and
12 times respectively. When zooming in, magnification will be placed at your current reading
position within the text. You can navigate within the zoomed-in image of the document using the
4 arrow keys right, left, up and down. If you navigate right, left, up or down in Photo Mode and
change to Text Mode your position within the text will correspond to the position in the
snapshot. Alternatively, when switching from Text Mode to Photo Mode, the highlighted word
will be displayed in the centre of the screen.
4.2
Text Mode
Within Text Mode, captured text will be formatted and displayed in high contrast. Options to
adjust the appearance of the text such as font size, view, color, type, bold, or highlight are
located within the ClearReader+ Menu. For more information please refer to Chapter 2 of the
ClearReader+ Menu.
English
Page 11
Optelec
ClearReader+
Within Text Mode a document can be read with or without speech. To enable or disable the
speech option, open the menu by pressing the Menu button. The first option is Speech on / off.
Select Speech on or Speech off using the Left or Right arrow key. By pressing the Menu button
again the menu will close and the setting will be saved.
There are two views: the Column view and the Line view. In the Column view the text is
displayed in a column to fit the width of the screen regardless of the text size. In Line view the
text is displayed in one continuous line, and the highlighted word is always displayed at the
centre of the screen. The Column or Line view can be selected in the menu under the menu
item “View”.
4.2.1 Navigating in Text Mode
In Text Mode you can navigate to the next or previous line of the text by pressing the Up or
Down arrow keys. To move a screen up in a document press the Play / Pause button together
with the Up arrow key. To move to the next screen press the Play / Pause button together with
the Down arrow key. To go to the start or end of the document use the Left plus Up arrow keys
or Right plus Down arrow keys respectively. If you are reading a book press the Play / Pause
button in conjunction with the Right arrow key to go to the next page. Alternatively, to go to the
previous page press the Play / Pause button with the Left arrow key.
By default the ClearReader+ will recognize columns. If you wish to disable the column
recognition to read tables press and hold the Play/Pause button and press the Photo button.
English
Page 12
Optelec
ClearReader+
4.2.2 Manual Reading
If the playback of text is paused, you can manually navigate within the document with the arrow
keys or one of the other navigation commands. By pressing the Right arrow key you will move
forward per word or by pressing the Left arrow key you will move back a word. For the function
of other buttons please refer to the previous subchapter, “Navigating in Text Mode”.
4.2.3 Automatic Document Reading
To start or stop the Automatic Document Reading function, press the Play / Pause button.
When Automatic Document Reading is activated, the text will scroll automatically. To decrease
the reading speed, press the Left arrow key. Alternatively, press the Right arrow key to increase
the reading speed. For the function of other buttons please refer to the previous subchapter,
“Navigating in Text Mode”.
English
Page 13
Optelec
ClearReader+
5. The ClearReader+ Menu
5.1 Activating and closing the menu
To activate the menu press the Menu button. The Menu button is the square button in the right
half of the remote control marked with the character “M”. To close the menu, press the same
button again. Any changes made in the menu are automatically saved. When you re-enter the
menu, the last menu item shown will be selected again.
5.2 Using the menu
The ClearReader+ menu is displayed as a large print vertical menu. To navigate within the
menu and select an item, use the Up and Down keys on the Magnification Feature Pack. Use
the Left and Right keys on the remote control to change the value of the selected menu item.
When the menu value has been adjusted, the new setting is automatically saved. With the Play
/ Pause button you can also adjust the value of the selected menu item or confirm your choice
similar to the Right arrow key. To exit the menu and save the changes press the Menu button.
5.3 Advanced, Basic and Voice only menu
The ClearReader+ Menu has three menu levels: Advanced, Basic and Voice Only. The
Advanced menu contains all the available menu items. The Basic menu is a simplified version
of the Advanced menu. The Voice Only menu is designed for people who would like to use the
English
Page 14
ClearReader+
Optelec
ClearReader+ without a monitor thereby showing only the menu options relevant for those who
only require speech access.
The Advanced menu contains the following options:
• Speech on / off
• Size
• Voice
• View
• Save
• Color
• Open
• Menu
• Delete
• Font
•
•
•
Bold
Word Highlight
Restore Defaults
The Basic menu contains the following options:
• Size
• Speech on / off
• View
• Voice
• Color
• Open
•
Menu
The Voice Only menu contains the following options:
• Voice
• Save
• Open
• Delete
•
Menu
English
Page 15
Optelec
ClearReader+
5.4 The menu items
5.4.1 Speech on / off
This menu item turns the Speech on or off. Use the Left or Right arrow key to toggle the speech
output on or off.
5.4.2 Voice
This menu item lets you select your reading voice and language. To select another reading
voice, use the Left or Right arrow key. Depending on the number of voices installed on your
ClearReader+, you can select up to a maximum of 4 reading voices. If by adjusting the reading
voice results in a change of language, the menus will automatically change to the same
language.
5.4.3 Save a document
By default a document will be saved on the SD card delivered with the ClearReader+
Magnification Feature Pack. If you wish to save your document on a USB drive, connect a USB
drive to the ClearReader+. When a USB drive is connected the document will be saved
automatically on the drive.
If you wish to save a document, open the menu, arrow down to “Save” and press the Right
arrow key to open the “Save” submenu. Using the Up or Down arrow key, you can select one of
three options: “Save without voice label”, “Save with voice label” and “Save book”.
English
Page 16
Optelec
ClearReader+
If you wish to save a document without a voice label select the option “Save without voice label”
and press the Right arrow key. The document will be saved and the menu will be closed
showing the document again. The name of the document will be the first line of the document.
If you select the option “Save with voice label” press the Play / Pause button or the Right arrow
key to start recording for 5 seconds. Speak the name of the document after you hear a beep
sound. At the end of the recording you will hear another beep sound and the voice label will be
played back to you. To save the document with the recorded voice label, confirm by pressing
the Play / Pause button or the Right arrow key. The document will be saved and the menu will
be closed showing the document again. The name of the document will be the first sentence or
line of the document and the recorded voice label. To cancel the recording and return to the
Save with voice label menu, press the Left arrow key.
To start saving a book, select the “Save book” option and press the Play / Pause button or the
Right arrow key to start recording a 5 second long voice label of your book. Speak the name of
the book after you hear a beep sound. At the end of the recording you will hear another beep
sound and the recording will be played back to you. To save the book with the recorded label,
confirm your save and press the Play / Pause button or the Right arrow key. The book will be
saved and you can start adding pages to your book.
To start adding pages to your book, place the book beneath the camera and press the Scan
button. Turn the page and press the Scan button again to add the next page. When you have
finished adding pages, press the Menu button. The ClearReader+ will start processing the first
page. You will be able to start reading the book immediately.
English
Page 17
Optelec
ClearReader+
5.4.4 Open a document
If you want to open a document select the “Open” menu item and press the Right arrow key to
see the list of saved documents showing the most recently saved document first. A document
saved by the ClearReader+ can be a photo document containing the original snapshot, a text
document converted from the photo or a book document containing more pages as a photo.
The type of document is indicated by an icon in front of the document name. The icon of a photo
document is a single page, the icon of a text document is a multiple page and the icon of a book
is an open book.
If the menu is set to “Basic” the 4 most recent
documents will be shown. If the menu is set to
“Advanced” or “Voice Only” all saved documents will
be shown. Move to the document you wish to read by
pressing the Up or Down arrow key and open the
document by pressing the Play / Pause button or the
Right arrow key. The menu will be closed and the
document will be opened.
If you open a book document you will be asked if you would like to convert it to a text book
document. Select this option if you wish to read the book on another device. Paging through a
text file is faster than paging through a book. The disadvantage of reading the text file compared
to the original book document is that you will not be able to view the pictures. If you would like to
English
Page 18
Optelec
ClearReader+
see the pictures in the book or the original document in the Photo mode open the book
document.
5.4.5 Delete a document
If you wish to delete a document, select the “Delete” menu item and press the Play / Pause
button or the Right arrow key to see the list of saved documents. Select the document you wish
to delete using the Up or Down keys and press the Play / Pause button or the Right arrow key.
You will be prompted to confirm that you are sure to delete the document. To delete the
document press the Play / Pause button or the Right arrow key again. To cancel deleting the
document, press the Left arrow key. Both choices will return you to the list of documents.
5.4.6 Size
The text size of the menu is always displayed in the same font size as your document. To adjust
the text size in the menu, press the Left or Right arrow key. The Left arrow key will decrease the
text size, whilst the Right arrow key will increase it. The text size of the menu will instantly adjust
to the new size.
5.4.7 Mode
There are two reading views in Text mode: “Column” and “Line” view. If set to Column view, text
is displayed to fit the width of the screen. If set to Line view, the text will be presented in a single
line.
English
Page 19
ClearReader+
Optelec
5.4.8 Color
To select another reading color, use the Left or Right arrow key. The colors that can be selected
are:
• Black – White
• Black – Red
• White – Black
• Red – Black
• Yellow – Black
• Black – Green
• Black – Yellow
• Green – Black
• Yellow – Blue
• Black – Purple
• Blue – Yellow
• Purple – Black
5.4.9 Menu
This option lets you choose between the “Advanced”, “Basic” or “Voice Only” menu (see also
paragraph 5.3).
5.4.10
Font
This option lets you select your preferred font for reading. Choose a font by pressing the Left or
Right arrow key. You can choose between the fonts of Arial or Verdana. Verdana is the default
font.
5.4.11
Bold
To make the text font bold, select “on” by pressing the Left or Right key. By default bold is off.
English
Page 20
ClearReader+
Optelec
5.4.12
Word highlight
This option lets you choose the shape of the word highlight, a “Block” or “Box” highlight. The
“Block” highlight is the default.
5.4.13
Restore defaults
If you wish to restore the default settings press the Play / Pause button or the Right arrow key.
You will be prompted if you are sure to restore the defaults. To restore the defaults press the
Play / Pause button or the Right arrow key once again. To cancel restoring the defaults press
the Left key.
Default settings
Speech
Size
View
Color
English
On
5
Column
White – Black
Menu
Font
Bold
Word highlight
Advanced
Verdana
Off
Block
Page 21
Optelec
ClearReader+
Appendix A: Safety
Handle the ClearReader+ Magnification Feature Pack with care. Rough handling will
damage internal components.
Contact your Optelec distributor to service this equipment if necessary.
Do not open or remove any parts of the ClearReader+ Magnification Feature Pack as it
will void the warranty.
Do not expose the ClearReader+ Magnification Feature Pack to excessive heat or direct
sunlight to avoid the risk of fire.
Do not use the ClearReader+ Magnification Feature Pack near inadequately shielded
medical devices.
To avoid risk of electrical damage, keep your ClearReader+ Magnification Feature Pack
away from fluids and chemicals.
Always disconnect the ClearReader+ Magnification Feature Pack before cleaning. Use a
soft damp cloth to clean the exterior. Do not use cleaning agents or abrasive materials as
they will damage you’re the product.
The ClearReader+ Magnification Feature Pack may only be used with the UL listed
Optelec ClearReader+.
Use of the ClearReader+ Magnification Feature Pack other than described in this manual will
exclude it from warranty conditions.
English
Page 22
ClearReader+
Optelec
Appendix B: Function overview
In Text Mode
Play/Pause
Photo button
Menu button
short
press
Manual
Automatic
start
Automatic
Document
Reading
stop
Automatic
Document
Reading
long press
short
press
short
press
spell a word
enter Photo Mode /
exit Text Mode
short
press
move to next
word
repeat move to
next word
In Photo Mode
In the menu
cycle through 4
magnification levels
(1X, 3X, 6X and 12X)
confirm selection
exit Photo Mode /
enter Text Mode
-
enter menu
exit menu
increase
speed
move right
change the value of
the current menu
option or enter the
submenu
repeat
increase
speed
repeat move right
-
enter menu
Right arrow key
long press
English
-
Page 23
ClearReader+
Optelec
short
press
move to
previous word
decrease
speed
move left
change the value of
the current menu
option or exit the
submenu
long press
repeat move to
previous word
repeat
decrease
speed
repeat move left
-
Left arrow key
short
press
long press
short
press
long press
move up per line
move up
repeat move up per line
repeat move down
move down per line
move down
repeat move down per line
repeat move down
move to the previous
menu item
move to the next menu
item
-
next page
-
-
Play/Pause + Left arrow key
previous page
-
-
Play/Pause + Up arrow key
screen up
-
-
Up arrow key
Down arrow key
Play/Pause + Right arrow key
Play/Pause + Down arrow key
Left + Up arrow key
Right + Down arrow key
Play/Pause + Photo button
English
screen down
-
-
move to the beginning of the
document
-
-
move to the end of the
document
-
-
toggle between the table and
column reading
-
-
Page 24
ClearReader+
Optelec
Appendix C: Technical Information
Dimensions (W x H x D):
Weight:
20 x 1.5 x 7 cm (7.9 x 0.6 x 2.8 inches)
215 g (0.47 lbs)
Supported monitor resolution:
1024 x 768
Operation conditions:
Relative humidity:
Temperature:
<70%, no condensation
0 to 40 °C
Storage and transport conditions:
Relative humidity:
<95%, no condensation
Temperature:
-20 °C to 60 °C
English
Page 25
Optelec Offices Worldwide / Optelec kantoren wereldwijd / Optelec dans le monde / Filiali Optelec
nel mondo / Optelec oficinas por todo el mundo / Optelec Zweigniederlassungen Weltweit
Optelec U.S. Ltd
3030 Enterprise Court, Ste C
Vista, CA 92081
U.S.A.
T: +1 (800) 826-4200
www.optelec.com
Optelec Canada
1832 Marie-Victorin
Longueuil, QC J4G 1Y9
Canada
T: +1 (450) 677-1171
www.optelec.com
Optelec Nederland BV
Breslau 4
2993 LT Barendrecht
The Netherlands
T: +31 (0)88 678 3555
www.optelec.nl
Optelec Limited
Optelec NV
2 Millfield House
Baron Ruzettelaan 29
Woodshots Meadow
8310 Brugge
Croxley Green Business Park Belgium
Watford WD18 8YX
United Kingdom
T: +44 1923 23 13 13
T: +32 (0)50 35 75 55
www.optelec.co.uk
www.optelec.be
Optelec GmbH
Fritzlarer Strasse 25
34613 Schwalmstadt
Germany
T: +49 6691 9617-0
www.optelec.de
Optelec Corporate Headquarters
Optelec Holding Hoofdkantoor / Optelec, Siège social / Sede Optelec / Optelec oficinas centrales /
Optelec Unternehmenssitz
Breslau 4 – 2993 LT Barendrecht – The Netherlands –
T: +31 (0)88 678 3444 – www.optelec.com
Page / Pagina / Página / Seite 26
UDC-02084
Rev: B