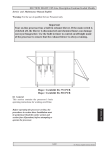
1
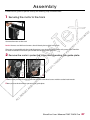
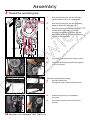
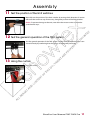
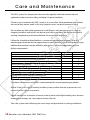
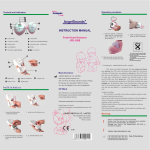
S h ow Te x Use r M anual
T M C D M X Pro
Ta b l e o f Co ntents
Introduction03
Safety Instructions
04
Components05
Assembly07
1 Secure the motor to the track 07
2
Remove the motor’s protective cover and operating line guide plate
07
3
Thread the operating line 08
4
Install the limit switches09
5
Install the control panel 09
6
Connect the motor to the control panel 09
7
Connect the remote control to the control panel 09
8
Connect the limit switches to the control panel 10
9
Connect the control panel to the power outlet 10
10
Switch the TMC DMX Pro to manual control option 10
11
Test the position of the limit switches
11
12
Test the general operation of the TMC system
11
13
Hang the curtain 11
14
Set the soft limits 12
14.1
Set up with the remote control 12
14.2
Set up with the keypad on the control panel 12
Connect the DMX cable to the control panel 13
15
16
Program the DMX channels13
17
Switch the TMC DMX Pro to DMX control 13
Care and Maintenance Instructions11
Trouble shooting12
02
S h ow Te x U s er M anual T MC D MX Pro
I n t ro ducti o n
·
The TMC DMX Pro system facilitates computerized motion control of curtains and set
pieces along a motorized track system.
·
The operating line and head pulley guarantee maximum grip for extremely accurate
movement.
·
The TMC DMX Pro system is equipped with an easy to use remote control with 370W open/close switch and speed controller.
·
The speed controller allows for fast motion with a variable speed of 0 to 80 cm/sec
·
The TMC DMX Pro system makes it possible to open and close curtains manually and
through DMX control.
·
The system can be partially integrated into the show by setting 2 DMX channels. Channel
1 opens the curtain and channel 2 closes the curtain. Speed can be controlled through a
remote control unit.
·
The TMC system is compatible with the ShowTex H100, Showpipe, 3-way, UniTrack and
ShowTrack track systems.
ShowTex User Ma nua l TMC DMX Pro
03
S a f e t y I ns tr ucti o ns
·
Read this user manual carefully
·
The motion system may only be used to move curtains and screens. Never use this system
to move people, animals, or any other heavy objects.
·
Installation and service of the units should only be carried out by qualified technicians
familiar with the system and its operation. Installation and operation must take place in a
dry frost-free environment.
·
To prevent electrocution and contact with moving parts, disable the power supply be
fore carrying out any work on the units including but not limited to operating line and
curtain mounting or removal of the casing or cowling. A sudden unexpected start up of
the system by not disabling the power in both the standard and DMX units creates a risk
to the operator.
·
Units must be installed with a corresponding earth wire with the same section as the
power cable.
04
S h ow Te x U s er M anual T MC D MX Pro
C o m p onent Pa r ts
The TMC DMX Pro system consists of the following parts:
TMC DMX Pro System
Controller
Remote Unit TMC
Power Supply Cable
Limit Switch Set
Cable 3G/0,75 +
XLR 3 Male Plug
NaamArt.nr.information
TMC DMX Pro + controller
Remote Unit TMC
8050 0741 3707 370 W
8050 0766 0030
with 25m cable
Power Supply Cable8150 0912 0027 Limit Switch Set
8050 0770 0050
2 pieces
Cable 3G/0,750350 0101 500025m
XLR 3 Male Plug
0360 0003 0010
Extra tools:
•
Socket head wrench M6
ShowTex User Ma nua l TMC DMX Pro
05
S p e ci fi ca ti o ns
•
Single phase power supply 2x 230Vac + earthing
•
Speed of rotation 50 Hz: 35m/min
•
Height: 460 mm
•
Width: 210 mm
•
Depth: 350 mm
•
Operating line Diameter: 8mm
•
Motor: 0,37 / KW I=1:10 / N2=138tr/min
•
EElectrical case to hang up with the cord unit with:
- Nord Invester SK 500E 370 323 A with a 370 Watt capacity
- Dmx-Uss link via standard Dmx channels
06
S h ow Te x U s er M anual T MC D MX Pro
As s embl y
In order for the system to operate correctly the following steps should be taken:
1
Securing the motor to the track
Connect the motor to the track
Attention: Runners and ball raced runners should already be installed in the track.
The motor is compatible with the H100, Showpipe, 3-way, Unitrack, ShowTrack track systems from ShowTex.
For track installation instructions please refer to individual track manuals.
2
Remove the motor’s protective cover and operating line guide plate.
1
2
1 Remove the protective cover. Loosen the two M6 socket head screws with the socket head wrench.
2 Next, remove the aluminum operating line guide plate.
ShowTex User Ma nua l TMC DMX P ro
07
As s embl y
3
Thread the operating line
1
1
2
3
3
Place the operating line over the left/right
guide wheel that serves as a guide pulley
Place the operating line over the tightening
wheel on the bottom left/right side.
Place the operating line between the belt
and the wheel while staying inside the
operating line guide groove. Then, turn the
hand wheel clockwise until the operating line
appears on the other side.
4
Secure the guide plate in the correct position.
5
Thread the operating line further through the
track as instructed
2
4
5
Thread the operating line through
6
the ball raced runners
7
Through the return pulley and pilot release
6
7
8
Make sure the springs are completely
tensioned.
9
Secure the protective cover in the correct
position.
8
08
9
S h ow Te x U s er M anual T MC D MX Pro
As s embl y
4
Install the limit switches
Attach the two limit switches (including the installation plate) to the track on the positions where the curtains should stop.
Attention: The limit switches must be installed before starting up the unit to prevent
motor blockage or slippage resulting in system damage.
5
Install the control panel
Attach the control panel to the track
6
Connect the motor to the control panel
Use the motor cable with the encoder link to connect the motor to the control panel.
7
Connect the remote control to the control panel
Connect the remote control to the control panel.
The remote control makes it simple to use and program the units, however, it’s not
essential for operation of the unit. When working solely through DMX channels and
DMX keyboard, always use a dummy plug in the remote control outlet to ensure the
unit remains in DMX mode.
ShowTex User Ma nua l TMC DMX Pro
09
As s embl y
8
Connect the limit switches to the control panel
Connect the two limit switches to the control panel using the 3G/0,75 cable. Plug the
3p XLR end plug in the Endstop Input outlet of the control panel.
Attention: Ensure that any extra cable can’t get in the way of operation by attaching it to
the suspension pipe with tape, cable straps, or B2B Velcro.
9
Connect the control panel to the power outlet
Plug the power cable into the Power Input 220Vac outlet of the control board and
then connect it to the power supply.
Attention: All connections must take place before powering up the unit. Unplug from the
power supply before any maintenance to the unit.
10
Switch the TMC DMX Pro to manual control option Use the remote control unit to switch the TMC DMX Pro system to the manual control
option.
10
S h ow Te x U s er M anual T MC D MX Pro
As s embl y
11
Test the position of the limit switches
Manually test the position of the limit switches by testing which direction of motion
will cause the curtain to stop. If necessary, change the position of the limit switches.
Attention: To prevent damage to the unit, never allow the master carriers to move beyond the end stops.
12
Test the general operation of the TMC system
Test the general operation of the TMC system. Confirm that the operating line is tensioned correctly by confirming that the springs are adequately tensioned.
13
Hang the curtain
Hang the curtain.
ShowTex User Ma nua l TMC DMX Pro
11
As s embl y
14 Set the soft limits
14.1 Set up with the remote control
• Use the “OPEN-CLOSE” button on the remote control to close the curtain. Now push the “STORE” button (blue) and
keep it pressed in. Confirm this position by briefly pressing the “ENTER” button (green).
• Next, open the curtain without releasing the “STORE” button.
• When the curtain is in the desired position, press the “ENTER” button again briefly.
Then you can release the “STORE” button.
• Both soft limits are now set at the correct position
14.2
Set up with the keypad on the control panel
1
2
3
1 Use the “OPEN-CLOSE” button on the remote control to close the curtain.
2 Press or on the control panel until “soft limit min” appears onscreen. Then press and at the same time and confirm by pressing
3 Next, press or until “soft limit max“ appears on screen, then press and
confirm by pressing
Both soft limits are now set in the correct position.
12
S h ow Te x U s er M anual T MC D MX Pro
at the same time and
As s embl y
15
Connect the DMX cable to the control panel
Connect the DMX cable of the motor to the control panel
16
Program the DMX channels
The system requires 3 DMX-channels:
• Channel 1 and 2 determine the position of the curtain
• Channel 3 controls the curtain’s speed of motion
Next set the correct DMX address by pressing on the button and the button until “DMX
address” appears on screen (use the and buttons to adjust the DMX address)
Press the button to confirm when you have arrived at the desired address. The DMX
adress is now programmed.
17
Switch the TMC DMX Pro to DMX control
Use the remote control unit to switch the TMC DMX Pro system to DMX control.
ShowTex User Ma nua l TMC DMX Pro
13
C a re a n d Ma i nte na nc e
•
The TMC system has components that must be regularly checked, maintained, and
replaced in order to ensure safety and keep it in good condition
•
The best way to maintain the TMC system is to use it often. Each mechanical part should
be used at least once a week. In this way irregular noises can be discovered in time.
•
Do not allow any item to be operated or used if there is any question as to its safety or
integrity. Accidents and injuries can be the result. Most accidents are the result of lack of
training, complacency, and overconfidence. Do not assume anything.
•
Follow the schedule outlined below as a minimum maintenance program. Once the
operating personnel has had an opportunity to work with the system during the first year,
additional procedures may be added or adjusted as is necessary depending on your
facility requirements.
ITEM
WEKELIJKS
Operate curtain tracks
X
Listen for unusual carrier noise
X
6 MAANDEN
Check that the curtain tracks are operating smoothly
X
Inspect condition of operating line
X
Inspect operating line tension
X
Listen for unusual pulley noise
X
Inspect master carriers and cord clamps
X
Inspect curtain to carrier attachments
X
Inspect track splices for alignment
X
Inspect track channel for debris and remove if required
X
Inspect connections of track to building structure
X
•
The above maintenance schedule is recommended for normal operating conditions.
•
Within 24 hours of using a recently installed system, confirm that the rope tension is at correct level for curtain movement.
•
Above average use or location of curtain track in places with high humidity, dust, extreme
temperature changes, etc. may require shorter intervals.
•
Take the system down following the same steps and precautions as during installation.
14
S h ow Te x U s er M anual T MC D MX Pro
Tro u b le Sho o ti ng
What to do if the curtain stops moving smoothly?
•
•
•
•
•
•
•
Check for damage to the track. If found, repair.
Check that all couplings are lined up without gaps. If necessary, realign.
Joints between track should not be too loose or too tight to avoid a bowed track.
Check for damage to runners. If necessary, replace damaged runners.
If your track has a switching point, check that all parts are lined up correctly.
If not, adjust alignment.
Check for debris on the track or runners, if found, remove carefully.
If the curtain slides out of the track, check if the end stops are loose or missing.
If necessary, tighten or replace.
In case of power failure, the motor can be detached by loosening the bolt of the hand wheel to
switch to manual wheel operation.
For more technical assistance please contact your local ShowTex office.
(see back cover of manual )
H AV E A GRE AT SHOW!
ShowTex User Ma nua l TMC DMX Pro
15
>> ShowTex België nv
Hoofdkantoor:
Everaertsstraat 69 • B-2060 Antwerpen • België
T +32 3 236 84 40 • F +32 3 236 23 02 • [email protected]
ShowTex Belgique sa
T +32 10 24 35 00 • F +32 10 24 36 00 • [email protected]
>> ShowTex France
16 Pl Général De Gaulle • F- 59800 Lille • France
T +33 (0)3 20 63 73 60 • F +33 (0)3 20 63 73 61
M+33 (0)6 89 62 59 90 • [email protected]
>> ShowTex Nederland bv
Energieweg 2b • 3762 ET Soest • Nederland
Postbus 31 • 3760 AA Soest • Nederland
T +31 35 693 86 92 • F +31 35 693 87 55
[email protected] • [email protected]
>> ShowTex Middle East F.Z.C.
Sharjah Airport Free Zone Warehouse Q4 - 79/80
P.O. Box 120226 • United Arab Emirates • T +971 6 557 98 00
F +971 6 557 98 10 • [email protected]
>> ShowTex Hong Kong ltd
Units D - F, 10th Floor • Wing Shan Industrial Building
428 Cha Kwo Ling Road • Yau Tong • Kowloon • Hong Kong
T +852 2727 7558 • F +852 2727 7920 • [email protected]
>> ShowTex South Africa pty
Union Textile Building • Perth Road • Maitland • Cape Town
Western Cape • 7451 • South Africa • T +27 82 453 7488
F +27 86 689 1535 • [email protected]
>> Sales Office UK
T +44 170 681 97 46 • M +44 776 534 1878
F +32 3 236 23 02 • UK • [email protected]
>> Sales Office Scandinavia
M +46768 936 632 • F +31 35 693 87 55
[email protected]
>> Sales Office North Africa
M +212 6 4817 6909 • F +32 3 236 23 02 • Morocco
[email protected]
www.showtex.com