1
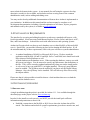
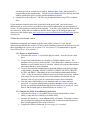
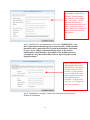
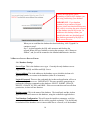
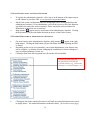
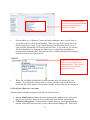
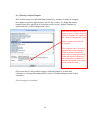
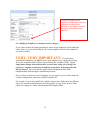
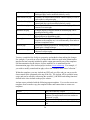
ARCHON ADMINISTRATOR’S MANUAL
v. 1.11
1.0 SYSTEM OVERVIEW
ArchonJ is a tool for managing descriptive information about archival materials and for
publishing it on the web. It allows archives to easily create and publish finding aids for all types
of archival materials. Version 1.11 also includes a digital library capability. Digitized or
electronic records can be linked to and searched alongside collection-level descriptions and
finding aids.
The system allows you to input descriptive records that are compliant with archival standards.
Archon=s scripts automatically produce a searchable and browseable interface where archival
users can access collection descriptions. The system supports authority-controlled creator and
subject records and provides an inventory tracking/location system.
In Archon, collections1 can be grouped into record groups, subgroups, fonds, or any other
classifications defined by the repository. Data can be imported into the system from EAD and
MARC format. The system also exports data in MARC and EAD formats. Repositories can
build custom websites using easily-modified HTML templates.
This documentation provides an overview of the software and guidance on managing some of the
1
Given the difficultly of standardizing archival terms between repositories, the term "collection" is used in
Archon simply as shorthand, to mean any group of archival records or personal papers managed as a discrete unit by
a repository. Archon is flexible enough to be used for organically-related organizational records, manuscript
collections, or both. The display of labels in the public interface can be tailored to reflect specific repository needs
and terminology. For more information, see the forthcoming technical documentation.
more technical elements in the system. A user manual (for staff using the system to develop
descriptive records) is also available, and includes sections covering some of the common
administrative tasks, such as adding and editing users.
You may need to develop additional documentation to illustrate how Archon is implemented at
your institution. In addition to this manual and the end-user manual, a complete set of
development documentation, including a list and explanation of all classes, objects, properties
and methods used by the system, is available at www.archon.org.
2.0 INSTALLATION REQUIREMENTS
The interface for accessing and editing descriptive records uses a standard web browser, with
JavaScript enabled. It has been tested with Internet Explorer, Firefox, Safari, and Opera, on PC,
Mac, and Linux desktops. It should also work with other browsers and operating systems.
Archon itself requires both a webserver and a database server (either MySQL or Microsoft SQL
server). Specifically, you need the following in place before running the install packet. If you
do not understand any of these requirements, check with your web host or systems administrator.
$
$
$
A standard installation of MySQL or Microsoft SQL Server. We have tested the
application with MySQL 4.0 and 5.0 and SQL Server 7 and 2000, but it should work with
later releases of these platforms as well.
A blank database on the database server. When creating the database, create a user with
full (owner) privileges. You do not need to specify any table names, data definitions, or
the like. They will be created or updated automatically when you run the install packet.
A web server of any type with PHP 5.0 or higher installed. The mysql, mssql libraries
must be enabled. The gd library must be enabled if you plan to use the Digital Library
Manager. Also, the zip library can be installed. This will allow zip files to be used by
the import utilities.
Please note that it is also possible to install Archon to a local machine that serves as both the
webserver and the database server.
3.0 INSTALLING/UPGRADING
3.1 PRELIMINARIES
A single installation/upgrade packet is provided for Archon 1.11. It is available through the
download page on the project website, www.archon.org.
In order for the install to work correctly, you MUST provide the install pack sufficient
information and permissions so that it can:
• Establish a connection to the MySQL or SQL Server where the Archon data will be
stored. The database and webserver systems requirements given above must be met, and
2
•
you must provide an accurate server address, database name, login, and passwords, as
requested during the install routine. The files install.pdf and install.doc that are provided
with the install pack specify exactly which information is needed.
Upload files to the webserver. The files may be uploaded either using FTP or a shared
drive.
If your attempt to install Archon fails, please check with project staff, your local system
administrator, or your web host, as needed, to ensure that the information you are supplying is
correct. It is also possible to install Archon manually. To do this, copy all the files in the zip file
to a webserver, define the server address, database name, login, etc in config.inc.php in the
archon root, then load the page www.myarchives.org/yourarchonfolder/install/index.php in your
web browser.
3.2 INSTALLATION INSTRUCTIONS
Installation and upgrade are handled using the same packet (Archon 1.11.zip), but the
instructions provided in this section (1.2) are for those installing Archon for the first time, not for
those upgrading from version 1.0 or version 1.10. See section 3.3 for instructions to upgrade
from version 1.0 or 1.10 to version 1.1.
3.2.1 Prepare to Install Archon
• Download the archon1.11.zip from the project website. Save the file on a local
drive.
• Create a new blank database on a MySQL or MSSQL database server. The
database can be given any name you like. If you do not have authority to create a
database on your database server or web host, contact your systems administrator
and request that they create a database.
• Create a user/password combination for the blank database with ALL privileges
to the database, including, SELECT, INSERT, UPDATE, DELETE, CREATE,
ALTER, and DROP. (Depending on how your database administrator defines
“ALL,” it may be necessary to manually select each of these privileges.) Archon’s
web scripts will use this account to access the database, and Archon will not
function if the user you create for Archon does not have these credentials.
• Note the name of the database server, database name, user login, and user
password. If a systems administrator created the database for you, ask the s/he
provide you with this information using the form install.doc or install.pdf. As as
them to run the install pack as instructed below in section 1.2.2.
3.2.2 Complete the Fields in Installation/Upgrade Pack
• Unzip the file archon1.11.zip (which you previously downloaded) to a local
folder, or open the file in WinZip or a similar utility.
• Open the file install.exe. An installation utility will launch. The utility is used to
specify connection settings for the database and to instruct the install pack as to
how it should upload the files to the web server.
• Complete the fields as instructed [See next page for screenshot] .
3
Select either MySQL or SQL Server,
depending on the server type.
Supply server address (either name or IP
address.
Enter the database’s username (login)
and password that were created when the
blank database was set up (see section
1.2.1), as well as the name of the
database.
The second part of this form specifies
how the install packet will upload the
archon scripts to the webserver. Check
EITHER ‘copy to local directory’ OR
“Copy to FTP Server” If you select FTP,
the Server Address, Port, Login,
Password, and Upload Path fields must
be completed. Normally, Port should be
left at the default value of “21”. NOTE:
This login and password are probably
different than the database login and
password.
This field MUST be completed for
installations using either the local
directory or FTP method. Provide the
based URL where Archon will be
accessible, e.g.
www.myarchives.org/archon/
•
•
•
•
If you need additional assistance completing the above fields, see section 1.4
of this document for a detailed description and instructions.
When you are ready to install Archon 1.11, click ‘Install!’
The utility will upload the files to the web server.
You will see the following box. Go to the web-based installation utility, but
DO NOT CLOSE THE BOX SHOWN BELOW. After the installation is
complete, you will need to enter a code into the box to activate your
installation of Archon.
[See next page for screenshot].
4
3.2.3 Complete the Web-Based Installation Utility.
• The web-based installation utility includes 8 steps. The installer attempts to
connect to the database, creates tables, and completes initial configuration for
your installation of Archon.
Step 1: Click through the welcome screen.
Step 2: Read and accept the license agreement
Step 3: Informational screen, click “Next” to continue
Step 4: Test database configuration. If everything is OK, click “Next,”
otherwise, reconfigure database or correct information supplied in initial (nonweb-based) install utility, then run the installation again.
Step 4 showing successful test
of database connection and
user credentials in green.
Step 5: Installation utility creates database and table structure. After the
structure has been created and the page loads completely into the web
browsers, scroll to the bottom of the screen and click “next.”
Step 6: Complete Repository information as per the screen below:
[See next page for screenshot]
5
Step 6: Provide repository
information as requested in
the form. All information
provided here can be edited
later, if necessary. NOTE:
Some his information is
collection and sent back to us,
where we will keep it in a
secure database, to inform you
of any issues that arise with
the software.
Step 7: Establish a SA and Administrator Password. IMPORTANT: write
the SA password down and keep it in a secure location. Unlike the other
passwords, the SA password is NOT stored in the database, and cannot
be reset. It is a ‘failsafe’ password allowing access to the Archon
administrative (staff) interface, for example, if the database has been
corrupted in a way that will not allow users to logon using the normal
logon procedures.
Step 7: Set the SA and
Administrator Passwords.
IMPORTANT: Record the
SA password in a secure
location. It can be used to
access Archon if the main
table storing user account
information becomes
corrupted. To login as the
“SA” use “sa” as login and
enter your password.
Step 8: Installation is complete. Follow the instructions on the screen to
finalize the installation.
6
3.2.4 Finalize the Installation
•
Return to the installation completion box and enter the text provided
during step 8 of the. After the completion word has been entered, your
installation is complete.
3.3 UPGRADE INSTRUCTIONS
Installation and upgrade are handled using the same packet (Archon 1.11.zip), but the
instructions provided in this section (1.3) are for those upgrading from version 1.0 or version
1.10 to 1.11, not for those installing Archon for the first time. See section 3.2 for instructions to
install version 1.11 without replacing an existing implementation..
3.3.1 Prepare to Upgrade Archon
• Download the file Archon 1.11.zip from the project website. Save the file on a
local drive.
• Note the name of the database server, name, user login/password. If you do not
know any of these, they are found in the file config.inc.php in the root folder of
your current archon installation, on the webserver where you have archon
installed, i.e. www.myarchives.org/archon/config.inc.php
3.3.2 Complete the Fields in Installation/Upgrade Pack
• Unzip the file Archon 1.11.zip (which you previously downloaded) to a local
folder, or open the file in Winzip or a similar utility.
• Open the file install.exe. An installation/update utility will launch. The utility is
used to specify connection settings for the database, as well as to instruct the
install pack as to how it should upload the files to the webserver.
• You will see the following screen. Complete the fields as instructed.
[See next page for screenshot]
7
Select either MySQL or SQL Server,
depending on the server type.
Supply server address (either name or IP
address.
Enter the username (login) and password
created when the blank database was set
up (see section 1.2.1), as well as the
name of the database.
The second part of this form specifies
how the install packet will upload the
archon scripts to the webserver. Check
EITHER ‘copy to local directory’ OR
“Copy to FTP Server” If you select FTP,
the Server Address, Port, Login,
Password, and Upload Path fields must
be completed. Normally, Port should be
left at the default value of “21”.
This field MUST be completed for
installations using either the local
directory or FTP method. Provide the
based URL where Archon will be
accessible, e.g.
www.myarchives.org/archon/
•
•
•
•
If you need additional assistance completing the above fields, see section 1.4
of this document for a detailed description and instructions.
When you are ready to upgrade to Archon 1.11, click ‘Install!’
You will see the following message box. Click Yes on this page, as well as
the following confirmation page to continue and replace an existing
installation of Archon v. 1.0.
The utility will upload the files to the web server. This may take a few
minutes.
8
•
You will see the following message box. Click OK to continue, and you will
be taken to the web-based installation utility.
3.3.3 Complete the Web-Based Upgrade Utility.
• The web-based installation utility connects to the database, creates/updates
tables, and completes configuration for your installation of Archon. No
existing data is altered or changed
• Step 1: Login as an administrator and back up your data. You may see the
following screen. If so, simply login as normal, using an account belonging to
the “Administrators” user group, in order to complete the upgrade. While you
are completing the upgrade, public web site will not be available.
After logging in, you will see the following screen:
[See next page for screenshot]
9
Choose the appropriate syntax
depending on which SQL database you
are using, and backup your database.
IMPORTANT: If you database
contains a large number of digital
objects, please note that this backup may
fail, since it is writing the entire contents
of the database into on SQL script. In
addition to this backup routine, you
should also make sure that backups of
the database generated by MySQL or
SQL server also exist
When you are confident the database has been backed up, click “Upgrade” to
continue to step 2.
Step 2: Archon upgrades the SQL table structure and finalizes the
upgrade.When you have finished reviewing the messages, click “Return to
Archon”, and you will be returned to the standard administrative interface.
3.4 DETAILS: INSTALL DIALOG FIELDS
3.4.1 Database Settings
Server Type: This is the database server type. Currently the only database servers
supported are MySQL and Microsoft SQL Server.
Server Address: This is the address to the database server which the Archon web
application will use to connect to the database (either IP or hostname).
Login & Password: These are the credentials the Archon web application will use to
connect to the database server. IMPORTANT: This user must have permissions to
perform the following commands on the database: SELECT, INSERT, UPDATE,
DELETE, CREATE, ALTER, and DROP. If the user account does not have all these
permissions, Archon will not function.
Database name: This is the name of the database. The install pack and the Archon
application itself will connect to this database, using the credentials supplied above.
Test Database Configuration: This will cause the installer to attempt to verify the
existence of the database server and the validity supplied credentials. This should only
be unchecked if the database server is inaccessible due to a firewall, or if the database
10
user will not have permissions to connect to the database from the machine running the
installer (for example, if the database account can only connect from the web server).
3.4.2 Installation Settings
Copy to Local Directory: This should be checked if files are transferred to the web
server through a Windows file share or if the installer wants to keep a local copy of the
installation on their machine as a backup.
Path: This should be set to the directory where Archon will be installed
(Example: \\webserver\wwwroot\Archon\ or C:\Archon\)
Copy to FTP Server: This should be checked only if files are being transferred to the
web server through an FTP server.
Server Address & Port: This is the address and port of the FTP server on which
Archon is to be installed (either IP or hostname).
Login & Password: These are the credentials the installer should use to upload
Archon to the FTP server.
Upload Path: This is the directory the Archon installer should create and upload
Archon to on the FTP server.
Archon Web Address: This is the URL where Archon will be accessible once copied to
the web server. It should be supplied whether you are transferring files to the web via a
local file share or FTP server.
3.5 REGISTRATION
When you install or upgrade Archon, the information that you enter in the installation forms that
you complete in your web-browser will be sent to us. We will keep your registration information
in a secure database that is accessible only to the project staff. We use registration information
only to inform you of product upgrades or outstanding issues, and will not reuse the information
for any other purpose, nor will we provide it the third parties. Therefore, we recommend you
completely fill out the form, or at a minimum, include your e-mail address so we can contact you
if any serious issues arise.
4.0 USING THE ADMIN INTERFACE
As an Archon Administrator, you can control most aspects of the system for the “Administrative
Interface.” In addition, staff users of the system (such as archival or cataloging staff) will also be
using the administrative interface to create and edit records in the system.
11
4.1 LOGIN INSTRUCTIONS AND SYSTEM OVERVIEW
$
$
$
To login to the administrative interface, click ‘log in’ at the bottom of the output screens
or add '/admin' to your base URL, www.myarchives.org/archon/admin
Much of the system configuration and user management can be accomplished from the
administrative interface. As an administrator, you will have access to all of the functions
specified below and in the end-user manual. Please consult the end user manual for
information on functions not covered here
Help buttons ( ) appear next to most feature of the administrative interface. Clicking
the help buttons will provide further direction on the use of the field or feature.
4.2 COMMON BEHAVIORS OF ADMINISTRATIVE INTERFACE
•
•
•
For most features in the Administrative Interface, help buttons ( ) appear in the right
hand margin. Clicking the help button will provide further direction regarding the field
or feature.
Depending on the access level granted by your system administrator, some features may
not be available, e.g. deleting records, managing the installation of Archon, adding new
users, modifying authority records, etc.
Clicking at item in the left navigation bar will load the selected module.
Clicking at item in the left
navigation bar will load the
selected module (e.g. Collections
Manager, Location Manager, etc.)
•
Clicking an item in the central selection area will load associated information and cause it
to display below. The loaded information can then be edited. [Screenshot on next page].
12
Clicking an item in the central
selection area will load associated
information and cause it to
display for editing
•
Some modules (e.g. Collection, Creator and Subject Managers) have a search filter so
you do not need to scroll to find information. When you type in the 'search' box or the
default field (such as ‘name’ in the Creator Manager), the items from which you can
choose will be automatically be filtered in the box below. If you wish too, you can also
full scroll the full list, by changing the (There may be a slight delay depending on
network traffic and bandwidth.) Then click any item to load its information for editing, or
hit enter to load the first item in the list.
Type in the “Search Filter” or
boxes to reduce long lists to a
manageable size. Then click an
item to select it or apply the
appropriate action
•
When you are editing information in Archon, pressing enter will usually save your
changes. If pressing enter does not work (i.e. if the screen does not reload when you
press enter, then click >update= at the bottom of module or the screen you are working on.
4.3 FOUR BASIC MODULE CATEGORIES
Archon contains 4 module categories, each with several menu items
•
•
Archon Administration: Includes functions to manage the database, users, and system.
Most, if not all of these functions are accessible only to the Archon Administrator.
Collections Management. Create and edit a classification (e.g. record group/subgroup)
scheme, collection-level descriptive records, and inventories/finding aids. Track room,
13
•
•
range, section, and shelf locations for each collection. Access authority modules as
necessary, and link digital objects to collections or finding aids.
Digital Library Manager Upload digital objects and link them to collections or
subordinate parts of collections, e.g. particular folders.
Global Components: Edit information used by both the Collections Manager and Digital
Library Manager. Create and edit creator, subject, and genre authority records, as well as
basic identifying information regarding the repository. Changes made to authority lists
will automatically propagate to associated collections and digital objects. Depending on
the level of access provided by your system administrator, you may not be able to use
some of these functions.
The Collections Management, Digital Library and Global Components Modules are fully
documented in the end-user Manual; see that manual for detailed instructions in using those
fucntions. The rest of this manual focuses on the ‘Archon Administration’ Module and its
associated menu items.
5.0 SYSTEM CONFIGURATION
5.1 OVERVIEW
The Archon Administration Module contains 7 menu items. Several are treated in more detail
below.
• About Archon: Project information and credits.
• Archon Configuration: Manage various technical aspects of your Archon installation.
• Change My Password
• Database management: import descriptive records in EAD, MARC and other formats.
View technical information about the database, export the entire database for backup
purposes, and re-import data from a backup file or using a user defined SQL script.
• Sessions Manager: Allows system administrator to regulate access to the system.
Sessions can be monitored to reveal who is logged in, and where they are logged in from.
Sessions can also be deleted to remove that user’s session, and deny them access until
they log in again.
• User Manager: Allows system administrator to add and delete system users and to
provide them a user name, password, and access level. Administrator can assign them to
a user group at a certain permission level or use the advanced permissions editor to grant
them special permissions for individual modules.
• Usergroup manager: Allows system administrator to assign individuals to a group of
uses who share a common permission level. You can also create new user groups and
edit permission levels for existing user groups. Changes to an existing user group
propagate to existing users assigned to that group (Special permissions applied to an
individual user in the user manager override settings made here.)
5.2 “ARCHON CONFIGURATION” PAGE
Most of these features are self-explanatory, but please note the following:
14
•
•
•
•
•
Administrative Style Sheet: Additional styles uploaded to the specified folder will
appear in the list as options.
Default Repository: Repositories are defined under the ‘Global Components’ menu.
Default Style: Additional styles uploaded to the specified folder will appear in the list as
options. See the documentation below on modifying public output for more information.
Default Template Set: Additional templates uploaded to the specified folder will appear
in the list as options. See the documentation below on modifying public output for more
information.
SA Password: This password is set during the installation procedure. The SA account
allows an administrator full access to the system in the case where the regular user
table has been corrupted. It is strongly recommended that this account is only used to
recover a system, and not used as a daily access account. To login as the SA account,
use ‘sa’ as your login, and the SA password as the password.
5.2 OTHER COMPONENTS
Again, most of the features are self-explanatory. However, please note
• Database Management, Import: Additional import scripts can be defined. MARC
records can be imported either singly or in one file, but they must be in raw format.
MARC records without a 245$a will not import since Archon requires a Title for all
collections in the system. The EAD importer is still somewhat experimental, but should
at the very least import supported collection-level data for EAD 2002 finding aids. It is
also likely that the importer will import content-level information, although since there
are many ways to describe this information, we can’t be sure we have every case covered.
Tip: Upload files you wish to import to the incoming/ directory, and they will appear in a
list of files in the database management.
• Database Management, Export: Unless your MySQL or SQL Server database is
backed up regularly we strongly recommend that you export the entire database to a file
as needed, and store that file in a secure location, not on the same server or in the same
physical location as the database server on which Archon has been installed.
• Sessions Manager: Allows you to view all users currently logged-in to the system, and,
if necessary, to forcibly disconnect them.
• User Manger: Allows you to add system users and assign them to a user group or tailor
their permissions level as individuals if necessary. See the End User Manual for further
information.
• Usergroup Manager: Change the default permission level for each of the groups as you
fell warranted based on the levels of access you wish to supply. See the End User Manual
for further information.
6.0 MODIFYING THE PUBLIC INTERFACE
6.1 OVERVIEW
Once Archon has been installed and data has been imported or entered, Archon automatically
15
publishes a searchable website. This website can be browsed and searched like any other
website. In the standard installation, collections can be browsed by creator, subject, or
classification (if classifications are used by the repository). Search queries can be entered
against either collection-level records or the full content of finding aids (including box and folder
lists).
6.2 SEARCH TIPS
$ The search engine looks for records containing every term you submit. It does not use
any truncation, or limit results only to whole words.
$ It returns both descriptions of collections AND links to materials in the digital library
placed on-line. The hits are differentiated in the results page, so that collection
descriptions are listed separately from digital library items.
$ Phrase Search: Use double quotes, e.g "Festival of Contemporary Arts"
$ Tip for limiting 'hits':
1. Use a minus sign. E.g. 'bass -fish' finds bass guitars but not bass
fishing.
2. Browse by subject, name, or classification.
$ Direct Access: If you enabled classification browsing you can directly access a collection
by entering its full collection identifier, e.g. '26/4/1' returns the University of Illinois
Archives Alumni File in our installation of Archon. If you use classifications, the
elements of the classification identifier must be separated by slashes. Records can also
be retrieved directly by entering the Archon ID.
6.3 CUSTOMIZATION
The public interface can be tailored to suit local needs by modifying the files in the ‘styles’ and
‘templates’ folders of the web server.
6.3.1 Selecting a Default Style
The style by which Archon presents data in the public interface can be easily modified
using the “Default Style” option under the “Archon Configuration” menu item.
[See next page for screenshot]
16
The public interface style is set
using the “Default Style” option
the Archon Configuration menu.
To change the ‘look and feel’ of
Archon’s public interface, select
an option from this pull down
menu.
New styles can be created by
adding folders to the styles folder
in Archon (It generally makes
sense to copy and existing folder
and edit the information.) Any
folders that are added will
automatically appear as an option
on the pull down menu.
6.3.2 Modifying Styles (e.g. colors, fonts, general layout of initial page)
Archon comes with a default style which is very general in appearance, defined in the
‘sytles/default’ folder It should meet most archives’ needs.
VERY, VERY IMPORTANT:
If you decide to
customize the look and feel of the website, you MUST create a new style by copying the
existing files in the ‘default’ folder to a new folder in the ‘styles’ folder, such as
‘styles/mystyle’ If you simply make changes in the default folder, you will run a strong
risk of losing your repository’s style during the installation of any future Archon
upgrades that may be released. This is because the install scripts will update the files in
the styles/default folder during the installation procedure.
Once you have created a new style, you can apply it to your website under the ‘Archon
Configuration’ menu item ‘Default Style,’ as noted in 4.3.1
The following files can be modified in the folders in your ‘styles/mystyle’ directory:
style.css
controls colors, fonts, etc.
header.inc.php
the header inserted into every page
footer.inc.php
the footer on every page
index.inc.php
The main text of the initial Archon page
17
6.3.3 Selecting a Default Template
More refined control over individual pages produced by Archon is available be changing
the template set which is applied when a specific file is called. To change the default
template that will be applied for all collection records, use the “Default Template Set ”
option under the “Archon Configuration” menu.
More detailed changes to specific
output screens are made using the
“Default Template Set” option in
the “Archon Configuration” menu
Select an option from this pull
down menu.
New templates can be created by
adding folders to the templates
folder in Archon (It generally
makes sense to copy and existing
folder and edit the information.)
Any folders that are added will
automatically appear as an option
on the pull down menu.
(Please note that it is also possible to apply a different template to an individual
collection, by selecting that template directly in the Collections Manager record for that
collection.)
[See next page for screenshot.]
18
A specific template can be
applied to an individual collection
without overriding system
defaults by selecting the template
from the Collections Manager
Interface.
6.3.4 Modifying Templates (i.e. making extensive changes)
If you wish to modify the output generated by archon scripts (instead of just tweaking the
colors, fonts, etc.), you must modify the files in the templates folder for the template set
you wish to modify.
VERY, VERY IMPORTANT: If you decide to
customize the templates, you MUST create a new template set by copying the existing
files in the ‘templates/efault’ folder to a new folder in the ‘templaes’ folder. If you
simply make changes in the default folder, you will run a strong risk of losing your
repository’s template set during the installation of any future Archon upgrades that
may be released. This is because the install scripts will update the files in the
template/default folder during the installation procedure.
Once you have created a new set of templates, you can apply it to your website under the
‘Archon Configuration’ menu item ‘Default Template Set.’
For example, if you wish to modify the ‘default’ output to have fields show in a different
order, you can make modifications to the following files in copy of the ‘default’ folder
called, for example in a folder called templates/MyTempltes folder.
19
collection.inc.php
collectionlist.inc.php
controlcard.inc.php
creatorlist.inc.php
dlcontent.inc.php
dlcontentlist.inc.php
index.php
item.inc.php
subjectlist.inc.php
Controls display of ‘collection-level’ information in
findingaid.php; can be modified relatively easily.
Normally no modifications needed, controls display of lists of
collections in collections.php.
Controls main ‘collection level’ view shown in
controlcard.php; can be modified relatively easily.
Normally no modifications needed, controls display of lists of
creators in creators.php.
Controls display of digital content in dlcontent.php can be
modified relatively easily.
Normally no modifications needed, controls display of lists of
digital objects in digitallibrary.php
This file should only be modified if you are adding a new
template to the template set, it is used internally as an index to
reference templates below.
Determines display properties in findingaid.php, for materials
listed in the ‘content manager.’
Normally no modifications needed, controls display of lists of
subjects in subjects.php.
You may consult the list of objects, properties and methods when making the changes.
For example, if you wish to refer to Archon fields which are used in the administrative
interface but not currently included in public output generated by any of the templates.
Full documentation for the classes, objects, methods, etc is maintained on the
documentation page of the Archon project website, www.archon.org. For example, if
you wish to modify controlcard.inc.php, refer to the variables in the class Collection.”
Within the templates, you may include any PHP code you like, and you can access the
classes noted in the comments at the top of the file. The Archon API is available in any
script, and can be called by referencing the variable $_ARCHON and calling functions
defined in the class Archon on the project website.
Archon comes preloaded with the following output templates. You can also create new
templates from scratch or copy the template folders and rename them to create new
templates.
default
draftcontrolcard
EAD
plaintext
The ‘out of the box’ output
Produces print style output used in UIUC
archives, for supervisors to review student or
processor’s work
Produces the EAD output.
Produces a printable version of the full finding
aid
20
printcontrolcard
Series, Box, Folder
Produces a summary view of the collection on
a 5x8 printable card, for filing in the UIUC
Kardex system
Provides an alternate display of content in
findingaid.php
For findingaid.php, the default template set creates a nested style finding aid, but we have
also included another template set, ‘Series, Box, Folder.’ So you can see a different
presentation of the data.
When you create a new folder in the templates directory on the server where archon is
installed, the new template will automatically appear as a menu item. You can also refer
to the templates in other scripts by passing a parameter to the appropriate php script in the
root archon folder. For example,
http://myarchives.org/archon/controlcard.php?id=13&template=printcontrolcard&nostyle
=1 will produce the printcontrolcard view, instead of the default output. “nostyle=1”
removes all of the other styling information, as well as any html and php that are
typically included in the selected style’s header.inc.php and footer.inc.php files.
6.3.5 EAD and MARC Output
When a staff user is logged in, the EAD and MARC output can be viewed by clicking
links at the bottom of the truncated collection record available through controlcard.php.
For local purposes, the records can then be copied into external files and imported to
other systems. AT UIUC, we are planning to tailor the system so that the MARC and
EAD files are written to local directories and/or FTP servers, then automatically loaded
into other systems, such as library catalogs. More information on this process may be
available from the project staff at a later date.
EAD output can be modified by editing the files in the templates/ead folder. This
template set is a bit more complicated than the and should serve as a good reference if
you want to accomplish more intricate customization. Note that you do not need to recreate every file to create a new template set, rather, just create a new index.php in the
folder for your template, and define/re-define the templates from default/index.php.
Templates are applied to your website under the ‘Archon Configuration” menu item
‘Default Template Set’.
The MARC output must be edited directly in marc.php in the root folder of the archon
installation. The marc output is produced using a third-party, open source library called
PHP MARC. More information on PHP MARC is available through
http://www.emilda.org/index.php?q=php-marc or through the package documentation on
the Archon project website, at http://www.archon.org/doc/1.11/.
We are soliciting feedback on MARC and EAD export functions. Please contact the
project staff if you have comments or notice an error in the mappings we have chosen.
21
6.3.6 Customizing the Administrative Interface
In order to customize the administrative interface, modify the php files in the admin
folder on the root of your archon installation. For example, if you wish to suppress the
view of fields your institution does not use in the collection manager, modify the files in
collections.php
7.0 ADDITIONAL DOCUMENTATION
If you cannot make the output changes you desire using the above information, refer to the
developer documentation. Please see http://www.archon.org/doc/ for a full description of
available classes, functions and constants.
8.0 GLOSSARY
Administrative Interface: The web forms produced by Archon which allow the Archon
Administrator and anyone with a valid login and password to modify data stored in the Archon
system.
Classifications Manager: An Archon module typically used by an Archon Administrator or by
archival staff, to define a hierarchical system into which collections may be grouped. The
Classifications Manager may be used to establish a provenance-based Record Group/SubGroup
system. Use of the Classification Manager is optional.
CollectionID: The unique identifier automatically assigned to a collection record in archon. It
can be viewed on the php pages produced for any collection record. For example, 3871 is the
Archon ID for the George Myers papers at the University of Illinois Archives:
http://web.library.uiuc.edu/ahx/archon/controlcard.php?id=3871
Creator Manager: An Archon module used by archival staff to define authority files for the
creators of archival material, which can then be applied to collections or digital content using the
Collections Manager and Digital Library Manager.
Collections Manager: An Archon module used by archival staff to add new collection
descriptions to the system or to edit existing information regarding an archival collection.
Content Manager: An Archon module used by archival staff to add detailed descriptions
regarding the components of archival collections, i.e. series, boxes, folder, items, or other
subunits.
Digital Library Manager: An Archon module used by archival staff to describe digital objects
and to link to external digital objects and or upload objects directly into the Archon database.
22
File Types Manager: An Archon module used by the Archon Administrator and/or archival
staff to define the types of digital objects which staff can upload into Archon and how those
types will be presented in the public interface.
Level/Container Manager: An Archon module typically used by an Archon Administrator, to
define the levels of description and physical container types which archival staff may select
when adding information using the Content Manager.
Locations Manager: An Archon module typically used by an Archon Administrator to define
the general locations (such as rooms) in which archival materials are permanently housed.
Material Types Manager: An Archon module typically used by an Archon Administrator to
define the basic classes of material (such as Records or Personal Papers) that are held by your
repository.
Phrase Manager: An Archon module typically used by an Archon Administrator to edit error
messages and help button texts provided to users of the Administrative Interface.
Repository Manager: An Archon module typically used by an Archon Administrator to define
basic information about the repository or repositories whose records are included in the
installation of Archon, such as name, address, email, etc.
Sessions Manager: An Archon module typically used by an Archon Administrator to forcibly
disconnect current or persistent connections to the Administrative Interface.
Style: The basic attributes and ‘look and feel’ of your Archon public interface. Styles are
modified by changing the files in the styles folder of your archon root directory.
SA Password: The SA password is a ‘super password’ defined during archon installation, which
will allow you to access Archon in the unlikely event that the main user table becomes corrupted.
It should not be used for routine access to the system, but should be written down in a secure
location. If you need to login with the SA password, enter ‘sa’ for the login and the password for
the password.
Subject Manager: An Archon module used by archival staff to define controlled subject or
genre terms, which can then be applied to collections or digital content using the Collections
Manager and Digital Library Manager.
Templates: Templates are files the define specifically how a single component of the public
interface will be rendered and displayed to users. For example, the template controlcard.inc.php
in the default template folder determines which specific archon fields are displayed to the user,
and in which order, when the controlcard.php file is called.
23