1
REFRIGERANT
RECOVERY/RECYCLING/RECHARGING UNIT
USER’S MANUAL
MODEL
LG-650
{ PAGE }
I、Brief Description
This machine is a full automatic computer control machine. It
is specially designed for auto AC system service.
General function:
Refrigerant Recovery : recovery the refrigerant from AC system to a
tank.
Refrigerant Recycling:separate the refrigerant in the AC system from
oil and water, and purify it , make it can be reused..
Refrigerant Charging:preset charging quantity, and charge
refrigerant into AC system.
Leakage Test:test leakage of the AC system.
Vacuuming:Vacuum AC system.
Oil Charging :preset charge quantity and charge oil into AC
system.
{ PAGE }
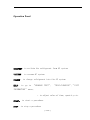
Operation Panel
RECOVERY:to reclaim the refrigerant from AC system
VACUUMN: to vacuum AC system
CHARGE: to charge refrigerant into the AC system
HELP : to go to “LEAKAGE TEST”, “SELF-CLEANING”,”UNIT
INFORMATION” menu;
:to adjust value of time, quantity etc.
START: to start a procedure.
STOP:.to stop a procedure
{ PAGE }
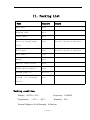
II、Packing List
Name
Quantity
Remark
Main unit
1pcs
Working tank
1pcs
Power cable
1pcs
Hose for liquid/vapor
1set
Install inside of machine
HP/LP hose
1set
Install inside of machine
glue tube
1set
manual
1pcs
Quality certificate
1pcs
R134a quick adaptor
1set
Vacuum pump oil
1bottle
System
1set
valve
oil charging
device
Working condition:
Voltage:AC220 ± 10%
Frequency:50/60HZ
Temperature:-10℃-﹢40℃
Humidity:85%
External Magnetic Field Strength:400mA/m
{ PAGE }
Specification:
Compressor power:
300W
Vacuum speed:
60L/min
Range of refrigerant scale:
60Kg
Precision of refrigerant scale:
±10g
Recovery speed:
>200g/min
Charging speed:
>800g/min
Tank capacity:
12L
Dimension of the machine:
670*600*1120mm
Weight :
67kg
III、Preparation
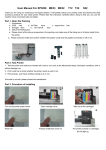
1. Check the machine and accessories in accordance with Packing List
2. Install working tank:
1)
Remove the back cover of the machine and take liquid/vapor
hose out.
2)
Connect hose to the handle valve of the tank(red to red, blue
to blue)
3)
Put the tank on the scale pan and fasten the fasten screw;
3. Install R134A quick couple(red to red blue to blue)
4. Pour vacuum pump oil :remove back cover of the machine, there
is a vacuum pump at the down-left of the machine. Open the blue
{ PAGE }
plug on the pump and pour oil into it , till the oil level is up
to the midline of the oil gauge.(see following figure)
5. Install system oil bottle.(see following figure)
6. Vacuum the machine system.
1、preparation:
1)Make sure R134A quick couple is connect well with the hose.
and open the HI/LO vale on the panel.
2)Close the handle valve on the working tank.
2、Steps:
{ PAGE }
1. Power on;
2. Press “HELP” key to go into “SELF-CLEANING” and
run it.
3. When “SELF-CLEANING” is completed, the machine
will stop automatically, then press “STOP” to
exit.
NOTICE:
In following cases, user need to vacuum the machine system:
1、Use the machine at the first time
2、There is air in the machine system.
4、After replace the filter.
IV、Operation Instruction
4、1 Recovery
4、1.1 Preparation
1) Open the vapor valve on the working tank.
2)Connect R134A quick couple to car AC system.
3)Open HI/LO valve on the panel
4、1、2 Steps:
1. Press “RECOVERY” to go to this function interface.
2. Press “START”;
3. When “RECOVERY” is completed, the machine will
stop automatically, then press “STOP” to exit
{ PAGE }
NOTE:
1、Check the HP/LP meter, if there is no pressure, please check
if the R134A quick couple is open, or if the connection is well,
otherwise, there is no refrigerant in the AC system
2、After recover 3-5 cars, please open drain valve to drain
the waste oil or impurity.
4、2 Charging
Before charging, vacuuming AC system, leakage test and oil
charging are strongly recommended.
4、2、1 Vacuum AC system
1、Preparation:
1)Open liquid valve on the working tank;
2)Connect R134A quick couple to AC system;
3)Open the HI, LO valve on the panel.
2、Steps:
1) Press “VACUUM” to go to the function interface.
2) Set up vacuum time(it’s normally 15-30 minute), then press
“ START”
3) When “VACUUM” is completed, the machine will stop
automatically, then press “STOP” to exit
NOTE:
Check low pressure meter, the read shall be -0.05 to -0.09 Mpa;
{ PAGE }
4、2、2 Leakage Test
1、Press “HELP” to go to “LEAKAGE TEST”;
2、Open the HI/LO vale on the panel;
3、Check if the point of th low pressure meter is stable, it should keep
stable atl east 5 minute. Otherwise, there is leakage, please use
professional tools to find it out.
NOTE: please vacuum the AC system before perform
the leakage test.
4、2、3 System oil charging
1、Open the LO valve on the panel, and close the HI valve;
2、Make sure the low pressure meter point below 0;
3 、 Open the valve of system oil charing device to charge the proper
quantity oil.
NOTE:before charging, please check vacuum status via low
pressure meter to make sure there is enough vacuum ,
otherwise ,please vacuum the system.
4、2、4 Refrigerant charging
1、Preparation
1) Open liquid valve on the working tank
2)Connect the R134A quick couple to the AC system.
3)Open the LO vale on the panel, and close HI valve.
2、Steps:
{ PAGE }
1) Press “CHARGE” to go into the function interface, and adjust
charging quantity by
UP and DOWN arrow key.
2) Press “START” to charge;
3) When procedure is completed, the machine will stop
automatically, then press “STOP” to exit
NOTE:please make sure that there is at least 3-4kg refrigerant
in the working tank.
V Clear Up And Maintenance
5.1 Clear up
1)Exit the operation system.
2 ) Tu r n o f f t h e p o w e r , a n d p u l l o u t t h e p l u g .
3) Replace all the adapters and hoses.
5.2 Maintenance
1)Drain the oil after recovering the refrigerant of 3-5 vehicles A/C system.
2)Change the filter-drier every 6 months of operation.
3)Keep the unit out of dust and water.
4)Maintenance of vacuum pump
a. Keep the vacuum pump oil level upper than the level marked on the oil
meter. Otherwise it may damage the parts. For maximum performance,
change the vacuum pump oil after every 10-20 hours of operation. To avoid
any damage to the vacuum pump, don’t start it without any oil in the
vacuum pump.
b. Change the vacuum pump oil. Turn on the unit, and keep the vacuum
pump running 10-20 minutes until the oil becomes thin. Remove the oil
{ PAGE }
drain screws to drain the waste oil in the vacuum pump. Add 100ml new oil
into the vacuum pump and keep it running 1 minute to clear the pump. Then
drain the waste oil. Repeat it twice. Replace the oil drain screws after
confirming the pump is clear. Add new oil into the pump until it reaches the
level marked on the oil meter.
c. Cap the pump if the vacuum pump is not in use for long time. Keep it from
dirt and water.
VI Cautions
1 ) Don’t move the unit when running a function. Moving will cause
inaccurate measurement.
2)Vacuum the unit system when use this unit after long time not in use.
3 ) Open the valve on the tank to release the air entering the tank by
accident during the operation.
4)Don’t recover any refrigerant into the tank if the system indicates the
tank is full.
5)If the power cuts when running an operation, please close the gas valve
and liquid valve on the tank. Keep the high/low pressure hosed
connected with the vehicle. Restart this operation after the power
resumes. Please vacuum the unit system if you disconnect the hoses
from the vehicle.
6)Please take out the weight scale from the tank when moving this unit.
Replace the weight scale after the unit is stable. Otherwise it will cause
inaccurate measurement.
7 ) Don’t hit the weight scale since it is high-precision measurement
electronic device.
8)The screen display of this unit is fragile electronic components. Don’t
hit or scratch it.
9)Please be careful when connecting the high/low hoses to the A/C system.
The refrigerant in the hoses may hurt your hands and eyes.
{ PAGE }
VII Warranty
Thank you for choosing this product. Following service and warranty
apply:
1. This product is warranted to be free from defects for a period of one
year from date of purchase.
2. For the repairs out of warranty period, we only charge the cost of
parts.
3. For updating the unit, we only charge the cost.
4. If your unit needs repair or replacement parts, contact your local
distributor or our company. We will serve you ASAP.
5. To validate your warranty, complete the warranty card attached to
your unit, and return it. We will keep your record, and serve you.
6. Followings do not apply to our warranty:
1) Wearing parts including, but not limited to, oil bottle, pressure
gauges, etc.
2) Consumables including, but not limited to, vacuum pump oil,
filter-drier, etc.
3) Break the vacuum pump because starts the unit without oil in the
vacuum pump.
4) The product, or product part, is broken by accident.
{ PAGE }