1
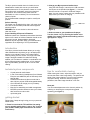
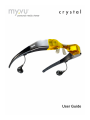
1
Congratulations on your purchase of the Myvu® personal media viewer, Crystal
Myvu set-up 3: Watching video with DVD player,
edition.
camcorder or gaming device…………………5
You are about to engage in a new, dynamic viewing
experience. The Myvu personal media viewer takes
portable media to an unprecedented level.
Prepare to be captivated by sharp color images and
built-in stereo sound as you watch your favorite music
videos, movies, sports or other downloaded
entertainment.
The viewer is one of the world’s most comfortable and
fashionable portable video displays. Within this manual,
you will find guidelines for product operation, care and
safety. More information can be found at
www.myvu.com.
Please register your myvu personal media viewer
online at www.myvu.com/registration.
Troubleshooting ................................................... 5
No video and no audio ................................... 5
Video image is not bright enough .................. 5
Video image is fuzzy or out of focus ............. 5
The video is clipped or black bars appear on top
and bottom of the image ................................ 5
Weak or nonexistent audio ............................ 6
Battery is not charging or is charging slowly 6
A note to individuals who wear prescription eyeglasses
.............................................................................. 6
Technical support ................................................ 6
Available accessories .......................................... 6
Specifications ....................................................... 6
Limited warranty................................................... 6
Limitation of liability………………………………..7
Regulatory agency requirements........................ 7
NOTICE
The information in this manual is subject to change
without notice. Myvu Corporation shall not be liable for
technical or editorial errors or omissions contained
herein; nor for incidental or consequential damages
resulting from the furnishing or use of this material.
important safety & handling
instructions
WARNING:
The Myvu personal media viewer must not be used
in any circumstances for which a complete field of
vision is necessary for reasons of safety. Nor should
the viewer be used in any situation in which
undistracted viewing, hearing or mental
concentration is necessary. The viewer should never
be worn while operating equipment or vehicles,
while handling sharp, hot or otherwise dangerous
objects, or used in other situations where your
undivided attention is needed to avoid danger to
yourself or to others. It is the responsibility of the
user of this product to employ common sense with
regard to appropriate product usage.
©2007 Myvu Corporation. All rights reserved. “Myvu”
and “SolidOptex” are trademarks of Myvu Corporation.
This product is protected by U.S. Patents 5715377,
5886822, 6023372, 6091546, 6204974B1, 6349001B1,
6356392B2, 6384982B1, 6879443B2, and other U.S.
and International Patents issued and pending.
contents
IMPORTANT SAFETY & HANDLING INSTRUCTIONS
.............................................................................. 2
Handling your myvu personal media viewer . 2
Surface cleaning ............................................. 3
Proper handling & disposal of batteries ........ 3
Introduction........................................................... 3
Included system components ............................. 3
Getting started...................................................... 3
Tips for comfortable viewing ............................... 3
Nose pad ......................................................... 3
Earbuds and earbud pads.............................. 4
Mag Clip………………………………………...4
Picture Control………………………………….4
Using the pendant controls ................................. 4
About charging the battery .................................. 4
Watching video with Made for iPod edition ........ 4
Myvu set-up 1: Watching video with iPod classic,
th
nano, and 5 generation video iPod.............. 4
Myvu set-up 2: Watching video with iPod touch..5
Myvu set-up 3: Watching video with iPhone . 5
Watching video with Universal edition................ 5
th
Myvu set-up 1: Watching video with iPod 5
generation or Zune ......................................... 5
Myvu set-up 2: Watching video with Archos or Nokia
N95……………………………………………...5
(contents continued on next page)
This product is not recommended for children under 10
years of age, nor for people with atypical visual or
neurological conditions. Consult a physician if you have
concerns about your specific condition and the use of
this product.
Even though the viewer permits users to maintain most
of their natural vision, some people may still experience
motion sickness, perceptual after effects, disorientation,
instability and loss of balance, and eyestrain. If you
experience any of these effects, discontinue use of the
product.
Hearing loss can result when listening to audio at
excessively high levels or for prolonged periods of time.
Always set the volume level on your source device and
your myvu personal media viewer to a safe level before
placing the earbuds in your ears.
Handling your Myvu personal media viewer
WARNING: Please use care when handling the cables.
Avoid kinks and knotting of the cables as careless
handling can result in permanent damage to the cables.
2
The Myvu personal media viewer is durable, but not
indestructible. Handle with care as you would other
portable electronics. Do not place the viewer on or near
hot surfaces such as heaters, stove top or electrical
components. Do not leave this product inside an
automobile on a hot or cold day. Do not immerse the
viewer in liquids.
Do not disassemble or attempt to repair or modify this
product.
2. Charge your Myvu personal media viewer.
Using the USB charger, insert the mini USB connector
into its port on the pendant (see figure 1.). Connect
the other end to a computer or USB wall charger.
Note: You can use the viewer and your portable media
player while your viewer is charging.
Surface Cleaning
The viewer may be wiped with a clean, soft cotton cloth,
lens cloth or the microfiber protective sleeve supplied
with this product.
WARNING: Do not use alcohol or other solvents to
clean the viewer.
USB Port
(figure 1)
3. Select content on your portable media player.
Turn the viewer “On” by pressing the button in the
middle of the viewer’s pendant and holding until the
light appears. Enjoy!
Proper Handling & Disposal of Batteries
Batteries contain toxic materials and therefore should be
kept out of the reach of children. Batteries should not be
punctured, burned, disassembled or damaged.
Batteries may be recyclable. Obey your local laws and
regulations when disposing of Li-Polymer batteries.
introduction
Power
Your Myvu personal media viewer allows you to enjoy
video entertainment anywhere you go. Its sleek profile
permits you to maintain most of your natural field of
vision by seeing over the viewer. The bright, full-sized
image is daylight-viewable for hands-free viewing
whether you are indoors or outside. In combination with
a fully-charged portable media player, a fully charged
Myvu Crystal battery provides up to 4 hours of video
viewing.
(figure 2)
included system components
•
•
•
•
•
•
•
•
tips for comfortable viewing
Crystal personal media viewer
In-ear noise reducing headphones from Ultimate
Ears plus two additional pairs of differently sized
earbud pads
Pendant with audio and video controls that is
also a lithium polymer USB rechargeable battery
One USB cable to charge your myvu battery
Connection cables
Mag clip for wearability and cable management
Microfiber protective sleeve to store your viewer;
also functions as a lens cloth
quick start guide
While wearing the viewer, adjust its position until you
can see the entire video image clearly. The position and
angle of the viewer relative to your eyes are important
for proper viewing. When the viewer is properly
positioned, the video image should be in full view.
Nose pad
You can make adjustments to the viewer’s position by
widening or narrowing the nose pad using gentle
squeezing (see figure 3.).
getting started
Follow these 3 steps to begin using your myvu personal
media viewer.
1. Please be sure that the TV Out/Video Out setting
on your portable media player is set to “On” (consult
your portable media player manufacturer for further
instructions.)
3
Increase
Volume*
(figure 3)
Control
Brightness
Earbuds and earbud pads
Cover the earbuds with the protective earbud pads.
Three different size earbud pads (small, medium and
large) are provided (see figure 4.). Choose a pad size
that fits comfortably in your ear. Be sure to adjust the
volume to a safe level before inserting the earbuds into
your ears (see figure 5.). The viewer ships with mediumsized earbuds attached.
Control Contrast
Decrease
Volume
Power*
(figure 7)
(figure 4)
(figure 5)
*Reset factory
settings by
depressing
these buttons
simultaneously
about charging the battery
Mag Clip
Myvu shades comes equipped with a magnetic clip for
comfortable viewing and cable management. Simply put
the glasses on and then slip the magnetic clip behind
your neck (see figure 6). The clip can easily slide up
and down the cable when slight pressure is applied for
customized placement.
In order to get the longest possible video experience,
fully charge your Myvu and your portable media player
before each use. You can still watch video or listen to
music while the battery is being charged if charging
through a USB wall adapter. If the battery is very low,
you may not be able to turn on the viewer until it has
charged some. The LED on the pendant indicates the
charging state of your Myvu:
Solid Blue: On and detected video signal
Blinking Blue: On but no video signal detected (check
video sources and A/V cable connections
Blinking Orange: Charging
Slow Blinking Orange: Low battery
Solid Orange: Fully charged
Note: When the pendant battery becomes very low, the
screen will begin to blink occasionally as you watch
video. This indicates that there is less than 10 minutes
of play time remaining in the Myvu battery and that it
should be charged to continue viewing.
(figure 6)
Picture control
Due to the nature of this universal product, picture
settings may need to change to suit your specific portable
media player. Use the brightness and picture controls
featured on the pendant to adjust Myvu’s picture to suit
your viewing pleasure. Further instructions on adjusting
the picture and brightness are listed below.
Charging time
The battery is designed to charge from many different
power sources. When using a high capacity charging
adaptor, such as a USB wall adaptor, full charge can be
achieved in approximately three hours. When charging
off of a computer, slow charge mode is in effect, which will
take approximately eight hours to achieve full charge.
using the pendant controls
You can power myvu “On” by using the power button on
the pendant. The pendant also allows you to control
image contrast and brightness by holding down the
appropriate button on the pendant. You can return the
brightness and contrast settings to the factory default
settings at any time by pressing the power and increase
volume buttons simultaneously while the viewer is on.
Figure 7 shows the button functions and layout on the
pendant.
watching video with Made for iPod
edition
Myvu set-up 1:
Watching video with the viewer and your iPod
th
Classic, nano or iPod 5 generation (video) model
Plug the 3.5mm end of the iPod connector cable to the
pendant. Connect the other end of the cable to your
iPod. Turn the viewer “On” by pressing the button in
the middle of the viewer’s pendant and holding until
4
the light appears. Choose your favorite video and
enjoy.
the viewer’s pendant and holding it until the light
appears. Choose your favorite video and enjoy!
Myvu set-up 2:
Watching video with the viewer and your iPod
Touch
Plug the 3.5mm end of the iPod connector cable to the
pendant. Connect the other end of the cable to your
iPod Touch. Turn the viewer “On” by pressing the
button in the middle of the viewer’s pendant and
holding until the light appears. Choose your favorite
video. Select “Yes” when your iPod Touch asks you if
you want to “Display Video on TV?”. Enjoy!
Myvu set-up 3:
Watching video with the viewer and your portable
DVD player, camcorder or gaming device, or
personal media player. Plug the black end of the
RCA connector cable to the pendant. Connect the
female RCA ends of the connector cable to the male
RCA ends of your device’s RCA cable. You may need
an accessory adaptor or cable provided by the
manufacturer to plug into the media player.
Myvu set-up 3:
Watching video with the viewer and your iPhone
Plug the 3.5mm end of the iPod connector cable to
your pendant. Connect the other end of the cable to
your iPhone. If a message about iPhone compatibility
appears on the iPhone you may get better audio
quality by putting it in Airplane Mode. Turn the viewer
“On” by pressing the button in the middle of the
viewer’s pendant and holding until the light appears.
Choose your favorite video. Select “Yes” when your
iPhone asks you if you want to enable “Video Out.”
Enjoy!
troubleshooting
No video and no audio
1. Make sure that the “TV out” or “Video out” setting on
your portable media player is set to “On.”
2. Make sure that the viewer’s battery and your portable
media player are fully charged. If the viewer’s LED is
slowly blinking orange after you turn it on, it has a low
battery. Use the USB cable to charge the battery.
3. Make sure the viewer in turned “On.” If the LED on
the pendant is not lit up, press the button and hold it until
the light comes on to power it on.
4. If the LED is blinking Blue, there is no video signal
getting to the viewer. Make sure the connectors are
seated properly into the pendant connector ports located
at the bottom and top of the pendant and in the
appropriate place on your portable media player.
watching video with Universal edition
Myvu set-up 1:
Watching video with the viewer and your iPod or
Zune portable media player
Plug the black end of the iPod/Zune connector cable to
the pendant. Connect the other end of the cable to the
headphone jack of your portable media player. Turn
the viewer “On” by pressing the button in the middle of
the viewer’s pendant. Go to the display setting on
your zune and selet TV out: on (see Zune manual for
further assistance). Choose your favorite video and
enjoy.
NOTE: The enclosed 3.5 mm cable will only function
with 30 GB and 80 GB Zune models; it will not work
with the 4 GB and 8 GB Zune models. The enclosed
th
3.5mm cable will only function with 5 generation
video iPod models. To use Crystal Standard with the
new iPod touch, iPod nano or iPod classic models, you
will need to purchase the Connection Cable for iPod at
www.myvu.com.
Video image is not bright enough
1. Make sure that the viewer is properly connected to
your portable media player.
2. Make sure that the viewer is fully charged or that it is
powered using the USB cable and a wall adapter.
3. Adjust the brightness level by pressing and releasing
the Brightness button on the pendant repeatedly until
you achieve the desired viewing mode. The image
contrast can also be adjusted (see “Using the pendant
controls”). Press Volume Up and Power simultaneously
to reset adjustments to factory settings.
Video image is fuzzy or out of focus
The viewer has a focal distance that is preset at the
factory. There is no focus adjustment. If you cannot see
the video image clearly, first try to adjust the nosepiece
so that myvu shades is situated properly on your face. If
you still cannot see the video image clearly, you may
need to wear a corrective lens with your viewer. This is
likely if you normally have to wear prescription glasses
when using a laptop computer or watching television. A
clip-on focus adjustment lens, the Myvu clip-on Crystal
edition, is available for the viewer (visit
www.myvu.com/clipon).
Myvu set-up 2:
Watching video with the viewer and Archos or
Creative Zen Vision portable media player or Nokia
N95 phone
Plug the black end of the Archos/Nokia connector
cable to the pendant. Connect the green end of the
cable to the of your Archos or Nokia N95 phone. You
may need an accessory adaptor or cable provided by
the manufacturer to plug into the media player. Turn
the viewer “On” by pressing the button in the middle of
The video is clipped or black bars appear on top and
bottom of the image
The viewer is designed to display a video image with a
4:3 aspect ratio in order to match the standard TV
image. If you’re viewing Widescreen content and your
5
portable media player allows you to turn Widescreen
viewing off, your image will appear clipped. If you’re
viewing Widescreen content and your portable media
player allows you to turn Widescreen On, the image will
appear in a letterbox format, with black bars appearing
on the top and bottom of the image.
For technical support and additional information, contact:
Myvu Corporation
31 Dartmouth Street
Westwood, MA 02090
telephone: 781.326.8111
fax: 781.326.4110
e-mail: [email protected]
www.myvu.com
Weak or nonexistent audio
Verify that all connectors are properly attached. Adjust
the volume on myvu’s pendant or adjust the volume on
your device.
available accessories
The following accessories are available from your Myvu
retailer or via the web at myvu.com.
• myvu clip-on lens
(For more information or to order, please visit
myvu.com/clipon.)
• Myvu Connection cables
• Premium travel case
Audio is too noisy
If the media player has adjustable volume, try turning
down the volume on the Myvu pendant and turning up
the volume on the media player. This makes a stonger
audio signal from the media player, and usually reduces
noise.
Battery is not charging or is charging slowly
Verify that the USB cable and all connectors are
securely attached. For the fastest charging time, it is
recommended that you use the USB cable with a USB
wall charger to charge your myvu. Charging your Myvu
with the USB cable connected to a computer is possible,
but might result in slower charging times.
specifications
Display format 640 x 480 (VGA), 24-bit color, 50–60 Hz frame
rate
Optics…………Dual-color LCDs V3 SolidOptex™ Optical
System
If you continue to experience technical problems, please
contact Myvu Corporation technical support. (See
contact information below or go to www.myvu.com FAQ)
Video input ..Auto sense and switch between NTSC and PAL
PowerLi-Polymer rechargeable battery…. up to 4 hours
of run time
a note to individuals who wear
prescription eyeglasses
Operating temperature:…………..32 to 104ºF (0 to 40ºC)
The Myvu personal media viewer has been designed to
be light weight and elegant. Accordingly, it will not fit
over larger sizes of eyeglasses. Whether or not you will
need to use your eyeglasses with the Myvu system
depends on the degree of correction that you require.
For those who cannot fit the myvu system over their
current eyewear yet desire ophthalmic correction, a clipon lens is available. The Myvu clip-on Crystal edition is
manufactured to suit your vision needs and attaches
easily to the viewer (see figure 8.). This lens can be
ordered at www.myvu.com/clipon.
Storage temperature:…………...-4 to 140ºF (-20 to 60ºC)
Weight………………………………………....Viewer: 82g (2.8oz)
limited warranty
Myvu Corporation (“Myvu”) warrants this product against
defects in material or workmanship as follows:
PRODUCT: Myvu will repair this product with new or
refurbished parts, free of charge, for a period of one (1)
year from the date of original purchase in the event of a
defect in materials or workmanship.
REPAIRS: Myvu will repair or replace defective parts
used in the repair or replacement of this product with
new or refurbished parts, free of charge, for a period
equal to the remainder of the original limited warranty
period on the original product, or for 60 days after the
date of the repair or replacement, whichever is longer.
This warranty is extended only to the original purchaser.
Proof of purchase in the form of a bill of sale or receipted
invoice, which is evidence that the unit is within the
warranty period, must be presented to obtain warranty
service. To obtain warranty service, you must take this
product, or deliver the product freight prepaid, in either
(figure 8)
technical support
6
its original packaging or packaging affording an equal
degree of protection, to Myvu Corporation. See below for
additional information.
This warranty only covers failures due to defects in
materials and workmanship, which occur during normal
use. The warranty does not cover damages which
occurred in shipment, cosmetic damage, damage that is
attributable to acts of God, failures which are caused by
products not supplied by the warrantor, or failures which
result from accident, misuse, abuse, neglect,
mishandling, faulty installation, misapplication, improper
installation, operation or maintenance, alteration,
modification, introduction of sand, humidity or liquids,
line power surge, improper voltage supply, lightning
damage, or subjecting the product to
operating/environmental conditions in excess of the
maximum values or below the minimum values set forth
in the applicable specifications, or products serviced by
anyone other than Myvu. This warranty is invalid if the
factory-applied serial number has been altered or
removed from the product. This warranty does not cover
products sold AS IS or WITH ALL FAULTS. This
warranty excludes consumable parts such as batteries
and power supplies.
This warranty is valid only in the United States.
THERE ARE NO EXPRESS WARRANTIES EXCEPT
AS LISTED ABOVE. REPAIR OR REPLACEMENT AS
PROVIDED UNDER THIS WARRANTY IS THE
EXCLUSIVE REMEDY OF THE PURCHASER. MYVU
SHALL NOT BE LIABLE FOR LOST PROFITS, LOST
SALES, LOSS OF USE OF THE PRODUCT, OR
OTHER INCIDENTAL OR CONSEQUENTIAL
DAMAGES RESULTING FROM THE USE OF THIS
PRODUCT, OR ARISING OUT OF ANY BREACH OF
THIS WARRANTY. ALL EXPRESS AND IMPLIED
WARRANTIES, INCLUDING THE WARRANTIES OF
MERCHANTABILITY, FITNESS FOR A PARTICULAR
PURPOSE AND TITLE, ARE LIMITED TO THE
APPLICABLE WARRANTY PERIOD SET FORTH
ABOVE.
This warranty gives you specific legal rights and you
may also have other rights, which vary from state to
state.
If a problem with this product develops during or after
the warranty period, please contact: Myvu Corporation,
31 Dartmouth Street, Westwood, MA 02090.
regulatory agency requirements
Federal Communications Commission Notice
This equipment has been tested and found to comply
with the limits for a Class B digital device, pursuant to
Part 15 of the FCC Rules. These limits are designed to
provide protection against harmful interference in a
residential installation.
Cables
Connections to this device must be made with shielded
cables in order to maintain compliance with FCC rules
and regulations.
Declaration of Conformity for products marked with
the FCC logo
(US Only)
This device complies with Part 15 of the FCC Rules.
Operation is subject to the conditions: 1) this device may
not cause harmful interference and 2) this device must
accept any interference received, including interference
that may cause undesired operation.
European Union Notice
limitation of liability
SELLER SHALL HAVE NO LIABILITY FOR ANY
CLAIM, LOSS, DAMAGE OR EXPENSE OF ANY KIND,
INCLUDING FOR LOST PROFITS, SPECIAL,
INDIRECT, CONSEQUENTIAL, EXEMPLARY OR
INCIDENTAL DAMAGES, WITH RESPECT TO THE
SELECTION, QUALITY, CONDITION,
MERCHANTABILITY, SUITABILITY, FITNESS,
OPERATION, PERFORMANCE, OR THE USE,
MAINTENANCE OR REPAIR OF THE PRODUCTS
EVEN IF SELLER OR BUYER HAS BEEN ADVISED OF
THE POSSIBILITY THEREOF. THE PRICE STATED
HEREIN WAS ARRIVED AT IN CONSIDERATION FOR
LIMITING SELLERS WARRANTIES AND LIABILITY AS
PROVIDED HEREIN.
Some states do not allow the exclusion or limitation of
incidental or consequential damages, or allow limitations
on how long an implied warranty lasts, so the above
exclusions or limitations may not apply to you.
This product, by bearing the CE marking, complies with
the EMC Directive (89/336/EEC) and the Low Voltage
Directive (73/23/EEC) issued by the Commission of the
European Community. Compliance with these directives
implies conformity with the following European
harmonized standards:
• EN55013 Radio Disturbance
• EN55020 Electromagnetic Immunity
This product may be used in all EU countries.
Please Recycle
In accordance with EU directive 2002/96/EC, please be
a friend to the environment by recycling your used
electronic products.
7
8