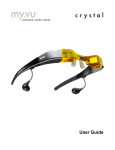
1
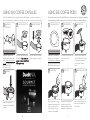
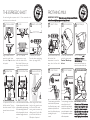
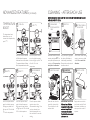
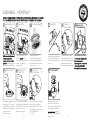
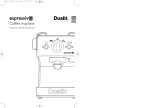
Espress-Auto
3in1 Coffee Machine
Instruction Manual & Guarantee
YOUR EsPREss-AUtO
3in1 COFFEE MACHINE
CONtENts
High pressure espresso machines, such as your new Dualit Espress-auto 3in1 coffee
machine, require constant care and maintenance to prolong their life.
Please remember to:
• Rinse through and wipe the steam wand after every use
• Descale your machine on a regular basis
Your Espress-auto 3in1 coffee machine................................... 2
safety precautions.................................................................................. 4
Before first use......................................................................................... 5
Know your 3in1 coffee machine................................................... 6
Priming - Before each coffee........................................................... 8
Using ground coffee............................................................................. 9
Using NX coffee capsules................................................................. 10
Using EsE coffee pods........................................................................ 11
the Espresso shot................................................................................. 12
Frothing milk............................................................................................. 13
Dispensing hot water.......................................................................... 14
Advanced features................................................................................ 15
Cleaning - After each use................................................................ 17
Cleaning - Monthly ............................................................................. 18
Descale regularly.................................................................................... 20
Barista training......................................................................................... 21
Recipes......................................................................................................... 25
troubleshooting guide........................................................................ 26
NX adaptor troubleshooting guide............................................ 32
Guarantee.................................................................................................. 34
2
3
READ ALL
INSTRUCTIONS
BEFORE UsING tHE EsPREss-AUtO 3IN1
COFFEE MACHINE. KEEP tHEsE
INstRUCtIONs FOR FUtURE
REFERENCE.
•
WARNING: this appliance must be
earthed.
•
•
do not use alkaline cleaning agents
when cleaning, use a soft cloth and a
mild detergent.
•
•
Ensure that the voltage of the
•
aged from 8 years and above if they
have been given supervision or
instruction concerning use of the
appliance in a safe way and if they
under stand the hazards involved.
Cleaning and user maintenance shall
not be made by children unless they
are older than 8 and supervised. Keep
the appliance and its cord out of reach
of children aged less than 8 years.
•
Appliances can be used by persons
•
with reduced physical, sensory or
mental capabilities or lack of experience
and knowledge if they have been given
supervision or instruction concerning
use of the appliance in a safe way and
understand the hazards involved.
•
Children shall not play with the
•
Do not lift the appliance up using the
water reservoir or cup rails. Only hold
Do not place the appliance on a
polished wood or permeable surface, it
could damage the surface.
•
•
•
•
If there is internal water leakage, do not •
operate the coffee maker and unplug it
at once in order to avoid electric hazard.
Before refilling the water reservoir,
Do not overfill the water reservoir.
Do not use sparkling water (with
carbon dioxide).
•
Never fill the reservoir with hot or
boiling water.
•
Only use the appliance with the drip
tray correctly fitted.
•
the appliance is not designed for
commercial or industrial use; it is for
domestic use only.
•
•
Do not operate this appliance with a
damaged cord or plug. If the supply
cord is damaged, it must be replaced
by Dualit Ltd, its service agent or
a similarly qualified person in order to
avoid a hazard.
•
Do not use the appliance without
water as this may cause the pump to
burn out.
•
the power supply cable should not be
•
allowed to come into contact with hot
surfaces.
•
BEFORE
FIRst UsE
Unpack the box with care, keeping all the
packaging materials until you are satisfied
everything is present and in working order.
Once satisfied remove any tags from the
coffee system and recycle the packaging
appropriately.
THE 3IN1 COffEE
mACHINE mUST bE
fLUSHED THROUgH
wITH wATER bEfORE
THE fIRST USE.
1. Follow the instructions as if priming the
appliance, page 8, leave the filter holder
or NX adapter empty, i.e. no EsE pod,
no NX capsule and no ground coffee.
Do not touch the metal parts, the filter
holder or its housing when the
appliance is in use, as this may
cause burns or scalding.
close to sources of heat such as electric
rings, hot ovens or open flames.
•
Do not leave the appliance in a room
with a temperature below 0°C, as any
water remaining in the appliance could
freeze and cause damage.
unplug the appliance from the mains.
Do not place the appliance over or
the use of extension cables not
authorised by the manufacturer may
cause damage or accidents.
Unplug the appliance from the mains
before cleaning or maintaining. For
details, please refer to CLEANING
sECtION
Do not place on a tray or surface that
may collect liquid.
appliance.
•
Do not throw away the
the appliance body. Unplug and allow
to cool prior to moving.
•
•
SAVE THESE
INSTRUCTIONS
this appliance conforms to directive
2004/108/EC regarding electromagnetic
compatibility.
Do not immerse in water or other
liquids.
Do not operate on an uneven surface.
turn the appliance off and unplug
when not in use.
2.
Empty the whole water tank through
the steam wand and coffee filter; this
will rinse the internals ready for brewing
coffee.
3.
Before they are used the filter holder,
measuring spoon, filters, water tank and
froth nozzle must be washed with
detergent and lukewarm water, then
rinsed and dried.
HEN NO
W
N USE
TI
•
this appliance can be used by children
unattended.
steam and hot water hazard. Do
not get into direct contact with hot
water and steam.
appliance with the normal
household waste at the
end of its life, but hand it
in at an official collection
point for recycling. By
doing this, you help to preserve the
environment
appliance corresponds to that of the
mains supply. Do not place the coffee
machine on a metal tray or other metal
surface during use.
•
to prevent damage to the appliance
Do not leave this appliance
UNPLUG
sAFEtY PRECAUtIONs
•
MAINtENANCE KIt
KNOW YOUR EsPREss-AUtO
3in1 COFFEE MACHINE
20X FILtER
PAPERs
FILtER PIN
AUtO DOsING BUttONs
stEAM PIN
EsPREssO
CUP WARMING PLAtE WItH RAIL
Preset 35ml
1.5 LItRE REMOvABLE WAtER tANK
DOUBLE
EsPREssO
stEAM/WAtER FLOW CONtROL
Preset 70ml
stEAM BUttON
CUP
stEAM WAND
Preset 150ml
FROtH NOzzLE
POWER ON/OFF sWItCH
EsE POD FILtER
POWER INDICAtOR
1 CUP FILtER
ILLUMINAtED WHEN ON
BREWHEAD, sHOWER HEAD
AND GAsKEt
2 CUP FILtER
7g MEAsURING sPOON WItH
INtEGRAtED tAMPER
FILtER HOLDER
NX ADAPtER
AND sEAL
REMOvABLE DRIP tRAY
AND NON-sLIP MAt
NX HOLDER
NX FILtER PLAtE
tRAY FULL INDICAtOR
NON-sLIP RUBBER FEEt
All illustrations are for representation only, your
model may vary from illustrations shown.
6
7
PRIMING - BEFORE EACH UsE
UsING GROUND COFFEE
the brewhead, filter holder and cup must be the correct operating temperature before the
first use. thereafter subsequent cups must be pre-warmed before EACH coffee.
select the filter holder with a black handle. Ground coffee has a three-day shelf-life, so grind only what
you need. Use a medium grind suitable for espresso machines too fine might block your filter.
1 FILL WAtER tANK
2 tURN ON
3 WAIt 40 sECONDs
1 tHE COFFEE
2 tHE FILtER
3 fILTER PAPER
COFFEE
Fill the water tank with
water; do not go above the
‘MAX’ mark. You will see air
bubbles at the connection
when correctly located.
4 AttACH HOLDER
Plug in the power cord. set
the power switch to ‘ON’.
the auto dosing buttons will
flash blue. the thermobloc is
now heating the water.
5 PRE-HEAt FILtER
HOLDER
the auto dosing buttons will turn
solid blue once the temperature
is correct for extraction. If you’re
in a hurry you can use the Auto
start feature (see page 15).
6 WARM CUP
Freshly grind your beans
using setting 3-5 on the
Dualit coffee grinder or use
a pre-ground coffee suitable
for espresso machines.
4 7 GRAM DOsE
select the appropriate sized ImPORTANT NOTICE:
some very small coffee
cup filter depending on
whether you are making one grounds can block the cup
filters. to prolong the life of
espresso, a double or two
your machine use the enclosed
singles. Make sure it’s dry.
filter papers with each serving.
6 WIPE
5 tAMP
LOCK
Align the holder with the
open lock symbol, insert,
then rotate 450 to the
closed lock symbol.
Dispense a cup full of water
through the machine by
pressing the cup button.
Ensure NO coffee is in the
filter holder.
8
If you like your coffee extra hot,
the serving cup must be warmed
through before EACH coffee.
Dispense a cup full of water, then
discard the water. Your machine
is now ready to go.
Using the measuring spoon,
measure out one level
spoon per serving into the
cup filter. Use 2 level spoons
if using the 2 cup filter.
With the other end of the
measuring spoon, ‘tamp’ the
coffee grounds LIgHTLY.
tamping too hard, will stop water
flowing through the ground coffee.
9
Wipe the edge of the cup
filter clean. If you don’t, a
water tight seal will not form
and water or coffee will leak
from the brewhead.
UsING NX COFFEE CAPsULEs
UsING EsE COFFEE PODs
select the NX holder with the grey handle. Every NX capsule is a sealed masterpiece of
flavour, character and just-roasted taste. Choose your favourite, unlock the aroma and enjoy.
select the filter holder with the black handle. EsE (Easy serving Espresso) pods are individually wrapped and
pre-tamped ensuring the perfect espresso every time. Look for the EsE logo on compatible coffee pods.
1 PURCHAsE
CAPsULEs
2 tHE NX ADAPtOR
3 INsERt CAPsULE
www.dualit.com/nx-capsules
NX coffee capsules are
available directly from retail
outlets, www.dualit.com/nxcapsules or call Dualit sales
on 01293 652 500
(UK delivery only).
1 PURCHAsE PODs
2 tHE EsE FILtER
3 INsERt POD
www.dualit.com/coffee-pods
Place the capsule in the NX
select the NX adaptor and
NX holder. this holder and holder and align the adaptor.
adaptor is for use with Dualit
NX capsules only.
Coffee pods are available
directly from retail outlets,
www.dualit.com/coffee-pods
or call Dualit sales on 01293
652 500 (UK delivery only).
4 CHECK sEAL
4 AssEMBLE
Make sure there is no gap
between the pod and filter
edge, or water will flow
round the pod and your
espresso will be diluted.
Lower the adapter to
assemble and lock capsule
in holder.
10
select the EsE pod filter and
snap into the filter
holder.
5 tUCK tAB
Make sure all the paper is
tucked inside the filter
before attaching the filter
holder to the brewhead.
11
Place one fresh coffee pod
into the EsE filter. Each pod
is individually wrapped so
you only use what you
need.
6 REMOvE WItH tAB
Use the tab to remove the
pod once the coffee has
been made.
2 CUPs
UNPLUG
UNPLUG
ImPORTANT NOTICE: After each use, wipe the steam wand & flush the
inside of the wand by dispensing water through the wand.
You are looking for an espresso with a 2 - 3mm crema and a rich,
dark brown colour underneath.
1 AttACH HOLDER
FROtHING MILK
HEN NO
W
N USE
TI
N USE
TI
tHE EsPREssO sHOt
HEN NO
W
3 sELECt AUtO DOsE
1 sELECt stEAM
2 FROtH NOzzLE
3 POsItION jUG
LOCK
Align the holder with the
open lock symbol, insert,
then rotate 450 to the closed
lock symbol.
4 EXtRACtION
the espresso will flow out of
the filter nozzles. this may
take a few seconds. Only the
selected button will remain
lit.
Place 1 or 2 warmed
espresso cups or a cup
under the nozzles of the
filter holder. Make sure your
cups are directly under both
nozzles.
5 stOP EXtRACtION
to extract your espresso,
Press the chosen auto dosing
button. (see page 6 & 25)
6 CLEAN FILtER OR
Press the steam button. It will
flash red until the
temparature is correct for
steam, then it will turn solid
red.
4 stARt stEAM
Put the froth nozzle on the
end of the steam wand.
Caution: Wand may
be hot.
Use 75 - 200ml of cold
semi-skimmed milk in a
stainless steel jug. Position the
head of the froth nozzle just
under the surface of the milk.
5 stOP stEAMING
6 fLUSH AND wIPE
NX ADAPtOR
When the correct dose of coffee
has been dispensed the machine
will automatically stop dispensing.
All the auto dosing buttons will
be lite when ready for the next
extraction. Unplug when not in
use.
When using the filter holder,
knock out the grounds over a
bin. Rinse the filter under
running water to remove any
coffee grounds. Use the filter
pin to unblock the filters or
NX adapter if required.
to start steaming turn the flow
control knob slowly between
the ‘off’ and the ‘steam / water’
position to adjust the flow of
steam. You will hear the pump
operating; this is quite
normal.
to stop steaming, turn the flow
control knob to the ‘off’
position. Press any button to
exit the steam function. the
pump will operate to reduce
the temperature to optimum
coffee temperature
ImPORTANT NOTICE:
After each use, flush the steam
wand by dispensing water (see
page 14) or steam to remove
any milk residue from inside the
steam wand. Wipe the steam
wand. Unplug when not in use.
UNPLUG
N USE
TI
DIsPENsING HOt WAtER
HEN NO
W
ADvANCED FEAtUREs
CAUtION: WAtER WILL BE HOt AND BE DIsPENsED At HIGH
PREssURE. sUBMERGE tHE WAND tO REDUCE sPLAsHING.
1 PREPARE
2 INsERt WAND
3 stARt DIsPENsING
AUtO
stARt
2 sELECt AUtO
DOsING
3 AUtO stARt
the auto start feature allows
you to pre select your dose.
Once heated up it will
automatically dispense your
coffee.
If you like your coffee extra
hot prime before use (see
page 8)
Remove the froth nozzle
from the steam wand.
Caution: Wand may be
hot. Ensure the water tank
is filled with water.
4 ADjUst FLOW
Insert into a deep jug or
teapot and point the wand
to a side wall to reduce
splashing.
5 stOP DIsPENsING
turn the flow control knob
to the steam/water position.
It will start with a continuous
flow then start to pulse. this
is normal.
1 sEt UP HOLDER
select your prefered
coffee and attach filter
or NX holder (see
page 9-11).
DOsING
MEMORY
set the power switch to
‘ON’. the lights will flash.
Press the desired auto
dosing button. the selected
button will continue to flash.
1 DIsPENsE
the light will go solid once the
thermobloc is at the correct
operating temperature and
automatically dispense coffee.
2 sAvE
the auto dosing buttons can
be programmed to fit your
desired cup size.
the flow of water can be
adjusted by turning the
control knob between the
‘off’ and the ‘steam/water’
position.
to stop the flow, turn the
flow control knob to the ‘off’
position. Unplug when not in
use.
14
Hold down the relevant auto
dosing button for ten
seconds.the machine will
start to dispense. Press the
same button again when the
desired amount of has been
dispensed.
Your preferance is now
saved. the coffee machine
remembers this dispense
volume, so the next time the
button is pressed the same
amount of coffee is
dispensed.
ADvANCED FEAtUREs
(continued)
CLEANING - AFtER EACH UsE
BEFORE CLEANING, MAKE sURE tHE MACHINE Is sWItCHED OFF, UNPLUGGED
AND ALLOWED tO COOL.
tEMPERAtURE
BOOst
1 tURN ON
2 ADD 1oC
+1oC
the temperature boost
feature allows you to
increase the temperature by
up to 3oC.
+2oC
Press the espresso button
once. the double espresso
button will light up solid. this
will add 1oC to the
temperature.
5 RECOMMENDED
4 ADD 3oC
Press the espresso button
again. the double espresso
and large cup button will
light up solid. this will add
2oC to the temperature.
2 DRIP tRAY
FILtERs & NOzzLE
ONLY
3 FILtER HOLDER &
NX HOLDER
40 C
TOP RACK
ONLY
Ensure the machine is switched
off. Hold down the espresso
button and turn on the machine.
the espresso button will always
flash in temperature boost mode.
3 ADD 2oC
1 DIsHWAsHER
Dishwasher filters & froth nozzle
on wash cycle below 40oC. Put
on top rack only & remove prior
to drying cycle. Do not wash any
other parts in the dishwasher.
4 WIPE tHE WAND
sEttING
Empty the drip tray regularly. If
the red tray full indicator is
visable, empty immediately.
Remove the non-slip mat and
rinse after each use.
5 fLUSH THE
STEAm wAND
Wash holders under running
water to remove any dried
coffee. Do not wash in the
dishwasher.
6 EMPtY WAtER
tANK
+3oC
Press the espresso button
again. the double espresso,
large cup and steam button
will light up solid. this will add
3oC to the temperature.
16
Press the espresso button
again to return to the
recommended setting. Once
you have selected your
desired temperature turn
the machine off to save the
setting.
After each use, clean the
wand with a damp cloth.
there should be no milk
residue visible.
ImPORTANT NOTICE:
After each use, flush the
steam wand by dispensing
water or steam, this will
remove any milk residue
from inside the steam wand
and remove nut
Empty and rinse out after
each session and refill with
fresh water just before you
make your next round of
espresso.
UNPLUG
N USE
TI
CLEANING - MONtHLY
HEN NO
W
BEFORE CLEANING, ENsURE tHE MACHINE Is sWItCHED OFF, UNPLUGGED & ALLOWED
tO COOL. UsE NX CAPsULEs OR EsE PODs tO REDUCE FREqUENCY OF CLEANING.
1 WIPE BREWHEAD
Wipe the entire brewhead
area and ensure it is
completely free of coffee
grounds. Fine coffee grounds
can block the showerhead.
4 UNBLOCK FILtER
2 UNsCREW
Using a screwdriver and
hammer, gently tap the
screw to dislodge any dried
coffee. then unscrew
anti-clockwise.
5 UNBLOCK NX
ADAPtOR
Filters often get blocked with
prolonged use. to unblock,
use the filter pin and push
through the central hole on
both sides of the
filter to unblock.
the filter plate on the NX
adaptor can get blocked with
dried coffee. to unblock, use
the filter pin to clean
between the grooves.
18
3 CLEAN BREWHEAD
thoroughly clean the
showerhead and gasket to
remove any coffee grounds.
Use the filter pin to unblock
or rinse in suds.
6 CLEAN tHE
7 UNsCREW
8 CLEAN tHE
stEAM WAND
Locate the measuring spoon
onto the steam wand nut.
Unscrew anti-clockwise and
remove.
Use the steam pin to remove
dried milk from inside the steam
wand. Use the measuring spoon
to place the nut back on the
steam wand & screw clockwise.
10 fILTER PAPER
stEAM WAND
Use the steam pin to remove
dried milk from inside the
steam wand nut. If this clears
the blockage then jump to fig.
9, if not then follow
fig. 7 & 8.
Remember to use filter
papers. these can help to
prevent filter blockages. these
are available directly from
www.dualit.com or Dualit
sales on 01293 652 500 (UK
delivery only).
19
9 fLUSH THE
STEAm wAND
ImPORTANT NOTICE:
turn on your machine. Flush
the steam wand by
dispensing water or steam to
remove any milk residue
from inside the steam wand.
DEsCALE REGULARLY
BARIstA tRAINING
ImPORTANT NOTICE: PRODUCt FAILURE DUE tO tHE BUILD UP OF
LIMEsCALE Is NOt COvERED BY GUARANtEE - DESCALE REgULARLY.
the Dualit 3in1 Coffee machine brings coffee shop style coffee into your home, Let’s start
with a quick training session and turn you, the coffee drinker, into a barista...
1 tHE DEsCALER
2 FILL tANK
3 FILtER HOLDER &
NX HOLDER
TER
WA
DESCALER
SUITABLE
FOR COFFEE
MACHINE
Ensure the descaling product
is suitable for coffee
machines. DESCALE
ONCE A mONTH IN
HARD wATER AREAS
4 DEsCALE
OR
Fill the water tank with the
descaling solution.
fOLLOw THE
INSTRUCTIONS ON
THE PACk.
5 DEsCALE FILtERs
tHE PERFECt COFFEE
You are looking for an espresso with a 2 - 3mm crema and a rich, dark brown colour
underneath (the exact colour will depend on the bean you have chosen).
LER
CA
DES
Choose the holder you use
regularily. Or if you use both
then cycle between the two
holders.
•
It should have a taste that is full of flavour (whether mild and subtle or rich and strong)
and should not be bitter. It should stay hot to the bottom of the espresso.
•
A espresso shot should be 35ml extracted from 7g of ground coffee.
•
A cappuccino should comprise an espresso topped with steamed milk and a head of
froth. the proportions are roughly equal.
•
the milk should be steamed for long enough to ensure the cappuccino (or latté) is hot
when served.
•
A caffé latté contains one-third espresso and nearly two-thirds steamed milk, the milk
should be fully frothed, giving the latté a more velvety texture.
6 RINsE tANK AND
FLUsH
TER
WA
Place the filters in a
Place a large container on
the drip tray. Cycle between container and soak in
descaling solution.
dispensing through brewhead and steam wand.
Continue until the tank is
empty.
20
Rinse the water tank and fill
with water. Operate as if
making coffee and flush
water through the machine.
this will remove any traces
of the descaling solution.
21
BARIstA tRAINING
there are 6 components to making a great cup of hot coffee. Get all these right and you’ll
have the perfect coffee, whether it’s a straight shot of espresso or a ‘combo’ like a latté
or cappuccino.
1
tHE RIGHt CHOICE OF COFFEE BEANs
there are two main types of bean; within each type there are numerous varieties that are
usually identified by their geographical region.
ArAbiCA: Low in caffeine, low in acidity, high in flavour and aroma.
robustA: twice the amount of caffeine, high in acidity and low in flavour and aroma.
3
WAtER
the perfect temperature for brewing coffee is just below boiling point. Boiling water will
burn the ground beans and the coffee will taste bitter. A lower temperature won’t extract
the oils or flavour from the bean.
Your Dualit coffee machine will heat the water to the perfect temperture every time you
make an espresso.
the roast will affect the strength and flavour of the coffee. Generally the darker the roast
the stonger the coffee will be.
4
DOsING AND tAMPING
try beans from around the world. As with wine, the soil, climate and cultivation methods
all affect the taste of the coffee, producing anything from a mild, mellow blend to a rich,
dark roast.
Your Dualit coffee machine comes with a 7g measuring spoon/tamper.
Whole beans will keep for fourteen days in an air-tight container or 45 days in the freezer.
Divide a big bag of beans into several smaller containers before freezing so you only open
what you require.
Compacting the coffee firmly and uniformly (but not too tightly) forces the water through
the coffee grounds in a way that extracts the best flavour. tamping too hard, will stop
water flowing through the ground coffee.
2
A good barista will tamper by pressing the grounds gently without tapping the filter holder,
then twisting slightly to ‘polish’ the surface of the compacted coffee.
tHE GRIND
Espresso machines need coffee with a fine grind as a coarser grind will affect the rate of
extraction. You’ll know when you’ve got it right because you’ll have a dense 2-3mm crema
on the surface of your coffee.
too CoArse: this will under-extract, giving you brown water but no flavour.
too fine: this will over-extract, giving you a bitter flavour.
22
23
UNPLUG
RECIPEs
N USE
TI
BARIstA tRAINING
HEN NO
W
Once the espresso is extracted (the basis of most coffee drinks) add
water or milk to the coffee to create different types of drinks.
WItH WAtER...
WItH MILK...
AMERICANO style coffee is made
with hot water topped with an espresso.
this gives a similar strength (but different
flavour) to a filter coffee machine.
CAPPUCCINO comprises equal
parts of espresso coffee, milk and froth,
sometimes sprinkled with cinnamon or
powdered cocoa.
LONG BLACK is similar to
CAFFè LAttE is often called simply
Americano, but prepared in a different
order (espresso is added to water instead
of vice versa).
latte. It is espresso with steamed milk,
traditionally topped with the froth created
when steaming the milk.
For best results use cold milk – full-fat, the higher the fat content of the milk, the lighter the
froth will be.
LUNGO is different from an Americano.
Don’t let milk boil – ideally it should reach 70-75°C. Once it reaches 79°C you will lose the
froth. Listen to the sound of the frothing; when it is ready the sound of the frothing will
become quieter.
It is usually a double shot of espresso run
through the machine; all the water runs
through the beans, as opposed to adding
water.
A latte comprises one-third espresso and
nearly two-thirds steamed milk. More
frothed milk makes it weaker than a
cappuccino. A latte is also commonly
served in a tall glass; if the espresso is
slowly poured into the frothed milk from
the rim of the glass, three layers of different
shades will form, with the milk at the
bottom, the froth on top and the espresso
in between.
5
FROtHING OR stEAMING
steaming or frothing introduces tiny bubbles of air into the milk, giving it a velvety texture.
Cappuccinos and lattés both use frothed milk, but a latté has a more velvety texture as the
milk is frothed from the bottom of the jug – only the top 1cm of a cappuccino comprises
frothed milk.
You will produce better, hotter frothed milk if you use a stainless steel jug. Make sure
there’s enough milk in it to allow the steamer to do it’s job properly.
6
RIstREttO is an espresso made with
tHE CUP
Coffee should always be served in a warm cup, this will keep the coffee hotter for longer
and enhance the aroma.
An espresso shot in particular will get cold very quickly if poured into a cold cup. For this
reason your cups must be pre-warmed before EACH use (see page 10).
less than the usual amount of water, filling a
small espresso cup half-full of very strong
coffee.
Filter
Max extraction
volume (ml)
NX
35
ESE
35
Single
35
Double
75-150
MOCHA is a latte with chocolate
added.
CAFFè MACCHIAtO
Macchiato meaning ‘marked’ or ‘spotted’ is
an espresso with a little steamed milk
added to the top, usually 1–2 oz,
sometimes sweetened with sugar or
flavoured syrup.
For longer drinks see Americano recipe
24
25
tROUBLEsHOOtING GUIDE
mPORTANT: fAILURE TO DESCALE AND CLEAN YOUR mACHINE wILL
INVALIDATE YOUR gUARANTEE.
Problem
Test
Result
Solution(s)
No coffee flowing from
brewhead
tHE tAMP tEst
Dispense water through the
brewhead with the cup filter in
place. Ensure NO coffee is in
the filter.
If you see no water after
7 seconds stOP the test.
No water
1. Water tank is not correctly seated in position.
Locate water tank (see page 8, fig 1).
Water flow
improves
1. the showerhead and cup filter may be blocked.
Clean showerhead (see page 18, fig 3) and cup filter (see page 18, fig 4).
2. You may be tamping too hard.
LIgHTLY ‘tamp’ the coffee grounds (see page 9, fig 5).
3. the cup filter is blocked because the coffee grind is too fine.
Ensure you are using setting 3-5 on the Dualit coffee grinder or use
a pre-ground coffee suitable for espresso machines. Clean the cup
filter (see page 18, fig 4).
4. there is too much coffee in the cup filter.
Use the measuring spoon (see page 9, fig 4).
Problem
Possible cause(s)
Solution(s)
No steam flowing from
steam wand
1. Water tank is not correctly seated in position.
1. Locate water tank (see page 8, fig 1).
2. steam wand is blocked.
2.1. Clean steam wand (see page 18-19, fig 6-8).
2.2. Descale (see page 20).
2.3. If you are unable to unblock your steam wand then contact Dualit on
01293 652 500 for advice or spare parts.
26
27
tROUBLEsHOOtING GUIDE
Problem
Possible cause(s)
Solution(s)
Coffee leaking
from the
brewhead
1. Dried coffee on the gasket.
1. Clean gasket (see page 18, fig 3).
2. EsE pod or NX capsules not seated correctly.
2. Check the capsule is in place. If using EsE pod, tuck the tab under (see page 11, fig 4-5).
3. Blocked brewhead.
3. Clean showerhead (see page 18, fig 3).
4. Damaged brewhead gasket.
4. to obtain a new gasket contact the Dualit customer helpline on
+44 (0)1293 652 500 (09:00 to 17:00 Monday to Friday).
Water dripping
from the brewhead
when steaming
1. Excess water in the brewhead is left over from previous
operation
1. this is not cause for concern. this will automatically stop when the machine has
finished steaming.
My machine is making a
loud and continuous
pumping noise
1. Water tank is not correctly seated in position.
1. Locate water tank (see page 8, fig 1).
2. Water tank is empty.
2. Fill water tank (see page 8, fig 1).
My machine has
stopped during use
1. Water tank is empty.
1. to prevent an air lock firstly remove the filter holder. Fill water tank (see page 8, fig
1). Your machine is now ready to extract your next coffee (see page 12).
1. Fuse may have failed.
1. Check and replace the fuse.
The auto dosing and steam
buttons are flashing
My machine is not
working
2. Contact the Dualit customer helpline on
+44 (0)1293 652 500 (09:00 to 17:00 Monday to Friday).
The lights are off and the machine
ceases to operate
My machine is not
dispensing correct
amount of coffee
1. Your cup holds a different quantity of coffee to the
preset amount.
2. the dosing memory has been used to change the dose.
28
1. Adjust the dose using the dosing memory feature (see page 15).
2. Use the dosing memory feature to adjust the dose to your desired amount (see
page 15).
29
tROUBLEsHOOtING GUIDE
Problem
Possible cause(s)
Solution(s)
Steam is venting from
the drip tray
1. Water is being purged through the machine to
reduce operating temperature ready for the
next coffee
1. this is not cause for concern. this will automatically stop when the machine has
finished purging.
My coffee is not hot
enough
1. Filter holder is not pre-heated.
1. Prime machine. (see page 8).
2. Cup or mug is not pre-warmed.
2. Warm cup (see page 8). You can also place your cups warm on the cup warming
plate.
3. You may prefer your coffee extra hot.
3. Use the temperature boost feature. (see page 16).
After frothing milk, my
milk is not foamy
1. Milk is not cold or fresh enough.
1. It is easier to make froth using cold semi-skimmed milk in a stainless steel jug.
2. steam wand is blocked with milk residue.
2.1. Clean steam wand (see page 19, fig 7-8).
2.2. Descale (see page 20).
My coffee has no crema
1. the cup filter is blocked because the coffee
grind is too fine.
1.1 Ensure you are using setting 3-5 on the Dualit coffee grinder or use a pre-ground
coffee suitable for espresso machines.
1.2. Clean cup filter (see page 18, fig 4).
1.3. Remember to use filter papers. these can help to prevent filter blockages. these are
available directly from www.dualit.com or Dualit sales on 01293 652 500
(UK delivery only).
2. Ground coffee is not fresh.
2. Ground coffee only has a three-day shelf-life. Grind only the amount of beans that
you need.
3. the coffee grind is too course.
3. Ensure you are using setting 3-5 on the Dualit coffee grinder or use a pre-ground
coffee suitable for espresso machines.
1. the valve is opening to allow water to flow through
the thermobloc
1. this is not cause for concern it is part of the operation of the machine.
My machine clicks when
auto dosing is selected
tROUBLEsHOOtING GUIDE
Problem
Possible cause(s)
Solution(s)
My coffee is weak
1. the volume of coffee dispensed is too high.
1. Ensure you are using the correct type and strength of coffee for the type of drink you
are making. see page 25 for recipes and max dispensing table.
2. You like your coffee extra strong.
2. Use the double espresso dose to make a single coffee.
3. When using NX adaptor:
Dried coffee on the filter plate.
3. Use the filter pin to remove the dried coffee.
4. When using NX adaptor:
the NX adapter is not fully locked in position.
4. Locate and fully lock the holder. (see page 12, fig 1).
5. When using NX adaptor:
Damaged seal
5. For spare parts contact the Dualit customer helpline on
+44 (0)1293 652 500 (09:00 to 17:00 Monday to Friday).
Problem
Test
Result
Solution(s)
No coffee flowing when
using the NX adaptor
tHE NX ADAPtOR tEst
Dispense water through the
NX Adaptor. Ensure NO
capsule is inside.
No water
1. Water tank is not correctly seated in position.
Locate water tank (see page 8, fig 1).
Water in drip tray
1. the showerhead and NX adaptor may be blocked.
Descale your machine with the NX adaptor locked in place. (see page 20)
Water flow
improves
1. the coffee in the capsule is stale.
Only remove capsules from the flow bag when ready to use.
2. We recommend only the use of Dualit NX capsules.
32
33
GUARANtEE
this appliance is of excellent quality and construction. However, if any defects in materials
or workmanship do appear during the relevant guarantee period, we will, at our discretion,
either repair or replace the defective parts, free of charge, subject to the terms and
conditions of our Guarantee shown below.
this Guarantee covers both parts and
labour. Carriage is not included.
•
Your mains electricity supply is
functional.
Your guarantee period is as follows:
•
the defect is not due to a blown fuse.
•
If you wish to claim under this Guarantee
you should:
1 year
this Guarantee provides benefits which are
additional to, and do not affect, your
statutory rights. this Guarantee does not
cover the cost of returning the product to
the dealer from whom it was purchased or
to ourselves. this Guarantee applies only to
products sold and located in mainland
Great Britain. It does not cover liability in
respect of or replacement of plugs, cables
or fuses and also does not cover defects
due to:
•
Failure to use or maintain product in
accordance with Dualit's instructions.
•
the product being connected to an
unsuitable electricity supply.
•
Accidental damage to or abuse or
misuse of the product.
•
the product modified except by Dualit
or approved agent.
•
Dismantling of or interference with the
product.
•
theft or attempted theft of the
product.
send the product, postage or carriage
paid, to the dealer from whom it was
purchased.
•
Ensure that the product is clean and
packed carefully (preferably in its
original carton).
•
Enclose details of your name, address
and telephone number and when and
where the product was purchased,
together with proof of purchase (e.g. a
till receipt).
•
Give exact details of the nature of the
defect.
this Guarantee does not cover any other
claims whatsoever, including, without
limitation, any liability for incidental, indirect
or consequential damage, nor does it cover
any claims for conversion or modification or
for the costs of repair carried out by any
third party without the prior consent of
Dualit. If replacement parts are fitted to the
product this will not extend the period of
the Guarantee.
Before returning any product under this
Guarantee, please check that:
•
•
For further advice contact the Dualit
customer helpline on +44 (0)1293 652 500
(09:00 to 17:00 Monday to Friday).
You have followed the product
instructions correctly.
Alternatively, email Dualit at
[email protected] or visit www.dualit.com
34