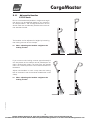
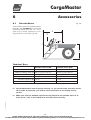
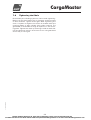
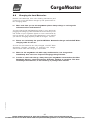
1
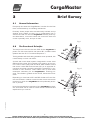
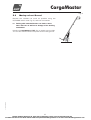
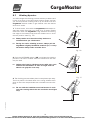
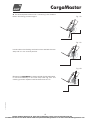
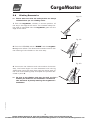
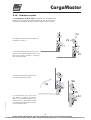
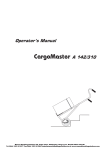
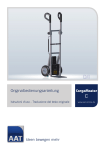
Operator’s Manual
CargoMaster
C 141
C 141 Vario
Manual Handling Solutions 58, Paige Close, Watlington, Kings Lynn, Norfolk PE33 0TQ UK
Tel 0044 1553 811977 Fax 0044 1553 811004 [email protected] www.manualhandlingsolutions.com
CargoMaster
1
Table of contents
2. Introduction
3. Brief Survey
3.1 General Information
3.2 Functional Concept
3.3 Functional Sequence
3.4 Description C 141, C 141 Vario
4. Before Operation
4.1 Checking the Safety Brakes
5. Operating the CargoMaster C 141, C 141 Vario
5.1 Safety Instructions
5.2 Parking With/Without Loads
5.3 Moving on Level Ground
5.4 Picking up Loads
5.5 Loading a Vehicle
5.6 Unloading a Vehicle
5.7 Climbing Upstairs
5.8 Climbing Downstairs
5.9 Continuously Adjustable Climbing Speed
5.10 Foldable toe plate
5.11 Adjustable handles C 141 Vario
6. Accessories
6.1 Portable Stairs
6.2 Spare Batteries
7. Care and Maintenance
7.1 General Information
7.2 Changing the Electrical Fuses
7.3 Changing the Batteries
7.4 Tightening the Chain
8. Sealed lead acid batteries
8.1 General Information
8.2 Charging the sealed lead acid batteries
9. Warranty and Liability
9.1 Warranty
9.2 Liability
c141_gb_12/02
10. Appendix
Noise and Vibrations
Declaration of CE Conformity
Note
2
Manual Handling Solutions 58, Paige Close, Watlington, Kings Lynn, Norfolk PE33 0TQ UK
Tel 0044 1553 811977 Fax 0044 1553 811004 [email protected] www.manualhandlingsolutions.com
CargoMaster
2
Introduction
Congratulations, you acquired a powerful and versatile machine to transport loads
The CargoMaster will shortly be an indispensable help to you.
However, in order to transport heavy loads effortlessly upand downstairs, it is necessary to acquire a certain skill in
using the CargoMaster.
For this reason we ask you to read the operator’s manual
carefully and pay particular attention to all warning and
safety instructions before using the CargoMaster for the
first time.
We further suggest that, in order to get used to this
stairclimbing device, you practise handling it first without
loads.Please practice at the lowest speed possible.
For safety reasons it is mandatory to observe strictly the
maximum limit for loads.
For damage done by exceeding the maximum load or improper use such as...
• warped axles
• deformed frame
• deformed handles
c141_gb_12/02
...we do not assume any warranty.
3
Manual Handling Solutions 58, Paige Close, Watlington, Kings Lynn, Norfolk PE33 0TQ UK
Tel 0044 1553 811977 Fax 0044 1553 811004 [email protected] www.manualhandlingsolutions.com
CargoMaster
3
3.1
Brief Survey
General Information
Everybody who sees the CargoMaster in action for the first
time is fascinated by its climbing mechanism.
Precisely those people who are technically inclined end up
shaking their heads as they try to understand how it
works.If one did not see the CargoMaster actually climb upand downstairs, one would reach the conclusion that this
couldn’t possibly work, and yet it does.
Fig. 1
3.2
A
The Functional Principle
The major focus lies at the axle (D3) of the CargoMaster’s
power unit (A) around which the levers (B1 und B2) rotate
(please see also 3.3 “Functional Sequence”).
D1
D2
D3
B1
B2
The big wheels and the braking wheels are not powered, but
rotate freely on their own axles.
A chain and tooth wheel system integrated in motor lever
(B2) and lifting lever (B1) transfer the rotation of the motor’s axle in such a way that the lever (B2) rotates around
the motor’s axle (D3) and the lever (B1) in an opposite direction around the connecting axle (D2). The axle (D1), connected to the climbers, thus makes the up and down
movement necessary for the CargoMaster’s climbing process. The climbers, guided on the rail (E), follow that movement.
Fig. 2
A
C
Depending on how levers (B1 and B2) climbers (C) and frame are located in relation to each other there are certain
positions in which the CargoMaster should preferably be driven or parked.
D3
B2
D2
D1
C
B1
c141_gb_12/02
How the up and down movement of the CargoMaster‘s climbers and frame can be used to climb stairs is desribed and
explained as you read on.
E
4
Manual Handling Solutions 58, Paige Close, Watlington, Kings Lynn, Norfolk PE33 0TQ UK
Tel 0044 1553 811977 Fax 0044 1553 811004 [email protected] www.manualhandlingsolutions.com
CargoMaster
3.3
Fig. 3
Functional Sequence
For the description of the functional sequence we assume
that the CargoMaster’s climbing mechanism and the climbers are at their highest position as shown in Fig. 3
This is the position in which one drives the CargoMaster on
level ground. It is further the position in which one can rest
the CargoMaster on its toe plate. In the following description
of the functional sequence this neutral or starting position
of the CargoMaster is called position 0°.
The First Phase
Drive the CargoMaster to the first step of the stairs in position 0°.Push the UP/DOWN switch “UP” and the motor begins to rotate. Both levers of the climbing system rotate
as well and the climbers move downward.
Fig. 4
The climbers touch the ground
and take over the load. The motor
continues to rotate, and because
the
rotating
movement
is
transfered to the climbers, the
frame is pushed upward, i.e.
lifted.
The motor lever’s rotation moves
0°
90°
from 90° to 120° and you notice
that the big wheels pass over the
edge to the next step. At approximately 180° the climbing
mechanism lifts the frame to the next step, and the big
wheels take over the load once more (see Fig. 4). This concludes the first phase.
120°
The Second Phase
180°
Fig. 5
Once the big wheels take over the load on the next
step at approximately 180°, the climbers are
lifted as well passing 210° and 270°.
210°
270°
330°
c141_gb_12/02
At 330° the climbers are “retracted” sufficiently
so that the CargoMaster can be pulled back to the
edge of the following step (see Fig. 5). The final position, 360°, coincides with the starting position
0°, which concludes the second phase. Now you
can repeat the process.
5
Manual Handling Solutions 58, Paige Close, Watlington, Kings Lynn, Norfolk PE33 0TQ UK
Tel 0044 1553 811977 Fax 0044 1553 811004 [email protected] www.manualhandlingsolutions.com
CargoMaster
3.4
Description C 141
C 141 Vario
Fig. 6
1
2
3
1 1
2
3
1
1 = Handlebars
4
4
2 = UP/DOWN-Switch
3 = Knob for continuos speed control
4 = On/Off Switch
9
5 = Battery pack
10
6 = Climber
7 = Big Wheels
5
5
8 = Climbing mechanism
9 = Clamp plus locking screw
8
10 = Helix cable
6
8
7
Technical Data:
C 141
Frame = 23,5 kg (51,8 lbs)
Batteries = 4,5 kg (9,9 lbs)
Lifting Capacity 140 kg (308 lbs)
Sealed lead acid batteries 2 x 12 V / 5 Ah (sealed)
D.C. Motor 24 V
Climbing Rate
7
C 141 Vario
Dimensions Height: 1390 mm
Width: 440 mm
(toe plate folded in / out) Depth: 300 / 550 mm
Weight
6
Height: 1060-1400 mm
Width: 440 mm
Depth: 300 / 550 mm
Frame = 20,5 kg (45,2 lbs)
Batteries = 4,5 kg (9,9 lbs)
140 kg (308 lbs)
2 x 12 V / 5 Ah (sealed)
24 V
8 - 30 steps per minute,
continuously adjustable
Capaticity with one 15 - 30 stories, depending on
charge of the batteris the load
8 - 30 steps per minute,
continuously adjustable
15 - 30 stories, depending on
the load
c141_gb_12/02
We reserve the right for technical and/or optical changes as well as for changes in
outfit.
6
Manual Handling Solutions 58, Paige Close, Watlington, Kings Lynn, Norfolk PE33 0TQ UK
Tel 0044 1553 811977 Fax 0044 1553 811004 [email protected] www.manualhandlingsolutions.com
CargoMaster
4
Before Operation
Before you use the CargoMaster for the first time, please
make sure the batteries are completely charged, as shown
in chapter 8.2 “Charging the Lead batteries”.
+
4.1
Please check the safety brakes each time
before you use the CargoMaster.
Fig. 7
Checking the Safety Brakes
Retract the climbers entirely by pushing the
UP/DOWN switch.
Unlock the safety brakes with the tip of your foot.
You need to push the stopping levers upward until
the looking mechanism opens. Now the brake levers
move down unencumbered, and the braking wheels
touch the ground as shown in Fig. 7
Fig. 8
Then, tilt the machine towards you until the
frame’s loading surface is almost in a horizontal
position. At this point the safety brakes must
engage and lock the running wheels. If the machine cannot be pushed forward, but only rolled
backward, then the braking effect for a safe use
of the CargoMaster is achieved.
+
If this braking effect does not set in, the CargoMaster may not be used under any
circumstances. Please contact your local dealer or the manufacturer immediately.
To climb up- or downstairs you must always unlock the safety brakes.
c141_gb_12/02
+
à à
7
Manual Handling Solutions 58, Paige Close, Watlington, Kings Lynn, Norfolk PE33 0TQ UK
Tel 0044 1553 811977 Fax 0044 1553 811004 [email protected] www.manualhandlingsolutions.com
CargoMaster
5
5.1
Operating the CargoMaster
Safety Instructions
+
For the safe operation of the CargoMaster, it is
imperative to observe all requests for caution and all
instructions of the operator’s manual as well as all
safety measures and instruction labels on the
machine itself.
+
The CargoMaster may only be used by a trained
person.
+
+
+
+
+
+
During operation, never put your hand underneath
the toe plate.
Check the safety brakes each time you use the
machine.
to climb up- or downstairs always unlock the safety
brakes.
The maximim load, see label on the machine, may
never be exceeded.
Each load you transport must be secured with the
safety belt.
If any of the power-driven elements of the
CargoMaster lock, turn off the machine immediately.
+
Never transport people with the CargoMaster.
+
Only operate the CargoMaster in conjunction with the
safety devices that belong to the particular machine.
+
Please turn off the CargoMaster, i.e. put the power
switch in position “0”, when you stop the machine or
take a break in transporting a load.
+
Repair work on the CargoMaster may only be done by
the manufacturer or authorized dealers.
+
+
People under age are not allowed to operate the
CargoMaster (except those over 16 who are trained
under supervision).
Make sure that the batteries are recharged after
each operation.
c141_gb_12/02
+
Only use original spare parts by AAT Alber
Antriebstechnik GmbH.
8
Manual Handling Solutions 58, Paige Close, Watlington, Kings Lynn, Norfolk PE33 0TQ UK
Tel 0044 1553 811977 Fax 0044 1553 811004 [email protected] www.manualhandlingsolutions.com
CargoMaster
5.2
Parking With/Without Loads
c141_gb_12/02
Handle the CargoMaster C 141 like a regular sack trolley.
9
Manual Handling Solutions 58, Paige Close, Watlington, Kings Lynn, Norfolk PE33 0TQ UK
Tel 0044 1553 811977 Fax 0044 1553 811004 [email protected] www.manualhandlingsolutions.com
CargoMaster
5.3
Fig. 9
Moving on Level Ground
Retract the climbers as much as possible using the
UP/DOWN switch (see Fig. 9), and lock the brakes.
+
Driving with unlocked brakes can lead to more
wear and tear as well as to damage of the braking
mechanism.
c141_gb_12/02
Handle the CargoMaster C 141 like a regular sack trolley.
You can also use it without the power unit on level ground.
10
Manual Handling Solutions 58, Paige Close, Watlington, Kings Lynn, Norfolk PE33 0TQ UK
Tel 0044 1553 811977 Fax 0044 1553 811004 [email protected] www.manualhandlingsolutions.com
CargoMaster
5.4
Picking up Loads
Fig. 10
To pick up loads retract the CargoMaster’s climbers as
much as possible as shown in Fig.10
+
Drive the CargoMaster’s toe plate under the load you
want to pick up, and secure it with the safety belt
Then pick up the load by pressing your foot against the motor housing (on the back side in the middle of the climbing
mechanism).
+
Your other foot must rest firmly on the ground
c141_gb_12/02
Finally pull at the handlebars and tilt the CargoMaster plus
load toward you, as you would with a regular sack trolley.
11
Manual Handling Solutions 58, Paige Close, Watlington, Kings Lynn, Norfolk PE33 0TQ UK
Tel 0044 1553 811977 Fax 0044 1553 811004 [email protected] www.manualhandlingsolutions.com
CargoMaster
5.5
Fig. 11
Loading a Vehicle
Tilt the CargoMaster backwards as low as possible
and drive straight forward to the loading platform. Remove the safety belt.
Push the UP/DOWN switch “UP” lifting the load
to its highest possible position.
+
+
Using “UP” instead of “DOWN” makes it
easier to keep the CargoMaster balanced.
By letting your arms climb with the
CargoMaster you keep the device plus its
load balanced, regarding a potential shift
of the center of gravity.
While the CargoMaster lifts the load, tilt it forward
towards the loading platform so that the load touches the loading platform.
à
Fig. 12
Then push it entirely onto the loading platform.
For your safety and convenience we recommend using the AAT Alber portable stairs
(see chapter 6.1 “Portable Stairs”).
c141_gb_12/02
+
12
Manual Handling Solutions 58, Paige Close, Watlington, Kings Lynn, Norfolk PE33 0TQ UK
Tel 0044 1553 811977 Fax 0044 1553 811004 [email protected] www.manualhandlingsolutions.com
CargoMaster
5.6
Fig. 13
Unloading a Vehicle
Push the load as far as possible over the edge of
the loading platform.
Put the CargoMaster into its highest position as
shown in Fig. 13, and drive with the toe plate as
closely as possible under the load to the edge of
the loading platform.
Tilt the load onto the CargoMaster and secure it
with the safety belt, see Fig.14.
à
Fig. 14
For your safety and convenience we recommend using the AAT Alber portable stairs
(see chapter 6.1 “Portable Stairs”).
c141_gb_12/02
+
à
13
Manual Handling Solutions 58, Paige Close, Watlington, Kings Lynn, Norfolk PE33 0TQ UK
Tel 0044 1553 811977 Fax 0044 1553 811004 [email protected] www.manualhandlingsolutions.com
CargoMaster
5.7
Climbing Upstairs
You will manage the climbing process without problems and
in next to no time, if you follow instructions closely. At first
you should practice climbing stairs up and down with the
CargoMaster without loads to get familiar with the device
and how it works.
Fig. 15
1. To climb stairs, drive with the CargoMaster backwards toward the stairs and then you climb 2 to 3 steps. Please
make sure that the CargoMaster’s big wheels are touching
the edge of the lowest step and the climbers are in their
utmost position (see Fig. 15).
+
+
Always make sure that the safety brakes are
unlocked when you climb stairs.
During the entire climbing process, always pull the
CargoMaster slightly backwards towards you, i.e.keep
the device always under tensible force.
Fig. 16
2. Push the UP/DOWN switch “UP” to initiate the climbing
process. The motor rotates while the climbers lift the frame plus load.
+
Imitate the frame’s climbing process with your arms
and hold the handlebars in such an angle that the
wheels can grip the next step.
Fig. 17
3. The climbing process takes place in two phases per step.
The first phase is finished when the running wheels touch
down on the next step and take over the load from the climbers.
Do not hold the handlebars too low because in such
case the running wheels do not reach the next higher
step.
c141_gb_12/02
+
14
Manual Handling Solutions 58, Paige Close, Watlington, Kings Lynn, Norfolk PE33 0TQ UK
Tel 0044 1553 811977 Fax 0044 1553 811004 [email protected] www.manualhandlingsolutions.com
CargoMaster
4. The second phase starts with “retracting” the climbers
before the lifting process begins.
Fig. 18
Fig. 19
It ends when the climbing mechanism has reached the next
step and is in its neutral position.
Fig. 20
c141_gb_12/02
Because the CargoMaster is always pulled slightly backward,
it rolls automatically to the next step (see Fig. 20). The
climbing process repeats itself as described in 5.2.
15
Manual Handling Solutions 58, Paige Close, Watlington, Kings Lynn, Norfolk PE33 0TQ UK
Tel 0044 1553 811977 Fax 0044 1553 811004 [email protected] www.manualhandlingsolutions.com
CargoMaster
5.8
+
Climbing Downstairs
Fig. 21
Please make sure that the safety brakes are always
unlocked when you are climbing stairs.
1. Push the CargoMaster, climbers in utmost position, all
the way to the edge of the stairs. The unlocked safety brakes make it impossible that the CargoMaster goes over the
edge of the stairs.
Fig. 22
2. Push the UP/DOWN switch “DOWN” and the CargoMaster begins its decent. The downward movement starts with
the lowering of the climbers to the next step.
Fig. 23
3. As soon as the climbers touch the surface of the next
step, the frame begins to move downward until the big
wheels also touch the step. Now push the device again to
the curb of the following step and repeat the process described in point 2.
As soon as the climbers take over the load, you feel a
definite pull forward in the handlebars. Counteract
this movement by briefly lowering the CargoMaster’s
handlebars.
c141_gb_12/02
+
16
Manual Handling Solutions 58, Paige Close, Watlington, Kings Lynn, Norfolk PE33 0TQ UK
Tel 0044 1553 811977 Fax 0044 1553 811004 [email protected] www.manualhandlingsolutions.com
CargoMaster
5.9
Continuously Adjustable Climbing Speed
Select a climbing speed that suits you by the knob
underneath the UP/DOWN switch. When transporting
loads that are difficult to handle or when you use the CargoMaster the first couple of times, choose the lowest speed
possible.
Note that the CargoMaster is equipped with an automatic turn off function. Once the
device has turned itself off (e.g. during a break) you need to turn the CargoMaster
first off and then on again with the ON/OFF switch.
c141_gb_12/02
+
17
Manual Handling Solutions 58, Paige Close, Watlington, Kings Lynn, Norfolk PE33 0TQ UK
Tel 0044 1553 811977 Fax 0044 1553 811004 [email protected] www.manualhandlingsolutions.com
CargoMaster
5.10 Foldable toe plate
The CargoMaster model C 141 is equipped with a foldable toe
plate thus storage and transportation of the device is comfortable and easy because it does not take up much space.
2a
In a regular position the toe plate is
locked by a bolt (1).
2b
2c
1
If you flip the lever (2a) from a vertical to a horizontal position (2b), the
bolt (2c) moves upward, unlocking
the toe plate (2d).
2d
The thus unlocked toe plate can
be moved up by 90° (3a).
c141_gb_12/02
3a
4a
4b
4c
In this position you can fix the
toe plate by flipping the lever
(4a) in a horizontal position so
that the bolt (4b) lowers itself
into the aparture at the toe plate and locks it (4c).
18
Manual Handling Solutions 58, Paige Close, Watlington, Kings Lynn, Norfolk PE33 0TQ UK
Tel 0044 1553 811977 Fax 0044 1553 811004 [email protected] www.manualhandlingsolutions.com
CargoMaster
5.11
Adjustable Handles
C 141 Vario
Due to the handles adjustable in height and angle
the device can be adapted ideally to any situation
of transportation. The storage dimensions of the
device itself are considerably smaller than those of
the standard model.
The handles can be adjusted in height by loosening
the locking screws of the clamps.
+
After adjusting the handles retighten the
locking screws.
If you unscrew the locking screws approximately 6
mm the plates of the clamps can be pulled apart so
that a locking bolt clears. At that point the handle
that is in a vertical position can be moved forward or
backward.
Adjust the handles in such a way that the locking
bolt is inserted in one of the three drilled holes in the
clamp.
After adjusting the handles retighten the
locking screws
c141_gb_12/02
+
19
Manual Handling Solutions 58, Paige Close, Watlington, Kings Lynn, Norfolk PE33 0TQ UK
Tel 0044 1553 811977 Fax 0044 1553 811004 [email protected] www.manualhandlingsolutions.com
CargoMaster
6
6.1
Accessories
Portable Stairs
Fig. 24
The portable stairs are especially developed for the CargoMaster to overcome
obstacles higher than 50 cm (~20”)
such as e.g. ramps, platforms or loading areas of trucks (see Fig. 24)
A
D
B
C
Technical Data
Portable stairs O 42
number of steps 3
4
height of loading area (C) 30 cm to max. 52 cm
maximum dynamic load (D) 350 kg (771 lbs)
protrusion (A) 80 cm
+
350 kg (771 lbs)
15 cm
~12,5 kg ( 27,5 lbs)
~16,5 kg ( 36,3 lbs)
The portable stairs must be put up securely, i.e. you need to make sure they cannot
tilt or slide. If necessary, you need to secure the stairs on the loading area by
screws.
Make sure that the minimum support (see Fig. 28, B) of the portable stairs is at
least 15 cm (~6”) on the loading area and rests there securely.
c141_gb_12/02
+
52 cm to max. 66 cm
100 cm
minimum support (B) 15 cm
weight
Portable stairs O 43
20
Manual Handling Solutions 58, Paige Close, Watlington, Kings Lynn, Norfolk PE33 0TQ UK
Tel 0044 1553 811977 Fax 0044 1553 811004 [email protected] www.manualhandlingsolutions.com
CargoMaster
6.2
Spare Batteries
If you need your CargoMaster continuously, i.e. if there are
not enough breaks to recharge the batteries, we recommend you get a spare set of batteries. While one set is in
use, the second set can be recharged.
The standard CargoMaster C 141 is conceptualized to be
used with spare batteries. It is delivered with one set of
batteries. A second set is available as an accessory.
To change the batteries, park the CargoMaster C 141. Pull
the battery pack upward and lift it from its fixture. Simply
put the new, fully charged battery pack into its fixture.
+
+
To charge the batteries, please use the AAT Alber battery charger exclusively.
Note that the CargoMaster is equipped with an automatic turn off function. Once the
device has turned itself off (e.g. during a break) you need to turn the CargoMaster
first off and then on again with the ON/OFF switch.
c141_gb_12/02
+
In order to prolong its lifetime, the spare set of batteries should always be
connected to the battery charger (see chapter 7 “Care and Maintenance”)
21
Manual Handling Solutions 58, Paige Close, Watlington, Kings Lynn, Norfolk PE33 0TQ UK
Tel 0044 1553 811977 Fax 0044 1553 811004 [email protected] www.manualhandlingsolutions.com
CargoMaster
7
7.1
Care and Maintenance
General Information
Your CargoMaster is not a maintenance-intense device. On
the contrary, it is easy to take care of. Clean it now and
then with a moist (not wet) cloth. The sealed lead acid batteries are maintenance-free. There are no oiling points; however, you should tighten the driving chain once in a while
as described in 7.2 “Tightening Chain”.
+
7.2
Repairs and any other work done on the CargoMaster are to be performed by
authorized personnel only.
Changing the Electrical Fuses
Two electrical fuses are located on the left side of the batteries’ housing. One fine wire fuse you find at the right of
the climbing mechanism.
+
7.3
Do not fix or bypass defective fuses but substitute them exclusively with fuses of
the same amperage.
Changing the Batteries
Remove the battery pack from the device and open it (unscrew). Unplug the contact plugs and take out the batteries.
When you put in new batteries, make sure you connect the
polarities properly.
Please pay attention to the polarities (black = minus, red = plus) when plugging in
the contact plugs of the new batteries.
c141_gb_12/02
+
22
Manual Handling Solutions 58, Paige Close, Watlington, Kings Lynn, Norfolk PE33 0TQ UK
Tel 0044 1553 811977 Fax 0044 1553 811004 [email protected] www.manualhandlingsolutions.com
CargoMaster
7.4
Tightening the Chain
c141_gb_12/02
Occasionally the climbing system’s chains need tightening.
Before you do that loosen the six hexagon socket screws
on both climbers. Tighten them again after tightening the
chain. A system to tighten the chains is located under the
covering plates of each climber (also chain housing). The
gearwheel is accessible through an aperture in the covering plate. Tighten the chain by inserting a solid screw driver
into the aperture using it as a lever to turn the gearwheel
all the way to the right.
23
Manual Handling Solutions 58, Paige Close, Watlington, Kings Lynn, Norfolk PE33 0TQ UK
Tel 0044 1553 811977 Fax 0044 1553 811004 [email protected] www.manualhandlingsolutions.com
CargoMaster
8
8.1
Sealed lead acid batteries
General Information
The two sealed lead acid batteries of your CargoMaster are
maintenance-free, rechargeable and of top quality.
The lifetime of sealed lead acid batteries is largely dependent on the charging and discharging cycles, i.e. if total
discharges can be avoided, one is able to get far more than
1000 partial discharges and over 200 times the full capacity out of lead batteries.
Total discharges of sealed lead acid batteries do not only
lead to a loss of capacity but also to a lower lifetime of the
batteries.
Avoid total discharges - never leave the CargoMaster switched on.
The CargoMaster’s batteries are supposed to be recharged
after each partial discharge, i.e. after each use.
Sealed lead acid batteries are subject to the so-called
self-discharge. Therefore, whenever possible, the batteries should always be connected to the AAT Alber Automatic Charger. As soon as the batteries are fully charged, the
charger automatically switches to the retaining of the
charge, which keeps the batteries from becoming overcharged.
If sealed lead acid batteries are stored for a longer period
of time without being charged, they suffer a partial loss of
capacity. However, after a few cycles of charging and
discharging, they regain their full capacity.
Your CargoMaster’s batteries can be charged or discharged
in any position. They are considered as safe as dry elements and admitted for air travel by DOT and IATA.
Charging your sealed lead acid batteries is a vital part of taking care of them.
c141_gb_12/02
+
24
Manual Handling Solutions 58, Paige Close, Watlington, Kings Lynn, Norfolk PE33 0TQ UK
Tel 0044 1553 811977 Fax 0044 1553 811004 [email protected] www.manualhandlingsolutions.com
CargoMaster
8.2
Charging the Lead Batteries
Remove the batteries from the climbing mechanism and
connect it to the AAT Alber charger by the special AAT Alber charging cable.
+
After each time you use the CargoMaster please always charge or recharge the
maintenance-free lead batteries.
You may charge the lead batteries either in your vehicle by
plugging the charging cable (available as an accessory) into
the socket of your cigarette lighter or into a wall outlet by
using a charger. If you charge the batteries in your vehicle
you reach a charging capacity of 80 % (charger, 100 %).
+
Please use exclusively the special AAT Alber Automatic Charger and the AAT Alber
charging cable for the car.
As soon as the batteries are fully charged, the AAT Alber
Automatic Charger switches to retaining the charge,
which means that overcharging is impossible.
Never let the CargoMaster sit with empty lead batteries, but charge them
immediately after each use. Frequent charging prolongs lifetime.
+
In order to retain the charge, always keep your CargoMaster connected to the Alber
Automatic Charger, particularly during weekends, holidays or vacations. This does
not damage the batteries; on the contrary, it prolongs their lifetime.
c141_gb_12/02
+
25
Manual Handling Solutions 58, Paige Close, Watlington, Kings Lynn, Norfolk PE33 0TQ UK
Tel 0044 1553 811977 Fax 0044 1553 811004 [email protected] www.manualhandlingsolutions.com
CargoMaster
9
9.1
Warranty and Liability
Warranty
AAT Alber Antriebstechnik GmbH assumes the warranty of
their products type CargoMaster and all accessory parts,
with the exception of the batteries, for the time period of
one year, starting with the date of purchase. During that
time Alber Antriebstechnik GmbH guarantees that the
above listed products (with the exception of the batteries)
are free of material damages or processing defects.
For batteries, provided that they receive the appropriate
care, AAT Alber Antriebstechnik GmbH assumes the warranty for the time period of six months from the time of
purchase.
The warranty of the CargoMaster does not include faults or
defects caused by:
• Insufficient or inappropriate maintenance on
the part of the customer.
• Unapproved changes or inappropriate use of
the CargoMaster.
• Using the CargoMaster while exceeding the
maximum load it is approved to transport.
• Charging of the lead batteries other than
described in chapter 8.2.
9.2
Liability
AAT Alber Antriebstechnik GmbH as the manufacturer of
the CargoMaster is not liable for potential damages if:
• the CargoMaster is handled carelessly and
unskillfully;
• repairs or assembly were not performed by
authorized persons only;
• the CargoMaster was not handled and used
according to this user’s manual;
• third party parts were attached to or
c141_gb_12/02
connected with the CargoMaster;
• any parts of the CargoMaster were removed.
26
Manual Handling Solutions 58, Paige Close, Watlington, Kings Lynn, Norfolk PE33 0TQ UK
Tel 0044 1553 811977 Fax 0044 1553 811004 [email protected] www.manualhandlingsolutions.com
CargoMaster
10
Appendix
Noise / Vibration Data
The A-weighted sound level of this device is typically less
than 70 dB (A). Upper parts of the human body are subjected to a weighted RMS value of acceleration typically below
2
2,5 m/s .
CE Declaration of Conformity
The company AAT Alber Antriebstechnik GmbH herewith
declares that the products, type CargoMaster, coincide with
the relevant rules of the European Community, EEC guidelines 89/392/EWG, appendix 1.
CE 95
CE
Markus Alber, Manager
Note
Due to the continuous work on development and construction, AAT Alber Antriebstechnik GmbH reserves the right
to make changes concering the technical data made in this
user’s manual.
c141_gb_12/02
AAT Alber Antriebstechnik GmbH
Postfach 10 05 60 · D - 72426 Albstadt
Tel.: +49 - 74 31 - 12 95 - 0 · Fax: 49 - 74 31 - 12 95 - 35
[email protected]
http://www.aat-gmbh.com
27
Manual Handling Solutions 58, Paige Close, Watlington, Kings Lynn, Norfolk PE33 0TQ UK
Tel 0044 1553 811977 Fax 0044 1553 811004 [email protected] www.manualhandlingsolutions.com