1
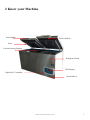
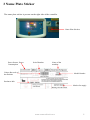
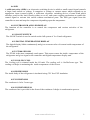
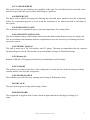
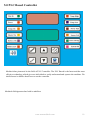
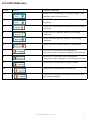
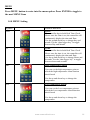
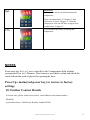
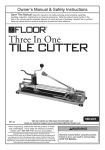
Ice Lined Refrigerator
User Operation & Maintenance
manual
www.newmeditech.com
1
Contents
Topics
Page No.
1.1 About this manual
3
1.2 Warnings
3
1.3 Working Safely
4
1.4 General Safety
4
1.5 Electrical safety
4
2.0 Know Your machine
5
3.0 Name Plate Sticker
6
4.0 Features
7
5.0 PLC Based Controller
10
6.0 LED Indicators
11
7.0 Keypad Function
12
8.0 Scrolling Live Data Logger
13
9.0 Menu Settings
14
10.0 Further Contact Details
15
www.newmeditech.com
2
1.1 About this manual
Welcome to the Ice Lined Refrigerator user Manual. This section explains the symbols and
conventions used in this manual, copyright information about this document, and trademark
information for products supplied by Meditech.
Intended audience
This manual is intended for use by qualified service technicians. This manual is to be used in
conjunction with Ice Lined Refrigerator user manual
Symbols and conventions
Several symbols and conventions are used in this manual.
1.2 Warnings
A Warning is used to call attention to a condition or possible situation that could cause injury to
the operator.
Warnings are identified as follows:
WARNING:
This is a sample of a caution: Be sure that the storage frame is free of
obstructions before starting the process
Cautions
A Caution is used to call attention to a condition or possible situation that could damage or destroy
the equipment or the operator’s work.
Cautions are identified as follows:
CAUTION:
This is a sample of a caution: Be sure that the storage frame is free
of obstructions before starting Ice Lined Refrigerator
Notes
Notes contain additional information about a topic. Notes are used to provide information about how
a topic relates to another topic, or background information about a design characteristic.
Notes are identified as follows:
NOTE
This is a sample of a note: In case of emergency please contact
Meditech Technical Team
Copyright and trademark information
Copyright © 2011 Meditech, Inc.
All other trademarks and registered trademarks are the property of their respective owners.
www.newmeditech.com
3
1.3 Working safely
This section describes general safety information for using the Ice Lined Refrigerator
The Operation Manual includes additional safety information for operating and cleaning the Ice
Lined Refrigerator . Your organization may provide additional safety information.
1.4 General safety
To avoid injury to yourself and the agitator, follow these safety instructions:
► Never attempt to physically restrict any of the moving components.
► Before performing the procedures in this manual, review the specific safety instructions for
them.
► Before using tools, materials, and equipment to perform procedures in this manual, review
the manufacturer’s safety instructions for them.
► Perform only the maintenance described in this manual. Maintenance other than that
specified in this manual should only be performed by technical service representatives
authorized by Meditech.
1.5 Electrical safety
WARNING:
The Ice Lined Refrigerator has the potential of being a shock hazard.
Review all safety instructions.
Review the following safety instructions before troubleshooting, repairing, or replacing parts in the
agitator:
► Use appropriate grounding precautions when replacing circuit boards and other electrical
parts.
► Use power cords and other electrical parts that are designed for use with the Machine .
1.6 Chemical and biological safety
Review the safety instructions in the Operation Manual before using, cleaning, or servicing the Ice
Lined Refrigerator .
WARNING:
In addition to the instructions included in this manual and the
Operation Manual, follow all chemical handling and disposal
requirements and procedures specified by your organization. Before
sending parts to Meditech or your distributor for service or repair,
decontaminate them as appropriate. Any items that have not been
decontaminated appropriately will not be accepted. Documentation
stating that the contents are not contaminated and are safe to handle
must accompany all returns. Contact Meditech for decontamination
instructions and a return authorization number.
www.newmeditech.com
4
2 Know your Machine
Door Handle
Lock with Keys
Door
Vaccines Storage Baskets
Refrigerator Body
LED Display
Digital PLC Controller
Castor Wheels
www.newmeditech.com
5
3 Name Plate Sticker
The name plate sticker is present on the right side of the controller
Name Plate Stickers
Power Source, Power
Consumption
Serial Number
Name of the
machine
Unique Bar code of
the machine
Model Number
Purchaser Info
Market for supply
www.newmeditech.com
6
4.0 Features
4.1 OUTER BODY
The Outer body of Ice Lined refrigerator is made up of Stainless Steel Sheet of thickness
1.2 mm. The outer body is powder coated.
4.2 DOOR HINGES
The door hinges used here are made up of stainless steel. The door hinges are provided to attach
door with the refrigerator body. It provides noiseless operation when the door is opened and
closed.
4.4 PUF INSULATION
The advantages of using polyurethane foam (PUF) are significant because of the material’s
physical properties and application flexibility. The American Medical Association has
performed studies proving polyurethane does not pose health problems for building occupants.
Polyurethane foams are actually used in buildings for the environmentally hypersensitive. This
material is environmentally friendly. Water blown and low ozone depletion potential products
are friendly to the earth’s atmosphere, reduce fuel consumption, and reduce the materials needed
for the construction of energy-efficient buildings even under the most difficult environmental
conditions. The Puf insulation used here has a density of 80 kg/cm². The thickness of puff
insulation is 80mm all around the body outside the SS tank. CFC free Puf Insulation.
www.newmeditech.com
7
4.6 SSR
A solid state relay (SSR) is an electronic switching device in which a small control signal controls
a larger load current or voltage. It comprises a voltage or current sensor which responds to an
appropriate input (control signal), a solid-state electronic switching device of some kind which
switches power to the load circuitry either on or off, and some coupling mechanism to enable the
control signal to activate this switch without mechanical parts. The SSR gets signal from the
controller to start and stop the compressor depending upon the temperature.
4.8 CONTROLLER AND LED DISPLAY
The function of the controller is to control the compressor and various activities of the
refrigerator
4.9 ON/OFF SWITCH
The ON/OFF switch is used to switch on the full system of Ice Lined refrigerator.
4.91 DIGITAL TEMPERATURE DISPLAY
The digital display blinks continuously and gives accurate value of current inside temperature of
the refrigerator.
4.92 PT100 SENSOR
The PT100 is the most commonly used sensor. This sensor senses the inside temperature of the
refrigerator and gives signal to the controller and digital temperature display unit.
4.93 COOLING COIL
The Cooling coil is situated inside the SS tank. The cooling coil is 16x20x2rows type. The
cooling coil helps in maintaing the inside temperature of the freezer.
4.94 INSIDE BODY
The inside body of the refrigerator is insulated using CFC free PUF insulation.
4.95 CONDENSOR
The condenser is 9x9x 2 rows type.
4.96 CONDENSER FAN
The condenser fan is provided in the front of the condenser. It helps in condensation process.
www.newmeditech.com
8
4.97 CASTOR WHEEL
The castor wheels are provided for easy mobility of the unit. Two lockable and two movable castor
wheels are provided for easy mobility and fixing at a position.
4.98 DRYER UNIT
The dryer unit is helpful in drying and filtering the dust and water particles from the refrigerant
before the evaporation process so as to avoid the formation of ice which can lead to chocking of
the system.
4.99 EXPANSION VALVE
The expansion valve expands the gas to sub zero temperature for cooling effect.
4.991 AIR CIRCULATION FAN
The air circulation fan provided inside and between the duck which forms the part of cooling coil.
The air circulation fan maintains uniform temperature across the freezer by circulating forced air
across the system.
4.992 INSIDE TANK SS
The tank is made up of SS 304 stainless steel 22 gauge. The tank accommodates the tray wherein
the blood bags are stored. This model can accommodate 60 bags of 450ml blood bags.
4.993 Baskets SS
Baskets of SS304 of 22 gauge provided for accommodation of blood bags.
4.995 GASKET
The gasket is provided in the door of the refrigerator. It seals the door with the body providing
vacuum and air loss from the refrigerator.
4.996 DOOR HANDLE
Door handle is provided for easy opening and closing of Refrigerator door.
DOOR LOCK
The door lock helps in closing and locking of door.
POWER CHORD
The equipment is supplied with 2 meter chord at input and fitted with plugs of rating of 15
Amp.
www.newmeditech.com
9
5.0 PLC Based Controller
Meditech has pioneered in the field of PLC Controller. The PLC Based is the latest and the most
effective technology which gives an individual to easily understand and operate the machine. We
shall discuss in details about how to use the controller
Meditech Refrigerators has built in stabilizer
www.newmeditech.com
10
6.0 LED Indicators
Sl.No
Photos
Function Indication
1.
This LED is on when there is a power supply to the
machine from the main source
2
This LED is on when the Controller is in working
condition.
3
This LED is on when the compressor is in working
condition
4
This LED is on when the heater is in working
condition
5
This LED is on when the battery is in working
condition
6
This LED is on when the battery is discharged
7
This LED is on when the inside compartment
temperature of the refrigerator is high above the set temp
8
This LED is on when the inside compartment
temperature of the refrigerator is Low below the set temp
9
This LED is on when there is power failure.
10
This LED is on when there is sensor fail
12
This LED is on when all functions of the System is
in working condition
www.newmeditech.com
11
7.0 Keypad Functions
Sl.No
Photos
Function Indication
1
The Menu button is pressed to enter into MENU
option.
2
The Enter button is pressed to enter into “ENTER”
option.
3
The Up Arrow button is pressed to go Upwards in
the menu option.
4
The Down Arrow button is pressed to go
Downwards in the menu option.
5
The data logger is pressed to get the data from the
PLC to the computer
6
The MUTE button is pressed to MUTE any Alarms
and sounds
8
The ON button is pressed to switch on the
refrigerator
9
The USB is provided to connect the Refrigerator to
the computer system.
www.newmeditech.com
12
8.0 Scrolling LIVE Data logger on LED screen
Scrolling Data are provided for the current parameters which are
as follows.
Sl.No
Symbol on the LED display
Function Indication
1
SU
Set Temperature of the machine will be displayed
2
U
Current Incoming voltage of the mains will be
displayed
3
R
Ambient Temperature
4
C
Time in hours of revolution of chart.
5
date
Current date will be displayed
6
Time
Current time will be displayed
7
Battery Voltage
Voltage of the battery will be displayed
www.newmeditech.com
13
MENU
Press MENU button to enter into the menu option. Press ENTER to toggle to
the next MENU Item
14.0 MENU Setting
Symbol
Function Indication
DAT
DATE
The controller has in built Real Time Clock.
Hence once the Date is set, the controller will
continuously display the time and Date.
Use the up and down key to change day and
month. Use the “data logger key” to toggle
between Day and Month
TI
TIME
The controller has in built Real Time Clock.
Hence once the time is set, the controller will
continuously display the time and Date.
Use the up and down key to change Hours and
Seconds. Use the “data logger key” to toggle
between hours and seconds
HI5
High Temperature Alarm
User can set the high temperature point at
which the high temperature Alarm funtion
should work
Use the up and down key to change the
temperature.
Lo5
Low Temperature Alarm
User can set the Low temperature point at
which the Low temperature Alarm function
should work
Use the up and down key to change the
temperature.
www.newmeditech.com
14
Hys
Hysteresis
Hysteresis is set to cut off and restart the
compressor.
If the set temperature is 2 degree C and
Hysteresis is set to 4 degree C. Then the
compressor will cutt off after 6 degree and
restart below 2 degree C
CT5
Ct5 is used to the delay in starting the
compressor.
NOTES
Press enter key for 1 to 3 sec to switch On the Compartment light without
opening the Door for 3 Minutes. This feature is provided to count and check the
stock without the need of physically opening the door.
Press Up+ mains(red power key) to restore to factory
settings
10. Further Contact Details
For more info, please contact us at below email address and contact number
Meditech
6 president terrace. Takli Road. Dwarka. Nashik 422011.
www.newmeditech.com
15