1
NN10027-113
Centrex IP Client Manager
Series 2.4
Etherset Installation Guide and User Manual
Centrex IP Client Manager Version 1.8 August 2002
ii
Version 1.8
August 2002
iii
Centrex IP Client Manager
Series 2.4
Etherset Installation Guide and User
Manual
Version: 1.8
Document Status: Standard
Security Status: Unclassified
© 2002 Nortel Networks
All rights reserved
NORTEL NETWORKS CONFIDENTIAL: The information contained in this document is the property of
Nortel Networks. Except as specifically authorized in writing by Nortel Networks, the holder of this document
shall keep the information contained herein confidential and shall protect same in whole or in part from disclosure
and dissemination to third parties and use same for evaluation, operation, and maintenance purposes only.
NN10027-113
Etherset Installation Guide and User Manual
iv
Comments on this document
The Centrex IP Client Manager Etherset Installation Guide and User Manual
is under continuous revision. Comments which will keep it accurate and
informative are welcome.
Please send comments to your Nortel Networks account prime or visit our
website at www.nortelnetworks.com.
NN10027-113
Etherset Installation Guide and User Manual
v
About this document
Purpose
The Series 2.4 Centrex IP Client Manager Etherset Installation Guide and
User Manual describes the installation process for the i2004 Etherset to be
used with the CentrexIP International Gateway.
Audience
This document is intended for Etherset customers. It describes the installation
and initialization procedure. In addition, it provides users with step-by-step
instructions in making basic calls and navigating the Etherset menu system.
Structure
This book is divided into the following sections:
•
Chapter 1 Overview
•
Chapter 2 Installing and initializing the i2004 Etherset
•
Chapter 3 Using the i2004 Etherset
•
Chapter 4 Adjusting Etherset settings
References
Series 2.4 Centrex IP Client Manager Product Specification
NN10027-113
Etherset Installation Guide and User Manual
vi
Publication history
DOCUMENT HISTORY
Issue
Date
Reason for Update
Version 0.1
June 22, 2000
Document creation
Version 1.0
June 27, 2000
Series 2, final draft.
Follows formal document review, held
June 26, 2000.
Version 1.1
July 4, 2000
Corrections to screenshots:
- Figure 3, (Etherset Display)
- Figures 7,8,9 (Password)
Approved: I.Donaldson, P.Jarvis
Draft 1.2
December 5, 2000
Draft of update for Series 2.1
Draft 1.3
December 15, 2000
Beta draft for Series 2.1
Draft 1.4
January 16, 2001
Updated firmware upgrade process in
Section 2.2.
Version 1.5
February 5, 2001
Updates from Formal Review.
Approved.
Version 1.6
May 15, 2001
Update for the Series 2.1 maintenance
release 2.1.246.
Version 1.7
August 15, 2001
Update for the Series 2.2 Release.
Version 1.8
August 2002
Update for the Series 2.4 Release.
NN10027-113
Etherset Installation Guide and User Manual
vii
Contents
Comments on this document . . . . . . . . . . . . . . . . . . . . . . . . . . . . .iv
About this document . . . . . . . . . . . . . . . . . . . . . . . . . . . . . . . . . . . . v
Purpose. . . . . . . . . . . . . . . . . . . . . . . . . . . . . . . . . . . . . . . . . . . . . . . . . . . . . . . . . . .
Audience . . . . . . . . . . . . . . . . . . . . . . . . . . . . . . . . . . . . . . . . . . . . . . . . . . . . . . . . . .
Structure . . . . . . . . . . . . . . . . . . . . . . . . . . . . . . . . . . . . . . . . . . . . . . . . . . . . . . . . . .
References . . . . . . . . . . . . . . . . . . . . . . . . . . . . . . . . . . . . . . . . . . . . . . . . . . . . . . . .
v
v
v
v
Publication history . . . . . . . . . . . . . . . . . . . . . . . . . . . . . . . . . . . . . .vi
Contents . . . . . . . . . . . . . . . . . . . . . . . . . . . . . . . . . . . . . . . . . . . . . vii
Chapter 1 Overview . . . . . . . . . . . . . . . . . . . . . . . . . . . . . . . . . . . . . 9
Centrex IP Client Manager . . . . . . . . . . . . . . . . . . . . . . . . . . . . . . . . . . . . . . . . . . . . 9
The i2004 Etherset . . . . . . . . . . . . . . . . . . . . . . . . . . . . . . . . . . . . . . . . . . . . . . . . . 10
The Etherset display screen . . . . . . . . . . . . . . . . . . . . . . . . . . . . . . . . . . . . . . . . . . 11
Main display area . . . . . . . . . . . . . . . . . . . . . . . . . . . . . . . . . . . . . . . . . . . . . . . . 11
Feature key labels and indicators . . . . . . . . . . . . . . . . . . . . . . . . . . . . . . . . . . . . 11
Autoscroll . . . . . . . . . . . . . . . . . . . . . . . . . . . . . . . . . . . . . . . . . . . . . . . . . . . . 12
Softkeys . . . . . . . . . . . . . . . . . . . . . . . . . . . . . . . . . . . . . . . . . . . . . . . . . . . . . . . 12
Navigation keys . . . . . . . . . . . . . . . . . . . . . . . . . . . . . . . . . . . . . . . . . . . . . . . . . 13
Quit key. . . . . . . . . . . . . . . . . . . . . . . . . . . . . . . . . . . . . . . . . . . . . . . . . . . . . . . . 13
Conspicuous keys. . . . . . . . . . . . . . . . . . . . . . . . . . . . . . . . . . . . . . . . . . . . . . . . 13
Chapter 2 Installing and initializing the i2004 Etherset . . . . . . . 15
Installing the i2004 Etherset . . . . . . . . . . . . . . . . . . . . . . . . . . . . . . . . . . . . . . . . . . 15
Initializing the i2004 Etherset . . . . . . . . . . . . . . . . . . . . . . . . . . . . . . . . . . . . . . . . . 16
Chapter 3 Using the i2004 Etherset . . . . . . . . . . . . . . . . . . . . . . . 21
Upgrading the Firmware on the i2004 Etherset . . . . . . . . . . . . . . . . . . . . . . . . . . .
Logging into the i2004 Etherset . . . . . . . . . . . . . . . . . . . . . . . . . . . . . . . . . . . . . . .
Predial . . . . . . . . . . . . . . . . . . . . . . . . . . . . . . . . . . . . . . . . . . . . . . . . . . . . . . . . . .
Making a call . . . . . . . . . . . . . . . . . . . . . . . . . . . . . . . . . . . . . . . . . . . . . . . . . . . . . .
Audio Handling . . . . . . . . . . . . . . . . . . . . . . . . . . . . . . . . . . . . . . . . . . . . . . . . . . . .
Predial . . . . . . . . . . . . . . . . . . . . . . . . . . . . . . . . . . . . . . . . . . . . . . . . . . . . . . . . . . .
Making a call with predial . . . . . . . . . . . . . . . . . . . . . . . . . . . . . . . . . . . . . . . . . .
Answering a call . . . . . . . . . . . . . . . . . . . . . . . . . . . . . . . . . . . . . . . . . . . . . . . . . . .
Placing and retrieving a call on hold . . . . . . . . . . . . . . . . . . . . . . . . . . . . . . . . . . . .
Forwarding calls . . . . . . . . . . . . . . . . . . . . . . . . . . . . . . . . . . . . . . . . . . . . . . . . . . .
Enabling call forward . . . . . . . . . . . . . . . . . . . . . . . . . . . . . . . . . . . . . . . . . . . . .
Disabling call forward . . . . . . . . . . . . . . . . . . . . . . . . . . . . . . . . . . . . . . . . . . . . .
Message waiting and message retrieval . . . . . . . . . . . . . . . . . . . . . . . . . . . . . . . . .
21
21
22
22
23
23
24
24
25
25
25
26
26
Chapter 4 Adjusting Etherset settings . . . . . . . . . . . . . . . . . . . . 27
Selecting the network connection . . . . . . . . . . . . . . . . . . . . . . . . . . . . . . . . . . . . . . 28
NN10027-113
Etherset Installation Guide and User Manual
viii
Contents
Adjusting the contrast on the Etherset . . . . . . . . . . . . . . . . . . . . . . . . . . . . . . . . . .
Labelling feature keys . . . . . . . . . . . . . . . . . . . . . . . . . . . . . . . . . . . . . . . . . . . . . . .
Language Selection . . . . . . . . . . . . . . . . . . . . . . . . . . . . . . . . . . . . . . . . . . . . . . . .
Changing your password . . . . . . . . . . . . . . . . . . . . . . . . . . . . . . . . . . . . . . . . . . . .
Changing date and time displays . . . . . . . . . . . . . . . . . . . . . . . . . . . . . . . . . . . . . .
Assigning auto login . . . . . . . . . . . . . . . . . . . . . . . . . . . . . . . . . . . . . . . . . . . . . . . .
Assigning an Inbox/Outbox to a DN feature key from the Etherset. . . . . . . . . . . . .
Using the Directory . . . . . . . . . . . . . . . . . . . . . . . . . . . . . . . . . . . . . . . . . . . . . . . . .
Using the Inbox . . . . . . . . . . . . . . . . . . . . . . . . . . . . . . . . . . . . . . . . . . . . . . . . . . . .
Using the Outbox . . . . . . . . . . . . . . . . . . . . . . . . . . . . . . . . . . . . . . . . . . . . . . . . . .
Version 1.8
29
29
31
31
32
33
33
34
35
38
August 2002
9
Chapter 1 Overview
1.1
Centrex IP Client Manager
Centrex IP Client Manager uses Internet Protocol (IP) telephony, the next
generation of telecommunication services that integrates voice and data
capabilities. Combining IP telephony with traditional Digital Multiplex
System (DMS) services, Centrex IP Client Manager delivers Centrex
capabilities to an IP network.
Some benefits of Centrex IP Client Manager technology are:
NN10027-113
•
Rich feature set
Centrex IP Client Manager offers the full range of Centrex features.
•
Cost Reduction
Corporate customers can move voice traffic onto their existing data
network.
•
Universal access
The access mechanism may be any method that supports an IP connection.
Etherset Installation Guide and User Manual
10
1.2
Overview
The i2004 Etherset
The Nortel Networks i2004 Etherset telephone is a member of the Centrex IP
Client Manager range of products. The Etherset connects directly to the Local
Area Network (LAN) and therefore allows customers to capitalize on the
economies of simplified wiring systems in the office.
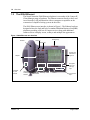
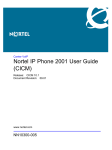
The i2004 Etherset user interface is shown in Figure 1. The Etherset has been
designed to have the look and feel of a standard Meridian Business Set (MBS)
telephone providing a full set of Centrex services along with additional
features such as a display screen, softkeys and multiple line appearances.
Figure 1 i2004 Etherset user interface
Handset
Alerting lamp
Hold key
Release key
Display area,
described in
Figure 2.
Dialpad
Navigation
keys, quit
and copy
keys
Handsfree
key and
indicator
Version 1.8
Volume keys,
mute key and
indicator
Headset key
and indicator
Directory
Inbox
Outbox
Conspicuous
keys
August 2002
Overview
1.3
11
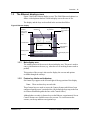
The Etherset display screen
Figure 2 shows the Etherset display screen. The i2004 Etherset telephone is a
feature rich telephone that has a built-in display screen for ease of use.
The display and the keys are described in the sections that follow.
Figure 2 Etherset display
Feature
keys 4 to 6
(bottom to
top).
Feature key labels and
indicators.
A highlighted
key indicator.
Context label.
Feature keys 1
to 3 (bottom to
top).
Feature Key 1.
Date and time
indicators.
Softkey labels.
Main display area.
Softkeys.
1.3.1
Main display area
The middle portion of the screen is the main display area. This area is used to
convey information to the user (e.g. when the user is invoking features such as
predial).
This portion of the screen is also used to display the screens and options
available through the softkeys.
1.3.2
Feature key labels and indicators
Six feature keys appear to the left and right of the top portion of the display.
Note: There are three keys on each side.
These feature keys are used to access the Centrex features which have been
configured against a user’s particular line. (By default the keys map to the first
six features datafilled against the line at the Central Office.)
Although there are only six feature keys on the Etherset, a maximum of eleven
Centrex features are available across two screens. To scroll between the
screens, use the up and down navigation keys.
NN10027-113
Etherset Installation Guide and User Manual
12
Overview
Note: Feature key 1 is never scrolled and is always associated with the
lower right-hand green key.
Note: The feature keys will be configured with a specific feature
template by your service provider as part of the installation procedure. For
the purposes of this document, the feature key assignment shown in
Table 1 will be assumed. However, this interface will vary depending on
the feature template configured by your service provider.
Table 1
Feature Key assignment
Feature key
Feature key assignment
Key 1
Primary Dialled Number
Key 2
Unassigned
Key 3
Forward
Key 4
Transfer
Key 5
Speed Call
Key 6
Message Waiting
Key 7
Ring Again
Key 8
Call Park
Key 9
Time and Date
Key 10
Auto Dial
Key 11
Inspect
1.3.2.1 Autoscroll
It is possible to invoke an option known as Autoscroll. Enabling autoscroll
allows the Etherset to display an active feature even if it was on a different
page when activated.
To enable autoscroll, see Section 4.3, “Labelling feature keys”.
1.3.3
Softkeys
The softkeys provide a simple way for users to navigate through the Etherset’s
extensive menu system. The softkeys are labelled in the Etherset display
screen directly above each of the softkeys.
In some cases, there may be more than four options for a particular menu. In
this case, menu options can be scrolled one at a time using the left and right
navigation keys. (See Figure 1.)
Version 1.8
August 2002
Overview
13
Note: The softkey labels will not wrap when scrolled in either direction.
Menu scrolling examples are shown below:
Figure 3 Menu scrolling examples
Menu context with three options:
Optn1 Optn2 Optn3
Menu context with seven options, scrolled fully to the right:
<Optn4 Optn5
Optn6 Optn7
Menu context with six options, scrolled one to the right:
<Optn2 Optn3
Optn4 Optn5>
Each time a new menu option is selected, the context label will be updated to
indicate the current context and the main display area will provide information
to the user.
1.3.4
Navigation keys
The navigation keys can be used to scroll between the softkey items if there
are more than four options. Use the left and right keys to scroll between the
items one at a time, or the up key to return to the first option and the down key
to go to the last soft key menu option.
The up and down navigation keys can also be used to scroll between the feature
key menus.
1.3.5
Quit key
The quit key is used to return to the top level menu.
1.3.6
Conspicuous keys
The conspicuous keys will be used in future Centrex IP Client Manager
releases to provide messaging and internet services. No functionality is
currently offered.
NN10027-113
Etherset Installation Guide and User Manual
14
Overview
Version 1.8
August 2002
15
Chapter 2 Installing and initializing the
i2004 Etherset
2.1
Installing the i2004 Etherset
The Etherset may be configured in different ways depending on whether a
DHCP (Dynamic Host Configuration Protocol) server is available on your
network. Full or partial DHCP may be used to provide the Etherset with an IP
address and other information required to initialize the set. Your network
administrator should inform you as to whether DHCP is being used and
whether it is partial or full DHCP. If you are not using DHCP, ensure that you
have the information required, as listed in Table 2, prior to beginning the
installation procedure.
The procedure for connecting the i2004 Etherset is as follows:
1 Connect one end of the handset cord to the handset jack on the telephone
base. Connect the other end of the handset cord to the handset.
Caution: Severe damage to your i2004 Etherset will occur if this set is
plugged into an ISDN connection. Consult your system administrator to ensure
that you are plugging your set into a 10/100 Base T Ethernet jack.
NN10027-113
2
Connect one end of the line cord to the line cord jack on the telephone base
and the other end of the line cord to an IP voice network, using a CAT-5
cable with an RJ45 connector.
3
Plug the AC Power adaptor into the base of the telephone and plug the
adaptor into the nearest 240V outlet.
Etherset Installation Guide and User Manual
16
2.2
Installing and initializing the i2004 Etherset
Initializing the i2004 Etherset
When you first connect your Etherset to a power source, all hardkey indicator
lights and softkey icons may flash. This indicates that the phone has not yet
been initalized.
The following steps describe the initialization procedure for the i2004
Etherset.
1 Power the Etherset on by connecting it to the power source, or by
disconnecting and reconnecting the AC power adaptor plug.
2
The Etherset will begin initializing. When the screen in Figure 4 is shown,
press each of the Softkeys once from left to right. This will allow you to
configure the Etherset.
Note: This must be done as soon as the screen appears. If you do not
press the buttons quickly, the screen in Figure 5 will appear. If this occurs,
disconnect the Etherset from the power source and reattempt the
initialization procedure.
If the screen in Figure 4 does not appear, contact your system
administrator, as your Etherset will need to be upgraded.
Figure 4 Initializing screen
Press these buttons
once from left to right
upon seeing this
screen.
Version 1.8
August 2002
Installing and initializing the i2004 Etherset 17
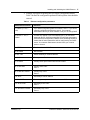
3
Prompts will appear requesting that you supply configuration details.
Table 2 defines the configuration parameters and explains what should be
entered.
Table 2
Etherset configuration parameters
Parameter/Text shown
Definition
1. DHCP? (0 - No, 1 Yes)
If you will be using either partial or full DHCP, enter 1. If you will be
manually configuring the Etherset, enter 0. Your network
administrator will let you know whether or not you are using DHCP.
2. DHCP: 0 - Full, 1 Partial
This will only appear if you have selected yes (1) for the DHCP
parameter above. Selecting partial DHCP means that parameters
3,4 and 5 will be configured by a DHCP server. Selecting full DHCP
means that all further parameters will be configured by the DHCP
server. Your network administrator should inform you of which
option to choose.
3. SET IP
IP address for the i2004 Etherset.
4. NETMSK
Net submask.
5. DEF GW
Default Gateway IP network address.
6. S1 IP
Primary server IP address.
7. S1 PORT
Primary server port number. Must be set to 5000.
8. S1 ACTION
Primary action code:
Enter 1
9. S1 RETRY COUNT
Primary retry count:
Enter 6
10. S2 IP
Secondary IP server address.
11. S2 PORT
Secondary server port number. Must be set to 5000.
12. S2 ACTION
Secondary action code:
Enter 1
13. S2 RETRY COUNT
Secondary retry count:
Enter 6
NN10027-113
Etherset Installation Guide and User Manual
18
Installing and initializing the i2004 Etherset
During the initialization procedure, the softkeys will be labelled as follows:
•
OK
Press OK to record the entry and advance to the next parameter.
•
Bkspace
Use Bkspace to edit the current entry. (Bkspace will delete the entry one
character at a time.)
•
Clear
Press Clear to erase the current entry to enter a new parameter.
•
Cancel
At any point during the initialization procedure, press Cancel to abandon
the configuration process and return to the power-up process.
To input requested information in the menu fields, use the number keys on the
dial pad. Press the * key to enter a period (".") when keying in IP addresses.
4
Once the parameters have been entered, the Etherset will save the newly
entered parameters and attempt to connect with the server.
Figure 5 Connecting with the server
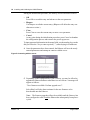
5
Depending on the configuration of your Gateway, you may be offered to
upgrade the Etherset firmware when there is a new release. A message will
appear as follows:
"New firmware available. Perform upgrade now?".
Select Yes. It will take about a minute for the new firmware to be
downloaded onto the Etherset.
Note: The firmware upgrade will not be available until the Gateway has
been configured to offer it and the Etherset has subsequently been powercycled.
Version 1.8
August 2002
Installing and initializing the i2004 Etherset 19
6
If the Etherset has successfully connected to the server, the following screen
will appear:
You may now begin using your Etherset.
If your telephone does not connect with the server, it will attempt to
reconnect. If the Etherset is unable to make a connection with the Gateway,
it may indicate that an invalid parameter setting was entered during
initialization. Disconnect the Etherset from the power source and reattempt
the initialization procedure.
If you are still unable to connect with the network, contact your system
administrator.
NN10027-113
Etherset Installation Guide and User Manual
20
Installing and initializing the i2004 Etherset
Version 1.8
August 2002
21
Chapter 3 Using the i2004 Etherset
3.1
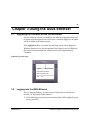
Upgrading the Firmware on the i2004 Etherset
If a new firmware release is available for the etherset an upgrade button will
be displayed at the login screen or if the user is currently logged in, an option
will be available in the options menu.
If the Upgrade softkey is selected, the following screen will be displayed.
When the firmware level is being upgraded, the softkey icons will flash and
the screen will remain blank for a short period of time (approximately
2 minutes).
Figure 6 Upgrade Prompt
Upgrade
20Jun 12:43pm
New firmware available.
Perform upgrade now?
Yes
3.2
No
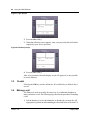
Logging into the i2004 Etherset
Prior to using the Etherset, it is necessary to log into the set and into the
network. To log into the i2004 Etherset:
1 At the following screen, enter your username (this will be supplied by your
service provider.)
NN10027-113
Etherset Installation Guide and User Manual
22
Using the i2004 Etherset
Figure 7 Login prompt
2
Press the OK softkey.
3
When the following screen appears, enter your password (this will also be
supplied by your service provider).
Figure 8 Password prompt
4
Press the OK softkey.
After a few moments, the main display screen will appear. It is now possible
to use the Etherset.
3.3
Predial
Selecting the OK key uses the default key. If no default key is defined, Key 1
is used.
3.4
Making a call
The Etherset is used in virtually the same way as a traditional telephone to
make and answer a call. The following steps describe the procedure for making
a call:
1 Lift the handset, or select the Handsfree or Headset key to route the call
appropriately (details on audio handling are described below in Section 3.5).
Version 1.8
August 2002
Using the i2004 Etherset
2
23
Using the dial pad, enter the telephone number you wish to dial.
Press the Release key or replace the handset to end the call.
3.5
Audio Handling
The Etherset provides the option of routing the audio path to your handset, to
a headset or to the handsfree option. When an audio path is going to be
opened, such as when you are making a call, the Etherset will route the audio
path depending on certain criteria:
•
If your handset is off the hook when an audio path is opened, the audio path
will be routed to the handset.
•
If the handset is on hook when an audio path is opened, the Etherset will
check to see if there is a headset plugged in. If there is a headset plugged
in, the audio will be routed to the headset; if there is not a headset plugged
in, the audio will be routed to the handsfree option.
Additionally, you may change where the audio is being directed at any time by
using the Handsfree or Headset buttons on the Etherset. You may refer to the
following table to determine where the audio will be routed:
Table 3 Audio handling scenarios
3.6
Current audio path
Pressing the Handsfree button
Pressing the Headset button
Handset
Routes the audio to Handsfree.
If there is a Headset available, it
routes to the Headset.
If there is not a Headset, it routes
to Handsfree.
Headset
Routes the audio to Handsfree.
Routes to the Handset.
Handsfree
Routes to the Handset.
If there is a Headset, routes to
Headset.
If there is not a Headset, it routes
to the Handset.
Predial
Predial is used to enter and edit a dialled number string prior to applying that
number to a line. This allows for errors without having to close and restart a
dialing sequence.
Note: Predial is only available when the line is idle.
Note: Selecting the "OK" key uses the default key. If no default key is defined,
key 1 is used.
NN10027-113
Etherset Installation Guide and User Manual
24
Using the i2004 Etherset
3.6.1
Making a call with predial
To make a call using predial:
1 When the telephone line is idle, use the dial pad to enter the telephone
number you wish to dial. The main display area will appear as shown below:
Figure 9 Predial
3.7
2
To edit the number, select the Clear softkey to restart the digit sequence;
or, press the Delete softkey to edit the sequence one number at a time.
3
You may now route the call by selecting OK or by selecting another line
key (selecting OK will route the call to the ’Default’ key).
4
The Etherset will begin ringing the dialled number.
5
Lift the headset, or select the Handsfree or Headset key to route the call
appropriately.
6
Hang up or press Release to end the call.
Answering a call
When an incoming call arrives at the Etherset, you will be notified by:
•
Audible ringing.
•
Flashing alert lamp.
•
The incoming line key will be flashing with the symbol.
•
The main display may show one of the following, depending on the calling
party information that is available:
— The calling party name and number.
— The calling party number only.
— The calling party name only.
— An indication that the calling party details have been withheld.
— A blank display.
Version 1.8
August 2002
Using the i2004 Etherset
25
Figure 10 shows the Etherset display indicating an incoming call.
Figure 10 Incoming call display
Incoming line
key.
The main display
screen indicates an
incoming call.
To answer a call:
1 Lift the handset, or select the Handsfree or Headset key to route the call
appropriately.
2
3.8
Hang up or press the Release key to end the call.
Placing and retrieving a call on hold
The Etherset has designated a key for the Hold function. This feature allows
you to place a call on hold until you are ready for the caller.
Place and retrieve an answered call on hold as follows:
1 Press the Hold key.
3.9
2
The Etherset will indicate a call on hold with a flashing symbol next to
the incoming line feature key.
3
Press the appropriate line key to retrieve the call.
Forwarding calls
The call forwarding feature allows you to divert calls to a second number. This
may be particularly useful should you wish to send calls to a mobile telephone
or voice mail system.
Note: The availability of the Call Forward feature will depend on your
individual service provider.
3.9.1
Enabling call forward
To enable call forwarding:
1 Press the Forward softkey. (This symbol: will appear next to the
Forward softkey and will be flashing.)
NN10027-113
Etherset Installation Guide and User Manual
26
Using the i2004 Etherset
3.9.2
2
Enter the telephone number of the forwarding destination.
3
Press the Forward softkey again. (The symbol will stop flashing.)
Disabling call forward
To disable call forward:
1 Press the Forward key. (The symbol will no longer appear.)
3.10 Message waiting and message retrieval
Note: The availability of the Message Waiting feature will depend on your
individual service provider.
You will be informed that you have a message waiting by the following
indicators:
•
The Msg Wait key is highlighted with a .
•
The alerting lamp will be lit.
•
An envelope icon will be displayed (left of the screen).
To check waiting messages:
1 Enter the phone number for your voice mail provider; or, if your Etherset
has been configured to do so, press the Msg Wait key.
Version 1.8
2
Review your messages.
3
Hang up or press the Release key to end the call.
August 2002
27
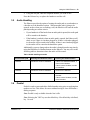
Chapter 4 Adjusting Etherset settings
The i2004 Etherset contains an extensive menu system which allows users to
change the default settings on their telephone set following the initial
configuration procedure.
To access the settings menu, select the Options softkey when the Etherset is
idle. The following screen will appear:
Figure 11 Softkey options menu
The options menu allows you to configure the following settings:
•
Network connection type.
•
Etherset display contrast.
•
Feature key labels.
•
Password.
•
Time and date settings.
•
Language.
•
Volume.
These options are described in the following sections.
NN10027-113
Etherset Installation Guide and User Manual
28
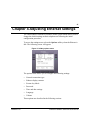
4.1
Adjusting Etherset settings
Selecting the network connection
The i2004 Etherset allows you to select the type of network connection
between your Etherset and the Gateway. The different types of network
connection offered will depend on the Audio Profiles configured on the
Gateway. Examples include:
•
Local Area Network
•
ISDN/DSL Dial-up
•
Modem Dial-up
•
Default
To select an option, do the following:
1 From the main menu, press the Options softkey.
2
In the Options menu, press the Audio softkey.
3
In the Audio menu, press the Profile softkey.
4
A screen similar to the following will appear:
Figure 12 Audio profile menu
5
Use the up and down navigation keys to select the desired network
connection type. When your preferred selection is highlighted, press the
Apply softkey, then press the OK softkey to save the changes and return
to the previous menu.
6
Press the Cancel softkey to return to the previous menu; or, press the Quit
key to return to the main menu.
The new network connection setting will take affect at the next call
origination.
Warning: Changing your network connection settings may affect the voice
quality of your calls. Contact your system administrator if you have any
problems with the voice quality.
Version 1.8
August 2002
Adjusting Etherset settings
4.2
29
Adjusting the contrast on the Etherset
The Options menu provides the ability to adjust the contrast on your display.
To adjust the contrast:
1 Select the Options softkey from the main menu.
4.3
2
In the options menu, press the Display softkey.
3
Use the right and left navigation keys to adjust the display contrast.
4
Press the OK softkey to return to the previous menu; or, press the Quit key
to return to the main menu.
Labelling feature keys
It is possible to add or edit feature key associations using the Etherset.
Note: Adding or editing feature keys creates an association between the
SoftClient or Etherset and the Centrex features which are available
through your service provider. Creating a feature key association does not
provide new functionality, but it labels the key.
To add or edit feature key associations:
1 Select the Options softkey from the main menu.
2
In the Options menu, press the Keys softkey. The following screen will
appear:
Figure 13 Softkey menu
3
NN10027-113
Use the up and down navigation keys to select the feature key you wish to
assign or edit. Press Assign. The following screen will appear:
Etherset Installation Guide and User Manual
30
Adjusting Etherset settings
Figure 14 Softkey label options
4
You may optionally select the key type by selecting the key to be a:
• "CO feature" (Central Office feature). This is selected if the feature
key is to be used for a feature being supplied by the DMS.
• "local" key type. This is selected if the feature key is to be used for a
CentrexIP feature, for example a contact in the contact list may be
assigned to a local feature key for dialing.
If "local" is chosen as the key type the user can only assign a memory space
(Contact from the directory) to that key and all other key assignments are
made unavailable.
5
The feature option will be highlighted. Use the left and right navigation
keys to scroll through the Centrex features which can be assigned to the
key. Apply the selection by pressing the Apply key.
6
You may optionally select a default key to be used if any of the following
are selected:
•
•
•
•
Version 1.8
Handsfree key
Headset key
"Dial" menu option from either the inbox or outbox
OK key from the predial options menu.
7
You may optionally choose to enable autoscroll on this feature. Use the
down navigation key to highlight autoscroll. Enable and disable autoscroll
using the left and right navigation keys. (For a full description of autoscroll,
see Section 1.3.2.1, “Autoscroll”.)
8
You may also optionally choose to assign the key as the Default key. The
Default key is used in selecting a Directory Number (DN) with such Centrex
features as Predial. Only one key can be specified as the Default.
9
Return to the Feature key menu by pressing the OK softkey.
August 2002
Adjusting Etherset settings
31
10 You may optionally select the key to be monitored by the inbox/outbox if
the option is available. Following keys can be used:
• Inbox: keys 1-6
• Outbox: keys 1-12
See Section 4.8, “Assigning an Inbox/Outbox to a DN feature key from the
Etherset” for more detailed information.
11 When you are finished assigning or editing feature keys, press the OK
softkey to return to the Options menu; or, press the Quit key to return to
the main menu.
4.4
Language Selection
The language displayed on your Etherset can be selected from a list of
languages configured by your service provider. To change the language on
your Etherset:
1 Select the Options softkey from the main menu.
2
In the options menu, press the Lang softkey.
3
Use the up and down keys to select the appropriate language.
4
Press the Apply key, and then press OK.
You will now have all further screens in the above chosen language.
4.5
Changing your password
To change your user password:
1 From the main menu, press the Options softkey.
2
In the options menu, press the Passwd softkey.
3
The following screen will appear:
Figure 15 Password screen
4
NN10027-113
Enter your old password and press the OK softkey.
Etherset Installation Guide and User Manual
32
4.6
Adjusting Etherset settings
5
Enter your new password and press the OK softkey.
6
Enter your new password again for verification, then press the OK softkey.
7
Your password is changed. Press the OK softkey to return to the options
menu; or, press the Quit key to return to the main menu.
Changing date and time displays
It is possible to use the Etherset to change the following time and date settings:
•
Time zone (in relation to GMT).
•
Daylight savings settings
•
Time formats.
•
Date formats.
The following procedure describes configuring the time and date settings on
your i2004 Etherset:
1 In the main menu, press the Options softkey.
2
In the options menu, press the Time softkey. The following screen will
appear:
Figure 16 Etherset Time and Date menu
Version 1.8
3
From this menu, use the up and down navigation keys to select the option
you would like to configure.
4
Once the option you would like to configure is highlighted, use the left and
right navigation keys to scroll between the available settings for that option.
5
Press Apply to select a setting. Once that setting has been selected, the *
symbol will appear next to the chosen setting.
6
When you have finished with this menu, press the OK softkey to return to
the options menu; or, press the Quit key to return to the main menu.
August 2002
Adjusting Etherset settings
4.7
33
Assigning auto login
To assign auto login:
1 From the main menu, press Options softkey.
2
In the Options menu, press the User softkey.
3
Highlight Autologin using navigator (scroll) keys and set it to Yes.
4
Press Apply key and then press OK.
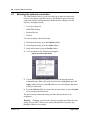
4.8 Assigning an Inbox/Outbox to a DN feature key from the
Etherset
You may assign an inbox, outbox or both to a DN key using the left and right
navigation keys. (For a full description of inboxes and outboxes, see
Sections 4.9 and 4.10.)
If an inbox has been assigned to a DN key and an incoming call to that DN key
is missed an inbox icon will be displayed to the left of the top level screen (see
example below) and the red LED will be lit at the top of the set. The icon will
disappear and the LED will be reset to its normal state as soon as the user views
their inbox.
Figure 17 Icon Descriptions
Msg Wait
Speed Call
Transfer
Voice Mail
Forward
590 1869
Centrex
20Jun 12:43pm
Missed Call
Options
Logoff
Restrictions:
Only one DN may be assigned to use the outbox at any one time on any feature
key.
NN10027-113
Etherset Installation Guide and User Manual
34
Adjusting Etherset settings
Up to 6 DN keys may be monitored by the inbox at any one time but only on
the first 6 feature keys.
If the user has a message waiting (on a feature key assigned as a "Msg Wait"
key) an envelope icon will be displayed to the left of the top level screen
(see Figure 17).
This icon is removed once the user dials the voice mail server to retrieve the
waiting message.
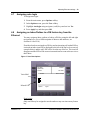
4.9
Using the Directory
The directory is accessed by selecting the directory button. The following
screen will appear:
Figure 18 Using the Directory
Forward
Msg Wait
Speed Call
Transfer
590 1869
Directory
Add
20Jun 12:43pm
Edit
Delete
Dial
The Directory can hold up to 16 contacts at any one time. Contacts held within
the directory may be assigned to feature keys so they may be dialed when the
assigned feature key is selected.
The following soft option keys may be selected while viewing the directory:
• The Add softkey may be selected to launch the contact wizard to add a
new contact into the directory.
• The Edit softkey may be selected to edit an existing contact entry in the
directory.
• The Delete softkey may be selected to delete an existing contact entry in
the directory.
• The Dial softkey may be selected to dial a contact in the directory.
Version 1.8
August 2002
Adjusting Etherset settings
35
The contact wizard prompts the user for the following details:
•
•
•
•
"Edit Number" - Enter the number of the new contact, if available.
"Edit Surname" - Enter the surname of the new contact, if available
"Edit First Name" - Enter the first name of the new contact, if available.
"Edit Display Format" - Use the left and right navigation buttons to select
the appropriate display format to be used. You may choose from the following display formats:
• Surname, First Name
• First Name Surname
• Surname only
• First name only
• Number only
When text is entered into the contact wizard for the first name or surname a
Symbols softkey will appear for a short period of time.
Figure 19 Edit Name
Forward
Msg Wait
Speed Call
Transfer
590 1869
Contact
20Jun 12:43pm
Edit Surname:
Brown
Next
Back
Symbols
The Symbols softkey allows you to access a symbols menu associated with the
number and character set of the selected key. A More softkey option is
available within the symbols screen to display the whole symbols menu
available to the i2004.
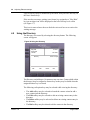
4.10 Using the Inbox
Once a DN key has been assigned an inbox all incoming calls to that DN key
will be logged (incoming calls will be logged regardless of whether the user is
logged in or not). The incoming key number, time and date will be stored as
well as the display shown on the i2004 at the time of the incoming call.
NN10027-113
Etherset Installation Guide and User Manual
36
Adjusting Etherset settings
Note: The display will only be captured if the incoming call lasts for
more than 2 seconds).
The logged calls may be viewed by selecting the inbox key. The inbox can
store up to 10 of the most recent incoming calls. The list is displayed in order
of the time the call was received, i.e. the most recent call being at the top of the
list.
Calls in the inbox are tagged with an icon to the left of the inbox screen. The
off hook icon means the call was taken and the on hook icon means the call
was missed as shown below:
Figure 20 Inbox
Forward
Msg Wait
Speed Call
Transfer
590 1869
Inbox
20Jun 12:43pm
1:52pm Paul Brown
19 Jun Paul Nash
19 Jun Dave Tubb
Display
Store
Clear
Dial
The inbox call list is comprised of a time or date stamp (a time stamp is shown
if the call was received on the same day of viewing the inbox, otherwise a date
stamp is displayed) and a name or number. If no name or number was extracted
from the display of the incoming call a "No Details" message will be displayed
in the name/number field. The list may be scrolled around using the up and
down navigation keys.
Note: The list does not wrap around.
The following options may be selected using the softkeys while viewing the
inbox:
• The Display softkey may be selected to show the display captured from
the incoming call, the time, date and key number. See screen shot below.
Version 1.8
August 2002
Adjusting Etherset settings
37
• The Store softkey may be selected to launch the contact list wizard. Any
captured details from the incoming call are passed into the contact wizard
so they may be edited before storing (see Section 4.9, “Using the Directory”).
• The Clear softkey may be selected to clear all of the inbox entries.
• The Dial softkey may be selected to dial the number of the incoming call
back (only if the incoming call number was available on the display when
the incoming call was captured). The number captured from the
display of the incoming call will be placed into the predial menu. From
here, you may delete/add extension numbers etc. which may or may not
be required.
Figure 21 Display Inbox entry
Forward
Msg Wait
Speed Call
Transfer
590 1869
Display
20Jun 12:43pm
Paul Brown 260001
20Jun -
1:52pm
Key01
Back
NN10027-113
Etherset Installation Guide and User Manual
38
Adjusting Etherset settings
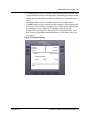
4.11 Using the Outbox
Once a DN key has been assigned to an outbox all outgoing calls from that DN
key will be logged. The outgoing key number, time and date will be stored as
well as the display shown on the i2004 at the time of the outgoing call.
Note: The display will only be captured if the outgoing call lasts for
more than 2 seconds.
The logged calls may be viewed by selecting the outbox key. The outbox can
store up to 10 of the most recent outgoing calls. The list is displayed in order
of the time the call was made, the most recent call being at the top of the list.
Figure 22 Outbox
Forward
Msg Wait
Speed Call
Transfer
590 1869
Outbox
20Jun 12:43pm
1:52pm Paul Brown
19 Jun Paul Nash
19 Jun Dave Tubb
Display
Store
Clear
Dial
The outbox call list is comprised of a time or date stamp (a time stamp is shown
if the call was received on the same day of viewing the outbox, otherwise a
date stamp is displayed) and a name or number. If no name was extracted from
the display of the outgoing call the number dialed will be displayed. The list
may be scrolled around using the up and down navigation keys.
Note: The list does not wrap around.
The following options may be selected using the softkeys while viewing the
outbox:
• The Display softkey may be selected to show the display captured from
the outgoing call, the time, date and key number.
• The Store softkey may be selected to launch the contact list wizard. Any
captured details from the outgoing call are passed into the contact wizard
Version 1.8
August 2002
Adjusting Etherset settings
39
so they may be edited before storing (see Section 4.9, “Using the Directory”).
• The Clear softkey may be selected to clear all of the outbox entries.
• The Dial softkey may be selected to dial the number of the outgoing call
back. The number is dialed directly using the default feature key.
NN10027-113
Etherset Installation Guide and User Manual
40
Adjusting Etherset settings
Version 1.8
August 2002
Centrex IP Client Manager
Series 2.4
Etherset Installation Guide and User Manual
Internet: http://www.nortelnetworks.com/
© 2002 Nortel Networks
All rights reserved
NORTEL NETWORKS CONFIDENTIAL: The
information contained in this document is the
property of Nortel Networks. Except as specifically
authorized in writing by Nortel Networks, the holder
of this document shall keep the information
contained herein confidential and shall protect same
in whole or in part from disclosure and dissemination
to third parties and use same for evaluation,
operation, and maintenance purposes only.
Information is subject to change without notice.
Nortel Networks reserves the right to make changes
in design or components as progress in engineering
and manufacturing may warrant.