1
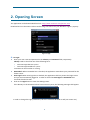
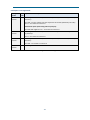
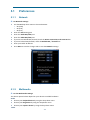
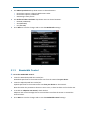
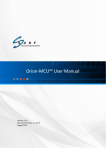
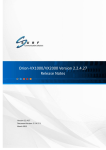
[Pick the date] SURF Motion Media Platform User Guide Orion-O User Manual Version 1.5.5 Document Version: 1.5.5.16 January 2014 www.surf-com.com a Orion-O User Manual Copyright © 2005-2014, SURF Communication Solutions Ltd. This document contains confidential and proprietary information of SURF Communication Solutions Ltd., henceforth referred to as “SURF.” All rights reserved. No part of this documentation may be reproduced in any form or by any means or used to make any derivative work (such as translation, transformation, or adaptation) without written permission from SURF Communication Solutions. SURF reserves the right to revise this document, and to make changes therein, from time to time without providing notification of such revision or change. This document contains descriptive information regarding the subject matter herein, and is not an offer to purchase or license any products or services of, or from SURF. SURF expressly disclaims any and all representations or warranties, expressed or implied herein, including but not limited to warranties of merchantability or fitness for a particular purpose. The licensing or sale of any product or service by or of SURF shall only be made in accordance with, and subject to the terms of, an agreement for the relevant product or service, to be signed by both the customer and SURF or its authorized agent or representative. Consequently, SURF shall carry no liability to any such customer based on this document, the information contained herein, or the omission of any other information. Trademarks The name “SURF Communication Solutions” is a registered trademark of SURF Communication Solutions Ltd. Any other trademarks, trade names, service marks or service names owned or registered by any other company and used herein are the property of their respective owners. SURF Communication Solutions, Ltd. Tavor Building, P.O. Box 343 Yokne’am 20692 Israel Tel: +972 (0)73 714-0700 Fax: +972 (0)4 959-4055 Web site http://www.orionmcu.com/ Email [email protected] Orion-O User Manual Table of Contents 1. Overview ............................................................................................................................ 4 2. Opening Screen................................................................................................................... 5 3. Joining a Conference ........................................................................................................... 7 4. Dialing Options ................................................................................................................... 9 5. Application Settings .......................................................................................................... 11 5.1 Preferences ....................................................................................................................... 12 5.1.1 Network ................................................................................................................ 12 5.1.2 Multimedia ............................................................................................................ 12 5.1.3 Bandwidth Control ................................................................................................ 13 5.2 SIP User ............................................................................................................................. 14 1. Overview Optimized to be used with SURF’s Orion-VX1000/VX2000 infrastructure video conferencing solution, Orion-O provides mobile connectivity solutions to the onsite video conferencing solution provided by the Orion-VX1000/VX2000. Orion-O provides the following benefits: Simple to use connectivity for voice or video communication solution from any network for a true collaborative experience. Open standard based (SIP, H.264) protocols allow connectivity to most enterprise gateways and systems through the Orion- VX1000/VX2000 video conference solution. Simple and easy to use application. Optimized for Apple iPhone, iPAD, and windows. This manual provides a detailed guidance on the use of the Orion-O, SURF’s video conferencing softclient, for windows. It includes a description of the product, its functionality, features, settings, and operation. Feedback: The SURF Technical Support Center is at your service. You may access Warranty Service through our Web Request Form by using the following link: www.orionmcu.com/support We are committed to constant and perpetual improvement. Your input will greatly help us in our endeavor. 4 2. Opening Screen The application can be downloaded from link: http://www.orionmcu.com/partner-area. Download and run the Orion-O video conferencing soft-client from your Windows. Figure 1 pops up: Figure 1: Login To Login: Enter your user name and password in the Identity and Password fields, respectively. Identity needs to be of the one of the following form: <username>@<domain>:<port> <username>@<IP address>:<port> username can be a number or a string Remember? When remember box is checked, the application remembers your password for the future entries. Auto Login? When auto login box is checked, the application shall not present the login screen and you are automatically logged-in. In order to check the Auto Login box Remember box should be checked as well. Click on the Login button to enter the dialing screen. If the Identity or the Password values have incorrect syntax, the following message shall appear: In order to change the Login parameters, SIP User screen can be used as well (see section 5.2). 5 To skip the registration: Press Skip Login In this case the Orion-O does not register to a registrar. The Current Status button at the top-left of the screen shall appear in grey. See Table 4-3 for the dialing options of an unregistered user. 6 3. Joining a Conference Following the login operation, the Orion-O dialing screen appears. Note that the Current Status is green for a successful login. If Current Status is red, logout, check your Identity and Password and login again. Figure 2 shows the dialing screen: Figure 2: Dialing Screen To join a conference: Edit or enter the pre-registered conference name or number. For dialing options see section 4. Press the green dialing button. To share a content with the other participants: Check that your laptop's webcam is on. Check that the device recognizes your camera by checking the Video input device text-box (by selecting Options-> Preferences-> Multimedia). Press the Start Screen Sharing button, as shown in the figure below: 7 Figure 3: Screen Sharing To stop the screen sharing: Press Stop Screen Sharing button. To quit the conference: Press the red dialing button To terminate the call: Press the red dialing button 8 4. Dialing Options In order to join a conference, the user can use the access number or the conference number. The following tables show various dialing options per each choice, using the below example: Access Number – 500 Conference Number – 100 Participant PIN Code – 1 Orion-VX1000/VX2000 Domain – Orion.com (Domain name or IP address). Participant is registered on PBX: Dialing Option PIN Code Operations and Prompts Access Number √ Dial 500 – Prompt: “Please enter your conference number followed by the # key” Dial 100 – Prompt: “Please enter the conference PIN number followed by the # key” Dial 1 – Connected to conference Conference Number √ Dial 100 – Prompt “Please enter the conference PIN number followed by the # key” Dial 1 – Connected to conference Access Number Dial 500 – Prompt “Please enter your conference number followed by the # key” Dial 100 – Connected to conference Conference Number Dial 100 – Connected to conference Table 4-1: Dialing Information - Registered on PBX Participant is registered on Orion-VX1000/VX2000 SIP Build-in Registrar: Dialing Option PIN Code Operations and Prompts Access Number √ Dial 500 – Prompt “Please enter your conference number followed by the # key” Dial 100 – Prompt “Please enter the conference PIN number followed by the # key” Dial 1 – Connected to conference Alternative option (Connecting without prompts): Dial 500*100*1 – Connected to conference Conference Number √ Dial 100 – Prompt “Please enter the conference PIN number followed by the # key” Dial 1 – Connected to conference Access Number Dial 500 – Prompt “Please enter your conference number followed by the # key” Conference Number Dial 100 – Connected to conference Dial 100 – Connected to conference Table 4-2: Dialing Information - Registered on Orion-VX1000/VX2000 9 Participant is not registered: Dialing Option PIN Code Operations and Prompts Access Number √ Dial [email protected] – Prompt “Please enter your conference number followed by the # key” Dial 100 – Prompt “Please enter the conference PIN number followed by the # key” Dial 1 – Connected to conference Alternative option (Connecting without prompts): Dial 500*100*[email protected] – Connected to conference Conference Number √ Dial [email protected] – Prompt “Please enter the conference PIN number followed by the # key” Dial 1 – Connected to conference Access Number Dial [email protected] – Prompt “Please enter your conference number followed by the # key” Dial 100 – Connected to conference Conference Number Dial [email protected] – Connected to conference Table 4-3: Dialing Information - Not Registered 10 5. Application Settings To set the application's parameters: Press on Options. The Orion-O setting options appear, as shown below: Preferences. Sets the network, multimedia and bandwidth control parameters (see section 5.1). SIP User. Sets the user’s identity and password, and the login characteristics (see section 2). Logout. Logs out from the system, enabling the user to login again. To login, enter the SIP User (see section 5.2). Always start video. When this check box is not checked, the conference starts without video and as a voice conference only. Enable self-view. When the enable self-view box is checked, an additional window opens, showing the image of the user. Quit. Quits the application and the user’s state shall turn to offline. Figure 4: Options 11 5.1 Preferences 5.1.1 Network For Network settings: Use the SIP drop-down menu to choose between: SIP (UDP) SIP (TCP) SIP (TLS) Enter the SIP listening port Enter the Audio RTP/UDP port Enter the Video RTP/UDP port If you are not behind NAT/Firewall, check the Direct connection to the Internet box. If you are behind NAT/Firewall, check the Behind NAT / Firewall box. Enter your Public IP address. Press Done to save the changes and to exist the Network settings. Figure 5: Network Settings 5.1.2 Multimedia For the Multimedia settings: The device options below depend on your device’s available hardware. Audio Choose your Playback device by using the drop-down menu Choose your Ring device by using the drop-down menu Choose your Capture device by using the drop-down menu Video 12 Use Video input device drop-down menu to choose between: Directshow capture: CyberLink Web Camera Filter Directshow capture; LG Webcam StaticImage: Statis picture Use Preferred video resolution drop-down menu to choose between: HD720P (1280X720) VGA (640x480) CIF (352x288) Press Done to save the changes and to exist the Multimedia settings. Figure 6: Multimedia 5.1.3 Bandwidth Control To set the Bandwidth Control: Insert the Download speed limit in Kbit/sec. Download speed limit is the maximum bit-rate from the network to your device. Insert the Upload speed limit in Kbit/sec Upload speed limit is the maximum bit-rate from your device to the network. Note that when the parameters above are set to zero, no limit has been set for the bit rate. To enable an adaptive rate control, check the box. Adaptive rate control manages the bit rate and does not allow the stream to exceed the entered values. Press Done to save the changes and to exist the Bandwidth Control settings. 13 Figure 7: Bandwidth Control 5.2 SIP User To edit the SIP User’s login parameters, Choose SIP User: Press Logout, to make the fields editable: Edit the login parameters, as described in the opening screen (see section 2). Enter the Outbound’s SIP proxy domain or IP address (optional). The following shows the syntax: <domain>:<port> <IP address>:<port> Note: Configure the Outbound SIP proxy with the same IP address of the Registrar, or leave this field blank (preferred). Press Login Figure 8: SIP User 14