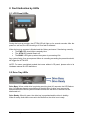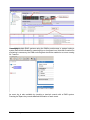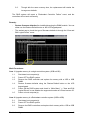
1
ISO 9001:2008
ISO 13485:2003 Certified
MODELS:
»G
X4L-XXXXX
Galaxy RAID Subsystem
Single & Dual Controller
Galaxy Troubleshooting
Reference Manual
Galaxy HDX RAID
7th Generation RAID
With over 10,000 Galaxy units in the field, Rorke Data’s award
winning RAID products provide the performance, protection,
and expansion capabilities for diverse customer environments.
PLEASE READ BEFORE INSTALLATION
www.rorke.com
Gal_DS_Tshoot_v1.1h
Rorke Data, An Avnet Company
7626 Golden Triangle Drive, Eden Prairie, MN 55344, USA
» Toll Free 1.800.328.8147 » Phone 1.952.829.0300 » Fax 1.952.829.0988
Contact Information
Americas
Rorke Data, an Avnet company
7626 Golden Triangle Drive
Eden Prairie, MN 55344 USA
Tel: +1-800 328 8147
Fax: +1-952 829 0988
[email protected]
[email protected]
http://www.rorke.com
Copyright 2011
This Edition First Published 2011
All rights reserved. This publication may not be reproduced, transmitted,
transcribed, stored in a retrieval system, or translated into any language or
computer language, in any form or by any means, electronic, mechanical,
magnetic, optical, chemical, manual or otherwise, without the prior written
consent of Rorke Data.
Disclaimer
Rorke Technology makes no representations or warranties with respect to
the contents hereof and specifically disclaims any implied warranties of
merchantability or fitness for any particular purpose. Furthermore, Rorke
Data reserves the right to revise this publication and to make changes
from time to time in the content hereof without obligation to notify any
person of such revisions or changes. Product specifications are also
subject to change without prior notice.
Trademarks
Galaxy and the Galaxy logo are registered trademarks of Rorke Data.
All other names, brands, products or services are trademarks or registered
trademarks of their respective owners.
Troubleshooting
1
Table of Contents
Contact Information ......................................................................................................................................... 1
Copyright 2010 ................................................................................................................................................ 1
This Edition First Published 2010.......................................................................................................... 1
Disclaimer............................................................................................................................................. 1
Trademarks .......................................................................................................................................... 1
Table of Contents ............................................................................................................................................ 2
1. Buzzer......................................................................................................................................................... 3
2. Fault Indication by LEDs.............................................................................................................................. 5
2.1 LCD Panel LEDs............................................................................................................................. 5
2.2 Drive Tray LEDs.............................................................................................................................. 5
2.3 Controller LEDs .............................................................................................................................. 6
3. Fault Indication by Galaxy Array Manager [GAM] and Other Interfaces ...................................................... 8
4.
Event Messages and Corrective Actions ............................................................................................. 11
4.1 Logical Drive Events ................................................................................................................................ 12
4.1.1 Critical: ...................................................................................................................................... 12
4.1.2 Notification: ................................................................................................................................ 18
4.2 Channel and Individual Drive Events ........................................................................................................ 25
4.2.1 Critical: ...................................................................................................................................... 25
4.2.2 Warning: .................................................................................................................................... 25
4.2.3 Notification: ................................................................................................................................ 30
4.3 General Target Events ............................................................................................................................. 32
4.3.1 Critical: ...................................................................................................................................... 32
4.3.2 Notification: ................................................................................................................................ 36
4.4 Controller Events ..................................................................................................................................... 40
4.4.1 Critical: ...................................................................................................................................... 40
4.4.2 Warning: .................................................................................................................................... 42
4.4.3 Notification: ................................................................................................................................ 43
5. Service LED (on Models that Come with an LED Side Panel).................................................................... 46
Appendix A
Concerns for Replacing a Failed Controller.................................................................... 48
Appendix B Firmware Automated Synchronization ........................................................................................ 51
Revision History:
Rev. 1.0:
Rev. 1.1.h:
2
Initial release.
Updated Galaxy LED definitions.
Galaxy DS
1. Buzzer
System Faults and Buzzer Sound Patterns
RAID enclosure fault conditions
JBOD condition
(via RAID)
Buzzer
behavior
Sound
patterns
Controller initialization
--
RAID: ON
1
--
JBOD controller
JBOD: ON
not ready/failed
5
Disk drive failure
Disk drive failure RAID: ON
2
Logical drive rebuild failure or manually
aborted
--
RAID: ON
3
UPS functions (AC connection failure,
low battery charge, BBU is absent)
--
RAID: ON
2
Cooling fan failure
Cooling fan
failure
RAID: ON
2
PSU failure
PSU failure
RAID: ON
2
Temperature sensor failure
Temperature
sensor failure
RAID: ON
2
Rebuilding a logical drive
--
RAID: ON
2
Regenerating array parity
--
RAID: ON
3
Adding drive
--
RAID: ON
3
One controller fails in a redundant pair
--
RAID: ON
1
Disk command is blocked by controller
(During controller initialization)
--
RAID: ON
4
FW download completed
--
RAID: ON
4
Any logical drive stated as not "GOOD"
(During controller initialization)
--
RAID: ON
4
Replacing a faulty controller will silence the currently sounded buzzer.
Troubleshooting
3
Buzzer Sound Patterns
Pattern #1:
Repeat until
process is done
Pattern #2:
Repeat until
any failure is
corrected.
Pattern #3:
Repeat until
any failure is
corrected.
Pattern #4:
Repeated twice.
Pattern #5:
Buzzer is sounded continuously.
Buzzer On
4
Galaxy DS
2. Fault Indication by LEDs
2.1 LCD Panel LEDs
During the boot-up process, the ATTEN LED will light up for several seconds. After the
power-on self test, the LED should go off if no fault is detected.
When the boot-up process is finished and the Galaxy enclosure if functioning normally:
• The PWR LED should light constantly blue.
• The ATTN LED should remain off.
• The BUSY LED lights up when the system is processing I/Os.
Any system faults, from a component failure to a reading exceeding the preset threshold,
will trigger the ATTN LED.
NOTE: For some specialized models that come without LCD panel, please refer to its
Hardware manual for LED definitions.
2.2 Drive Tray LEDs
Drive Busy: When a disk drive is spinning servicing host I/O requests, the LED flashes
blue. Off indicates there is no activities on the disk drive. A drive error may not be
detected before the RAID system firmware access the disk drive or before I/Os are
distributed to it.
Drive Ready: When lit green, the drive bay is populated and the drive is healthy.
When lit ready, faults have occurred to the disk drive; the drive is not ready.
Troubleshooting
5
2.3 Controller LEDs
Galaxy HDX4 series:
RAID Subsystem
LED Definition
#1 Controller Status LED (Ctrl Status LED)
The controller is active and operating normally.
Green
Color
Behavior
Amber
The controller is going through the initialization process
Or
The controller is not ready for operation.
Steady On
#2 Cache Dirty LED (C_Dirty LED)
Off
Color
Amber
Behavior
No data is in the cache memory. (The BBU unit can
sustain memory in case of power loss)
“ Steady On” LED indicates the followings:
There is data in the cache memory,
An error has occurred in the cache memory (ECC
errors).
Cached data is being sustained by the BBU.
Battery voltage is lower than 2.5V.
Battery temperature is abnormal.
The BBU is not present.
“ Fast Blink” LED indicates that data in the cache
memory is being written to the Flash Backup Module
during power outage.
Steady On / Fast Blink /
Off
#3 Temperature Abnormal LED (Temp. LED)
Abnormal temperature reading is detected (the
Color
Amber
temperature is above the preset threshold setting).
Behavior
Steady On
6
Galaxy DS
#4 Cache Backup Module LED (CBM Status LED)
Off
Amber
The BBU is not installed
“ Steady On” LED indicates that the CBM failed (either
BBU or Flash Backup Module or both failed).
In redundant models, it also indicates that no BBU
and/or Flash Backup Module are found.
Color
Green
“ Steady On” LED indicates that the CBM is ready and
the BBU and Flash Backup Module are both present.
“ Fast Blink” LED indicates that the BBU is charging.
Behavior
Steady On / Fast Blink /
Off
# 5 Host Channel Busy LED
Color
Behavior
Green
The host port is busy (there are activities).
Fast Blink (4Hz)
# 6 Drive Channel Busy LED
Color
Behavior
Green
The drive port is busy (there are activities).
Fast Blink (4Hz)
F/W Restore Default LED
Color
Behavior
Green
The restore factory default handshake is ready.
Steady On
For the definitions of LEDs on interface connectors and the LEDs of system modules,
please refer to the Hardware Manuals that came with your systems.
Troubleshooting
7
3. Fault Indication by Galaxy Array Manager [GAM] and
Other Interfaces
The Notification Manager within GAM can be configured to deliver system events using
various methods, including Email, Fax, LAN broadcast, MSN, SMS, and SNMP traps. An
administrator can also isolate a problem using GAMs graphical display.
Please refer to the Galaxy Array Manager User’s Manual for more details.
If system faults occur, the faults will be indicated by the LED display, status summary, and
the system events.
8
Galaxy DS
If managing multiple RAID systems using the GAM’s portal screen, a system having a
system fault will be indicated by a warning sign on its system icon. Note that if continuous
monitoring is necessary, the GAM service agents should be enabled on a server running
24-7 service.
An event log is also available by checking a terminal console with a RAID system.
Pressing the Space key reveals detailed information of each event.
Troubleshooting
9
Event messages are also displayed on the LCD screen. You can check the event
message and system LEDs to verify and then correct the faults.
UPS Power
Failure Detected!
10
Galaxy DS
4.
Event Messages and Corrective Actions
The controller events can be categorized as follows according to the severity
levels:
Critical
Warning
Notification
Errors that need to attend to immediately
Errors
Command processed message sent from Firmware
The RAID subsystem records all system events from power on, temporarily
record them in cache with up to 1,000 entries. To power off or to reset the
controller will cause an automatic deletion of all the recorded event logs.
Firmware rev. 3.61 enables an event log to be saved into logical drives’ 256MB
reserved space and hence users can also see the events after a system reset.
The GAM manager can be used to record events on multiple subsystems
especially when a controller reset or power-off is an expected action. The events
can also be seen from GAM’s Notification Manager. Associated details can be
found in the GAM user's manual and online help.
Descriptions below may contain abbreviations. Abbreviations and Capitalized
letters are preserved for the coherency with the event messages shown on the
terminal session.
Troubleshooting
11
4.1
Logical Drive Events
4.1.1 Critical:
Message
What
Happened?
What to Do?
LG:X Logical Drive ALERT: CHL:0 ID:132 Drive Missing
The LD member drive could have been accidentally removed or
drive connection problems occurred before system boot-up.
The drive could have been accidentally removed or drive
connection problems occurred in the boot time. Check drive
connection and related enclosure status.
Message
What
Happened?
What to Do?
LG:X Logical Drive ALERT: CHL:0 ID:132 Drive Failure
The specified hard drive in the specified logical drive has failed
Message
What
Happened?
LG:X Logical Drive ALERT: Rebuild Aborted/ Failed
Logical drive rebuild aborted. It could result from the one of the
following reasons:
1. The rebuild has been manually canceled by a user.
2. The replacement drive used for a rebuild may have failed
during the rebuild or the drive contains immanent defects.
3. System faults (for example, an LD fatally failed) occurred.
Another member disk failed in a rebuild process.
Carefully identify and replace the faulty drive and perform logical
drive rebuild again. It is best to stop host I/Os temporarily to this
logical drive.
What to Do?
Message
What
Happened?
What to Do?
12
When a system is running, removing any LD member disk or
member disk failure will be recognized as disk failure event. For
example, RAID controller cannot access a member disk and
decides this drive has failed. If a spare is available, the subsystem
will proceed with an automatic rebuild. If there is no spare, replace
the faulty drive using a drive that is known to be good and rebuild
will be automatically initiated provided that a replacement drive can
be recognized by the subsystem.
For example, in a SCSI-based subsystem, a manual “Scan Drive”
command should be executed. In subsystems using other types of
disk drives, drive swap auto-detection should be enabled on the
drive channels.
If all disk drives are lost inside an enclosure, please check the
related power supply status or backplane power connection.
LG:X Logical Drive ALERT: Parity Regeneration Aborted/Failed
It could result from one of the following reasons:
1.
The regenerate operation has been manually canceled by a
user.
2.
System faults or integrity problems forced system to abandon
the operation. For example, any single member disk failed in a
LD will force this operation to stop.
3.
Irrecoverable parity inconsistency may also cause a halt to
the operation by user’s configuration/operation errors.
If the Check/Regenerate Parity Failure is caused by a drive failure,
replace the faulty drive and rebuild the LD. Then execute the check
parity operation again.
Galaxy DS
If the Check/Regenerate Parity Failure results from the discovery of
inconsistent parity, users have to change the firmware check
parameters if users wish to complete the whole check parity
operation.
Message
What
Happened?
What to Do?
Message
What
Happened?
What to Do?
Message
What
Happened?
What to Do?
Message
What
Happened?
What to Do?
Troubleshooting
LG:X Logical Drive ALERT: Creation Aborted
Logical drive creation process manually aborted or that some
system integrity problems forced the subsystem to abort logical
drive creation process.
Check proper system working conditions.
LG:X Logical Drive ALERT: Creation Failed
Logical drive creation process failed when one or more drive
members failed or have been accidentally removed. Drive
abnormality may also be the cause of the problems.
Check proper system working conditions and drive connection.
Replace the faulty drives and repeat the creation process.
LG:X Logical Drive ALERT: Initialization Failed
Logical drive initialization failed. It could result from one of the
following reasons:
1. Off-Line Initialization Failed
Logical drive initialization failed. This event can result from one
member drive failure during initialization for all types of RAID
configuration (R0/1/3/5/6).
2. On-Line Initialization Failed
This event can result from fatal failure of a logical drive, for
example, two disk drives failed during the initialization process
for a RAID 5 LD and three disk drives failed for a RAID 6 LD.
For off-line initialization, carefully identify and replace the faulty
drive and perform create logical drive again.
For on-line initialization, reboot system and check the LD
1. If LD can be restored to the degraded mode, then the
initialization process will continue.
2. If the LD cannot be restored, then you have to replace the
failed disks, recreate the LD, and restore data from a previous
data backup.
LG:X Logical Drive ALERT: Expansion Aborted/Failed
Logical drive expansion failed. It could result from one of the
following reasons:
1. The expansion has been canceled by a user.
2. For On-line expansion, an expansion operation is
terminated when the target LD fatally fails.
3. For Off-line expansion, an expansion operation fails when
any of its member drives fails.
Carefully identify and replace the faulty drive and perform logical
drive rebuild first.
For an online expansion, the expansion operation should continue
with a single drive failure. When the LD rebuild process is
completed, the LD will resume the expansion process.
For an off-line expansion, the expansion will be discontinued by a
single disk failure. The expansion operation will not continue after
13
the rebuild is completed. Users have to start the expand process
again.
Message
What
Happened?
What to Do?
LG:X Logical Drive ALERT: CHL:0 ID:132 Clone Failed/Aborted
Drive cloning failed. It could result from one of the following
reasons:
1.
Cloning has been canceled by a user.
2.
The LD contains the source drive is fatal failed during the
cloning process.
3.
The source drive used for cloning has failed during the
cloning process.
4.
The target drive used for cloning has failed during the
cloning process.
If the Logical Disk has fatally failed, then the cloning operation
stops.
If the source drive fails, then system firmware will proceed with the
following:
1. If a spare drive is available, then LD will stop cloning and
begins a rebuild using the available spare drive.
2. If no spare drive is available, then LD will stop cloning and
start rebuild using the target drive (the target drive was
originally a spare drive).
If the target drive fails, then cloning will stop. Carefully identify and
replace the faulty drive. Then restart the cloning operation.
Message
What
Happened?
What to Do?
LG:X Logical Drive ALERT: Logical Drive Bad Block Table FULL
There are too many damaged sectors and firmware used up the
available bad block table entries. Bad blocks have been discovered
and marked by “write” operations including host write commands,
disk clone, Add Drive, etc.
The target disk drive may have become physically unreliable. The
data in the target LD could have been corrupted, please restore the
data from backup. Contact system vendor for help.
Message
What
Happened?
What to Do?
LG:X Logical Drive ALERT: Logical Drive Bad Block Table BAD
System failed to generate a bad block table. Logical drive may have
generated serious integrity problems.
The data in the target LD could have been corrupted, please
execute the Regenerate Parity function and restore data if
instances of inconsistent parity are found. Contact system vendor
for help.
Message
What
Happened?
LG:X Logical Drive ALERT: Logical Drive On-Line Init Table Bad
When an LD is still under an online initialization process and the
system reboots for some reasons, the system will not be able to
generate a correct On-line Init table at boot time. The logical drive
may have encountered serious integrity problems.
Execute regenerate parity operation and ignore the inconsistent
parity event if occurred. Contact system vendor for help.
What to Do?
Message
What
Happened?
14
LG:X Logical Drive ALERT: Bad Data Block Marked 000000084
During write operations (including rebuild, host write commands,
disk cloning, and Add Drive), media errors may cause data
Galaxy DS
What to Do?
Message
What
Happened?
What to Do?
Message
What
Happened?
What to Do?
Message
What
Happened?
What to Do?
Message
What
Happened?
What to Do?
Message
Troubleshooting
inconsistency. System cannot regenerate the data by RAID parity
calculation. The affected data blocks # are marked bad. The
situation may result from the following:
1. Rebuild and host write command:
For example, in a RAID 5 configuration, one member drive
failed, and media errors are found on another member drive.
2. Disk clone and Add Drive:
Concurrent occurrences of media errors are found on the
same stripe across two member drives.
The data affected by data blocks failure will be lost. The host
computer will return media error messages if host accesses fall
within the affected blocks. Restoring data from a backup source is
recommended.
LG:X Logical Drive ALERT: UNPROTECTED Block Marked
000000084
Media errors are found in an unprotected array, e.g., RAID0. The
affected data blocks will be marked bad.
The data affected by data blocks failure will be lost. The host
computer will return media error messages if host access falls
within the affected blocks. Restoring data from a backup source is
recommended.
LG:X Logical Drive ALERT: Bad Data Block Encountered
000000084
Data blocks previously marked Bad are re-encountered during host
I/O access or certain operations such as Media Scan. The marked
logical blocks will cause the firmware to return media error status to
host.
The data affected by data blocks failure is lost. Restoring data from
a backup source is recommended. The host computer will return
media error messages if host access falls within the affected
blocks.
LG:X ALERT: Inconsistent Parity Encountered Block 000000084
Users execute regenerate parity operation and a parity
inconsistency is encountered. Problematic block address is shown
at the end of the message.
Parity inconsistency means the data is corrupted or invalid across
some data blocks.
We recommend users to restore specific data from their routine
backup.
LG:X ALERT: Inconsistent Parity Block 000000084 Regenerated
Users execute regenerate parity operation and a parity
inconsistency is encountered and regenerated. Problematic block
address is shown at the end of the message.
Parity inconsistency means the data is corrupted or invalid across
some data blocks. This message shows an inconsistent instance
has been corrected.
LG:X Logical Drive ALERT: Cache Data Purged
15
What
Happened?
What to Do?
Message
What
Happened?
What to Do?
16
There can be two causes for a RAID system to purge its cached
data that belongs to a specific LD:
1. A fatal failure occurred on a specific LD, the related cached
data becomes useless and will be purged.
2. Cached data is missing when system powers up (e.g., in the
event of power outage and the battery backup was not able to
support cached data). System will check for the cached data
and issue an alert event by each LD if the cache data is gone.
Data inconsistency may occur if power outage occurs when
unfinished writes are still cached in memory.
If this event occurs, it means the cached data for this LD could have
been corrupted or invalid.
The LD will be put into an off-line state. Users have to manually
check the integrity of data and try to recover data before proceeding
with any actions. It is recommended to restore data from your
routine backup.
LG:X Logical Drive ALERT: Fatal Fail/ Invalid Array/ Incomplete
array
Fatal failure or incomplete array means that the LD has lost the
protection by RAID configuration.
If system cannot find some member disks for a specific LD at boot
time, the LD will be considered as incomplete.
If some member disks of a specific LD fail during operation, the LD
will be considered as fatally failed.
The possible causes include:
1. For RAID 5, two member disks have failed or are missing.
2. For RAID 6, three member disks have failed or are missing.
3. For RAID 1, two member disks have failed or are missing in
the same mirror pair. The locations of mirrored drives are
somehow difficult to decipher. Shown below is an example
of mirror pair relationship which shows a RAID1 made of
six members.
4. One disk failed or missing in a RAID 0/NRAID
configuration.
The LD is not available at boot time or running time. If an LD has
fatally failed, you may try to restart the RAID system and check if
the system detects the failed disks. If one or two member disks are
back then LD will be rebuilt.
If the LD cannot be restored, then you have to replace the failed
Galaxy DS
disks, recreate the LD, and restore data from a backup source.
Message
What
Happened?
What to Do?
Message
What
Happened?
What to Do?
Message
What
Happened?
What to Do?
Message
What
Happened?
What to Do?
Troubleshooting
LG:X Logical Drive ALERT: Add Drive Operation Paused
The Add-Drive expansion process is paused. The reason could be:
1. User cancelled the add drive process,
2. The drive-to-be-added is faulty.
3. The drive-to-be-added has incongruous drive size, e.g.,
smaller than the LD members.
4. The logical drive into which the drive will be added has a
drive that just failed.
Check drive and LD status, replace a failed drive, or re-start the
add-drive process if you manually cancelled it.
LG:X Logical Drive ALERT: Migrate Operation Paused
The logical drive migration process is paused. The reason could be:
1. User cancelled the migration process,
2. One drive involved has failed.
3. The target logical drive has fatally failed.
4. Insufficient no. of LD size, e.g., when migrating from RAID5 to
RAID6, another member drive is required for the additional
parity. You should expand the logical drive first, by adding
another member.
5. The logical drive to be migrated has a failed drive. The process
can re-enacted after a successful rebuild.
Check drive and LD status, replace a failed drive, or re-start the
process if you manually cancelled it.
CHL:_ ID:_ ALERT: Media Error Unrecoverable-0x0
Media errors are found during read operations, and the errors can
or cannot be recovered. The causes include:
1. Media errors are found in an unprotected array, e.g., a
RAID0 and NRAID configuration.
2. Media errors are found in a degraded array, e.g., a RAID 5
array with a failed disk. Drive failure and the media errors
on other members failed the recovery attempt.
3. Concurrent occurrences of media errors found on the same
stripe across two member drives.
Host receives a media error response for the specific logical block
address related to the physical bad block.
The data affected by data blocks failure will be lost. The host
computer will return media error messages if host access falls on
the affected data blocks. Restoring data from a backup source is
recommended.
LG:X ALERT: Media Error Encountered During Check Parity
000000000
Media errors are found during parity regeneration process, and the
errors can or cannot be recovered. If data blocks and parity are
intact on other members of a logical drive, the errors can be
corrected by regenerating and writing data to other disk sectors.
If the data blocks on the bad media can not be regenerated, the
data affected by media errors will be lost. The host computer will
return media error messages if host access falls on the affected
17
data blocks. Restoring data from a backup is recommended.
Message
What
Happened?
What to Do?
LG:X Logical Drive ALERT: Media Error During Check Parity
Recovered 000000000
Data blocks affected by Media errors are recovered by comparing
and regenerating data from other members of a logical drive.
If the Media Errors and Recovery events appear too often on a
specific disk drive, that drive might have become unreliable. You
may consider replacing it using the Copy and Replace function.
4.1.2 Notification:
Message
What
Happened?
What to Do?
LG:X Logical Drive NOTICE: Continue Rebuild Operation
The target logical drive has been stored to its previous
one-drive-failed status, and the rebuild operation is automatically
resumed by firmware. This may occur when the system is powered
off or reset during the rebuild process or that media errors have
been discovered and corrected during the rebuild.
Press ESC to clear the message.
Message
What
Happened?
What to Do?
LG:X Logical Drive NOTICE: Starting Rebuild
The rebuild process has begun.
Message
What
Happened?
What to Do?
LG:X Logical Drive NOTICE: Rebuild of Logical Drive Completed
The subsystem has successfully rebuilt a logical drive.
Message
LG:X Logical Drive NOTICE: Continue Parity Regeneration
Operation
The parity regeneration process continues to execute.
What
Happened?
What to Do?
This is the message displayed when a stand-by spare is available
when a member drive fails or when a faulty drive is physically
replaced. The subsystem should automatically detect a drive for
rebuild if the hot-swap detection mechanism has been enabled.
Press ESC to clear the message.
Press ESC to clear the message.
Message
What
Happened?
What to Do?
LG:X Logical Drive NOTICE: Starting Parity Regeneration
Start regenerating parity of a logical drive.
Message
LG:X Logical Drive NOTICE: Parity Regeneration of Logical Drive
Completed
Galaxy DS
18
Press ESC to clear the message.
What
Happened?
What to Do?
The parity regeneration process on logical drive _ is completed.
Message
What
Happened?
LG:X Logical Drive NOTICE: Starting Creation
Logical drive creation process started. Note that the creation and
initialization processes are separated. Creation of a logical drive
only takes a second while the initialization may take hours with the
arrays containing numerous large capacity drives.
Press ESC to clear the message.
What to Do?
Message
What
Happened?
What to Do?
Message
What
Happened?
What to Do?
Message
What
Happened?
What to Do?
Message
What
Happened?
What to Do?
Message
What
Happened?
What to Do?
Message
What
Happened?
Troubleshooting
Press ESC to clear the message.
LG:X Logical Drive NOTICE: Creation of Logical Drive Completed
A logical drive is created. Note that the initialization runs in the
background. If a logical drive is created using the Online mode, you
can continue with the host LUN mapping, etc. Yet you cannot
proceed with Add-Drive or Parity Regeneration until the
background initialization is completed.
Press ESC to clear the message.
LG:X Logical Drive NOTICE: Starting On-Line Initialization
Creation process is completed, initialization process has begun to
generate parity sectors and readying member drives. The On-line
initialization mode takes a longer time to complete and allows the
logical drive to receive host I/Os immediately if appropriate host
ID/LUN mapping has been applied.
Press ESC to clear the message.
LG:X Logical Drive NOTICE: On-Line Initialization of Logical Drive
Completed
Logical drive on-line initialization completed.
Press ESC to clear the message.
LG:X Logical Drive NOTICE: Starting Off-Line Initialization
Creation process is completed, initialization process has begun to
generate parity sectors and readying member drives. The Off-line
initialization mode takes place immediately after the creation of a
logical drive, and does not allow host I/Os to be distributed to the
logical drive at the same time.
Press ESC to clear the message.
LG:X Logical Drive NOTICE: Off-Line Initialization of Logical Drive
Completed
Logical drive off-line initialization completed. The logical drive is
now ready for host ID/LUN mapping, and then receiving host I/Os.
Press ESC to clear the message.
LG:X Logical Drive NOTICE: Starting On-Line Expansion
Start expanding the logical drive’s added or free capacity
(previously not included) when system find appropriate time after
selecting to expand its capacity. The On-Line mode allows the
added capacity of a logical drive to appear immediately as a usable
19
What to Do?
Message
What
Happened?
What to Do?
Message
What
Happened?
What to Do?
Message
What
Happened?
partition and ready for host I/Os. This partition may require being
associated with a separate ID/LUN on the host bus. Response to
host I/Os will be slower because the expansion process requires
distributing data blocks and parity data across new drive sectors.
Press ESC to clear the message.
LG:X Logical Drive NOTICE: On-Line Expansion of Logical Drive
Completed
Logical drive on-line expansion completed. The added capacity will
appear as a new partition, and this partition may require being
associated with a separate ID/LUN on the host bus. Adjustments
should also be made through the host OS volume management
utility.
Press ESC to clear the message.
LG:X Logical Drive NOTICE: Starting Off-Line Expansion
Start expanding the logical drive’s added or free capacity
(previously not included) when system find appropriate time after
selecting to expand its capacity. The Off-Line mode does not allow
the added capacity of a logical drive to be immediately available for
host I/Os. This partition can only be associated with a separate
ID/LUN on the host bus after the expansion process is completed.
Access to the data already stored on the logical drive is not
affected.
Press ESC to clear the message.
LG:X Logical Drive NOTICE: Off-Line Expansion of Logical Drive
Completed
Logical drive off-line expansion completed. The added capacity will
appear as a new partition, and this partition may require being
associated with a separate ID/LUN on the host bus.
What to Do?
Press ESC to clear the message.
Message
What
Happened?
LG:X Logical Drive NOTICE: Continue Add Drive Operation
The target logical drive has been restored to its previous status,
e.g., power-off or media errors, and the add drive operation can
continue.
Press ESC to clear the message.
What to Do?
Message
What
Happened?
What to Do?
LG:X Logical Drive NOTICE: Continue Migrate Operation
The target logical drive has been restored to its previous status,
e.g., power-off or media errors, and the migration operation can
continue.
Press ESC to clear the message.
Message
What
Happened?
What to Do?
LG:X Logical Drive NOTICE: Starting Add Drive Operation
Add drive expansion process started
Message
LG:X Logical Drive NOTICE: Starting Migrate Operation
20
Press ESC to clear the message.
Galaxy DS
What
Happened?
What to Do?
Logical Drive Migrate process started
Message
What
Happened?
LG:X Logical Drive NOTICE: Add Drive Operation Paused
The add drive expansion process is halted by:
1. Logical drive expansion is cancelled by a user.
2. One of the member drives failed during logical drive
expansion.
3. Media errors are found on one or more of the logical drive
members.
4. System faults have occurred.
5. If an LD is manually shut down or the controller is reset,
Add Drive will also be halted. When the LD is re-started or
the controller is successfully rebooted, the Add Drive
Paused event will prompt reminding you of the incomplete
process. Also, the same event will prompt if Parity
Regeneration or Rebuild took place before an LD was
manually shutdown or the controller was reset.
Carefully identify and replace the faulty drive and correct system
faults. The add drive expansion should continue once the faults are
corrected.
What to Do?
Press ESC to clear the message.
Message
What
Happened?
What to Do?
LG:X Logical Drive NOTICE: Add Drive to Logical Drive Completed
The add drive expansion process is completed.
Message
What
Happened?
What to Do?
LG:X Logical Drive NOTICE: Migrate to Logical Drive Completed
The logical drive migration process is completed.
Message
What
Happened?
What to Do?
NOTICE: CHL:X ID:XXX Starting Media Scan
Media Scan is manually or automatically started by the preset Task
Schedules on a specific disk drive.
Press ESC to clear the message.
Message
What
Happened?
What to Do?
LG:X NOTICE: CHL:0 ID:132 Starting Media Scan
Media Scan is manually or automatically started by the preset Task
Schedules on a specific member drive of Logical Drive X.
Press ESC to clear the message.
Message
What
Happened?
What to Do?
NOTICE: Media Scan of CHL:X ID:XXX Completed
Media Scan on a specific disk drive on CHLX IDXXX is completed.
Message
What
Happened?
LG:X NOTICE: Media Scan of CHL:X ID:XXX Completed
Media Scan on a specific member of Logical Drive X, on CHLX and
IDXXX is completed.
Troubleshooting
Press ESC to clear the message. Please remember to rearrange
the added capacity which will appear as a new partition volume.
Press ESC to clear the message.
Press ESC to clear the message.
21
What to Do?
Press ESC to clear the message.
Message
LG:X Logical Drive NOTICE: CHL:X ID:XXX Continue Clone
Operation
The target logical drive has been restored to its previous status,
e.g., a failed drive is restored, and the cloning process can
continue.
Press ESC to clear the message.
What
Happened?
What to Do?
Message
What
Happened?
What to Do?
LG:X Logical Drive NOTICE: CHL:X ID:XXX Starting Clone
Cloning process started on one of the members of Logical Drive X
Message
LG:X Logical Drive NOTICE: CHL:X ID:XXX Copy and Replace
Completed
Copy and replace is completed with a specific member of Logical
Drive X. The original member drive is replaced by another disk
drive.
Press ESC to clear the message.
What
Happened?
What to Do?
Message
What
Happened?
What to Do?
Message
What
Happened?
What to Do?
Message
What
Happened?
What to Do?
Press ESC to clear the message.
LG:X Logical Drive NOTICE: CHL:X ID:XXX Clone Completed
Cloning is completed with a specific member of Logical Drive 0,
whether it is replaced (Copy and Replace) or cloned (Perpetual
Clone) to a spare drive.
Press ESC to clear the message.
LG:X Logical Drive NOTIFY: Bad Data Block Recovered
000000084
Host writes fall onto the data blocks previously marked bad and
overwrite the drive sectors.
Press ESC to clear the message.
LG:X NOTICE: CHL:X ID:XXX Media Scan Failed
Media Scan failed to carry on with scanning drive(s) for certain
reasons, e.g., a logical drive or a disk drive has fatally or physically
failed.
Media Scan on a failed disk drive will stop, but the scan on healthy
members of a target LD will continue.
For some OEM version, the choice between proceeding or ending a
Media Scan operation depends on the integrity of an LD. If the LD
status is not good, e.g., a member drive fails and enters a degraded
mode, then the Media Scan operation will pause for healthy
members of the target LD. When the LD restores its good status,
e.g., a faulty drive replaced and the LD is successfully rebuilt, then
firmware will resume the Media Scan operation. Media Scan on the
replacement drive will start from the beginning.
Message
What
Happened?
22
NOTICE: CHL:X ID:XXX Media Scan Failed
Media Scan failed to carry on with scanning drive(s) for certain
reasons, e.g., a logical drive or a disk drive has fatally or physically
Galaxy DS
What to Do?
failed.
Media Scan on a failed disk drive will stop, but the scan on healthy
members of a target LD will continue.
For some OEM version, the choice between proceeding or ending a
Media Scan operation depends on the integrity of an LD. If the LD
status is not good, e.g., a member drive fails and enters a degraded
mode, then the Media Scan operation will pause for healthy
members of the target LD. When the LD restores its good status,
e.g., a faulty drive replaced and the LD is successfully rebuilt, then
firmware will resume the Media Scan operation. Media Scan on the
replacement drive will start from the beginning.
Message
What
Happened?
What to Do?
Message
What
Happened?
What to Do?
Message
What
Happened?
What to Do?
LG:X Logical Drive ALERT: Degraded
Degraded mode means a logical drive has one or more members
missing: e.g., 1 in RAID5 or 2 in RAID6. The LD is still operational.
However, rebuild is immediately necessary if you do not have a
hot-spare. Even when you have a hot-spare and it already joined
the rebuild, it is recommended that you replace the failed drive, and
configure the replacement drive as a hot-spare (in case that
another drive may fail while system is still performing a rebuild).
Replace the failed drive to begin a manual rebuild or configure a
hot-spare as a precaution against yet another drive failure.
LG:X ALERT: Missing Drive(s)
The LD member drive could have been accidentally removed or
drive connection problems occurred before system boot-up. This
could result from a defective drive or simply when a drive tray is not
properly installed.
The drive could have been accidentally removed or drive
connection problems occurred in the boot time. Check drive
connection and related enclosure status.
LG:X ALERT: CHL:0 ID:132 Media Scan Aborted
Media Scan operation is aborted for certain reasons, e.g., it has
been manually canceled.
Check disk drive and system operation status.
The following events are related to the Shutdown/Restart Logical Drive function (a.k.a.
LD Roaming):
Message
What
Happened?
What to Do?
Message
What
Happened?
Troubleshooting
LG:X Logical Drive #SEV#. State change from on-line to off-line
Event shown when a logical drive is manually pulled off-lined. Then
its members can be moved to another enclosure and then the
logical drive restarted. Note that you must note the slot numbers of
member drives so that you will not swap the wrong drives.
Press ESC to clear the message.
LG:X Logical Drive #SEV#. State change from off-line to on-line
Event shown when a logical drive is manually brought on-line.
When all its members are present, a shutdown (off-line) logical
drive can be brought on-line. You should then perform LUN
mapping to the logical drive if it has been moved from other
enclosure to the present location.
23
What to Do?
Press ESC to clear the message.
Message
What
Happened?
LG:X Logical Drive #SEV#. Remove member drives complete
Event shown when all members of a shutdown logical drive are
removed. This applies when you want to physically move a logical
drive to another enclosure.
Press ESC to clear the message.
What to Do?
Message
What
Happened?
What to Do?
Message
What
Happened?
What to Do?
24
LG:X Logical Drive #SEV#. Member drives restored
This event is shown when all members of a logical drive are moved
to another enclosure, and that enclosure recognize the presence of
all members.
Press ESC to clear the message.
LG:X Logical Drive #SEV#. Undeleted
An accidentally deleted logical drive can be rescued from the LD list
queue as long as its members are still present, not been used to
create another logical drive, and their 256MB reserved space has
not been removed.
Press ESC to clear the message.
Galaxy DS
4.2
Channel and Individual Drive Events
4.2.1 Critical:
Message
What Happened?
What to Do?
CHL:_ ID:___ ALERT: Media Error Unrecoverable-0xD8001C7C
Drive surface media errors found and after rewrites the drive
sectors are determined as physically damaged and unusable.
Data will be reassigned to other drive sectors. Host writes should
continue without problems.
4.2.2 Warning:
Message
What Happened?
What to Do?
Message
What Happened?
What to Do?
CHL:_ ID:_ Target WARN: Unexpected Select Timeout
Drive target select timeout. The specified hard drive cannot be
selected by the RAID controller/subsystem. Whether the drive
has been removed, or the cabling/termination/canister is out of
order.
This could occur if a disk drive is not properly installed or
accidentally removed, or when cable links/backplane
traces/connection become unreliable. Check cabling and drive
installation, and contact your RAID system supplier.
CHL:_ Drive Channel WARN: Unexpected Select Timeout
Drive Channel target select timeout. The specified drive channel
cannot be selected by the RAID controller/subsystem. Faults
might have occurred with the cabling/termination/internal data
paths.
Check cabling and drive installation, and contact your RAID
system supplier.
Message
What Happened?
What to Do?
CHL:_ RCC Channel WARN: Gross Phase/Signal Error Detected
Phase/signal abnormality detected on the specific RCC channel.
Rare occurrence of phase/signal error could be recovered by
firmware retry. Contact your RAID system supplier.
Message
What Happened?
What to Do?
CHL:_ RCC Channel WARN: Unexpected Select Timeout
Phase/signal abnormality detected on the specific RCC channel.
Rare occurrence of phase/signal error could be recovered by
firmware retry. Contact your RAID system supplier.
Message
What Happened?
CHL:_ ID:0 Target WARN: Gross Phase/Signal Error Detected
Phase/signal abnormality detected with a specific target disk
drive.
Check proper installation of disk drives or cabling and contact
your RAID system supplier.
What to Do?
Message
What Happened?
Troubleshooting
CHL:_ Drive Channel WARN: Gross Phase/Signal Error Detected
Phase/signal abnormality detected on the specific drive channel.
25
What to Do?
Contact your RAID system supplier.
Message
What Happened?
What to Do?
CHL:_ RCC Channel WARN: Timeout Waiting for I/O to Complete
I/O timeout on specific RCC channel.
Contact your RAID system supplier.
Message
What Happened?
CHL:_ ID:_ Target WARN: Timeout Waiting for I/O to Complete
Drive-side
target
I/O
timeout.
Possible
drive-side
cabling/termination and canister connection abnormal or drive
malfunctioning.
Check
drive-side
cabling/termination/canister/disk
drive
connections and contact your RAID system supplier.
What to Do?
Message
What Happened?
What to Do?
CHL:_ Drive Channel WARN: Timeout Waiting for I/O to Complete
I/O timeout on specific drive channel.
Contact your RAID system supplier.
Message
What Happened?
What to Do?
CHL:_ RCC Channel WARN: Parity/CRC Error Detected
RCC channel parity or CRC errors detected.
Rare occurrence of these errors can be managed by firmware.
Contact your RAID system supplier.
Message
What Happened?
CHL:_ ID:_ Host Channel WARN: Parity/CRC Error Detected
Parity or CRC errors detected through host channel ID, CHL_
ID_.
Occurrences of these faults usually can be negotiated between
RAID subsystems and application servers. If occurrences
become frequent, contact your RAID system supplier.
What to Do?
Message
What Happened?
What to Do?
Message
What Happened?
What to Do?
Message
What Happened?
What to Do?
26
CHL:_ Host Channel WARN: Parity/CRC Error Detected
Host channel parity or CRC errors detected. Problems with HBA
or host link cables may also result in this event.
Parity and CRC faults can often be negotiated between
application servers and RAID subsystems. Contact your RAID
system supplier if this occurs too frequently.
CHL:_ ID:_ Drive WARN: Unexpected Drive Not Ready (00B)
Unexpected drive not ready returned from a disk drive on CHL:_
ID:_.
Check proper installation of disk drives or cabling connection.
This event often occurs when hot-swapping disk drives and may
be caused by signal glitches. When swapping a disk drive, always
be careful and gentle. If the disk drive fails to respond, the
subsystem should consider the disk drive as a failed drive when
the timeout threshold is reached. Contact your RAID system
supplier.
CHL:_ ID:_ Drive WARN: Drive HW Error (00B)
Drive hardware error returned from a disk drive on CHL:_ ID:_.
The target disk drive may have failed. Contact your RAID system
supplier for a replacement.
Galaxy DS
Message
What Happened?
What to Do?
CHL:_ RCC Channel WARN: Unit Attention Received
Unit attention received from RCC channel CHL:_.
Rare occurrences of these errors can be managed by firmware. If
the problem is not resolved, contact your RAID system supplier.
Message
What Happened?
CHL:_ ID:_ Target WARN: Unit Attention Received (10B)
Drive-side target unit attention received on a disk drive CHL:_
ID:_.
Rare occurrence of these errors can be managed by firmware.
Check disk drive connection and contact your RAID system
supplier.
What to Do?
Message
What Happened?
What to Do?
CHL:_ Drive Channel WARN: Unit Attention Received (10B)
Drive-side target unit attention received on a drive channel CHL:_
ID:_.
Rare occurrence of these errors can be managed by firmware.
Check proper installation and contact your RAID system supplier.
Message
What Happened?
What to Do?
CHL:_ ID:_ Drive WARN: Aborted Command (00B)
Aborted command reported from a disk drive CHL:_ ID:_
Rare occurrence of these errors can be managed by firmware.
This can indicate a drive failure. Contact your RAID system
supplier for a replacement drive.
Message
What Happened?
CHL:_ ID:_ Drive WARN: Unexpected Sense Received (00B)
Drive-side target unexpected sense received on a disk drive
CHL:_ ID:_.
Check drive-side cabling/installation/working conditions. This
may result from bad signal quality or poor connection. Contact
your RAID system supplier.
What to Do?
Message
What Happened?
CHL:_ ID:_ Drive WARN: Block Reassignment Failed – 0(10B)
Data regeneration and reassignment failed.
The Bad Block Table is full. Too many bad blocks have been
found on the disk drive.
What to Do?
Message
What Happened?
What to Do?
Message
What Happened?
What to Do?
Troubleshooting
The adjacent data blocks on other member drives might have also
been damaged.
Rare occurrence of these errors can be managed by firmware.
Contact your RAID system supplier.
CHL:_ RCC Channel WARN: Data Overrun/Underrun Detected
Data overrun/underrun errors detected on the RCC channel
CHL:_.
Rare occurrence of these errors can be managed by firmware.
Contact your RAID system supplier.
CHL:_ ID:_ Target WARN: Data Overrun/Underrun Detected
Data overrun/underrun errors detected on a disk drive CHL:_
ID:_.
Rare occurrence of these errors can be managed by firmware.
27
Contact your RAID system supplier.
Message
What Happened?
What to Do?
CHL:_ Drive Channel WARN: Data Overrun/Underrun Detected
Data overrun/underrun errors detected on the drive channel
CHL:_.
Rare occurrence of these errors can be managed by firmware.
Contact your RAID system supplier.
Message
What Happened?
What to Do?
CHL:_ RCC Channel WARN: Negotiation Error Detected
Negotiation errors occurred on the RCC channel CHL:_.
Rare occurrence of these errors can be managed by firmware.
Contact your RAID system supplier.
Message
What Happened?
CHL:_ ID:_ Target WARN: Negotiation Error Detected
Negotiation errors occurred with the communications with a disk
drive CHL:_ ID:_. The event could also occur with drive target
data bus sync/wide negotiation abnormality.
Rare occurrence of these errors can be managed by firmware.
Contact your RAID system supplier.
What to Do?
Message
What Happened?
What to Do?
CHL:_ Drive Channel WARN: Negotiation Error Detected
Negotiation errors occurred with the communications over a drive
channel CHL:_. The event could also occur with drive target data
bus sync/wide negotiation abnormality.
Rare occurrence of these errors can be managed by firmware.
Contact your RAID system supplier.
Message
What Happened?
What to Do?
CHL:_ RCC Channel WARN: Invalid Status/Sense Data Received
Invalid status/sense data received on the RCC channel CHL:_
Rare occurrence of these errors can be managed by firmware.
Contact your RAID system supplier.
Message
CHL:_ ID:_ Target WARN: Invalid Status/Sense Data Received
(10B)
Invalid status/sense data received by a disk drive CHL:_ ID:_.
Rare occurrence of these errors can be managed by firmware.
Contact your RAID system supplier.
What Happened?
What to Do?
Message
What Happened?
What to Do?
Message
What Happened?
What to Do?
28
CHL:_ Drive Channel WARN: Invalid Status/Sense Data
Received
Invalid status/sense data received on the drive channel CHL:_
Rare occurrence of these errors can be managed by firmware.
Contact your RAID system supplier.
CHL:_ WARN: Redundant Loop Connection Error Detected on
ID:_
One of the dual loop members might have failed or been
disconnected. Make sure all cabling are properly connected and
topological configurations properly set.
Check cabling and channel bus working conditions. If the
problem does not result from cabling problems, contact your
RAID system supplier.
Galaxy DS
Message
What Happened?
What to Do?
CHL:_ Host Channel WARN: Channel Failure
Host channel CHL:_ link failure or disconnection occurred.
Check proper cabling connection and host HBA, link connection
devices, etc. Contact your RAID system supplier.
Message
What Happened?
WARN:SMART-Slot _ Predictable Failure Detected-Clone Failed
Hard drive(s) report SMART-detected defects. A spare drive is
commenced to clone or replace the member drive showing
defects. The cloning operation failed. The member drive
suspected of errors might have failed, or the clone process has
been interrupted, e.g., yet another member has failed or the spare
drive used for cloning has shown immanent faults.
Carefully check drive status and replace the unstable/failed drive.
Contact your RAID system supplier.
What to Do?
Message
What Happened?
What to Do?
Message
What Happened?
What to Do?
Message
What Happened?
What to Do?
Message
What Happened?
What to Do?
Message
What Happened?
Troubleshooting
WARN:SMART-Slot _ Predictable Failure Detected
Hard drive slot:_ reported SMART-detected errors, e.g., abnormal
rotation speed, seek time delay, etc.
Carefully check drive status and replace the unstable/failed drive.
Contact your RAID system supplier.
WARN:SMART-Slot _ Predictable Failure Detected-Starting
Clone
One or more hard drive(s) reports SMART-detected defects.
Starts using a pre-defined spare drive to clone the member drive
suspected of inherent errors. This happens when SMART
detection is enabled with the “Copy & Replace” or “Perpetual
Clone” reaction schemes.
Press ESC to clear the message. After the cloning process, you
may consider replacing the defective drive with a good one and
configure it as a spare drive in case drive failure might happen in
the future.
CHL:_ WARN: Fibre Channel Loop Failure Detected
Fibre Channel loop integrity warning. Lack of bypass or nodes on
a loop caused a Fibre loop to fail.
Check host- or drive-side connection. Contact your RAID system
supplier.
CHL:_ WARN: Redundant Loop for CHL:_ Failure Detected
One of the dual loop members may have failed or been
disconnected. Make sure all channels are properly connected
and topological configurations properly set.
Check cabling and system installation. Contact your supplier if no
connection errors could be found.
CHL:_ WARN: Redundant Path for CHL:_ ID:_ Expected but Not
Found
One of the dual loop members may have failed or been
disconnected. This event is regenerated in the event when one of
the dual loop connections to an expansion enclosure can not be
found after power-up.
Make sure all channels are properly
29
What to Do?
Message
What Happened?
What to Do?
Message
What Happened?
What to Do?
connected and topological configurations properly set.
Check cabling and system installation. A manual “Issue LIP”
command may restore the connection. Contact your supplier if no
connection errors could be found.
CHL:_ ID:_ WARN: Redundant Path for CHL:_ ID:_ Failure
Detected
One of the dual loop members connecting device CHL:_ ID:_ may
have failed or been disconnected. Make sure all channels are
properly connected and topological configurations properly set.
Check cabling and system installation. Contact your supplier if no
connection errors could be found.
Slot:X Drive WARN: Excessive Bad Block Advisory (0/0)
Multiple instances of bad blocks have been found on a disk drive.
The disk drive can be faulty and causing drag to LD performance.
If the situation worsens, this drive can be considered as an Exiled
drive and disbanded from a logical drive.
You may consider replacing an unreliable drive using the Copy
and Replace function or use the “Drive Performance Monitor”
utility in GAM to check a drive’s read/write latency. If a drive
member produces high latency, you can consider replacing it.
4.2.3 Notification:
Message
What Happened?
What to Do?
Message
What Happened?
What to Do?
Message
What Happened?
What to Do?
30
Invalid trunking configuration for Slot X-CHX
Incongruent settings on system host ports and Ethernet switch
ports. The most probable reason is that switch ports have not
been configured into corresponding trunked ports.
You might as well have configured MC/S (Multiple Connections
per Session) that does not match your trunk setting; e.g., CH0 &
CH1 into MC/S group whereas you configure CH0~CH3 into a
trunk group.
Check trunk (Link Aggregation) settings on your Ethernet switch.
CHL:_ ID:_ NOTICE: Media Error Recovered-0xD8001C7C
Data once stored on bad drive sectors has been successfully
re-conducted from adjacent data blocks/stripes onto the original
drive blocks or distributed onto other healthy sectors.
** Galaxy firmware translates SATA error codes into SCSI
standard sense keys and sense codes. That’s the error codes at
the end of message.
Press ESC to clear the message.
CHL:_ NOTICE: Fibre Channel Loop Connection Restored
Specific Fibre Channel loop connection restored.
Check proper host- or drive-side activities. Press ESC to clear
the message.
Galaxy DS
Message
What Happened?
What to Do?
Message
What Happened?
What to Do?
CHL:_ ID:_ NOTICE: Redundant Path for CHL:_ Restored
Redundant path, one of the drive-side loop members, for CHL:_
ID:_ is restored.
Check proper host- or drive-side activities. Press ESC to clear the
message.
CHL:_ NOTICE: Redundant Path for CHL:_ ID:_ Restored
The redundant path (CHL:_) connecting drive (CHL:_ ID:_) is
restored.
Check proper host- or drive-side activities. Press ESC to clear the
message.
Message
What Happened?
What to Do?
CHL:_ Host Channel Notification: Bus Reset Issued.
Bus reset on the CHL:_ host channel.
Check proper host- or drive-side activities. Press ESC to clear the
message.
Message
What Happened?
CHL:_ ID:_ Drive NOTICE: Scan Drive Successful
A new drive or a replacement drive has been successfully
scanned/recognized by the subsystem.
Press ESC to clear the message.
What to Do?
Message
What Happened?
What to Do?
Message
What Happened?
What to Do?
Troubleshooting
CHL:_ ID:_ Drive NOTIFY: Block Successfully Reassigned – 0
(10B)
Writes conducted, retried, and media errors were discovered.
Writes will then be re-directed to other drive sectors.
Press ESC to clear the message. If this message becomes
frequent, the target disk drive might have developed serious
media errors.
CHL:_ ID_ Drive #SEV#: Media Error Encountered
Media errors are encountered in a hard drive.
Press ESC to clear the message. If this message becomes
frequent, the target disk drive might have developed serious
media errors.
31
4.3
General Target Events
IMPORTANT!
Firmware revision 3.63 added event strings for I2C slave devices. The I2C device error
is indicated by a bracketed message such as “FAN0 status Failure Detected(2)” by the
end of a peripheral device event. The cause of an error can be an I2C bus arbitration
error, bus timeout, or a slave device content error.
NOTE:
In the event of dual PSU failure of a 4U RAID enclosure, both the RAID controller and
logical drives will enter a “shutdown” state for lack of wattage. When the PSU failure
is corrected, users should manually power-cycle the system to re-activate system
operation.
Error Code Definitions:
Exp: Peripheral Set 0 Device ALERT: PSUX Failure Detected (error code)
Error codes are related to I2C bus communication errors. Below are the conditions
with the display of I2C error codes:
1. Hardware module peripheral device failures such as those for PSU and cooling
fans will not have an error code attached to the end of event messages.
2. Peripheral Device Warning (diicc) – indicates I2C bus communication errors.
Where Device Types <d> can be: Voltage (V), PSU (P), FAN (F), Temperature
(T), and BBU (B).
<ii> is component index.
<cc> is the bus error type including: 01 - I2C command NoAck, 02 - I2C
command timeout, and 03 - I2C command arbitration lost
3. <NOTICE> Peripheral Device Notification (dii) – indicates I2C bus
communication errors have been recovered.
4.3.1 Critical:
Message
What Happened?
What to Do?
Peripheral Set 0 Device ALERT: PSUX Failure Detected (error
code)
Power supply failure detected through an I2C serial bus.
Check the Power Supply Status LED on the front panel of system
or check the PSU Status LED on the power supply unit on the rear
panel.
If the Amber LED is lit constantly, that indicates that a power
supply has failed.
32
Galaxy DS
If the LED is off, check the power cord is connected correctly or
the corresponding AC is intact.
Contact your RAID supplier for a replacement module.
Message
What Happened?
What to Do?
Peripheral Set 0 Device ALERT: PSUX Not Present (error code)
No power supply module is installed in the expected module slot.
Check proper module installation. If an installed module can not
be detected, contact your RAID supplier.
Message
Peripheral Set 0 Device ALERT: Low Voltage Detected (5V) (error
code)
Low voltage detected from the power supply. Power supply may
have become unstable.
Check proper module installation and contact your RAID supplier
for a replacement module.
What Happened?
What to Do?
Message
What Happened?
What to Do?
Message
What Happened?
What to Do?
Message
What Happened?
What to Do?
Message
What Happened?
What to Do?
Message
What Happened?
What to Do?
Troubleshooting
Peripheral Set 0 Device ALERT: Cooling FanX Failure Detected
(error code)
Cooling fan failure detected through an I2C serial bus.
Check the Cooling Fan Status LED on the front/rear panel of
RAID/SBOD system. If the Amber LED is lit constantly, that
indicates at least one cooling fan within a module has failed.
Check your hardware manual for LED locations.
Contact your RAID supplier for a replacement module.
Peripheral Set 0 Device ALERT: Cooling FanX Not Present (error
code)
No cooling fan module is installed in the expected module slot.
Check proper module installation or contact your RAID supplier
for a replacement module.
Peripheral Set 0 Device ALERT: Low Speed Detected (XXXX
RPM) (error code)
Low rotation speed detected on cooling fan. This is a fault
detected through an I2C serial bus.
Check proper module installation or contact your RAID supplier
for a replacement module.
SES(C0 I0)Cooling Fan X: Device Not Supported!
Unrecognizable device type. This event may result from an
incorrect configuration with the SES remote device monitoring.
Check proper module installation and contact your RAID system
supplier.
Peripheral Device ALERT: CPU Cold Temperature Detected
(X.X(C)) (error code)
Temperature below the lower CPU threshold is detected.
Improper installation site condition might have caused the
situation. Always acclimate a system to an appropriate room
temperature before powering up.
Correct your installation site condition. Contact your RAID system
supplier.
33
Message
What Happened?
What to Do?
Message
What Happened?
What to Do?
Message
What Happened?
What to Do?
Message
What Happened?
What to Do?
Message
What Happened?
What to Do?
Message
What Happened?
What to Do?
Message
What Happened?
What to Do?
Message
34
Peripheral Device ALERT: Elevated Temperature Alert
High temperature threshold violated and detected through an I2C
serial bus. Insufficient cooling at the installation site or cooling fan
failure might have caused the situation.
Correct your installation site ambient condition and cooling fan
failure. Contact your RAID system supplier if a replacement is
necessary.
Peripheral Set 0 Device ALERT: Backplane Temperature Failure
Detected (error code)
Temperature sensor on the backplane has failed or reported
erroneous readings.
Contact your RAID system supplier.
Peripheral Set 0 Device ALERT: Backplane Temperature Not
Present (error code)
IIC bus lost contact with the backplane sensor.
Contact your RAID system supplier.
Peripheral Set 0 Device ALERT: Temperature Sensor 0 Not
Present
Temperature sensor failed or serial bus configuration/connection
faults occurred.
Contact your RAID system supplier.
Peripheral Set 0 Device ALERT: Cold Detected (X.X(C)) (error
code)
Temperature dropped below the lower system threshold detected.
Improper installation site condition might have caused the
situation.
Correct your installation site condition. Contact your RAID system
supplier.
Peripheral Set 0 Device ALERT: Hot Detected (X.X(C)) (error
code)
Temperature rises above the higher system threshold detected.
Improper installation site condition or cooling fan failure might
have caused the situation.
Correct your installation site condition. Contact your RAID system
supplier.
SES(C0 I0)Power Supply X: Device Not Supported!
Unrecognizable device type. This event may result from an
incorrect configuration with the SES remote device monitoring.
You might have inserted a wrong type of PSU from a similar
Galaxy model. PSUs for different Galaxy models may look similar.
Check proper module installation and contact your RAID system
supplier.
SES(C0 I0)Cooling Fan X: Device Not Supported!
Galaxy DS
What Happened?
What to Do?
Message
What Happened?
What to Do?
Message
What Happened?
What to Do?
Message
What Happened?
What to Do?
Unrecognizable device type. This event may result from an
incorrect configuration with the SES remote device monitoring.
Check proper module installation and contact your RAID system
supplier.
SES(C0 I0)Temp Sensor X: Device Not Supported!
Unrecognizable device type. This event may result from an
incorrect configuration with the SES remote device monitoring.
Check proper module installation and contact your RAID system
supplier.
SES(C0 I0)UPS X ALERT: Device Not Supported!
Unrecognizable device type. This event may result from an
incorrect configuration with the SES remote device monitoring.
Check proper module installation and contact your RAID system
supplier. The type of attached UPS may not be supported.
SES(C0 I0)UPS 2: Device Not Supported!
Unrecognizable device type. This event may result from an
incorrect configuration with the SES remote device monitoring.
Check proper module installation and contact your RAID system
supplier.
Message
What Happened?
What to Do?
ALERT: UPS Connection Is Absent
The COM2 link to a UPS device is absent.
Check cabling to the UPS device. If hardware faults occurred,
contact your RAID system supplier.
Message
What Happened?
ALERT: UPS AC Power-Loss Detected
UPS AC power loss reported through the COM2 serial port
connection.
Contact your UPS supplier.
What to Do?
Message
What Happened?
What to Do?
Message
What Happened?
What to Do?
Message
Troubleshooting
ALERT: UPS Battery Low - __%
UPS battery charge low, may not be able to support subsystem
during a power outage.
Wait for the UPS to recharge or you may use the Event Triggered
mechanisms implemented with firmware. These mechanisms use
conservative write-through caching mode to reduce the chance of
data loss in the event of power outage. Contact your UPS
supplier.
Peripheral Set 0 Device ALERT: UPS X AC Power Failure
Detected
AC power source failure reported by UPS and to the subsystem
firmware through an I2C serial bus.
Check your power source connection or contact your RAID
system supplier.
Peripheral Set 0 Device ALERT: UPS X Battery Failure Detected
35
What Happened?
What to Do?
Message
What Happened?
What to Do?
Message
What Happened?
What to Do?
UPS battery failure reported by UPS and to the subsystem
firmware through an I2C serial bus.
Contact your UPS supplier.
ALERT: Redundant Controller Failure Detected
One RAID controller in a controller pair has failed. Check if the
failover process runs smoothly. You may need to reduce the
workload on the storage system having a single controller failure
because the surviving controller takes over all the workload on the
failed controller.
Contact your system supplier for a replacement.
ALERT: Enclosure ID Conflict/Invalid
Incorrect enclosure ID setting.
Check ID rotary switch at the front of RAID or SBOD enclosures.
Some enclosures, have related DIP switches that might have
been accidentally flipped to wrong configuration. A RAID
enclosure’s ID DIP switches should normally not be changed.
Please refer to the hardware manual that came with your array.
Ensure that all enclosures in a RAID-JBOD configuration is
configured with a unique enclosure ID.
Message
What Happened?
What to Do?
ALERT: Enclosure IDX Invalid Drive Configuration
Incorrect enclosure ID setting with the shown ID, may be a conflict
with attached enclosures.
Check ID rotary switch at the front of RAID or SBOD enclosures.
Some enclosures, e.g., Galaxy Fibre drive models, have related
DIP switches that might have been accidentally flipped to wrong
configuration. A RAID enclosure’s ID DIP switches should
normally not be changed. Please refer to the hardware manual
that came with your array.
Ensure that all enclosures in a RAID-JBOD configuration is
configured with a unique enclosure ID.
4.3.2 Notification:
Message
What Happened?
What to Do?
Message
What Happened?
Peripheral Set X Device NOTICE: PSUX Back On-Line
The Peripheral Set number indicates the location where the event
occurred (e.g., 0=RAID enclosure, 1=attached JBOD). A PSU has
been successfully replaced or re-installed.
Press ESC to clear this message.
What to Do?
Peripheral Set X Device NOTICE: PSUX is Present
The Peripheral Set number indicates the location where the event
occurred (e.g., 0=RAID enclosure, 1=attached JBOD). A PSU
once missing is now present in the module bay.
Press ESC to clear this message.
Message
Peripheral Set X Device NOTICE: PSUX Back On-Line (5.0V)
36
Galaxy DS
What Happened?
What to Do?
Message
What Happened?
What to Do?
Message
What Happened?
What to Do?
Message
What Happened?
The Peripheral Set number indicates the location where the event
occurred (e.g., 0=RAID enclosure, 1=attached JBOD). The 5.0V
line from PSU is now successfully restored.
Press ESC to clear this message.
NOTICE: Fan Module X Back On-Line(FAN0 _RPM)
A once missing or failed cooling fan is restored. This message is
reported through an I2C serial bus with RPM reading.
Press ESC to clear this message.
NOTICE: Controller FAN X Back On-Line(_ RPM)
A once missing or failed cooling fan is restored. This message is
reported through an I2C serial bus with RPM reading.
Press ESC to clear this message.
What to Do?
Peripheral Device NOTICE: Fan Back On-Line
An I2C serial bus message indicating a once missing or failed
cooling fan is restored.
Press ESC to clear this message.
Message
What Happened?
What to Do?
Peripheral Set X Device NOTICE: Cooling fanX Back On-Line
An individual cooling fan once missing or failed is restored.
Press ESC to clear this message.
Message
What Happened?
What to Do?
Peripheral Set X Device NOTICE: FAN X is Present
An individual cooling fan once missing or failed is restored.
Press ESC to clear this message.
Message
Peripheral Set X Device NOTICE: Cooling fanX Back
On-Line(_RPM)
An individual cooling fan once missing or failed is restored, and
the PRM reading displays. This applies to enclosure
implementations using cooling fans capable of reporting rotation
speed.
Press ESC to clear this message.
What Happened?
What to Do?
Message
What Happened?
What to Do?
Message
What Happened?
What to Do?
Message
What Happened?
What to Do?
Troubleshooting
SES(C0 I0) Cooling Fan X: Fan Back On-Line
A cooling fan once missing or failed is restored. This message is
reported through an SES monitoring device.
Press ESC to clear this message.
Peripheral Set 1 Device NOTICE: Temperature 1 Back To
Non-Critical LVs
Temperature sensor 1 reports operating temperature is now
within normal temperature range.
Press ESC to clear this message.
Peripheral Set 1 Device NOTICE: Temperature 1 is Present
Temperature sensor 1 once missing and is now present on the
serial bus.
Press ESC to clear this message.
37
Message
What Happened?
What to Do?
Message
What Happened?
SES(C0 I0) Temp Sensor X: Temperature Back to Non-Critical
LVs
Temperature sensor 1 reports operating temperature is now
within normal temperature range.
Press ESC to clear this message.
What to Do?
NOTICE: Power Supply X Back-Online
Power supply module 0 is back online. Shown when a failed PSU
is replaced or re-installed.
Press ESC to clear this message.
Message
What Happened?
What to Do?
Peripheral Set 0 Device NOTICE: PSU0 +12V Back On-Line
Power supply module 0 restored normal +12V voltage range
Press ESC to clear this message.
Message
What Happened?
What to Do?
Peripheral Set 0 Device NOTICE: PSU0 +12V is Present
Power supply module 0 restored normal +12V voltage range
Press ESC to clear this message.
Message
What Happened?
What to Do?
Peripheral Set 0 Device NOTICE: PSU0 +12V Back
On-Line(5.0V)
Power supply module 0 restored normal +12V voltage range
Press ESC to clear this message.
Message
What Happened?
What to Do?
SES(C0 I0)Power Supply X: Power Supply Back On-Line
Power supply module 2 once missing or failed is now restored.
Press ESC to clear this message.
Message
What Happened?
What to Do?
NOTICE: UPS Connection Detected
The COM2 serial link to UPS device is now valid.
Press ESC to clear this message.
Message
What Happened?
What to Do?
NOTICE: UPS AC Power Restored
UPS reports AC power source is now restored.
Press ESC to clear this message.
Message
What Happened?
NOTICE: PS Battery Restored to Safe Level _%
UPS battery is charged to a safe level, able to protect cached data
during system operation.
Press ESC to clear this message.
What to Do?
Message
What Happened?
What to Do?
Peripheral Set X Device NOTICE: UPS X AC Power Back
On-Line
UPS 2 AC power source restored.
Press ESC to clear this message.
Message
What Happened?
What to Do?
Peripheral Set X Device NOTICE: UPS X Battery Back On-Line
UPS 2 Battery charge or battery failure restored.
Press ESC to clear this message.
38
Galaxy DS
Message
What Happened?
What to Do?
SES(C0 I0)UPS 2: UPS Power Back On-Line
UPS 2 connected through SES interface reports power back
online.
Press ESC to clear this message.
Message
What Happened?
What to Do?
NOTICE: CPU Cold Temperature Back To Normal
Cold temperature has risen up back to the normal range.
Press ESC to clear this message.
Message
What Happened?
Controller Cold Temperature Back To Normal (sensor no.);
Cold temperature has risen up back to the normal range. Reading
from a sensor on controller board.
Press ESC to clear this message.
What to Do?
Message
What Happened?
What to Do?
Message
What Happened?
What to Do?
Message
What Happened?
What to Do?
Message
What Happened?
What to Do?
Troubleshooting
ASIC Cold Temperature Back To Normal (sensor no.);
Cold temperature has risen up back to the normal range. Reading
from a sensor on ASIC.
Press ESC to clear this message.
IO chip Cold Temperature Back To Normal (sensor no.);
Cold temperature has risen up back to the normal range. Reading
from a sensor on IO chip.
Press ESC to clear this message.
Peripheral Set X Device NOTICE: Backplane Temperature Back
to Normal
The Peripheral Set number indicates the location where the event
occurred (e.g., 0=RAID enclosure, 1=attached JBOD). Sensor on
a backplane reports normal temperature reading.
Press ESC to clear this message.
Peripheral Set X Device Notice: Backplane Temperature is
Present
The Peripheral Set number indicates the location where the event
occurred (e.g., 0=RAID enclosure, 1=attached JBOD). Sensor is
now present on the backplane.
Press ESC to clear this message.
39
4.4
Controller Events
4.4.1 Critical:
Message
What
Happened?
What to Do?
License key data consistency check failed
This could occur when installing a HDX, HDX2, or HDX3 controller
to an HDX4 enclosure. The license key verifies system serial
number against the applied features. This may also occur when the
license key is due.
Contact Galaxy’s technical support and provide them with the
information of current firmware revision.
Message
What
Happened?
License key not supported by install FW
This could occur when you apply Galaxy HDX4 DS firmware to an
enclosure running earlier HDX, HDX2, or HDX3 firmware. RAID
controllers cannot be swapped between different storage models
including Galaxy HDX, HDX2, HDX3, and HDX4.
What to Do?
Contact Galaxy’s technical support and provide them with the
information of current firmware revision.
Message
What Happened?
What to Do?
Message
What Happened?
What to Do?
Message
What Happened?
What to Do?
Message
40
ALERT: +3.3V Low Voltage Detected(_._V) (error code)
The detected +3.3V voltage source is lower than the preset
voltage threshold.
1. Check power supply working condition
2. Check voltage threshold settings, if you do not know the
appropriate threshold value for voltage monitoring, please
use the default setting for voltage threshold.
3. If the alert still occurs then it can result from controller
hardware problems. Please contact your RAID system
supplier for a replacement controller.
ALERT: Controller FAN 0 Low Speed Detected (_RPM)
This only applies to controller fans in the certain Galaxy series.
Low rotation speed detected.
Contact your RAID system supplier for a replacement.
Controller ALERT: Redundant Controller Failure Detected
One RAID controller in a controller pair failed. This message
indicates that its partner has taken the workload and managed the
failover operation.
The fault can result from the following:
1. A RAID controller failure
2. The partner controllers cannot communicate with each other.
The other major reason can be the failure of the inter-controller
communication channels. It could result from the defects of one or
both RAID controllers, or that of the backplane.
Contact your RAID system supplier for a replacement controller
and restore the dual-active configuration.
Controller PCI Bus Parity Errors Detected
Galaxy DS
What Happened?
What to Do?
Serious system faults have occurred.
Stop host I/Os immediately to prevent further data integrity errors
and contact your RAID system supplier.
Message
What Happened?
ALERT: Controller BBU Failure Detected! (error code)
BBU (battery cell pack) has failed or is accidentally removed.
When a new module is installed, reset the subsystem for the
configuration to take effect.
Check proper installation of the module or contact your RAID
system supplier for a replacement module.
What to Do?
Message
What Happened?
What to Do?
Message
What Happened?
What to Do?
Message
What Happened?
What to Do?
Message
What Happened?
Troubleshooting
WARN: BBU Charger entered Self-protection state (error code)
The following conditions will cause the charger circuits to enter a
low-power and self-protection state:
1. The temperature sensor on the charger circuit reports
elevated temperature reading (>= 45 degree Celsius).
2. The BBU (battery cell pack) has been charged for over 14.3
hours. The BBU charger will enter a timer fault state.
1. Check proper ventilation within the subsystem. You may also
check the readings from other sensors within the enclosure.
Airflow might have been disrupted by the absence of one or
several major modules or the failure of a cooling fan. Once the
thermal condition is improved, charging will resume
automatically.
2. If a new or totally-discharged battery module has been
charged for over 14.3 hours and this event is issued, you may
remove and re-install the battery module. An empty battery
module may take more than 14.3 hours to be fully charged.
There is a timer embedded with the charger, doing so can
reset the timer. Charging will resume automatically.
3. If a BBU has been left unused for a long time, it will be totally
discharged, and its usability may become a problem.
ALERT: Force Controller Shutdown Start
System start to shutdown triggered by user or other configured
event action. For example, 2 of the 3 PSUs in a 4U Galaxy failed
or an elevated temperature is detected, controller firmware will
force the controller to enter a non-responsive shutdown state.
Note that the system does not electronically shut down.
Check proper working condition and press ESC to clear the
message.
ALERT: Force Controller Shutdown Complete
System shutdown is complete. Cache is clean, and you can
manually turn off the system power or reset the system.
Press ESC to clear the message.
Fatal: Power exhausted while backup to EBU, cached data might
be lost
Insufficient charge in battery to supply the transmission of data
from cache memory to CBM backup module.
41
What to Do?
Battery might not be able supply enough electricity. Replace the
battery. Battery charger defects may also cause the insufficient
charge. Change the battery every 3 years.
Message
What Happened?
Fatal: EBU Cached Data Read error
Read errors occurred with the CBM module. Cached data can be
lost.
Contact technical support for help.
What to Do?
4.4.2 Warning:
Message
What Happened?
What to Do?
Firmware synchronization started
Refer to Appendix B for more information.
Check if firmware synchronization is properly processed. You may
need to reset the system later.
Message
What Happened?
WARN: Memory Not Sufficient to Fully Support Current Config.
The installed memory size does not support current configuration.
Try using a DIMM module of a larger size.
Check proper installation of the module or contact your RAID
system supplier for a certified module.
What to Do?
Message
What Happened?
What to Do?
WARN: Controller Memory ECC Multi-bits Error Detected (1); no
(_) = slot; (1) = onboard
Mostly results from cache memory faults.
Contact system supplier for a replacement DIMM module.
Message
What Happened?
What to Do?
WARN: Controller Memory ECC Single-bit Error Detected (1)
Data bus signal errors.
Contact technical support for help.
Message
What Happened?
What to Do?
Warning: Wrong EBU inserted
A wrong type of EBU is installed to controller.
Contact and verify with your system vendor for a replacement.
Message
What Happened?
Warning: Restore EBU data failed
Data kept in EBU (also known as CBM) during power outage has
failed.
Contact technical support for help.
What to Do?
Message
What Happened?
42
Warning: Firmware cannot recognize the format of backed up
Cached data
Data comparison errors occur with data saved to the CBM flash
Galaxy DS
What to Do?
Message
What Happened?
What to Do?
Message
What Happened?
module. Data inconsistency could have occurred when data is
distributed to flash module in a power outage.
Contact technical support for help.
Warning: Inconsistent Installed Memory for Cached Data(%MB)
Restored
Inconsistent DIMM module type or size that does not allow data
retrieval from flash module.
Contact technical support for help.
What to Do?
Warning: Incorrect unique ID (%d=%d) for EBU data restored
The flash module might have been installed to another controller,
causing problems with data transmission.
Contact technical support for help.
Message
What Happened?
What to Do?
Warning: Backed-up Cached Data was stalled
Cached data cannot be successfully distributed to flash memory
Contact technical support for help.
4.4.3 Notification:
Message
What Happened?
What to Do?
Message
What Happened?
NOTICE: Force Controller Write-Through on Trigger Cause
Preset conditions, e.g., elevated temperature or component
failure, has forced the subsystem to adopt a more conservative
operating mode by disabling the Write-Back caching.
Check proper working condition and correct system faults. Press
ESC to clear the message.
What to Do?
NOTICE: Controller Default Write Policy Restore
Controller write caching policy has been forcefully changed to a
conservative Write-through policy to avoid risk of losing data.
When the fault conditions have been corrected, e.g., temp back to
normal or voltage readings become normal, the original Write
Policy will return to normal.
Check if firmware synchronization is properly processed.
Message
What Happened?
What to Do?
Firmware synchronization completed
Refer to Appendix B for more information.
Check if firmware synchronization is properly processed.
Message
What Happened?
NOTICE: +12V Upper Voltage Back To Normal (_._V)
+12V voltage dropped back within preset thresholds.
Troubleshooting
43
What to Do?
Check proper working condition and press ESC to clear the
message.
Message
What Happened?
What to Do?
NOTICE: +12V Lower Voltage Back to Normal (_._V)
+12V voltage dropped back within preset thresholds.
Check proper working condition and press ESC to clear the
message.
Message
What Happened?
Memory is Now Sufficient to Fully Support Current Config.
Memory of a sufficient capacity is installed and the subsystem
should work properly. This event could prompt after replacing a
controller DIMM module or upgrading from a 512MB DIMM to a
1GB DIMM. With 1GB DIMM, you can create 1024 LUNs and 32
logical drives, etc., on an HDX2 RAID system. With 512MB
DIMM, you may not be able to create the max. supported LUNs,
etc.
Check proper working condition and press ESC to clear the
message.
What to Do?
Message
What Happened?
What to Do?
Controller NOTICE: NVRAM Factory Defaults Restored
The factory defaults for system configuration profile are restored.
Press ESC to clear the message.
Message
What Happened?
NOTICE: NVRAM Restore From File is Completed
The factory defaults are restored from a file saved on a host
computer’s system drive.
Press ESC to clear the message.
What to Do?
Message
What Happened?
What to Do?
Message
What Happened?
What to Do?
Message
What Happened?
What to Do?
Message
What Happened?
44
NOTICE: NVRAM Restore From Disk is Completed
The factory defaults are restored from a copy saved in logical
drive’s reserved space.
Press ESC to clear the message.
NOTICE: Controller BBU is Charging!
Once a new BBU is installed or BBU charge drops below a
preconfigured level, the subsystem will start charging its batteries.
Press ESC to clear the message. All batteries have a limited life
expectancy. If this message appears too frequently, the BBU may
have gradually lost its ability to hold charge.
NOTICE: Controller BBU is Present!
A BBU once missing or removed is now electrically connected to
the subsystem.
Check proper working condition and press ESC to clear the
message.
NOTICE: Controller BBU Back On-Line!
A BBU once missing or removed is now restored to its normal
Galaxy DS
What to Do?
working condition.
Check proper working condition and press ESC to clear the
message.
Message
What Happened?
What to Do?
NOTICE: Controller BBU Fully Charged!
A BBU is fully charged.
Check proper working condition and press ESC to clear the
message.
Message
What Happened?
NOTICE: Redundant Controller Firmware Updated
Firmware updated on a redundant controller RAID subsystem.
Resetting the subsystem may be required for the new firmware to
take effect.
Updating firmware on a complex system configuration is
recommended for experienced engineers only. Unless for bug
fixing, updating firmware is not always necessary.
What to Do?
Troubleshooting
45
5. Service LED (on Models that Come with an LED Side Panel)
The service LED is available with the Galaxy series JBOD expansion enclosures
(SBOD/JBOD).
The service LED can be enabled by a single click on the GAM screen icon from a remote
site to identify which subsystem needs attention. For example, an administrator receives
component failure event, and turns on the enclosure service LED using the GAM GUI, so
that an engineer on the installation site can easily locate the faulty component. When
turned on, the corresponding subsystem LED will also be lit on the GAM GUI screen.
A mouse click on the service LED in the GAM screen lights the service LED.
The Services LED helps you locate a specific enclosure in a complex configuration
consisting of multiple enclosures.
A RAID administrator can be notified by component failure event via a variety of
notification methods.
46
Galaxy DS
An administrator may initiate the Service ID by clicking on the LED icon in GAM’s
Enclosure View so that he can easily locate the faulty drive later.
An engineer can then locate and replace the failed drive on the installation site.
After servicing the subsystem, the administrator should turn off this service LED by
manually pressing the service button on the chassis or remotely using the GAM
management software.
Troubleshooting
47
Appendix A Concerns for Replacing a Failed
Controller
There is a “1GB” parameter threshold for NVRAM defaults in earlier Galaxy disk array
firmware. The 1GB threshold determines whether your RAID supports a standard or a
large number of logical configurations by the size of cache memory.
NOTE that the 1GB threshold no longer applies to all HDX4 models (ASIC667). All HDX4
models come with max. numbers of logical configurations, e.g., 32 LDs and 1024 LUNs.
The supported numbers by different DIMM sizes are shown below:
Feature
64-bit LBA Support (>2TB)
De f a u lt Va lu e
<1GB DIMM
>= 1GB DIMM
Yes
Yes
Number of LDs
16 (Max.)
32 (Max.)
Number of LVs
8 (Max.)
16 (Max.)
Number of Partitions per LD
16 (Max.)
64 (Max.)
Number of LUNs per Channel lD
8 (32 Max.)
8 (32 Max.)
Number of LUNs
128 (Max.)
1024 (Max.)
Optimization Mode
Sequential I/O
Caching Mode (Default)
Write-Back
Stripe size(Optimization for Sequential I/Os-RAID 5)
128KB
Auto-assign Global Spare
Disable
Max. LD capacity (Optimization for Sequential I/Os)
No. of Media Scan Task Schedules
Max. No. of members per DIMM size (RAID5)
64TB (Max.)
16 (Max.)
128 drives max. / 512MB
Note that these numbers can be slightly different across different firmware revisions and
in most situations 16 logical drive entries will be sufficient.
This parameter threshold, however, can cause problems if users upgrade DIMM modules
to a larger size, especially when combining two RAID controllers, without knowing their
NVRAM defaults. The fault can also occur when replacing a faulty controller in a
redundant-controller configuration.
Fault Scenarios:
1. Field-side Upgrade:
1-1.
1-2.
Customers upgrade controller DIMM modules, e.g., from 2GB to 4GB.
Combine controllers into a redundant configuration. One retains the
“1GB” defaults, while the other the “≥ 2GB” defaults.
2. Replacing a Failed Controller:
2-1.
48
Branch office acquires a replacement controller and upgrades its
memory to the size of surviving controller.
Galaxy DS
2-2.
Though with the same memory size, the replacement still retains the
incongruous defaults.
The RAID system will report a “Redundant Controller Failure” event, and the
controllers will not work coherently.
Remedy:
-
Restore firmware defaults after installing/changing the DIMM module. You can
either use the Restore Default button or the LCD keypad panel.
-
The easiest way to check the type of firmware defaults is through the “View and
Edit Logical Drives” menu.
Work Procedures:
Case 1: Upgrade memory in a single-controller system (2GB to 4GB)
1-1.
1-2.
1-3.
1-4.
1-5.
1-6.
Shut down host computer(s).
Power OFF the RAID system.
Remove the RAID controller and replace its memory with a 1GB or 2GB
DIMM.
Restore firmware defaults using the Restore Default button or the LCD
keypad panel.
Power ON the RAID system and check in “Main Menu” -> “View and Edit
Logical Drives” to see whether the supported number of LD has become 32.
Power on host computer(s).
Case 2: Upgrade memory in a Redundant-controller system (2GB to 4GB)
2-1.
2-2.
2-3.
Shut down host computer(s).
Power OFF the RAID system.
Remove the RAID controllers and replace their memory with a 1GB or 2GB
DIMM.
Troubleshooting
49
2-4.
2-5.
2-6.
Restore firmware defaults using the Restore Default button or the LCD
keypad panel. You should restore controller defaults each at a time by
removing a controller from chassis.
Power ON the RAID system and check in “Main Menu” -> “View and Edit
Logical Drives” to see whether the supported number of LD has become 32.
Power on host computer(s).
Case 3:
Replacing a failed controller in a redundant-controller RAID system equipped
with 1G/2G size cache memory.
3-1.
Check through the firmware configuration utility -> “Main Menu” -> “View and
Edit Logical Drives” to see whether the supported number of LD is 32. If the
screen shows 32 logical drive indexes, then the firmware running on the
surviving controller supports the “≥ 1GB” defaults.
NOTE: If the firmware screen shows 16 indexes, you may refer to the Case 2
procedure if you prefer enlarging the number of logical configurations.
3-2.
3-3.
3-4.
50
Install a 1G or 2G memory (size identical to that on the surviving controller) to
the replacement controller.
Restore the replacement’s defaults using the Restore Default button or the
LCD keypad panel. (See Appendices for details) You should use another
RAID system to restore the defaults on the replacement controller.
Replace the failed controller with the replacement. The replacement should
be brought online after a short while.
Galaxy DS
Appendix B Firmware Automated Synchronization
Background for this feature:
In the event of RAID controller failure, a replacement controller usually comes with a
firmware of a different revision than that running on the surviving controller. If partner
controllers run different firmware, configuration errors can occur.
Benefits:
Automated Synchronization eliminates the needs to manually upgrade or downgrade
firmware of a replacement in order to comply with firmware on a running system.
Synchronization Flow:
More Details:
1. Online Replacement: When the synchronization process is completed, the
replacement controller will automatically restore defaults and reset itself to
complete the process.
2. Status Indication:
2-1. On a terminal screen, the redundant controller status will be indicated as
“Firmware synchronizing” in the View and Edit Peripheral Device” sub-menu.
2-2. The Controller Status LED will blink Green and Amber during the
synchronization process.
Troubleshooting
51
2-3. The corresponding LED icon will also blink on the GAM /Embedded
RAIDWatch Enclosure View.
3. The LED will turn solid Green when the process is completed.
Limitations:
1. This feature is available since firmware revision 3.64P.
2. This feature only works with redundant controllers running firmware revision
3.64P or later.
52
Galaxy DS
www.rorke.com
Rorke Data, An Avnet Company
7626 Golden Triangle Drive, Eden Prairie, MN 55344, USA
» Toll Free 1.800.328.8147 » Phone 1.952.829.0300 » Fax 1.952.829.0988