1
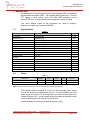
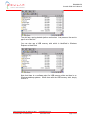
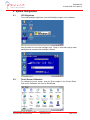
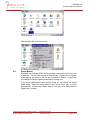
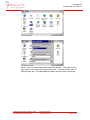
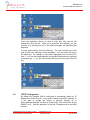
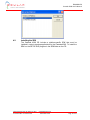
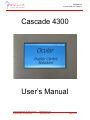
FBDA8281-50
Cascade 4300 User’s Manual
Cascade 4300
User’s Manual
12700 Park Central, Suite 750, Dallas, TX 75251
Tel: 972-437-3888
Fax: 972-437- 2562
[email protected]
www.OcularLcd.com
Page 1 of 12
FBDA8281-50
Cascade 4300 User’s Manual
1. General Info
Congratulations on the purchase of your Ocular Cascade 4300, an advanced
Human Machine Interface (HMI). The Cascade 4300 includes a 4.3” full color
TFT display, a touch screen, and a 533 MHz ARM processor running
Windows CE, all in a compact metal frame designed for panel mounting.
This User’s Manual covers all the information you need to configure,
program, and install your Cascade 4300 HMI.
1.1.
Specifications
Parameter
Screen Size
Display Format
Active Area
Pixel Size
Colors
Brightness
Touch Screen
Outline Dimensions
Weight
Viewing Angle
Speaker
Processor
Speed
Flash Memory
Operating System
Operating Temperature
Storage Temperature
1.2.
Table 1
Specification
4.3 (Diagonal)
480 RGB x 272
95.04 (W) x 53.856 (H)
198 (W) x 198 (H)
16,777,216 (24-bit)
350 (Maximum)
4-Wire Resistive
148 (W) x 99 (H) x 35 (D)
400 (complete unit)
6 o’clock
2
ARM920T
533
64
Win CE 5.0
0 to 50
-40 to 85
Power
Parameter
Power Voltage
Power Current
Table 2
Symbol
Min.
VCC
12
ICC
2
Unit
inch
pixels
mm
μm
colors
cd/m2
─
mm
g
─
watts
─
MHz
MB
─
°C
°C
Max.
25
3
Unit
V
A
Remark
Note 1
Note 2
Note 1: Power plug is 5.5mm outer diameter, 2.10mm inner diameter, center positive.
Note 2: Minimum is when USB port is unused. Max includes a 1A for two USB ports.
The Cascade 4300 is designed to run off of a well-regulated power supply
such as the power brick supplied with the unit. You may substitute your own
power supply as long as it is well regulated (low noise, minimal ripple, over
voltage protected, etc.). Using a power supply that does not regulate as well
as the included power brick may void your warranty.
Ocular can assist in choosing or qualifying a power supply.
12700 Park Central, Suite 750, Dallas, TX 75251
Tel: 972-437-3888
Fax: 972-437- 2562
[email protected]
www.OcularLcd.com
Page 2 of 12
FBDA8281-50
Cascade 4300 User’s Manual
1.3.
Ports
1.3.1.
RS-485
The RS-485 port is connected to UART2 on the ARM9 processor. The port is
half-duplex and uses the Request To Send line (RTS) to control direction.
The connector is a standard RJ-25 phone jack. The pin out of the connector
is:
Table 3
Pin No. Symbol
Description
1
Shield Cable shield
2
A
RS-485 A Signal
3
GND
Ground
4
GND
Ground
5
B
RS-485 B Signal
6
GND
Ground
1.3.2.
Ethernet
1.3.3.
USB
The Ethernet port is capable of 10 Mbps and 100 Mbps. Power over Ethernet
(POE) is not supported. The connector is a standard RJ-45 jack.
The USB 1.1 host port is a standard host Type A connector. The host port
supports high speed (480 Mbps).
The USB 2.0 device port is a min-USB Type B connector. The device port
supports both full speed (12 Mbps) and high speed (480 Mbps).
1.3.4.
Storage
There is a standard size SD card slot on the side of the Cascade 4300.
Insert the SD card, then use Windows Explorer to view the card’s contents.
The SD card shows up as SDMMC.
12700 Park Central, Suite 750, Dallas, TX 75251
Tel: 972-437-3888
Fax: 972-437- 2562
[email protected]
www.OcularLcd.com
Page 3 of 12
FBDA8281-50
Cascade 4300 User’s Manual
The slot has a spring-loaded ejection mechanism. Just press on the card to
pop it out of the slot.
You can also use a USB memory stick which is identified in Windows
Explorer as Hard Disk.
Note that there is no software eject for USB memory sticks as there is on
Windows desktop systems. When done with the USB memory stick, simply
remove it.
12700 Park Central, Suite 750, Dallas, TX 75251
Tel: 972-437-3888
Fax: 972-437- 2562
[email protected]
www.OcularLcd.com
Page 4 of 12
FBDA8281-50
Cascade 4300 User’s Manual
2. System Configuration
2.1.
LCD Brightness
To set the backlight brightness, open the Backlight program on the desktop.
Use the slider bar to set the backlight level. Keep in mind that using a lower
backlight level increases the backlight’s lifetime.
2.2.
Touch Screen Calibration
To calibrate the touch screen, open the Stylus applet in the Control Panel.
Click on the Calibration tab, then on Recalibrate.
12700 Park Central, Suite 750, Dallas, TX 75251
Tel: 972-437-3888
Fax: 972-437- 2562
[email protected]
www.OcularLcd.com
Page 5 of 12
FBDA8281-50
Cascade 4300 User’s Manual
The calibration application will prompt you to touch different locations on the
screen.
For the best possible accuracy you should use the tip of a screwdriver or
some other small stylus (be sure not to press too hard to avoid damaging the
touch screen). Touch the center of each location and hold the stylus there
until the next location is indicated.
When the calibration is complete, touch anywhere on the screen to end the
calibration process.
2.3.
Volume
To set the volume, open the Volume and Sounds applet in the Control Panel.
12700 Park Central, Suite 750, Dallas, TX 75251
Tel: 972-437-3888
Fax: 972-437- 2562
[email protected]
www.OcularLcd.com
Page 6 of 12
FBDA8281-50
Cascade 4300 User’s Manual
User the slider bar to set the volume.
2.4.
Power Modes
By default your Cascade 4300 reduces its power consumption after 5 minutes
of inactivity. This includes shutting off the backlight. Entering this low power
mode reduces the stress on the unit and increases its lifetime. In particular,
the backlight’s lifetime is greatly extended by shutting it off.
If you want the backlight to remain on all the time, you can change the default
power mode. Open the Power applet in the Control Panel, then go to the
Schemes tab. Set both the “Switch state to User Idle” and “Switch state to
System Idle” to Never.
12700 Park Central, Suite 750, Dallas, TX 75251
Tel: 972-437-3888
Fax: 972-437- 2562
[email protected]
www.OcularLcd.com
Page 7 of 12
FBDA8281-50
Cascade 4300 User’s Manual
NOTE: There is a third power state called “Suspended”. This state is at the
very bottom of the Power Properties dialog box. It can be partially seen by
hiding the task bar. This state defaults to Never and should not be changed.
12700 Park Central, Suite 750, Dallas, TX 75251
Tel: 972-437-3888
Fax: 972-437- 2562
[email protected]
www.OcularLcd.com
Page 8 of 12
FBDA8281-50
Cascade 4300 User’s Manual
3. Windows CE
3.1.
Using the Touch Panel, a Mouse, and a Keyboard
You can use the touch panel with your finger or with a stylus (e.g., a small
screw driver, the end of a recessed ball point pen, a plastic stylus, etc.). Be
sure not to press too hard to avoid damaging the touch panel. In some
applications you can simulate a click of the right mouse button by pressing
and holding the stylus for several seconds. A small dashed circle will appear
around the stylus before the right click action occurs.
You can also attach a USB mouse to the Cascade 4300 and use it instead of
a stylus.
When you need to type letters on the Cascade 4300, you can plug any
standard USB keyboard into the USB slot. If you want to use a mouse and a
keyboard at the same time, you can plug a USB hub into the USB port, then
plug a USB mouse and a USB keyboard into the hub. For best results, use a
powered USB hub.
3.2.
Soft Keyboard
An alternative to a physical keyboard is the Windows CE Soft Keyboard. This
application can be used to type text into any application running on the
Cascade 4300. To open the Soft Keyboard touch the keyboard icon on the
status menu, then select Keyboard.
12700 Park Central, Suite 750, Dallas, TX 75251
Tel: 972-437-3888
Fax: 972-437- 2562
[email protected]
www.OcularLcd.com
Page 9 of 12
FBDA8281-50
Cascade 4300 User’s Manual
Touch the application where you want to enter text, then use the soft
keyboard to enter the text. When you’re done with the keyboard, you can
minimize it by touching the icon in the status bar again and selecting Hide
Keyboard.
To enter capital letters, touch the Shift key. The next character you touch
(and only the next character) will be capitalized. You can use the Ctrl key in
the same way. For example, to copy some highlighted text, first touch Ctrl,
then C. You can also toggle between the standard keyboard and a keyboard
of symbols (e.g., ¿, ä, ý, etc.) by touching the key just to the right of the Ctrl
key.
3.3.
TCP/IP Configuration
By default the Cascade 4300 is configured to automatically obtain an IP
address from a DHCP server. If you need to assign a specific IP address, or
if you want to change the subnet or gateway settings, go to
Start->Settings->Network and Dial-Up Connections, then double click on the
DM9CE1 icon. Use this application to set the IP address source and DNS
servers.
12700 Park Central, Suite 750, Dallas, TX 75251
Tel: 972-437-3888
Fax: 972-437- 2562
[email protected]
www.OcularLcd.com
Page 10 of 12
FBDA8281-50
Cascade 4300 User’s Manual
3.4.
Connecting to PC
You can connect the Cascade 4300 to a PC using the supplied mini-USB
cable. After attaching the cable, the PC may prompt you for the location of
the USB driver. Insert the Cascade 4300 CD and direct the driver installation
program to the folder on the CD named Drivers.
Once connected, you can communicate with the Cascade 4300 using
Microsoft ActiveSync (provided on the CD) or with eMbedded Visual C++ 4.0
(available from Microsoft). Use ActiveSync to transfer files to and from your
PC. Note that most of the visible drive space on the Cascade 4300 resides in
SRAM and will therefore be erased when power is lost. To store files
permanently, place them in the ResidentFlash folder.
4. Developing Applications
4.1.
Development Environment
You can use eMbedded Visual C++ 4.0 to develop, deploy, and debug
applications directly on your Cascade 4300. Connect the mini-USB cable
and, when prompted, install the USB drivers located in the Drivers folder on
your Cascade 4300 CD.
To use the Cascade 4300 as your active platform in eMbedded Visual C++,
go to Build->Set Active Platform and select A8281.
12700 Park Central, Suite 750, Dallas, TX 75251
Tel: 972-437-3888
Fax: 972-437- 2562
[email protected]
www.OcularLcd.com
Page 11 of 12
FBDA8281-50
Cascade 4300 User’s Manual
4.2.
Installing the SDK
The Cascade 4300 CD includes a platform-specific SDK that must be
installed in order to develop applications for the Cascade 4300. To install the
SDK run the SETUP.EXE program in the SDK folder on the CD.
12700 Park Central, Suite 750, Dallas, TX 75251
Tel: 972-437-3888
Fax: 972-437- 2562
[email protected]
www.OcularLcd.com
Page 12 of 12