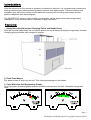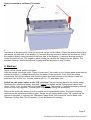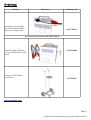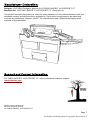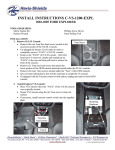
1
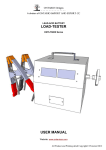
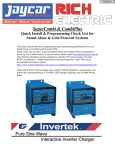
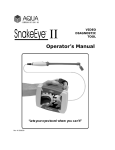
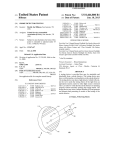
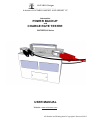
ONTARIO Designs
---------------A division of ONTARIO IMPORT AND EXPORT CC
Automotive
POWER BACKUP
and
CHARGE RATE TESTER
ONTCEPS12 Series
USER MANUAL
Website: www.ontarioza.com
All Product and Printing detail Copyright© Protected 2012
Content:
Introduction .................................................1
Features ......................................................1
Power Backup Procedures ..........................2
Alternator Charge Rate Test Procedure ......4
Trouble Shooting .........................................4
Maintenance ................................................4
Safety Instructions .......................................4
Technical Specifications ..............................5
Limited Warranty .........................................5
Ordering ......................................................6
Manufacturer Declaration ............................7
Support and Contact Information ................7
All Product and Printing detail Copyright© Protected 2012
Introduction:
With the advances on the electronic systems for automotive vehicles, it is a precautionary measure to
back up vehicle power when performing battery fitments and replacements. Failure to perform this
procedure may cause the vehicle to have electronic memory loss including radio setup, window
position calibration and alarm program.
The ONTCEPS12 series is used to back up automotive vehicle power when performing battery
installations. It also functions as an “alternator charge rate tester”.
Features:
1. Handy Box Unit with Isolated Clamping Points and Rubber Base
With the non-slip rubber base the unit can be placed on any surface including the engine bay. Isolated
clamping points provides safe storage for clamps.
2. Flush Panel Meters
The panel meters fit flush into the unit. This minimizes damage to the meters.
3. Clear Wide View Self-Explanatory Graphs
Two Copyright© protected graphs ensures reliability backups and accurate “alternator charge rate”
tests.
Page 1
All Product and Printing detail Copyright© Protected 2012
Power Backup Procedures:
1. Clamp Connections:
Note: Do not use cigarette power points on vehicles as a backup access points. These connections
may have protective circuitry that will prevent reversed inputs.
Clamp Connections on Jump Start Points
Switch the unit power-switch to the “Off” position before connecting. Failure to perform this procedure
may cause an electric spark. Clean the jump start points on the vehicle. Place the (red) clamp jaw
around positive (+) jump start point. Place the negative (black) clamp jaw around the negative (-) jump
start point or the chassis. The standard “Backup” procedure can now be performed as stipulated in
point 2 below.
Page 2
All Product and Printing detail Copyright© Protected 2012
Clamp Connections on Battery Terminals
Switch the unit power-switch to the “Off” position before connecting. Failure to perform this procedure
may cause an electric spark. Clean the terminals on the vehicle battery. Place the positive (red) clamp
jaw around the back side of the positive (+) terminal allowing access to loosen the terminal nut. Place
the negative (black) clamp jaw around the back side of the negative (-) terminal allowing access to
loosen the terminal nut . The negative (black) clamp jaw can also be clamped on the chassis. The
standard “Backup” procedure can now be performed as stipulated in point 2 below.
2. Backup:
Switch off the vehicle ignition and lights.
With the clamps connected (refer “Clamp Connections”) the needle on the Voltage panel meter should
indicate a positive (+) voltage detected from the battery to be replaced. If not, check the clamp
connections. Dirt can be cleared with scratching back-and-forth motions to the clamps. Check the
protection fuse on the unit. If blown, replace with 10 – 15 amp blade fuse.
Switch the unit power-switch to the “ON” position!! The unit will now backup the vehicle power.
Discontent the automotive battery terminals. (Note1:The needle on the Voltage panel should stay
above 10Volt. If not, the unit was not switched on. Note2: The positive (+) automotive battery terminal
must not touch any negative (-) chassis point of the vehicle during this procedure)
Remove the automotive battery from the vehicle and fit replacement battery. Connect the battery
terminals on the replacement battery again. Switch the unit power-switch to the “Off” position as the
process is complete. If required, the “Alternator Charge Rate Test Procedure” can be done (refer
“Alternator Charge Rate Test Procedure”). If not, disconnect the clamps.
Page 3
All Product and Printing detail Copyright© Protected 2012
Alternator Charge Rate Test Procedure:
With the clamps connected (refer “Clamp Connections on Battery Terminals”) and the unit powerswitch to the “Off” position, start the vehicle. Increase the revolutions to 2000 r.p.m. The needle on the
Alternator panel meter should stay between 13.8 Volt and 14.2 Volt. Repeat test with vehicle main
lights switched on.
Note: A bottom buffer on the Alternator graph has been added for alternators with lower performance.
A top buffer on the Alternator graph has been added for new calcium-calcium high charging
specifications alternators that charge up to 14.5V. Use own discretion.
Trouble shooting:
Voltage panel meters do not detect any voltage
1. Check protection fuse on unit. If blown, replace with 10 – 15 amp blade fuse.
2. Clean the automotive battery terminals and the units clamps. Check the clamp connections. Dirt
can also be cleared with scratching back-and-forth motions when the clamps are connected to the
battery terminals. If problem persists, send product to nearest sales representative for repairs.
• Voltage panel meter needle shifts to the incorrect (left negative) side.
Reverse polarity.
• Panel meter needles not on zero point
Send product to nearest sales representative.
•
Maintenance:
•
•
•
•
•
•
Keep the 12Volt lead-acid battery located inside the unit charged. The charge state can be checked
by switching the unit power-switch to the “ON” position. The Voltage panel meter red bar indicates
that charging is required. Connect a 12Volt lead-acid battery chargers clamps directly to the units
clamps (+ on +) and ( - on - ). Switch the unit power-switch to the “ON” position to initiate charging.
The Alternator panel meter will indicate the charge voltage.
Replace the 12Volt lead-acid battery located inside the unit every 2 to 3 years, or when faulty. A
nearest sales representative may perform repairs if soldering skills are required.
The clamps on the unit should be kept clean with a solution of hot water and bicarbonate of soda.
Do not let the inner components come into contact with water.
The casing and panel meters may be cleaned with a soft damp cloth.
Do not drop the unit onto hard services or let it fall. This may cause damage and void the warranty.
Safety Instructions:
•
•
•
•
•
•
•
•
•
The ONTCEPS12 is designed for 12Volt automotive vehicles. Do dot use the unit for any other
purpose.
Always make sure the units power-switch is in the “Off” position before making connections.
Do not perform replace a hot automotive battery with a hissing sound from excessive gassing.
A unit with damaged cables should not be used. Repairs should be performed by a ONTARIO
IMPORT AND EXPORT CC representative.
Always use protective gear including safety glasses when working with lead-acid batteries.
Batteries emit explosive gas. Never smoke or allow open sparks near the vicinity of the battery.
Lead-acid battery acid is corrosive. If acid come into contact with eyes, rinse with fresh water and
seek immediate medical advice.
Allow sufficient ventilation when using the unit.
This product should not be used by children.
Page 4
All Product and Printing detail Copyright© Protected 2012
Technical Specifications:
Model
Rated Input Voltage
ONTCEPS12
0-15Vdc, 20Vdc max for 20 seconds
Rated Reverse Voltage (Do not operate -15Vdc for 5 seconds
in this mode)
Alternator test resolution
0.1V
Internal Battery Type
12Volt 7Amp-Hour valve regulated lead-acid
Internal Battery Rated Charge
14.5Volt max, 2.2Amp max
Dimensions on casing
158mm x 116mm x 148mm (LxWxH)
Indicators (Panel Meters)
Analogue, wide view
Dimension on Panel Meter View Area
69mm x 34mm (LxH)
Clamp Cable length
1 Meters
Clamp Grasp Displacement
24 mm
Protection Fuse
10 – 15Amp blade
Weight (Including internal Battery)
3.2 Kg
Limited Warranty:
This product carries a 1 year limited warranty to the original purchaser on manufacturing faults. The
12Volt lead-acid battery located inside the unit carries a 3 month limited warranty. The receipt
(proofing date of purchase) and the product must be returned to a ONTARIO IMPORT AND
EXPORT CC representative. The warranty is void if the unit casing has been opened by any one
else. The warranty is also void when handled carelessly.
ONTARIO IMPORT AND EXPORT CC will not be held responsible for any damages on other
products nor personal injury when using our products.
Page 5
All Product and Printing detail Copyright© Protected 2012
Ordering:
Product
Illustration
Automotive power backup
unit with build in alternator
charge rate testing feature
Ordering Code
ONTCEPS12
Accessories (Not included with ONTCEPS12)
Carbon-Graphite 6000Watt
12V Lead-Acid Battery LoadTester
Trolley for ONTLT6000
Load-Tester
ONTLT6000
ONTTR001
www.ontarioza.com
Page 6
All Product and Printing detail Copyright© Protected 2012
Manufacturer Declaration:
Designer: ONTARIO Designs a division of ONTARIO IMPORT AND EXPORT CC
Manufacturer: ONTARIO IMPORT AND EXPORT CC (South Africa)
This product has been designed by a team with years experience in the lead-acid battery retail and
wholesale industry including electronic engineering. The product is engineered to be robust and
accurate for professional customer service. The manufacturer tests, calibrates and approves all
products to high standards.
Support and Contact Information:
ONTARIO IMPORT AND EXPORT CC offers professional customer support:
www.ontarioza.com
Director: Petrus Jacobus Nel
Electronic Engineer (B.Eng)
ONTARIO IMPORT AND EXPORT CC
Page 7
All Product and Printing detail Copyright© Protected 2012