1
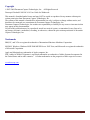
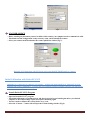
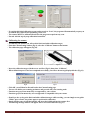
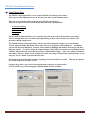
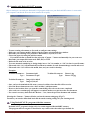
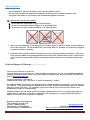
DocketSCAN II
User’s Guide
DocketSCAN II (Ver. 2.0.4) 110708 Page 1 Copyright
© 2007-2008 Document Capture Technologies, Inc. All Rights Reserved.
Docucap® DocketSCAN II® 2.0.4 User Guide for Windows®.
This manual is furnished under license and may NOT be copied or reproduced in any manner without prior
written permission from Document Capture Technologies, Inc.
The content of this manual is furnished for informational use only, is subject to change without notice, and
should not be construed as a commitment by Document Capture Technologies, Inc.
Document Captured Technologies, Inc assumes no responsibility or liability for any errors or inaccuracies that
may appear in this documentation.
No part of this publication may be reproduced, stored in a retrieval system, or transmitted, in any form or by
any means, electronic, mechanical, recording, or otherwise, without the prior written permission of document
Capture Technologies, Inc.
Trademarks
IBM, PC, and VGA are registered trademarks of International Business Machines Corporation.
MS-DOS, Windows, Windows 98SE/2000/ME/XP/Server 2003/Vista, and Microsoft are registered trademarks
of Microsoft Corporation.
Apple and Macintosh are trademarks of Apple computer, Inc.
PDF, Adobe ACROBAT Signature is registered trademarks or trademarks of Adobe Systems Incorporated in
the United States and/or other countries. All other trademarks are the properties of their respective owners.
www.docucap.com
DocketSCAN II (Ver.2.0.4) Page 2 Contents
DocketSCAN II User Manual
- DocketSCAN II Copyright statement
- Trademark statement
- Contents
- Welcome Statement
1
2
2
3
3
DocketSCAN II Introduction
- Program scanner button
- Starting DocketSCAN II Program
- Reprogram button
- Scanner source
4
4
4
4
5
Initial Calibration with DocketSCAN II
- Launch DocketSCAN II program
- Calibrate the scanner
5
5
6
TWAIN Control Panel Functions
- Control Panel Tabs
- Scanning with DocketSCAN II Program
- Using DocketSCAN II with other scanners
7
7
8
8
Tips and Caution
- How to take care of your scanner
- Technical support & warranty Information
9
9
9
Welcome …………………
Thank you for purchasing our DocketPORT® family of scanners.
We have designed this product to provide the user with a simple but effective tool to capture, manage
and archive documents of many types. We encourage you to read this short, but important
DocketSCAN II User Guide carefully.
Your DocketPORT® scanner has the latest technology and compatible drivers. These drivers are
certified by Microsoft for various Windows operating systems. We also feature a TWAIN 1.9
compatible driver that will work with thousands of imaging applications. If you experience any
difficulty with these drivers, please check our website www.docucap.com to verify that you are using the
latest version.
DocketSCAN II (Ver.2.0.4) Page 3 DocketSCAN II Introduction
Efficient, fast, and convenient – DocketSCAN II program makes it easy to scan, share, and organize your photos
and documents. DocketSCAN II can also help you convert piles of papers into organized and digitalized files.
This program can also help you view, edit, send, and back up files in PDF, JPEG, and TIFF formats.
Before setting up your DocketSCAN II program, make sure your DocketPORT scanner is connected to your
computer and that the driver has been installed successfully.
PROGRAM SCANNER BUTTON
- Push the event launch button located on the top right hand side of the scanner.
- This will open the “Select program to launch setting window” (Fig-1).
- Choose the “DocketSCAN II” program and check the box at the bottom of the window to
“Always use this program for this action”, click OK to accept the setting.
- This program launch setting window will only appear during your first time installation or when the button
has not been programmed (Fig-2).
- Once the launch button has been programmed, it will automatically open your
“DocketSCAN II” program when the button is pressed the next time.
Fig-1
Fig-2
STARTING “DocketSCAN II” Program
-
Double click “DocketSCAN II” shortcut on your desktop (Fig-3) or system tray (Fig-4).
This will open the program and display the TWAIN control panel (Fig-2).
You can open the program by clicking on either one of these shortcuts.
To launch “DocketSCAN II” automatically from the button, refer to Program Scanner Button above.
Fig-3
Fig-4
REPROGRAM THE BUTTON FOR ANOTHER PROGRAM
- If you wish to reprogram the scanner button to open a different program at a later date you may do so from
this location: START/Control Panel/Scanners and Cameras
- Right click on your scanner model and select “Properties” (Fig-5).
- Your scanner’s property page will appear then select “Events” tab (Fig-6).
- Choose the program that is displayed in the pull-down window you wish to auto launch.
- If your program is not displayed in the list then that program is not compatible.
DocketSCAN II (Ver.2.0.4) Page 4 Fig-5
Fig-6
SCANNER SOURCE
- Before scanning any document you need to define which scanner your computer needs to communicate with.
- This initial one time configuration is only necessary when you first install the scanner.
- Select your scanner model listed under the scanner pull-down window (Fig-7).
Fig-7
DocketSCAN II application will ONLY work with certain DOCKETPORT family of scanners.
Initial Calibration with DocketSCAN II
Calibration is a critical step in setting up your scanner. It allows the image quality to be “balanced” for your
computer and scanner combination. If at any time you switch the scanner to another computer, you will need to
calibrate the scanner again on that computer.
Launch DocketSCAN II® Program
- Open the DocketSCAN II® program.
- This initial calibration is a onetime process and doesn’t need to be performed again unless you switched
computer or the scanned image is poor and requires balancing again.
- You don’t need to calibrate the scanner before every scan.
- Select the “Custom…” button, this will open the Custom Settings window (Fig-9).
DocketSCAN II (Ver.2.0.4) Page 5 Fig-8
Fig-9
- If you skip this initial calibration process and proceeds to “Scan”, the program will automatically request you
to calibrate the scanner before permitting you to scan.
- The scanner MUST be calibrated first before the program can perform any scan.
- Proceed with the step-by-step calibration instruction.
Calibrating the scanner
- To calibrate your scanner you will need the black and white calibration target.
- From the Custom Setting window (Fig-9), select the “Calibrate” button at the bottom.
- The calibration page will appear (Fig-10).
Fig-10
Fig-11
- Insert the calibration target with the arrow end first (Fig-11) then select “Calibrate”.
- When calibration process has been completed successfully, you will see the message displayed below (Fig-12).
Fig-12
-
Fig-13
Click OK, you will then be directed back to the Custom Setting page.
You now can define your scanning perimeters and proceed with your scanning tasks.
Functions not grayed out means they are supported by your scanner.
Functions grayed out means they are not supported or compatible with your scanner.
- Should you lose or forget the black and white calibration target while traveling, you can simply use any plain
“White” piece of letter size printer paper to perform the calibration.
- Simply fold the paper in half horizontally and insert the folded end into the scanner first.
- The following message/window will appear after a successful calibration (Fig-13).
DocketSCAN II (Ver.2.0.4) Page 6 TWAIN Control Panel Functions
Control Panel Tabs
The TWAIN control panel allows you to control all details and settings of the scanner.
These types of “fine-adjustments” may be necessary for some of your document needs.
Please be aware of the Page Tabs at the top of the TWAIN control panel.
Take time to explore these Tabs and their individual functions and capabilities.
-
Pre-defined Setting
Custom Settings
Information
Language
The Pre-defined setting Tab allows you to quickly choose the most frequent and common scan settings.
These are designed for your convenience and right clicking on these icons will allow you to define your
personal scanning settings needs.
The Custom Settings control panel allows you the ease of fine-tuning the settings to your specification.
You can adjust the Mode, Resolution, Filter (None or De-screen) together with scanning size. In addition,
you can also adjust the Brightness, Contrast, Color (Gamma), Highlight and Shadow of the image with the 5
slide-bar controls. In case you forget the original settings of these slide-bar controls you can simply press the
“RESET” button, this will restore these back to the original default settings. Once your settings are defined,
select either “Preview” button to take a quick look at how your image will look in the scanning window or you
can press “SCAN” button to perform the final scan.
Information page provides important date regarding the software and driver version.
if you need to know the software version.
This may be required
Language page allows you to choose the language mode you prefer to operate under.
You can switch to any of these languages: Spanish, Dutch, French, or Italian.
Fig-14
DocketSCAN II (Ver.2.0.4) Fig-15
Page 7 Scanning with DocketSCAN II® program
Before starting to scan with your DocketSCAN II program, make sure your DocketPORT scanner is connected to
your computer and that the driver has been installed successfully.
Fig-16
-
Fig-17
To start scanning a document we first need to configure some settings.
Make sure your scanner model is displayed in the scanner selection pull-down window.
Determine your scanning color preference: Black/white, Grayscale, or Color.
Choose the paper size using the pull down menu.
- If you need to define a custom size then select the “Custom…” button and manually size your scan area.
Determine your output file format need: PDF, JPG, or TIFF.
Define the file name to be saved as.
To create automatic numbering or dating simply insert “%n” for number, or “%d” for date in your file name.
Files noted with “%n” will automatically increment its number for each document/image scanned and saved.
Files noted with “%d” will have the month, date, and year saved for that day.
Examples:
-
To define file name as:
Type :
Document-1.pdf
Document-%n.pdf
To define file name as:
Type:
Image-1(11-6-08).tif
Image-1(%d).tif
To define file name as:
Type:
Picture 1.jpg
Picture %n.jpg
Once you have determined the file name, you need to define where that file will be saved to.
Select the Browse button next to the “Store in folder” pull-down menu.
Browse to the location where you want the scanned image file to be saved to once completed.
After each scan a continue page will appear, to continue another scan just insert the next document.
If a rescan is necessary then check the “Rescan…” box, insert the previous document and continue.
Selecting the “Custom…” button will take you into the custom setting page (Fig-17).
From here you can also define both basic and advanced scanning settings for your scanning needs.
Using DocketSCAN II® program with other scanners
DocketSCAN II® program is design solely for certain supported DocketPORT scanners.
This program will not recognize or function for any scanner other than what is pre-defined for.
DocketSCAN II (Ver.2.0.4) Page 8 Tips & Cautions
- Your DocketPORT® scanner will provide you a long and productive service.
- We encourage you follow the suggestions listed below to prolong your investment and improve the
convenience and quality of your scanning and document management experience.
How to take care of your scanner
Do not introduce stapled items or pages into the scanner.
Do not scan documents that have chipped or un-dried White-Out.
Do not insert any type of adhesive material, even POST-IT paper.
☺ Make sure the leading edge of your documents are straight and not wrinkled or folded. Insert document at
level to the intake slot. If your document has a fold, sharp-bend or is wrinkled, you will need to straighten
or flatten it first before scanning.
☺ Clean the scanner with the included cleaning sheet and 70% isopropyl alcohol (not included). Place a few
drops along the middle of the cleaning material and proceed to the Calibrate menu, select CLEAN instead.
Your scanner will automatically pass the cleaning material back and forth over the internal image sensor
glass.
Technical Support & Warranty …………………
FREE SUPPORT THROUGH EMAIL & WEB
Visit our website at www.docucap.com. Click the Support section where you can access valuable information
including: Installation guides, FAQ’s, spare parts ordering, troubleshooting, driver downloads, and email your
issue to [email protected].
TECHNICAL SUPPORT BY TELEPHONE
1-408-436-6152 (10:00 A.M. - 5:00 P.M. U.S. Pacific Time Monday - Friday)
For all DocketPORT® products you can speak directly to a technical support representative or leave a message
for call-back. You will be connected to a highly trained, friendly, and professional support agent who will work
with you to resolve your issue. For expediency, please be in front of your system with your software and
documentation handy for troubleshooting.
Telephone support calls will usually be answered within 1 business day, however we strongly suggest that you
make contact via email first, to provide an explanation of the problem you are experiencing and a call back
number if is necessary for us to speak to you directly.
Document Capture Technologies Inc.
1798 Technology Dr. Suite 178
San Jose, California 95110
Main Number +1-408-436-9888
Technical Support +1-408-436-6152
DocketSCAN II (Ver.2.0.4) [email protected]
Updated Drivers and User Guides
http://www.docucap.com/index.php?/downloads/index
Page 9