1
liteCam Game 5 User Guide
liteCam Game 5 User Guide
Last Updated: August 2015
Copyright © 2001~2015 RSUPPORT Co., Ltd. ALL RIGHTS RESERVED. www.rsupport.com
1
Copyright
liteCam Game 5
Guide Version 3.0
ⓒ 2015 RSUPPORT Co., Ltd. All Rights Reserved
The information contained in this manual and future improvements are subject to change
without notice.
Rsupport Co., Ltd. hereafter referred to as “Rsupport”, does not take any responsibility
for any marketability nor compatibility apart from the usage described in the manual.
Under no circumstances will Rsupport be liable to direct, indirect, incidental nor
accidental damages due to errors in the manual.
This manual is the intellectual property of Rsupport and is protected under international
copyright laws. Reproducing or copying all or part of this document without the prior
written consent of Rsupport is a violation of international copyright law.
Windows Vista / 7 / 8 / 10 are registered trademarks of Microsoft Corporation in the U.S.
and other countries. Any additional third party registered trademarks mentioned in this
manual are used for reference and descriptive purposes only and are still the intellectual
property of the third party in question.
Copyright © 2001~2015 RSUPPORT Co., Ltd. ALL RIGHTS RESERVED. www.rsupport.com
2
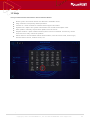
1. SYSTEM REQUIREMENTS ............................................................................................... 5
2. LITECAM GAME INSTALLATION GUIDE .......................................................................... 6
A.
INSTALLATION ............................................................................................................................. 6
B.
LAME INSTALLATION ..................................................................................................................... 6
3. SETTINGS PRIOR RECORDING ....................................................................................... 7
A.
AUDIO DEVICES ........................................................................................................................... 7
B.
VIDEO OPTIONS ........................................................................................................................... 9
C.
VIDEO FILE OPTIONS ................................................................................................................... 11
D.
SHORTCUT KEYS ........................................................................................................................ 12
4. RECORDING MODE....................................................................................................... 13
A.
GAME RECORDING ...................................................................................................................... 13
B.
VIDEO RECORDING ...................................................................................................................... 14
5. RECORD ....................................................................................................................... 15
A.
VIDEO RECORDING ..................................................................................................................... 15
B.
GAME RECORDING ...................................................................................................................... 15
C.
TIMER RECORDING (FOR VIDEO RECORDING MODE) .............................................................................. 16
D.
STOP/PAUSE RECORDING (VIDEO RECORDING MODE) ........................................................................... 17
6. PREVIEW ..................................................................................................................... 18
A.
SELECT “PREVIEW.” ..................................................................................................................... 18
B.
FULL SCREEN ............................................................................................................................ 19
7. GENERAL OPTIONS ...................................................................................................... 24
A.
FRAME PER SECOND .................................................................................................................... 24
B.
AUDIO FORMAT .......................................................................................................................... 26
C.
VIDEO FORMAT .......................................................................................................................... 27
D.
SELECT AN AREA ........................................................................................................................ 28
8. ADVANCE RECORDING OPTION ................................................................................... 29
A.
TITLE ...................................................................................................................................... 29
B.
CREDITS .................................................................................................................................. 30
C.
LOGO...................................................................................................................................... 31
D.
MOUSE EFFECTS ......................................................................................................................... 32
E.
PIP ........................................................................................................................................ 33
F.
Show/Hide PIP while recording ...................................................................................................................... 34
LOCK FRAME RATE ......................................................................................................................... 36
G.
OSD ...................................................................................................................................... 37
Show/Hide Game Recording Information. ................................................................................................ 37
9. STREAMING ................................................................................................................. 38
10.CONVERTING AND EXTRACTING ................................................................................. 40
A.
CONVERT VIDEO FILES ................................................................................................................. 40
11.ETC ............................................................................................................................. 41
A.
WORK AND LOG FOLDER ............................................................................................................... 41
B.
HIGHLIGHT RECORDING AREA ........................................................................................................ 41
C.
BLINKING RECORDING AREA .......................................................................................................... 41
Copyright © 2001~2015 RSUPPORT Co., Ltd. ALL RIGHTS RESERVED. www.rsupport.com
3
D.
RUN PREVIEW AFTER RECORDING .................................................................................................... 41
12.HELP ........................................................................................................................... 43
Copyright © 2001~2015 RSUPPORT Co., Ltd. ALL RIGHTS RESERVED. www.rsupport.com
4
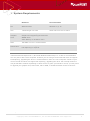
1. System Requirements
Minimum
Recommended
OS
Windows Vista
Windows 7, 8, 10
CPU
1.5GHz single-core CPU
2GHz dual-core CPU or better.
128MB Video Memory
Graphics
Graphic Card supporting DirectX9 and
Card
WDDM driver
Video Memory of 512MB or more.
RAM
1GB RAM or more is recommended
Sound Card
A sound card that supports
Full-duplexing is required.
*Microsoft Internet Explorer 8.0 / Microsoft Windows Media Player 11 or later is recommended.
You may not be able record computer sounds if you are using a sound card that does not support
full-duplexing, upgrading the driver is recommended in order to record computer sounds. If your
current sound card does not support full-duplexing, upgrading the driver will not help because it
may be hardware related. Depending on which movie or game you intend to record, you may need
to upgrade your graphic card, sound card, CPU or RAM, or install the latest version of Direct X.
Copyright © 2001~2015 RSUPPORT Co., Ltd. ALL RIGHTS RESERVED. www.rsupport.com
5
2. liteCam Game Installation Guide
a. Installation
liteCam Game is only available on Steam. http://store.steampowered.com/
To download and install liteCam Game, you must have a Steam account and password. You must
install the Steam PC client, as well. http://store.steampowered.com/about/
When you have finished installing, click “LAUNCH” to start using liteCam Game.
NOTE: To have an MP3 encoder (LAME), follow the steps below.
b. LAME Installation
Lame is a high quality MPEG Audio layer III (3) encoder. To have an MP3 option, or to save or
convert audio to MP3 format, Lame encoder must be installed in your computer. During installation,
you will see a dialog box which will prompt you to install the MP3 encoder (Lame), click "OK" to be
directed to the website where you can download the Lame file.
Download the zip file and extract it. Copy and paste the “lame_enc.dll file” to the folder below (in
case you didn’t change the liteCam Game directory)
C:\Program Files\Steam\SteamApps\common\liteCam Game Folder.
Copyright © 2001~2015 RSUPPORT Co., Ltd. ALL RIGHTS RESERVED. www.rsupport.com
6
3. Settings Prior Recording
Before recording your monitor screen, some options need to be set. Those options include the
following:
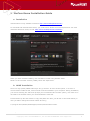
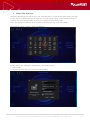
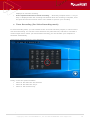
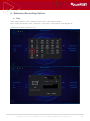
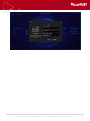
a. Audio Devices
When recording using Game Recording or Video Recording, you need to choose which audio device
to record audio/sound from. Record audio/sound from your computer or microphone, or record
both computer and microphone sound simultaneously.
Start liteCam Game> Option> Audio Device
Copyright © 2001~2015 RSUPPORT Co., Ltd. ALL RIGHTS RESERVED. www.rsupport.com
7
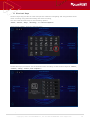
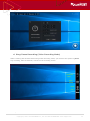
Finally, select a device you wish to record audio/sound from.
1. Toggle ON
2. Choose either computer sound or microphone sound.
3. For dual recording, select computer sound in 2, and check microphone input.
Copyright © 2001~2015 RSUPPORT Co., Ltd. ALL RIGHTS RESERVED. www.rsupport.com
8
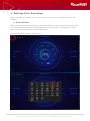
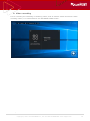
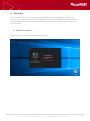
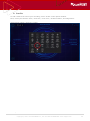
b. Video Options
When recording using Game Recording or Video Recording, you will have different video options
you can use, such as "Automatic Video Overlay", and "Automatic Hardware Acceleration".
When recording in full screen, select “Icon in the taskbar”. This function will allow you to view the
entire screen of your monitor without any issues. In addition, you can choose which picture format
to save captured screenshots in.
Start liteCam Game> Option> Video Options
Copyright © 2001~2015 RSUPPORT Co., Ltd. ALL RIGHTS RESERVED. www.rsupport.com
9
Choose your settings you wish to use.
Automatic Video Overlay: This is a function that allows a video displaying window on a
computer display while bypassing the chain of CPU from the graphics card to computer
monitor automatically.
Automatic Hardware Acceleration: Automatic hardware acceleration optimizes
recording performance by using a hardware-accelerated H.264 encoder. It will allow you to
record the target in high speed, with a high compression ratio and excellent quality.
Nvidia CUDA
AMD APP
Intel Quick Sync
Windows Vista, 7,
Windows Vista,
Windows 7 or 8
8
7, 8
Graphic
Check yours on
HD 7700 or
i3, i5, i7 processors
Card
nVidia webpage
higher
(2nd~4th
OS
generation)
Video
3840x2160
1920x1080
Resolution
Haswell:
2560x1600,
Pre-Haswell:
1920x1200
Icon in the Taskbar: To hide ‘sidebar’ during recording, you will be able to manage
functions in the liteCam Taskbar instead of ‘Sidebar’.
Reduce lag on game (beta): Uncheck if you have a problem with recorded files.
Captured file format: Change capture file format to PNG or JPG.
Copyright © 2001~2015 RSUPPORT Co., Ltd. ALL RIGHTS RESERVED. www.rsupport.com
10
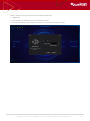
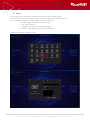
c. Video File Options
Select the file format you wish to save your recorded files in, as well as the Video Codec you wish
to use. If your computer file system is FAT 32, you will need to select “Continuous Recording” to
create a new recording file when the current recording file size reaches 4GB.
Note: For computers with FAT 32 file systems maximum size of a single file is 4GB
Start liteCam Game> Option> Video File Options.
Finally, select “file extension,” “Video Codec,” and “Audio Codec”.
1. Video Codec
2. Continuous Recording (Only for FAT 32 File System)
Copyright © 2001~2015 RSUPPORT Co., Ltd. ALL RIGHTS RESERVED. www.rsupport.com
11
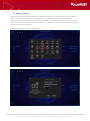
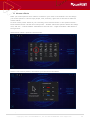
d. Shortcut Keys
Shortcut keys help provide an easier and quicker method of navigating and using liteCam Game
when recording using Game Recording and Video recording,
You can create shortcut keys for the following options:
"Start", "Pause", "Stop", "Drawing", and "Screen capture"
Start liteCam GAME> Options> Shortcut Keys.
Choose the keys you wish to use as shortcuts when recording. Create shortcut keys for “Start”,
“Pause”, “Stop”, “Draw”, and “Capture”.
Copyright © 2001~2015 RSUPPORT Co., Ltd. ALL RIGHTS RESERVED. www.rsupport.com
12
4. Recording Mode
liteCam Game has two different recording modes for different purposes. They are “Game
Recording”, and “Video Recording”.
a. Game Recording
Game Recording is for recording DirectX 7, 8, 9, 10, 11 and OpenGL games. You can record both
Steam and non-Steam games. It is recommended to use “RSUPPORT MJPEG Codec" when
recording games.
Copyright © 2001~2015 RSUPPORT Co., Ltd. ALL RIGHTS RESERVED. www.rsupport.com
13
b. Video recording
It is for recording non-streaming or streaming videos, such as YouTube videos and movies. When
recording videos, it is recommended to use “RSUPPORT MJPEG Codec".
Copyright © 2001~2015 RSUPPORT Co., Ltd. ALL RIGHTS RESERVED. www.rsupport.com
14
5. Record
a. Video Recording
With Video Recording, you can record non-streaming and streaming videos from websites (YouTube,
Vimeo, etc) that cannot be downloaded as video files. In addition, you can record movies, Skype
video chats and calls, online web conferences video with audio, etc.
Select recording area - Move the recording area through the “arrow cross” in the middle
of the liteCam Game window. - Drag and drop the window corners of the liteCam Game
window to resize the recording area. - From the toolbar, select the video format you wish to
use.
Select Frame per Second (FPS) - 20 FPS is a default FPS in Game Recording mode. - To
change FPS, select “FPS” button in the toolbar and choose the FPS you wish to use.
Select Audio Device – Select an audio device to record audio/sound from, either you’re
your computer or microphone. In Windows Vista, 7, 8, and 10, computer sound is the
default option.
Audio Format - Select the quality you wish to use for your audio recording. - In toolbar,
select “Audio Format” button and chose the audio file format you want to use when
recording. - Basically Mono, 16 bit, 22 KHz is fine. To record with high quality, use stereo,
16 bit, 44 KHz.
Click Record Button - Recording will be started in 3..2..1!.
Finish recording – When you have finished recording, click the stop button, which is
located in the bottom right corner of the liteCam window.
b. Game Recording
With liteCam Game, you can record DirectX 7, 8, 9, 10, 11, and OpenGL games on your computer.
The Game Recording Mode is 3 times faster than General Recording Mode or Video Recording Mode.
Record your game play at maximum of 120 FPS in 1080p without any lag.
Select Frame per Second - 20 FPS is defaults FPS in game recording mode, but you can
choose above 30 FPS if you have higher performing system. - To change FPS, select “FPS”
button in the toolbar and choose FPS you want.
Select Audio Device
–
Select an audio device to record sound/audio from, either from
your computer or microphone. - In Windows Vista, 7, 8, and 10, computer sound is the
default option.
Audio Format - Select the quality you wish to use for your audio recording. - In toolbar,
select “Audio Format” button and chose the audio file format you want to use when
recording. - Basically Mono, 16 bit, 22 KHz is fine. To record with high quality, use stereo,
16 bit, 44 KHz.
Start game you want to record - “Standby Press *** key to record.” is displayed in
green when liteCam Game is ready to record.
Click Keyboard shortcut to record - “Standby Press *** key to stop recording.” is
Copyright © 2001~2015 RSUPPORT Co., Ltd. ALL RIGHTS RESERVED. www.rsupport.com
15
displayed in red while recording.
Press keyboard shortcut to finish recording. - “Recording Complete Press *** key to
stop.” is displayed when the recording has finished. Once the recording is complete, close
the game and choose “Preview mode” in the toolbar to preview your recording.
c. Timer Recording (For Video Recording mode)
In Video Recording mode, you can schedule a time to record a favorite program, or online lecture
with Timer Recording. You can also record activities at a particular time, and start or end after a
certain length of time. When you have finished recording, you can schedule your computer to
shutdown automatically.
Start liteCam Game> Options> Timer Recording.
Finally, choose the options available.
Choice A. Set start time and end time
Choice B. Set start time only 3.
Choice C. Set end time only.
Copyright © 2001~2015 RSUPPORT Co., Ltd. ALL RIGHTS RESERVED. www.rsupport.com
16
d. Stop/Pause Recording (Video Recording Mode)
While recording with liteCam Game using Video Recording mode, you will have the option to pause
any recording, take screenshots, or draw on the recording screen.
Copyright © 2001~2015 RSUPPORT Co., Ltd. ALL RIGHTS RESERVED. www.rsupport.com
17
6. Preview
Your recordings can be viewed in Preview window. Within the Preview Window, you can Trim,
Convert, Save As or Delete the recording. In addition, you can hide/unhide the recorded video list,
and import other files or open the Work Folder. The Work Folder is the folder where all recorded
files are saved.
a. Select “Preview.”
Click the Play icon on the liteCam Game main window.
Copyright © 2001~2015 RSUPPORT Co., Ltd. ALL RIGHTS RESERVED. www.rsupport.com
18
b. Full Screen
Click "Full Screen" to watch your recorded videos in full screen mode.
Copyright © 2001~2015 RSUPPORT Co., Ltd. ALL RIGHTS RESERVED. www.rsupport.com
19
Can’t seem to find your recorded videos? Recover them by clicking “Open” as shown below.
The Work folder is where your recorded files are saved. Click “Open Folder” as shown below.
To trim your recordings, click the scissor icon.
Copyright © 2001~2015 RSUPPORT Co., Ltd. ALL RIGHTS RESERVED. www.rsupport.com
20
To convert your recorded video or audio files, click the convert icon.
To upload your recordings to YouTube, click the “Upload to YouTube” button.
Copyright © 2001~2015 RSUPPORT Co., Ltd. ALL RIGHTS RESERVED. www.rsupport.com
21
Before uploading your recordings to YouTube, make sure the following apply:
1. You have an active YouTube account.
2. Your video was recorded using Video Recording Mode or Game Recording Mode
3. You have uploaded a video to your active YouTube account before.
For recordings longer than 15 minutes, change your YouTube account setting options to “Increase
your limit”: https://support.google.com/youtube/answer/71673?hl=en
To hide or unhide your recorded file list, left-click on the Preview screen.
Copyright © 2001~2015 RSUPPORT Co., Ltd. ALL RIGHTS RESERVED. www.rsupport.com
22
Copyright © 2001~2015 RSUPPORT Co., Ltd. ALL RIGHTS RESERVED. www.rsupport.com
23
7. General Options
a. Frame per Second
FPS measures how much information is used to store and display motion video. The maximum FPS
available to record video in Game Recording is 120FPS, and for Video Recording is 30FPS.
For Video Recording mode
Copyright © 2001~2015 RSUPPORT Co., Ltd. ALL RIGHTS RESERVED. www.rsupport.com
24
For Game Recording Mode
Copyright © 2001~2015 RSUPPORT Co., Ltd. ALL RIGHTS RESERVED. www.rsupport.com
25
b. Audio Format
Different audio formats have different quality. You can choose the quality you wish to use, we
recommend "Mono, 16bit, 22KHz".
To choose the audio quality you wish to use when recording.
Mono, 16bit, 11 KHz
Stereo, 16bit, 48 KHz: Record channels, bit, and sampling rate.
System Default Settings: Record system sounds in Windows Vista, 7, 8, and 10.
No Audio: Exclude sounds from recording.
Start liteCam Game> Options> Audio Format
Copyright © 2001~2015 RSUPPORT Co., Ltd. ALL RIGHTS RESERVED. www.rsupport.com
26
c. Video Format
Before game recording, you need to select the screen size you wish to use; there are many options
to choose from.
Start liteCam Game> Option> Video Format
Select an area to record
Pre-defined resolution ranging from 1920x1080 to 320x240.
Custom Resolution: define a custom area by adjusting width and height.
100% or 50% of the screen 100% recording size is the same aspect ratio of the
original screen. (50% Recording size is 50% of aspect ratio of the original screen)
Copyright © 2001~2015 RSUPPORT Co., Ltd. ALL RIGHTS RESERVED. www.rsupport.com
27
d. Select an Area
Before recording a video or screen, you have to select the screen size you wish to record; there are
many options to choose from.
To select an area to record
Pre-defined
1024 x 768: select the screen resolution on recording area.
Custom Resolution: define a custom area with adjusting the width and height.
Rectangle: select a rectangular area to Record.
Window: select a specific window to record.
Program: select a program to record.
Full Screen: select the full screen to record.
Start liteCam Game> Option> Select an Area
Copyright © 2001~2015 RSUPPORT Co., Ltd. ALL RIGHTS RESERVED. www.rsupport.com
28
8. Advance Recording Option
a. Title
When adding a title to your recording, select "Title" in the options window.
Next, select your favorite “Font”, “Font size”, “Text Color”, “Title location”, and “Alignment”.
Start liteCam Game> Options> Title
Copyright © 2001~2015 RSUPPORT Co., Ltd. ALL RIGHTS RESERVED. www.rsupport.com
29
b. Credits
To add credits to the end of your recording, select "Credit" in the options window.
Next, select your favorite “Font”, “Font size”, “Text color”, “Credits location”, and “Alignment”.
Start liteCam Game> Options> Credits
Copyright © 2001~2015 RSUPPORT Co., Ltd. ALL RIGHTS RESERVED. www.rsupport.com
30
c. Logo
Add a logo to your recording! The logo will be seen in your recorded video.
To add a logo to your video, select "Logo" in options window and import a logo file.
Next, select the transparency and location of the selected Logo.
On/Off: toggle switch to insert logo or not.
File: import logo file.
Transparency: make the image transparent.
Location: indicate where the image is displayed.
Start liteCam Game> Options> Logo
Copyright © 2001~2015 RSUPPORT Co., Ltd. ALL RIGHTS RESERVED. www.rsupport.com
31
d. Mouse effects
Make your mouse pointer more visible or invisible in your video or screenshots. You can change
your mouse pointer in various ways (shape, color, and size), right-click or left-click for different
mouse effects.
To show mouse pointer effects in your recording, select "Mouse Pointer" in the options window. Record Mouse Pointer: Record the mouse pointer. - Default: add mouse pointer effects with shape,
color, and size. - Left-Click Effect: Add effects to the left click. - Right-Click Effect: Add effects to
the right click.
Start liteCam Game> Options> Mouse Pointer
Select "record mouse pointer,” and choose your favorite mouse effects.
Copyright © 2001~2015 RSUPPORT Co., Ltd. ALL RIGHTS RESERVED. www.rsupport.com
32
e. PIP
Show your active speech simultaneously in the corner of your screen with Picture-in-Picture (PIP)
to include yourself in your video.
Start liteCam Game> Options> PIP
Settings for Webcam
Video Format: select your webcam resolution.
Webcam: check for available webcam devices.
Option Button: check webcam property. - Location: PIP display area.
PIP Style: design PIP window.
Preview: Test where PIP will appear.
Copyright © 2001~2015 RSUPPORT Co., Ltd. ALL RIGHTS RESERVED. www.rsupport.com
33
Show/Hide PIP while recording
While recording, PIP window can sometimes interfere with your recordings. With the show or hide
PIP feature, you can show or hide PIP while recording. Follow the steps below
Start liteCam Game> Options> PIP> PIP Style
Copyright © 2001~2015 RSUPPORT Co., Ltd. ALL RIGHTS RESERVED. www.rsupport.com
34
Copyright © 2001~2015 RSUPPORT Co., Ltd. ALL RIGHTS RESERVED. www.rsupport.com
35
f. Lock Frame Rate
liteCam Game’s Lock Frame Rate feature helps to lock your FPS while recording games so that the
FPS can be maintained throughout your recording.
Start liteCam Game> Options> Lock Frame Rate
Copyright © 2001~2015 RSUPPORT Co., Ltd. ALL RIGHTS RESERVED. www.rsupport.com
36
g. OSD
While recording game play, the ‘Game Recording Information’ also known as ‘FPS Counter’ might
block some game information or screens. Also, at times, the game recording voice guide might
become a nuisance. The two features ‘Game Recording Information’ and ‘Voice guide’ can be
disabled or enabled anytime.
Show/Hide Game Recording Information.
To enable or disable the Game Recording Information: Start liteCam Game> Options> OSD
Check or uncheck “Show Game Recording Information” to show or hide the FPS Counter. Disable
the voice “Recording Available” command by disabling “Enable Voice Guide.”
Copyright © 2001~2015 RSUPPORT Co., Ltd. ALL RIGHTS RESERVED. www.rsupport.com
37
9. Streaming
liteCam Game allows for live streaming while recording. You can stream to your favorite streaming
site, such as Twitch, YouTube, Ustream, etc. that supports “RTMP” protocol.
Start liteCam Game> Options> Streaming
On/Off: toggle switch to turn streaming on or off.
Server Address: the server to send the streaming video to.
Stream Key: authentication key provided by the streaming site.
Video Quality: average bitrate sending video to the server.
Audio Quality: bit depths for audio transmission.
Users should turn the streaming OFF is they are not streaming to a server in order to save
bandwidth and processing power to obtain a smoother recording.
While in streaming, the captured screen is also stored in the local storage.
Server Address and Stream Key can be found through whichever streaming site you choose to
stream to. Make sure to press “OK” when streaming settings have been set. Also, users must check
with the streaming site to make necessary changes to the firewall.
Users should adjust the video and audio quality is the key to deliver the best streaming experience.
This is directly related to the available network bandwidth from the user’s PC and streaming server.
Higher bitrate for video and audio means clearer and sharper image, but requires more bandwidth
to deliver the larger amount of information.
Copyright © 2001~2015 RSUPPORT Co., Ltd. ALL RIGHTS RESERVED. www.rsupport.com
38
Copyright © 2001~2015 RSUPPORT Co., Ltd. ALL RIGHTS RESERVED. www.rsupport.com
39
10. Converting and Extracting
All audio or video recorded using the liteCam Game can be converted to other file formats. For
videos, you can convert them to MP4 or WMV file formats, while audio can be converted to MP3,
WAV, and WMA file formats.
a. Convert Video Files
Convert video recordings by using liteCam Game. This option can be used in Game Recording and
Video Recording modes.
Copyright © 2001~2015 RSUPPORT Co., Ltd. ALL RIGHTS RESERVED. www.rsupport.com
40
11. Etc
a. Work and Log folder
The work folder is where all recordings are saved.
The Log folder is where all the logs created during the recording period are created and stored.
The default location of work folder is C:\Users\{UserName}\Documents\liteCam.
The default location of log folder is C:\Users\{UserName}\Documents\liteCam\Log.
Both of folders can be changed
b. Highlight Recording Area
When enabled, the recording area is highlighted in bold to clearly indicate the area that is captured.
c. Blinking Recording Area
When enabled, the recording area blinks while recording is in progress. This indicate that the
selected are is being recorded.
d. Run Preview After Recording
When enabled, the View Preview menu will automatically displayed with the recorded video list for
viewing and editing.
Start liteCam Game> Option> Etc.
Copyright © 2001~2015 RSUPPORT Co., Ltd. ALL RIGHTS RESERVED. www.rsupport.com
41
Copyright © 2001~2015 RSUPPORT Co., Ltd. ALL RIGHTS RESERVED. www.rsupport.com
42
12. Help
This provides all the information about liteCam Game.
Online guide: the liteCam Game User Manual is available online.
FAQ: solutions to frequently asked questions.
Contact us: email contacts for liteCam Game support and sales.
System Info: capture the system information such as CPU and Graphic card.
Auto Update: manually request auto update from the server.
Register Product: option enabled if Demo/Free version is installed. License key can be
entered here to fully unlock the product.
About liteCam: all information about liteCam Game, such as license code, license type,
liteCam Game version, Product name, etc.
Copyright © 2001~2015 RSUPPORT Co., Ltd. ALL RIGHTS RESERVED. www.rsupport.com
43
Copyright © 2001~2015 RSUPPORT Co., Ltd. ALL RIGHTS RESERVED. www.rsupport.com
44
For more information about RSUPPORT, please
visit
http://www.rsupport.com
Japan :
Korea :
(138-724) 서울시 송파구 방이동 45번지 한미타워
〒105-0001 東京都港区虎ノ門1-2-20
15층, 16층
第3虎の門電気ビル
전 화 : +82-70-7011-3900
팩 스 : +82-2-479-4429
기술문의 : [email protected]
구매문의 : [email protected]
기타문의 : [email protected]
TEL : +81-3-3539-5761
FAX : +81-3-3539-5762
お問い合わせ : [email protected]
Sales : [email protected]
Info : [email protected]
USA :
China :
333 Sylvan Avenue, Suite 110
Englewood Cliffs, NJ 07632
Phone : +1-888-348-6330
Fax : +1-888-348-6340
Tech : [email protected]
Sales : [email protected]
Info : [email protected]
北京市朝阳区东三环北路丙2号
天元港中心B座1005室
联系电话 +86-10-8256-1810
传真号码 +86-10-8441-7505
技术咨询 [email protected]
销售咨询 [email protected]
其他咨询 [email protected]
Copyright © 2001~2015 RSUPPORT Co., Ltd. ALL RIGHTS RESERVED. www.rsupport.com
45