1
liteCam Android User Guide
liteCam Android User Guide
Last Updated: Feb. 2015
Copyright © 2001~2015 RSUPPORT Co., Ltd. ALL RIGHTS RESERVED. www.rsupport.com
1
Copyright
liteCam Android
Guide Version 2.0
ⓒ 2015 RSUPPORT Co., Ltd. All Rights Reserved
The information contained in this manual and future improvements are subject to change
without notice.
Rsupport Co., Ltd. hereafter referred to as “Rsupport”, does not take any responsibility
for any marketability nor compatibility apart from the usage described in the manual.
Under no circumstances will Rsupport be liable to direct, indirect, incidental nor
accidental damages due to errors in the manual.
This manual is the intellectual property of Rsupport and is protected under international
copyright laws. Reproducing or copying all or part of this document without the prior
written consent of Rsupport is a violation of international copyright law.
Windows Vista / 7 / 8 / 10 are registered trademarks of Microsoft Corporation in the U.S.
and other countries. Any additional third party registered trademarks mentioned in this
manual are used for reference and descriptive purposes only and are still the intellectual
property of the third party in question.
Copyright © 2001~2015 RSUPPORT Co., Ltd. ALL RIGHTS RESERVED. www.rsupport.com
2
SYSTEM REQUIREMENTS .................................................................................................. 4
LITECAM ANDROID INSTALLATION GUIDE ....................................................................... 5
1. LITECAM ANDROID INSTALLATION. ........................................................................................................... 5
2. LAME INSTALLATION. ........................................................................................................................ 15
3. ACTIVATE USB DEBUGGING MODE......................................................................................................... 15
4. DOWNLOAD AND INSTALL USB DRIVERS.................................................................................................. 17
SETTINGS PRIOR TO RECORDING .................................................................................. 19
1. AUDIO DEVICE ................................................................................................................................ 19
2. VIDEO OPTIONS ............................................................................................................................... 20
3. VIDEO FILE OPTIONS ......................................................................................................................... 22
4. SHORTCUT KEYS .............................................................................................................................. 24
RECORD .......................................................................................................................... 26
1. ONE-CLICK RECORDING ..................................................................................................................... 26
2. STOP/PAUSE RECORDING.................................................................................................................... 26
PREVIEW ........................................................................................................................ 27
1.
SELECT PREVIEW ........................................................................................................................... 27
2.
FULL SCREEN ............................................................................................................................... 29
3.
OPEN ......................................................................................................................................... 29
4.
OPEN FOLDER ............................................................................................................................... 29
5.
TRIM ......................................................................................................................................... 30
6.
CONVERT .................................................................................................................................... 30
7.
UPLOAD TO YOUTUBE ...................................................................................................................... 31
8.
HIDE/UNGIDE RECORDED LIST .......................................................................................................... 32
GENERAL OPTIONS ......................................................................................................... 33
1. FRAMES PER SECOND ........................................................................................................................ 33
2. AUDIO FORMAT ................................................................................................................................ 35
3. VIDEO FORMAT ................................................................................................................................ 37
ADVANCE RECORDING OPTION ...................................................................................... 39
1. TITLE ........................................................................................................................................... 39
2. CREDITS ........................................................................................................................................ 41
3. LOGO ........................................................................................................................................... 43
4. PIP .............................................................................................................................................. 45
Solution for PIP interference while recording................................................47
CONVERTING AND EXTRACTION ..................................................................................... 49
1. CONVERT VIDEO FILES ....................................................................................................................... 49
2. EXTRACT AUDIO FILES ....................................................................................................................... 51
OTHER ............................................................................................................................ 53
HELP............................................................................................................................... 55
Copyright © 2001~2015 RSUPPORT Co., Ltd. ALL RIGHTS RESERVED. www.rsupport.com
3
System Requirements
Minimum
Recommended
OS
Windows Vista
Windows 7, 8, 10
CPU
1.5GHz single-core CPU
2GHz dual-core CPU or better.
128MB Video Memory
Graphics
Graphic Card supporting DirectX9 and
Card
WDDM driver
Video Memory of 512MB or more.
1GB RAM or more is recommended
RAM
Sound Card
A sound card that supports
full-duplexing is required.
*Microsoft Internet Explorer 8.0 / Microsoft Windows Media Player 11 or later is recommended.
You may not be able record computer sounds if you are using a sound card that does not support
full-duplexing, upgrading the driver is recommended in order to record computer sounds. If your
current sound card does not support full-duplexing, upgrading the driver will not help because it
may be hardware related. Depending on which movie or game you intend to record, you may need
to upgrade your graphic card, sound card, CPU or RAM, or install the latest version of Direct X.
Copyright © 2001~2015 RSUPPORT Co., Ltd. ALL RIGHTS RESERVED. www.rsupport.com
4
liteCam Android Installation Guide
1. liteCam Android installation.
Download and Run
To download, go to www.litecam.net/en/ and download liteCam Android.
Next, run the downloaded installation file.
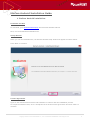
Setup Window
When you run the installation file, the liteCam Android setup window will appear as shown below.
Click “Next” to continue.
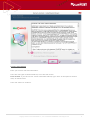
License Agreement
Agree to the liteCam Android Terms and Condition to continue with the installation process.
To accept the liteCam terms, click “I accept the terms of the license agreement” and click “Next” to
continue.
Copyright © 2001~2015 RSUPPORT Co., Ltd. ALL RIGHTS RESERVED. www.rsupport.com
5
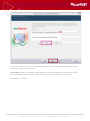
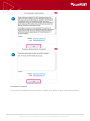
License Information
Enter your license code and information.
There are two types of liteCam Android, a free and full version.
Free version: if you have a free version of liteCam Android, type “Free” in the space for license
code, as shown below.
Then click “Next” to Continue.
Copyright © 2001~2015 RSUPPORT Co., Ltd. ALL RIGHTS RESERVED. www.rsupport.com
6
You will be prompted with “Do you want to install the liteCam FREE version” as shown below, click
“Yes” in order to continue.
Copyright © 2001~2015 RSUPPORT Co., Ltd. ALL RIGHTS RESERVED. www.rsupport.com
7
If you have a license code or you have purchased the full version of liteCam Android, click “No” to
return back to the previous window.
Full version: when you purchase liteCam Android, you will be provided with your license code in
the confirmation email you receive. Enter your license code in the space for license code.
Click “Next” to continue
Copyright © 2001~2015 RSUPPORT Co., Ltd. ALL RIGHTS RESERVED. www.rsupport.com
8
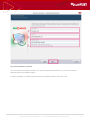
Choose Installation location
You can choose the location of where you want to install liteCam Android, or you can let liteCam
Android install to its default location.
Choose “Complete” to install liteCam Android in its default location, and click next.
Copyright © 2001~2015 RSUPPORT Co., Ltd. ALL RIGHTS RESERVED. www.rsupport.com
9
If you choose “Custom,” you can manually select the installation location.
1. Click “Change” to select the installation folder.
2. Select the installation folder.
3. Click “Next” to continue.
Copyright © 2001~2015 RSUPPORT Co., Ltd. ALL RIGHTS RESERVED. www.rsupport.com
10
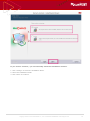
Click “Next” to continue.
Copyright © 2001~2015 RSUPPORT Co., Ltd. ALL RIGHTS RESERVED. www.rsupport.com
11
Click “Install” to continue.
Copyright © 2001~2015 RSUPPORT Co., Ltd. ALL RIGHTS RESERVED. www.rsupport.com
12
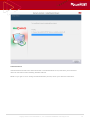
Authentication
liteCam Android needs to be authorized with our authentication server, therefore you must have
internet connection while installing liteCam Android.
NOTE: If you get an error during the authentication process, check your internet connection.
Copyright © 2001~2015 RSUPPORT Co., Ltd. ALL RIGHTS RESERVED. www.rsupport.com
13
Installation complete
If you see the “InstallShield Wizard Complete” window, click “Finish” to start using liteCam Android.
Copyright © 2001~2015 RSUPPORT Co., Ltd. ALL RIGHTS RESERVED. www.rsupport.com
14
NOTE: During installation, RSUPPORT Screen Capture Codec (RSCC) and RSUPPORT MPEG-4 Codec”
will be installed automatically.
2. LAME Installation
Lame is a high quality MPEG Audio layer III (3) encoder. To have an MP3 option, or to save or
convert audio to MP3 format, Lame encoder must be installed in your computer. During installation
you will see a dialog box which will prompt you to install the MP3 encoder (Lame), click "OK" to be
directed to the website where you can download the Lame file.
Download the zip file and extract it. Copy and paste the “lame_enc.dll file” to the folder below (in
case you didn’t change the liteCam Android directory) C:\Program
Files\Steam\SteamApps\common\liteCam Android Folder.
3. Activate USB Debugging Mode
Enabling USB debugging mode is incredibly easy, however USB debugging is different depending on
your Android device and OS version
Note: liteCam Android only supports Android version 4.1 and above.
Copyright © 2001~2015 RSUPPORT Co., Ltd. ALL RIGHTS RESERVED. www.rsupport.com
15
Android 4.1
Go to Settings
Go to Developer Options
Slide the Developer Options Switch to turn on Developer Options
Place a Check Mark on the box beside USB Debugging / Android Debugging
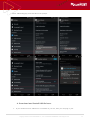
Android 4.2 and Above
Go to Settings
Tap About Phone
Scroll towards the bottom and tap “Build number” between 5 and 7 times, depending on
your device. You will get a short pop-up in the lower area of your display saying that you
are now a developer.
Go back and now access the “Developer options” menu
Copyright © 2001~2015 RSUPPORT Co., Ltd. ALL RIGHTS RESERVED. www.rsupport.com
16
* Check ‘USB debugging’ and click OK on the prompt.
4. Download and Install USB Drivers.
1. If your Android Device USB driver is installed on your PC, then you can plug in your
Copyright © 2001~2015 RSUPPORT Co., Ltd. ALL RIGHTS RESERVED. www.rsupport.com
17
Android device to your PC through a USB cable. If you do not have a USB Driver installed
on your PC, you will need to install it.
2. Drivers for all others devices are provided by the device manufactures.
- Acer: http://www.acer.com/worldwide/support/mobile.html
- ALCATEL ONE TOUCH: http://www.alcatelonetouch.com/global-en/support/faq/usbdriver.html
- Asus: http://support.asus.com/download/
- Dell:
http://support.dell.com/support/downloads/index.aspx?c=us&cs=19&l=en&s=dhs&~ck=anavml
- Foxconn: http://drivers.cmcs.com.tw/
- Fujitsu: http://www.fmworld.net/product/phone/sp/android/develop/
- Garmin Asus: https://www.garminasus.com/en_US/support/pcsync/
- Google: http://developer.android.com/sdk/win-usb.html#download
Hisense:http://app.hismarttv.com/dss/resourcecontent.do?method=viewResourceDetail&resourceI
d=16&type=5
- HTC: http://www.htc.com
- Huawei: http://www.huaweidevice.com/worldwide/downloadCenter.do?method=index
- Intel: http://www.intel.com/software/android
- KT Tech: http://www.kttech.co.kr/cscenter/download05.asp
- Kyocera: http://www.kyocera-wireless.com/support/phone_drivers.htm
- Lenovo: http://developer.lenovomm.com/developer/download.jsp
- LG: http://www.lg.com/us/mobile-phones/mobile-support/mobile-lg-mobile-phone-support.jsp
- Motorola: http://developer.motorola.com/docstools/USB_Drivers/
- MTK: http://online.mediatek.com/Public%20Documents/MTK_Android_USB_Driver.zip
- Oppo: http://www.oppo.com/index.php?q=software/view&sw_id=631
- Pantech: http://www.isky.co.kr/cs/software/software.sky?fromUrl=index
- Pegatron: http://www.pegatroncorp.com/download/New_Duke_PC_Driver_0705.
- Samsung: http://www.samsung.com/us/support/downloads
- Sharp: http://k-tai.sharp.co.jp/support/
- SK Telesys: http://www.sk-w.com/service/wDownload/wDownload.jsp
- Sony Mobile: http://developer.sonymobile.com/downloads/drivers/
- Teleepoch: http://www.teleepoch.com/android.html
- Toshiba: http://support.toshiba.com/sscontent?docId=4001814
- Yulong Coolpad: http://www.yulong.com/product/product/product/downloadList.html#downListUL
- Xiaomi: http://www.xiaomi.com/c/driver/index.html
- ZTE: http://support.zte.com.cn/support/news/NewsDetail.aspx?newsId=1000442
Copyright © 2001~2015 RSUPPORT Co., Ltd. ALL RIGHTS RESERVED. www.rsupport.com
18
Settings Prior to Recording
Before recording your Android screen, some options need to be set. Those options include the
following;
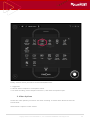
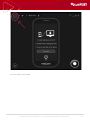
1. Audio Device
When recording your Android screen, choose what audio device to record audio/sound from. Record
audio/sound from your computer or microphone, or both computer and microphone sound
simultaneously.
Start liteCam> Options> Audio Devices
Copyright © 2001~2015 RSUPPORT Co., Ltd. ALL RIGHTS RESERVED. www.rsupport.com
19
Finally, select a device you want to record sound/audio from.
1. Toggle ON
2. Choose either computer or microphone sound.
3. For dual recording, select computer sound in 2, and check microphone input.
2. Video Options
Choose the video options you wish to use when recording. To select which format to save the
screen shots
Start liteCam> Option> Video Format
Copyright © 2001~2015 RSUPPORT Co., Ltd. ALL RIGHTS RESERVED. www.rsupport.com
20
Select the file format to save the screenshot in.
Copyright © 2001~2015 RSUPPORT Co., Ltd. ALL RIGHTS RESERVED. www.rsupport.com
21
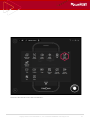
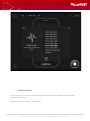
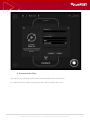
3. Video File Options
Choose the file format you wish to save your recorded files in. Select the Video and Audio Codec
you wish to use, and if your computer file system is FAT 32, you will need to select “Continuous
Recording” to create a new recording file when the current recording file size reaches 4GB. Note:
For computers with FAT 32 file systems maximum size of a single file is 4GB.
Start liteCam> Option> Video Recording Options.
Copyright © 2001~2015 RSUPPORT Co., Ltd. ALL RIGHTS RESERVED. www.rsupport.com
22
Select File Extension, Video Codec, and Audio Codec
1. File Extension: AVI or MP4
2. Video Codec
3. Audio Codec
4. Continuous Recording (Only for FAT 32 File System)
Copyright © 2001~2015 RSUPPORT Co., Ltd. ALL RIGHTS RESERVED. www.rsupport.com
23
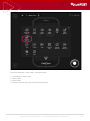
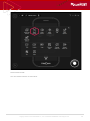
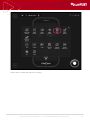
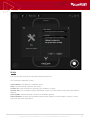
4. Shortcut Keys
Shortcut keys help provide an easier and quicker way of using liteCam HD while recording.
You can create shortcut keys for the following options: "Start", "Pause", "Stop", "Drawing", and
"Screen capture".
Start liteCam > Options> Shortcut Keys.
Copyright © 2001~2015 RSUPPORT Co., Ltd. ALL RIGHTS RESERVED. www.rsupport.com
24
Copyright © 2001~2015 RSUPPORT Co., Ltd. ALL RIGHTS RESERVED. www.rsupport.com
25
Record
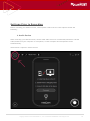
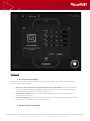
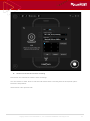
1. One-Click Recording
A simple one-click on the record button will start liteCam Android to record any activity on the
screen of your Android device.
Plug your Android device into your PC through a USB Cable Connect your Android
device to your PC through a USB cable. Make sure that your device’s USB debugging is
enabled and the USB driver is installed on your PC.
Click Record button As soon as you click the Recording button the countdown to
recording will start…3 2 1.
Finish recording when you have finished recording, click the “Pause/Stop” button in the
right corner of the window to stop the recording.
2. Stop/Pause Recording
Copyright © 2001~2015 RSUPPORT Co., Ltd. ALL RIGHTS RESERVED. www.rsupport.com
26
While recording with liteCam Android, you will have the option to pause any recording, and capture
screenshots.
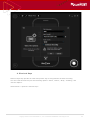
Preview
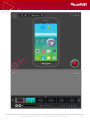
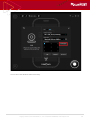
1. Select Preview
Your recorded videos and audio can be viewed in preview.
In the Preview window you can trim, convert, save as or delete your recording. You can hide or
unhide the recorded file list, and you can import other files or open the work folder.
The Work Folder is where all your recorded files are saved.
Click the “Play” icon in the liteCam Android main window.
Copyright © 2001~2015 RSUPPORT Co., Ltd. ALL RIGHTS RESERVED. www.rsupport.com
27
Copyright © 2001~2015 RSUPPORT Co., Ltd. ALL RIGHTS RESERVED. www.rsupport.com
28
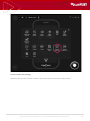
2. Full Screen
Click "Full Screen" to watch your recorded videos in full screen mode.
3. Open
Can’t find your recording in Preview? Recover it by clicking “Open” as shown below.
4. Open Folder
Open the work folder where you recordings are saved.
Copyright © 2001~2015 RSUPPORT Co., Ltd. ALL RIGHTS RESERVED. www.rsupport.com
29
5. Trim
To trim your recorded video files, click the scissor icon.
6. Convert
To convert your recorded video or audio file, click convert icon.
Copyright © 2001~2015 RSUPPORT Co., Ltd. ALL RIGHTS RESERVED. www.rsupport.com
30
7. Upload to Youtube
To upload your recorded video to YouTube, click “Upload to YouTube”
Before uploading your recordings to YouTube, make sure the following apply:
1. You have an active YouTube account.
2. Your video was recorded using Video Recording Mode or Game Recording Mode
Copyright © 2001~2015 RSUPPORT Co., Ltd. ALL RIGHTS RESERVED. www.rsupport.com
31
3. You have uploaded a video to your active YouTube account before.
For recordings longer than 15 minutes, change your YouTube account setting options to “Increase
your limit”
Link: https://support.google.com/youtube/answer/71673?hl=en
8. Hide/Unhide Recorded List
To hide or unhide your recorded files list, left-click on the Preview screen.
Copyright © 2001~2015 RSUPPORT Co., Ltd. ALL RIGHTS RESERVED. www.rsupport.com
32
General Options
1. Frames Per Second
FPS measures how much information is used to store and display motion video.
The maximum FPS available to record video in General Recording and Video Recording is 30 FPS.
Start liteCam> Frames Per Second> select your desired FPS
Copyright © 2001~2015 RSUPPORT Co., Ltd. ALL RIGHTS RESERVED. www.rsupport.com
33
You can choose up to 30FPS.
Copyright © 2001~2015 RSUPPORT Co., Ltd. ALL RIGHTS RESERVED. www.rsupport.com
34
2. Audio Format
Different audio formats have different quality. You can choose the quality you wish to use, we
recommend “Mono, 16bit, 22KHz"
To choose the audio quality you wish to use while recording.
- Mono, 16bit, 11 KHz
– Stereo, 16bit, 48 KHz: record channels, bit, and sampling rate.
- System Default Settings: record system sounds in Windows Vista, 7, 8, 10.
- No Audio: exclude sounds from recording.
Start liteCam> Options> Audio Format
Copyright © 2001~2015 RSUPPORT Co., Ltd. ALL RIGHTS RESERVED. www.rsupport.com
35
Copyright © 2001~2015 RSUPPORT Co., Ltd. ALL RIGHTS RESERVED. www.rsupport.com
36
3. Video Format
The resolution of your screen can be selected under the Video Format option. There are many
options to choose from.
Start liteCam Game> Option> Video Format
Copyright © 2001~2015 RSUPPORT Co., Ltd. ALL RIGHTS RESERVED. www.rsupport.com
37
Select Video Format.
You can choose between 10 and 100%
Copyright © 2001~2015 RSUPPORT Co., Ltd. ALL RIGHTS RESERVED. www.rsupport.com
38
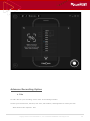
Advance Recording Option
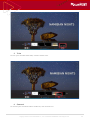
1. Title
To add a title to your recording, select "Title" in the settings window.
Choose your favorite font, font size, text color, title location, and alignment to create your title.
Start liteCam HD> Options> Title.
Copyright © 2001~2015 RSUPPORT Co., Ltd. ALL RIGHTS RESERVED. www.rsupport.com
39
Copyright © 2001~2015 RSUPPORT Co., Ltd. ALL RIGHTS RESERVED. www.rsupport.com
40
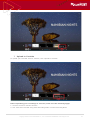
2. Credits
To add credits to the end of your recording, select "Credit" in the settings window.
Choose your favorite font, font size, text color, title location, and alignment to create your ending
credits.
Start liteCam HD> Options> Credits
Copyright © 2001~2015 RSUPPORT Co., Ltd. ALL RIGHTS RESERVED. www.rsupport.com
41
Copyright © 2001~2015 RSUPPORT Co., Ltd. ALL RIGHTS RESERVED. www.rsupport.com
42
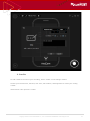
3. Logo
With liteCam Android, you can add your own logo to your recording.
To add a logo to your recording, select "Logo" in the settings window and import a file to use.
Next, select the transparency and location of the selected logo.
You can adjust your logo with the following settings:
On/Off: toggle the switch to insert logo or to not include it.
File: import logo file.
Transparency: control the image’s transparency.
Location: indicate where the image is displayed.
Start liteCam HD> Options> Logo
Copyright © 2001~2015 RSUPPORT Co., Ltd. ALL RIGHTS RESERVED. www.rsupport.com
43
Copyright © 2001~2015 RSUPPORT Co., Ltd. ALL RIGHTS RESERVED. www.rsupport.com
44
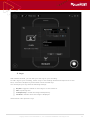
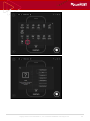
4. PIP
Simultaneously show your active speech in the corner of your recording with the Picture-in-Picture
(PIP) function to include yourself in the video.
To record and use your webcam at the same time:
On/Off: toggle switch to activate PIP webcam recording.
Video Format: select the webcam resolution.
Webcam: Select webcam installed on your PC
Option Button: check the webcam’s property.
Location: where PIP will display in your recording.
PIP Style: select the style of the PIP window.
Preview: test how PIP will appear.
Start liteCam HD> Options> PIP
Copyright © 2001~2015 RSUPPORT Co., Ltd. ALL RIGHTS RESERVED. www.rsupport.com
45
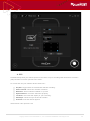
Switch “ON” to enable PIP webcam recording.
Copyright © 2001~2015 RSUPPORT Co., Ltd. ALL RIGHTS RESERVED. www.rsupport.com
46
Solution for PIP interference while recording
PIP window can sometimes interfere with recordings.
You can choose to either show or hide the PIP window while recording with the show/hide option.
Follow the steps below.
Start liteCam HD> Options>PIP
Copyright © 2001~2015 RSUPPORT Co., Ltd. ALL RIGHTS RESERVED. www.rsupport.com
47
Check “Show PIP Window While Recording”
Copyright © 2001~2015 RSUPPORT Co., Ltd. ALL RIGHTS RESERVED. www.rsupport.com
48
Converting and Extraction
All video or audio recorded using liteCam HD can be converted into other file formats.
You can convert videos to MP4 or WMV file formats, while audio files can be converted to MP3, WAV,
and WMA file formats.
1. Convert Video Files
Convert the videos that you have recorded using liteCam Android. Convert your recorded videos to
MP4 or WMV file formats.
Start liteCam> Convert Video Files
Copyright © 2001~2015 RSUPPORT Co., Ltd. ALL RIGHTS RESERVED. www.rsupport.com
49
Convert video file settings
Select the file you have already recorded, then select the file format and output quality.
Copyright © 2001~2015 RSUPPORT Co., Ltd. ALL RIGHTS RESERVED. www.rsupport.com
50
2. Extract Audio files
Any audio in your recorded videos can be extracted and saved as an audio file.
To extract audio from videos: Start liteCam HD> Option> Extract Audio File.
Copyright © 2001~2015 RSUPPORT Co., Ltd. ALL RIGHTS RESERVED. www.rsupport.com
51
Copyright © 2001~2015 RSUPPORT Co., Ltd. ALL RIGHTS RESERVED. www.rsupport.com
52
Other
Work and Log folder
The work folder is where all recorded files are saved. The default location of this folder is
C:\Users\{UserName}\Documents\liteCam.
You can have your recorded files saved to any folder in the preferences.
The Log folder is where all the logs created during recording. The default location of this folder is
C:\Users\{UserName}\Documents\liteCam\Log
This folder can also be changed at any time.
Options for Recording Window
Other options for recording windows are:
Copyright © 2001~2015 RSUPPORT Co., Ltd. ALL RIGHTS RESERVED. www.rsupport.com
53
Highlight Recording Area: this means that the selected area being recorded will be highlighted
while recording.
Blinking Recording Area recording area will blink while recording.
Run Preview After Recording: The preview window will open as soon the recording is completed
Copyright © 2001~2015 RSUPPORT Co., Ltd. ALL RIGHTS RESERVED. www.rsupport.com
54
Help
The Help window provides all information about liteCam HD.
You will find the following in Help:
Online Guide: User Manual is available online.
FAQ: frequently asked questions and issues.
Contact us: open the page for reporting your problem or inquiry
System info: your computer system information, helps if you are experiencing issues with liteCam
Android.
Auto Update: liteCam Android will check for available updates.
About liteCam: Provides all information about liteCam Android, include Product, Version, License
type/code and more information.
Copyright © 2001~2015 RSUPPORT Co., Ltd. ALL RIGHTS RESERVED. www.rsupport.com
55
Copyright © 2001~2015 RSUPPORT Co., Ltd. ALL RIGHTS RESERVED. www.rsupport.com
56
For more information about RSUPPORT, please visit
http://www.rsupport.com
Japan :
Korea :
(138-724) 서울시 송파구 방이동 45번지 한미타워
〒105-0001 東京都港区虎ノ門1-2-20
15층, 16층
第3虎の門電気ビル
전 화 : +82-70-7011-3900
TEL : +81-3-3539-5761
FAX : +81-3-3539-5762
お問い合わせ : [email protected]
Sales : [email protected]
Info : [email protected]
팩 스 : +82-2-479-4429
기술문의 : [email protected]
구매문의 : [email protected]
기타문의 : [email protected]
USA :
China :
247 West 30th Street, Floor 4,
New York, NY 10001
Phone : +1-888-348-6330
Fax : +1-888-348-6340
Tech : [email protected]
Sales : [email protected]
Info : [email protected]
北京市朝阳区东三环北路丙2号
天元港中心B座1005室
联系电话 +86-10-8256-1810
传真号码 +86-10-8441-7505
技术咨询 [email protected]
销售咨询 [email protected]
其他咨询 [email protected]
Copyright © 2001~2015 RSUPPORT Co., Ltd. ALL RIGHTS RESERVED. www.rsupport.com
57