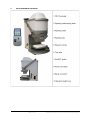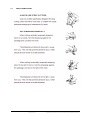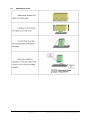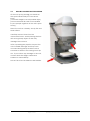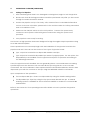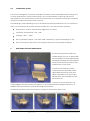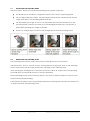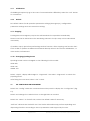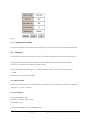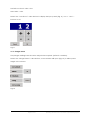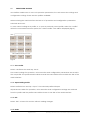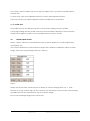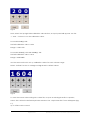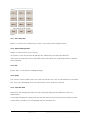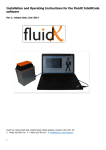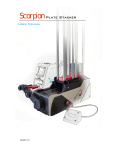
1
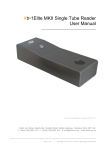
Software Operating Instructions For The i-Pette Liquid Handling System
__________________________________
Version 1 Release 3 November 2009
©FluidX Ltd.
FluidX Ltd. Monks Heath Hall, Chelford Road, Nether Alderley, Cheshire, SK10 4SY, UK.
T: +44(0) 1625 861 614 F: +44(0) 1625 861 615 E: [email protected] www.fluidx.co.uk
Page 1 of 37
Operating Instructions For The i-Pette Liquid Handling System
This document is for information only; the manufacturer accepts no liability for errors
contained herein or for incidental or consequential damages with the furnishing,
performance, or use of this material.
Unless otherwise specified references to names or parts is purely casual and has the purpose
of illustrating the product. The contents of this publication may not be reproduced in any
form or by any means (including electronic storage and retrieval or translation into a foreign
language) without prior agreement and written consent from the copyright owner.
The information contained in this document is subject to change without notice.
All rights reserved.
Page 2 of 37
Operating Instructions For The i-Pette Liquid Handling System
TABLE OF CONTENTS
1.
FEATURES OF THE I-PIPETTE
6
2.
QUICK REFERENCE DIAGRAMS
7
3.
SAFETY PRECAUTIONS
8
3.1
SAFETY INSTRUCTIONS:
9
3.2
UNPACKING CRATE
10
3.3
MOVING & INSPECTING THE PIPETTOR
11
OPERATIONS OVERVIEW (HARDWARE)
12
4.1
Setting of of Pipettor:
12
4.2
CONDITIONS OF USE
13
4.
5.
6.
DISPOSABLE TIPS AND HEAD USAGE
13
5.1
INSTALLING THE PIPETTING HEAD
14
5.2
REMOVING THE PIPETTING HEAD
14
5.3
PLATE HEIGHT
15
5.4
EMERGENCY STOP
15
CARE AND MAINTENANCE
16
6.1
FOR DISPOSABLE TIPS USAGE:
16
6.2
GENERAL MAINTENANCE:
16
7.
TROUBLESHOOTING
17
8.
SPECIFICATIONS
17
9.
OPERATIONS OVERVIEW (SOFTWARE)
18
10.
TO RUN OR UPDATE I-PETTE SOFTWARE
19
11.
PROGRAM INITIALISATION
19
12.
MAIN SCREEN OVERVIEW
21
13.
USING THE SOFTWARE
23
Page 3 of 37
Operating Instructions For The i-Pette Liquid Handling System
14.
15.
16.
17.
13.1 Confirm Machine Model
23
13.2 Set Pipetting Head
23
SET OPERATION PARAMETERS
23
14.1 Changing asprirate parameters
24
14.2 Changing dispense parameters
25
14.3 Changing parameters for mixing
25
PERFORMING COMMANDS
25
15.1 Aspirate function
26
15.2 Dispense function
26
15.3 Mixing function
27
15.4 Emptying function
27
15.5 Blow-out function
28
15.6 Auto function
28
15.7
Initialisation
29
15.8
Default
29
15.9 Stopping
29
15.10 Changing pipetting heads
29
SET CONFIGURATION PARAMETERS
29
16.1 i-Pipette Model Number
30
162
30
COM Ports
16.3 Max Volume
30
16.4 Over Shoot
30
16.5 Plunger Pause
31
CREATE USER PROFILES
32
17.1 Save Profile
32
17.2 Open Existing Profile
32
17.3 Exit
32
17.4 Notes
32
Page 4 of 37
Operating Instructions For The i-Pette Liquid Handling System
17.5 Profile Exist
18.
19.
33
DEFINE LIQUID CLASS
33
18.1 Save Class File
35
18.2 Open Existing Profile
35
18.3 Exit
35
18.4 Notes
35
18.5 Class File Exist
35
APPENDIX A
36
Page 5 of 37
Operating Instructions For The i-Pette Liquid Handling System
1.
FEATURES OF THE I-PETTE
The i-Pette is the ultimate in functionality, reliability, versatility and value. It features:
Revolutionary in industry – first pipetting head design that enables pipetting with both
384 and 96 well Labware.
High volume capacity — 1μL max per channel; 1μL dispensing volume under 3% CV (125 model)
Support full range of ESP disposable tips: 15μL, 50μL, 125μL and custom robotics tips
Control of dispense rate and calibration values allow for pipetting various liquids with
accuracy.
Manual indexing for serial dilution through simple control lever.
Easy to use Pocket PC (PPC) for calibration and control feedback.
Reliable core technology that has been field tested for over two decades and used
by major pharmaceutical companies and research laboratories.
Easily removable pipetting heads for both disposable tips and fixed tips.
Choice of disposable or Teflon coated (INSIDE/OUTSIDE) stainless steel tips.
9‖x 14‖ footprint fits into compatible hoods.
Lightweight and portable.
Page 6 of 37
Operating Instructions For The i-Pette Liquid Handling System
2.
QUICK REFERENCE DIAGRAMS
Page 7 of 37
Operating Instructions For The i-Pette Liquid Handling System
3.
SAFETY PRECAUTIONS
The i-Pette is designed and engineered to meet or exceed all safety standards.
Nevertheless, careless or abusive operation of these machines may still lead to possible
hazardous situations. Please comply with the following guidelines:
Never open the instrument; there are no user-serviceable parts inside. In the rare occasion
that you experience problems with your machine, please follow the remedies under Section 7
―Troubleshooting‖ in this manual. If this does not solve the problem, contact FLUIDX LTD.
Only operate the instrument in an indoor environment. Avoid direct exposure to sunlight and
excessive humidity. Avoid operating the machine with wet hands.
Always connect the machine to a power outlet with ground connection.
Use only optional equipment and peripherals supplied by FLUIDX LTD.
Using any other add-on products or modifications may affect the performance of your
machine and jeopardize the operator‘s safety.
In no circumstances should any part of the operator‘s body or any foreign object(s), except
the labware in use, enter the area directly under the pipetting tips and above the elevator. In
case of emergency, the machine can be stopped at any time by pressing the STOP button.
Always wear appropriate protective clothing/goggles when dealing with corrosive or
radioactive substances.
Immediately remove pipetting head from main unit and clean up stainless steel tips or
dispose the disposable tips after operating the instrument.
When dealing with volatile organic solvents, the machine should be operated inside a fume
hood.
Page 8 of 37
Operating Instructions For The i-Pette Liquid Handling System
3.1
SAFETY INSTRUCTIONS:
Page 9 of 37
Operating Instructions For The i-Pette Liquid Handling System
3.2
UNPACKING CRATE
Page 10 of 37
Operating Instructions For The i-Pette Liquid Handling System
3.3
MOVING & INSPECTING THE PIPETTOR
Lift the unit up by placing your hands at
the spots indicated by the two arrows.
Keep
your back straight to avoid possible injury
(we recommend this task to be handled
by two people together as the unit is quite
heavy).
Place the unit on a steady, sturdy, flat and
level surface.
Carefully remove items from the
accessories boxes. Avoid piercing the box
with a long sharp object as this may
damage the contents.
After unpacking the pipettor, inspect the
unit for visible damage that may have
occurred during transportation such as
scratches or dents in the casing, bent tips
etc. If you notice any damage to the unit,
contact both the freight carrier and
FLUIDX LTD. immediately.
DO NOT PLUG IN OR TURN ON THE SYSTEM.
Page 11 of 37
Operating Instructions For The i-Pette Liquid Handling System
4.
OPERATIONS OVERVIEW (HARDWARE)
4.1
Setting of of Pipettor:
1. After confirming that there is no damaged or missing item, begin to test the pipettor.
2. Please note that this testing procedure should be performed only after you have read
through the entire instruction manual.
3. Position the pipettor on top of a sturdy, safe, clean surface. For detailed information
on how to choose a location, please refer to the sections under 3.1 Safety precautions
and 3.9 Conditions of use.
4. Make sure the ON/OFF switch is at the OFF position. Connect the power entry
connector and a power outlet with ground connection using the power cord
provided.
5. Your pipettor is now ready for testing.
The i-Pette is a high precision instrument designed for high throughput liquid operations using
96 or 384 well microplates.
These operations most commonly begin with the installation of the pipettor head into the
pipettor main unit. The user has the choice of two types of pipettor heads:
type 1: Pipettor head with non-disposable stainless steel tips.
type 2: Pipettor head with disposable tips made of polypropylene. For this option, the
disposable tips are installed onto the pipettor head prior to operation according to
the following instructions.
Once the pipettor head is installed, the user generally places a source labware containing
specific liquid onto the elevator. The user then fills the tips using the FILL or FILL VOLUME
commands. The source labware is then replaced with the destination labware, which is then
dispensed upon with the contents of the tips using the DISPENSE or EMPTY commands.
Upon completion of the operations:
for non-disposable tips: Clean non-disposable tips using the head washing station
for disposable tips: Eject tips using the tip ejector and discards the tips A manual
indexing option is available for the 96 channel I-PIPETTE to enable it to work with 384
well labware.
Refer to the i-Pette PPC GUI operating manual for details on how to perform the pipettor
operations.
Page 12 of 37
Operating Instructions For The i-Pette Liquid Handling System
4.2
CONDITIONS OF USE
The i-Pette is designed to perform optimally and safely under normal laboratory settings. Use
of these instruments in other environments is not recommended. FLUIDX LTD. will not be
responsible for any unsatisfactory results if the instrument is no operated under the conditions
and intent outlined in this instruction manual.
The following is a list indicating some of the ideal operational parameters for you instrument.
This is not an exclusive list; please contact FLUIDX LTD. if you have further questions.
Environment: indoor, temperature regulated, non-dusty
Operation Temperature: 50F - 100F
Voltage: 100V — 240V
Size of particles in liquid: less than 0.032‖ diameter (to prevent blockage of tips)
This unit should not be used in a moving environment or relocated frequently
5.
DISPOSABLE TIPS AND HEAD USAGE
The EZ-Load pipettor heads from
FLUIDX simplify the use of disposable
tips for multiple channel pipetting by
making tip loading and unloading a
simple manual process without the
requirement for any tools.
The EZ-Load heads are used in
conjunction with specially-made
disposable pipette tip racks that
allow the transfer of a rack of tips
directly from the package into the
EZ-Load head.
The tops of the pipette tips are
sealed against the face seal by the pipettor‘s automatic electric loading mechanism. A
reliable seal is provided for optimal pipetting performance.
The ESP EZL tips in EZ-Load format can be loaded on the head in three easy
Page 13 of 37
Operating Instructions For The i-Pette Liquid Handling System
5.1
INSTALLING THE PIPETTING HEAD
Important Note: Before you install the pipetting head, please make sure:
The fill volume of machine is not greater than the tip volume of pipetting head
For non-disposable tips usage: The pipetting head had been cleaned since the last
usage and there is no remaining liquid inside tips.
For disposable tips usage: A new set of disposable tips has been loaded onto the
pipetting head correctly and there is no remaining liquid inside tips. (see Section 4
Disposable pipetting Tips Usage for details).
There is no foreign object between the plunger block and the pipetting head.
5.2
REMOVING THE PIPETTING HEAD
The pipetting head can be easily removed by reversing the above procedure.
Important Note: Due to vacuum suction, some gaskets may become stuck to the pipetting
head. This situation can be easily avoided by carrying out the following step.
After opening the locking levers, wait a few seconds to allow air to get inside. The pipetting
head will drop automatically once the vacuum diminishes.
When pipetting head is removed from pipettor, user must re-define maximum volume of the
pipettor during head installing.
If the pipettor crashed, remove pipetting head before restarting the machine and make sure
no fluid is left inside the pipetting head.
Page 14 of 37
Operating Instructions For The i-Pette Liquid Handling System
5.3
PLATE HEIGHT
The user can perform all the functions by manually
raising and lowering the elevator. The elevator can
be locked at any height by turning the elevator
handle knob clockwise. User can also bring the tray
seat to same height by adjusting the heightpositioning screw.
A height-positioning screw guarantees that the tray
seat will stop at set height; its locking mechanism
will stop the tray seat from traveling beyond set
height position. To adjust height position, slightly
loosen the screw by turning counter-clockwise,
bring screw to desired height, then lock. To lock,
turn height-positioning screw clockwise.
NOTE Properly setting the plate height will ensure minimal adhesion of liquid to the tips, which
will increase pipetting accuracy.
5.4
EMERGENCY STOP
For emergency stop at any time, pres the STOP button on
the PPC controller.
Page 15 of 37
Operating Instructions For The i-Pette Liquid Handling System
6.
CARE AND MAINTENANCE
Proper care and maintenance can ensure the efficiency, safety and durability of your
instrument.
It is imperative that an appropriate daily cleaning procedure be devised so that the pipetting
head assembly does not become contaminated or attacked by harsh solvents. Please follow
these guidelines carefully:
Grade mineral oil can be purchase at drug store. We do not supply mineral oil.
6.1
FOR DISPOSABLE TIPS USAGE:
Always eject tips from pipetting head after use. Never leave tips on pipetting head
overnight.
Lubricate pipetting head o-rings every other pipetting with the supplied lubrication
box. Refill box with heavy grade mineral oil when necessary.
Never expose pipetting head o-rings to UV light as this will cause damage to the orings.
6.2
GENERAL MAINTENANCE:
Periodically apply a thin layer of mineral oil to the bottom of the plunger block (see
picture in section 3.4) in order to promote proper vacuum seal. Caution: use mineral
oil ONLY; over lubrication may produce adverse effect.
Regularly inspect the underside of the plunger block as well as the top of the pipetting
head for dirt or foreign objects. Failure to do so may severely jeopardize the
performance of the instrument.
Inspect all moving parts regularly. Carefully remove any dirt or foreign objects.
Lubricate with high-quality instrument-grade lubricant that contains silicone or
molybdenum when necessary.
Visually inspect the stainless steel tips or disposable tips every time before a pipetting
session. Replace any bent stainless steel tips or damaged disposable tips before
proceeding.
Regularly inspect the instrument for worn components and replace them immediately.
Clean the unit regularly with a clean cloth moistened with a mild solvent or cleanser.
Avoid cleaning the LCD area with solvent or cleanser. These can dull the surface and
damage the LCD.
Maintain the cleanliness of your work area.
Page 16 of 37
Operating Instructions For The i-Pette Liquid Handling System
7.
TROUBLESHOOTING
Problem:
Leakage
Signs:
Uneven liquid levels among the tips; drippings from tip(s) even when EMPTY or
DISPENSE commands are not in use;
Solution:
Apply thin film of mineral oil to the gasket(s) suspected of leaking. Make sure
there is no foreign object(s) between the plunger block and the pipetting head.
Make sure both the locking levers are at horizontal positions.
Check the top of the pipetting head, make sure there is no missing or damaged gasket(s).
If disposable tips are used, make sure tips are loaded correctly.
Every tip has to cover both o-rings.
Problem:
Machine crashed
Solution:
Remove pipetting head before restarting the machine and make sure no fluid
left inside the pipetting head.
8.
SPECIFICATIONS
Dispensing Precision (500) <3% CV at 5 ul (125) <3% CV at 1 ul
Dispensing Accuracy (500) +/- 1% at 10 ul(125) +/- 1% at 1 ul
Resolution (500) 1 ul (125) 0.1 ul
Pipette Volume (500) 5-500 ul (125) 1-125 ul
Dimensions 9‖W x 14‖D x 19‖H 229W x 356D x 483H mm
Weight Approx. 44 lbs. (20 kg)
Power 100 to 240 VAC, 50/60 HZ
Operating Temperature 50 - 100 ºF
Page 17 of 37
Operating Instructions For The i-Pette Liquid Handling System
9.
OPERATIONS OVERVIEW (SOFTWARE)
Turn On i-Pipette
Start AIP GUI
To Simulation Mode
Init i-Pipette
To Operation Mode
Set Operation Parameters
Change Config Values
(Optional)
Execute
Single Command
Save Profile
Page 18 of 37
Operating Instructions For The i-Pette Liquid Handling System
10.
TO RUN OR UPDATE I-PETTE SOFTWARE
The i-Pette operating software is normally loaded into the PDA before shipment.
To turn on, press the power button on the right-side top of the PDA.
Go to ―Start‖ then ―Programs‖. Use the stylus to select the ―Apricot― icon to run the software.
The software may require updating periodically. An updated installation file ―Setup.CAB‖ will
be sent to users on CD or via email, this file can be transferred from a PC to the PDA.
The PC must run MS WindowsTM 2000 (or MS Windows XPTM) as the minimum operating system.
To download the file from a PC:
(Follow step 6 only to download the file into the PDA without using a computer).
1) If connecting PDA to the PC for the first time, install the file
―ActiveSync41Setup.exe‖ found on the CD supplied with original shipment, this
sets up communication between the PDA and PC.
2) Connect desktop cradle to the PC. Attach free end of the USB cable into USB
port on the PC. If the PDA battery charge level is low then recharge by
connecting one end of the AC adapter to the cradle and the other to an
electrical outlet.
3) Insert PDA into the desktop cradle and turn on.
4) Double click ―My Computer‖ on the PC, locate new PDA icon with text
―Mobile Device‖.
5) Copy updated software installation file ―Setup.CAB‖ into any folder under
―Mobile Device‖.
6) On the PDA, go to ―Start‖ then ―File Explorer‖. Select the folder which contains
the file ―Setup.CAB‖ under ―My Documents‖.
7) Select ―Setup‖ and follow installation instructions. The updated software will
replace the old software within the PDA.
To run the software:
Select ―Start‖ followed by ―Programs‖ and then the ―Apricot‖ icon.
11.
PROGRAM INITIALISATION
With the software installed and running, the i-Pette model will be automatically detected,
connection made and the appropriate interface entered.
When the i-Pette is turned on and connected, initialisation (homing tasks for plungers) will
commence and the software displays ―Operation Mode‖.
Page 19 of 37
Operating Instructions For The i-Pette Liquid Handling System
―Operation Mode‖ allows the user to control all functions and plunger movements of the iPette.
A wire connection or wireless connection between the i-Pette and PDA is required to use
Operation Mode. If no connection is available the message ―Select Correct COM Port or
Check Connection!‖ will be displayed and the software will enter Simulation Mode.
NB. Simulation Mode is for demonstration purposes only. The default i-Pette model (IP96B-500)
is used to set parameters and save profiles without the need for PDA connection.
If there appears to be no connection between i-Pette and PDA then first check physical
connections.
Alternatively perform the following actions:
Change COM port (use COM1 for wire connection and COM8 for wireless
connection) in ―Config‖ file, then tap ―Init‖ to perform initialization without exiting the
interface.
Or exit and open the program again
Or turn off, and then turn on, the i-Pette power.
If it is not possible to exit the program locate the ―Reset‖ button on the left-side bottom of the
PDA, insert the stylus into the small hole and press ―Reset‖. Wait for the PDA to initialise as
normal, then open program again.
Page 20 of 37
Operating Instructions For The i-Pette Liquid Handling System
12.
MAIN SCREEN OVERVIEW
Fig. 1
Page 21 of 37
Operating Instructions For The i-Pette Liquid Handling System
Key for Fig. 1:
1
Tip Volume Bar
Display current actual remaining volume in the tips.
2
Aspirate Volume Input Button
Display and change aspirate volume value.
3
Aspirate Speed Input Button
Display and change aspirate speed value.
4
Dispense Volume Input Button
Display and change dispense volume value.
5
Dispense Speed Input Button
Display and change dispense speed value.
6
Dispense Depth Input Button
Display and change dispense depth value.
7
Aspirate Execution Button
Tap to execute aspirate operation.
8
Mix Execution Button
Tap to execute mix operation.
9
Dispense Execution Button
Tap to execute dispense operation.
10
Configuration File Button
Tap to open configuration parameter list.
11
Title Bar
Display new file or existing profile name.
12
Aspirate Depth Input Button
Display and change aspirate depth value.
13
Mix Volume Input Button
Display and change mix volume value.
14
Mix Cycle Input Button
Display and change mix cycle value.
15
Auto Execution Setting Button
Tap to open auto execution setting window.
16
Value Group Switch Button
Switch among the three groups of parameter
values.
17
Liquid Class Setup Button
Tap to open liquid class setup files.
18
Execution Command Switch
Button
Tap to switch into another set of execution
commands.
19
Exit Button
Tap ―X‖ button to exit.
Page 22 of 37
Operating Instructions For The i-Pette Liquid Handling System
13.
USING THE SOFTWARE
13.1 Confirm Machine Model
When in ―Operation Mode‖ the PDA will retrive i-Pette details automatically, i.e. model and
the original position. The i-Pette model will be shown within the ―Configuration Form‖.
When in Simulation Mode, the default i-Pette model is IP96B-500.
13.2 Set Pipetting Head
An appropriate pipetting head volume must be set for the i-Pette before starting a protocol.
For i-Pette models IP96B-500 and IP96P-500 - default maximum volume is 500ul
For i-Pette models IP96B-125 and IP96P-125 - default maximum volume is 125ul
For i-Pette models IP384B-125 and IP384P-125 - default maximum volume is 125ul.
A message box will appear with option to change maximum pipetting volume. Choose ―yes‖
to enter configuration window, max. volume change can be made.
To change to a different pipetting head:
Reset the max. volume value in the ―config form‖. (Select ―config‖ to open).
Then install the pipetting head and change tips as required.
NB. The maximum volume setting can be changed without changing pipetting head.
14.
SET OPERATION PARAMETERS
Set parameters for volume, speed and cycle within the parameter setting panel (Fig.2)
before running single execution commands.
Depth parameters can only be set for instruments fitted with an elevator motor (models IP96P500, IP96P-125, IP384P-125).
Fig. 2
Page 23 of 37
Operating Instructions For The i-Pette Liquid Handling System
14.1 Changing asprirate parameters
Select ―Volume‖ found under ―Aspirate‖ title. The following panel (Fig. 3) will be displayed:
Fig. 3
Using the ‗+‘ or ‗-‘ buttons change each digit as required.
Select ―OK‖ to exit and save new value.
To change aspirating speed select ―Speed‖ under ―Aspirate‖ title, the following (Fig 4) will be
displayed:
Fig. 4
Using the ‗+‘ or ‗-‘ buttons change each digit as required.
Select ―OK‖ to exit and save new speed value. (Range is from 0 to 100).
To change depth select ―Depth‖ under ―Aspirate‖ title, the following (Fig. 5) will be displayed:
Fig. 5
Using the ‗+‘ or ‗-‘ buttons change each digit as required.
Page 24 of 37
Operating Instructions For The i-Pette Liquid Handling System
Select ―OK‖ to exit and save new depth value. (Range is from 0 to 79. Set to 0 if no
movement required).
14.2 Changing dispense parameters
Select ―Volume‖ found under ―Dispense‖ title to display input panel.
Change volume, speed and depth values as in section 6.1.
14.3 Changing parameters for mixing
Select ―volume‖ under ―mix‖ title to display input panel. Change volume and cycle values as
in section 6.1.
The aspirating speed and depth for the mix function are set as described in section 6.1.
The dispensing speed and depth for the mix function are set as described in section 6.2.
Three sets of values for aspirating, dispensing and mixing can be selected before running
commands:
Select ―Value1‖, the text will change to ―Value2‖.
Set the second group of volume, speed, depth and cycle values.
Select ―Value2‖, the text will change to ―Value3‖
Set the third group of values.
Select ―Value3‖ to display the first set of parameters.
N.B. A command can be run without changing values each time.
Example:
Pre-airgap parameter is set as ―Value1‖, aspirate volume as ―Value2‖, post-airgap as
―Value3‖.
Select ―Aspirate‖ button before executing the second and third aspirate command.
Select ―Value1‖ without inputing aspirate value each time.
All three groups of parameters can be saved within a user profile.
Fig. 6
15.
PERFORMING COMMANDS
After setting operation parameters select an action from the command panel (Fig.7). This
allows the user to complete a single command, set configuration parameters, automatic
execution, liquid class or profiles.
Fig. 7
Page 25 of 37
Operating Instructions For The i-Pette Liquid Handling System
Select ―Shift‖ to switch to next group of command buttons (Fig.8).
Fig. 8
15.1 Aspirate function
Place a filled plate on the stage, manually adjust to the required aspirate depth and input
value as ―Depth‖ under ―Aspirate‖ title.
To use automatic mode:
Set ―Depth‖ value without locking stage (if sensor block is unlocked or touches the bottom,
the stage will not move).
To use manual mode:
Manually adjust the aspirate depth and lock the stage.
Select ―Aspirate‖ to start aspirating, the stage will rise to the depth set (in automatic mode) or
remain at the fixed depth (in manual mode).
The aspirating volume and depth performed will be those seen in the current set of ―Aspirate‖
parameters.
If aspirating an airgap, allow the stage to move away from the tips. Alternatively set ―Depth‖
value to 0 in automatic mode. If the instrument does not allow stage movement, the aspirate
depth can only be changed manually. Hold the stage, or lock.
15.2 Dispense function
Place a plate on the stage, manually adjust the stage to set dispense depth and input value
as ―Depth‖ found under ―Dispense‖ title.
Page 26 of 37
Operating Instructions For The i-Pette Liquid Handling System
To use automatic mode:
Set ―Depth‖ value without locking stage (if sensor block is unlocked or touches the bottom,
the stage will not move).
To use manual mode:
Manually adjust the dispense depth and lock the stage.
Select ―Dispense‖ to start dispensing. Volume and speed will be those shown in current
parameter settings.
If the instrument does not have an automated stage movement the dispense depth can be
changed manually. Adjust the dispense depth, hold the stage or lock the stage to dispense.
15.3 Mixing function
Place a plate on the stage. Manually adjust the stage to set the aspirate or dispense depth of
the mix. Input values in ―Depth‖ found under ―Aspirate‖ and ―Dispense‖ titles.
To use automatic mode:
Set the aspirate and dispense values without locking stage (if sensor block is unlocked or the
stage touches the bottom, the stage will not move).
To use manual mode:
Manually adjust the mix depth and lock the stage. Select ―Mix‖ to start. Volume and speed
for mix cycles will be those seen in the current parameter settings.
If the instrument is not fitted with an automated stage movement mix depth can be adjusted
manually. Hold the stage or lock stage to dispense.
15.4 Emptying function
Place a plate on the stage; manually adjust the stage to the required depth to empty. Input
―depth‖ value under ―dispense‖ title.
To use automatic mode:
Set the ―Depth‖ value without locking stage (if sensor block is unlocked or touches the
bottom, the stage will not move).
To use manual mode:
Page 27 of 37
Operating Instructions For The i-Pette Liquid Handling System
Manually adjust the emptying depth and lock the stage. Select ―empty‖ and any remaining
liquid within the tips will be removed. (Speed can be changed under ―dispense‖ title).
If the instrument does not have an automated stage movement, manually adjust the depth
for emptying by holding the stage or locking it.
15.5 Blow-out function
Once the emptying process has been completed, select ―Blow-out‖.
The i-Pette will execute ―Blow-out‖ function to remove any remaining liquid attached to the
tips.
If the remaining volume is not greater than 1ul, the blow command can be incorporated into
the emptying function.
15.6 Auto function
Use the ―auto‖ function to set the automatic execution of a command.
After setting a command, ―Aspirate‖, ―Dispense‖ or ―Mix‖, select ―auto‖ to open a new
window (Fig. 9).
When the stage is raised a sensor is activated (set and lock position beforehand), the i-Pette
will perform the pre-set command with the values displayed in the current interface.
This shortcut reduces the need to select ―Aspirate‖, ―Dispense‖ or ―Mix‖ on the panel to start
the function.
The interval of touching sensor is at least 3 seconds when continuing to do any function more
than once.
To disable the Auto function set ‗None‘ in the auto setting window. The Auto function can
only be used in manual mode by using the touch sensor. For automatic mode the sensor
block should be locked at the highest position to enable the stage to move freely.
Fig. 9
Page 28 of 37
Operating Instructions For The i-Pette Liquid Handling System
15.7
Initialisation
If initialising is required (e.g. in the case of communication difficulties) select the ―Init‖ button
to commence.
15.8
Default
Set default values for all operation parameter settings (three groups), configuration
parameter settings and auto execution setting.
15.9 Stopping
Pushing the red emergency stop button will terminate the operation immediately.
Please note that in this instance the remaining volume in the tips may not be calculated
accurately.
If possible, empty tips before performing another function. After stopping one function the iPette is able to perform additional commands directly without the need for initialisation, or
other action, beforehand.
15.10 Changing pipetting heads
Pipetting heads can be changed on the following i-Pette models:
IP96P-500,
IP96P-125,
IP384P-125.
Select ―Liquid‖, display will change to ―Chg.Head‖. The select ―Chg.Head‖ to unlock the
pipetting head.
After fitting the new head, select ―OK‖ to lock.
16.
SET CONFIGURATION PARAMETERS
Select the ―Config‖ within the command execution panel to display the ―Config Form‖ (Fig.
10).
Select and change the value buttons on the right side as needed.
Select the ―name‖ on the left side, restore the default values if necessary.
―Self Test‖ will activate i-Pette life test. The i-Pette will continuously perform aspirating and
dispensing functions according to the set parameters until stopped by the user.
Page 29 of 37
Operating Instructions For The i-Pette Liquid Handling System
Fig. 10
16.1 i-Pipette Model Number
The i-Pette model is shown within this panel (Fig. 10) but cannot be changed using this form.
162
COM Ports
The default communication port is COM1 for a wire connection between PDA and i-Pette.
If using a wireless connection, remove the wire cable from the PDA and use wireless
connector, activate the wireless function in PDA.
After entering the software, go to ―Config‖ window, select ―COM Port‖ button, select
―COM8‖.
Select the ―Init‖ button to initialise.
16.3 Max Volume
Select the value button for ―Max Volume‖ to display the Input Panel. Set the max. volume by
using the ‗+‘ and ‗-‗ buttons.
16.4 Over Shoot
For model IP96B(P)-500:
Default over shoot value = 12uL
Max value = 48.
For models IP96B(P)-125 and IP384B(P)-125:
Page 30 of 37
Operating Instructions For The i-Pette Liquid Handling System
Default over shoot value = 3uL
Max value = 12uL
Select the ―Over Shoot‖ value button to display the input panel (Fig. 11). Use ‗+‘ and ‗-‗
buttons to set.
Fig. 11
16.5 Plunger Pause
The plunger-waiting interval can be adjusted as required. (Default = Medium).
Select the ―Plunger Pause‖ value button, a new window will open (Fig. 12) to allow pause
length to be chosen.
Fig. 12
Page 31 of 37
Operating Instructions For The i-Pette Liquid Handling System
17.
CREATE USER PROFILES
User Profiles enable users to save set operation parameters, the auto-execution settings and
configuration settings. There are nine profiles available.
When entering the main interface the last set of operation and configuration parameters
selected are shown.
To save current settings as a profile, or to open a previously saved profile, select the ―Profile‖
within the command execution panel, the ―Select Profile‖ form will be displayed (Fig 13).
Fig. 13
17.1 Save Profile
Select a Profile button and tap ―Save‖.
The current settings for operation, auto execution and configuration parameters are saved in
the user profile. The profile window will close and the name will be shown within the title of the
main interface.
17.2 Open Existing Profile
Select Profile button and tap ―Open‖. The selected profile will open.
All parameter values for operation, auto execution and configuration settings are retrieved
from the profile and the profile name will be shown in the title of the main interface.
17.3 Exit
Select ―Exit‖ to leave this section without making changes.
17.4 Notes
Page 32 of 37
Operating Instructions For The i-Pette Liquid Handling System
The ―Notes‖ text box allows the user to input a simple note, e.g. name of profile creator,
purpose etc.
To enter note, click on small keyboard icon to open the keyboard for input.
Once saved, the note will be displayed when a profile button is selected.
17.5 Profile Exist
The profile buttons are different colours to show either existing or empty profiles.
A message stating that the profile cannot be opened will be displayed if the instrument
model saved within a profile is not compatible with the current model.
18.
DEFINE LIQUID CLASS
Select ―Liquid‖ within the command execution panel to display the ―Define liquid class‖
section (Fig. 14).
This can be divided into several volume ranges with a different calibration value for each
range. (From zero to pipetting head max. volume).
Fig. 14
Select the top left-side volume button to display a volume setting panel. Use ‗+‘ and ‗-‗
buttons to set the volume (Fig. 15). This volume is the lower limit for the current volume range
and will become the upper limit for the next volume range.
Set up the remaining ranges in the same way.
Page 33 of 37
Operating Instructions For The i-Pette Liquid Handling System
Fig. 15
Next, select the top right-side calibration value button, an input panel will appear. Use the
‗+‘ and ‗-‗ buttons to set the calibration value.
For model IP96B(P)-500:
Default calibration value = 1604
Range = 1500-1700
For models IP96B(P)-125 and IP384B(P)-125:
Default calibration value = 6416
Range = 6000-6800
Use the same method to set up calibration values for each volume range.
Select ―Default‖ button to change settings back to default values.
Fig. 16
To save the current class setting into a class file, or open an existing class file to operate,
select ―File‖ within the default liquid class window. The ―Liquid Class File‖ form will appear (Fig.
17).
Up to 9 files can be saved.
Page 34 of 37
Operating Instructions For The i-Pette Liquid Handling System
Fig. 17
18.1 Save Class File
Select a ―Class‖ button followed by ―Save‖. The current class setting is saved.
18.2 Open Existing Profile
Select a ―Class‖ button, then ―Open‖.
An option to save the current file will appear, followed by the class file selected.
Class setup is retrieved from the class file and is seen within the ―Define liquid class‖ window
when opened.
18.3 Exit
Select ―Exit‖ to exit without making changes.
18.4 Notes
The ―Notes‖ text box allows the user to input a simple note, such as a description for the class
file. The note is displayed when the associated ―Class‖ button is selected.
18.5 Class File Exist
Buttons for the existing class files and the empty files will appear in different colours to
differentiate.
A message will appear stating that the class file cannot be opened if the instrument model
saved within a profile is not compatible with the model in use.
Page 35 of 37
Operating Instructions For The i-Pette Liquid Handling System
19.
APPENDIX A
SPECIFICATIONS
Operating system
Windows Mobile® 5.0 for Pocket PC, Premium Edition
(Pocket versions of Microsoft software are included (Outlook,
Word, Excel and Internet Explorer for Pocket PC))
Processors available Marvell PXA270 processor 520 MHz
Memory
64 MB SDRAM
Flash memory
192 MB Flash ROM
Flash ROM
Audio
Integrated microphone; Speaker and one 3.5 mm stereo
headphone jack; MP3 stereo (through headphone jack)
Ports
Standard:
1 IrDA
1 USB 1.1 Client
1 Serial RS232
1 DC power
1 AC/DC connector
Rear:
1 Charging/ActiveSync connector
Slots
1 Compact flash
1 secure digital
Display
3.5-in transflective TFT QVGA color; touch screen
Display size
3.5 - inch Transflective TFT QVGA
Input devices
Stylus
Touch-sensitive display for stylus or fingertip
Wireless
communication
Wi-Fi (802.11b); Bluetooth wireless technology
Software included,
ROM
ActiveSync; Adobe Reader for PC; ClearVUE Suite (Word and
Excel); ClearVUE Suite (PPT and PDF); Outlook 2002 Desktop;
WorldMate (NA Retail only); Media Player Desktop
Security
management
HP ProtectTools secured by CREDANT Technologies
Dimensions (w x d x
h)
3.01 x 0.65 x 4.71 in (76.6 x 16.3 x 119.4 mm)
Weight
5.8 oz (164.4 g)
Power
Removable/rechargeable 1440 mAh battery
Warranty Feature
One-year parts and labor in most regions; 90 days technical
support for software in most regions. Additional offers may
Page 36 of 37
Operating Instructions For The i-Pette Liquid Handling System
vary by region.
Manufactured for:
Manufactured by:
fluidX Ltd.
Monks Heath Hall
Helford Road
Nether Alderley
Cheshire
SK10 4SY
UK
Apricot Designs, Inc.
681 Arrow Grand Circle
Covina
CA 91722
USA
Tel: +44 (0) 1625 861 614
Fax: +44 (0) 1625 861 615
Email: [email protected]
www.fluidx.co.uk
Page 37 of 37
Tel: (626) 966-3299
Fax: (626) 966-3200
Email: [email protected]
www.apricotdesigns.com
Operating Instructions For The i-Pette Liquid Handling System