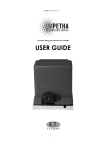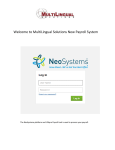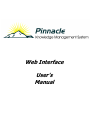
1
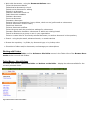
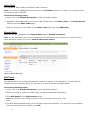
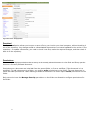
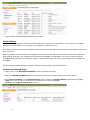
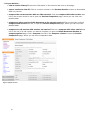
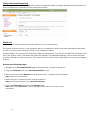
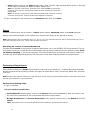
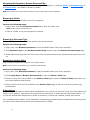
Web Interface
User’s
Manual
Table of Contents
About this Guide……..3
This workis licensed under a
Creative Commons Attribution 2.5 License.
Getting Help……..4
Welcome to Pinnacle……..4
Introduction……..4
Organizational Hierarchy……..4
Security……..4
Version Control……..5
Pinnacle Editions……..6
Working in the Web Interface……..7
Login: Web Interface……..7
Dashboard……..7
Dashboard Features……..8
Notifications and Alerts……..9
Browse Documents……..9
Working with Folders……..11
Working with Documents……..15
Search……..32
Navigating the Repository: Browse Documents By……..35
Subscriptions……..35
Preferences……..37
Changing Your Password……..37
Logging Out……..37
2
Welcome to Pinnacle
Pinnacle™ is document management made simple - easily share, track, secure, and manage the documents
and records your organization depends on.
By leveraging an active and innovative open source community, Pinnacle provides an easy-to-use, production-ready, enterprise document management solution for use by corporations, government institutions, medium to small businesses, and many other organizations. Pinnacle’s open source architecture allows organizations to easily customize and integrate their document management system with their existing infrastructure, providing a more flexible, cost-effective alternative to proprietary applications.
Pinnacle is available in two editions:
• Pinnacle SMB Edition (20 users)
• Pinnacle Enterprise Edition (unlimited users)
Pinnacle SMB and Enterprise Edition are known collectively as Pinnacle Commercial Editions. Pinnacle
Commercial Editions are the certified versions of Pinnacle Open Source Edition, and are sold with commercial
support and extended functionality that provides access to the
Pinnacle document repository from Windows® Explorer and Microsoft® Office® applications.
To find out more about Pinnacle, call +703-385-0101, email [email protected], or visit http://
www.vircosoft.com
For detailed information about installing and configuring Pinnacle, please see the Pinnacle Administrator
Manual, and the Pinnacle Installation Guide.
Features in Brief
Pinnacle provides:
• A central document repository with audited document content version control
• Powerful document metadata management and versioning
• Sophisticated document authoring management and workflow
• Full-text indexing technology allowing search within document contents
• Powerful security group and role-based security model and integration with enterprise directory servers
About this Guide
The Pinnacle™ User Manual is a guide to using the Pinnacle Document Management System. These
instructions are intended for end users of the Pinnacle Document Management System.
Please Note:
This document is a working draft that is continually being updated. We welcome your contributions to help
us document Pinnacle. Please post your comments and suggestions by creating a Documentation ticket for
the Pinnacle project on http://support.vircosoft.com
If you don't find the information you're looking for in this document, please ensure that you have the latest
version of the Pinnacle User Manual. You can download the latest version from www.vircosoft.com.
3
Getting Help
Pinnacle Commercial Editions subscribers receive priority commercial support from the Pinnacle support
staff.
Find out more about support and subscriptions for Pinnacle SMB Edition and
Pinnacle Enterprise Edition at http://www.vircosoft.com.
Getting help for Pinnacle Open Source
Support is available at http://support.vircosoft.com. Post
your questions at where our support staff and developers endeavor to answer questions around installing,
managing, and using Pinnacle.
Introduction
Organizational Hierarchy
TM
Pinnacle
users are organized into Units, Groups, and Roles.
Only a user who has been added to a group or to a role is allowed to access and work with content in the
repository. This is because permissions are allocated at the group and role level, and not to individual users.
• Units - these are the top level folders that model the organization's logical business units, e.g. Marketing,
Finance, Research and Development. Units are also used to create divisions based on, for example, geographical regions. Units may be internally administered - an administrative user has the permissions of
the Pinnacle system administrator, but only within their Unit.
• Groups - contains one or more users. Any user may belong to more than one group. Groups may also be
allocated to Roles on a per-directory basis.
• Roles - roles are typically used where one user or group performs a specific task - e.g. editor, or publisher. Roles are particularly useful in workflows.
Note: Only the Pinnacle system administrator is allowed to create, modify, or delete these groupings.
Content Organization
Pinnacle uses metadata, and a flexible folder structure, to organize documents in the repository.
Security
TM
Access to content in the Pinnacle
repository is controlled through the system's Permissions structure.
Permissions are set up at the following levels:
• Group - all users in the group acquire the permissions assigned to the group
• Role - permissions are assigned to the role, and the role is assigned to the user, who then acquires the
permissions of the role.
• Folder - users are only able to read/write to folders if they belong to a group or to a role that has the
appropriate permissions on the folder. Folder permissions apply also to content in the folder (unless otherwise specified); by default, new child folders inherit the permissions of the parent folder, and any
changes made to the parent folder is passed on to the child folder/s, unless the 'inherit permissions' feature is disabled.
4
Note: Only users who have the Manage Permissions permission on a folder may use
enable/disable/inherit permissions on the folder.
Non-administrative users use the Permissions link on the Folder Actions menu in Browse Documents to
view permissions set up for specific folders.
The Permissions Set - See Administrator’s Manual
Version Control
TM
Pinnacle
includes version control mechanisms to ensure that content is changed in a controlled and audited manner.
Check out / Check in
Check out
Checking out a document locks the file and makes it read only. Other users can view the file, but they cannot change it.
Check in
Files must be checked into the repository to make them available to other users. The cancel check out
function reverses the check-out action and restores the document to the state it was in before it was
checked out. Alternatively, the system administrator can force check in a document if the document is required urgently and the user who checked out the document is unavailable.
Incremented Versions
By default, new documents are version number 0.1. Each time a document is checked out, the version number increments by 0.1 if the change is minor - e.g. version 0.9 becomes 0.10 - or, if this is a major change,
the version increases to 1.0 or 2.0 etc. The Version History link in the Document info menu provides a
history of version changes for the currently selected document.
Figure: Version History page
5
Pinnacle Commercial Editions
Pinnacle SMB Edition and Pinnacle Enterprise Edition are known collectively as Pinnacle Commercial
Editions.
Note: A Pinnacle SMB Edition subscription provides access to Pinnacle for up to 20 named, active users - excluding
the default admin user and anonymous users. A Pinnacle Commercial Enterprise subscription provides access to an
unlimited number of users.
Pinnacle Commercial Editions offer extended functionality through components that provide a familiar
Windows® Explorer and Microsoft® Office® view of the Web-based repository. (See Pinnacle ClientTools for
Windows Manual.
Pinnacle Commercial Editions include:
• Pinnacle Integration Server - a server-side component that seamlessly integrates Pinnacle's Web-based
repository with Microsoft applications through Pinnacle Explorer.
• Pinnacle Client Tools for Windows - a set of client-side tools for Windows users that allows you to work
with content in the repository as you're working on your local computer. Pinnacle Tools for Windows
includes:
• Pinnacle Explorer - provides a familiar, Explorer-type view of the Web-based repository.
• Pinnacle Desktop Imaging - a scanner tool within Pinnacle Explorer that allows the upload of hard
copy documents into the repository.
• Pinnacle Office Integration - provides access to the Pinnacle repository from within Office applications by providing Pinnacle buttons and a menu on the Office toolbar (in Excel, PowerPoint, and Word).
Files can be saved (checked in), checked out. and opened from within Office.
• Pinnacle Outlook Integration - allows saving of incoming and outgoing emails and attachments directly to the Pinnacle repository; files are selected from within Outlook to send as attachments with
outgoing messages in Outlook.
• Pinnacle Integration Server - a server component that allows users to access the repository through
Pinnacle's Explorer interface.
Pinnacle Tools for Windows provides integration with Microsoft Office applications, such as Word (Office
Plugin), and Microsoft Outlook (Outlook Integration). It also provides an Explorer-type interface to the Pinnacle repository, which includes a scanner tool (Pinnacle Desktop Imaging) that lets you scan hard-copy documents directly into Pinnacle.
Important
Subscriptions-based Access
Pinnacle Commercial provides two license options - SMB and Enterprise:
• A Pinnacle SMB Edition Subscription allows permissions-based access to the repository (via Pinnacle
Explorer or via the Web Interface) to up to 20 named, active users, plus the default admin user, and, if
configured in the system, to any anonymous user.
• A Pinnacle Enterprise Edition Subscription allows permissions-based access to the repository (via
Pinnacle Explorer or via the Web Interface) to an unlimited number of users, including the default admin
user, and, if configured in the system, any anonymous user.
6
Working in the Web Interface
The Open Source edition of Pinnacle Document Management System provides a Web-interface view of the repository.
The Pinnacle Commercial Editions Subscriptions - SMB or Enterprise - allow you to work with content in the repository through the Web-interface, or through Pinnacle Explorer.
Login: Web Interface
This procedure opens Pinnacle's Web-interface.
Note: This is the only login option available to users of Pinnacle Open Source. If you have access to Pinnacle Commercial Editions, you can log in to the Web interface of the DMS, or log in via Pinnacle Integration Server.
Note: By default, the system logs after a period of inactivity; when logging in after an automatic logout, the system reopens at the last working session.
Note: If you are unable to log in, the Pinnacle administrator should ensure that your user profile is added to the system and
is enabled. If your Pinnacle SMB subscription has reached the maximum filled user slots, your administrator will need to
disable another user to allow access to your user profile; alternatively, your organization can upgrade to the Pinnacle Enterprise subscription.
Perform the following steps:
1. Use your Web browser to open Pinnacle's Login page.
2. Enter your login details in the Username and Password fields.
Note: Your username and your password are case-sensitive.
3. Click login to open the Pinnacle at the Dashboard.
Dashboard
When logging on to Pinnacle via your Web-browser the system opens at the Dashboard.
The Dashboard provides tabs for the following functionality:
• Browse Documents - use this tab to enter the folder structure
• Preferences - use this tab to define or edit your details
• Logout - use this button to close your current working session, and to exit the system
7
Figure: The Dashboard
Dashboard Features
The Dashboard displays items relevant to your login profile, such as a list of the documents you have checked
out, and items requiring your attention.
Items that may be on your Dashboard:
• Items that require your attention - this section may include:
• notifications – documents that you have subscribed to, and which have been added, deleted, or otherwise
modified; documents requiring your input in the workflow cycle; as well as other system-generated notices.
• orphaned folders – orphaned folders are sub folders of parent folders where you do not have the appropriate view or other permissions. You have permissions for accessing the orphan folder, but you are not
allowed to access the parent folder. The dashboard provides a direct link to the orphaned folder in the repository. This is because you do not have permissions to navigate to the folder through its' parent folder.
• Your Checked-out Documents - this section lists the documents that you currently have checked out of
the repository. You can click the link provided to go directly to the document in the repository, where you can
download the document to view it, check the document back in, or cancel the document check out.
• Search - search for documents or folders in the repository directly from the Dashboard.
8
Notifications and Alerts
Notifications are system-generated messages that display on the Dashboard to inform you of relevant
changes and events related to the system or to content in the repository. Pinnacle provides an email notification feature that can be switched on to send your notifications by email.
Note: You can switch email notifications on or off for your user profile on the Preferences tab.
Two types of default notifications in Pinnacle:
• Subscription alerts - informs you when a document (including document metadata), or a folder that
you're watching, is checked out, or deleted, or if it changes in some other way.
• Workflow alerts - informs you when a workflow that you're involved with has reached a certain state. Notifications can also be triggered when you are assigned a Role for the next step in the process for a document
in a Collaboration workflow.
Browse Documents
You use the Browse Documents section of the Pinnacle Document Management System to enter the folder
structure, and to work with documents and folders in the repository.
Note: If your organization has purchased Pinnacle Commercial Editions, you can work with content in the Pinnacle repository through Pinnacle Explorer or through the web interface.
Browse View
Folder View
By default, the right pane of the Browse Documents page displays a Folder view of the repository. This is the
page that opens when you click the Browse Documents tab on the Pinnacle Document Management System
toolbar.
Click on a folder to view its contents, or to drill down further into the Pinnacle folder structure.
Note: The system only returns folders where you have read and/or write permissions.
Document Type View
You can display content in Browse Documents by Document Type - all documents of the type you specify will
display in this view.
Lookup Value View
You can select a field and associated value criteria as the browse view for content in the repository.
Figure: Browse by Lookup Field
9
Columns
The Browse Documents table lists the folders for which you have at least view permissions.
Description
Column
Check boxes
This column contains check boxes for selecting the items in the list that you want to
Delete or Move.
Select the check box at the top of the column (adjacent to the column header Title) to
automatically select all the items in the list.
Select the check box next to a folder/document title to move or delete these item.
To delete the item(s) you selected, click the Delete button at the bottom of the table. To
move the item(s) you selected to another location in the repository, click Move.
Title
This column lists the folders and documents in the repository that you are allowed to
access. Click on a folder name to display the content of that folder. Use the adjacent arrow
icon to change the sort order of items in the column.
Created
Sorts the items in the list by the date they were created. Use the adjacent arrow icon to
change the sort order of items in the table.
Modified
Sorts the items in the list in order of the date a folder was last modified. Use the adjacent
arrow icon to change the sort order of items in the table.
Creator
This column displays the name of the Pinnacle user who created the folder or document.
Use the adjacent arrow icon to change the sort order of the list in this column.
Workflow state
This column sorts the documents in the list in order of their current workflow state. Use
the adjacent arrow icon to change the sort order of the list in this column.
Note: Workflow state is a categorization applied to a document, based on its current position in a
predefined workflow cycle.
Browse Documents provides access to the following functionality:
Note: The availability of options depends on your permissions, and on the actions allowed in particular workflow states.
• Work with folders - using the Folder Actions menu
add documents
add folders
rename folders
view or edit permissions
perform a bulk upload of documents, in a zipped file, from your local computer
view a folder transaction history
configure workflows (if automatic workflows have been set up by your administrator)
allocate roles to groups or users
10
• Work with documents - using the Document Actions menu
view the document details
download a document to view it
check out a document for editing
check in a document
cancel a document check out
edit document metadata
delete a document
move a document
rename a document
view a history of transactions (move, delete, check out etc) performed on a document
view a document's version history
archive a document
view a document workflow
view the group and role permissions settings for a document
create a discussion thread on a document or add to an existing thread
email a document to a group or user in your organization
view or create links for a currently selected document, to another document in the repository
• Search - using simple search, advanced search, or saved searches
• Browse the repository - by folder, by document type, or by lookup value
• Subscribe to folders and/or documents, and manage your subscriptions
Working with Folders
You use the About this folder and the Actions on this folder menus in the Folder View of the Browse Documents section to work with folders.
Folder Menus - About/Actions
The folder view menus - About this folder and Actions on the folder - display the actions available for the
currently selected folder.
Figure: Root Folder: Folder Actions Menu
11
Using Folder Actions
The options displayed in this menu are permissions-based. If you do not have permissions to perform one or
more of the folder actions, you will not see the option for that action in this menu when you log on to Pinnacle:
Action
Result
Add Document
Opens the Add a document page, where you can add a document to the currently
selected folder.
Add a Folder
Opens the Add a folder page, where you can add a folder to the repository.
Rename
Opens the Rename page, where you can change the name of the currently selected folder.
Permissions
Opens the Folder permissions page, where you can view or edit group permissions.
Import from
Server Location
Opens the Import files into [folder name] page, where you can specify a path to a
location on the server to perform a bulk import of documents at that location.
Bulk Upload
Opens the Bulk import page, where you specify a path to an archive (ZIP) folder on
your local computer that you want to add to the repository.
Folder Transactions
Opens the Transaction History page for the currently selected folder, which lists the de
tails of all actions that have been performed on the folder.
Allocate Roles
Opens the Allocate Roles page, where you can set up or change roles.
Bulk Export
Allows you to download (for viewing only) the entire contents of the currently selected
folder, in one zipped file.
Usage Information
Opens the Usage Information for [folder name] page, where you can elect a report
type to view usage statistics on the folder - by user, by transaction and period, or by work
flow detail.
Add Document
This procedure adds a new document to the Pinnacle Document Management System repository.
Perform the following steps:
1. Login; then, click Browse Documents to enter the folder structure.
2. Click Add Document in the Folder Actions menu to open the Add a document page.
3. Specify the path to the document location in the File field; or, click Browse to locate the document.
4. Specify the document title in the Title field.
5. Click the down arrow for the Document Type pick list; then, select an option.
6. Complete the fields for the custom fieldsets defined for this document type - e.g. author, category, keywords
etc.
Note: Your administrator defines custom fieldsets and fields for document types.
7. Click Add to upload the document.
Note: Having uploaded the document, the system opens the new document's Document
Detail page.
12
Add a Folder
This procedure adds a folder to Pinnacle’s folder hierarchy.
Note: If you belong to a group that has been assigned the Add Folder permission on a folder, you are allowed to add
child folders to that parent folder.
Perform the following steps:
1. Login; then, click Browse Documents to enter the folder structure.
2. Navigate to the location where you want to add a folder; then, click Add a Folder in the Folder Actions
menu to open the Add a folder page.
3. Define a name for the new folder in the Folder name field; then, click Add folder.
Allocate Roles
Roles are set up or changed on the Allocate Roles page in Browse Documents.
Note: The Pinnacle administrator is generally tasked with role allocation and with modifying roles. To find out more
about allocating or editing roles, see the Pinnacle Administrator Manual.
Figure: The Allocate Roles page
Bulk Export
This feature allows you to download the entire contents of a folder in one zipped file. You can save the
zipped file to your computer where you can open it to view all the files you downloaded.
Perform the following steps:
1. Login; then, click Browse Documents to enter the folder structure.
2. Search or browse to locate the folder where you want to download bulk content.
3. Click Bulk Export in the Folder Actions menu.
Note: This menu item won't display if you do not have permissions for this action on the
folder.
4. A system dialog displays where you can choose to open the zipped file, or to save it to your computer.
Once you have made your selection, click OK.
13
Bulk Upload
You use Bulk Upload when you need to upload multiple documents to the repository, and you want to use a
zipped folder to do this. You need to place the files into a zip archive at the source location before uploading this
content to the Pinnacle. Bulk upload retains the same directory structure as defined in the zip archive.
Note: Bulk Upload may not be available for your installation. Consult your administrator to find out more.
Performing a Bulk Upload of content:
1. Login; then, click Browse Documents to enter the folder structure.
2. Locate the destination folder where you want to upload bulk content.
3. Click Bulk Upload in the Folder Action menu to open the Bulk Import page.
4. Specify the path to the ZIP file in the Archive file field; or, click the adjacent Browse button to navigate to
the ZIP file.
5. Select a predefined document type from the Document Type pick list.
6. Complete the information fields for this document type.
Note: The Pinnacle administrator may have defined custom fieldsets for this document type, which display once you have
selected a document type.
7. Click Upload.
Permissions: Folders
Viewing Folder Permissions
This procedure displays the permissions set up on a selected folder. Folder permissions are viewable on the
Folder Permissions page in Browse Documents.
Perform the following steps:
1. Login; then, click Browse Documents to enter the folder structure.
2. Locate the folder for which you want to view permissions.
3. Click the Permissions link in Folder Actions to open the Folder permissions page.
4. View Role/Group permissions for the folder.
14
Figure: View Folder Permissions
Editing Folder Permissions
Only the Pinnacle administrator is allowed to edit permissions on the folder.
By default, child folders inherit permissions from the parent folder. Pinnacle allows you to override the permissions of the parent folder, if you have the required permissions, so that you can define new permissions for
the child folder.
For more information about Editing Folder Permissions, see the Pinnacle Administrator Manual.
Rename: Folders
This procedure changes the name of the currently selected folder.
Note: The Folder Actions menu only displays the Rename option if you have the required permissions to rename the currently selected folder. 'Rename' is only available on sub folders, and not at the Root folder.
Perform the following steps:
1. Login; then, click Browse Documents to enter the folder structure.
2. Locate the folder that you want to rename; then, click Rename in the Folder Actions menu to open the
Rename page in Browse Documents.
3. Enter a new name for the folder in the New folder name field; then, click Rename.
Result: A system message displays to advise you that the folder name has changed - you will also see the old folder
name and the new folder name in this message.
Usage Information
This menu item allows you to view user activity on a folder and its sub folders. Usage information may be filtered by:
• user
• general activity - date range, transaction type
• folder content - by workflow and document type
Working with Documents
The Document Info menu and the Document Actions menu in the Browse view provides access to document
level repository functions.
15
Figure: Document Info and Document Actions Menu
Accessing the Document Menus
Perform the following steps:
1. Login; then, click Browse Documents to enter the folder structure.
2. Use Search, or navigate through the folder structure to locate the document you want to work with.
3. Click on the document to open its Document Detail page.
Note: The document's Document Detail page corresponds with the first item in the
Document Actions menu - Display Details.
4. Now you can:
• View the document details on the right of the page.
• Select the option for the task you want to perform in the Document Actions menu.
Note: If certain actions are not available in the Document menus, check with
your systems administrator that all the relevant plugins are activated for the
current Pinnacle installation.
Document Info Menu
Display Details
Display Details in the Document Actions menu opens the Document Detail page.
The Document Detail page - a default view that opens when you click the document link from the folder view summarizes key information about the currently selected document. It also provides information about the builtin metadata for the document, including the file name, file type, creator, last update date, document type, and
the document’s workflow status.
Note: Additional metadata fields may have been added by your Pinnacle administrator.
16
Figure: Document - Display Details
Download
The Download option allows you to open or save a file to your local to your local computer, without checking it
out of the repository. Any changes made to a downloaded document are not saved updated to the version in the
repository - to update a document, you need to check it out first, make the required changes, and then check it
back in to the repository.
Permissions
This menu option displays permissions that are set up on the currently selected document. to view Role and Group permissions on a currently selected document.
Permissions on a document are inherited from the parent folder, or from a workflow (if the document is in a
workflow). To add a document to a folder, you require write permissions to the folder. The new document inherits the folder permissions. Users wanting to delete a document in a folder require delete permissions on the
folder.
Only users who have the Manage Security permission on the folder are allowed to configure permissions for
the folder.
17
Figure: View document permissions
Viewing Document Permissions
This procedure displays permissions on the currently selected document.
Perform the following steps:
1. Login to Pinnacle; then, navigate to the relevant document.
2. Click the Permissions link in the Document Info menu to open the Document permissions page.
3. View the permissions set up displayed on the page.
Transaction History
This menu option displays a record of all transactions performed on the document: create date, uploads,
downloads, check-out, check-in and the previous deletion of the document if it has been restored.
The following procedure opens a transaction history.
Perform the following steps:
1. Login; then, click Browse Documents to enter the folder structure.
2. Navigate to the relevant document; then, click Transaction History in the Document Info menu to open
the Transaction History page.
3. View details of transactions that have occurred on this document (user, action, date, version, comment).
18
Figure: viewing a record of transactions performed on a document
Version History
Version History displays a record of all past and current versions of a document - a new version is created
whenever the document in the repository is changed (i.e. after check in).
This feature allows you to download older versions of the currently selected document for comparison with more
recent versions.
Edits to checked out documents won't display in a document in the repository until the document is checked in
after editing. However, any changes to the document metadata are displayed in its version history because
metadata editing occurs in the Pinnacle system. The document does not have to be checked out to change its
metadata.
The following procedure displays a version history of the currently selected document.
Perform the following steps:
1. Login; then, click Browse Documents to enter the folder structure.
2. Open the Document Detail page for the document where you want to access a version history.
3. Click Version History in the Document Info menu to open the Version History [document title]page.
Note: The current version of the document is indicated by the bold text current
version in the Compare with Current column.
19
4. Do you want to...
• view a version history? Review the information in the columns and rows on this page.
• open a version to view it? Click on a version number in the Content Version column to download a
read only version.
• compare the current version with an older version? Click the compare with other version text
link in the current version's row to open the Version Comparison page, where you can view comparative data.
• compare an older version of this document to the current version? Click on the older version's
compare with current text link, to open the Version Comparison page, where you can view comparative data.
• compare one old version with another old version? Click on a compare with other version text
link in the row of an old version you want to compare, to open the Select Document Version to
compare against page. Click a compare text link in the Compare column to open the Version
Comparison page, where you can view comparative data.
Figure: compare versions
20
View Roles
The View Roles menu option displays role allocations on the currently selected document.
Figure: viewing roles
Document Actions Menu
Archive
This procedure archives a currently selected document.
Archiving renders a document invisible to non-administrative users. Only administrative users are allowed to
restore archived documents. Archiving clears space in the repository in order to speed up search and document viewing.
Perform the following steps:
1. Login; then, click Browse Documents to enter the folder structure.
2. Open the Document Detail page for the document you want to archive.
3. Click Archive in the Document Actions menu to open the Archive page.
4. Specify a reason for the archive in the Reason field; then, click Archive.
Note: The system re-opens the folder structure view and displays a message to confirm
that the document has been archived. The system sends an email to the document
creator to advise that the document has been archived (if you have alerts set up on the
document for such notifications).
21
Change Document Ownership
The Change Document Ownership menu option provides the ability to change document ownership when another user becomes responsible for the document's content.
Check out
This procedure checks a document out for editing on your local computer.
The system locks the version in the repository while it's checked out. Other users may download the document
to view it, but they cannot change it while it is in checked out status.
An administrator can override the checked out status of a document. The user who checked the document out to
edit it will need to check it out again and redo their changes. The Dashboard displays a list of documents that
you have checked out when you log on. This reminds you to check in documents where you may have forgotten
to do so.
Perform the following steps:
1. Navigate to the Document Detail page of the document you want to check out.
2. Click the Check out link in the Document Actions menu.
3. Enter a comment in the Reason field to describe you’re checking out the document.
Note: Reason is a required field.
4. Verify that you’re checking out the correct document.
Note: To cancel the checkout, click cancel this checkout.
5. Click the Check out button below the Reason field.
Note: After clicking Check out, a system message advises that the document is being
downloaded.
22
Figure: Check out page
Check in
This procedure checks in a document that was previously checked out of the repository.
Any document that is checked out of the repository is unavailable for other users to edit, move, delete, or archive. Checking in a document increments the document version number - by 1.0 if this is a major update; or,
by 0.1 if this is not a major update.
Perform the following steps:
1. Log in to Pinnacle; then, navigate to the Document Detail page of the document you're checking in.
2. Click Check in on the Document Actions menu.
3. Specify the path to the document location in the File field; or, click Browse to locate the document.
4. Is this a ...
• major update? Select the Major Update check box.
• minor update? Leave the Major Update check box deselected.
5. Type a brief comment in the Reason field to explain the changes made to this document.
6. Do you want to ensure that the document is checked back in to the repository using only the
original file name?
• Yes. Select the Force Original Filename check box.
• No. Leave the Force Original Filename check box deselected.
7. Click Checkin to upload the document.
23
Figure: Check in page
Cancel Check out
The Cancel Checkout option in the Document Actions menu allows you to restore the document to the repository without saving any changes made to the document while it was checked out.
Copy
The Copy option on the Document Actions menu copies the currently selected document to another location in
the repository.
The Copy Document [document name] page allows you to browse the folder structure to select a target destination.
Delete
Deleted documents remain in the repository, and may be restored or expunged (permanently deleted) by an Administrator in the Document Storage section of DMS Administration.
Note: You need to have the appropriate permissions on a document or folder to delete it. Additionally, an administrative
user will not be allowed to delete immutable documents using the Delete button in Browse Documents, even if they're
working in Administrator mode. To delete an immutable document, you will need to use the Delete action from that immutable document's Document Detail page. This ensures that immutable documents are only deleted one at a time, and
avoids the mistaken deletion of an immutable document in a mass action delete.
24
Deleting Documents and Folders
This procedure removes a currently selected document or folder to the repository's deleted documents storage
location.
Note: The Pinnacle administrator is able to expunge or restore a deleted document or folder.
Perform the following steps:
1. Navigate to the folder or document that you want to delete.
2. Are you deleting one or more...
• folders? Select the check box adjacent to title of each folder that you want to delete; then, click Delete.
• documents? Select the check box adjacent to the title of each document that you want to delete; then,
click Delete. Alternatively, click on the document to open the Document Detail page; then, click Delete in the Document Actions menu on the left of the page.
3. Specify the reason you're deleting the file or folder in the Reason field on the Delete Files and Folders
page; then, click Delete.
Note: The file or folder is deleted, and this action is recorded in the Transaction History for this file or folder in the
DMS.
Discussion
Discussions are a low level collaboration tool that provides a forum for users to share their ideas on a document. You can view and add to existing discussion threads for a currently selected document, or create a new
discussion thread.
Perform the following steps to access discussion threads:
1. Login; then, open the Document Detail page for the relevant document.
2. Click Discussion in the Document Actions menu to open the Discussion page.
3. Do you want to:
• view all existing threads? Click View threads to display all existing threads in the View all threads
section.
• create a new thread? Enter a topic in the Subject field; then, add your comment in the Body field.
Click Create thread.
25
Figure: Creating a new thread
• add to a thread? Click the link to the thread in the Existing threads section; enter the topic in the
Subject field; then, post a comment in the Body field. Click Post reply.
• close a thread? Click the link to the thread in the Existing threads section. Select the new state for
this thread in the State menu; then, add a comment in the Reason field to explain why you are closing the thread; then, click Change state.
Edit Metadata
This procedure changes the document's metadata.
You can change or add the following detail:
• document type
• document title
• author
• origin
• department
Perform the following steps:
1. Login; then, navigate to the relevant document.
2. Click Edit Metadata in the Document Actions menu to open the Editing page.
3. Do you want to define or modify ...
• the document type? Click the document type link to open the Change Document Type page. Select
a document type from the pick list; then, click Update Document. Update the document metadata, now
including metadata specific to this document type; then, click Update Document.
• the document title? Define a new title for the document in the Document Title field.
26
• the name of the author? Specify the author's name in the Author field.
• the document origin? Click the relevant radio button to select an option in the Origin section.
• the department responsible for this document? Click the relevant radio button to select an option in
the Department section.
4. When you're done, click Update Document.
Links
Document links allow you to establish associations between documents in the repository.
Important:
Your Pinnacle administrator needs to create the Document Link Types that you use to link documents. When
creating a document link, the administrator specifies the type of relationship that the link implies between the
linked documents – i.e. ‘associated with’, or ‘duplicated by’. You will not be able to create links if there are no
pre-defined link types to choose from.
Viewing / Adding Links
This procedure displays the links (if any) that exist on the currently selected document, and it allows you to set
up links from this document.
Perform the following steps:
1. Login; then, open the document's Document Detail page.
2. Click Links in the Document Actions menu to open the Document Links page.
3. Do you want to..
• view existing links? View the list of links (if any) on the page.
• add a new link? Click Add a new link to open the Add Link page. Select the target folder; then, click
Link. Select a link type - e.g. 'Associated with'; then, click Link.
Note: The administrator needs to create link types before you can add links. Ask the
administrator for assistance or see the Pinnacle 3.0 Administrator Manual.
27
Make immutable
The Make immutable option on the Document Actions menu prohibits further content changes to the currently selected document.
When a document has been rendered immutable, no further changes can be made to its metadata, and the
document can no longer be moved or deleted. These actions may only be performed by the Pinnacle administrator. Should you require any change to the document, you can click Request Assistance on the Document
Actions menu.
Request Assistance
The Request Assistance item on the Document Actions menu sends a message to the Pinnacle administrator and the document owner to request the required action to be performed on the currently selected immutable document.
Move
Only users with the read and write permissions for a folder are allowed to move an item to another location in
the repository.
Moving Documents and Folders
This procedure moves a document or folder to another location in the repository.
Perform the following steps:
1. Login; then, click Browse Collections to enter the folder structure.
2. Search or navigate to the document or folder you want to move.
3. Are you moving a...
• folder? Select the check box adjacent to the folder title in the Browse Documents table on the right of
the page. Do this for each folder that you want to move to the destination location. Click the Move button at the bottom of the table to open the Move page.
28
• document? Select the check box adjacent to the document title in the Browse Documents table on the
right of the page. Do this for each document that you want to move to the destination location; then, click
the Move button at the bottom of the table. Alternatively, click on the document to open the Document
Detail page; then, click Delete in the Document Actions menu.
4. Browse to the location where you want to move this item; then, click Move.
5. Enter a comment in the Reason field on the Move Files and Folder page to describe why you're moving
the document or folder; then, click Move.
Note: The documents and/ or folders you moved display in the Browse Documents table in their new location.
Rename
The Rename option on the Document Actions menu renames the file name of the document. This action is
only available if you have the write permission on the document.
Note: This action does not change the document title. It only changes the file name. Suppose you have a jpg image file in
the repository, and you want to change it into a bitmap. This involves renaming the file from filename .jpg to filename .bmp;
then, checking out the .jpg file and checking in the bitmap version.
Perform the following steps:
1. Login; then, click Browse Documents to enter the folder structure.
2. Locate the document where you want change the file name.
3. Click Rename in the Document Actions menu to open the Rename document page.
4. Enter a new file name for the document in the New file name field; then, click Rename.
View Inline
The View Inline option on the Document Actions menu opens the document inline, within the Web interface,
and displays its content.
Workflow
A workflow describes a document life-cycle as a predefined series of states and transitions that a document
must pass through before it is considered complete.
Any Pinnacle user may be involved in a document workflow. Some documents, such as tenders, may have complex workflows involving several people, both internal and external to your organization.
Note: The Pinnacle administrator defines and manages workflows in DMS Administration. Predefined workflows display in the
pick list on the Document Workflow page.
29
Assigning workflows
A document in the repository can have only one workflow attached to it at any given time. By default, workflows are not automatically attached to new documents when they’re added to the repository. However, the
administrator may configure the system to assign workflows when new documents are created, or to assign
workflows only to specific documents.
You will only be allowed to select and assign workflows to the documents you're working with – provided you
permissions to do so, and assuming that a workflow was not assigned by default when the document was
added to the repository.
Note: Once a document is in a workflow, you cannot overwrite that workflow by assigning a different workflow to the
document - the document can transition between states in the workflow that has been assigned to it.
States and Transitions
Workflows consist of states and transitions.
States
A state may be defined as a stage in a document’s life-cycle, such as billed, or
draft. Each document workflow has a starting state, which is the initial state for any document in a workflow.
Transitions
Transitions, which may be defined as the way in which documents move between states, are an essential part
of the workflow. Each state can have one or more transitions, depending on how the administrator has created
the workflow.
Transitions point to the next step in the workflow, such as send to client or review, which effectively
changes the state of the document. Transitions represent the actions that may be performed on a document.
For example, an invoice starts in the generated state; then it is sent to client, before it is marked as billed.
Transitions are said to be guarded – not all users are allowed to access them. For example, in a Publication
workflow, only users with the role Reviewer may be allowed to review a document, and to move it from
Draft to Published.
Workflow Effects (Actions)
Document workflows are more than just states and transitions.
Pinnacle users and administrators may use workflows to restrict, deny, or grant access to documents in the
repository, based on the document’s position in the workflow. For example, a state can restrict both actions
and permissions on a document – only reviewers may be allowed to discuss draft documents for instance,
while clients will be disallowed from viewing unbilled invoices, and published documents will be prevented from
being checked in or checked out of the repository.
Additionally, users in specified Roles or Groups can be notified when a document reaches a certain state in a
workflow. These notifications display on the Dashboard, and are emailed to users who are set up to receive
email notifications.
Viewing / Starting Workflows
This procedure displays the workflow (if any) that is assigned to the currently selected document, and it allows
you to start a workflow on this document.
Note: Once a document is in a workflow, you cannot overwrite that workflow by assigning a different workflow to the
document - the document can only transition between states in the workflow that has been assigned to it.
30
Perform the following steps:
1. Navigate to the Document Detail page of the document where you want to view or start a workflow.
2. Click Workflow in the Document Actions menu.
3. Do you want to ...
• open the document's workflow? Clicking the Workflow link in Document Actions opens the Current workflow settings page, where you can view settings for the workflow, and perform a transition
to a new state. Go to step 4.
• start a workflow on this document? Clicking the Workflow link in Document Actions opens the
Document Workflow page. Select a predefined workflow from the drop down menu; then, click Start
Workflow. Go to step 4.
4. Do you want to perform a transition on the workflow?
• Yes. Select a transition in the Transition to perform pick list; then, add a comment in the Reason for
transition field to describe why you are changing the workflow state. Click Perform Transition.
Note: The Document Workflow page confirms that the transition has been performed,
and it displays the new workflow state.
Note: Transitions are a manual procedure - e.g. once you have reviewed a document,
you need to check it back in, and then manually transition the document to the
'reviewed' state.
• No. Exit the Workflow section.
Email
Pinnacle allows you to send an email from within the system to one or more groups or users.
Each recipient receives a link to the document in the repository. Clicking the link opens the Document Detail
page of the document in Pinnacle.
Note: Emails can only be sent to users who have email notifications turned on, and who have provided their email address. Email notifications are switched on in the Preferences tab, or ask your Pinnacle Administrator for assistance. The
list of recipients that display on the Email page are those users for whom email notifications are turned on.
Sending an Email
This procedure sends an email message to one or more Pinnacle users or groups, and provides a link to the
currently selected document.
Perform the following steps to send an email:
1. Login; then, open the document's Document Detail page.
2. Click Email in the Document Actions menu to open the Email document page.
3. Are you sending this email to one or more ...
• groups? Select a group in the Groups display menu; then, click the right pointing double arrow on the
right of the page to populate the adjacent empty display field.
Note: To randomly multi-select, hold down your keyboard Ctrl key and select
recipients; then click the right pointing double arrow to populate the right side
display field.
Note: To remove a recipient from the right side display field, select the recipient
name and click the left pointing double arrow adjacent to the field.
31
• users? Select a user in the Users display menu; then, click the right pointing double arrow on the right
of the page to populate the adjacent empty display field.
Note: To randomly multi-select, hold down your keyboard Ctrl key and select
recipients; then click the right pointing double arrow to populate the right side
display field.
Note: To remove a recipient from the right side display field, select the recipient
name and click the left pointing double arrow adjacent to the field.
5. Type a message for the recipients in the Comment field; then, click Email.
Search
Pinnacle provides three search options – simple (quick) search, advanced search, and saved searches.
Search is permissions-based, so the system only returns items that you are allowed to access.
Note: Words shorter than 4 characters long (e.g. "the" or "for") are discarded from the search. Search also only ever returns fully matching words (e.g. "Know" will not match "Pinnacle").
Searching the content of scanned documents
Pinnacle allows search of the content of scanned documents only in an MS Office 2003 environment. This eature allows Pinnacle to include the text of documents that have been scanned into the repository using Pinnacle Desktop Imaging, in the search operation. The scanned document is returned in the search results if it
includes any of the specified keywords, and if the user has at least read permissions on the document.
Performing a Simple Search
This procedure performs a simple (quick search) of all text in the repository – including document metadata
and the contents of the following common file types: Microsoft Word, Excel, PowerPoint, Adobe PDF, and Plain
Text files.
Note: Pinnacle also supports indexing for other file types. Check with your Pinnacle administrator to find about more about
the files types enabled for your organization.
Perform the following steps:
1. Login to Pinnacle.
2. Do you need to search from...
• the Dashboard? Specify search criteria in the Search field on the Dashboard to start your search. See
the rest of this procedure for more information about the simple search.
• Browse Documents? Click Browse Documents; then, specify a search term in the Search field. Click
search.
Note: The system returns a list of the documents that contain the specified search criteria.
32
Performing an Advanced Search
This procedure launches an advanced, Boolean search of the repository. The advanced search is based on
one or more sets of criteria, which is selected prior to launching the search.
An advanced search allows the configuration of detailed search requests, using document metadata. For example, you can search for all Microsoft Excel documents containing the word 'Invoice'.
Note: The Advanced Search feature is currently not available in the Pinnacle Client Tools for Windows.
Perform the following steps:
1. Login to Pinnacle.
2. Do you need to search from...
• the Dashboard? Click the Advanced Search link to open the Boolean Search page; then, go to step
3.
• Browse Documents? Click Browse Documents; then,click Advanced Search in the Search menu to
open the Boolean Search page. Go to step 3.
3. Select all or any from the Return items which match…of the criteria groups specified pick list.
4. Select all or any from the Return items which match…of the criteria specified below pick list, in the
Criteria Group section.
5. Select a query type from the pre-defined Criteria pick list (see the table below); then, click Add.
Note: The system displays a Values field – one or more – for each query type you select in the Criteria pick list. You can
remove any Values field by clicking the Remove button adjacent to the field.
Select
to search…
Name
Title
Creator
Date Created
Document Type
ID
Date Modified
Document Contents
documents by name.
documents by their title.
documents created by this user.
All files and folders created during the search period you define.
All files and folders of this document type – e.g. default, reports, articles, etc.
the document by its numerical identifier.
all files and folders modified during the search period you define.
files or folders containing the search criteria you define, which may be a word or a
phrase in the file.
files and folders that have this workflow state.
comments made during transactions, e.g. workflow transitions, check in reasons, etc.
all text related to this document.
You can also search by custom fields set up by your Pinnacle Administrator.
Workflow state
Transaction Text
Searchable Text
Custom
33
6. Do you want to select another query type for this Criteria Group?
• Yes. Go back to step 5.
• No. Go to step 7.
7. Complete the Values fields for each query type you added to the Criteria Group.
8. Do you want to define another criteria group for this search?
• Yes. Click Add another set of criteria; then, go back to step 5.
• No. Go to step 9.
9. Click Search to start the search.
Figure: Boolean Search Page - with criteria defined and Values fields displayed
Viewing Saved Searches
The saved search function allows Pinnacle administrators to pre-save useful advanced searches. For example,
the administrator may want to save a search that displays all documents in a completed state of a workflow.
Saved searches save time on commonly used searches.
Perform the following steps:
1. Login; then, click Browse Documents.
2. View the list of links for saved searches in the Search section.
Note: Your Pinnacle administrator creates this list of saved searches.
3. Click on a link to run the search.
Note: The system uses the search criteria saved for the search to find and return
relevant content in the repository.
34
Navigating the Repository: Browse Documents By...
You use the Browse Documents section to navigate the repository – either by folder, by document type, or
by lookup value – the default is browse by folder.
Note: The system only returns folders where you have read and/or write permissions.
Browsing by Folder
This procedure provides a folder view of the repository.
Perform the following steps:
1. Login; then, click the Browse Documents tab to open the folder view.
Note: Folder view is the default view.
2. Click on a folder in the list to display it's contents.
Browsing by Document Type
This procedure provides a view of the repository by document type.
Perform the following steps:
1. Login; then, click Browse Documents to open the default folder view of the repository.
2. Click Document Type in the Browse Documents By menu to open the Select a document type page.
3. Select a document type from the list to open a list of the documents in the repository that match this criteria.
Browsing by Lookup Value
This procedure browses the repository by lookup values.
Note: Lookup values are defined by your Pinnacle administrator.
Perform the following steps:
1. Login; then, click Browse Documents to open the default folder view of the repository.
2. Click Lookup Value in Browse Documents By to open the Select a Field page.
3. Select an option from list provided on the Select a Field page to open the Select a Value page where you
can further define browse criteria.
4. Select an option from the list provided on the Select a Value page to open a view of the repository by
Lookup Value.
Subscriptions
Subscribing to a document or folder allows notifications to be sent to you via email (if you have this feature activated on your system), when actions are performed on a document or folder that you have subscribed to - i.e.
you will be notified when a document or folder is checked in, checked out, deleted, moved, archived etc.
Your notifications also display on the Dashboard. Unsubscribing prevents further notifications from being sent to
you when further actions are performed on the document or folder.
35
Viewing Subscriptions
This procedure displays your current subscriptions.
Perform the following steps:
1. Login; then, click Browse Documents to enter the folder structure.
2. Click Manage subscriptions to open the Subscriptions page.
3. View the list of files and folders to which you are currently subscribed.
Subscribing to Documents or Folders
This procedure creates a subscription to a currently selected folder or document.
Perform the following steps:
1. Login; then, click Browse Documents to enter the folder structure.
2. Search or navigate to the document or folder where you want to create the subscription.
3. Is this a...
• folder subscription? Click Subscribe to folder in the Subscriptions section at the bottom left of the
page.
• document subscription? Click on the document title to open the Document Detail page; then, click
Subscribe to document in the Subscriptions section at the bottom left of the page.
4. View the system message above the table to confirm that you are now subscribed to the document or
folder.
Unsubscribing from Documents or Folders
This procedure removes an existing subscription from a folder or a document.
Perform the following steps:
1. Login; then, click Browse Documents to enter the folder structure.
2. Search or navigate to the document or folder where you want to remove the subscription.
3. Is this a...
• folder subscription? Click Unsubscribe from folder in the Subscriptions section at the bottom left
of the page.
• document subscription? Click on the document title to open the Document Detail page; then, click
Unsubscribe from document in the Subscriptions section at the bottom left of the page.
4. View the system message above the table to confirm that your subscription has been removed.
Note: You can also use the Manage subscriptions button to view a list of your current
subscriptions, and then select the files and folders where you want to unsubscribe.
36
Preferences
Defining Preferences
This tabbed page allows you to view, define, or modify your personal details.
Note: Click the Update your details button to save any changes you make on this page.
The following information is configurable in this section:
• name - this information is used for reports and listings
• email address - this is the address used to send alerts and notifications
• email notifications - this check box defines whether or not you should receive email notifications at the
email address specified in the previous field. If this option is not selected you will only see notifications on
the Dashboard.
• mobile number - this number is used to send notifications to your mobile phone, if this service has been
configured on the system for your organization
• password -
Changing your Password
This procedure changes the password you use to log in to Pinnacle.
Perform the following steps:
1. Log in to Pinnacle's Web interface.
2. Click the Preferences tab to open the Preferences page.
3. Click Change your password to open the Password page.
4. Enter your new password in the Password field; then, retype the new password in the Confirm Password field.
5. Click Change your password.
6. The Preferences page re-opens, and a system message at the top of the page informs you that your
password has been changed.
Logout
Logging out
The toolbar Logout button allows the currently logged in user to log off, and it closes Pinnacle.
Your working session is set to time out automatically after a pre-defined period of inactivity. You will need to
log in again to continue working, and in this case the system re-opens at the page where your session timed
out.
When you use the toolbar Logout button to exit your session, the system opens at the Dashboard the next
time you log on.
37