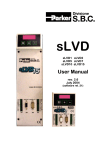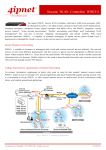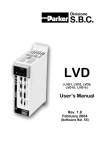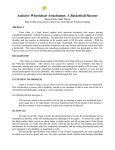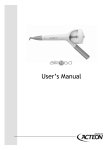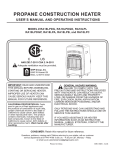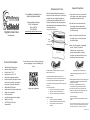
1
General Cautions Indications for Use For questions, comments, or concerns, please contact Digital Camera Size Whitney Medical Solutions 6153C W. Mulford St. Niles, IL 60714 847-470-9300 www.whitneymedicalsolutions.com Whitney Medical Solutions equipment drapes are to be used to cover a variety of surgical and non-surgical equipment in various settings throughout the clinical setting. These drapes are used to protect the equipment from contamination during various procedures. Sterile/Unsterile indicator line Cuffs User Manual Product Information eShield Digital Camera Size Reorder number: EC2200 Overall size: 9” x 14” Functional size: 9” x 4.5” Sterilized via gamma radiation Contents of each peel pouch sterile unless seal is broken or package is punctured. Examine before use. ANSI/AAMI PB70 Level 4 Not made with natural rubber latex Single use, disposable Do not resterilize Avoid direct exposure to sunlight Made in the USA 16 CFR Part 1610 Class 1 Flammability Do not use cover on devices with sharp edges that can potentially damage the cover and compromise the sterile barrier Note: To maintain optical clarity of the cover, store in a cool dry place out of direct light Green circles Adhesive tape If you notice a tear or other breach in the cover at any time during use, immediately discard the cover Tear line Note: The entire cover is packaged sterile; “Sterile”/”Unsterile” indicator line is to help scrub person visualize which areas the circulator may have touched. Users should not have cross contact. For an electronic copy of this user manual in various languages, scan the following QR code Finding Solutions to Real Problems is our future. Make it part of yours! The Whitney Medical Solutions portion of our website where we connect your Aha! Moments with our years of medical manufacturing experience. http://qrs.ly/al3cbcz Ever been struck by a flash of genius while working in the lab? Ever said to yourself…? There should be a better way to do this! Why hasn’t someone made a better…? If only we had something that would do… Maybe you have… An idea for a product modification. Identified a problem that needs a solution. A new product in mind that solves a problem. Why bring your idea to Whitney? A Money Making Opportunity for you...and because... Whitney Medical Solutions has over twenty years of experience manufacturing products for the medical environment. Our future is in NEW products so we are committed to taking new ideas to market. Your idea will not fall into some black hole! Whitney is a family owned manufacturer with real, accessible people at the helm. Sound interesting? Take a minute to go to our website to find out more. Idea for eShield was brought to our attention by Dr. Alex Meininger. With the help of Whitney Medical Solutions Dr. Meininger was able to see his idea come to life. ec2200h – Rev. 0 Video Instructions for Use 8) Circulator: Gently place camera inside the cover http://qrs.ly/xp2ygja 5) Circulator: Remove the excess rings which will leave only correct ring size on bezel. Written Instructions Camera Preparation Phase 11) Scrub person: Remove the adhesive tape liner Tip: Camera can be placed upside down so that controls are easily accessible when in use Tip: Place covered camera on a sterile stand for steps 11-14 so that the weight is supported. Caution: Avoid dropping the camera into the cover Press down on bag to remove all excess air prior to sealing so that it is easier to use camera. Step 11 can be performed before Step 9. 6) Circulator: Turn off the camera to collapse bezel Cover Preparation Phase 9) Scrub person: Hold the green circles and pull in opposite directions to tear off top. Discard top portion 1) Circulator: Remove the camera strap Caution: The newly created top edge of the cover is considered to be unsterile after the cuffs are torn off. Avoid contact with this area for steps 9-14. 12) Scrub person: Fold cover over at fold lines 1 then 2 to seal along adhesive tape Caution: Avoid unsterile areas when folding over top of cover. 7) Scrub person: Place hands inside cuffs and separate to create opening to cover 2) Circulator: Turn the camera on to extend the bezel 3) Circulator: Remove the white ring liner Tip: When putting camera into the cover during next step, the scrub person can hold cover horizontally to allow for circulator to easily place the camera inside the opening. Note: The entire cover is packaged sterile; “Sterile”/”Unsterile” indicator line is to help scrub person visualize which areas the circulator may have touched. Users should not have cross contact. 10) Scrub person: Press cover to the ring 13) Scrub person: If “NOT SEALED” is visible, cover is not ready for use Tip: Make sure there are no wrinkles in the cover so that clear pictures can be taken . 14) Scrub person: Once “SEALED” is formed, cover is ready for use 4) Circulator: Stick the rings to the center of the camera bezel by aligning center of rings with center of bezel. Press around edges to secure rings to bezel. 15) Scrub person: Once the cover is done being used, unfold top seal to remove the camera. Carefully remove adhesive ring from camera bezel. Dispose of the potentially biohazardous cover in accordance with facility protocol.