1
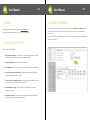
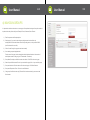
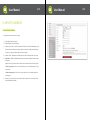
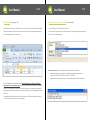
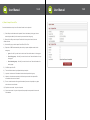
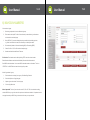
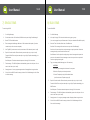
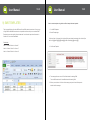
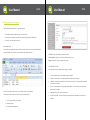
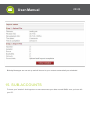
Call Us
083 321 6914
User
Manual
START MARKETING YOUR
BUSINESS TODAY
Table of Contents
1.
2.
3.
4.
5.
Login.......................................................................4
Account Settings.....................................................4
Online Payments....................................................5
Maintain Groups.....................................................6
Import Numbers......................................................8
a) Insert Single Number:......................................................................... 8
b) Bulk Import: (Preparing your file).....................................................................10
c) Save your Excel file as a CSV file: (Comma Delimited)............................ 11
d) How to Import from a File: ............................................................... 12
6. Maintain Numbers................................................14
7. Single SMS...........................................................16
8. Bulk SMS..............................................................17
9. SMS Templates....................................................18
10. Sent/Queued........................................................20
11. Replies..................................................................21
12. Blacklist/Auto Delete............................................21
13. Sub-Accounts.......................................................22
14. BIRTHDay – Groups, Import:...............................23
a) Birthday Messages:.......................................................................... 23
b) Setting up data in excel sheet: ........................................................ 24
15. Sub-Accounts.......................................................26
Copyright © 2015 SMSDepot. All rights reserved.
User-Manual
4/26
User-Manual
1) LOGIN
5/26
3) ONLINE PAYMENTS
The fastest way to get credits into your account is to pay online with a credit card or debit card. This
First login with your Username and Password at www.smsdepot.co.za.
is a totally secure website transaction. Enter the number of credits in the box next to “Enter Number of
The number of credits in your account are in red in the bottom left corner.
Credits to buy”.
Ex. 500 credits will be 0.27c per SMS credit ex VAT. 1 credit = 1 SMS. Click on Continue to payment page
and proceed as directed.
2) ACCOUNT SETTINGS
You can change the following here:
1)
Change Your password – Just enter the new one twice beside Password and Confirm Password, Click on Update Account (Username cannot be changed)
2)
Contact Information: name, email and phone numbers
3)
Time Difference - If you are international, you can change your server time difference
4)
Low Credit Warning and Reporting - Remove or change low credit warnings and summary reports that are sent to your email.
5)
Forward replies to mobile or email - Incoming messages from the SMS’s you send can go to the cell (costs 1 credit) or email number you enter
6)
Send response to reply – If someone replies to your message you can send a response (cost 1 credit)
7)
Forward data to URL – If you want to have sent messages and replies forwarded to a website. Technical help is required to have this set up.
User-Manual
6/26
User-Manual
4) MAINTAIN GROUPS
It’s important to start here and create one or more groups. Groups allow the storage of many cell numbers to
be placed where they will be easily found. Example: Friends, Customers, Sales Team etc.
1)
Enter Group name and Group description.
2)
Sub-Accounts – If you want to share that group with someone else who will also be sending SMS’s. Sub-Account holders can have only Reading access, or they can Write SMS’s.
(see Sub-Accounts for more info)
3)
Click on Create Group (Your group has now been created)
4)
Your created groups are displayed below.
First the name of the group, then the description and then Numbers. Numbers is the number of mobile phone numbers in the group (ex. 47 Downloaded = 47 numbers)
5)
Group Name, Description, and Sub-Accounts can be edited – Click Edit for the correct group.
6)
Share Group with Sub-accounts: Read – they cannot edit the group, Write – they can edit the group
7)
Group can be deleted - Click box above edit for the correct group. Click Delete Selected
8)
Group can be Exported to Excel – Click on the word Download
9)
View groups from Sub-Accounts only (if Read or Write has been selected) or your account and
Sub-Accounts
7/26
User-Manual
8/26
User-Manual
5) IMPORT NUMBERS
a) Insert Single Number:
A single number can be entered into a group.
1)
Select Specific Group to Insert to.
2)
Beside Number enter mobile number
3)
Optional - Enter Value 1 – Value 6 (Column B to Column G in the Excel Spreadsheet) if you have more data to add to the cell number. Make it similar to the numbers and descriptions already in your group. (See Bulk Import for more on Values)
4)
Update if exists – Update the cell number with new values if it already exists in the group.
5)
Duplication – SMSPortal automatically does not let you import a duplicate number into the
same group
Ignore - Use this if you don’t want to check to see if the mobile number is in other groups
Check all my groups – Use this if you want to check to see if the mobile number is in any other groups
Check selected groups – Use this if you want to check to see if the mobile number is in certain groups
6.
Deleted – If you check this box, the number will not be imported if it is on the Auto Delete list (see Blacklist/Auto Delete)
9/26
User-Manual
10/26
b) Bulk Import: (Preparing your file)
User-Manual
11/26
c) Save your Excel file as a CSV file: (Comma Delimited)
You can import your data from an Excel workbook. Then save your Excel file as CSV (Comma Delimited)
1. In the Excel file go to File and then click on Save As
Prepare a spreadsheet in Excel with the cell numbers in column A. You can add other data pertaining to
2. At the bottom of the pop up window, File Name: rename your file (optional) and then beside Save as
that cell number beside it in the other columns:
Type: select CSV (comma delimited)
Text download formats: You can use NotePad found under Accessories in Microsoft.
1.
Mobile number needs to be contained as the first field in the file. Mobile number can be written as 0831234567, 2783234567, 831234567, or “2783234567”
2.
Note: In the spreadsheet to be uploaded the data must start from row 1 (Cell no.) The first
column (A) is for cell numbers only. These numbers can be written as 0831234567, 2783234567,
831234567, or “2783234567”. Columns B to G is for any variable you wish to add into your cell number
pertaining to the person linked to the relevant cell number. This allows you to send a bulk SMS and make
it personal.
For example: Dear Peter Smith we thank you for your donation of R300. Dear Johan Black we thank you
for your donation of R400 (see How to create a Template)
Separate the columns with commas. Up to 7 separated data fields with commas are allowed.
User-Manual
12/26
d) How to Import from a File:
Once the data has been set up in one of the above formats it can be imported.
1)
Select Group to which data must be imported. If there is data already in the group, the new data will only be added. (It will not overwrite your current data in the group).
2) Browse for the file you want to import. Double click it when you have found it, then the window will close.
3) Select the file type you wish to import. Select Excel, CSV or Text.
4) Duplication – SMSPortal automatically does not let you import a duplicate number into the same group
•
Ignore - Use this if you don’t want to check to see if the mobile number is in other groups
•
Check all my groups – Use this if you want to check to see if the mobile number is in any
other groups
•
Check selected groups – Use this if you want to check to see if the mobile number is in
certain groups
5)
Click Bulk Import from File
6) The task is finished when it says Upload and import complete
7)
Imported – total amount of cell numbers that have been imported into the group
8) Updated – cell numbers were already in the file and any new values in the imported file were added to the correct cell number
9) Errors - counts the number of wrong mobile numbers (these are not imported) or any place where there was no cell number
10) Duplicates are counted – they are not imported
11) Opt outs are counted – they are not imported, these people have requested to be removed from database
User-Manual
13/26
User-Manual
14/26
User-Manual
6) MAINTAIN NUMBERS
View numbers in group:
1.
Select the group desired or leave to default to all groups.
2.
Enter search criteria (add 27 in front of the cell number) or leave blank to give all numbers or all numbers in a selected group.
3. Select 'DISPLAY' if you want to display the values you added in when loading you data, e.g. Value1 could be the client name, this will assist you to identify the number.
4. Sort numbers by Number or Value and Ascending (ASC) or Descending (DESC)
5. Choose Set Size – 20, 50 or 100 numbers viewed per page
6. Numbers are listed below the Search Filter area.
Edit Numbers: Each number can be edited by clicking ‘EDIT’ next to the relevant number.
Delete Numbers: Numbers can be deleted individually. Select and click delete selected.
Send SMS to selected numbers: You can send SMS to selected numbers or all numbers. There is a
‘SELECT ALL’ or 'NONE' function to assist in working with your data.
Move/Copy numbers in group:
1. Select numbers to move/copy from a group. Click Move/Copy Selected
2. Select Action (Move or Copy) and group
3. Update or ignore the contact if it exists in group
4. Click on Copy/Move data
Note: Important! The size of your sets can be set to 20, 50 or 100. This is to assist when sending
selected SMS. Once you go to the next set the previous set selections are deleted. It is important to select
one page then send your SMS. Going to the next set will not carry over your selection.
15/26
User-Manual
16/26
User-Manual
7) SINGLE SMS
8) BULK SMS
To send a single SMS:
To send a Bulk SMS:
17/26
1. Go to Single Message
1. Go to Bulk Message
2. Set the date and time. If left at default, SMS will be sent upon clicking ‘Send Messages!’
2. At the top of the page Tick the box beside the correct group or groups
3. Beside “TO” Enter Mobile number
(You can view groups from your Subaccounts to if they have selected the Read/Write option)
4. Enter message beside Message. Maximum of 160 characters. Add template, if you have 3. Select the Time: Send Now, Send Later, or Send Between
created one (see How to create a template).
Send Now: The message will be send as soon as you select “Send Message”.
5. Use Tag SMS if you have more to write, also maximum of 160 characters (costs 1 credit)
Send Later: You have the option to send you message on any day and time. Select date 6. Replies: Forward to mobile: Enter cell number you want replies to go to (cost 1 credit)
message should go out and select the time as well.
Forward to Email: Enter email you want replies to go to (free). Replies automatically go to Send Between: Use this option for sending a large volume of messages that request the SMSPortal too.
person to call a number. A few text messages are sent out every minute over a period of Send Response: To send an automated response to the reply, fill in the text area.
time thus regulating incoming calls.
7. Flash message – The SMS only flashes and immediately opens on the cell phone. It is not 4. Type your message beside Message (max. 160 characters):
saved in their inbox (cost 1 credit).
3 OPTIONS
8. Campaign name – You can group messages under a Campaign Name to organize them
A. You can type a message that is the same for everyone or
9. Click on Preview SMS. Preview of message is shown. Click Send Messages! or click Close B. Select the Template you’ve already created or
to edit the message.
C. Create a Template by using the Placeholder Values
(see How to create a Template on page 18)
5. Replies: Forward to mobile: Enter cell number you want replies to go to (cost 1 credit)
Forward to Email: Enter email you want replies to go to (free). Replies automatically go to SMSPortal too.
Send Response: To send an automated response to the reply, fill in the text area.
6. Flash message – The SMS only flashes and immediately opens on the cell phone. It is not saved in their inbox (cost 1 credit).
7. Campaign name - You can group messages under a Campaign Name to organize them
8. Click on Preview SMS. Preview of message is shown. Click Send Messages! Or click Close to edit the message.
User-Manual
18/26
9) SMS TEMPLATES
User-Manual
19/26
How to create a template using the above Excel example that was imported:
This is a powerful feature for routine SMS’s sent. Set up SMS content here and save it. Once you go
1. Go to SMS Templates
to Single SMS or Bulk SMS menus there is a drop down menu from which you can select an SMS
2. Beside Template type:
Template, do some minor editing if required and send. You will need to import other information in
Columns B – G to use the Placeholders.
Hi (click on Value 1) (hit space) (click on Value2) (hit space) thanks for donating (click on Value3) You
will see: Hi @@value1@@ @@value2@@ thanks for donating @@value3@@.
Placeholders:
Value 1 = Column B Value 4 = Column E
3. Click Create Template
Value 2 = Column C Value 5 = Column F
Value 3 = Column D Value 6 = Column G
4. The message will come out as: Hi Peter Smith thanks for donating R300.
The next SMS would read: Hi Johan Black thanks for donating R400.
5. Before you send, there is a Preview of the message, and you will see the first person’s details in the first message.
User-Manual
20/26
10) SENT/QUEUED
User-Manual
21/26
11. REPLIES
View the results of the SMS’s you’ve sent. Select the Date the message was sent, select the Campaign
All replies automatically go under this menu option. Search for Replies based on Date, All, Read or
name (if needed), Tick off Include groups in Reports to see groups that were sent to.
Unread replies. You can also search by Campaign name, From number, and by Words. To easily identify
the sender include Values 1 to 6 by clicking ‘Include Sent detail’, and click ‘Search’. The SMS receiver
Click on EXPAND then click on ALL beside VIEW or Download.
•
Status “Delivered” means it was successfully delivered to the Networks.
•
Status “Unknown” means that it’s an unknown number, not recognized by network.
•
Status “Expired” means the system tried for 24 hours to send the message, but message could not
has 7 days to reply.
Blacklist Selected: You can directly blacklist cell numbers based on their replies from this page.
Download Replies: Sort and download your replies.
be delivered due to connection problems or cell phone that could have been off.
•
Status “Undelivered” means that the messages were not delivered
•
Replies is all the replies you received.
•
Opt outs are all the persons that replied “stop”, “no” “delete” that would not want to receive any further
messages.
•
Cancel Messages: Click on Pause Messages beside Waiting to be processed.
12. BLACKLIST/AUTO DELETE
Then click on Cancel (or release to send the messages)
Numbers are automatically added to your blacklist if the person replies with STOP, REMOVE,
UNSUBSCRIBE, or other similar words and swear words.
You can search for blacklisted numbers by cell number (add 27 in front of cell number), Campaign, date,
and containing word. You can manually add numbers to the auto delete list by one at a time or in bulk.
These numbers will be deleted and should the same number be imported again it will be deleted again
on importing.
User-Manual
22/26
13. SUB-ACCOUNTS
Sub-Accounts: Create an account for another user and transfer credits to them. Give them a Username,
User-Manual
23/26
14. BIRTHDAY – GROUPS, IMPORT:
a) Birthday Messages:
Password and Full name and then click on Create Sub-Account.
Birthday Messages are sent to your contacts automatically. All you need to do is create a group, add a
Edit Sub-Account: Click on EDIT on the relevant line. Change Password, Full name, activated or
message, select a sending time and import your information. When importing your data from an Excel
deactivate the sub account and change Time Difference. Allocate credits to the sub-account (see below).
spreadsheet, the cell number should be in Column A, Day in Column B, Month (numerical) in Column C,
Column D may contain their name (optional). A short User Guide is available upon request.
Sub-Account Credit Allocation: Allocate the credits to the sub-account. Enter number of credits beside
Amount. Add your own Note for your reference (optional). Click on Update Credits. Note: check the
1.
To create your birthday group, select “B-day group” on the menu bar
primary credit stock before allocation of credit to see if there is enough credits available.
2.
Enter a group name and group Description.
3.
Type the message you want to send next to “Group Message”
4.
Select the time you would like the messages to go out each day
5.
Replies – Enter cell number you want replies to go to (cost 1 credit)
6.
Select “create group”
Require Authorization: Check this function if any messages that the sub-account sends will first need
to be authorized by the main account. These are viewed in Sub-Accounts (Holding) on the menu. Then
release or cancel the message. These messages can be sent to your cell phone (costs 1 credit) or to
your email address (free).
Maintain Groups: When creating groups, you have a choice to make the group available to a sub
account holder as Read Only or Write. The Sub-Account holder can also create groups and make them
Read or Write for the Main account.
User-Manual
24/26
User-Manual
25/26
b) Setting up data in excel sheet:
Your birthday data should always be in the following order:
•
The cell phone number should always be in your first column.
•
In Column B you should put in the date these people are celebrating their birthdays on.
•
In Column C you should put in the month.
See example below.
You can have any information following in the next columns. Should you wish to have their Addresses
and email address in this list, then you can add them in the columns that follow.
Insert Into – Select the birthday group that you created.
File to upload - Browse for the excel sheet with the data you set up
File type - Select the File type, example CSV or Excel
Select Bulk Import from file
All of your data will now be imported into the group you selected.
1.
The task is finished when it says Upload and import complete
2.
Imported – total amount of cell numbers that have been imported into the group
3.
Updated – cell numbers were already in the file and any new values in the imported file were added to the correct cell number
4. Errors - counts the number of wrong mobile numbers (these are not imported) or any place where Once all of your data has been set up, you should save the file on your desktop.
The next step will be to import your data into the group already created.
there was no cell number
5. Duplicates are counted – they are not imported
6. Opt outs are counted – they are not imported, these people have requested to be removed from database
1.
For this, you go to BDay – Import Data
2.
Select Bulk Import
3.
The screen below will appear
User-Manual
26/26
Birthday Messages are now set up and will be sent to your contacts automatically as scheduled.
15. SUB-ACCOUNTS
To leave your "session" click logout so no-one can access your data or send SMS’s once you have left
your PC.