1
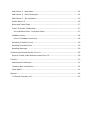
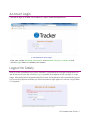
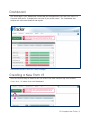
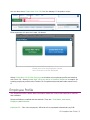
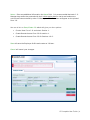
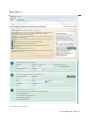
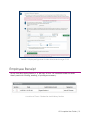
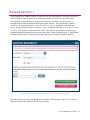
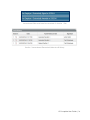
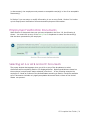
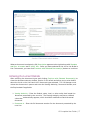
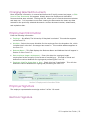
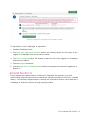
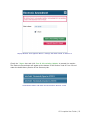
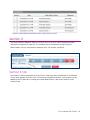
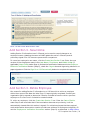
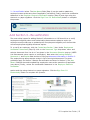
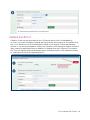
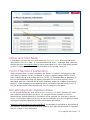
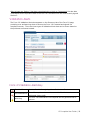
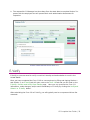
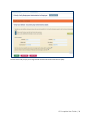
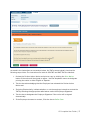
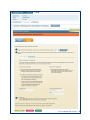
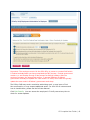
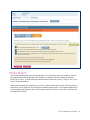
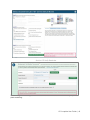
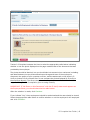
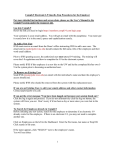
I-9 Complete User Guide Last updated : 6/10/15 I-9 Complete Powered by TABLE OF CONTENTS Account Login...................................................................................................... 1 Logout for Safety ................................................................................................. 1 Dashboard .......................................................................................................... 2 Creating a New Form I-9....................................................................................... 2 Employee Profile .................................................................................................. 3 Section 1 ............................................................................................................ 6 Employee Name and Identification....................................................................... 7 Employee Address and Contact Information .......................................................... 7 Employee Employment Status............................................................................. 8 Employee Signature .......................................................................................... 8 Electronic Signature .......................................................................................... 9 Preparer and/or Translator Certification ................................................................ 9 Under Age 18 Employees ................................................................................. 11 Employee Receipt .............................................................................................. 12 Amend Section 1 ............................................................................................... 13 Section 2 .......................................................................................................... 15 Section 2 Data Entry ....................................................................................... 15 Employment Verification Documents .................................................................. 16 Selecting List A or List B and List C Documents ................................................ 16 Entering Document Details ............................................................................ 17 Changing Selected Documents ....................................................................... 20 Employment Information.................................................................................. 20 Employer Signature ......................................................................................... 20 Electronic Signature ..................................................................................... 20 Amend Section 2 ............................................................................................ 21 Section 3 .......................................................................................................... 23 Section 3 Tab ................................................................................................. 23 Add Section 3 - New Name ............................................................................... 24 Add Section 3 - Rehire Employee ...................................................................... 24 Add Section 3 – Re-verification ......................................................................... 25 Delete Section 3 ............................................................................................. 26 Notes and Tasks Fields .................................................................................... 27 Form I-9 Section 3 Addendum .......................................................................... 27 Re-verification Rules - Expiration Dates ........................................................... 27 Validation Alerts ............................................................................................. 28 Form I-9 Validation Alerts Key ....................................................................... 28 Handling Curable Errors ............................................................................... 29 Handling Incurable Errors ................................................................................. 29 Handling Warnings .......................................................................................... 29 Create a New Remote Access Form I-9 ................................................................. 29 Steps to Create a New Remote Access Form I-9 .................................................. 29 E-Verify ............................................................................................................ 30 Employment Authorized ................................................................................... 31 Tentative Non-confirmation .............................................................................. 34 Photo Match ................................................................................................... 41 Reports ............................................................................................................ 46 I-9 Record Summary List ................................................................................. 46 Account Login The URL to login to Tracker I-9 Complete is: https://www.i9complete.com. I-9 Complete Account Login Enter your unique Username (DirectoyID) and Password (Directory Password) and click the Login button to validate your account. Logout for Safety After you have completed your work in Tracker I-9 Complete and no longer require access o r are at the end of your day, click the Logout hyperlink that appears at the top right of every page. After being idle for approximately 20 minutes, the application will automatically log you out for security purposes whereby you will be required to login again to continue using Tracker I-9 Complete. Tracker I-9 Complete Session Idle Automatic Logout I-9 Complete User Guide | 1 Dashboard The Home page is your Dashboard, customized and configured for your User role in the I-9 Complete web portal. It displays an overview of your action items. The Dashboard also contains the most used features and reports. Dashboard for Basic User with E-Verify Privileges Creating a New Form I-9 There are several ways to create a new I-9 record. The most common way is to click the Create New I-9 button from the Dashboard. I-9 Complete User Guide | 2 You can also select Create New Form I-9 from the Manage I-9 dropdown menu. Either approach will open the Create I-9 Wizard. Create New I-9 for New Employee Create New I-9 for New or Active Employee Select Create New I-9 for New Employee to create a new employee profile and create a new Form I-9. Select Create New I-9 for an Active or Inactive Employee to search for existing employee profiles in the Tracker I-9 Complete web portal and create a new Form I9. Employee Profile The Employee Profile is where basic information about the newly hired employee is entered and validated. Required fields are marked with an asterisk. They are: First Name, Last Name, Employer and Worksite. Employee ID – This is the employee’s UID and will be populated automatically by PHR. I-9 Complete User Guide | 3 Notes – Enter any additional information the Notes field. It is recommended that each I- 9 Manager tags notes they entered with their initials and a date for clarity and makes sure not to erase notes entered by other I-9 Managers. This field does not appear on the printed Form I-9. You can click on Save/Create I-9 which will give you the options • Create New Form I-9 and start Section 1. • Create Remote Access Form I-9 for section 1. • Create Remote Access Form I-9 for Sections 1 & 2. Save will save the Employee Profile and create an I-9 later. Cancel will cancel your changes. Employee Profile I-9 Complete User Guide | 4 Duplicate Employee Record When you enter an employee profile that has matching information to an existing profile, a warning message will be displayed. If you know the profile you are creating is for a different person and then disregard the warning and click on Create New Profile. Otherwise and contact the I-9 helpdesk for further assistance. Duplicate Employee Record Warning The purpose of this feature is to prevent duplicate I-9 records from being created in error and to inform I-9 Managers when an employee is rehired and a Form I-9 is already on file. After clicking Save/Create I-9, a new Form I-9 tab will appear. Here the employee can type the information directly onto the page to complete Section 1. After following the data collection rules and saving the required information, Section 1 must be completed and electronically signed by the employee to add the record to the Form I-9 Audit History. I-9 Complete User Guide | 5 Section 1 FIG. FORM I-9 SECTION 1 I-9 Complete User Guide | 6 Employee Name and Identification Completed by the employee: • First Name - Enter the first name for the employee. This field is required in order to save the I-9 record. • Middle Initial - Enter the middle initial for the employee, if applicable. • Last Name - Enter the last name for the employee. This field is required in order to save the I-9 record. • Other Names Used (if any) – Provide all other names used, if any (including maiden name). If the employee has had no other legal names, check the N/A (Not Applicable) box. This field is required in order to save the I-9 record. • Social Security Number - The social security number for the employee in the format of XXX-XX-XXX. This field is checked to ensure only valid numbers are accepted. This field is required in order to save the I-9 record if the employee is associated with a Worksite that has E-Verify enabled. • Date of Birth - The date of birth for the employee in the format of mm/dd/yyyy. This field is required in order to save the I-9 record. Employee Address and Contact Information Completed by the employee: • Street Name and Number - Enter the full street address for the employee, not including an apartment number, if applicable. This field is required in order to save the I-9 record. • Apt Number - Enter the apartment number (without the "Apt" prefix), if applicable. • City - Enter the city for the address of the employee. This field is required in order to save the I-9 record. • State - Enter the state or U.S. territory for the address of the employee from the dropdown list of valid choices. This field is required in order to save the I-9 record. • Zip Code - Enter the zip code (5 digits) or the zip+4 code for the address of the employee. This field is required in order to save the I-9 record. • Phone Number – Optional field to record the employee’s phone number. • Email Address - Optional field to record the employee’s email address. Data entered into this field is validated to ensure that only a valid email address is entered. I-9 Complete User Guide | 7 Section 1 Employee Employment Status Fields Employee Employment Status Completed by the employee: • Employee Employment Status - This field is required in order to save the I-9 record. Select one of the four possible radio buttons: A citizen of the United States A noncitizen national of the United States A lawful permanent resident - Requires a nine digit A-Number/USCIS Number An alien authorized to work - Requires either a nine digit A-Number/USCIS Number or an eleven digit Admission Number (select the matching radio button to choose which document number to add to the Form I-9) o Date authorized to work until – Date that the employment authorization expires, if any. The date should be entered in the format of mm/dd/yyyy. If employment authorization does not expire (ex., refugees, aliases, etc.) then check the N/A (Not Applicable) box. o A-Number/USCIS Number – 9 digits, required if no Admission Number o Admission Number – 11 digits, required if no A-Number/USCIS Number • Foreign Passport Number – if an Admission Number is entered, a foreign passport number is required. In certain circumstances this is not necessary, and the employee can check the N/A (Not Applicable) box. • Issuing Country – if a foreign passport number is provided, choose the country that issued the passport here. Employee Signature I-9 Complete provides the ability for the employee to sign electronically. I-9 Complete User Guide | 8 Electronic Signature Section 1 Electronic Employee Signature Process Select the Electronic Signature radio button. The first time an employee signs Section 1, they are required to: 1. Enter their full name in the Employee Name (First, Last and Middle Initial) textbox. 2. If applicable, enter and confirm the answer to the signature question listed. Answers should be entered in the Answer and Confirm Answer textboxes. If there are changes made to the I-9 that warrants Section 1 to be resigned by the employee, they will need to re-enter the same answer they provided for this signature question at that time. Adding a signature question when signing Section 1 is a Tracker I-9 Complete feature that can be configured by Users with a Client Admin role. 3. Check the I Agree box. 4. If applicable, complete the Preparer/Translator Certificate. This should only be completed and signed if Section 1 is prepared by a person other than the employee. 5. Click the Sign Form I-9 Electronically button. Preparer and/or Translator Certification This set of fields is used to record the name and address of the person that assisted the employee when filling out Section 1 information. Click the + (plus) button to show the Preparer/Translator Certification to display this optional signing section. Click the – (minus) button if you wish to hide the Preparer/Translator signing section from the Section 1 signature. Please refer to the Form I-9 guidelines and your organization's policies on when I-9 Complete User Guide | 9 to offer assistance and how to store information on the preparer or translator who provided this assistance. The following fields must be completed by the preparer or translator when completing this certification during Section 1 signing: • Last Name - Have the preparer or translator enter their last name. • First Name - Have the preparer or translator enter their first name. • Date – Date Section 1 was completed by the preparer or translator in the format of mm/dd/yyyy. • Answer and Confirm Answer - Have the preparer or translator answer the question and confirm the entry as a way to record their electronic signature. • Preparer’s/Translator’s Address - Have the preparer or translator enter their complete mailing address. o Street Name and Number o City o State o Zip Code • Attestation – Have the preparer or translator check the attestation box. I-9 Complete User Guide | 10 Section 1 Electronic Employee Signature with Preparer/Translator Certificate Displayed Section 1 Paper Employee Signature with Preparer/Translator Certificate Displayed Under Age 18 Employees When I-9 Complete detects that an employee is under the age of 18, a warning prompt appears during the signing process to inform you when to follow special rules. Based on which identity and work authorization documents the employee has will determine how to handle this scenario. Refer to the USCIS I-9 Handbook for Employers (M-274) for more information about the legal requirements. You cannot use the Remote Hire link for Employees under the age of 18. If the employee is under the age of 18 and cannot produce an acceptable List A or List B document, check the box directly beneath Provide an Electronic Signature. This will require having a parent or guardian sign as the Preparer/Translator in Section 1. I-9 Complete User Guide | 11 Section 1 Employee Signature for New Hire Under the age Of 18 Employee Receipt At any time after signing Section 1, a .pdf copy of Form I-9 is available under the Audit History section for viewing, emailing, or printing as necessary. Location of Form I-9 Under the Audit History Section I-9 Complete User Guide | 12 Amend Section 1 If any changes are made to Section 1 after the new hire has signed it, it must be amended electronically in order to make those changes permanent in the Form I-9 Audit History. I-9 Complete recognizes when a change has occurred to Section 1 and alerts the I-9 Manager that it must be amended through a popup window. The I-9 Manager needs to select who is amending Section 1 from the Editor’s Identity dropdown menu and then h a v e the appropriate person check the I Agree checkbox and click Save & Acknowledge Updates. If Employee is selected as the editor, they may be prompted to re-answer the signature question that was posed to them when they initially signed Section 1. USCIS Best Practices states that the Employee should be making any changes needed to Section 1. Popup Window That Appears When Section 1 Needs to Be Amended The Electronic Amendment will appear at the bottom of the Section 1 tab of Form I-9 and under the Audit History Section of the Summary tab. I-9 Complete User Guide | 13 Amendment Editor and Date Documented On Section 1 Tab Section 1 Amendment Recorded Under Audit History I-9 Complete User Guide | 14 Section 2 Section 2 on the Form I-9 page is the place where the employer is required to enter information related to employment and eligibility. The I-9 Manager requests documentation from the employee and enters the provided information according to a strict set of rules. After following the verification rules and saving required information, Section 2 must be signed by a representative of the organization to store the information in the Form I-9 Audit History. Form I-9 Section 2 Section 2 Data Entry Employers must complete Section 2 by examining evidence of identity and employment authorization within three business days of the date employment begins. However, if an employer hires an individual for less than three business days, Section 2 must be completed at the time employment begins. If an employee is unable to present a required document I-9 Complete User Guide | 15 (or documents), the employee must present an acceptable receipt(s) in lieu of an acceptable document(s). In Section 2 you can enter or modify information in one or more fields. Section 2 is broken up into Employment Verification Documents and Employment Information. Employment Verification Documents When Section 2 documents have not yet been selected on the Form I-9, the following is shown. You must click on any of the List A, B or C dropdowns to select the document(s) that has been presented by the employee. Section 2 Documents before selection Selecting List A or List B and List C Documents The popup window that appears when you click on any of the dropdowns to select documents while completing Section 2 is displayed below. Options available are based on the employee’s employment status selected in Section 1. In the following example the employee is listed as a citizen of the United States according to Section 1 and the available set of documents includes only legally acceptable documents that a citizen of the United States can present. I-9 Complete User Guide | 16 Section 2 Document select window When a document is selected, a full Description appears to the right along with Samples and Doc. # Locator and E-Verify Info. Once you have selected a List A or a List B and a List C document, you can click Continue with Selected Document(s) button to continue. Entering Document Details After selecting the document types and clicking Continue with Selected Document(s) to close the document selector window, Section 2 will refresh and allow you to enter details about the List A or the List B and List C document types selected. The I-9 Manager must review the documents in person and enter the Issuing Authority, Document Number, and the Expires date if applicable. Issuing Authority - Enter the federal, state, local, or other entity that issued the document presented by the new hire. The Issuing Authority may have a default value that automatically appears, which should be modified to match the actual document. Document # - Enter the full document number for the document presented by the new hire. I-9 Complete User Guide | 17 Expires - Enter the expiration date for the document selected and presented as evidence. For document types that do not have an expiration date like a Birth Certificate, the Expires textbox is disabled. In most cases when the document requires an expiration date, the Expires date must not be in the past. Certain Section 2 documents can have a blank expiration date to account for exception cases (e.g. Washington State Driver's License, legacy Alien Registration Receipt Card). An alert message pop-up appears when a Section 2 document expiration is blank. Attach File - Scan all documentation as part of the Form I-9 process, browse to the scanned file on your system to attach it to the record. The document should be scanned copy of the document in GIF, JPG, or PDF format. Upon saving the section, the file is uploaded to the I-9 Complete web portal and stored with the I-9 record. Employee presented and acceptable receipt in lieu of an original document Check this box if the employee provided employment eligibility document receipts so that you can receive reminders when work authorization documents are due. When the List B document Driver's License or Non-driver's ID Card is presented, a few additional fields are required: Driver license/ID - Select whether the document is a Driver's License or ID Card from the dropdown. State – Select the state that issued this document from the dropdown. When the citizenship status is "alien authorized to work" and the employee presents the List A document Foreign Passport with I-94, additional fields will be displayed which must be entered: Country of Issuance – Select the country that issued the foreign passport from the dropdown. I-94 Issuing Authority - This will be pre-populated with 'DHS.' I-94 Document # - This is also known as the 'admission number.' I-94 Expires - Enter the expiration date found on the I-94. For some visa holders, the I-94 may be stamped "D/S" for duration of stay. If this is the case, the employee must also present either the Form I-20 or Form DS-2019 (these can be selected from the Additional Documents dropdown). Selecting either of these will display additional fields to record the Issuing Authority, Document #, and Expires date. With either choice, the D/S box next to the I-9 Expires field should be checked. Note: I-9 Complete displays error messages when invalid data is entered into any of these fields and requires you to correct the information in order to proceed and save Section 2. I-9 Complete User Guide | 18 Example List B and List C Documents Selected For A U.S. Citizen Example List A Document Selected For an Alien Authorized To Work I-9 Complete User Guide | 19 Changing Selected Documents Once document information is entered and before the E-Verify process has begun, a Click here to Clear Documents link appears directly above the Employment Verification Documents that were selected. Clicking this link allows you to reset the document selector and start over. It is important to note that clearing the documents also clears any data entered for the previously selected documents such as document number, attachments, and expiration date. Employment Information Enter the following information: • Employer – By default, The University of Maryland is selected. This selection appears on the Form I-9. • Worksite - Select the correct Worksite for the employee from the dropdown list, which includes the all units the I-9 manager has access to. This worksite address appears on the Form I-9. • Business Name – This field displays the Business Name and Address that will appear in Section 2 of the Form I-9. • Date employee began employment - Enter the date the employee began employment at the company in the format of mm/dd/yyyy. This field is critical and determines various deadlines for signing and processing the Form I-9. • Employee hired for three days or less – Check this box if applicable. This will also determine various deadlines for signing and processing the Form I-9. Section 2 Employment Information Fields Employer Signature The employer representative must sign section 2 of the I-9 record. Electronic Signature I-9 Complete User Guide | 20 Section 2 Electronic Employer Signature Process To sign Section 2 the I-9 Manager is required to: 1. Read the Certification text 2. The Enter your legal name and title textbox will already contain the full name of the logged in I-9 Manager User and cannot be edited. 3. The Title or Position textbox will already contain the title of the logged in I-9 Manager and cannot be edited. 4. Click the I Agree checkbox. 5. Click the Sign Form I-9 Electronically button to complete the electronic signature of Section 2. Amend Section 2 If any changes are made to Section 2 after the I-9 Manager has signed it, you must electronically amend the document to make those changes permanent in the Form I-9 Audit History. I-9 Complete recognizes when a change has occurred to Section 2 and alerts the I9 Manager to amend the section through a popup window. I-9 Complete User Guide | 21 Popup Window That Appears When a Change Has Been Made To Section 2 Check the I Agree box and click Save & Acknowledge Updates to amend the section. The Electronic Amendment will appear at the bottom of the Section 2 tab of Form I-9 and under the Audit History Section of the Summary tab. Amendment Editor and Date Documented On Section 2 Tab I-9 Complete User Guide | 22 Section 2 Amendment Recorded Under Audit History Section Section 3 The most common usage for Section 3 of the Form I-9 is to re-verify employees whose employment eligibility is expiring. The updating and re-verification of expiring work authorization is a key component of keeping Form I-9 records compliant. The Section 3 tab is located under the Form I-9 tab Section 3 Tab The Section 3 tab is accessible from the Form I-9 tab only after both Section 1 and Section 2 have been signed. Once the Form I-9 has been completed, Section 3 information can be added to the I-9 Record by clicking the Create New Section 3 bar at the bottom of the Section 3 tab. I-9 Complete User Guide | 23 Form I-9 and Create New Section 3 Bar Add Section 3 - New Name Adding Section 3 information to an I-9 Record can be used to record changes to an employee's name. Updating the name will NOT update the entire I-9 Record, and all previously signed Form I-9 items are preserved for comparison. To record an employee's new name, click the Create New Section 3 bar. Enter the new version of the employees name in the Last Name, First Name, and Middle Initial (if applicable) Name Fields under Step A. Review the certification statement in the Employer Electronic Verification Section (Step E), check the I Agree box and sign using electronic or paper signature. Click the Sign Form I-9 Electronically button to complete the process. Section 3 add New Name Add Section 3 - Rehire Employee One reason for adding Section 3 information to an I-9 Record is to rehire an employee within three years of the date the initial Form I-9 was originally completed. Consult your organization policy manual to determine if Section 3 should be used to rehire a previous employee or if a new Form I-9 should be created instead. To rehire an employee, click the Create New Section 3 bar. Enter the Date of Rehire under Step 3 and remember that if the termination date was set previously, it will be automatically cleared after this section is signed. For rehired employees that have expired work authorization documents or need to provide new evidence of employment eligibility, fill out the Employment Verification Documents section (Step B) as described in Add Section I-9 Complete User Guide | 24 3 – Re-verification below. The New Name fields (Step A) can be used to update the employee's name at the same time if applicable. (see above) Finally, review the certification statement in the Employer Electronic Verification section (Step E) and sign using the electronic or paper signature. Click the Sign Form I-9 Electronically button to complete the process. Section 3 Rehire Employee Add Section 3 – Re-verification The most critical reason for adding Section 3 information to an I-9 Record is to re-verify employment eligibility when work authorization documents are about to expire. An employee must provide new or updated proof of employment eligibility on or before their current employment eligibility document expires. To re-verify an employee, click the Create New Section 3 bar. Under Employment Verification Documents (Step B) click on the Document Type drop-down menu and select a document from List A or C as shown in the Document Selection pop-up. (NOTE: List B documents never require re-verification.) Next enter the Issuing Authority, Document #, and Expires date similar to filling out document information in Section 2. The employee may also present a receipt in lieu of an original document. The same guidelines apply for Section 3 Receipt Re-verification as those for Section 2. The New Name fields can be used to update the employee's name at the same time if applicable. (see above) Finally, review the certification statement in the Employer Electronic Verification section and sign using electronic or paper signature. Click the Sign Form I-9 Electronically button to complete the process. Section 3 Re-verification Document Selection Pop-Up I-9 Complete User Guide | 25 Section 3 Employment Verification Documents Delete Section 3 A Section 3 item can be removed from the I-9 Record at any time if it was added by m i s t a k e or if the information entered was not accurate and needs to be re-entered. Click the Delete button on any Re-verified section listed on the Section 3 tab to permanently remove it. You will be prompted to confirm the operation, which cannot be undone. Section 3 items cannot be edited and can only added to or deleted from the I-9 Record. To preserve the Form I-9 Signing History and change report, deleting a Section 3 will update the history to reflect the removal of the signed Section 3. Delete Section 3 I-9 Complete User Guide | 26 Audit History Showing Section 3 As Deleted Notes and Tasks Fields I-9 Managers can use the Notes field under the Employee Profile Enter any additional information in the Notes field. It is recommended that each I- 9 Manager tags notes they entered with their initials and a date for clarity and makes sure not to erase notes entered by other I-9 Managers. This field does not appear on the printed Form I-9. Form I-9 Section 3 Addendum Unlike the paper Form I-9 that is limited to one Section 3, Tracker I-9 allows you to add more than one Section 3 to any I-9 Record. In order to support multiple Section 3 items when viewing, saving, and printing the Form I-9 PDF, I-9 Complete adds an addendum to the end. Each addendum page can display information for up to four Section 3 items associated with the I-9 Record and as many addendum pages can be added as necessary. Section 3 items displayed on the Updating and Re-verification Page and on the Form I-9 PDF are always sorted in date signed order, from the earliest to the latest. Re-verification Rules - Expiration Dates An I-9 Record displays the next action as Re-verification Due with a due date for when the employee's authorization will expire. I-9 Complete follows a number of rules to determine the earliest date that re-verification will be required. The rules are in place to ensure re-verification alerts are as early as may be necessary given the complexity of many employment eligibility situations and work authorization documents. When an I-9 Record does not have a Section 3, the due date is calculated as the earliest of the Section 1 employee supplied alien authorized to work date OR the Section 2 expiration date for a List A or List C document. I-9 Complete User Guide | 27 After at least one Section 3 has been completed with a List A or C document, the due date is calculated as the expiration date of the List A or C document for the most recently signed Section 3. Validation Alerts The Form I-9 Validation Alerts box appears on the Summary tab of the Form I-9 page, providing error and warning alerts to ensure the Form I-9 is created and signed in a compliant manner. There are three types of Validation Alerts that can be shown based on the problems and issues located. Section 1 And 2 Alerts for an I-9 Record Form I-9 Validation Alerts Key Curable Error Must be fixed before signing either Section 1 or 2. Incurable Error Form I-9 compliance issues that cannot be fixed but can be addressed via an audit. Warning For Form I-9 fields that are not required and for general areas of concern. I-9 Complete User Guide | 28 Handling Curable Errors All curable errors listed for a section must be corrected before that section can be signed. When you try to sign or re-sign Section 1 or 2, a red error message will appear if there are curable errors that must be fixed. Handling Incurable Errors Incurable errors can arise that cannot be fixed given the existing data in the I-9 record. For example if Section 1 is not signed as of the Start Date and instead signed the next day, an incurable error is listed in the Validation Alerts box. Since it is too late to fix this issue, an incurable error remains with the I-9 record. Handling Warnings The Form I-9 Alerts box lists warnings, which are general areas to be concerned with, including optional data fields that you might have missed by mistake. Warnings are not a major concern most of the time, but can alert you by providing useful assistance and suggestions. Create a New Remote Access Form I-9 The New Remote Access Form I-9 feature in Tracker I-9 Complete allows employees to complete Section 1 remotely. This feature will send an email to the new hire with a link to a web form so that they can fill out their Form I-9 Section 1 securely from home or at their desk. Steps to Create a New Remote Access Form I-9 1. Click Create New I-9 from the Dashboard page or Create New Form I-9 from the Manage I-9 menu. 2. Click Create New I-9 for New Employee option from the Create I-9 Wizard popup. 3. Enter the employee's First Name, Last Name, Employer, and Worksite. The Middle Name, Other Names Used (if any), Social Security Number, Employee ID, Employee Email Address, Date of Birth and I-9 Manager fields are all optional for this step. Click Save. 4. Click Create a New Form I-9 and select the Create a New Remote Access Form I-9 radio button. 5. Enter the employee’s Start Date and Email Address and click Continue. 6. A confirmation popup message will appear. Click OK to proceed. 7. The next action due for this employee under their Progress Bar will appear as Complete Section 1. 8. An email message will be sent to the employee's email address welcoming them to the University of Maryland and requesting they click a link to complete Section 1 of the Form I-9. I-9 Complete User Guide | 29 9. The responsible I-9 Manager has three days from the start date to complete Section 2 in person with the employee who will present their work authorization documents for inspection. Create a New Remote Access Form I-9 E-Verify E-Verify is a process used to verify a new hire’s identity and authorization to work in the United States. Once you have completed the Form I-9 for a new employee by filling and signing Section 1 and Section 2, an E-Verify tab will open next to the Form I-9 tab and you will land on the E-Verify: Preview and Verify Case Details page. Here you can preview the Form I-9 information, make changes, and/or send immediately to E-Verify by clicking the Verify and Submit to E-Verify button. After submitting the Form I-9 to E-Verify, you will typically receive a response within a few moments. I-9 Complete User Guide | 30 E-Verify: Preview and Verify Case Details The following are the two most common scenarios encountered when using EVerify. For assistance with E-Verify, contact the I-9 helpdesk. Employment Authorized If the Form I-9 has been filled out correctly, the new hire is eligible for work in the United States, and the information provided matches the information found in the DHS and SSA databases, the E-Verify case will receive a response of Employment Authorized. Per the USCIS, ~98% of all employees are automatically confirmed as authorized to work (‘work authorized’) either instantly or within 24 hours. I-9 Complete User Guide | 31 E-Verify Case – Employment Authorized Select the appropriate employment status of the employee and click Continue. I-9 Complete User Guide | 32 Final E-Verify Step Lastly, provide case closure details by selecting the appropriate radio button and click Continue. The E-Verify case will be closed and you can click Exit E-Verify I-9 Complete User Guide | 33 E-Verify Case Closed Tentative Non-confirmation Even if all information has been entered correctly, the details provided by the new hire may not match the information found in the DHS or SSA databases. When this happens, an SSA or DHS Tentative Non-confirmation (TNC) is issued. The guidelines on the screen will help determine how to proceed in this case. The TNC notice must be reviewed with the employee (in private) as soon as possible. To proceed with the TNC review process, click the Continue button and follow the additional steps. If the employee was not willing or able to review the TNC notice with you, click the Close Case button only and select from the case closure options. Important: Employers may not terminate, suspend, delay training, withhold or lower pay, or take any other adverse action against an employee based on the employee’s decision to contest the TNC or while the case is still pending with the SSA or DHS. I-9 Complete User Guide | 34 First you will receive a screen allowing you to Preview and Verify the case details. Next, Verify and Submit to E-Verify You may have another opportunity to Re-verify the Case Details I-9 Complete User Guide | 35 The next screen will prompt you to begin the SSA Tentative Nonconfirmation Process (TNC) I-9 Complete User Guide | 36 Begin TNC Process As noted in the instructions on screenshot below, the TNC process typically involves the following steps. Note: The instructions for both an SSA TNC and DHS TNC are identical. 1. Review the Further Action Notice and print a copy by clicking the Print Notice button if the notice will be signed on paper. Use the dropdown menus to designate printing the notice in either English or Spanish. 2. Tick the box acknowledging that the Employee has reviewed the Further Action Notice and 3. If signing Electronically, indicate whether or not the employee intends to contest the TNC by selecting the appropriate radio button under the Employee Signature. 4. Tick the box to designate the Employer Signature if the notice will be signed electronically. 5. If the Employee chooses to contest, Click the box to Refer Case. I-9 Complete User Guide | 37 TNC Print, Review & Sign Further Action Notice I-9 Complete User Guide | 38 An employee that chooses to contest a TNC must be referred to the SSA or DHS. Employees that choose to contest the TNC have eight federal government workdays to visit an SSA or contact DHS. Initiate the Referral process after completing the TNC Notice process To continue with the TNC process, you will need to follow the steps on the page that follows (see screenshot below): 1. Print the SSA Referral Date Confirmation Letter by clicking on the Print Notice button. Use the dropdown menus to designate printing the notice in either English or Spanish. 2. Provide the SSA (or DHS) Referral Date Confirmation Letter to the employee who has contested this SSA (or DHS) TNC. 3. Inform the employee that he or she has until the date indicated on the Referral Date Confirmation Letter to contact SSA (or DHS). 4. Check back here periodically for case status updates. E-Verify will let you know the date that they will update the case by. 5. Click Close Case if you have created the case in error. 6. Click Exit E-Verify to Continue. I-9 Complete User Guide | 39 Print, Review & Sign the TNC Letter Important: The employee must visit the SSA office in person or contact DHS within 8 federal workdays after you have completed the TNC process. Federal government workd a y s are Monday through Friday except for federal holidays. After the employee contacts the appropriate agency, in general SSA has 10 federal government workdays to update the case result in E-Verify while DHS will typically update the case result in 8 federal government work days. The SSA or DHS may send a resolution authorizing work, or may issue a Final Non-confirmation, or may request additional action. For a full list of outcomes and how to handle them, please see the full User Manual. Click Exit E-Verify. You can access the employee’s E-Verify case at any time to check for status updates. I-9 Complete User Guide | 40 Referred – SSA/DHS Decision Pending Photo Match The photo-matching step occurs automatically in I-9 Complete when you create a case for an employee who has presented a US Passport or Passport Card, Permanent Resident Card (Form I-551), or an Employment Authorization Document (Form I-766) for his or her Form I-9 documentation. When photo matching is required, you must 1) acquire and retain a copy of the employee’s document, and 2) fulfill the E-Verify photo-matching requirement. I-9 Complete displays an alert message reminding the User of this requirement in Section 2 when the employee will be subject to E-Verify. I-9 Complete User Guide | 41 Section 2 E-Verify Reminder Section 2 E-Verify Reminder The following screen will appear when a case that has been submitted to E-Verify requires photo matching. I-9 Complete User Guide | 42 E-Verify Match Photo Tracker I-9 Complete instructs the User to select the appropriate radio button indicating whether or not the photo displayed on the page matches that of the document that was provided by the employee. The photos should be identical, but you should take into account minor variances in shading and detail between the two photos based upon the age and wear of the employee’s document, the quality of your computer monitor, and the watermark on the photo in EVerify to protect it from unlawful use. Do not compare the photo displayed by E-Verify to the employee directly. The direct comparison between the document and the individual happens during Form I-9 completion, prior to using E-Verify. IMPORTANT: If "No Photo on this Document" with the E-Verify watermark appears as the Employee Photo, you should select the Yes radio button. After the selection is made, click Continue. If you indicate "Yes," then employment should be authorized and the case should be closed. Select the appropriate radio button to confirm whether or not the employee is still employed and click Continue. I-9 Complete User Guide | 43 E-Verify Employment Status Provide case closure details by selecting the appropriate radio button that represents the employee’s current employment status and click Continue. E-Verify Case Closure Details The E-Verify case is now closed. Click Exit E-Verify to return to the Employee Profile page. I-9 Complete User Guide | 44 E-Verify Case Closed If the photo displayed does not match the photo on the document provided by the employee, the No radio button is selected, and the User clicks Continue then the DHS TNC process will begin. The User will follow the same steps for the TNC process that are listed out earlier in this guide. I-9 Complete User Guide | 45 Photo Mismatch DHS TNC Process Reports Several important reports are available in Tracker I-9 Complete, to help you keep tabs on the I-9 records that you are managing and discover issues before they become problems. Many reports display the employee name as a hyperlink that when clicked, opens the I-9 record. Right click and choose to open the I-9 record in a new browser window or tab (depending upon browser version) in order to keep the report visible as you investigate specific records. I-9 Record Summary List To review I-9 records logon to I-9 Complete and select the I-9 Record Summary List View from the Reports dropdown. I-9 Complete User Guide | 46 Accessing the I-9 Record Summary List View You can filter your results by selecting one or more values from the Next Action Needed, Employer, Worksite and/or I-9 Manager dropdown lists and clicking the Apply Filter button. You can also limit your results by choosing one or more of the radio button options listed on the left hand side of the page and entering a corresponding date or range of dates. Employee I-9 Record Summary List View Employee I-9 Records displays a spreadsheet like view of your I-9 records. This list can help you quickly locate employees, check the status of their Form I-9 and access their I-9 Records. You can sort by column and hide and unhide columns. All data is exportable to excel. I-9 Complete User Guide | 47