1
Altibase Tool & Utilities
iLoader User’s Manual
Release 6.1.1
February 4, 2013
Altibase Tools & Utilities iLoader User’s Manual
Release 6.1.1
Copyright © 2001~2012 Altibase Corporation. All rights reserved.
This manual contains proprietary information of Altibase® Corporation; it is provided under a license agreement containing restrictions on use and disclosure and is also protected by copyright patent and other intellectual property law. Reverse engineering of the
software is prohibited.
All trademarks, registered or otherwise, are the property of their respective owners
Altibase Corporation
10F, Daerung PostTower II, 182-13,
Guro-dong Guro-gu Seoul, 152-847, South Korea
Telephone: +82-2-2082-1000
Fax: 82-2-2082-1099
Homepage: http://www.altibase.com
Content
Preface............................................................................................................................................................................. i
About This Manual.................................................................................................................................................................................... ii
Intended Audience.................................................................................................................................................................... ii
Software Environment ............................................................................................................................................................. ii
Organization ................................................................................................................................................................................ ii
Documentation Conventions................................................................................................................................................ ii
Related Documents................................................................................................................................................................... v
On-line Manuals.......................................................................................................................................................................... v
Altibase Welcomes Your Comments................................................................................................................................... v
1. iLoader Overview....................................................................................................................................................... 1
1.1 Introducing iLoader ..........................................................................................................................................................................2
1.1.1 What is iLoader? ...............................................................................................................................................................2
1.1.2 Uses.......................................................................................................................................................................................2
1.1.3 Functionality .....................................................................................................................................................................2
1.1.4 Advantages........................................................................................................................................................................2
1.1.5 How to Install iLoader ....................................................................................................................................................2
1.1.6 iLoader Settings ...............................................................................................................................................................3
1.1.7 Environment Variables ..................................................................................................................................................4
2. Using iLoader ............................................................................................................................................................. 7
2.1 Command-Line Options ..................................................................................................................................................................8
2.2 General Options..................................................................................................................................................................................9
2.2.1 Limitations of Options ................................................................................................................................................ 13
2.2.2 LOB Option ..................................................................................................................................................................... 13
2.3 Performance Options..................................................................................................................................................................... 18
2.3.1 Atomic Array INSERT ................................................................................................................................................... 19
2.3.2 Direct-Path INSERT ....................................................................................................................................................... 20
2.4 Using iLoader in Batch Mode...................................................................................................................................................... 22
2.4.1 Creating FORM Files .................................................................................................................................................... 22
2.4.2 Downloading Data....................................................................................................................................................... 23
2.4.3 Uploading Data ............................................................................................................................................................. 23
2.4.4 Execution Result Code................................................................................................................................................ 25
2.4.5 Using iLoader for Remote Database Access ....................................................................................................... 25
2.5 Using iLoader in Interactive Mode............................................................................................................................................ 28
2.5.1 Starting iLoader............................................................................................................................................................. 28
2.5.2 Creating FORM Files .................................................................................................................................................... 28
2.5.3 Downloading Data....................................................................................................................................................... 29
2.5.4 Uploading Data ............................................................................................................................................................. 29
2.5.5 Execution Result Code................................................................................................................................................ 29
2.5.6 Remote Access in Interactive Mode....................................................................................................................... 29
2.6 Online Help and Other Options ................................................................................................................................................. 32
2.6.1 Help ................................................................................................................................................................................... 32
2.6.2 Other Options ................................................................................................................................................................ 33
3. FORM Files................................................................................................................................................................ 35
3.1 About FORM Files............................................................................................................................................................................ 36
3.1.1 Writing SEQUENCE Statements .............................................................................................................................. 36
3.1.2 Modifying Date Format Strings in a FORM File.................................................................................................. 37
3.1.3 Writing Condition Clauses......................................................................................................................................... 41
3.1.4 Handling TIMESTAMP Columns ............................................................................................................................. 42
4. Troubleshooting and FAQs ..................................................................................................................................... 51
4.1 Troubleshooting.............................................................................................................................................................................. 52
4.1.1 Record Upload Failure ................................................................................................................................................ 52
4.1.2 FORM File Parsing Errors ............................................................................................................................................ 52
4.1.3 Performance Issues ...................................................................................................................................................... 53
4.2 FAQs ..................................................................................................................................................................................................... 54
iii
Preface
i
Preface
About This Manual
About This Manual
This manual describes how to use the iLoader utility.
Intended Audience
The following ALTIBASE® HDB™ users will find this manual useful:
•
database administrators
•
performance managers
•
database users
•
application developers
•
technical support workers
It is recommended that those reading this manual possess the following background knowledge:
•
basic knowledge in the use of computers, operating systems, and operating system utilities
•
experience in using relational databases and an understanding of database concepts
•
computer programming experience
•
experience in database server, operating system or network administration
Software Environment
This manual has been prepared assuming that ALTIBASE HDB 6 is used as the database server.
Organization
This manual is organized as follows:
•
Chapter1: iLoader Overview
•
Chapter2: Using iLoader
•
Chapter3: FORM Files
•
Chapter4: Troubleshooting and FAQs
Documentation Conventions
This section describes the conventions used in this manual. Understanding these conventions will
make it easier to find information in this manual and other manuals in the series.
There are two sets of conventions:
iLoader User’s Manual
ii
About This Manual
•
syntax diagrams
•
sample code conventions
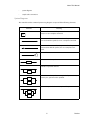
Syntax Diagrams
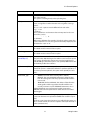
This manual describes command syntax using diagrams composed of the following elements::
Elements
Meaning
The start of a command. If a syntactic element starts with an
arrow, it is not a complete command.
Reserved
word
The command continues to the next line. If a syntactic element ends with this symbol, it is not a complete command.
The command continues from the previous line. If a syntactic
element starts with this symbol, it is not a complete command.
The end of a statement.
;
Indicates a mandatory element.
SELECT
Indicates an optional element.
NOT
ADD
Indicates a mandatory element comprised of options. One,
and only one, option must be specified.
DROP
Indicates an optional element comprised of options.
ASC
DESC
iii
Preface
About This Manual
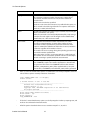
Elements
Meaning
Indicates an optional element in which multiple elements may
be specified. A comma must precede all but the first option.
ASC
DESC
,
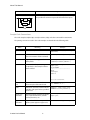
Sample Code Conventions
The code examples explain SQL, stored procedures, iSQL, and other command line statements.
The printing conventions used in the code examples are described in the following table.
Rules
Meaning
Example
[]
Indicates an optional item.
VARCHAR [(size)] [[FIXED |]
VARIABLE]
{}
Indicates a mandatory field for which
one or more items must be selected.
{ENABLE|DISABLE|COMPILE}
|
Argument indicating optional or mandatory fields.
{ENABLE|DISABLE|COMPILE }
[ENABLE|DISABLE|COMPILE ]
.
.
.
Indicates that the previous argument
is repeated, or that sample code has
been omitted.
iSQL> select e_lastname from
employees;
E_LASTNAME
-----------------------Moon
Davenport
Kobain
.
.
.
20 rows selected.
Other symbols
Symbols other than those shown
above are part of the actual code.
EXEC :p1 := 1;
acc NUMBER(11,2);
Italics
Statement elements in italics indicate
variables and special values specified
by the user.
SELECT * FROM table_name;
CONNECT userID/password;
Lower Case
Characters
Indicate program elements set by the
user, such as table names, column
names, file names, etc.
SELECT e_lastname FROM
employees;
Upper Case
Characters
Keywords and all elements provided
by the system appear in upper case..
DESC SYSTEM.SYS_INDICES_;
iLoader User’s Manual
iv
About This Manual
Related Documents
For more detailed information, please refer to the following document.
•
ALTIBASE HDB Installation Guide
•
ALTIBASE HDB Administrator’s Manual
•
ALTIBASE HDB Replication Manual
•
ALTIBASE HDB Precompiler User’s Manual
•
ALTIBASE HDB ODBC Reference
•
ALTIBASE HDB Application Program Interface User’s Manual
•
ALTIBASE HDB iSQL User’s Manual
•
ALTIBASE HDB Utilities Manual
•
ALTIBASE HDB Error Message Reference
On-line Manuals
Manuals are available at Altibase Customer Support (http://support.altibase.com/).
Altibase Welcomes Your Comments
Please let us know what you like or dislike about our manuals. To help us with future versions of our
manuals, please tell us about any corrections or classifications that you would find useful.
Include the following information :
•
The name and version of the manual that you are using
•
Any comments that you have about the manual
•
Your name, address, and phone number
When you need an immediate assistance regarding technical issues, please contact Altibase Customer Support (http://support.altibase.com/).
Thank you. We appreciate your feedback and suggestions.
v
Preface
About This Manual
iLoader User’s Manual
vi
1 iLoader Overview
1
iLoader Overview
1.1 Introducing iLoader
1.1 Introducing iLoader
1.1.1 What is iLoader?
iLoader is a utility provided by Altibase for downloading or uploading data in ALTIBASE HDB in units
of tables. Downloaded data will be saved as a text file, and the FORM file containing the structure
information of the table is necessary.
1.1.2 Uses
iLoader is mostly used for database migration or when backing up tables. However, because database schema and catalog information are not saved, care must be taken when using iLoader as a
backup utility.
1.1.3 Functionality
•
FORM file Creation
For creating FORM files for storing information about tables to be downloaded or uploaded.
•
Downloading Data
FORM files are used to save the database table data in files.
•
Uploading Data
Using FORM files, the data saved in the files are uploaded to the relevant database tables.
1.1.4 Advantages
The advantages of iLoader are as follows.
•
Data can be uploaded from one or more files.
•
Multiple input records can be uploaded to a single table.
•
Data can be uploaded to multiple tables at once.
•
Data can be appended to tables that already contain data, or can replace the data therein.
•
Data input and management can be made more systematic.
1.1.5 How to Install iLoader
iLoader is automatically installed when the ALTIBASE HDB package is installed. The executable file is
located in:
$ALTIBASE_HOME/bin
iLoader User’s Manual
2
1.1 Introducing iLoader
1.1.6 iLoader Settings
In order to connect to the server, iLoader requires the following information:
•
ALTIBASE_HOME
A path to a server or client installation
•
server_name
The name (or IP address) of a computer on which ALTIBASE HDB Server is running
•
port_no
The port number to be used when connecting via TCP or IPC
•
user_id
a User ID registered in the database
•
password
The password corresponding to the User ID
•
NLS_USE
The character set with which to display retrieved data to the user
ALTIBASE_HOME can only be set using an environment variable, while the other settings may be
made using command-line options. (For detailed information, please refer to “Batch Mode”.)
The ALTIBASE_HOME environment variable must be set in order to use iLoader. This is typically set
automatically when the server is installed, but, in the case of the client, must be set manually by the
user. We strongly suggest that you verify that this setting has been made properly, as the application
may not run correctly if this setting is not made.
port_no and NLS_USE can be set using the corresponding environment variables or the server settings file (altibase.properties). If these settings are made via all three methods, they will take priority
as follows, in descending order:
1.
command-line options
2.
environment variables
(ALTIBASE_PORT_NO, ALTIBASE_NLS_USE)
3.
server settings file (altibase.properties)
Therefore, when it is desired to connect using options other than those that have been previously
set, the command-line options can be used, thus making it unnecessary to change the settings in
the server settings file or the environment variables.
If these options have not been set, when iLoader is executed for the first time, the user will be
prompted to enter the corresponding variables. At this time, it is essential to enter values that are
valid and follow the proper format, otherwise iLoader may not run properly.
However, if the NLS_USE option in particular has not been set, no command prompt will appear at
3
iLoader Overview
1.1 Introducing iLoader
the time of execution. Instead, US7ASCII will be used, and a connection attempt will be made. In
such instances, if the server is not using US7ASCII, the application will not execute properly, or some
of the users’ data could become corrupted. Thus it is paramount that NLS_USE be set to the value
that matches the usage environment.
In order to ensure stable iSQL operation, we strongly recommend that the following environment
variables be set:
•
ALTIBASE_HOME: the path to a server or client installation
•
ALTIBASE_PORT_NO: the port number to use to connect to the server
•
ALTIBASE_NLS_USE: the character set to use to display retrieved data to the user
•
PATH: the path containing the executable file, which must equal $ALTIBASE_HOME/bin
1.1.7 Environment Variables
1.1.7.1 ALTIBASE_HOME
This is used to set the directory in which the package is installed.
In the case of MS Windows, this is set automatically when the server is installed, but when the client
is installed, it is not set automatically due to the risk of conflict with the corresponding environment
variable for the server. It must therefore be set manually by the user at the time that the client is
installed.
This environment variable must be set in order to use iLoader.
Ex)
Windows (Server): ‘set ALTIBASE_HOME=C:/Program Files/Altibase/
Altibase5_Server/altibase_home’,
Windows (Client): ‘set ALTIBASE_HOME=C:/Program Files/Altibase/
Altibase5_Client/altibase_home_client’)
1.1.7.2 ALTIBASE_PORT_NO
This indicates the port number on the server with which a connection is to be established. This can
be set using the -PORT option or altibase.properties.
If no designated port number can be found (in descending order of precedence) in the -PORT
option, in the environment variable ALTIBASE_PORT_NO, or in altibase.properties, a prompt to enter
the port number will appear.
1.1.7.3 ALTIBASE_NLS_USE
This sets the character set that is used when data are downloaded or uploaded.
•
When downloading: data received from the server are saved in the specified character set.
•
When uploading: sets the character set for data to be transmitted to the server.
Note: when uploading data, if the character set of the database is different from the value specified
iLoader User’s Manual
4
1.1 Introducing iLoader
using the ALTIBASE_NLS_USE environment variable, the data may not be uploaded normally.
Please be sure to set the correct value for this variable.
•
One of the following character sets may be set to ALTIBASE_NLS_USE.
—
—
—
—
—
—
—
—
US7ASCII
KO16KSC5601
MS949
BIG5
GB231280
UTF8
SHIFTJIS
EUCJP
If the character sets used by the server and client are different, the character data will be converted
accordingly. It is recommended to synchronize the character sets between server and client before
using iLoader for two reasons as follows :
•
It takes additional CPU time to convert character data according to the character set.
•
If the character data are converted to target character set, data loss can occur.
The client character set can also be set using the -NLS_USE option or in altibase.properties. If
NLS_USE is not specified using the -NLS_USE option, the environment variable ALTIBASE_NLS_USE,
or altibase.properties (in descending order of precedence), then US7ASCII is used as the default
character set.
5
iLoader Overview
1.1 Introducing iLoader
iLoader User’s Manual
6
2 Using iLoader
This chapter explains how to use iLoader. The various options provided by ALTIBASE HDB can be
used with iLoader. iLoader can run in batch mode or in interactive mode. Command-line options are
used when running iLoader in batch mode.
7
Using iLoader
2.1 Command-Line Options
2.1 Command-Line Options
The command-line options supported by ALTIBASE HDB include general options and options for
improving performance.
•
General Options
•
Performance Options
The general options and performance options are all listed below. They are explained in the next
section.
iloader [-h]
[-s server_name] [-u user_name] [-p password]
[-port port_no] [-silent] [-nst] [-displayquery]
[-NLS_USE nls_name]
[-prefer_ipv6]
[{ in | out | formout | structout | help }
[-d datafile or datafiles] [-f formatfile]
[-T table_name] [-F firstrow] [-L lastrow]
[-t field_term] [-r row_term] [-mode mode_type]
[-commit commit_unit] [-bad badfile]
[-log logfile] [-e enclosing] [-array count]
[-replication {true | false}] [-split number]
[-readsize size] [-errors count]
[-lob lob_option_string] [-atomic]
[-parallel count] [-direct]
[-rule csv]]
iLoader User’s Manual
8
2.2 General Options
2.2 General Options
iLoader is run with the following options. Where applicable, default values are shown.
Factor
Description
-S|-s server_name
The server_name
When connecting in IPC, if this option is specified, it is ignored and
no error is raised regardless of the operating system.
It can be a host name, an IPv4 address, or an IPv6 address. An IPv6
address must be enclosed by a left square bracket([) and a right
square bracket(]).
For example, in the case of localhost (meaning this computer), localhost can be specified as the host name, 127.0.0.1 as the IPv4
address, or [::1] as the IPv6 address. For more information about
the IPv6 address notation, please refer to the ALTIBASE HDB Administrator's Manual.
-U|-u user_name
The user ID
-P|-p password
The user password
-PORT port_no
Specifies the port number for connecting via TCP/IP or IPC. However,
when connecting in a Unix environment via IPC, this option can be
omitted. If it is specified, it is ignored and no error is raised. To connect via TCP, first set 'ISQL_CONNECTION=TCP' on the client and then
enter the PORT_NO.
To connect via IPC in a Windows environment, set the environment
variable 'ISQL_CONNECTION=IPC' and specify the port number using
one of the following:
•
•
•
the -PORT option
the ALTIBASE_IPC_PORT_NO environment variable
the IPC_PORT_NO property in altibase.properties
If the environment variable ISQL_CONNECTION is not set to IPC and
the -PORT option is omitted, the port number will be checked for first
in the environment variable ALTIBASE_PORT_NO and then in the
PORT_NO property in altibase.properties, and if it is not set in either
of those places, a prompt to enter it will be raised.
-NLS_USE charset
Specifies the character set with which to process data at client side.
For more details, see 1.1.7.3 ALTIBASE_NLS_USE
9
Using iLoader
2.2 General Options
Factor
Description
-prefer_ipv6
This option determines the IP address to be connected first when a
host name is given for the -s option.
If this option is specified and a host name is given for the -s option,
this means that resolving the host name to the IPv6 address is prefered.
If this option is omitted, iloader connects to the IPv4 address by
default.
If it fails to connect to the prefered IP version address, an attempt is
made to connect using the other IP version address.
For example, when localhost is given for the -s option and this
option is specified, iloder first tries to connect to the [::1] IPv6
address. If this attempt fails, iloder proceeds to connect to the
127.0.0.1 IPv4 address.
in | out | formout | structout | help
Sets the direction in which to copy data (it is essential that only one is
set)
•
•
•
•
•
in:
Copy from a file to a database table.
out:
Copy from a database table to a file.
formout: Make a table format file (FORM file).
structout: Performs a function similar to that of formout. Used
to create a structure matching that of a given table. (Used when
creating a client application.)
help:
Explain how to use help.
-T table_name
The name of the table to be copied. If you use double quotation
marks to enclose this, this is case-sensitive when you execute iLoader
in interactive mode. Since the table name is already written in the
FORM file, this option is ignored when uploading or downloading
data.
-d datafile(datafiles)
The full path of the data file used when copying data from the database to the file or from the file to the database. Not used with formout.
A maximum of 32 filenames can be entered. A consecutive series of
files can be specified and used only when uploading data.
When multiple files are specified using the -d option, they are
uploaded in the order that the filenames are entered.
Moreover, when this option is used together with the parallel option
during a download operation, at least as many files as the number
specified in the parallel option are created.
-rule csv
This specifies the format of the data file as csv. This option cannot be
used in conjunction with the -t or -e options. Otherwise, an error will
be raised. If none of the -t, -r, -e or -rule csv options are set, csv is used
by default.
-f formatfile
The full path of formatfile, created by a previous call to iLoader.
-F firstrow
The line number of the first row to be copied (default is 1).
This option is meaningful only when uploading data.
iLoader User’s Manual
10
2.2 General Options
Factor
Description
-L lastrow
The line number of the last row to be copied (default is the line number of the last row).
This option is meaningful only when uploading data.
-t field_term
The delimiter between fields. The default is ’^’. %t signifies a tab character, %n signifies a newline character and %r signifies a carriage
return.
The -t, -r and -e options must be different from each other.
e.g.) -t ^%t
<Caution>
It is inadvisable to use characters that are interpreted on the command line, such as:
' " \ &
as delimiters.
When using delimiters (for example “#”) at the iLoader prompt, they
can be entered as -t # or “#”. At a general command prompt, they can
be entered as -t #, ‘#’ or “#”.
-r row_term
row terminator (default is '\n '.)
The details are the same as for the -t option.
-e enclosing_term
Block delimiter for enclosing fields.
The details are the same as for the -t option.
-lob lob_option_string
(see LOB Option)
Because the maximum allowable size of LOB data is 4GB, problems
may arise when LOB data larger than 2GB are saved on 32-bit operating systems. Therefore, this option can be used to specify how to
handle LOB type data. If this option is not specified, LOB columns will
be handled just like other columns.
-replication true | false
This option specifies whether to perform replication when uploading
data. If this option is omitted, the default is to perform replication, so
in order to prevent replication, this option must explicitly be set to
false.
-mode mode_type
•
•
-bad badfile
If one or more errors occur during an upload operation, this option
saves rows that were not uploaded in badfile. Not saved if not specified.
If stdout or sterr (must be in lowercase) is specified for this option, no
file is created. Instead, the rows are output to stdout (standard out) or
stderr (standard error).
APPEND: This adds data to existing tables. (default)
REPLACE: This uses the DELETE statement to delete all data
from the existing table and then populate the table with the
new records.
•
TRUNCATE: Similar to REPLACE, this deletes all data from the
existing table and then populates the table with the new
records, however it uses the TRUNCATE statement to do so.
TRUNCATE affords some performance benefits compared to
REPLACE, but cannot be performed on tables that are associated
with triggers.
11
Using iLoader
2.2 General Options
Factor
•
Description
-log logfile
Maintains a record of iLoader execution while iLoader is running.
The start time, end time, number of target rows, number of processed rows, number of erroneous rows, and error details are
recorded here.
It will not be saved unless specified.
If stdout or sterr (must be in lowercase) is specified for this option, no
file is created. Instead, the log information is output to stdout (standard out) or stderr (standard error).
-split n
Specifies the number of records to copy to each file (only meaningful
when used with the -out option).
After the command is executed, multiple backup files, each storing a
number of records equal to n and having the names datefile.dat0,
datafile.dat1, etc... will have been created.
-errors count
This specifies the maximum number of allowable errors when
iLoader is executed with the -in option. If the number of errors
exceeds the number specified here, execution terminates. If this
option is omitted, the default is 50. If this value is set to 0, execution
continues regardless of the number of errors.
The number of errors occurring during the uploading operation may
exceed the number specified here.
When this option is used in conjunction with the -parallel option, if
the number of errors exceeds the specified value for one of multiple
threads executing in parallel, all threads are terminated.
-partition
If the table specified using the -T option is a partitioned table, a number of FORM files equal to the number of partitions in the table will
be generated. The name of each FORM file will have this structure:
[formfile_name.partition_name]. If the specified table is not a partitioned table, one FORM file, named formfile_name, will be generated.
If the -S, -U and -P command-line options are omitted, the user will be prompted to enter the
values of these options manually at the time of execution.
iSQL> CREATE TABLE test (i1 integer);
Create success.
$ iloader formout -T test -f test.fmt
------------------------------------------------------Altibase Data Load/Download utility.
Release Version 6.1.1.1
Copyright 2000, ALTIBASE Corporation or its subsidiaries.
All Rights Reserved.
------------------------------------------------------Write Server Name (default:localhost) :
Write UserID : sys
Write Password :
ISQL_CONNECTION : TCP
•
If “iloader” is entered without any options at a shell prompt, the iLoader> prompt appears, and
work can be conducted in interactive mode.
•
All of the options described above are case-sensitive except for -S, -U, and -P.
iLoader User’s Manual
12
2.2 General Options
•
The -in | -out | -formout option must be entered before any of the other command options.
2.2.1 Limitations of Options
Field delimiters, row delimiters and block delimiters cannot be subsets of each other. In other words,
the field delimiter must not contain the row delimiter, and the row delimiter must not contain the
field delimiter. Moreover, column values cannot contain these delimiters.
For example, if the field delimiter is ‘-’ and the row delimiter is ‘-#’, a row having 3 columns would be
displayed as follows:
Honggildong-027551234-Seoul-#
In this case, the third ‘-‘ would be recognized as another field delimiter, so the row would be handled
as though it had 4 columns and no row delimiter.
In the case below, although the field delimiter, which is ’-‘, is not a subset of the row delimiter, which
is ’##’, the second and third dashes (‘-‘), which are part of the data in the second column, are erroneously recognized as field delimiters.
Honggildong-02-755-1234-Seoul##
Therefore, the delimiters must be selected carefully because of the possibility that they will be incorrectly handled.
In Windows, lines end with both a line feed and a carriage return('\r\n'). So when you write a datafile
manually and upload it, '\r\n' must be specified for the row terminator.
For example, when uploading a data file which is in csv format with '\r\n' for a row terminator, the
following options would be specified.
iloader in [-T table_name] [-f formatfile] [-d datafile] [-r %r%n] [-rule
csv]
2.2.2 LOB Option
The user can specify how LOB columns are handled by entering lob_option_string after the -lob
option. To specify multiple keywords (see below), use the -lob option repeatedly on the same line,
each -lob option being followed by its own lob_option_string, enclosed in double quotation marks.
The keywords for lob_option_string are as follows:
The user can determine how a LOB column is processed by specifying lob_option_string after -lob
option.
•
use_lob_file
•
lob_file_size
•
use_separate_files
•
lob_indicator
13
Using iLoader
2.2 General Options
2.2.2.1 use_lob_file
use_lob_file = {yes|no}
Determines whether LOB data expressions refer to external files (LOB files).
Either value can be used when iLoader is copying data in either direction (“in” or “out”).
For information on LOB file naming conventions, please refer to the description of the lob_file_size
option.
2.2.2.2 lob_file_size
lob_file_size = file_size
Specifies the maximum size of a LOB file. If the use_lob_file option is set to yes and this option is not
specified, the size of the external file is only limited by the operating system’s file size limit. When the
file size is limited by the operating system or the platform, it is recommended that this option be set
to 2 GB or less on platforms on which the long data type is 4 bytes.
This option is applicable only when the iLoader data copy direction is “out”. iLoader ignores this
option when the data copy direction is “in”. When the data copy direction is “in”, the size of the first
LOB data file is taken as lob_file_size.
If this option is set without the use_lob_file option being specified, it is inferred that use_lob_file =
yes.
If the size of LOB data to be dumped exceeds the size specified in this option, a new file is created,
and the data dump continues.
The file size is represented in 'number + unit’ format. The number can be represented to one decimal
place. The number cannot be 0.
The units that can be used for the file size are “T” and “G”. “T” indicates terabytes and “G” indicates
gigabytes. If no units are specified, gigabytes are used by default.
The name of each LOB file is determined by removing the filename extension from the original data
file name and appending _serialNumber.lob thereto. The serial number has 9 digits. If the number of
digits in the serial number is less than 9, the leftmost positions of the serial number are filled with 0’s
(zeroes). The serial numbers start at 1. If a data file is split into several files using the -split option, a
data file number is appended to each LOB file name.
For example, if the option
-d dump.dat -lob "lob_file_size-uG".
is specified, the following LOB files are created:
Total amount of LOB data: T GB
Size of each resulting file: u GB
dump_000000001.lob
dump_000000002.lob
...
dump_n.lob (T - un
where n = int(T /
iLoader User’s Manual
(u Gbytes)
(u Gbytes)
GBytes)
u), preceded by 0
14
2.2 General Options
2.2.2.3 use_separate_files
use_separate_files = {yes | no}
When processing LOB files, this option determines whether to save each LOB data item (i.e. contents
of one cell) in a separate file. This option assumes that use_lob_file is set to yes.
If this option is set to yes and lob_file_size is also specified, an error occurs.
When this option is set, folders having the same names as tables and columns are created and LOB
data from these columns are saved in data files in numeric order according to row. The row numbers
start from 1 and have 9 digits. If the number of digits in the row number is less than 9, the leftmost
positions of the row number are filled with 0’s (zeroes).
For example, if columns C1 and C3 of table t1, which has 3 columns, are LOB type columns, and
-d d.dat -lob "use_separate_files=yes"
is specified, the following LOB files are created.
•
t1/C1/000000001.lob
•
t1/C1/000000002.lob
•
t1/C3/000000002.lob
•
t1/C3/000000002.lob
When this option is set, the path of the LOB file is written in the corresponding data cell in the LOB
column in the data file. However, if the LOB data are NULL, the address of the LOB file isn't written,
and no LOB file is created.
Note: When downloading data using -lob “use_separate_files=yes”, the directory, in which
LOB files is located, which is written in a data file is represented relative to the path given with -d option.
But, if you change the relative path to the absolute path manually in the data file and upload it, the file
path set specified by -d option will be ignored.
In other words, if an absolute path is represented for the directory in which LOB files is located, iLoader
utility uses the absolute path. On the contrary, if a relative path is represented for the directory, iLoader
utility uses the path made by attaching the relative path in the data file to the path given with -d option.
2.2.2.4 lob_indicator
lob_indicator = char_sequence
This option specifies a block delimiter that denotes a pointer for indicating the offset and size of a
LOB file.
It can be used regardless of whether the data copy direction in iLoader is in or out.
The default value is %%.
Up to 10 characters can be used. However, %t, %n and %r are each regarded as one character.
%t indicates a tab, %n indicates a newline character and %r indicates a carriage return.
15
Using iLoader
2.2 General Options
This option cannot have the same value specified for the -t, -r or -e options.
It is recommended that characters that are interpreted on the command line, such as:
'
"
\
&
not be used as delimiters.
It is assumed that use_lob_file = yes if it is not specified.
When the data copy direction in iLoader is in and use_lob_file = yes, if a LOB column in a data file
does not start with the character sequence specified by lob_indicator, the data row containing that
LOB column is treated as an erroneous row.
2.2.2.5 Examples
To dump LOB data to external files, such as t1_000000001.lob, t1_000000002.lob, etc. which are 1.5
GB in size:
$ iloader out ... -f t1.fmt -d t1.dat -lob "lob_file_size=1.5G"
To dump LOB data to a single file named t1.lob:
$ iloader out ... -f t1.fmt -d t1.dat -lob "use_lob_file=yes"
$ iloader out ... -f t1.fmt -d t1.dat -lob "use_lob_file=yes" -lob
"lob_file_size=1G"
$ iloader out ... -f t1.fmt -d t1.dat -lob "lob_indicator=%$LOB$%"
2.2.2.6 Data File Format for LOB Data
When downloading a column containing LOB data, an offset:size combination which points to the
location of LOB data in an external file is written to the data file.
If the offset:size combination, which points to LOB data, is not expressly specified, then iLoader looks
in the data file for the pointer to the position of the LOB data in the LOB file after a %% delimiter.
Ex)
$ cat t1.fmt
table t1
{
"I1" integer;
"I2" blob;
"I3" char (10);
}
DATA_NLS_USE=KO16KSC5601
$ iloader out ... -f t1.fmt -d t1.dat -lob “lob_file_size=3G”
$ ls
t1_000000001.lob t1_000000002.lob t1.dat t1.fmt
$ cat t1.dat
1,“%%0:2000000000”, “Terminator3”
2,“%%2000000000:1800000000”, “SixSense”
$
The actual LOB data are downloaded to a LOB file, regardless of whether LOB offset and size informaiLoader User’s Manual
16
2.2 General Options
tion is provided between field delimiters (or between a pair of block delimiters, if using block delimiters).
This is illustrated in the following figure:
When null LOB data are downloaded to a data file, there will be no data between the field separators
(or between the pair of block delimiters, if appropriate) at the position of the corresponding LOB
data within the data file. LOB data of size 0 are also stored in the same way. (ALTIBASE HDB internally
handles LOB data of size 0 as NULL.)
If the use_separate_files option is specified, the data files are organized as follows:
t1/I1/000000001.lob,t1/I2/000000001.lob,t1/I3/000000001.lob
t1/I1/000000002.lob,t1/I2/000000002.lob,t1/I3/000000002.lob
t1/I1/000000003.lob,t1/I2/000000003.lob,t1/I3/000000003.lob
,,,
In the above example, all of the columns contain LOB data.
If the LOB data to be stored in a LOB file are NULL, no characters are stored at the corresponding LOB
data position in the data file, as can be seen in the fourth row above.
17
Using iLoader
2.3 Performance Options
2.3 Performance Options
The following options can realize considerable performance gains when running iLoader.
Factor
Description
-array array_size
To increase the speed of a data uploading (“in”) operation, data read
from a file are first organized into an array before being sent to the
server.
Performance is increased because the number of times that communication with the server must be established is decreased.
However, if this value is set excessively high, it can have the opposite
effect.
If a LOB column exists, -array is ignored.
-commit commit_unit
When uploading data, this option determines how many records are
committed at one time after being inserted. By default, 1000 records
are committed after being inserted.
If commit_unit is set to 0, the application runs in NON-AUTOCOMMIT
mode, in which the commit operation takes place only after all data
have been inserted.
If commit_unit is set to 1, the application runs in AUTOCOMMIT
mode, in which a commit operation takes place for every record at
the time that it is inserted.
When this option is used together with the array option, the commit
operation takes place after a number of records equal to array_size *
commit_unit have been inserted.
-atomic
This option is set to use the Atomic Array INSERT option. Atomic
Array INSERT realizes better performance than Array Insert because
Atomic Array INSERT handles a number of Insert statements (up to
the size of the array) as a single transaction.
This option must be used together with the -array option. Additionally, tables that contain LOB type columns cannot be handled using
this option.
Furthermore, this option is useful only when uploading data.
-direct [log|nolog] (See
Direct-Path INSERT)
This option is for use with the Direct-Path INSERT when uploading
data to a disk table.
If neither log nor nolog is specified, log is the default.
If using nolog mode, it is essential to back up the table in question. If
execution fails in nolog mode, recovery to a normal state will be
impossible.
If loading tables for which there are restrictions (see Restrictions for
Direct-Path INSERT), execution will automatically switch to the
atomic option.
If the -array option has not been set, the size of the array will automatically be set to the maximum possible size (=USHRT_MAX-1, or
65535).
If the -commit option is omitted, its value will be set to 1.
iLoader User’s Manual
18
2.3 Performance Options
Factor
Description
-parallel count
This specifies the number of threads that can operate at the same
time. A number of threads can be created and executed in parallel up
to the specified value, the maximum of which is 32. When downloading, a number of files equal to the specified value is created, and the
data are saved therein.
When downloading with only the -parallel option set, the performance of repeated bind and fetch operations may be reduced.
Therefore, when downloading data, the -parallel and -array options
should be used together.
If a LOB column is present, this option is ignored.
When uploading with the -parallel option, iloader creates count + 1
connections, and when downloading with this option, iloader always
creates two connections. Therefore, when uploading or downloading
with this option via IPC, the value in the IPC_CHANNEL_COUNT property in altibase.properties must be equal to or greater than the number of these connections.
-readsize integer
When iLoader is executed in “in” mode, this option specifies the
amount of data that are read from a file at one time. The size must be
greater than 0. The default is 1048576 bytes.
2.3.1 Atomic Array INSERT
The -atomic option is used to execute Atomic Array INSERT, which is useful only when uploading
data. Atomic Array INSERT can realize faster performance than Array INSERT because Atomic Array
INSERT handles a number of Insert statements (up to the size of the array) as a single transaction.
When uploading records using Atomic Array INSERT, if one of the records is not successfully
uploaded, the records will instead be uploaded using Array INSERT. In other words, the result of
Atomic Array INSERT is the same as Array INSERT. Moreover, Atomic Array INSERT provides much better performance than Array INSERT. For this reason, the use of Atomic Array INSERT is recommended.
2.3.1.1 The Difference between Atomic Array INSERT and Array INSERT
A comparison of Atomic Array INSERT and Array INSERT reveals the following:
Array INSERT executes individual statements separately, whereas Atomic Array INSERT can combine
several statements and handle them as though they were a single statement.
While Array INSERT’s original advantage is low communication overhead, Atomic Array INSERT realizes even faster performance because it reduces the number of statements.
Array INSERT and Atomic Array INSERT are compared in the following table.
Table 2-1 Differences between Array INSERT and Atomic Array INSERT
Characteristic
Number of Statements
Array INSERT
Number of Array Elements
19
Atomic Array INSERT
One
Using iLoader
2.3 Performance Options
Characteristic
Array INSERT
Atomic Array INSERT
Number of Results
Number of Array Elements
One
Number of Results
(when an error occurs)
Number of Array Elements
Number of Array Elements
Transmission Speed
Fast
Very Fast
2.3.1.2 Atomic Array INSERT Limitations
The following limitations govern the use of Atomic Array INSERT:
Note: N=number of array elements
Table 2-2 Atomic Array INSERT Limitations
Array INSERT
Atomic Array INSERT
Foreign Key
Operates Normally
Operates Normally
Unique Key
Operates Normally
Operates Normally
Not null
Operates Normally
Operates Normally
Trigger Each Row
Executed N times
Executed N times
Trigger Each Statement
Executed N times
Executing Once
Partitioned Table
Operates Normally
Operates Normally
Sequence
Executed N times
Executed N times
SYSDATE
Executed N times
Executing Once
LOB Column
Operates Normally
Atomic attribute is not guaranteed when errors occur.
Procedure
Operates Normally
Operates Normally
SubQuery
A new view is observed every
time
The first executed view is
observed
2.3.1.3 Atomic Array INSERT: Warning
The -atomic option must be used with [-array array_size], and must not be used on tables that
include LOB columns. Furthermore, this option is only useful when uploading data.
2.3.2 Direct-Path INSERT
The so-called Direct-Path INSERT has been provided to support the uploading of data into a disk
table. Direct-Path INSERT is a method of writing data directly into a data file using a Direct-Path
INSERT buffer and a flush manager, bypassing the buffer manager. Moreover, free space in the existing extents is not used. Instead, new extents are allocated for a Direct-Path INSERT operation. Conse-
iLoader User’s Manual
20
2.3 Performance Options
quently, performance is improved, but additional space is required.
You can query the V$DIRECT_PATH_INSERT performance view to manage statistics for DirectPath INSERT. See Administrator’s Manual.
2.3.2.1 Restrictions for Direct-Path INSERT
The following restrictions apply when uploading data using the Direct-Path INSERT. If the data to be
uploaded do not satisfy all of these restrictions, data can be uploaded automatically using Atomic
Array INSERT (-atomic option) instead of Direct-Path INSERT (-direct option).
•
the table can't have an index (or a Primary Key).
•
the table can't be associated with a trigger.
•
the table can't have a LOB column.
•
the table must not be required to satisfy referential integrity requirements.
•
replication cannot be performed on the table.
•
the table must exist in disk tablespace.
2.3.2.2 Warnings
When processing data using the Direct-Path INSERT, please abide by the following:
•
If data upload fails while Direct-Path INSERT operation is being executed in nologging mode
(“-direct nolog”), it will be impossible to restore the database normally. Therefore, it is critical to
back up the relevant table(s) before using nologging mode.
•
The Direct-Path INSERT realizes excellent performance when uploading large amounts of data.
However, when not handling large amounts of data, the improvement in performance will not
be notable.
•
Data can be loaded using the Direct-Path INSERT only if the table exists in disk tablespace.
Therefore, when using this method to load data into memory tablespaces, the result will be
the same as if the -atomic option were used.
2.3.2.3 Example
•
To execute direct-path uploading in logging mode with the maximum array size:
iloader in t1.form -d t1.dat -direct [log]
•
To execute direct-path uploading in nologging mode with the maximum array size:
iloader in t1.form -d t1.dat -direct nolog
•
To execute direct-path uploading in logging mode with a specified array size:
iloader in t1.form -d t1.dat -array 1000 -direct
21
Using iLoader
2.4 Using iLoader in Batch Mode
2.4 Using iLoader in Batch Mode
iLoader can run in interactive mode or in batch mode. When running iLoader in batch mode, command-line options are used.
2.4.1 Creating FORM Files
FORM files provide iLoader with information on the attributes of target tables when data are
uploaded or downloaded. This information covers all aspects of table schema except constraints. In
order to use iLoader to load data, FORM files containing information about the target tables(s) must
first be created.
The syntax for creating FORM files is shown below.
iloader formout [-S server_name] [-U user_name] [-P password] [-T
table_name] [-f formatfile]
In the following example, table T1 and a corresponding FORM file are created.
iSQL> CREATE TABLE t1 (
name
VARCHAR(30),
age
INTEGER,
gender
CHAR(1),
etc
NVARCHAR(30));
Create success.
iSQL> INSERT INTO t1 VALUES ( 'John Doe', 20, 'M', N'Group A');
1 row inserted.
iSQL> INSERT INTO t1 VALUES ('Pham Tan Sang', 30, 'M', N'Group C');
1 row inserted.
iSQL> INSERT INTO t1 VALUES ('Alisee Dupoint', 24, 'F', N'Group D');
1 row inserted.
iSQL> SELECT * FROM t1;
NAME
AGE
GENDER
ETC
--------------------------------------------------John Doe
20
M
Group A
Pham Tan Sang
30
M
Group C
Alisee Dupoint
24
F
Group D
3 rows selected.
iSQL> EXIT
$ iloader formout -s 127.0.0.1 -u sys -p manager -T T1 -f T1.fmt
------------------------------------------------------Altibase Data Load/Download utility.
Release Version 6.1.1.1
Copyright 2000, ALTIBASE Corporation or its subsidiaries.
All Rights Reserved.
------------------------------------------------------ISQL_CONNECTION : TCP
$ cat T1.fmt
table T1
{
"NAME" varchar (30);
"AGE" integer;
iLoader User’s Manual
22
2.4 Using iLoader in Batch Mode
"GENDER" char (1);
"ETC" nvarchar (30);
}
DATA_NLS_USE=KO16KSC5601
NCHAR_UTF16=YES
DATA_NLS_USE can be used to show how downloaded data will be encoded. Normally, when a
FORM file is created, the client character set is used.
If the table to be downloaded contains a national character type column, NCHAR_UTF16 will be
used. The encoding method that is used when data are saved is UTF-16BE (Big Endian) when
NCHAR_UTF16 is set to YES. If set to NO, data will be encoded as CHAR type, and could be lost. The
default value is YES.
2.4.2 Downloading Data
Records in the database table that satisfy the conditions specified in the FORM file are saved in text
file form. Downloaded data will be saved according to the character set specified using the
ALTIBASE_NLS_USE environment variable. If the database character set is different from that specified in ALTIBASE_NLS_USE, the data will be converted. When downloading data, ALTIBASE HDB displays the table name every 5,000 records, and also displays the total number of records after all
records have been downloaded. The following syntax is used to download data.
iloader out [-S server_name] [-U user_name] [-P password] [-f formatfile] [-d datafiles] [-split number] [-array count] [-parallel count]
In the following example, the T1.fmt file is used to download data to the T1.dat file.
$ iloader out -s 127.0.0.1 -u sys -p manager -f T1.fmt -d T1.dat
----------------------------------------------------------------Altibase Data Load/Download utility.
Release Version 6.1.1.1
Copyright 2000, ALTIBASE Corporation or its subsidiaries.
All Rights Reserved.
----------------------------------------------------------------ISQL_CONNECTION : TCP
DATA_NLS_USE: KO16KSC5601
NCHAR_UTF16 : YES
Total 3 records downloaded(T1)
DOWNLOAD : 11.2320 msec
$ cat T1.dat
"John Doe",20,"M","Group A"
"Pham Tan Sang",30,"M","Group C"
"Alisee Dupoint",24,"F","Group D"
2.4.3 Uploading Data
iLoader can be used to upload backup files or files containing edited data to the database.
The data character set must be specified using ALTIBASE_NLS_USE when uploading data. iLoader
converts data saved in the character set specified in ALTIBASE_NLS_USE to the database character
set and then saves the data. If the database character set and the character set specified using
ALTIBASE_NLS_USE are different, the data are converted. If the character set specified in
23
Using iLoader
2.4 Using iLoader in Batch Mode
ALTIBASE_NLS_USE is different from the character set in which the data were actually saved, the
data will not be uploaded properly.
When uploading data, the -atomic option can be used to perform Atomic Array Insert to realize
improved performance. The -atomic option must be used with the -array option, and it is additionally recommended that the -commit option also be used.
When uploading data, iLoader displays the table name every 5,000 records, and also displays the
total number of records after all records have been uploaded.
The following syntax is used to upload data.
iloader in [-S server_name] [-U user_name] [-P password] [-f formatfile] [-d backup_files] [-mode mode_type] [-F firstrow] [-commit
commit_unit] [-L lastrow] [-array count] [-atomic] [-parallel count]
In the following example, the T1.fmt file and the T1.dat file are used to upload data.
$ iloader in -s 127.0.0.1 -u sys -p manager -f T1.fmt -d T1.dat -F 1 -L 2
------------------------------------------------------Altibase Data Load/Download utility.
Release Version 6.1.1.1
Copyright 2000, ALTIBASE Corporation or its subsidiaries.
All Rights Reserved.
------------------------------------------------------ISQL_CONNECTION : TCP
DATA_NLS_USE: KO16KSC5601
NCHAR_UTF16 : YES
UPLOAD : 24.4040 msec
Load Count
: 2(T1)
$ isql -s 127.0.0.1 -u sys -p manager -silent
iSQL> SELECT * FROM t1;
NAME
AGE
GENDER
ETC
------------------------------------------------------John Doe
20
M
Group A
Pham Tan Sang
30
M
Group C
Alisee Dupoint 24
F
Group D
Yuvraj Kohli
20
M
Group A
Hok Chan
30
M
Group C
5 rows selected.
•
The table information in the previously created T1.fmt file is referenced to upload the data in
the T1.dat file to table T1 of the current database.
•
Since the default value of the -mode option is APPEND, data are appended to the T1 table.
(The REPLACE option uploads data after first deleting all of the data in table T1 of the current
database.)
•
The 1st and 2nd records are uploaded from the T1.dat file. If 100 and 1000 are specified for the
first row and the last row respectively, data in the file from the 100th record to the 1000th
record are uploaded.
$ iloader in -s 127.0.0.1 -u sys -p manager -f T1.fmt -d T1.dat -array
1000 -commit 1 -atomic
•
The table information in the T1.fmt file is referenced to upload 1000 records at a time from the
iLoader User’s Manual
24
2.4 Using iLoader in Batch Mode
T1.data file to table T1 of the current database using Atomic Array Insert.
2.4.4 Execution Result Code
ALTIBASE HDB displays one of the following execution result codes after using iLoader to download
or upload data.
•
0 : Success
•
-1 : General Error
•
-2 : One or more upload errors have occured.
0 or -1 is displayed to indicate success or failure, respectively, of a data upload or download operation. -2 is displayed to indicate that the overall upload operation succeeded but that one or more
errors occurred.
2.4.5 Using iLoader for Remote Database Access
You can use iLoader to access a remote server. To execute iLoader, the ALTIBASE HDB server must
have been started. The options are as follows, and are case-insensitive.
2.4.5.1 Command line options for running iLoader remotely
iloader [-H] [-S server_name] [-U user_name] [-P password][-PORT
port_no] [-SILENT] [-NST] [-DISPLAYQUERY]
•
-H: provides help on how to execute iLoader.
•
-S server_name: specifies the name (or IP address) of the computer on which the ALTIBASE HDB
server is running.
•
-U user_name: specifies the user ID with which to access the database.
•
-P password: specifies the password corresponding to the user ID.
•
-PORT port_no: specifies the port number for communication with the remote server.
•
-SILENT: specifies execution in silent mode. In silent mode, nonessential information, such as
the copyright notice etc., is not displayed.
•
-NST: specifies execution in nst mode. In nst mode, elapsed times are not displayed.
•
-DISPLAYQUERY: The user can check hints and conditional clauses specified in a FORM file
when executing statements. They are displayed in query format.
•
-NLS_USE: specifies the character set to be used when downloading or uploading data. If omitted, the client’s environment variable ALTIBASE_NLS_USE and altibase.properties are referred
to in sequence, and if still not set, the basic character set (US7ASCII) is used.
The options -S server_name, -U user_name, -P password, and -PORT port_no must be directly input at
a command prompt when connecting to the remote server.
25
Using iLoader
2.4 Using iLoader in Batch Mode
2.4.5.2 Example
•
Remote server (IP 192.168.1.10, PORT_NO: 21300)
•
Communication protocol :TCP/IP (ISQL_CONNECTION=TCP/IP)
Remote Server Data
Remote server (192.168.1.10)
iSQL> CREATE TABLE departments (
dno
SMALLINT
PRIMARY KEY,
dname
CHAR(30)
NOT NULL,
dep_location
CHAR(15),
mgr_no
INTEGER );
Create success.
iSQL> INSERT INTO departments VALUES (5001, 'TECHNICAL', 'Las Vegas', 1);
1 row inserted.
iSQL> INSERT INTO departments VALUES (5002, 'ENGINE DEVT', 'Munich', 10);
1 row inserted.
iSQL> INSERT INTO departments VALUES (5003, 'MARKETING', 'Honolulu', 9);
1 row inserted.
iSQL> INSERT INTO departments VALUES (5004, 'PLANNING', 'Washington DC', 15);
1 row inserted.
iSQL> INSERT INTO departments VALUES (5005, 'OPERATIONS', 'Budapest', 2);
1 row inserted.
Remote Data Download
Local server
$ iloader formout -s 192.168.1.10 -u sys -p manager -port 21300 -T departments -f dept.fmt
----------------------------------------------------------------Altibase Data Load/Download utility.
Release Version 6.1.1.1
Copyright 2000, ALTIBASE Corporation or its subsidiaries.
All Rights Reserved.
----------------------------------------------------------------ISQL_CONNECTION : TCP
$ ls
dept.fmt
$ iloader out -s 192.168.1.10 -u sys -p manager -port 21300 -f dept.fmt -d
dept.dat
------------------------------------------------------Altibase Data Load/Download utility.
Release Version 6.1.1.1
Copyright 2000, ALTIBASE Corporation or its subsidiaries.
All Rights Reserved.
------------------------------------------------------ISQL_CONNECTION : TCP
DATA_NLS_USE: K016KSC5601
NCHAR_UTF16 : YES
Total 5 record downloaded(departments)
iLoader User’s Manual
26
2.4 Using iLoader in Batch Mode
DOWNLOAD: 1.1490 msec
$ ls
dept.dat dept.fmt
Remote Data Upload
Local server
$ iloader in -s 192.168.1.10 -u sys -p manager -port 21300 -f dept.fmt -d
dept.dat -mode replace
------------------------------------------------------Altibase Data Load/Download utility.
Release Version 6.1.1.1
Copyright 2000, ALTIBASE Corporation or its subsidiaries.
All Rights Reserved.
------------------------------------------------------ISQL_CONNECTION : TCP
DATA_NLS_USE: KO16KSC5601
NCHAR_UTF16 : YES
UPLOAD : 26.0640 msec
Load Count
: 5(departments)
Result
Remote server (192.168.1.10)
iSQL> SELECT * FROM departments;
DNO
DNAME
DEP_LOCATION MGR_NO
--------------------------------------------------------------------------5001
TECHNICAL
Las Vegas
1
5002
ENGINE DEVT
Munich
10
5003
MARKETING
Honolulu
9
5004
PLANNING
Washington DC
15
5005
OPERATIONS
Budapest
9
5 rows selected.
27
Using iLoader
2.5 Using iLoader in Interactive Mode
2.5 Using iLoader in Interactive Mode
If you don't enter any of the mandatory inputs for iLoader execution, i.e. formout / out / in, the
iLoader> prompt will be displayed, and iLoader will be executed in interactive mode. In interactive
mode, command-line options can be used the same way as in batch mode.
2.5.1 Starting iLoader
You must first be logged in before entering interactive mode. Connection information can be
entered either on the command line or via iLoader. Additional information required to establish a
connection with the server includes the server name (-S), user name (-U) and password (-P). The
password is not case-sensitive, but the user name is if you use double quotation marks to enclsoe
this.
2.5.1.1 How to Enter Connection Information on the Command line
$ iloader -s 127.0.0.1 -u sys -p manager
-------------------------------------------------------------Altibase Data Load/Download utility.
Release Version 6.1.1.1
Copyright 2000, ALTIBASE Corporation or its subsidiaries.
All Rights Reserved.
--------------------------------------------------------------ISQL_CONNECTION : TCP
iLoader> -> When the iLoader prompt appears, enter a command to accomplish a desired task in interactive
mode.
2.5.1.2 How to Enter Connection Information in iLoader
$ iloader
-------------------------------------------------------------Altibase Data Load/Download utility.
Release Version 6.1.1.1
Copyright 2000, ALTIBASE Corporation or its subsidiaries.
All Rights Reserved.
-------------------------------------------------------------Write Server Name (enter:127.0.0.1) :
Write UserID : sys
Write Password : -> The password is not output to the screen.
ISQL_CONNECTION : TCP
iLoader> -> When the iLoader prompt appears, enter a command to accomplish a desired task in interactive
mode.
2.5.1.3 Exiting Interactive Mode
iLoader> exit
2.5.2 Creating FORM Files
iLoader> formout -T employees -f employees.fmt
iLoader> exit
$ ls
iLoader User’s Manual
28
2.5 Using iLoader in Interactive Mode
employees.fmt
2.5.3 Downloading Data
iLoader> out -f employees.fmt -d employees.dat
DATE FORMAT : YYYY/MM/DD HH:MI:SS:SSSSSS
DATA_NLS_USE: KO16KSC5601
NCHAR_UTF16 : YES
Total 20 record download(EMPLOYEES)
DOWNLOAD : 54.7250 msec
iLoader> exit
$ ls
employees.dat employees.fmt
2.5.4 Uploading Data
iLoader> in -f employees.fmt -d employees.dat -mode replace
DATE FORMAT : YYYY/MM/DD HH:MI:SS:SSSSSS
DATA_NLS_USE: KO16KSC5601
NCHAR_UTF16 : YES
UPLOAD : 9.4580 msec
Load Count
: 20(EMPLOYEES)
2.5.5 Execution Result Code
ALTIBASE HDB displays one of the following execution result codes after downloading or uploading
data using iLoader.
•
0 : Success
•
-1 : General Error
•
-2 : One or more upload errors have occurred.
0 or -1 is displayed to indicate success or failure, respectively, of a data upload or download operation. -2 is displayed to indicate that the overall upload operation succeeded but that one or more
errors occurred.
2.5.6 Remote Access in Interactive Mode
When iLoader is executed remotely, if none of the command-line options (formout / out / in) are
entered, and only the port number is entered, the user will be prompted to enter the option values.
If access is successful, an iLoader prompt will appear, and a command can be entered to perform a
desired task interactively.
In the following example, after the port number of a remote server is used to access the remote
server from a local server, the iLoader utility is used to download the data from the MANAGER table
29
Using iLoader
2.5 Using iLoader in Interactive Mode
on the remote server to a file, and then to upload the data back to the MANAGER table.
•
Remote server (IP 192.168.1.10, PORT_NO: 21300)
•
Communication protocol :TCP/IP (ISQL_CONNECTION=TCP/IP)
2.5.6.1 Remote Server Data
Remote server (192.168.1.10)
iSQL> CREATE TABLE manager(
mgr_no INTEGER,
mname VARCHAR(20),
address VARCHAR(60));
Create success.
iSQL> INSERT INTO manager VALUES (7, 'HJMIN', '44-25 Youido-dong Youngdungpogu Seoul, Korea');
1 row inserted.
iSQL> INSERT INTO manager VALUES(8, 'JDLEE', '3101 N. Wabash Ave. Brooklyn,
NY');
1 row inserted.
iSQL> INSERT INTO manager VALUES(12, 'MYLEE', '130 Gongpyeongno Jung-gu
Daegu, Korea');
1 row inserted.
iSQL> SELECT * FROM manager;
MGR_NO
MNAME
ADDRESS
-------------------------------------------------------------------7
HJMIN
44-25 Youido-dong Youngdungpo-gu Seoul, Korea
8
JDLEE
3101 N. Wabash Ave. Brooklyn, NY
12
MYLEE
130 Gongpyeongno Jung-gu Daegu, Korea
3 rows selected.
2.5.6.2 Remote Data Download and Upload
Local server
$ iloader -s 192.168.1.10 -u sys -p manager -port 21300
-------------------------------------------------------------Altibase Data Load/Download utility.
Release Version 6.1.1.1
Copyright 2000, ALTIBASE Corporation or its subsidiaries.
All Rights Reserved.
-------------------------------------------------------------ISQL_CONNECTION : TCP
iLoader> ->iLoader is connected to the server, and in this mode commands can be entered to interactively
perform a desired task.
or
$ iloader -port 21300
-------------------------------------------------------------Altibase Data Load/Download utility.
Release Version 6.1.1.1
Copyright 2000, ALTIBASE Corporation or its subsidiaries.
All Rights Reserved.
--------------------------------------------------------------
iLoader User’s Manual
30
2.5 Using iLoader in Interactive Mode
Write Server Name (enter:127.0.0.1) : 192.168.1.10
Write UserID : sys
Write Password : ->The password is not displayed on the screen.
ISQL_CONNECTION : TCP
iLoader> formout -T MANAGER -f MANAGER.fmt
iLoader> out -f MANAGER.fmt -d MANAGER.dat
DATA_NLS_USE: KO16KSC5601
NCHAR_UTF16 : YES
Total 3 record download(MANAGER)
DOWNLOAD : 1.3110 msec
iLoader> in -f MANAGER.fmt -d MANAGER.dat
DATA_NLS_USE: KO16KSC5601
NCHAR_UTF16 : YES
UPLOAD : 30.4730 msec
Load Count
: 3(MANAGER)
2.5.6.3 Result
Remote server (192.168.1.10)
iSQL> SELECT * FROM manager;
MGR_NO
MNAME
ADRESS
----------------------------------------------------------------7
HJMIN
44-25 Youido-dong Youngdungpo-gu Seoul, Korea
8
JDLEE
3101 N. Wabash Ave. Brooklyn, NY
12
MYLEE
130 Gongpyeongno Jung-gu Daegu, Korea
7
HJMIN
44-25 Youido-dong Youngdungpo-gu Seoul, Korea
8
JDLEE
3101 N. Wabash Ave. Brooklyn, NY
12
MYLEE
130 Gongpyeongno Jung-gu Daegu, Korea
6 rows selected. ->The data have been appended to the table MANAGER.
31
Using iLoader
2.6 Online Help and Other Options
2.6 Online Help and Other Options
2.6.1 Help
Help is available for the commands provided with iLoader. The HELP command displays all help
information. For help on a specific command, enter the HELP command followed by the information
for which help is needed.
2.6.1.1 Example
iLoader> help
Usage : { in | out | formout | structout | help }
[-d datafile or datafiles] [-f formatfile]
[-T table_name] [-F firstrow] [-L lastrow]
[-t field_term] [-r row_term] [-mode mode_type]
[-commit commit_unit] [-bad badfile]
[-log logfile] [-e enclosing] [-array count]
[-replication true/false] [-split number]
[-readsize size] [-errors count]
[-lob lob_option_string] [-atomic]
[-parallel count] [-direct]
[-rule csv]
iLoader> help help
Ex) help [ in | out | formout | structout | exit | help ]
iLoader> help in
Ex) in -f $formatfile -d $datafile -bad $badfile -log $logfile -e $enclosing
iLoader> help out
Ex) out -f $formatfile -d $datafile -split $number
iLoader> help exit
Ex> exit (or quit)
or
$ iloader help
=====================================================================
ILOADER HELP Screen
=====================================================================
Usage
: iloader [-h]
[-s server_name] [-u user_name] [-p password]
[-port port_no] [-silent] [-nst] [-displayquery]
[-NLS_USE nls_name]
[-prefer_ipv6]
[{ in | out | formout | structout | help }
[-d datafile or datafiles] [-f formatfile]
[-T table_name] [-F firstrow] [-L lastrow]
[-t field_term] [-r row_term] [-mode mode_type]
[-commit commit_unit] [-bad badfile]
[-log logfile] [-e enclosing] [-array count]
[-replication true/false] [-split number]
[-readsize size] [-errors count]
[-lob lob_option_string] [-atomic]
[-parallel count] [-direct]
[-rule csv]]
-h
iLoader User’s Manual
: This screen
32
2.6 Online Help and Other Options
-s
: Specify server name to connect
-u
: Specify user name to connect
-p
: Specify password of specify user name
-port
: Specify port number to communication
-silent
: No display Copyright
-nst
: No display Elapsed Time
-displayquery : display query string
-NLS_USE
: Specify NLS
-prefer_ipv6 : Prefer resolving server_name to IPv6 Address
=====================================================================
2.6.2 Other Options
•
-log
cution.
iLoader records task results, execution progress and errors that occurred during exe-
•
-bad
rows that could not be uploaded due to the occurrence of errors during loading are
recorded.
2.6.2.1 Example
$ isql -s localhost -u sys -p manager -silent
iSQL> CREATE TABLE test1 (i1 INTEGER);
Create success.
iSQL> CREATE TABLE test2 (c1 CHAR(1));
Create success.
iSQL> INSERT INTO test2 VALUES(1);
1 row inserted.
iSQL> INSERT INTO test2 VALUES('A');
1 row inserted.
iSQL> INSERT INTO test2 VALUES(2);
1 row inserted.
iSQL> exit
$ iloader -s localhost -u sys -p manager -silent
iLoader> formout -T test1 -f test1.fmt
iLoader> formout -T test2 -f test2.fmt
iLoader> out -f test2.fmt -d test2.dat
DATA_NLS_USE: KO16KSC5601
NCHAR_UTF16 : YES
Total 3 record download(TEST2)
DOWNLOAD : 1.0420 msec
iLoader> in -f test1.fmt -d test2.dat -log test.log -bad test.bad
DATA_NLS_USE: KO16KSC5601
NCHAR_UTF16 : YES
UPLOAD : 6.6670 msec
Load Count : 2(TEST1)
Error Count : 1
iLoader> exit
$ cat test.bad
A
33
Using iLoader
2.6 Online Help and Other Options
$ cat test.log
<DataLoad>
TableName : TEST1
Start Time : Thu Sep 30 10:39:46 2010
Record 2 : A
[ERR-21011 : Invalid literal]
End Time : Thu Sep 30 10:39:46 2010
Total Row Count : 3
Load Row Count : 2
Error Row Count : 1
iLoader User’s Manual
34
3 FORM Files
35
FORM Files
3.1 About FORM Files
3.1 About FORM Files
A FORM file is similar to a Create Table statement in that contains information for iLoader about the
attributes of a table with which data are to be exchanged. iLoader can be used to automatically create FORM files. They can also be directly edited to use the following three additional options.
•
SEQUENCE sequence_name column_name [ NEXTVAL | CURRVAL ]
•
DATEFORM date_format
•
DOWNLOAD CONDITION “WHERE condition”
3.1.1 Writing SEQUENCE Statements
A FORM file can be modified to implement a SEQUENCE.
To modify the FORM file, enter the word SEQUENCE followed by the sequence name, the name of
the column(s) to be used, and pseudocolumns such as NEXTVAL or CURRVAL, etc in order at the very
beginning of the form file.
SEQUENCE sequence_name column_name [ NEXTVAL | CURRVAL ]
The default value for pseudocolumns is NEXTVAL.
The maximum number of columns that can be used is 8
The default format of the FORM file is as follows, and if the table has a column for which the data
type is date, the date format will be the default.
Ex) table sample
{
A numeric (10);
B numeric (10, 4);
C char (10);
D varchar (10);
E date;
}
DATEFORM YYYY/MM/DD HH:MI:SS:SSSSSS
3.1.1.1 Example
iSQL> CREATE TABLE seqTable(
num INTEGER,
name VARCHAR(30));
Create success.
iSQL> INSERT INTO seqTable VALUES(1, 'JANE');
1 row inserted.
iSQL> INSERT INTO seqTable VALUES(2, 'SARA');
1 row inserted.
iSQL> CREATE SEQUENCE seq1
START WITH 30 INCREMENT BY 2
MINVALUE 0 NOMAXVALUE;
Create success.
iLoader> formout -T seqTable -f seqTable.fmt
iLoader User’s Manual
36
3.1 About FORM Files
$ vi seqTable.fmt
SEQUENCE seq1 NUM -> Revised part
table SEQTABLE
{
"NUM" integer;
"NAME" varchar (30);
}
DATA_NLS_USE=US7ASCII
iSQL> INSERT INTO seqTable(name) VALUES('JOHN');
1 row inserted.
iSQL> INSERT INTO seqTable(name) VALUES('JOHNSON');
1 row inserted.
iSQL> SELECT * FROM seqTable;
NUM
NAME
----------------------------------------------1
JANE
2
SARA
JOHN
JOHNSON
4 rows selected.
After using the FORM file to back up seqTable table to a file, when the file is examined it looks like:,
iLoader> out -f seqTable.fmt -d seqTable.dat
DATA_NLS_USE: US7ASCII
Total 4 record download(SEQTABLE)
DOWNLOAD : 53.4390 msec
$ cat seqTable.dat
1,"JANE"
2,"SARA"
,"JOHN"
,"JOHNSON"
After uploading the backup file to the current database, the following statement is used:
iLoader> in -f seqTable.fmt -d seqTable.dat -mode replace
DATA_NLS_USE: US7ASCII
UPLOAD : 8.9460 msec
Load Count
: 4(SEQTABLE)
If the records in the seqTable table are queried, the results will be as follows:
iSQL> SELECT * FROM seqTable;
NUM
NAME
----------------------------------------------30
JANE
32
SARA
34
JOHN
36
JOHNSON
4 rows selected.
3.1.2 Modifying Date Format Strings in a FORM File
The format for date data type columns can be set as follows (case-insensitive), and download or
upload actions can be conducted on the basis of the format.
37
FORM Files
3.1 About FORM Files
The date format should be specified at the bottom of the FORM file when modifying it. The default is
DATEFORM YYYY/MM/DD HH:MI:SS:SSSSSS.
DATEFORM
DATEFORM
DATEFORM
DATEFORM
DATEFORM
DATEFORM
DATEFORM
DATEFORM
DATEFORM
DATEFORM
DATEFORM
DATEFORM
DATEFORM
YYYY-MM-DD HH:MI:SS:SSSSSS
YYYY/MM/DD HH:MI:SS:SSSSSS
YY/MM/DD HH:MI:SS:SSSSSS
YY-MM-DD HH:MI:SS:SSSSSS
YYYYMMDDHHMISSSSSSSS
YYMMDDHHMISSSSSSSS
YY
YYYY
YYMMDD
YYYYMMDD
HHMISSSSSSS
HH:MI:SS:SSSSS
HH:MI:SS
Single quotation marks ( ' and ' ) can be used to define a new date format that differs from the date
formats given above.
For example, a date format that uses a space as the delimiter between the year, month and day elements can be defined thus: “DATEFORM YY MM DD” or” DATEFORM YYYY MM DD”.
iSQL> CREATE TABLE t1(
i1 INTEGER,
i2 DATE,
i3 INTEGER);
Create success.
iSQL> INSERT INTO t1 VALUES(1, TO_DATE('2002-01-23 10:11:12:222222', 'YYYYMM-DD HH:MI:SS:SSSSSS'), 1);
1 row inserted.
iSQL> INSERT INTO t1 VALUES(2, TO_DATE('2002-01-23 13:14:15:333333', 'YYYYMM-DD HH:MI:SS:SSSSSS'), 2);
1 row inserted.
iSQL> INSERT INTO t1 VALUES(3, TO_DATE('2002-01-23 16:17:18:444444', 'YYYYMM-DD HH:MI:SS:SSSSSS'), 3);
1 row inserted.
iSQL> SELECT TO_CHAR(i2, 'YYYY-MM-DD HH:MI:SS:SSSSSS') testdate FROM t1;
TESTDATE
----------------------------------------------2002-01-23 10:11:12:222222
2002-01-23 13:14:15:333333
2002-01-23 16:17:18:444444
3 rows selected.
The created FORM file is modified as follows:
iLoader> formout -T t1 -f t1.fmt
$ vi t1.fmt
table T1
{
"I1" integer;
"I2" date;
"I3" integer;
}
DATEFORM YYYY-MM-DD HH:MI:SS:SSSSSS -> Revised part
DATA_NLS_USE=US7ASCII
iLoader User’s Manual
38
3.1 About FORM Files
After the FORM file is used to back up the seqTable table to a file, examining the file reveals the following,
iLoader> out -f t1.fmt -d t1.dat
DATE FORMAT : YYYY-MM-DD HH:MI:SS:SSSSSS
DATA_NLS_USE: US7ASCII
Total 3 record download(T1)
DOWNLOAD : 982.0000 usec
$ cat t1.dat
1,”2002-01-23 10:11:12:222222”,1
2,”2002-01-23 13:14:15:333333”,2
3,”2002-01-23 16:17:18:444444”,3
To upload the backup file to the database, the following command is used.
iLoader> in -f t1.fmt -d t1.dat -mode replace
DATE FORMAT : YYYY-MM-DD HH:MI:SS:SSSSSS
DATA_NLS_USE: US7ASCII
UPLOAD : 10.0930 msec
Load Count
: 3(T1)
Selecting the records in table t1 using the TO_CHAR function results in the following:
iSQL> SELECT TO_CHAR(i2, 'YYYY-MM-DD HH:MI:SS:SSSSSS') TESTDATE FROM t1;
TESTDATE
----------------------------------------------2002-01-23 10:11:12:222222
2002-01-23 13:14:15:333333
2002-01-23 16:17:18:444444
3 rows selected.
However, when uploading data, it is important to ensure that the previously downloaded data have
the same date format specified in the FORM file.
3.1.2.1 DATE FORMAT Environment Variable
In the FORM file structure, an environment variable that plays a role analogous to that of DATEFORM
can be specified as follows. For example, when using the Bourne, Korn, or Bash Shells
$ export ILO_DATEFORM='YYYY-MM-DD'
3.1.2.2 How to specify the DATE FORMAT for Respective Columns
When dealing with DATE data type columns that have different formats, if the FORM file is modified
by entering DATEFORM and a desired date_format in double quotes (" ") after the DATE type declaration (not case sensitive), data can be uploaded or downloaded in this format.
iSQL> CREATE TABLE t1 (i1 INTEGER, i2 DATE, i3 DATE, i4 DATE);
Create success.
iSQL> INSERT INTO t1
TO_DATE('2004/11/24
TO_DATE('2004/11/25
TO_DATE('2004/11/26
1 row inserted.
VALUES (1,
09:55:30 181133','YYYY/MM/DD HH:MI:SS SSSSSS'),
09:55:30 181133','YYYY/MM/DD HH:MI:SS SSSSSS'),
09:55:30 181133','YYYY/MM/DD HH:MI:SS SSSSSS'));
39
FORM Files
3.1 About FORM Files
iSQL> SELECT * FROM t1;
I1
I2
I3
I4
-------------------------------------------------------1
24-NOV-2004 25-NOV-2004 26-NOV-2004
1 row selected.
$ iloader formout -s 127.0.0.1 -u sys -p manager -T t1 -f t1.fmt;
$ vi t1.fmt
table T1
{
"I1" integer;
"I2" date DATEFORM "YYYY-MM-DD"; -> Revised part
"I3" date;
"I4" date DATEFORM "YYYY/MM/DD HH:MI:SS SSSSSS"; -> Revised part
}
DATEFORM YYYY/MM/DD HH:MI:SS:SSSSSS
DATA_NLS_USE=US7ASCII
$ iloader out -s 127.0.0.1 -u sys -p manager -f t1.fmt -d t1.dat;
DATE FORMAT : YYYY/MM/DD HH:MI:SS:SSSSSS
DATA_NLS_USE: US7ASCII
Total 1 record download(T1)
DOWNLOAD : 1.0710 msec
$ cat t1.dat
1,"2004-11-24","2004/11/25 09:55:30","2004/11/26 09:55:30 181133"
$ iloader in -s 127.0.0.1 -u sys -p manager -f t1.fmt -d t1.dat;
DATE FORMAT : YYYY/MM/DD HH:MI:SS:SSSSSS
DATA_NLS_USE: US7ASCII
UPLOAD : 13.7350 msec
Load Count
: 1(T1)
iSQL> SELECT * FROM t1;
I1
I2
I3
I4
-------------------------------------------------------1
24-NOV-2004 25-NOV-2004 26-NOV-2004
1
24-NOV-2004 25-NOV-2004 26-NOV-2004
2 rows selected.
iSQL> SELECT TO_CHAR(I2,'YYYY/MM/DD HH:MI:SS SSSSSS') FROM t1;
TO_CHAR(I2,'YYYY/MM/DD HH:MI:SS SSSSSS')
----------------------------------------------2004/11/24 09:55:30 181133
2004/11/24 00:00:00 000000
2 rows selected.
iSQL> SELECT TO_CHAR(I3,'YYYY/MM/DD HH:MI:SS SSSSSS') FROM t1;
TO_CHAR(I3,'YYYY/MM/DD HH:MI:SS SSSSSS')
----------------------------------------------2004/11/25 09:55:30 181133
2004/11/25 09:55:30 000000
2 rows selected.
$ SELECT TO_CHAR(I4,'YYYY/MM/DD HH:MI:SS SSSSSS') FROM t1;
TO_CHAR(I4,'YYYY/MM/DD HH:MI:SS SSSSSS')
----------------------------------------------2004/11/26 09:55:30 181133
iLoader User’s Manual
40
3.1 About FORM Files
2004/11/26 09:55:30 181133
2 rows selected.
Note:
The date format specifications take precedence in the following order (from highest precedence to lowest):
1) the specification following the DATE column in the FORM file
2) the ILO_DATEFORM environment variable
3) 'DATEFORM YYYY/MM/DD HH:MI:SS:SSSSSS' in the FORM file
3.1.2.3 Executing Functions
Data being uploaded can be placed in a particular column using a function. However, this is not possible for the data types DATE, TIMESTAMP or GEOMETRY.
When modifying a FORM file, the function name should be specified in double quotes (" ") after the
other options. Furthermore, a question mark (?) should be used to indicate the location at which the
column is to be bound.
$ vi t2.fmt
table t2
{
"I1" integer "trim(?)"; -> Revised part
"I2" varchar(10) "trim(?)"; -> Revised part
"I3" varchar(10) "concat(trim(?),'value')"; -> Revised part
}
3.1.3 Writing Condition Clauses
FORM files can be modified so that condition clauses are used when downloading data from tables.
Hints can also be added to realize improved performance.
Enter the words “DOWNLOAD CONDITION” (without quotes) at the very end of a FORM file, followed
by the condition clause within double quotes (" "). At the time of execution, the executed query can
be checked to verify that hints and condition clauses specified by the user are working properly
using the “-displayquery” option.
3.1.3.1 Syntax
DOWNLOAD CONDITION “WHERE conditions_clause”
[HINT “hint_string”]
conditions_clause : For specifying conditions. Has the same form as the WHERE clause of a SELECT
statement.
hint_name : For specifying a hint in order to increase the performance of a SELECT statement. Has
the same form as a HINT used with a SELECT statement.
3.1.3.2 Example
iSQL> CREATE TABLE table1(
t1 INTEGER,
t2 INTEGER,
t3 DATE);
41
FORM Files
3.1 About FORM Files
Create success.
iSQL> INSERT INTO table1 VALUES(1, 1, '01-May-2002');
1 row inserted.
iSQL> INSERT INTO table1 VALUES(2, 2, '02-Jun-2002');
1 row inserted.
iSQL> INSERT INTO table1 VALUES(3, 3, '03-Apr-2002');
1 row inserted.
iSQL> INSERT INTO table1 VALUES(4, 4, '04-Sep-2002');
1 row inserted.
iSQL> INSERT INTO table1 VALUES(5, 5, '05-Oct-2002');
1 row inserted.
iSQL> SELECT * FROM table1;
T1
T2
T3
----------------------------------------1
1
01-MAY-2002
2
2
02-JUN-2002
3
3
03-APR-2002
4
4
04-SEP-2002
5
5
05-OCT-2002
5 rows selected.
The FORM file created with this command:
iloader> formout -T table1 -f table1.fmt
is modified as follows:
$ vi table1.fmt
table TABLE1
{
"T1" integer;
"T2" integer;
"T3" date;
}
DATEFORM YYYY/MM/DD HH:MI:SS:SSSSSS
DATA_NLS_USE=US7ASCII
DOWNLOAD CONDITION "WHERE t1 > 2" -> Revised Part
After using the FORM file to back up table1 to a file, when the file is examined, the results of application of the condition clause can be seen.
iLoader> out -f table1.fmt -d table1.dat
DATE FORMAT : YYYY/MM/DD HH:MI:SS:SSSSSS
DATA_NLS_USE: US7ASCII
Total 3 record download(TABLE1)
DOWNLOAD : 1.4150 msec
$ cat table1.dat
3,3,"2002/04/03 00:00:00"
4,4,"2002/09/04 00:00:00"
5,5,"2002/10/05 00:00:00"
3.1.4 Handling TIMESTAMP Columns
After downloading a data file from a current Altibase database using iLoader, a value pertaining to a
TIMESTAMP column in a data file can be uploaded by using the following options to modify the
FORM file.
•
ADD DEFAULT
iLoader User’s Manual
42
3.1 About FORM Files
•
ADD NULL
•
ADD YYYYMMDD[HHMISS]
•
SKIP DEFAULT
•
SKIP NULL
•
SKIP YYYYMMDD[HHMISS]
Below is an example of the use of the above option to download the data in a database table to a file
and upload the data to the table again.
1.
A FORM file is created based on the table to be downloaded from the current Altibase database.
2.
The created FORM file is used to back up the table data, downloaded from the current database, to a file.
3.
The FORM file to be uploaded is modified according to the following guidelines as the circumstances require.
3.1.4.1 If the data file has no value in a TIMESTAMP column
•
If there are no TIMESTAMP data in the data file, but the current time is to be entered in the
TIMESTAMP column: enter “ADD DEFAULT” (without quotation marks) at the end of the line
describing the TIMESTAMP column in the FORM file to be uploaded (or delete the line describing the TIMESTAMP column from the FORM file).
•
If there are no TIMESTAMP data in the data file, and a null value is to be entered in the TIMESTAMP column: enter “ADD NULL” at the end of the line describing the TIMESTAMP column in
the FORM file to be used for uploading data.
•
If there are no TIMESTAMP data in the data file, but a specified value is to be entered in the
TIMESTAMP column: enter “ADD YYYYMMDD[HHMISS]” at the end of the line describing the
TIMESTAMP column in the FORM file to be used for uploading data.
Ex) YYYYMMDD[HHMISS]
ADD 20040623
ADD 20040623102315
3.1.4.2 If a value corresponding to a TIMESTAMP column is in the data file
•
To discard the value in the data file and enter the current time instead: enter “SKIP DEFAULT” at
the end of the TIMESTAMP column of the FORM file to be uploaded.
•
To enter NULL instead of the value in the data file: enter “SKIP NULL” at the end of the TIMESTAMP column of the FORM file to be uploaded.
•
To enter a specified value instead of the value in the data file: enter “ADD YYYYMMDD
[HHMISS]” at the end of the TIMESTAMP column of the FORM file to be uploaded.
Use the edited FORM file to upload data to the current database.
43
FORM Files
3.1 About FORM Files
3.1.4.3 Example
ADD DEFAULT
iSQL> CREATE TABLE test (i1 INTEGER);
Create success.
iSQL> CREATE TABLE test2 (
i1 INTEGER,
i2 TIMESTAMP
);
Create success.
iSQL> INSERT INTO test VALUES(1);
1 row inserted.
iSQL> INSERT INTO test VALUES(2);
1 row inserted.
iSQL> INSERT INTO test VALUES(3);
1 row inserted.
$ iloader formout -s 127.0.0.1 -u sys -p manager -T TEST -f test.fmt;
$ iloader out -s 127.0.0.1 -u sys -p manager -f test.fmt -d test.dat;
DATA_NLS_USE: US7ASCII
Total 3 record download(TEST)
DOWNLOAD : 831.0000 usec
$ cat test.dat
1
2
3
$ iloader formout -s 127.0.0.1 -u sys -p manager -T test2 -f t2_add_default.fmt;
$ vi t2_add_default.fmt
table TEST2
{
"I1" integer;
"I2" timestamp ADD DEFAULT; -> Revised part
}
DATEFORM YYYY/MM/DD HH:MI:SS:SSSSSS
DATA_NLS_USE=US7ASCII
$ iloader in -s 127.0.0.1 -u sys -p manager -f t2_add_default.fmt -d
test.dat;
DATE FORMAT : YYYY/MM/DD HH:MI:SS:SSSSSS
DATA_NLS_USE: US7ASCII
UPLOAD : 12.2470 msec
Load Count
: 3(TEST2)
iSQL> SELECT * FROM test2;
I1
I2
--------------------------------1
4CA92B4500074CAB
2
4CA92B4500074CF8
3
4CA92B4500074D27
3 rows selected.
iLoader User’s Manual
44
3.1 About FORM Files
ADD NULL
iSQL> CREATE TABLE test (i1 INTEGER);
Create success.
iSQL> CREATE TABLE test2 (
i1 INTEGER,
i2 TIMESTAMP
);
Create success.
iSQL> INSERT INTO test VALUES(1);
1 row inserted.
iSQL> INSERT INTO test VALUES(2);
1 row inserted.
iSQL> INSERT INTO test VALUES(3);
1 row inserted.
$ iloader formout -s 127.0.0.1 -u sys -p manager -T TEST -f test.fmt;
$ iloader out -s 127.0.0.1 -u sys -p manager -f test.fmt -d test.dat;
DATA_NLS_USE: US7ASCII
Total 3 record download(TEST)
DOWNLOAD : 833.0000 usec
$ cat test.dat
1
2
3
$ iloader formout -s 127.0.0.1 -u sys -p manager -T TEST2 -f t2_add_null.fmt;
$ vi t2_add_null.fmt
table TEST2
{
"I1" integer;
"I2" timestamp ADD NULL; -> Revised part
}
DATEFORM YYYY/MM/DD HH:MI:SS:SSSSSS
DATA_NLS_USE=US7ASCII
$ iloader in -s 127.0.0.1 -u sys -p manager -f t2_add_null.fmt -d test.dat;
DATE FORMAT : YYYY/MM/DD HH:MI:SS:SSSSSS
DATA_NLS_USE: US7ASCII
UPLOAD : 11.2610 msec
Load Count
: 3(TEST2)
iSQL> SELECT * FROM test2;
I1
I2
--------------------------------1
2
3
3 rows selected.
45
FORM Files
3.1 About FORM Files
ADD YYYYMMDD [HHMISS]
iSQL> CREATE TABLE test (i1 INTEGER);
Create success.
iSQL> CREATE TABLE test2 (
i1 INTEGER,
i2 TIMESTAMP
);
Create success.
iSQL> INSERT INTO test VALUES(1);
1 row inserted.
iSQL> INSERT INTO test VALUES(2);
1 row inserted.
iSQL> INSERT INTO test VALUES(3);
1 row inserted.
$ iloader formout -s 127.0.0.1 -u sys -p manager -T TEST -f test.fmt;
$ iloader out -s 127.0.0.1 -u sys -p manager -f test.fmt -d test.dat;
DATA_NLS_USE: US7ASCII
Total 3 record download(TEST)
DOWNLOAD : 801.0000 usec
$ cat test.dat
1
2
3
$ iloader formout -s 127.0.0.1 -u sys -p manager -T TEST2 -f t2_add_val.fmt;
$ vi t2_add_val.fmt
table TEST2
{
"I1" integer;
"I2" timestamp ADD 20040623; -> Revised Part
}
DATEFORM YYYY/MM/DD HH:MI:SS:SSSSSS
DATA_NLS_USE=US7ASCII
$ iloader in -s 127.0.0.1 -u sys -p manager -f t2_add_val.fmt -d test.dat;
DATE FORMAT : YYYY/MM/DD HH:MI:SS:SSSSSS
DATA_NLS_USE: US7ASCII
UPLOAD : 9.9950 msec
Load Count
: 3(TEST2)
iSQL> SELECT * FROM test2;
I1
I2
--------------------------------1
40D8497000000000
2
40D8497000000000
3
40D8497000000000
3 rows selected.
iLoader User’s Manual
46
3.1 About FORM Files
SKIP DEFAULT
iSQL> CREATE TABLE test (
i1 INTEGER,
i2 TIMESTAMP
);
Create success.
iSQL> CREATE TABLE test2 (
i1 INTEGER,
i2 TIMESTAMP
);
Create success.
iSQL> INSERT INTO test VALUES(1, BYTE'40D930BF000A7566');
1 row inserted.
iSQL> INSERT INTO test VALUES(2, BYTE'40D930BF000A7566');
1 row inserted.
iSQL> INSERT INTO test VALUES(3, BYTE'40D930BF000A7566');
1 row inserted.
$ iloader formout -s 127.0.0.1 -u sys -p manager -T TEST -f test.fmt;
$ iloader out -s 127.0.0.1 -u sys -p manager -f test.fmt -d test.dat;
DATE FORMAT : YYYY/MM/DD HH:MI:SS:SSSSSS
DATA_NLS_USE: US7ASCII
Total 3 record download(TEST)
DOWNLOAD : 859.0000 usec
$ cat test.dat
1,40D930BF000A7566
2,40D930BF000A7566
3,40D930BF000A7566
$ iloader formout -s 127.0.0.1 -u sys -p manager -T test2 -f
t2_skip_default.fmt;
$ vi t2_skip_default.fmt
table TEST2
{
"I1" integer;
"I2" timestamp SKIP DEFAULT; -> Revised Part
}
DATEFORM YYYY/MM/DD HH:MI:SS:SSSSSS
DATA_NLS_USE=US7ASCII
$ iloader in -s 127.0.0.1 -u sys -p manager -f t2_skip_default.fmt -d
test.dat;
DATE FORMAT : YYYY/MM/DD HH:MI:SS:SSSSSS
DATA_NLS_USE: US7ASCII
UPLOAD : 7.4390 msec
Load Count
: 3(TEST2)
iSQL> SELECT * FROM test2;
I1
I2
--------------------------------1
4CA92F9F000759E2
47
FORM Files
3.1 About FORM Files
2
4CA92F9F00075A2E
3
4CA92F9F00075A5F
3 rows selected.
SKIP NULL
iSQL> CREATE TABLE test (
i1 INTEGER,
i2 TIMESTAMP
);
Create success.
iSQL> CREATE TABLE test2 (
i1 INTEGER,
i2 TIMESTAMP
);
Create success.
iSQL> INSERT INTO test VALUES(1, BYTE'40D930BF000A7566');
1 row inserted.
iSQL> INSERT INTO test VALUES(2, BYTE'40D930BF000A7566');
1 row inserted.
iSQL> INSERT INTO test VALUES(3, BYTE'40D930BF000A7566');
1 row inserted.
$ iloader formout -s 127.0.0.1 -u sys -p manager -T TEST -f test.fmt;
$ iloader out -s 127.0.0.1 -u sys -p manager -f test.fmt -d test.dat;
DATE FORMAT : YYYY/MM/DD HH:MI:SS:SSSSSS
DATA_NLS_USE: US7ASCII
Total 3 record download(TEST)
DOWNLOAD : 856.0000 usec
$ cat test.dat
1,40D930BF000A7566
2,40D930BF000A7566
3,40D930BF000A7566
$ iloader formout -s 127.0.0.1 -u sys -p manager -T TEST2 -f t2_skip_null.fmt;
$ vi t2_skip_null.fmt
table TEST2
{
"I1" integer;
"I2" timestamp SKIP NULL; -> Revised part
}
DATEFORM YYYY/MM/DD HH:MI:SS:SSSSSS
DATA_NLS_USE=US7ASCII
$ iloader in -s 127.0.0.1 -u sys -p manager -f t2_skip_null.fmt -d test.dat;
DATE FORMAT : YYYY/MM/DD HH:MI:SS:SSSSSS
DATA_NLS_USE: US7ASCII
UPLOAD : 5.3590 msec
Load Count
: 3(TEST2)
iSQL> SELECT * FROM test2;
I1
I2
---------------------------------
iLoader User’s Manual
48
3.1 About FORM Files
1
2
3
3 rows selected.
SKIP YYYYMMDD [HHMISS]
iSQL> CREATE TABLE test (
i1 INTEGER,
i2 TIMESTAMP
);
Create success.
iSQL> CREATE TABLE test2 (
i1 INTEGER,
i2 TIMESTAMP
);
Create success.
iSQL> INSERT INTO test VALUES(1, BYTE'40D930BF000A7566');
1 row inserted.
iSQL> INSERT INTO test VALUES(2, BYTE'40D930BF000A7566');
1 row inserted.
iSQL> INSERT INTO test VALUES(3, BYTE'40D930BF000A7566');
1 row inserted.
$ iloader formout -s 127.0.0.1 -u sys -p manager -T TEST -f test.fmt;
$ iloader out -s 127.0.0.1 -u sys -p manager -f test.fmt -d test.dat;
DATE FORMAT : YYYY/MM/DD HH:MI:SS:SSSSSS
DATA_NLS_USE: US7ASCII
Total 3 record download(TEST)
DOWNLOAD : 911.0000 usec
$ cat test.dat
1,40D930BF000A7566
2,40D930BF000A7566
3,40D930BF000A7566
$ iloader formout -s 127.0.0.1 -u sys -p manager -T TEST2 -f t2_skip_val.fmt;
$ vi t2_skip_val.fmt
table TEST2
{
"I1" integer;
"I2" timestamp SKIP 20040623; -> Revised part
}
DATEFORM YYYY/MM/DD HH:MI:SS:SSSSSS
DATA_NLS_USE=US7ASCII
$ iloader in -s 127.0.0.1 -u sys -p manager -f t2_skip_val.fmt -d test.dat;
DATE FORMAT : YYYY/MM/DD HH:MI:SS:SSSSSS
DATA_NLS_USE: US7ASCII
UPLOAD : 13.4300 msec
Load Count
: 3(TEST2)
49
FORM Files
3.1 About FORM Files
iSQL> SELECT * FROM test2;
I1
I2
--------------------------------1
40D8497000000000
2
40D8497000000000
3
40D8497000000000
3 rows selected.
iLoader User’s Manual
50
4 Troubleshooting and
FAQs
51
Troubleshooting and FAQs
4.1 Troubleshooting
4.1 Troubleshooting
4.1.1 Record Upload Failure
Records can fail to be uploaded in a variety of ways, as described below:
•
Duplicate data (a primary key or unique index) already exists in the table to which data are to
be uploaded.
If duplicate data already exist in the table to which data are to be uploaded, the duplicate data
(and only the duplicate data) will be saved in a bad log file, which is set using the “-bad” (badfile) option, while the remainder of the data, which are not duplicate data, will be uploaded
normally. When this problem occurs, the data must be changed manually, or the unique key
constraint violation must be resolved and another upload attempt made.
•
Record data contain characters used as delimiters.
If characters used as delimiters exist in the record data, the delimiters must be changed to
some other set of characters, and another upload attempt made.
•
Insufficient space to save data.
If there is not enough database space to save the data, manage the database or the table or
perform compaction to secure more free disk space, and then upload data from the point at
which the previous upload attempt was interrupted.
•
Character data are saved as “?”.
This occurs if the character data can't be expressed using the character set used by the database. The database character set needs to be changed, which is accomplished by creating the
database again.
•
Only multilingual records fail to be uploaded.
If the character set specified using the ALTIBASE_NLS_USE environment variable is different
from the character set in which the records were actually saved, data may not be uploaded
normally. In this case, the value of the ALTIBASE_NLS_USE environment variable should be
changed to match the character set actually used by the records.
4.1.2 FORM File Parsing Errors
Most FORM file parsing errors are caused by syntax errors that result from editing FORM files manually. Aside from such grammatical errors, similar problems can occur if iLoader reserved words are
used as column names or the like.
The following is a list of iLoader reserved words:
ADD
BINARY
BOOLEAN
CLOB
DATA_NLS_USE
DECIMAL
iLoader User’s Manual
APPEND
BIT
BYTES
CONDITION
DATE
DEFAULT
BIGINT
BLOB
CHAR
CURRVAL
DATEFORM
DOUBLE
52
4.1 Troubleshooting
DOWNLOAD
FORMOUT
HINT
LOG
NEXTVAL
NOLOG
NUMERIC
QUEUE
REPLACE
SMALLINT
TIMESTAMP
VARBIT
EXIT
GEOMETRY
IN
NCHAR
NIBBLE
NULL
NVARCHAR
QUIT
SEQUENCE
STRUCTOUT
TRUE
VARCHAR
FLOAT
HELP
INTEGER
NCHAR_UTF16
NOEXP
NUMBER
OUT
REAL
SKIP
TABLE
TRUNCATE
YES
4.1.3 Performance Issues
iLoader generally establishes a connection to ALTIBASE HDB using a TCP socket. If the process running iLoader and the ALTIBASE HDB server are running on the same host, it is helpful to use a Unix
domain socket or IPC to connect to ALTIBASE HDB. The connection method can be changed by setting the environment variable ISQL_CONNECTION to UNIX or IPC. The details may vary depending
on the system.
Ex)
sh : $ ISQL_CONNECTION=IPC; export ISQL_CONNECTION
csh: $ setenv ISQL_CONNECTION=IPC
When iLoader is used to upload data, it will attempt to commit a transaction for every record. If the commit option is used to increase the commit interval, upload speed will be affected to some
extent. Upload speed increases as the commit interval is increased.
The following shows the changes in speed depending on the commit interval when 100,000 records
are uploaded to a disk table.
$ time iloader -s 127.0.0.1 -u sys -p manager in -f test.fmt -d test.dat -mode
replace -silent
100000 record load
UPLOAD: 1519620035
Load Count : 100000
real 25m29.391s
user 0m7.310s
sys 0m3.930s
$ time iloader -s 127.0.0.1 -u sys -p manager in -f test.fmt -d test.dat -mode
replace -silent -commit 5000
100000 record load
UPLOAD: 47475459
Load Count : 100000
real 0m54.725s
user 0m3.010s
sys 0m2.900s
$ time iloader -s 127.0.0.1 -u sys -p manager in -f test.fmt -d test.dat -mode
replace -silent -commit 10000
100000 record load
UPLOAD: 45757975
Load Count : 100000
real 0m52.652s
user 0m3.240s
sys 0m2.990s
53
Troubleshooting and FAQs
4.2 FAQs
4.2 FAQs
•
Q: When I use iLoader with the following FORM file, a parsing error occurs. What is the
reason?
table TB_SPEC
{
"CODE" char (6);
"TIME" integer;
"SEQ" integer;
"PROC" integer;
"CONDITION" integer;
}
•
A: Since CONDITION is a reserved word in ALTIBASE HDB, a parsing error occurs.
•
Q: Whenever I use iLoader to upload data, I receive errors. I want detailed information
about the errors. Can you tell me how to get it?
•
A: To obtain such error information, execute iLoader with the option shown below.
iloader in -f form.fmt -d data.dat -bad a.bad -log a.log
If a file named a.log is specified using the -log option, as shown above, error contents will be
written to the file a.log. The format is as follows:
[ERR-errno : error_string]
This is informative when tracing problems. For reference, if the - bad option is used as shown
about, information about failed records is also saved.
•
Q: Can I combine special characters (such as “^” or “|” ) with “\n” (line break)?
•
A: Yes, it's possible. The following example shows how to accomplish this.
$ iloader formout -s 127.0.0.1 -u sys -p manager -f goods.fmt -T goods silent
$ iloader out -s 127.0.0.1 -u sys -p manager -f goods.fmt -d goods.dat r '^%n' -silent
Total 30 record download(GOODS)
DOWNLOAD : 876.0000 usec
$ cat goods.dat
cat goods.dat
A111100001,IM-300
A111100002,IM-310
B111100001,NT-H5000
C111100001,IT-U950
C111100002,IT-U200
...
•
,AC0001
,DD0001
,AC0002
,FA0001
,AC0003
,1000,78000^
,100,98000^
,780,35800^
,35000,7820.55^
,1000,9455.21^
Q: I tried to download data after adding the following condition clause to the FORM file:
table CUST_PROD
{
"SERV_NO" varchar (10);
"PROD_ID" char (5);
iLoader User’s Manual
54
4.2 FAQs
"EFF_DATE" char (14);
"EXP_DATE" char (14);
"CUST_TYPE" char (2);
"L_MOD_DATE" date;
}
DATEFORM YYYY/MM/DD HH:MI:SS:SSSSSS
DOWNLOAD CONDITION WHERE EXP_DATE >= '20050301000000'
The following error occured, and it would not run.
Input Command Parser Error or Reserved Keyword Used
DOWNLOAD: 338
•
A: When you specify conditions in a download condition clause, you must use double quotation marks (" ").
DOWNLOAD CONDITION "WHERE EXP_DATE >= '20050301000000'"
This is how you use the quotation marks.
•
Q: I want to sort my data before downloading it. I am wondering whether iLoader supports anything like an ORDER BY clause.
•
A: Data can be sorted by modifying the form file so that it includes a download condition. The
data will be sorted according to the column specified in the download condition. The only limitation on this technique is that the column specified in the download condition must be a primary key, or have an index.
Here are the download results before the form file is modified:
$ iloader formout -s 127.0.0.1 -u sys -p manager -f dept.fmt -T departments -silent
$ iloader -s 127.0.0.1 -u sys -p manager out -f dept.fmt -d dept.dat silent
Total 8 record download(DEPARTMENTS)
DOWNLOAD : 908.0000 usec
$ cat dept.dat
1001,"RESEARCH DEVELOPMENT DEPT 1
1002,"RESEARCH DEVELOPMENT DEPT 2
1003,"SOLUTION DEVELOPMENT DEPT
2001,"QUALITY ASSURANCE DEPT
3001,"CUSTOMER SUPPORT DEPT
3002,"PRESALES DEPT
4001,"MARKETING DEPT
4002,"BUSINESS DEPT
","New York
","Sydney
","Osaka
","Seoul
","London
","Peking
","Brasilia
","Palo Alto
",16
",13
",14
",17
",4
",5
",8
",7
After modifying the FORM file as shown below, the downloaded data will be sorted according
to the column specified in the download condition.
table DEPARTMENTS
{
"DNO" smallint;
"DNAME" char (30);
"DEP_LOCATION" char (15);
"MGR_NO" integer; -> Not null
}
DOWNLOAD CONDITION "WHERE mgr_no is not null" -> Modified
DATA_NLS_USE=US7ASCII
55
Troubleshooting and FAQs
4.2 FAQs
$ iloader -s 127.0.0.1 -u sys -p manager out -f dept.fmt -d dept.dat silent
Total 8 record download(DEPARTMENTS)
DOWNLOAD : 717.0000 usec
$ cat dept.dat
3001,"CUSTOMER SUPPORT DEPT
3002,"PRESALES DEPT
4002,"BUSINESS DEPT
4001,"MARKETING DEPT
1002,"RESEARCH DEVELOPMENT DEPT 2
1003,"SOLUTION DEVELOPMENT DEPT
1001,"RESEARCH DEVELOPMENT DEPT 1
2001,"QUALITY ASSURANCE DEPT
","London
","Peking
","Palo Alto
","Brasilia
","Sydney
","Osaka
","New York
","Seoul
",4
",5
",7
",8
",13
",14
",16
",17
•
Q: Is there a command I can use to directly upload a text file in which the delimiter is '|'? Mysql
has the 'load data infile' command. What commands can I use with your MMDBMS?
•
A: You can use the iLoader utility, which allows you to download and upload data on a tableby-table basis. First, use iLoader to create a FORM file corresponding to the table. (You can also
use a text editor instead of iLoader.)
$ iloader formout -s 127.0.0.1 -u sys -p manager -T test -f test.FORM
This is how to upload a text file (delimiter '|'):
$ iloader in -s 127.0.0.1 -u sys -p manager -f test.FORM -d datafile -t
'|'
In this way, the text file can be directly uploaded.
Note: that the table must already exist.
•
Q: When the date formats of two columns in the same table are different, is there any way I can
import them?
•
A: In iLoader, DATEFORM can be set for individual columns, as shown in the following example:
Ex) Details of FORM file
table table_name
{
column1 date "YYYY-MM-DD";
column2 date;
...
}
DATEFORM YYYY/MM/DD HH:MI:SS:SSSSSS
Note that date format options are applied in the following order, in descending order of preferenc:
1.
2.
3.
•
Date format stated right after the DATE column of a FORM file
Environment variable ILO_DATEFORM
Date format stated outside of brackets in a FORM file
Q: I want to use iLoader to upload data into a table that already contains data. If I use the
-mode replace option, will it delete the existing data or truncate it?
iLoader User’s Manual
56
4.2 FAQs
•
A: It will delete the existing data.
•
Q: The manual says, 'if you want to truncate a large table, it is recommended that you use
the iLoader utility to download and upload data.' Does that mean I have to download the
data from the table, truncate it with iLoader, and then upload it again with iLoader? And
is using the -mode replace option in iLoader different than truncating?
•
A: Since it may take a long time to delete large amounts of data, it is recommended that data
be truncated, Data must be downloaded before truncating, and uploaded again after truncating.
•
Q: If I need to add columns to a table while a database is online, how can I go about doing
that? Also, I made a backup before changing the schema. Will it be all right if I add columns and then upload a backup file that I made before changing the schema?
•
A: It is possible to change a schema using the ALTER TABLE command, but adding columns is
not recommended if a table has many records, because it takes a long time and uses a large
amount of memory. In such cases, we recommend that the following steps be taken:
1.
2.
3.
4.
5.
6.
7.
8.
Backup data before changing schema using iLoader
stop replication
drop table from replication
drop table
create table
Use iLoader to upload the backup file saved before changing the schema
add table to replication
Start replication
The FORM file and data file generated before the schema was changed do not contain the
information about the added columns. If the added columns have default values, the default
values will be inserted, but if they do not have any default values, NULL will be inserted.
•
Q: Is there any way I can import a dmp file exported from Oracle to ALTIBASE HDB as it is?
•
A: Oracle exports are in the binary format. Exported files cannot be imported into ALTIBASE
HDB. You must use SQL Loader to access the data. Because the binary format of Oracle cannot
be read by other databases, you must use SQL Loader to import the data.
•
Q: Is it possible to upload or download gis data with iLoader? If so, what format are they
saved as in the data file?
•
A: Gis data are saved as the Geometry type, which is supported by iLoader. Geometry data
stored in data files by iLoader have the WKB (Well Known Bytes) format, which enables them to
be saved in the byte order used by the server. WKB data is encoded in CSV format or is stored
in a binary format that consists of distinguishable row and column delimiters.
57
Troubleshooting and FAQs
4.2 FAQs
iLoader User’s Manual
58
Index
A
T
Accessing Remote 29
ALTIBASE_NLS_USE 4
Atomic 19
TIMESTAMP column 42
B
batch mode 22
C
Condition Clause Creation 41
Creating form file 22, 28
D
Data Download 23, 29
Data Upload 23, 29
date format 37
DATE FORMAT environment variable 39
direct-path INSERT 20
considerations 21
restrictions 21
E
Executing iLoader 28
Execution Result Code 25, 29
H
Help 32
I
iLoader overview 2
Interactive Mode
interactive mode 28
M
Modifying the form files 36
P
Performance Option 18
R
Remote Access using the Port Number 25
S
sequence 36
specifying date format by column 39
59
Index