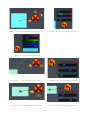
1
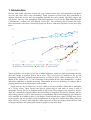
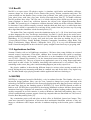
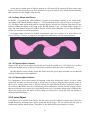
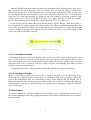
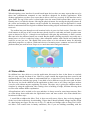
BACHELOR'S THESIS
Physics Sandbox
Multitouch Application for Children
Aron Frostinger
2015
Bachelor of Science in Engineering Technology
Computer Game Programming
Luleå University of Technology
Department of Computer Science, Electrical and Space Engineering
Physics Sandbox:
Multitouch Application
for Children
Author:
Supervisors:
Aron WÅHLBERG
Johannes HIRCHE
Spring 2014
LULEÅ UNIVERSITY OF TECHNOLOGY, SKELLEFTEÅ
COMPUTER GAMES DEVELOPMENT (BSC), 180 ECTS
DEPARTMENT OF COMPUTER SCIENCE, ELECTRICAL AND SPACE ENGINEERING
I
Abstract
NUITEQ, one of the world leading companies that specializes in multitouch applications for big
touchscreens need more applications to their software suite Snowflake. In this project a physics
sandbox is created using the Box2D physics engine. The application will be made for the Snowflake
platform and the design of it is aimed toward young kids. The report describes how this is made and
how several tools that are used to interact with the simulation are made, like creating new objects of
different shapes, dragging them around, attaching springs to them, applying motors and welding
them together.
Sammanfattning
NUITEQ, ett av världens ledande förtag som specialiserar sig på multitouch applikationer för stora
pekskärmar behöver mer applikationer till deras programpaket Snowflake. I detta project skapas en
interaktiv och kreativ fysik simulation där fysikmotorn Box2D kommer att användas. Applikationen
som skall göras till Snowflake plattformen skall vara designad och utformad för att passa små barn.
Hur detta är gjort beskrivs i rapporten samt hur verktyg som kan användas för att interagera med
simulationen görs, som att skapa nya object av olika former, dra omkring dem, sätta på fjädrar,
motorer samt sätta fast dem i varandra.
II
Acknowledgments
Firstly I would like to thank Harry van der Veen for letting me carry out my thesis work at NUITEQ
and Johan Österberg for helping me with the Snowflake Software Suite answering technical
questions. Also to the rest of the people working at NUITEQ, I appreciate the opportunity to work
with you, and I would like to thank all of you for making me feel welcome.
My supervisor Johannes Hirche, thank you. And to all the other teachers I have had during my
school time here at LTU Campus Skellefteå.
A big thanks to Andréas Söderberg who did all the graphics for my application, without your
help the graphics would have been unintelligible. You were able to help me while being stressed out
over your own project. Thanks to my classmates who did their examination project here at
NUITEQ: Jonathan Öhlund and Simon Andersson. Jonathan gave me some really good feedback on
my project/report.
Thanks to my friends Viktor Hansson and Fredrik Larsson who helped me with friendly advises
during this project.
And my wife, Anja, who were able to support me trough out the whole project and taking care of
our kids, thank you!
III
Table of Contents
1. Introduction
1
1.1 Goal and Purpose.......................................................................................................................2
1.1.1 Physics...............................................................................................................................2
1.1.2 Sandbox..............................................................................................................................2
1.1.3 Multitouch..........................................................................................................................2
1.1.4 Children Friendly Design...................................................................................................3
1.2 Limitations.................................................................................................................................3
1.3 Background................................................................................................................................3
1.3.1 Snowflake...........................................................................................................................3
1.3.2 Box2D................................................................................................................................4
1.3.3 Applications for Kids.........................................................................................................4
1.4 NUITEQ.....................................................................................................................................4
1.5 Method.......................................................................................................................................5
1.5.1 Social, Ethical, and Environmental Considerations...........................................................5
2. Design and Implementation
7
2.1 Tools and Frameworks...............................................................................................................7
2.2 Objects.......................................................................................................................................7
2.2.1 Physics Object....................................................................................................................7
2.2.1.1 Body, Shape and Fixture............................................................................................8
2.2.1.2 PhysicsObject Creation..............................................................................................8
2.2.1.3 PhysicsObject Deletion..............................................................................................8
2.2.2 Joint Object........................................................................................................................8
2.2.2.1 JointObject Creation...................................................................................................9
2.2.2.2 JointObject Deletion...................................................................................................9
2.3 The Scene...................................................................................................................................9
2.4 Toolbar.....................................................................................................................................10
2.4.1 Box Tool...........................................................................................................................11
2.4.2 Circle Tool........................................................................................................................11
2.4.3 Polygon Tool....................................................................................................................12
2.4.4 Move Tool........................................................................................................................13
2.4.5 Engine Tool......................................................................................................................14
2.4.6 Spring Tool.......................................................................................................................14
2.4.7 Weld Tool.........................................................................................................................15
2.4.8 Remove Tool....................................................................................................................16
2.4.9 Settings Button.................................................................................................................16
2.4.10 Settings Menu................................................................................................................16
2.5 Play/Pause Simulation.............................................................................................................17
2.6 Advanced Menu.......................................................................................................................17
2.6.1 Material Settings..............................................................................................................18
2.6.2 Color Settings...................................................................................................................18
2.6.3 Spring Settings.................................................................................................................18
2.6.4 Engine Settings................................................................................................................18
2.6.5 Remove............................................................................................................................18
2.7 Smart Snap...............................................................................................................................18
3. Results
20
3.1 Physics.....................................................................................................................................20
3.2 Sandbox...................................................................................................................................20
3.3 Multitouch................................................................................................................................20
IV
3.4 Children Friendly Design.........................................................................................................21
3.5 Result Summary.......................................................................................................................21
4. Discussion
22
4.1 Future Work.............................................................................................................................22
5. Conclusion
24
6. References
25
7. Abbreviations and Terms
27
8. Appendices
28
8.1 Trailer.......................................................................................................................................28
V
1. Introduction
Devices with touch capacitive screens are quite common these days, their popularity has grown
over the last years and is now flourishing. Touch capacitive screens have been introduced to
markets where the devices were not originally intended for touch controls, like MP3 players and
cell phones. The very first smartphone with touch capacitive screen was the IBM Simon Personal
Communicator, created 1992 and shipped 1994 [1][2]. The technology have become far better,
faster and smaller since then. Now most people use devices with touch capacitive screen on a daily
basis.
( Fig. 1.1 – Device ownership over time from 2000-2014 in America [3] )
Touch capacitive screens have given life to tablet computers, which are light and portable but also
powerful enough to perform quite a bit of work. They are perfect for working on the go and
consuming media like watching streamed movies or listen to music while browsing the web. As
shown in the graph of Fig. 1.1, the ownership of the portable devices like smartphones, e-readers
and tablet computers is rapidly increasing. Touch-based devices are definitely an industry that is
growing and it has an excellent future on the market.
Touch screens come in larger sizes as well. Often as a touch capacitive frame that is mountable
on a TV/big screen. These screens can also be placed next to each other to create a wall of
intractable screens, for use in shopping malls or big events. These bigger touch capacitive screens
often use custom built solutions and are directed mostly at companies for specific solutions, like for
showcasing products, used for their business or entertainment. But as this technology gets cheaper it
will eventually be available to have in our homes. People already have smart TVs that have access
to the internet, can stream media, browse applications in an app-store and do more things than just
show ordinary TV shows. More and more touch capacitive screens are being sold and devices such
as laptops and tables are getting quite usual for people to own these days.
1
1.1 Goal and Purpose
The goal of this project is to develop an application for NUITEQ, they specialize in multitouch
applications for big screens. They have a custom made product called Snowflake Software Suite
that run applications for such a TV setup. The Snowflake software takes care of the technical input
and setup, so it is really easy to get started developing applications for it.
My application is a physics-driven 2D sandbox. The physics will be using the free open-source
Box2D physics engine [4], it is widely used, it is easy to get started with and provides good speed
and performance. Box2D provides functionality for different joints that can be used to simulate
motors, hinges and springs etc [5]. By implementing the most vital of these joints the sandbox part
of the application will become much more interesting as the possibilities of what can be created are
greatly expanded. The applications category, physics sandbox, was chosen because the users can
express their creativity, try out cool ideas and explore physics in a creative and entertaining way.
The application will to be aimed toward kids in the age of 4+ because of my own interest in
applications for children since I have two kids of my own. There is a specific pack of the Snowflake
Software Suite called ABC, which is a fun educational software suite designed to help kids learn
while they play [6]. My application fits very well since it is both fun to play around with physics
and it is educational to study how physics behave. “What they are able to do effectively is to
promote conceptual learning, problem solving skills, co-operation, and practical participation”
(Gros, 2007, p.30) [7].
NUITEQ wants to showcase multitouch, and my application will greatly benefit from having
multitouch support. Kids get to play together and learn to co-operate and they find it more natural to
use multitouch input [8]. They will try to use multiple finger to turn objects etc. and moving their
hands across the screen and something happens is natural [9]. Secondly, sandbox-wise, being able
to interact with multiple physically objects at the same time increases the fun and complexity of
what one can build. Or at least it will allow for easier building, since on can use more than one
finger to move, rotate and place objects.
To sum up my goals into four categories:
1.1.1 Physics
The Box2D physics engine will be used to get physically simulated bodies that can react/behave in
a physics world. The behavior should look realistic.
1.1.2 Sandbox
Tools that can be used to interact with and change the simulation are to be implemented. Box2D
provides quite a large set of different joints [5] that can be used for various situations. There will be
a motor/hinge joint (revolute joint), a rope/spring joint (distance joint), a joint to stick objects
together or to the background (weld joint) and lastly a joint so objects can be dragged around
(mouse joint).
1.1.3 Multitouch
The application will support multitouch input. Multiple objects can be created at the same time and
the same goes with moving objects or placing joints. By allowing multitouch the users will be able
to move around objects using multiple fingers, turning and throwing them like one would with a
physical object (only this is in a 2D space).
2
1.1.4 Children Friendly Design
The whole application needs to be adapted for young children at the age of around 4+. The first
thing is that there will only be icons in my application, no text. Most kids at the age of four can not
read and text-based design will make them confused [10]. Icons are more adapted to a natural user
interface than text also, icons that looks like buttons one will try to click on, with text it is not as
certain. The user interface has to be self explanatory and simple in order for small kids to use it.
The design of the icons is really important, they have to be easy to spot and their purpose has to
be clear by just the look of the image. “Remember, if you’re able to make an icon work for kids,
you’ll be able to make an icon work for anybody” (Adam Parrish, 2014, [10]). Children tend to like
bright and happy colors with cartoonified images [10][11], it is more appealing to them than dark
themes.
1.2 Limitations
With only 7 weeks of implementation the functionalities to cut shapes, as well as save and load
scenes are skipped since they would take too much time. NUITEQ also wanted us to participate in
tests of new software and debugging sessions of their products. This took a few days from the
project and report (which I set of one and a half week for) as well.
1.3 Background
Touchscreens are getting both cheaper and better, thereby they have started to become more
common. They can be made using many different techniques and they come in some different
variants that can allow either one, two or multiple touch inputs at the same time [12]. Many normal
applications are not suited for being used with touch-input as it is not as precise as using a mouse,
and using an on-screen keyboard for shortcuts does not really make things easier. Lately there have
been a lot going on how to design new applications more suited for touch-based input and the
business is blossoming with the increasing sales on smartphones and tablets.
1.3.1 Snowflake
Snowflake is a software suite for multitouch applications that NUITEQ have been developing for
over 7 years. Their products are of high quality and they want to highlight and push forward the
development of multitouch applications, over the years they have had over 35 public releases. The
Snowflake software is offered in three different editions. First there is the ABC edition where the
main focus lies on education and fun, this edition is aimed toward kids and can be used in the home,
kindergartens or children's corner in shopping malls etc. Then there is the Entertainment edition,
which obviously has its main focus on entertainment and fun ways to promote ones brand. The uses
of this edition are many and it is suited to be almost anywhere, aimed towards perhaps a little older
crowd 7+ years. Lastly there is the Business edition which is mostly directed to companies wanting
to present their company or showcase their products in an interesting way.
Snowflake's API is written in C++ and it uses OpenGL for rendering. It is cross-platform on
Windows, Mac and Linux with reasonably low system/hardware requirements [13]. It handles the
more complicated process of extracting the touch inputs and determining their locations and unique
ids so fingers do not get mixed up, and what you get to work with are functions that are called
whenever a finger is put down, moved or lifted from the surface. It has support for loading textures,
audio, creating GUI like buttons and sliders [14].
3
1.3.2 Box2D
Box2D is an open source 2D physics engine, it simulates rigid bodies and handles collisions,
contacts, shapes etc. It has plenty of nice features like gravity, friction, restitution and joints. The
joints available are the distance joint, revolute joint, prismatic joint, pulley joint, gear joint, mouse
joint, wheel joint, weld joint, rope joint, friction joint and motor joint [5]. To handle collisions
Box2D performs three steps. The first one is a broad collision phase which uses the sweep and
prune technique to detect any collisions between the objects Axis Aligned Bounding Boxes
(AABB). The second step is a continuous collision detection which test all the collision candidates
to determine if any collision actually occurred. And the third and final step is a stable linear-time
contact solver which is responsible for resolving all the results from the previous step. By using
these algorithms the simulation is both fast and precise [15].
The author Erin Catto originally wrote the simulation engine in C++[4]. It has later been ported
to other languages like Java, JavaScript, ActionScript, Lua and C#. Above that it also works crossplatform and has been used on several other devices, like Nintendo Wii & DS, iPhone, Android and
BlackBerry 10 [15]. Box2D is pretty well used and some titles that are making use of it are,
“Crayon Physics Deluxe, Limbo, Rolando, Fantastic Contraption, Incredibots, Angry Birds, Tiny
Wings, Transformice, Happy Wheels“ (Wikipedia, 2014, [15]). It is very well documented with
loads of tutorials and guides on the web and it is pretty straight forward and easy to get going with.
1.3.3 Applications for Kids
Suzanne Gainsley tells us in HighScopes newsletter, “We know that young children are oriented
towards sensory experiences. From birth, children have learned about the world by touching,
tasting, smelling, seeing, and hearing.” and describes it as the foundation of all learning [8]. The
core of NUI - natural user interface is for the interaction between human and machine to be as
natural as possible [16]. The way of input in my application's case is by using fingers and hands,
touch input in other words. For children, interacting with touchscreens is very natural. They see
something on the screen, they poke it and something happens just as they expect it to.
My physics sandbox is about having different shapes in various colors moving around on the
screen, having the users interacting with them in a natural way, and for the kids a very logical way
too. The kids should enjoy playing around with the application and have fun doing so.
1.4 NUITEQ
NUITEQ is a company located in Skellefteå, a city in northern Sweden. The founder, who was a
interaction design graduate, Harry van der Veen, wanted to change how people interacted with
technology. In 2006 he created one of the first touch displays that more than one person could use at
the same time, that was the founding spark of NUITEQ [13]. Later NUITEQ started an office in
India as well. NUITEQ have specialized in developing multitouch software and have drawn much
attention from large companies all around the world. Their industry leading product Snowflake is
used by companies in over 60 countries, it works on Windows, Mac and Linux and they have a very
effective and dedicated customer support. Some big companies that use Snowflake are 3M, Lenovo,
Porsche, Best Buy and PQ Labs [13].
My examination project will take place at their office in Skellefteå, located on Campus. They
want more innovative applications to showcase their multitouch Snowflake software so they are
happy to collaborate with Campus and take in students studying at the location, quite a valuable
asset.
4
1.5 Method
In order for my application to be implemented there were first a few steps that needed to be done.
The first days were spent planning ahead and researching the software to be used. The Wiki of
Snowflake SDK [14] needed to be read in order to understand how to set up a new project and when
that is done it goes through a couple of examples on how certain tasks are performed with
Snowflake so there was benefit in reading those as well. The Box2D manual [5] is really useful and
serves as a good guide. It both explains how to set up a Box2D world and shows some example
code on how it is done. It goes through Box2D bodies, fixtures, shapes and every joint, often
complimented with example code. Then some research about applications for kids was done [7][8]
[9], also color and design choices where looked up [10][11].
(Figure 1.2 - Method)
To get my working environment up and running Visual Studio 2010 and Qt were required. Then I
needed Mercurial and figure out how it works, it is the version control system that they use here at
NUITEQ. By using mercurial the newest Snowflake SDK can be pulled down and the work on the
project can start. With the Snowflake SDK that was made available through the mercurial repository
the source of some previous projects are included for me to look at. The new project/application
could then be created by using those projects and the Snowflake wiki describing how to set up a
new application, build it and run it. When everything were set up it was time to start implement
features.
By following the Box2D guide and looking at previous projects making use of it, Box2D will get
employed. In the application bodies of various shape should be able to be created and their physics
should be simulated. I will implement all the tools needed to create and destroy objects, the spring
tool, engine tool and move tool. When implementing these I need to consider the aspect that
children will be using them so they have to work in a natural and simple way. I also have to
consider that everything has to work with multitouch, since that is what NUITEQ want to showcase.
Lastly the GUI will be implemented with a toolbar that is very simple to use and an advanced
menu at the top of the screen. The toolbar will include tools for basic functionality and the advanced
menu lets the users modify physics parameters. Final touches will be added to everything and
finalized graphics will be applied.
1.5.1 Social, Ethical, and Environmental Considerations
This application is designed that people who use it should not have to be able to read to play with it.
This is not only good for kids, but also for people with reading disabilities and people from other
5
countries that do not know the language. When designing my application I have taken the social
part in much consideration. NUITEQ's Snowflake supports multiple touch inputs which they want
to showcase, so I designed my application to be used by multiple persons at the same time. When
more than one person is playing they have to communicate with one another, learn to share and cooperate. The design is very colorful and simple, making it easy to understand and use.
No personal information is used in my application except the names of the creators. But the users
have no worries about the regards of their personal information or who did what, except the real
persons standing around and can observe them while they are playing. Also no real persons get hurt
when playing around with my simulation, the only incidents may be if people can not get along
while playing together and sharing the same screen.
The environmental impact of my application in minimum, the only necessity is the hardware to
run the application and electrical power to run the hardware. What might have some positive
impact is that one plays with my simulated physics sandbox instead of using real objects and
material. My application can be used over and over again while material wears out and breaks.
Some materials are hard to come by and some contraptions difficult to build in the real world, like
motors and cars for instance.
6
2. Design and Implementation
The design of the application is aimed towards young children and the focus lies on the ease of
usability and the potential of what the users can create with it and the provided tools. For it to be
really usable for kids it needs to be simple, but for it to have greater potential and becoming more
interesting for an older crowd as well there needs to be a way to go in to more advanced settings as
well, but they should not be required to be able to enjoy the game. Therefore the interface has been
split into two sections. First there is the toolbar which is designed with children in mind, it is easily
accessible at the top of the screen with big and simple buttons providing the users with all the tools.
Then there is the advanced menu for those who want to take the application a bit further. In it the
users should be able to change the properties of individual objects in order to suit their specific
needs.
2.1 Tools and Frameworks
The following tools and frameworks were used in the development of my application:
• Microsoft Visual Studio 2010 Ultimate + VS10sp1
• Qt 5.2.1
• Qt VS Addin 1.2.2
• CMake 2.8.12
• Mercurial 2.9.1
• TortoiseHg 2.11.1 – Hg 2.9.1
• Snowflake 4.0.1
My development machine was running Windows 7.
2.2 Objects
The application contain different objects that the user can interact with, both physical objects and
joints. The joints however do not have any physical representation by default in Box2D so it had to
be implemented. Object is the base class that was created with everything that both physical objects
and joint objects should have in common like position, color, size, aspect, rotation, shape, is the
object selected, is it flagged for deletion and all functions to access these things.
2.2.1 Physics Object
Physics object is a subclass from the Object class, but with some custom variables oriented towards
physical objects like density, restitution and friction. The Box2D representatives for a physical body
are stored in this class. The application supports three different shapes for physics: boxes, circles
and polygons. Depending on which one of these three shapes it has, the rendering and creation of it
will be handled in different ways.
At the rendering pass when traversing through all fixtures attached to a body (see 2.2.1.1
Shape/Fixture), it extracts an aligned bounding box (AABB) from every fixture. It compares the
AABB against the edges of the screen, and will only render those who are not fully outside the
bounds of the screen. An object will be marked as off screen when all fixtures are outside. All
physics objects are rendered with an outlining border around them, giving them a more pleasant
look as the edges do not look as sharp.
7
At the physics update pass all objects marked as off screen will be removed if their center point
is also to far away from the scene. This distance is to prevent objects to be deleted unintentionally,
and it measures to the length of five screens.
2.2.1.1 Body, Shape and Fixture
In Box2D, a physical body, called b2Body, can have several shapes making up the whole body.
According to the Box2D manual a shape is “A 2D geometrical object, such as a circle or polygon. “
[5]. All shapes make up the body and are what the physics will use for collision. Then there are the
fixtures binding the shapes to the body, in the Box2D manual it says “A fixture binds a shape to a
body and adds material properties such as density, friction, and restitution.“[5], so when defining a
fixture you also have to set the properties.
A polygon shape can have by default a maximum value of 8 vertices in it, and it has to be
convex. In Fig.2.1 you see a polygon in my application made up by several convex fixtures.
(Figure 2.1 – Polygon made up from several shapes attached with fixtures to the body)
2.2.1.2 PhysicsObject Creation
Shape of the object is determined by selected tool from the toolbar (see 2.4 Toolbar). It is created
with preset default values of density, friction and restitution while the color is randomized.
Box2D physics creates a body, shape and fixture from the given input and adds it to the Box2D
world so it takes part in the simulation.
2.2.1.3 PhysicsObject Deletion
It is important to first remove/cancel all ongoing events that includes the object. It can be joints
connected, and there can be tools using it. People may be trying to drag the object around or are on
their way to connect joints from it. All such actions are canceled and all joints connected from/to it
are removed (Box2D do take care of destroying joints connected to objects, but the wrapper classes
that are used needs to be removed). No advanced menu (see 2.6 Advance Menu) that is linked to the
object can remain open, but when all these things are removed or closed the body can finally be
destroyed and deallocated
2.2.2 Joint Object
Joint objects are a subclass from Object, but have more specific variables aimed toward joints like
length, frequency, damping ratio, motor speed and motor torque. The two bodies that the joint is
connected to and the anchor points. Then there is also the Box2D representation of a joint.
8
Since the Box2D joints do not have any physical representation like the bodies have, there fore a
way to detect if an user is trying to select it is needed. This was done by adding a circular area
around each anchor point on the joints that can be used to check input against. There is also a box
placed along the line between the points so it becomes selectable as well (see Fig. 2.2). Pure Box2D
joints have no visual representation by default, so this was created by rendering a point at each
anchor position and a line between them (see Fig. 2.12). Some joint do not have any distance
between their anchor points and may have a sprite instead (see Fig. 2.11 and 2.14).
Joints can also end up outside the screen just like physics objects. But for joints the position of
their end-points are compared against the sides of the screen. This is not bulletproof since they can
leave at the opposite sides of the screen so their line between should still be visible, that occasion
would be really rare though. When they are too far outside the screen (5 times the length of the
scene) they will be marked for removal.
(Figure 2.2 – Selectable area on a joint)
2.2.2.1 JointObject Creation
A JointObject is allocated with some default values set, the rest of the values are determined by the
type of joint. It receives references to the objects and to the anchor points marking where on the
objects it is attached. The type of joint also determines whether the objects should be able to collide
with each other or not. A distance joint have length, frequency and damping ratio while revolute
joint have motor speed and torque.
The Box2D joint will be created from these inputs and applied to the physics simulation.
2.2.2.2 JointObject Deletion
Menus or tools that are making use of the joint are closed or canceled. If a connected body do not
exist in the list of physics object, it means that it is a temporary body that was used to connect the
joint to the background. They are remembered so they can be deleted after the Box2D joint is
destroyed, otherwise they will not go away until the world itself is deleted. So first the Box2D joint
is deleted before deleting the bodies if they were just being used temporary. Lastly the container
class is deallocated.
2.3 The Scene
The scene is built up by a background that covers the whole screen, a toolbar that covers the top of
the screen containing all the tools, a play/pause button at the bottom right and all the objects that are
being simulated.
9
(Figure 2.3 – An overview over the complete scene)
At the bottom of the scene (see Fig. 2.3) is a platform that acts as the ground. This object has a
static body, meaning that it will not move no matter how much force is applied. It serves as the base
foundation and stops all the other objects in the scene from falling straight through.
On top of the platform several boxes lies shattered around from the collapse of the stacked tower
after having the two cylinders connected with a spring crashing into it by the cause of gravity
pulling it downwards.
The dark background that covers the whole scene was carefully picked because it really brings
out the colors in all the other objects. The shape on the button icons in the toolbar are designed to be
simple and distinct, they should not be mistaken for one another. The icon colors should somewhat
complement their button colors, and the buttons should be clearly visible on the dark background.
They should look playful and pressable, so that kids would want to try them out.
2.4 Toolbar
The sandbox application should encourage creativity, so it have a lot of tools available allowing a
wide range of possibilities.
The first idea were static buttons placed in a hexagonal pattern at the top of the screen. The
hexagonal button did all look alike with only a small icon that differed them. But they took up a
really big portion of the center screen area, they were hard to differentiate and they looked dull.
The solution was a toolbar, which can be hidden or shown at the press of a button (see Fig 2.4).
A light transparent background gave the toolbar a feeling of consistency while still allowing the
objects behind it to be seen. The buttons are of the same shape and use very bright colors that stands
out from the background. The icons use colors that creates contrast, they are very large, informative
but yet simplistic. The selected tool will pulse in a shining version so it is easy to notice which tool
is currently in use, and the toolbar can easy wrap its icons (see Fig 2.5) allowing more varied screen
size.
10
(Figure 2.4 – Toolbar with all tool buttons)
(Figure 2.5 – Wrapped toolbar since the application is to narrow)
The toolbar is positioned at the top of the screen. Both because that is where it usually is positioned
and it is not interfering with the rest of the application too much, since the most of the action
happens closer to the bottom and the middle of the screen.
Here follows detailed descriptions on the tools showed in Fig. 2.4, left to right:
2.4.1 Box Tool
The box tool is very basic, it simply allows the user to create rectangle shaped objects. As showed
in Fig. 2.6 the box is created by pressing down to set a start point, then dragging the finger and
releasing when done. A preview of the box will be shown in with white line and makes it very easy
to see how the created object will look. The box will be created when the finger is released, if the
objects is not too small.
(Figure 2.6 – Creating a box-shaped object)
2.4.2 Circle Tool
The circle tool is used to create circle-shaped objects only, ovals can not be created with it. When a
touch is started using this tool, it represents the center point. The radius of the circle is determined
by how far away from the center the finger is moved. A preview makes it easy to see how it will
turn out. The circle object is created when the user releases the finger, unless the object is too small.
11
(Figure 2.7 – Creating a circle-shaped object)
2.4.3 Polygon Tool
The polygon tool is used to create free-form shaped objects. The starting position is set were the
touch starts, and while the input progressively moves across the screen the shape will check if the
distance between the current position and the last point is greater than 0.01 (about 1/200 th part of the
screen). If it is greater that current position will be added as the last point in the shape, so it will
build up as the user draws. A preview will be rendered for the polygon as well, a white line going
between all set points to the fingers position, and then back to the start point so the shape is closed.
Note that a shape that intersect with itself may not come out as expected.
Getting the points is the easy part, the hard part is getting the free-form polygon shape
compatible with the limitations of Box2D. First off, all points need to be ordered in a counter
clockwise winding (CCW). Then the Box2D polygon shapes need to be convex and can only
consist of 8 vertices (a default value in Box2D, can be changed in its source). The drawn figure
must contains at least three vertices, or else it would just be a line.
A quick center point is calculated based on all vertices, this is necessary since all vertex
coordinates was created with the center of the screen as origin, so they are offsetted to a center more
according their position. All points are sorted in a CCW order starting from the start pint. Mark
Bayazit has already written a polygon decomposor that converts a free-form polygon into several
convex polygons created CCW [17]. Each convex polygon that was made up by more than 8
vertices are then divided into two smaller until each was compatible with Box2D. Then for each
valid polygon a fixture is created and added to the physics body until the whole polygon is built up
from several smaller convex polygons with each a maximum amount of 8 vertices (see Fig.2.1).
12
(Figure 2.8 – Creating a polygon-shaped object)
(Figure 2.9 – Various shaped polygons)
2.4.4 Move Tool
In order for users to interact with existing objects there is the move tool. When this tool is in use
and a touch input hits a physical object, the object will be attached to the finger by a Box2D mouse
joint which is set up to act like it a spring. So it rather drags the object than moving it directly, this
was done because it is easier to see how it reacts with other physical objects when it is connected to
the finger only by a loose joint instead of always being fixed under the finger.
As showed in Fig. 2.10 more than just one touch input can be connected to a physical object at
the same time. By allowing the users to have multiple joints controlling the movement of the object,
the users have great precision and it enables them to turn the object around or keeping it in a certain
angle. When releasing a finger the mouse joint connected to that input will be destroyed. If it was
the only joint keeping the object up it will fall (or go flying).
(Figure 2.10 – Using the move tool on an object, two fingers are pulling in different directions)
13
2.4.5 Engine Tool
The engine tool can be used to create things like motors and car wheels (Fig. 2.11), but also for
conveyor systems, rotating paddles, free-rotation hinges or a free-rotating hinge that apply breaking
force. The icon is a ball in the middle with a circle around it, arrows on the side shows that it is
spinning.
It is created by staring an input on either an object or the background. As the user drags the
finger across the screen a preview will be shown between the start position and the finger. The
second anchor is attached by releasing the finger. The joint will not be created if the background is
connected to itself, if an object is connected to itself or an static object being connected to the
background.
For the engine tool the Box2D revolute joint is used, it will form between the two valid anchor
points. The order the bodies matters since bodyA will rotate around bodyB, and wheels for instance
would look to go the opposite direction than the engine graphics shows. So to determine if they
should swap places it checks if bodyA is the background, if bodyA is welded to something or if
bodyA have more joints connected to it than bodyB. If it is the case they swap places before the
joint is created.
When the joint is created an advanced menu with engine settings is opened (see 2.6.4 Engine
Settings and Fig. 2.24). When an engine is rotating the motor joint icon will display that by
changing icon to a circle with arrows showing the rotation direction. As seen in Fig. 2.11 the car is
moving to the right, up the hill. When changing the direction the icon will change too.
(Figure 2.11 – Attached wheels with the engine tool to a box. The car is moving forward)
2.4.6 Spring Tool
Objects can be connected together by using the spring tool. The properties of the spring can be
altered so the behavior of the spring can vary from acting like a stiff stick to a loose line between
two bodies. To create a spring the Box2D distance joint is used.
The first touch position will be the start position and the release will become the end position. A
preview is shown between start point and the finger. As the engine tool background, objects or static
objects cannot be connected with themselves. The length of the spring is determined by the distance
between the objects at creation of the joint.
14
Figure 2.12
Figure 2.13
Three circles connected together with the spring tool
Lots of small boxes connected together with the
spring tool
2.4.7 Weld Tool
The weld tool is created by using the Box2D weld joint. What is does is connecting two bodies
together and they will be stuck together, acting as just one body (Fig. 2.15). Its icon is a paper pin
representing that something will be pinned somewhere.
The first touch position will be the start and the release will become the end. A white line
between the start point and the finger will be shown. The same rule that no objects can be connected
with itself applies here too. If one of the object is static and the other is dynamic, and do not have
any other joints connected to it, the dynamic one will move to the static so the anchor points align.
When both are dynamic the one without joints will be moved to the other, otherwise the Box2D
simulation will make them move together.
(Figure 2.14 – Object welded onto background)
15
(Figure 2.15 – Three objects welded together, so they act as one free moving body)
2.4.8 Remove Tool
The remove tool is used to remove objects from the scene. The icon representing this tool is a
recycle bin, a quite common icon used for removing. To use it the tool set down a touch input and
upon the release it will check for the first object beneath the finger. Whether it is a physics object or
a joint it will remove it. Even the platform can be removed using this tool. It comes in handy when a
faulty object has been created or the placing of a joint went wrong.
2.4.9 Settings Button
The settings button reassembling three cogs is the last button on the toolbar. When this button is
pressed it reveals the settings menu, unless it is already showing, then it does nothing (see Fig 2.16).
2.4.10 Settings Menu
The settings menu has a smooth transition whenever it enters or leaves the screen. It is a box-shaped
menu positioned to the top right area of the screen, just beneath the toolbar. On it there is a button
showing a recycle bin in the center with objects shattered around it and arrows displaying that the
objects are going into the bin (Fig. 2.16). The button is used to clear the scene of all objects
whenever pressed. After clearing everything away it will create a new platform at the bottom of the
scene again, but not the stack of boxes.
There is also a button at the bottom of the menu, showing two green arrows pointing upwards
that will make the settings menu will float up and hide itself if pressed.
Some extra space is left between the clear scene button and the hide button. The intention of this
is to have extra room for the save and load scene buttons in the future, because they should be
accessible from the settings menu. There was however no time to implement these features in the
limited timeframe that were available.
(Figure 2.16 – The settings window, the clear scene button and the hide settings button)
16
2.5 Play/Pause Simulation
In the lower right corner of the application the play and pause button are positioned, but they are
only visible one at a time. They represent the opposite state in which the physical world is
simulating. Meaning that if the physical world is currently simulating, the pause button is present.
And if the physical world simulation was paused, the play button would be visible. The simulation
state of the world will toggle upon pressing the buttons.
When the simulation is playing all physical bodies and entities (such as joints) will be simulated
by Box2D. When asking the Box2D world (b2World) to simulate each frame it requires the time
since last update (delta time) since box2D uses an integrator technique [5]. Then amount of velocity
iterations and amount of position iterations are needed for the constraint solver that solves one
constraint at a time. So to get a better result they need to check for constraint multiple times.
(Figure 2.17 – Pause and Play icons in lower right corner)
2.6 Advanced Menu
The advanced menu was introduced because the toolbar should stay as simplistic as possible, but
there should still be a way to tweak with the more advanced settings and properties of the object,
both physical objects and springs. The menu is built up by having a hexagon button in the middle
with a cross icon that closes the menu if pressed and moves the menu if dragged. Smaller icons are
positioned around the center hexagon that will open their menus if pressed. When located in a submenu the center icon changes to an arrow pointing backwards and will upon press return the
advanced menu to the initial state with all the icons.
In order to bring out this menu one has to double click on either a physical object or a joint
object. The double click action with touch based input is not hard to perform but it is not natural.
When the advanced menu is showed there will be a line displayed that goes from the menu to the
object it manipulates. The sub-menus have lines that goes from their center to the center of the
menu. So the advanced menus always show where they belong to.
2.6.1 Material Settings
By clicking the top icon representing a weight the material settings menu can be brought forth. In
this menu there are three icons that belong to a respective slider, Fig. 2.19. The first image represent
the density of the object, the second represents the friction of the object and the last one represents
the restitution of the object. By using these sliders each respective value can be changed.
2.6.2 Color Settings
The second icon available from physics objects are a color wheel. The menu display three color
component red, green and blue with a respective slider. At the bottom there is a preview of the
objects color that will change by modifying the color sliders. See Fig.2.20.
17
2.6.3 Spring Settings
The menu displays a recycle bin icon and a spring icon (see Fig. 2.21). The spring icon have a submenu (see Fig. 2.22) with three images with respective sliders to change their values. The top slider
modifies the length of the spring, the center one modifies the frequency of it and the last one is the
damping ratio of the spring.
2.6.4 Engine Settings
The menu (see Fig. 2.23) have a recycle bin, a wheel indicating that it is the behavior of the motor.
The shown sliders change the wheel engine properties (see Fig. 2.24). There is motor torque, simply
how strong the motor is, and motor speed, also indication in which way the motor is rotating (left or
right).
2.6.5 Remove
In every advance menu there is a recycle bin icon. Pressing the icon simply will cause the object to
be removed and the menu to close. It is handy being able to remove an object using the advance
menu as well as using the remove tool. It is hard to aim precisely in some situations using touchbased input the wrong object can sometimes be deleted using the remove tool. But with the advance
menu the selected object is highlighted and can be confirmed before deletion.
2.7 Smart Snap
When using touch input it becomes very hard to do precision work. One major issue was connecting
wheels to cars or similar things because even how hard you tried, it was almost impossible to hit the
center of the circle. When the motor was not in the precise center the wheels spun bad and the car
was jumping.
This problem was solved by making it possible for joints to snap into certain areas, like the
center. After implementing this it became much easier to build contraptions and the snapping works
on all shapes, including boxes and polygons too.
18
(Figure 2.18 – Advanced menu for a physics object)
(Figure 2.19 – The material settings menu)
(Figure 2.20 – The color settings menu)
(Figure 2.21 – Advanced menu for a spring)
(Figure 2.22 – The spring settings menu)
(Figure 2.23 – Advanced menu for the engine)
(Figure 2.24 – The engine settings menu)
19
3. Results
In order to simplify the goal of my project it was split into four different smaller goals that were
easier to define. The categories of those goals that were to be achieved are first the physics part of
my project, then the sandbox aspect, the multitouch part and lastly that the application should be
designed for children. These categories were set by myself taking NUITEQ's values into
consideration. NUITEQ wanted me to create an application for their Snowflake Software Suite and
they required my project to make use of multitouch, because that is what they feature. The rest of
the project specification was up to me to decide.
3.1 Physics
The goal of the physics part was to make use of the Box2D physics engine in my application. The
application should has objects that has physics applied, so they can behave as rigid bodies in a 2D
physics world. They should be able to react with other bodies and it should look legitimate.
This was the first part of the application that was implemented. The application is able to create
bodies with the shape of boxes, circles and free-shaped polygons, all which are simulated by the
Box2D engine and rendered to the screen. Moreover it is not only the bodies that are making use of
the Box2D engine, but also the tools that are available in the application toolbar makes use of the
joints available there.
3.2 Sandbox
The sandbox part of my application was to allow the users to interact with and change the
simulation. I wanted to make use of some various joints in the Box2D engine, these are the revolute
joint, the distance joint, the weld joint and the mouse joint. All of these were used to implement a
respective tool that the user can wield to interact with the simulation. The users are also able to
create objects in various shapes as well as destroying them.
The first tool to be implemented allowed the creation of boxes and circles. When creating bodies
they would be taken over by the simulation, be pulled down by gravity and collide. After that the
mouse joint was implemented in a tool called Move Tool. The tool allows the user to drag the
bodies around using multiple fingers to pull in different directions. And already at this stage the
application could be called a sandbox.
The rest of the joints were implemented shortly after. The distance joint was used to make the
Spring Tool that allows two bodies to be connected together with a spring. The revolute joint made
the Engine Tool that connect two bodies and making them rotate around the connection point. The
last of the joint that was implemented was the weld joint, the tool it made is called Weld Tool and it
sticks two objects together. Not to forget the Polygon Tool that allows the user do draw a
completely free-shaped polygon that will be created. If the polygon intersect with itself it may not
come out as expected though. The last tool is the Remove Tool, what it does is basically removing
the object that is being pressed.
3.3 Multitouch
The goal was to support multitouch as widely as possible. The users should be able to interact with
the application while simultaneously doing things like creating objects, moving them, using tools
etc. This has been a main focus through out the whole project and has been underlying in all the
design decisions that has been made. All tools in the toolbar are designed to work even if multiple
20
users are using them at the same time. Objects can be created simultaneously and multiple fingers
can draw free-shaped polygons at the same time. Different tools can be used on the same objects at
the same time without any problem (except for the physical space for fingers on the screen). When
using the Move Tool several inputs could be used to control the objects rotation and position, or
even to fly them off.
3.4 Children Friendly Design
The last goal is to adapt the design of my application to work with children at the age of 4+. The
most significant design choice is to use no text in my application, but instead trying to describe
everything with simple images and icons. The reasons being that most children that young can not
read so they find text confusing, icons and big buttons are more natural for touch-based user
interfaces.
This has been the most important focus through out the whole design and implementation phase.
The toolbar is designed to be easy accessed with bright and colorful icons that really stands out. The
icons have been reworked through an iterated process until they look simple and pleasing. The
darker background creates a huge contrast and makes all user interface and objects in the scene
clearly visible. Objects will spawn with a random color and a smooth border, making them both
colorful and playful.
A test involving adults have been made in order to see if the application is ready to be tested by
children. The adults got to play around with the application on their own and find out the meaning
of all tools. They stated that the application was fun and easy to understand and to use. This
concludes that the application is ready to be tested by children, although no kids have been able to
try it yet.
3.5 Result Summary
These four goals were the foundation for the whole application. By putting them all together there is
a well working application that makes use of multitouch controls. A playful 2D physics sandbox
designed for young children with tools that can be used to interact with the simulation and an
interface that is simple and self explanatory.
21
4. Discussion
When designing a user interface for touch-based input devices there are many aspects that are to be
taken into consideration compared to user interfaces designed for desktop applications. With
desktop applications you have your cursor that is able to click very precisely so the interface can be
quite small. The age of the users is often higher since the mouse and keyboard have quite a steep
learning curve is a little bit obscure. Moving the physical mouse for moving the physical pointer on
the screen and touching the buttons on the keyboard for interacting with an application is much
harder to understand and less logical to children than touching objects and buttons on the screen that
react to it.
The toolbar has gone through several iterations before it got to its final version. First there were
fixed buttons on the top of the screen that was placed closer to each other and took up quite some
space as showed in Fig. 4.1. Altough it was functional it felt quite big and clumsy, so then a version
that came to be the advanced menu was created. But the double-clicking experience was really not a
natural move at all so it ended up being a thin collapsible toolbar with colorful tool buttons that
could fit on one just row. The double-click menu came to be the advanced menu for adjusting
individual properties on objects. With touch devices becoming more common and used on other
platforms than just small screens I hope to see much innovation and good solutions.
(Figure 4.1 – The first version of the tools)
4.1 Future Work
No children have been able to try out the application, this must be done in the future to conclude
that it is easy enough for them to use. However, people outside the targeted age have tested it and
confirmed that it is easy for them to understand and use, so therefore it only needs to be tested on
children within the intended age group. I can think of two different ways the tests could be done:
The first way is to let the children use the application on their own, to see if they can figure out how
it can be used without anyone explaining it to them. The other way is giving the children tasks to
complete by using the application, like creating a box or building a bridge, and then allowing them
to solve tasks without further explanation.
All applications can be worked on for ages and there is always room for some improvements. Here
are some things that would make the application better and more usable. Also what should have
been done in other ways.
I would like to address the Move Tool, it does not really move objects, they are being dragged.
So the icon in the toolbar may be misleading, I figure that it should probably change into the design
of a hand using one finger, like the one in Fig. 4.1, and the tool change name to Drag Tool. Also a
real Move Tool would come in handy sometimes, like if you are building something with the
22
simulation paused and you would like to move an object. So having both a drag tool and a move
tool would be nice.
The polygon tool should maybe be referred to as a Pen Tool, because it feels more like painting a
shape. The icon could be a pen as well.
Moreover there is no polygon optimization so big ones can take quite a while to
compute/complete. Meaning that even if a polygon was created consisting of almost just straight
lines, there would still be a vertex each 0.01 unit. The polygon shape would need some optimization
and simplification.
The smart snap feature mentioned in 2.7 Smart Snap should be improved so it can snap to edges
and corners as well. It would be very useful since the touch-based input is so imprecise.
Cutting shapes was skipped due to the limit of time. It would be a cool feature and children are
known to like to destroy buildings made out of blocks. But it was not really necessary for the
application to be included in the limited time frame.
In 2.4.5 Engine Tool I talk about how bodies are swapped depending on which of them should
rotate around the other. It does not always work so there would need to be some more tests to make
sure that the thought body will rotate around the other one. More conditions that can be checked are
to compare the weight of the objects, the lighter should be bodyA, thereby rotating around the other
one. It could also be checked if one of the bodies is a circle, because then it is quite probable that it
is the body that should be rotating.
The toolbar placed on top of the screen may not have been such a good idea after all. Sure it is
out of the way but children do not have that long reach, physically there arms are quite short so if
the application run on a big TV (both lying and standing) they will have a hard time reaching the
toolbar at the top. Moreover the toolbar only allow the users to have one active tool at a time, some
better implementation on how the different tools could be used simultaneously would be necessary.
Maybe the greatest feature that should be done in the future is the saving and loading of scenes.
This feature would allow users to share their creations with others, there could be preset tutorial
scenes or games already set up, like a match of pong. There have already been made room for the
buttons in the settings menu (2.4.10 Setting Menu).
23
5. Conclusion
I would like to say that In general this project is a success and proceeded high over my own
expectations. The final result is a fully working application running on the Snowflake Software
Suite with working physics and many tools to use that enhances the experience. The whole design
of the application came out pretty good and it gives the feeling of being an application for children
just by looking at it. The application runs without any problems, the only time it has crashed was
when the Polygon Tool was used and drawing obscure shapes and could not be reproduced.
The application can definitely handle rigid 2D bodies of various shape really well. The Box2D
physics was easy to get going with, it performs excellent and it took much less time and effort than I
originally expected it would take to use. It have a lot of different joints and I got a chance to try
some of them out when working with my tools. Everything regarding Box2D worked really smooth
and from now on I will stick to using the Box2D engine for 2D physics.
It is everything that you can do with the included tools that really makes it into a sandbox game,
you set up your own goals on what you want to do and have fun doing it. Each tool has a wide
range of use, the Move Tool for instance can be used not only to move objects, but also to throw
them, rotate them, swing them or playing games where you should bounce off other objects. If two
people are participating they could create a paddle each and play a match of tennis/pong. All other
tools can also be used to do more than just one thing, and when combining all of them it is really
just the imagination that sets the limitations.
The multitouch part of my application works really well and all tools are made so other persons
touches will not interfere. However when there are multiple users at the same time there is
something that does not work that well, the toolbar can only have one active tool at one time. This
means that for example if someone is using the drag tool to stack boxes while someone else decides
that he needs to use the remove tool, and so he activates it in the toolbar. Now the next time the guy
that is stacking boxes presses on a box, it will be removed because the new touch used the currently
active tool. So for one person the multitouch aspect works really good, but for multiple persons the
toolbar really limit how well the application can be used.
The application is made for children at a young age. The colors and design are picked to be
attractive, playful and clearly visible. But even if the application is designed for kids, there has not
been a chance to let any children try it. I have not been able to bring any kids the right age here nor
been able to bring my application to them. The only conclusion that can be made from the result of
this part is that the application looks like it is aimed toward kids, the interface is focused on being
natural, there are only big simple icons and no text, and those who have tried it (all grown ups)
thinks it is easy to understand and have had fun playing it.
24
6. References
[1]
PhoneScoop. Smartphone. (Online). Retrieved 2014-05-19 from:
http://www.phonescoop.com/glossary/term.php?gid=131.
[2]
Wikipedia. IBM Simon. (Online) Retrieved 2014-05-19 from:
http://en.wikipedia.org/wiki/IBM_Simon.
http://www.businessweek.com/articles/2012-06-29/before-iphone-and-android-came-simonthe-first-smartphone.
[3]
Pew Research Internet Project. (Jan 2014). Device ownership over time. (Online). Retrieved
2014-05-15 from: http://www.pewinternet.org/data-trend/mobile/device-ownership/.
[4]
Box2D. Box2D a 2D Physics Engine for Games. (Online). Retrieved 2014-05-14 from:
http://box2d.org/about/.
[5]
Box2D Manual. Box2D v2.2.0 User Manual. (Online). Retrieved 2014-05-20 from:
http://www.box2d.org/manual.html.
[6]
NUITEQ. ABC. (Online). Retrieved 2014-05-14 from:
http://nuiteq.com/snowflake/software/abc/.
[7]
Gros, B. (2007). Digital Games in Education: The Design of Games-Based Learning
Environments. (Journal of Research on Technology in Education, University of Barcelona).
Retrieved from: http://files.eric.ed.gov/fulltext/EJ826060.pdf.
[8]
Gainsley, S. (2011). Look, Listen, Touch, Feel, Taste: The Importance of Sensory Play.
(Curriculum Newsletter, HighScope). Retrieved from:
http://www.highscope.org/file/NewsandInformation/Extensions/ExtVol25No5_low.pdf.
[9]
Rosin, H. (Mars 2013). The Touch-Screen Generation. (Article) The Atlantic. Retrieved
2014-05-20 from: http://www.theatlantic.com/magazine/archive/2013/04/the-touch-screengeneration/309250/?single_page=true.
[10]
Creative Freedom. (Mars 2014). Design Icons for Kids. (Article). Retrieved 2014-05-20
from: http://www.creativefreedom.co.uk/icon-designers-blog/designing-icons-for-kids/.
[11]
DesignPax. (Oct 2012). Icons for Children – What Works?. (Blog). Retrieved 2014-05-20
from: http://www.designpax.com/blog/icons-for-children-%E2%80%93-what-works/.
[12]
Wikipedia. Touchscreen. (Online). Retrieved 2014-05-26 from:
http://en.wikipedia.org/wiki/Touchscreen.
[13]
NUITEQ. Snowflake Multitouch Software Suite. (Online). Retrieved 2014-05-20 from:
http://nuiteq.com/.
[14]
Snowflake Wiki. Snowflake Developer Edition (SDK) - C++ multi-touch application
framework. (Online). Retrieved 2014-05-26 from:
http://wiki.nuiteq.com/tiki-index.php?page=SnowflakeSDK.
[15]
Wikipedia. Box2D. (Online). Retrieved 2014-05-20 from:
http://en.wikipedia.org/wiki/Box2D.
http://www.box2d.org/manual.html.
http://www.jbox2d.org/.
http://box2dflash.sourceforge.net/.
25
http://code.google.com/p/box2dx/.
http://box2d-js.sourceforge.net/.
http://code.google.com/p/box2dweb/.
[16]
Wikipedia. Natural user interface. (Online). Retrieved 2014-05-27 from:
http://en.wikipedia.org/wiki/Natural_user_interface.
http://en.wikipedia.org/wiki/Human%E2%80%93computer_interaction.
http://nuigroup.com/go/lite/about/.
[17]
Bayazit, M. Bayazit's Polygon Decomposor. (Online). Retrieved 2014-04-09 from:
http://mnbayazit.com/406/bayazit.
26
7. Abbreviations and Terms
NUI
- Natural User Interface
NUITEQ
- Natural User Interface Technologies (AB)
Box2D
- Free open-source 2D physics simulation engine
OS
- Operating system (Like iOS, Android, Windows, Linux etc.)
TV
- Television
API
- Application Programming Interface
C++
- A powerful commonly used programming language
OpenGL
- A graphics API that works cross platform
GUI
- Graphical User Interface
SDK
- Source Development Kit
IDE
- Integrated Development Environment
Visual Studio - An IDE from Microsoft, used to develop programs
Qt
- Cross-platform application for user interface framework
Mercurial
- A version control system
CCW
- Counter Clockwise Winding
AABB
- Axis Aligned Bounding Box
27
8. Appendices
8.1 Trailer
Trailer retrieved 2014-05-27 from:
https://www.youtube.com/watch?v=id3sH3FSvCo
28