1
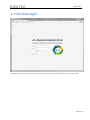
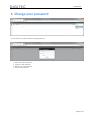
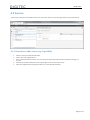
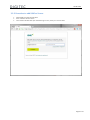
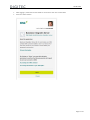
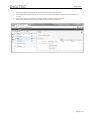
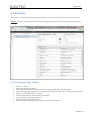
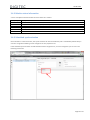
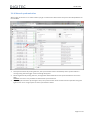
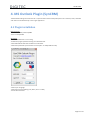
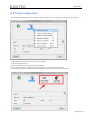
DIGITEC GmbH Business Integration Server User Manual © DIGITEC GmbH 2014 Revision 0.9 27.04.2015 Table of contents Introduction ....................................................................................................................................................... 2 1. First time login ............................................................................................................................................... 3 2. Change your password................................................................................................................................... 4 3.2 Sources .................................................................................................................................................... 5 3.2.1 Procedure to add a source (e.g. SugarCRM) .................................................................................... 5 3.2.2 Procedure to add XING as Source .................................................................................................... 6 3.4 Relations .................................................................................................................................................. 9 3.4.1 Procedure to add a relation ............................................................................................................. 9 3.4.2 Relation status information............................................................................................................10 3.4.3 Scheduled synchronization ............................................................................................................10 3.4.4 Manual synchronization .................................................................................................................11 4. MS Outlook Plugin (SynCRM) .......................................................................................................................12 4.1 Plugin installation ..................................................................................................................................12 4.2 Plugin configuration...............................................................................................................................13 Contact information .........................................................................................................................................15 Page 1 of 15 27.04.2015 Introduction Keep customer related data consistent between your web based office applications. All changes are synchronized without the requirement to install client side software or plugins. Via web-based administration interface the different data sources for synchronization can be comfortable configured and customized. The modular and open architecture allows easy expansion of the system to connectors for other data sources. In general some words about synchronization: - The B.I.S. operates with your companies sensitive data. - Pay attention of that and keep it in your mind! - Read the following information carefully. - Don’t hesitate to ask your system administrator for assistance in any case of ambiguity what kind of synchronization is used in your environment. There are three ways of synchronizations supported by the B.I.S.: 1. Bidirectional synchronization Any creation, change or deletion of a data record will be synchronized 1 to 1 to the associated application. For example, if a contact in your synchronized Groupware contact folder is deleted or moved to another folder it will be deleted in your CRM system, too. 2. Bidirectional synchronization without deletion Any creation or change of a data record will be synchronized 1 to 1 to the associated application. Only deletions will not be synchronized. In this case it is possible, that the quantity of data records differs between the synchronized applications. 3. Unidirectional synchronization A leading application is defined. Any creation, change or deletion of a data record will be synchronized 1 to 1 to the associated target application. Creations, changes or deletions in the target application will NOT be synchronized to the (source) leading application. Page 2 of 15 27.04.2015 1. First time login Login with your Email address and enter the initial password (ask your system administrator for the password). Page 3 of 15 27.04.2015 2. Change your password Click on the B.I.S. symbol and select “Change Password” Enter your initial password. Type your new password. Repeat your new password. Press the save button. Page 4 of 15 27.04.2015 3.2 Sources The Sources Tab shows all available sources. The user has to enter his personal login data for every used source. 3.2.1 Procedure to add a source (e.g. SugarCRM) Select a source from the left side table Enter user name and password Press 'Check Connection' button. This is necessary to check if the URL and the connection settings are correct. Activate the 'enabled' check box in the upper right corner to access the source Save the configuration by pressing the disk icon in the left side actionbar. Page 5 of 15 27.04.2015 3.2.2 Procedure to add XING as Source Select XING from the left side table Press “Retrieve Access Token” Your browser window will open the XING login screen, enter your account data Page 6 of 15 27.04.2015 After logging in, XING asks to allow the B.I.S. the access to the users contact data. Press the “Allow” button Page 7 of 15 27.04.2015 After pressing the allow button you’ll get back to the B.I.S. Sources screen Press 'Check Connection' button. This is necessary to check if the URL and the connection settings are correct. Activate the 'enabled' check box in the upper right corner to access the source Save the configuration by pressing the disk icon in the left side actionbar. Page 8 of 15 27.04.2015 3.4 Relations The Relations Tab allows to assign a predefined template to a user. Usually this is done on personal by each user. REMARK: This is only possible if the user has entered his login data (via the sources tab) for each of the systems to synchronize. 3.4.1 Procedure to add a relation Press the '+' button Add a name for the new relation Select a template from the Dropdown menu (e.g. Contacts (SugarCRM <> MS-Exchange)) Choose an existing target folder from the target module name dropdown menu or enter a new folder name Check if the enabled Checkbox is activated Check if all attributes for synchronization are enabled optional: deselect not needed attributes optional: add user specified attributes Save the configuration by pressing the disk icon in the left side actionbar. Page 9 of 15 27.04.2015 3.4.2 Relation status information A color and object scheme describes the actual status of a relation. Color / Object Description Synchronization successful All synchronizations (relations) suspended by admin Single synchronization (relation) suspended by user Last synchronization failed 3.4.3 Scheduled synchronization Once a Relation is saved and active, the synchronization will start automatically and is scheduled by default every 5 minutes. The global scheduling can be changed in the ‘bis.properties’ file. If the scheduled synchronization should be different from the global one, it can be changed as you can see in the following screenshot: Page 10 of 15 27.04.2015 3.4.4 Manual synchronization With a right mouse click on an active relation you get a context menu which allows to synchronize independent from the scheduler. 1. 2. 3. Start synchronization: By clicking this item, the synchronization starts immediately. If the synchronization is running during the new trigger a failure message will appear. Reset Target Data: By clicking this item, all target data will be deleted and new synchronized from the source data. REMARK: This item is only available on bidirectional synchronizations. Suspend Synchronization: By clicking this item, the synchronization of this relation will be suspended. The green light will turn to an orange square to inform you about this status. Page 11 of 15 27.04.2015 4. MS Outlook Plugin (SynCRM) The MS Outlook Plugin enhances the B.I.S. synchronization functionality with quick links. Contacts, tasks, calendars and notes can be edited easily in the origin application. 4.1 Plugin installation Requirements: • MS Outlook 2010, 2013 32/64Bit • B.I.S. or OXSynCRM Workflow: • Be sure MS Outlook is not running. • Install the plugin by double clicking the installation file. • Start MS Outlook after the installation has finished. • Select the preferred synchronization service (B.I.S. or OXSynCRM or both) • Select your language • Select the log level (Debug, Info, Warn, Error or Fatal) • Press OK to continue Page 12 of 15 27.04.2015 4.2 Plugin configuration The configuration dialog shows the installed synchronization servers as well as the applications to synchronize. Right click for the context menu on a server to configure Click “Enable Connection” Enter the Base URL, the username and the password Via context menu press “Check Connection Settings” to ensure the correct user data Via context menu press “Update Connection Settings” to load the applications to synchronize Page 13 of 15 27.04.2015 Save the configuration by pressing the save button. By pressing the continue button the configuration dialog will close and the standard configuration is finished. By clicking on an application the automatic connection settings can be checked. REMARK: After the configuration is completed, MS Outlook must be restarted! The connection names are only suggestions and can be changed through the context menu of by pressing “F2”. Deleting a connection can be done via the context menu or the “DEL” key. Page 14 of 15 27.04.2015 Contact information DIGITEC GmbH Johannes-Brahms-Platz 1 20355 Hamburg Telephone: 040-23776-0 Telefax: 040-23776-200 Email: [email protected] Web: http://www.digitec.de/ Youtube: http://www.youtube.com/watch?v=mecbzluruL4 Page 15 of 15