1
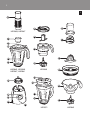
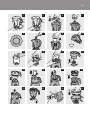
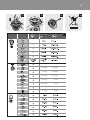
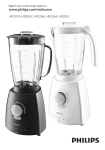
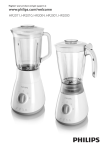
HR2071, HR2068, HR2067, HR2061
2
3
1
K
U
S
HR2068, HR2067
R
J
T
I
H
Q
1500 ml
cups 6
5
4
G
F
3
2
1250
1000
V
750
500
1
250
0.5
150
P
HR2069, HR2068,
HR2067, HR2061
HR2068
W
O
E
N
X
cups 6
M
B
C
5
4
3
L
A
D
2
1500 ml
1250
1000
750
500
1
250
0.5
150
HR2071
Y
HR2069
4
HR2071, HR2069, HR2068, HR2067, HR2061
English 6
Indonesia 16
한국어 26
Bahasa Melayu 36
ภาษาไทย 47
Tiếng Việt 55
繁體中文 65
简体中文 74
6
English
Introduction
Congratulations on your purchase and welcome to Philips! To fully benefit from the support that
Philips offers, register your product at www.philips.com/welcome.
The appliance is equipped with a built-in safety system that prevents the appliance from functioning
if the accessories have been assembled incorrectly or have not been assembled at all.
General description (Fig. 1)
A Motor unit with control knob
B Pulse setting
C Speed settings
D Ice button
E Blender blade unit
F Plastic blender jar (HR2069/HR2068/HR2067/HR2061)
G Level indication
H Lid of plastic blender jar
I Opening in lid
J Measuring cup
K Filter (HR2068/HR2067 only)
L Glass blender jar (HR2071 only)
M Level indication
N Lid of glass blender jar
O Opening in lid
P Coupling unit
Q Chopper bowl (HR2068 only)
R Chopper blade unit
S Lid
T Mill blade unit
U Mill beaker
Citrus press (HR2069 only):
V Cone
W Sieve
X Juice jug
Y Coupling unit
Important
Read this user manual carefully before you use the appliance and save it for future reference.
General
Danger
-- Never immerse the motor unit in water or any other liquid, nor rinse it under the tap. Use only
a moist cloth to clean the motor unit.
Warning
-- Check if the voltage indicated on the appliance corresponds to the local mains voltage before
you connect the appliance.
-- If the mains cord is damaged, you must have it replaced by Philips, a service centre authorised by
Philips or similarly qualified persons in order to avoid a hazard.
-- Do not use the appliance if the plug, the mains cord or other parts are damaged.
-- Never use the blender jar, mill beaker or chopper bowl (specific types only) to switch the
appliance on and off.
-- Never let the appliance run unattended.
English
7
-- This appliance is not intended for use by persons (including children) with reduced physical,
sensory or mental capabilities, or lack of experience and knowledge, unless they have been given
supervision or instruction concerning use of the appliance by a person responsible for their
safety.
-- Children should be supervised to ensure that they do not play with the appliance.
-- Do not touch the blades, especially when the appliance is plugged in. The blades are very sharp.
Caution
-- Always unplug the appliance before you assemble, disassemble or make adjustments to any of
the parts.
-- Never use any accessories or parts from other manufacturers or that Philips does
not specifically recommend. If you use such accessories or parts, your guarantee becomes
invalid.
-- Do not exceed the maximum indication on the blender jar, the mill beaker and the chopper
bowl (specific types only).
-- Do not exceed the maximum quantities and processing times indicated in the relevant table.
-- The appliance can only be switched on if the blender jar, the mill beaker or the chopper bowl
(specific types only) is assembled on the motor unit correctly.
Blender
Warning
-- Never reach into the blender jar with your fingers or an object while the appliance is running.
-- Make sure the blade unit is securely fastened to the blender jar before you assemble the
blender jar onto the motor unit.
-- Do not touch the cutting edges of the blender blade unit when you handle or clean it. They are
very sharp and you could easily cut your fingers on them.
-- If the blade unit gets stuck, unplug the appliance before you remove the ingredients that block
the blades.
Caution
-- Never fill the blender jar with ingredients hotter than 80ºC.
-- To prevent spillage, do not put more than 1.5 litres of liquid in the blender jar, especially when
you process at a high speed. Do not put more than 1 litre in the blender jar when you process
hot liquids or ingredients that tend to foam.
-- If food sticks to the wall of the blender jar, switch off the appliance and unplug it. Then use a
spatula to remove the food from the wall.
-- Always make sure the lid is properly closed/assembled on the jar and the measuring cup is
inserted properly in the lid before you switch on the appliance.
-- HR2071 only: The jar is made of glass and therefore breakable. Do not drop the jar on a hard
floor. Also avoid extreme thermal shocks. If the jar is very cold, rinse it well with lukewarm water
before you pour hot liquid into it. If the glass jar cracks, stop using it.
Mill
Warning
-- Make sure the blade unit is securely fastened to the mill beaker before you assemble the mill
beaker onto the motor unit.
-- Do not touch the cutting edges of the mill blade unit when you handle or clean it. They are very
sharp and you could easily cut your fingers on them.
-- Never use the mill to grind very hard ingredients such as nutmeg and ice cubes.
Caution
-- Never use the mill for more than 30 seconds without interruption. Let the mill cool down to
room temperature between processing cycles.
8
English
-- Always process cloves, star anise and aniseed together with other ingredients. If processed
separately, these ingredients may attack the plastic materials of the appliance.
-- The mill beaker may become discoloured when you use the mill to process ingredients such as
cloves, anise and cinnamon.
-- The mill is not suitable for chopping raw meat. Use the blender or chopper instead.
-- Do not use the mill to process liquids such as fruit juice.
Chopper (HR2068 only)
Warning
-- Make sure the coupling unit is securely fastened to the chopper bowl before you assemble the
chopper onto the motor unit.
-- Do not touch the cutting edges of the chopper blade unit when you handle or clean it. They are
very sharp and you could easily cut your fingers on them.
-- Never reach into the chopper bowl with your fingers or an object while the appliance is
running.
-- If the blade unit gets stuck, unplug the appliance before you remove the ingredients that block
the blades.
Caution
-- Always make sure the lid is properly assembled on the chopper bowl before you switch on the
appliance.
-- If food sticks to the wall of the chopper bowl, switch off the appliance and unplug it. Then use a
spatula to remove the food from the wall.
Filter (HR2068/HR2067 only)
Caution
-- Never use the filter to process ingredients hotter than 80°C.
-- Never overload the filter. Do not fill the filter beyond its metal part.
-- Always make sure the lid of the blender jar is closed/assembled properly and the measuring
cup is inserted properly in the lid before you switch on the appliance.
-- Cut fruit into smaller pieces before you put it in the filter.
-- Soak dried ingredients, such as soy beans, before you put them in the filter.
Citrus press (HR2069 only)
Warning
-- Make sure the coupling unit is securely fastened to the juice jug before you assemble the citrus
press onto the motor unit.
Caution
-- Never use the citrus press for more than 3 minutes without interruption.
Electromagnetic fields (EMF)
This Philips appliance complies with all standards regarding electromagnetic fields (EMF). If handled
properly and according to the instructions in this user manual, the appliance is safe to use based on
scientific evidence available today.
Built-in safety lock
This feature ensures that you can only switch on the appliance if the blender jar and lid, the mill
beaker or the chopper bowl and lid (specific types only) are assembled on the motor unit properly.
If the blender jar and lid, the mill beaker or the chopper bowl and lid are correctly assembled, the
built-in safety lock will be unlocked.
English
9
Motor circuit protector
The appliance is equipped with a motor circuit protector that switches off the motor if the motor
jams (which might occur during heavy processing jobs or if the appliance is not used according to
the instructions in the user manual). If this happens, DO NOT press the reset button in the bottom
of the appliance immediately after the circuit protector has switched off the appliance. First switch
off and unplug the appliance and let it cool down to room temperature. Then check if the quantity
of ingredients you are processing does not exceed the quantity mentioned in the user manual or if
something is blocking the blade unit. After this, press the reset button in the bottom of the appliance
and continue processing. Do not touch the blade unit when you press the reset button.
Before first use
-- Thoroughly clean the parts that come into contact with food before you use the appliance for
the first time (see chapter ‘Cleaning’).
Using the appliance
Blender
,,
----
The blender is intended for:
Blending fluids, e.g. dairy products, sauces, fruit juices, soups, mixed drinks, shakes.
Mixing soft ingredients, e.g. pancake batter or mayonnaise.
Pureeing cooked ingredients, e.g. for making baby food.
Preparing the blender for use
1 Screw the blender blade unit clockwise onto the blender jar (Fig. 2).
2 Mount the blender jar with the blade unit attached to it onto the motor unit and turn it
clockwise until it locks into position (Fig. 3).
3 Put the ingredients in the blender jar.
Let hot ingredients cool down before you put them in the blender jar (max. temperature
80°C/175°F).
4 HR2071 only: fasten the lid on the jar by pressing it down (1) and turning it clockwise
(2).  (Fig. 4)
Note: Make sure that the sieve in the lid is positioned in front of the spout of the jar to be able to pour
out liquids.
5 HR2068/HR2067/HR2061 only: close the lid.
6 Insert the measuring cup into the lid (Fig. 5).
7 To disassemble the blender, follow the instructions above in reverse order and direction.
Using the blender
Never reach into the jar with your fingers or an object (e.g. a spatula), while the blender is
running.
Do not exceed the maximum level indicated on the blender jar.
1 Put the mains plug in the wall socket.
2 Switch on the appliance.  (Fig. 6)
Note: See the blender table at the end of this user manual for the recommended quantities, speed
settings and processing times.
-- To process ingredients at a particular speed, turn the control knob to the required speed setting.
10
English
Do not let the appliance run for more than 30 seconds at a time. Let the appliance cool down to
room temperature before you continue processing.
-- To process ingredients very briefly, turn the control knob to the pulse setting (P) several times.
Never use the pulse setting longer than a few seconds at a time.
-- To crush ice, press the ICE button.
3 When you have finished processing, set the control knob to 0 and unplug the appliance.
Always set the control knob to 0 before your open the lid.
Tips
-- To prevent spillage, do not put more than 1.5 litres of liquid in the blender jar, especially when
you process at a high speed. Do not put more than 1 litre in the blender jar when you process
hot liquids or ingredients that tend to foam.
-- You can use the opening in the lid to add ingredients while the appliance is running (Fig. 7).
-- Do not process dry ingredients for more than 1 minute.
-- Cut solid ingredients into smaller pieces before you put them in the blender jar. Do not process
a large quantity of solid ingredients at the same time. Process these ingredients in a series of
small batches instead.
-- If you are not satisfied with the results when you blend solid ingredients, use the pulse setting  a
few times to let the blender run briefly. If you want to use a spatula, switch off the appliance,
open the lid and then stir the ingredients. You can also remove some of the contents of the jar
and process smaller amounts.
-- To crush ice cubes, put max. 5 cubes at a time in the jar and press the ICE button a few times.
HR2071 only: The jar is made of glass and therefore breakable. Do not drop the jar on a hard
floor. Also avoid extreme thermal shocks. If the jar is very cold, rinse it well with lukewarm water
before you pour hot liquid into it. If the glass jar cracks, stop using it.
Filter (HR2068/HR2067 only)
You can use the filter to obtain extra finely blended sauces, fresh fruit juices or cocktails. All pips and
skins are caught in the filter.
HR2071/HR2061: You can order the filter (type number HR2938) from your Philips dealer.
Never fill the filter beyond its metal part.
Do not use the filter to process hot ingredients.
Preparing the filter for use
1 Assemble the blender jar onto the motor unit (see section ‘Preparing the blender for use’ in
this chapter).
2 Put the filter in the blender jar (Fig. 8).
Make sure the filter is placed properly on the bottom of the jar.
The grooves of the filter and the ribs inside the blender jar help you put the filter in the right
position.
3 Close the lid.
Using the filter
1 Put the ingredients in the filter through the opening in the lid.
Cut fruits into smaller pieces and soak dried pulses, such as soy beans, before you process them in
the filter.
2 Add water or another liquid.
English 11
3 Put the measuring cup in the lid, set the control knob to the highest speed and let the
appliance run for max. 40 seconds.
4 Set the control knob to 0 and remove the blender jar from the motor unit.
5 Pour out the drink through the spout of the blender jar (Fig. 9).
Make sure the lid is closed and the measuring cup is in the lid. This prevents pulp and skins from
ending up in your drink.
6 For optimal results, put the jar with the remaining ingredients back onto the appliance,
without opening/removing the lid. Then let the appliance run for a few more seconds.
7 Pour out the rest of the drink.
8 When you have finished processing, set the control knob to 0 and unplug the appliance.
Tips
-- When you process a large quantity, we advise you not to put all the ingredients in the filter at
the same time. Start to process a small quantity and let the appliance run for a few seconds.
Then switch off the appliance and add another small quantity. Repeat this procedure until you
have processed all the ingredients. Always keep the lid on the blender jar during processing.
-- To get the best result when you make fruit juices and cocktails, add approx. 300ml water to
150g fruit. You can also use other liquids, e.g. to make cocktails.
-- To make tomato juice, cut the tomatoes in four and drop the pieces through the opening in the
lid onto the rotating blades.
Mill
You can use the mill to grind and chop ingredients such as peppercorns, sesame seeds, rice, wheat,
coconut flesh, nuts (shelled), coffee beans, dried soy beans, dried peas, cheese, breadcrumbs, etc.
Always process cloves, star anise and aniseed together with other ingredients. If processed
separately, these ingredients may attack the plastic materials of the appliance.
The mill is not suitable for chopping very hard ingredients like nutmeg and ice cubes.
Do not exceed the maximum level indicated on the mill beaker.
Preparing the mill for use
1 Put the ingredients in the mill beaker (Fig. 10).
Note: See the mill table at the end of this user manual for the recommended quantities and processing
times.
2 Screw the mill blade unit clockwise onto the mill beaker (Fig. 11).
3 Turn the assembled mill upside down and screw it clockwise onto the motor unit (Fig. 12).
Using the mill
1 Switch on the appliance.
We advise you to use the pulse setting or speed setting 5.
Never let the mill run for more than 30 seconds without interruption.
2 When you have finished processing, set the control knob to 0.
3 To remove the mill from the motor unit, turn the mill anticlockwise.
12
English
Chopper (HR2068 only)
You can use the chopper to chop ingredients such as onions, meat, herbs, vegetables, fruit, chocolate,
firm cheese, baby food and nuts.
HR2071/HR2067/HR2061: You can order the chopper (type number HR2939) from your Philips
dealer.
Do not use the chopper to mix liquids. Use the blender for this purpose.
1 Insert the coupling unit of the chopper into the bottom of the chopper bowl (1). Turn the
coupling unit anticlockwise to fix it (2) (Fig. 13).
2 Place the chopper bowl (1) on the motor unit and turn it clockwise to fix it (2).  (Fig. 14)
3 Place the chopper blade unit in the chopper bowl (Fig. 15).
4 Put the ingredients in the chopper bowl (Fig. 16).
Note: See the chopper table at the end of this user manual for the recommended quantities and
processing times.
Do not exceed the maximum quantities  indicated in the table.
Tip: Precut large pieces of food into pieces of 1-2cm.
5 Put the lid on the chopper bowl (1) and turn it clockwise to fix it (2) (Fig. 17).
Note: Make sure the lid is properly fixed before you switch on the appliance.
6 Switch on the appliance.
Note: If the appliance shakes because the food is not evenly distributed, put your hand on the lid.
Note:The chopper does its work in a few seconds. Never let it run longer than a few seconds.
7 When you have finished processing, set the control knob to 0 and unplug the appliance.
8 Turn the chopper bowl anticlockwise (1) and remove it from the motor unit (2).  (Fig. 18)
9 Turn the coupling unit clockwise (1) and remove it from the bottom of the chopper
bowl (2) (Fig. 19).
10Remove the lid and the blade unit from the chopper bowl.
11Empty the chopper bowl.
Always remove blade unit from the chopper bowl and the chopper from the motor unit before
you empty the chopper bowl.
Be careful when you empty the chopper bowl. The cutting edges of the blade unit are sharp.
Citrus press (HR2069 only)
HR2071/HR2068/HR2063/HR2061: You can order the citrus press (type number HR2947) from
your Philips dealer.
Preparing the citrus press for use
1 Insert the coupling unit of the citrus press in the bottom of the juice jug (1). Turn the
coupling unit clockwise until it snaps into position (2) (Fig. 20).
2 Place the sieve in the juice jug (1). Push down the sieve and turn it clockwise until it snaps
into position (2) (Fig. 21).
3 Place the cone onto the driving shaft in the centre of the sieve (Fig. 22).
English 13
4 Place the citrus press on the motor unit and turn it clockwise until it locks into
position.  (Fig. 23)
Using the citrus press
1 First set the control knob to speed 1 and then press the citrus fruit onto the cone.
2 Stop pressing from time to time to remove the pulp from the sieve.
Do not exceed the level indication on the juice jug.
3 When you have finished processing, set the control knob to 0 and unplug the appliance.
4 Remove the juice jug with the sieve and cone still assembled by turning the juice jug
anticlockwise.
5 Remove the cone and the sieve before you pour out the juice.
Cleaning (Fig. 24)
Never use scouring pads, abrasive cleaning agents or aggressive liquids such as petrol or acetone
to clean the appliance.
Always unplug the appliance before you clean it.
Tips:
-- Cleaning the appliance and its parts is easiest immediately after use.
-- If necessary, clean the mesh of the filter with a very soft brush.
-- Always disassemble all removable parts before you clean them.
,, See the cleaning table for further instructions.
Quick-cleaning the blender jar
1 Fill the blender halfway with warm water and add a few drops of washing-up liquid.
2 Turn the control knob to the pulse setting a few times.
3 Detach the blender jar, empty it and rinse it under the tap.
Storage
-- To store the mains cord, wind it round the reel in the bottom of the appliance (Fig. 25).
-- Store the appliance in a safe and dry place.
Environment
-- Do not throw away the appliance with the normal household waste at the end of its life, but
hand it in at an official collection point for recycling. By doing this, you help to preserve the
environment (Fig. 26).
Guarantee & service
If you need service or information or if you have a problem, please visit the Philips website at
www.philips.com or contact the Philips Consumer Care Centre in your country (you find its
phone number in the worldwide guarantee leaflet). If there is no Consumer Care Centre in your
country, go to your local Philips dealer.
14
English
Recipes
Soy milk (HR2068, HR2067 only)
Ingredients:
-- 80g dried soy beans
-- 600ml water
1 Soak the soy beans for 4 hours before you process them. Set them aside to drain.
2 Put the soaked soy beans in the filter and pour the water into the blender jar. Blend for 30
seconds at the highest speed.
Do not process more than the quantities indicated in this recipe in one go. Let the appliance cool
down to room temperature before you continue processing.
3 Bring the soy milk to the boil in a pan, then add sugar and leave to simmer.
Ice-blended vanilla coffee
Ingredients:
-- 150ml warm water
-- 1.5 tbsp sugar
-- 2 tbsp instant coffee
-- 200g vanilla ice cream
-- 10 ice cubes
1 Dissolve the coffee and sugar in water. Pour all ingredients (except the ice cubes) into the
blender.
2 Blend until you have obtained a smooth substance.
3 Drop the ice cubes through the opening in the lid while the motor is running.
Kiwi-strawberry smoothie
Ingredients:
-- 200g peeled kiwi, cut into pieces of 3x3x3cm
-- 100g banana, cut into 1cm slices, frozen
-- 150ml pineapple juice
-- 100g frozen strawberries (straight from the freezer)
1 Put the ingredients in the blender jar in the order mentioned above and blend until you have
obtained a smooth substance.
Tip:To gain an even thicker consistency you can also freeze the bananas.
Frequently asked questions
If the appliance does not work or does not work properly, first check the list below. If the problem
is not mentioned in this list, the appliance probably has a defect. In that case we advise you to take
the appliance to your dealer or to an authorised Philips service centre.
Question
Answer
Why does not the
appliance work?
This appliance is equipped with a safety system. The appliance does not
work if the blender jar and lid, the mill beaker or the chopper bowl and
lid (specific  types only) are not assembled correctly on the motor unit
or are not assembled at all. Check if you have assembled the blender jar
and lid, the mill beaker or the chopper bowl and lid (see the various
sections in this user manual). Set the control knob to 0 first.
English 15
Question
Answer
Can I clean all
Yes, except the motor unit, and the coupling unit of the chopper (specific
removable parts in the types only).
dishwasher?
What does ‘pulse’
mean?
When you turn the control knob to the pulse setting, the appliance runs
at its highest speed as long as you keep the knob in this position. Use the
pulse setting if you want to have more control over the processing jobs.
Can I pour boiling hot
liquids into the
blender jar?
No, let hot liquids cool down to 80°C/175°F to avoid damage to the jar.
Why does the motor
produce an unpleasant
smell during
processing?
It is common for a new appliance to give off an unpleasant smell or emit
some smoke the first few times it is used. This phenomenon stops after
you have used the appliance a number of times. The appliance may also
give off an unpleasant smell or emit some smoke if it has been used too
long. In this case, set the control knob to 0 and let the appliance cool
down for 60 minutes.
The appliance stopped Set the control knob to 0 and use a spatula to dislodge the ingredients
that block the blade unit. We also advise you to process a smaller
running because the
quantity.
blade unit is blocked.
What should I do?
Why does the fruit
juice or soy milk
contain a lot of pulp
or skins?
To prevent pulp and skins from ending up in your drink, make sure that
the filter (specific types only) is placed properly in the jar, the lid is closed
and the measuring cup is inserted in the lid.
The blender jar leaks.
What should I do?
Set the control knob to 0 and pour out the ingredients. Make sure that
the sealing ring is properly in place on the blade unit. Also make sure
that the blade unit is assembled correctly.
85
24
1500 ml
cups 6
5
4
3
2
1500 ml
cups 6
5
1250
4
1000
750
500
3
2
1250
1000
750
500
1
250
1
250
0.5
150
0.5
150
86
2
3
4
5
50
40
30
20
10
4
1000
500
2
500
1
250
0.5
150
1
250
0.5
150
1500 ml
cups 6
6
4
750
3
500
2
3
7
1500 ml
1250
1000
750
500
8
9
30
20
10
0 ml
2
150
PULSE
5
1000
2
P 0 1
cups 6
1250
5
4
0
125
0
3
4
5
5
cup
s6
100
2
1500 ml
1250
1000
750
3
750
0.5
1
150
2
250
3
500
4
750
3
5
1250
5
4
cups 6
1500 ml
cups 6
SMOOTHIE
cups 6
ICE
5
4
1500 ml
1250
1000
cups 6
3
750
5
2
500
1
250
0.5
150
4
3
2
1500 ml
1250
1000
750
500
10
11
12
13
14
15
16
17
18
19
20
21
87
22
23
25
26
27
cups 6
5
4
3
2
1500 ml
1250
1000
750
500
1
250
0.5
150
50 - 150g
5 - 8 pulses
50 - 200g
5 - 10 pulses
10 - 20g
7 - 10 pulses
75 - 150g
20 - 30 sec.
max. 75g
15 sec.
max. 100g
25 sec.
100 - 200g
30 sec.
25 - 150g
30 sec.
4222.002.7010.2