1
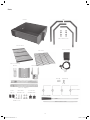
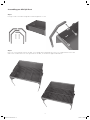
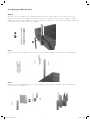
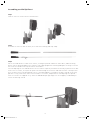
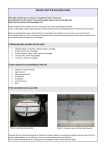
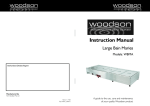
SPIT ROASTER WITH 240V ROTISSERIE
OPERATING INSTRUCTIONS
For model: GSR100
Tools required:
2 Adjustable spanners
1 Phillips head screwdriver
SP003-1C Instructions.indd 1
24/06/11 4:59 PM
3
2
SP003-1C Instructions.indd 2
24/06/11 4:59 PM
Thank you for choosing this Goldair Spit Roaster. This Goldair Spit Roaster has been designed and
manufactured to a high standard of engineering and with proper use and care, as described in this leaflet, will
give you years of useful service. Please read these instructions carefully.
READ ME FIRST
Take extra care when unpacking and assembling your Goldair Spit Roaster.
Some edges may be sharp from the manufacturing process and may result in cuts if not assembled with care.
Before attempting to assemble your Goldair Spit Roaster, ensure all parts are correct and contained within
the box as per the components list.
Goldair suggests laying out all components on a large flat surface and removing any plastic or protective
material before assembling your Spit Roaster.
Do not dispose of packaging until completely satisfied with assembly of your Spit Roaster.
When storing your spit roaster, never leave the rotisseries motor outside, always store indoors in a dry, cool
location.
CLEANING AND CARE OF YOUR BARBEQUE
Ongoing Maintenance
Your Spit Roaster requires regular maintenance (interior and exterior) to ensure it remains in proper working
order and to maintain its appearance.
Exterior:
Powder Coated Exterior
Over time grease, fat and other cooking oils may build up on your Spit Roaster.
To clean, wash with warm/hot soapy water.
Wash off soapy water with warm/hot clean water, leave to air dry.
Once dry, use a BBQ exterior cleaner, this will apply a protective coating on the exterior of the Spit Roaster
and assist in repelling the elements.
Always you use a soft cloth to clean your Spit Roaster.
Never use abrasive heavy duty sponges or scouring pads on the exterior of your Spit Roaster, these products
will begin to remove the powder coated finish resulting in an uneven surface and may result in rusting in the
future.
DO NOT use oven cleaner on the exterior of the Spit Roaster, this will damage the surface.
DO NOT store your rotisserie motor outdoors, always store indoors in a dry cool location.
Interior:
Grills –The best way to clean your Spit Roaster grill is to do so after cooking while the grill is still warm.
When able, remove excess fat, oils, cooking residue with paper towels or a cotton rag from grill.
Depending on how often you use your Spit Roaster you should also wash your grill bi-monthly.
After you have completed the steps above and have allowed time for the Spit Roaster to cool, remove the grill
and wash with warm/hot soapy water. Wash off soapy water with warm/hot clean water, leave to air dry and
place back into Spit Roaster.
NOTE: Never use chlorine based cleaners or bleaches on your Spit Roaster, these products will deteriorate
the surface and contribute to rusting
Spit Roaster Covers – The Spit Roaster must be stored with a cover when not in use (as per the warranty).
After use, allow your Spit Roaster to cool completely before fitting the cover (the cover may melt or burn if
placed onto a hot Spit Roaster). Also condensation can occur when the Spit Roaster cools down under the
cover which can foster rust growth. Please note, a cover can foster a “micro-environment” where moisture,
salts and fat deposits can develop. when stored for long periods of time (typically this will occur during the
Winter months when your Spit Roaster is not used). During these longer periods of non-use a Spit Roaster can
develop stains and/or rust marks. It is important to check regularly (monthly) for any signs of these stains/
rust and clean if needed. If surface stains and rust are left, over time they develop and can become very hard
to remove.
3
SP003-1C Instructions.indd 3
24/06/11 4:59 PM
Assembly, operation and maintenance instructions
Please read and understand the contents of this manual fully before assembling
and operating the barbecue. Failure to do so and follow the instructions could
result in fire or explosion.
Important safety instructions
!
• Do not operate this appliance before reading the
instruction booklet
• Do not place articles on or against this appliance
• Do not use or store flammable materials or spray
aerosols near this appliance
• Do not operate this appliance indoors
• Do not enclose this appliance
• Do not light or operate with cover on
1 This roaster is designed for outdoor use only
THIS APPLIANCE MUST NOT BE USED
INDOORS.
9 Proper clearance from combustible materials
must be maintained at all times. The minimum
clearances are as follows:
Side: 700mm Rear: 700mm Above: 1500mm
2 Intended for use in well ventilated, undercover
outdoor areas only.
10 The roaster will run very hot – avoid contact and
keep children away from area of the unit.
3 Read all operating instructions before lighting.
11 Avoid moving the roaster while hot.
4 Do not store chemicals or flammable materials
near this appliance, keep such materials away
during operation.
12 Allow coals to go out and roaster to cool before
storage.
5 This appliance is not intended for use by young
children or infirm persons unless they have been
adequately supervised by a responsible person to
ensure that they can use the appliance safely.
13 Never use petrol, kerosene, etc to try to start or
reactivate the fire.
14 Keep the power cord of the motor away from hot
parts.
6 Young children should be supervised to ensure that
they do not play with the device
15 Do not use water to put out coals as this may
distort the firebox and damage the enamel coating.
NOTE: The heat of the fire may discolour the body
and firebox.
7 People with flammable clothing (such as nylon, etc)
should keep well away from the roaster while it is
operating.
16 Maximum load of the rotisserie is 10kg.
Ensure the weight is evenly distributed.
8 Do not leave food unattended on the roaster
17 If the supply cord of the motor is damaged, it must
be replaced by suitably qualified technician.
5
4
SP003-1C Instructions.indd 4
24/06/11 4:59 PM
Parts
Legs
Firebox
M6 x 12mm Screws
Cast Iron Grate
Rotisserie Motor
Wire Grille
Rotisserie Bearing
Bracket
Motor Bracket
Heat Shield
Bearing
Stop Clamp
Rotisserie Supports
Rotisserie Forks
Plastic
Spacers
M6 x 30mm
Plated Screws
Screws with
moulded knobs
Rotisserie Handle
M6 x 12mm
Plated Screws
M6 x Nuts
Rotisserie Bar Sections
5
SP003-1C Instructions.indd 5
24/06/11 4:59 PM
Assembling your Mini Spit Roast
Step 1
Fit legs to sides of firebox using M6 x 12mm long black screws.
Step 2
Place the cast iron grate into the firebox, it is held up off the bottom by the lower set of indentations in the side
walls of the firebox. Place the wire grill into the firebox, located on the upper indentations
7
6
SP003-1C Instructions.indd 6
24/06/11 4:59 PM
Assembling your Mini Spit Roast
Step 3
Mount the rotisserie supports to the firebox by sliding them into the square tubes located centrally on the outer
side walls of the firebox. The supports must have the holes to the top and the open side of the support facing the
middle of the firebox. Set the supports to the same height by screwing in the screws with moulded finger knob and
locating into one of the indentations of the support.
Step 4
Mount the Rotisserie bearing bracket on one of the vertical supports using M6 x 12mm long screws and M6 nut.
Step 5
Mount the Heatshield and motor bracket as shown using M6 x 30mm long screws, plastic spacers and M6 nuts
onto the other vertical support.
7
SP003-1C Instructions.indd 7
24/06/11 4:59 PM
Assembling your Mini Spit Roast
Step 6
Slide the rotisserie motor onto the motor bracket.
Step 7
Assemble the rotisserie bar as shown, then slide on the bearing and stop clamp.
Step 8
Put the assembled rotisserie bar on the roaster, locating the pointed end into the motor drive, and the bearing
groove onto the bearing support. Then slide the stop clamp up against the bearing and tighten its wing screw. This
will ensure the bar does not slip out from the motor drive.
The forked prongs are assembled onto the rotisserie bar as required, to hold the meat firmly in position on the bar.
Fit the first set of forks, then spear the point of the bar through the meat first and slide meat into central position.
Try to keep the meat evenly distributed so there is not a big imbalance of weight as the bar is turned, as this may
put unnecessary strain on the motor. Then fit another set of forks, and position the forked prongs as required.
Four sets of forks are supplied – they can be used doubled up at right angles for extra support; or individually to
suit the meat being cooked.
9
8
SP003-1C Instructions.indd 8
24/06/11 4:59 PM
Lighting, Cooking & Maintenance
Before first use
• Clean the cooking surface with warm soapy water and
rinse thoroughly.
• Dry the cooking surface, and then lightly coat all sides of
the burners, rock trays, plates and grills with a suitable
non-stick BBQ cooking spray.
• Pre-heat your Spit Roaster and you’re ready to go!
Light the roaster without the meat first, since the
firelighters will produce odour that is undesirable to get
into the meat.
Select a location that is away from flammable materials, is
well ventilated and not windy.
Put a layer of charcoal briquettes onto the lower cast iron
grate of the firebox so that the briquettes are 1-2 deep.
Place 3 to 4 firelighter cubes evenly spaced around the
firebox, pushed well down into the briquettes. Light the
firelighters with a match, and allow to burn for about 40 –
50 minutes. By this time the smell of the firelighters will
have burnt away, and the briquettes should be glowing and
displaying a covering of ash.
Care after every use
• Use a suitable BBQ Oil and Grease Remover to clean
excessively dirty parts.
• Scrub the cooking surface thoroughly with clean warm
water.
• To prevent rusting, lightly coat your cast iron grate with a
suitable non-stick BBQ cooking spray.
To protect your Spit Roaster we strongly recommend using
outdoor protective covers when not in use.
The rotisserie bar carrying the meat can now be positioned
on the roaster. You may want to adjust the height of the bar
on the supports to suit the type and size of meat you are
cooking. (ie it may need to be lower down for chickens, and
higher up for a large leg or side of meat)
Plug the rotisserie motor in to 240volt mains power and
switch on at the switch at the side of the motor box. The
roast should now be turning slowly over the heat.
Regular maintenance will prolong the life of your
Spit Roaster.
The grille on the top of the firebox can also be used for
other cooking, (eg baking potatoes) and warming, so long
as the heat to the main roast is not obstructed significantly.
Steel
The steel in this product may experience rusting
deterioration over a prolonged period of time if left outside
unprotected.
Depending on wind conditions, the briquettes should burn
3-4 hours.
If the fire begins to die down, add further charcoal
briquettes as required. Lift the top wire grille using tongs
and avoid contacting the body of the roaster when doing so,
as it will be very hot.
Maintenance and Service
Cleaning your roaster
Your roaster will look better and last longer if you keep it
clean. Follow these simple steps.
The cooking surfaces: While the cooking surfaces are
still hot, take a long handled brush and a scraper and
remove remaining oil and food scraps. You should use an
oven mitt to avoid burning yourself.
The roaster body: Grease can build up on the body of the
roaster. When the roaster has cooled, simply clean it off
with hot water and detergent.
Do not use oven cleaner as this will damage the surface
coating.
The firebox: clear out ash and brush out once cool.
Storing your roaster
The roaster should be stored in a sheltered location. Be
especially careful not to allow the motor unit to become
wet. If you do not intend to use the unit for a long duration,
lightly spray the surfaces of the body and rotisserie with
canola oil.
This will help protect against corrosion.
Servicing your roaster
Service and spare parts are available from your retailer.
9
SP003-1C Instructions.indd 9
24/06/11 4:59 PM
If your Goldair product fails to operate satisfactorily, please contact Goldair via phone in the
first instance. To obtain a repair or replacement product under this warranty, you will need
to produce satisfactory evidence of date of purchase. The completed warranty and purchase
receipt must be presented with the product. The warranty should be filled out at the time of
purchase. It is in your interest to make sure this is done. Please note, BBQ covers (if included)
are not covered under the warranty.
If the product is to be replaced (cannot be repaired) then that replacement will be of the same or
similar product or accessory excluding packaging, instruction card etc. Where a replacement
product is supplied, this shall be guaranteed for the balance of the original warranty period.
Any model that is no longer available will be replaced by a model of a value and with such
features as we consider appropriate in the circumstances. Goldair Ltd is not responsible for
freight forwarding charges, losses or damage in transit.
If service is required after the warranty period has expired, the product should be inspected by
a qualified gas service technician. Service outside of the warranty period will be at your cost.
ONE YEAR WARRANTY
Your Goldair product has been inspected, tested and is guaranteed subject to the following for
a period to one year from the date of purchase against defects in workmanship and materials.
During this period, such defects will be rectified by repair or replacement of the product
purchased. Your warranty becomes invalid if in our opinion the product has been misused,
incorrectly assembled, tampered with, connected to a gas supply not corresponding with the
name plate specification, stored outdoors without the use of a BBQ cover and exposed to the
elements or not regularly maintained as per the “Cleaning and Care and Maintenance” notes at
the beginning of this user manual. The warranty does not include any labour or other associated
expense that may be involved in removal or installation of the product. Normal wear & tear and
any issues involving spider/insect web build ups inside gas lines are expressly excluded.
Consumers Guarantee Act (1993).
In accordance with the above act, consumers are advised that: The manufacturer does not
undertake that repair facilities and parts are necessarily available for this product.
If any of the provisions of the foregoing are contrary to any relevant legislation, then that
provision shall be deemed to be excluded from the warranty and the rest of the provisions will
continue to apply.
IMPORTANT: PLEASE RETAIN THIS WARRANTY CARD
NAME:
ADDRESS:
PURCHASED FROM:
SUBURB:
DATE OF PURCHASE:
NAME OF PRODUCT:
Model No:
10
11
SP003-1C Instructions.indd 10
24/06/11 4:59 PM
ONE YEAR WARRANTY
SUPPORT AND TECHNICAL ADVICE
North Shore City, Auckland, New Zealand
Monday – Friday 8am-5pm
Phone: 0800 232 633
Website: www.goldair.co.nz
11
SP003-1C Instructions.indd 11
24/06/11 4:59 PM
SPIT ROASTER WITH 240V ROTISSERIE
OPERATING INSTRUCTIONS
For model: GSR100
CPIN002231
SP003-1C Instructions.indd 12
24/06/11 4:59 PM