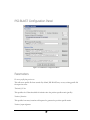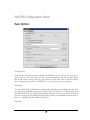
1
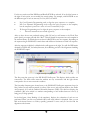
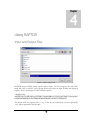
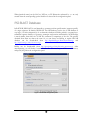
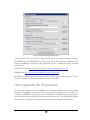
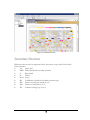
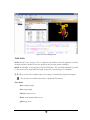
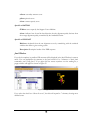
BIOINFORMATICS SOLUTIONS INC RAPTOR 4.1 User Manual © Bioinformatics Solutions Inc. 470 Weber St. N. Suite 204 Waterloo, Ontario, Canada, N2L 6J2 Phone 519-885-8288 • Fax 519-885-9075 http://www.bioinfor.com [email protected] 1 RAPTOR 4.1 User Manual TABLE OF CONTENTS INTRODUCTION TO RAPTOR 4.1 ....................................................................................................................................................... 4 HOW TO USE THIS USER’S MANUAL .......................................................................................................................................................... 4 WHAT IS HOMOLOGY MODELING? ........................................................................................................................................................... 4 General procedures to create homologus models................................................................................................................................ 5 Does homology modeling always work?.............................................................................................................................................. 5 FOLD RECOGNITION (PROTEIN THREADING)............................................................................................................................................ 5 Fold recognition: procedures............................................................................................................................................................... 6 WHAT IS RAPTOR?.................................................................................................................................................................................. 6 WHAT CAN RAPTOR DO FOR YOU? ......................................................................................................................................................... 7 GETTING STARTED WITH RAPTOR 4.1 ........................................................................................................................................... 8 WHAT WE WILL NEED: .............................................................................................................................................................................. 8 Package contents .................................................................................................................................................................................. 8 System requirements............................................................................................................................................................................. 9 INSTALLATION & REGISTRATION (WINDOWS)......................................................................................................................................... 9 Organization of directories (Windows).............................................................................................................................................. 11 INSTALLATION & REGISTRATION (LINUX) ............................................................................................................................................. 11 Organization of directories (Linux) ................................................................................................................................................... 13 FEATURES WALKTHROUGH ............................................................................................................................................................ 14 BEGIN THE QUICK TOUR ......................................................................................................................................................................... 14 Load Sequence.................................................................................................................................................................................... 14 Run Sequence...................................................................................................................................................................................... 15 USING RAPTOR...................................................................................................................................................................................... 18 INPUT AND OUTPUT FILES ...................................................................................................................................................................... 18 PSI-BLAST DATABASE .......................................................................................................................................................................... 20 THREADING METHODS............................................................................................................................................................................ 21 Dynamic Programming vs. Integer Programming ............................................................................................................................ 21 NoCore vs. NPCore ............................................................................................................................................................................ 21 Running one sequence with more than one method........................................................................................................................... 21 JUDGING PREDICTION QUALITY FROM ALIGNMENT ................................................................................................................................ 21 USING MODELLER................................................................................................................................................................................... 22 CUSTOMIZING TEMPLATES ..................................................................................................................................................................... 22 USING JMOL ............................................................................................................................................................................................ 22 REPORTING BUGS ................................................................................................................................................................................... 23 USING PSI-BLAST.................................................................................................................................................................................. 24 PSI-BLAST INTRODUCTION .................................................................................................................................................................. 24 INPUT AND OUTPUT ................................................................................................................................................................................ 24 HOW PSI-BLAST WORKS ...................................................................................................................................................................... 25 HOW TO GENERATE THE 3D STRUCTURES .............................................................................................................................................. 26 USING JMOL ........................................................................................................................................................................................... 27 JMOL INTRODUCTION ............................................................................................................................................................................. 27 JMOL MOUSE COMMANDS ...................................................................................................................................................................... 27 JMOL MENU COMMANDS ........................................................................................................................................................................ 28 MENU SYSTEM....................................................................................................................................................................................... 29 LAUNCH RAPTOR.................................................................................................................................................................................. 29 FILE ......................................................................................................................................................................................................... 30 EDIT......................................................................................................................................................................................................... 32 RUN ......................................................................................................................................................................................................... 32 TOOLS ..................................................................................................................................................................................................... 33 Update PDB Sequence ....................................................................................................................................................................... 33 WINDOW ................................................................................................................................................................................................. 34 HELP ........................................................................................................................................................................................................ 34 WORK FLOW PANEL ............................................................................................................................................................................... 34 PSI-BLAST CONFIGURATION PANEL .................................................................................................................................................... 35 PARAMETERS .......................................................................................................................................................................................... 35 DATABASE PATHS ................................................................................................................................................................................... 36 OUTPUT PATH ......................................................................................................................................................................................... 36 RAPTOR CONFIGURATION PANEL ........................................................................................................................................................ 37 Basic Options...................................................................................................................................................................................... 37 Advanced Options............................................................................................................................................................................... 38 TEMPLATE SETTINGS .............................................................................................................................................................................. 38 NAVIGATION PANEL ........................................................................................................................................................................... 40 OUTPUT WINDOW ................................................................................................................................................................................... 40 PSI-BLAST PROFILE .............................................................................................................................................................................. 40 SECONDARY STRUCTURE ........................................................................................................................................................................ 41 RANKING BY SCORE ................................................................................................................................................................................ 42 Top Window........................................................................................................................................................................................ 42 Bottom Window .................................................................................................................................................................................. 45 ALIGNMENTS........................................................................................................................................................................................... 46 ABOUT BIOINFORMATICS SOLUTIONS INC................................................................................................................................ 47 RAPTOR SOFTWARE LICENSE......................................................................................................................................................... 48 RAPTOR REFERENCE LIST ............................................................................................................................................................... 50 3 Chapter 1 Introduction to RAPTOR 4.1 R APTOR makes 3D structure predictions of proteins by identifying structurally similarities in proteins and aligning them to the protein sequence. RAPTOR not only uses NoCore, NP Core algorithms, but advanced Integer Programming to ensure pair-wise contact potential is carefully inspected. Thorough research involves knowing all the facts, don’t you think your software should provide it to you? RAPTOR gives it all. How to use this user’s manual This user’s manual is intended to help us get started using RAPTOR 4.1, acquaint us with its functionality, show us how to customize RAPTOR to our application, allow us to work efficiently with the interface, provide a task based reference, and help us with troubleshooting. As such, this manual is organized into chapters based on these categories. Use the table of contents at the front of this manual to access the relevant section. What is Homology Modeling? Suppose you know the amino acid sequence of a target protein and you want to know its threedimensional (3D) structure, unfortunately, this has yet to be solved experimentally by X-ray crystallography or NMR. An underlying premise for homology modeling is that a set of proteins are homologous, their 3D structures are more conserved than their sequences. The homology modeling method constructs the three-dimensional structure for a target sequence by using the homologous proteins of the target. 4 General procedures to create homologus models • • • • • • • Homologue selection: Identify one or several homologous proteins from the structure database (i.e. PDB). o Some computer tools such as PSI-BLAST can be used for this action. Sequence alignment: Build a multiple sequence alignment among the target sequence and the selected homologous sequences. Core determination: Identify the most conserved segments (cores) and variable segments (loops) in the multiple sequence alignment. Core modeling: Predict coordinates of core residues of the target sequence from those of the known structure(s). Loop modeling: predict conformations for the loops in the target sequence. Side chain packing: construct the side chain coordinates. Refinement and Evaluation: The quality of predicted structure can be measured by using some software. Does homology modeling always work? Given a target sequence, if there are no homologous proteins found from the structure database, you cannot use homology modeling. In practice, when the sequence identity in the alignment is below 25%, the homology is insignificant and you can not expect to obtain a good homologous model from homology modeling. Fold Recognition (Protein Threading) Fold recognition is based on the observation that the number of distinct structures are not growing as fast as the PDB as a whole and 90% of the new structures submitted to PDB in the past several years have similar structure folds to known structures in PDB. Currently, there are more than 1000 folds cataloged. Protein threading predicts protein structures by using statistical knowledge of the relationship between the structure and the sequence. The prediction is made by “threading” each amino acid of the target sequence to a position in the template structure; evaluation is performed with respect to how well the target fits the template. After the template with the best-fit is selected, the model is built on the alignment with the chosen template. 5 Fold recognition: procedures Preparation: the construction of a structure template database: • Select protein structures from the PDB as structural templates. • The design of a scoring function: Design a good scoring function to measure the fitness between target sequences and template. o A good scoring function should consider: mutation potential, environment fitness potential, pair-wise potential, secondary structure compatibilities and gap penalties. The quality of the scoring function is closely related to the prediction accuracy. Given a Target Sequence • Threading alignment: Align the target sequence with each structure template by optimizing the designed scoring function. If there are ‘N’ structure template in the database, after this step, there will be ‘N’ alignments. • Ranking alignment: All the obtained alignments are ranked by using various measuring methods and the best alignment is identified. • Build the structural model from the selected alignment as homology modeling does, i.e. core determination, core modeling, loop modeling, side-chain packing. Fold recognition is most effective for hard targets that homology modeling cannot handle. In practice, when the sequence identify is below 25%, in many cases, fold recognition can give reasonably good prediction. What is RAPTOR? RAPTOR (RApid Protein Threading predictOR) is a protein threading software package developed by Dr. Jinbo Xu and Dr. Ming Li. It applies novel Linear Programming techniques to the protein threading problem and has achieved great success. RAPTOR minimizes the scoring function (i.e. seeks for the optimal alignment between sequence and template) by integer programming method. The scoring function used by RAPTOR rigorously takes the pair-wise contact potential into account. The threading problem is formulated as a large scale integer programming problem and RAPTOR can find a global optimal alignment. It turns out that RAPTOR can produce high accuracy alignments and is most effective for hard targets. RAPTOR has been consistently ranked in the top tier in recent CASP’s (CASP5, CASP6, CASP7). In CASP5, RAPTOR was ranked number one and RAPTOR paper was voted as the “most innovative paper” by peers in the research community. 6 What can RAPTOR do for you? First, our software has PSI-Blast included, with which you can perform a homology search. If you have Modeler installed, our software will allow you to build the 3D structures of the PSI-Blast output. The structures will be displayed by Jmol. If PSI-Blast cannot find any significant hits, you can try using RAPTOR to do protein threading. Similar, Modeller can be used to help build 3D structures from threading outputs. In RAPTOR, three different protein threading algorithms have been implemented. Each method can be used to deal with certain types of targets. After putting them together, you will experience the real strength of protein threading. You can always start from the easy one and this will save your valuable time. 7 Chapter 2 Getting started with RAPTOR 4.1 Everything we need to know from the beginning and step by step. T his section of the manual will guide us through the process of installation and configuration of RAPTOR 4.1. If we run into any problems we can contact technical support at [email protected]. What we will need: Package contents The RAPTOR 4.1 package should contain: This manual Two RAPTOR CDs or equivalent downloadable files. For Windows these files/CDs are: RAPTOR1.exe (executable and template library), RAPTOR2.exe (RefSeq Database used by PSI-BLAST). For Linux these files/CDs are: RAPTOR1.tar.gz (executable and template library), RAPTOR2.tar.gz (RefSeq Database used by PSI-BLAST); in addition, Liux users require the installation program Install.sh. 8 System requirements RAPTOR will run on most platforms with the following requirements: Equivalent or superior processing power to a Pentium at 500 MHz. At least 512 M of memory (RAM). The RAPTOR package will take up to 4G space on the hard drive. Multiple high speed CPUs are not required, but are preferred for faster processing. Installation & Registration (Windows) If we already have RAPTOR installed on our system, we must uninstall it before proceeding. First create a temporary directory on your hard drive. Copy all the installation files to the temporary direction and enter that directory. To install the software, please load the file RAPTOR1.exe, and complete its setup before progressing to the installation of file RAPTOR2.exe. Follow the onscreen directions and you should have no trouble. Note that for compatibility reason, there cannot be any space in the installation path or any path used in RAPTOR, i.e. C:\Program Files\RAPTOR is NOT acceptable. After you finish the installation of RAPTOR1.exe, a window will pop up asking you for a registration key. Input the key you got from BSI and continue to install RAPTOR2.exe Post installation, before you run RAPTOR for the first time, you need to log out and log in again to make sure the environmental variable is properly set. If you find that the installation has difficulty processing the installation, it could possibly be due to environment variables, follow these instructions to complete the installation. 1. After you install RAPTOR1.exe in a directory, proceed to Control Panel > System >Advanced 9 2. Click “Environment Variables” button at the bottom of the panel. This will prompt a window to pop up. 3. Click the “New” button on the top. This will cause an input window to appear. 4. Input “RAPTOR_HOME” as Variable name. Input the path where you installed RAPTOR 1 as the variable value. 5 Continue to install RAPTOR2.exe. If you do not have RAPTOR2.exe (or want to download REFSEQ or NR database by yourself) PSI-BLAST is used internally by RAPTOR. Database searched by PSI-BLAST can be either NR or REFSEQ which is a representative subset of NR and half the size of NR. By default, REFSEQ comes with RAPTOR which is compressed in RAPTOR2.exe. Optionally, you can download REFSEQ or NR by yourself and install it manually, which is quite straightforward. For that install RAPTOR1.exe first by opening the file. Then you can download NR or REFSEQ by yourself from ftp://ftp.ncbi.nih.gov/blast/db/ Here are instructions for downloading NR database: 1. Download nr.00.exe and nr.01.exe to a directory 2. Uncompress them in that directory and you will obtain a bunch of files whose names start with “nr.00.” or “nr.01.”. 3. Move those files to RAPTOR\data\nr\ 4. After that, you need to specify the NR database path in the configuration panel. i.e. if the NR database is installed at D:\RAPTOR\data\nr, then the “PSI-BLAST Database” field in the “Advanced” tab of the configuration panel should be set to “D:\RAPTOR/data/nr/nr.” Note: You need to specify both the path and file prefix for the NR database. Alternatively, you can download REFSEQ database which is much smaller than NR. Here are instructions for downloading REFSEQ database: 1. Download refseq_protein.tar.gz to a directory. 2. Uncompress the file and you will obtain a bunch of files whose names start with “refseq_protein”. 3. Move those file to RAPTOR\data\REFSEQ 4. After that, you need to specify the database path in the configuration panel. i.e. if the REFSEQ database is installed in D:\RAPTOR\data\REFSEQ\, then the “PSI-BLAST 5. Database” field in the “Advanced” tab of the configuration panel should be set to D:\RAPTOR\data\REFSEQ\refseq_protein. Note: You need to specify both the path and file prefix for the REFSEQ database. 10 The first time we run RAPTOR, we will be told that the product is not registered. Press the “Ok” button and a dialogue will appear. Enter the registration key that came with the product – whether it be a key for the full version or time limited trial version. We must also enter our name, the name of our organization. If we are connected to the internet, registration will be completed automatically. If all is well, a dialogue will show “Registration Successful” and RAPTOR will load. Organization of directories (Windows) RAPTOR bin\ blast\ data\ fssp\ PSM\ parameters\ fssp.list RAPTOR.conf GuiProperties.conf Ip-files\ nocore-files\ nocore2-files\ pdb\ pdbseq\ jre\ ver\ weights\ Binaries PSI-Blast binaries Template fssp Files Template PSM Files Template List Configuration File of RAPTOR Configuration File of the GUI Parameter Files used in IP Parameter Files used in NoCore Parameters files used in NPCore Template PDB Files Protein sequences of structures stored in PDB Java Run Environment Version and registration information Parameter Files used by Support Vector Machine Installation & Registration (Linux) If we already have RAPTOR installed on our system, we must uninstall it before proceeding. First open an X window client, create a temporary directory on your hard drive. Copy all the installation files to the temporary direction and enter that directory. You may need to run “chmod u+x Install.sh” to make the script file executable. As well, you need root privilege to install RAPTOR in a system directory. Run install.sh to start installing RAPTOR. You can specify an installation directory or simply use the default. When the installation is done, a registration window will appear. Enter the registration key that came with the product – whether it be a key for the full version or time limited trial version. You must also enter your name, the name of your organization. If you are connected to the internet, registration will be completed automatically. 11 The installation will create RAPTOR_GUI.sh in the specified installation directory. In RAPTOR_GUI.sh, you will find a line similar to “Export RAPTOR_HOME=….” It is recommended that you append the line to your .bashrc or .cshrc file. So next time when you log in, the environmental variable RAPTOR_HOME will be automatically set. If you do not have RAPTOR2.tar.gz (or want to download REFSEQ or NR database by yourself) PSI-BLAST is used internally by RAPTOR. Database searched by PSI-BLAST can be either NR or REFSEQ which is a representative subset of NR and half the size of NR. By default, REFSEQ comes with RAPTOR which is compressed in RAPTOR2.tar.gz. Optionally, you can download REFSEQ or NR by yourself and install it manually, which is quite straightforward. For that install RAPTOR1.tar.gz first by running Install.sh. Then you can download NR or REFSEQ by yourself from ftp://ftp.ncbi.nih.gov/blast/db/ Here are instructions for downloading NR database: 1. Download nr.00.tar.gz and nr.01.tar.gz to a directory 2. Uncompress them in that directory and you will obtain a bunch of files whose names start with “nr.00.” or “nr.01.”. 3. Move those files to RAPTOR/data/nr/ 4. After that, you need to specify the NR database path in the configuration panel. i.e. if the NR database is installed at /home/usr/RAPTOR/data/nr, then the “PSI-BLAST Database” field in the “Advanced” tab of the configuration panel should be set to “/home/usr/RAPTOR/data/nr/nr.” Note: You need to specify both the path and file prefix for the NR database. Alternatively, you can download REFSEQ database which is much smaller than NR. Here are instructions for downloading REFSEQ database: 1. Download refseq_protein.tar.gz to a directory. 2. Uncompress the file and you will obtain a bunch of files whose names start with “refseq_protein”. 3. Move those file to RAPTOR/data/REFSEQ 4. After that, you need to specify the database path in the configuration panel, i.e. if the REFSEQ database is installed in /home/usr/RAPTOR/data/REFSEQ/, then the “PSI-BLAST 5. Database” field in the “Advanced” tab of the configuration panel should be set to /home/usr/RAPTOR/data/REFSEQ/refseq_protein. Note: You need to specify both the path and file prefix for the REFSEQ database. 12 Organization of directories (Linux) RAPTOR bin/ blast/ data/ fssp/ PSM/ parameters/ fssp.list RAPTOR.conf GuiProperties.conf Ip-files/ nocore-files/ nocore2-files/ pdb/ pdbseq/ jre/ ver/ weights/ Binaries PSI-Blast binaries Template fssp Files Template PSM Files Template List Configuration File of RAPTOR Configuration File of the GUI Parameter Files used in IP Parameter Files used in NoCore Parameters files used in NPCore Template PDB Files Protein sequences of structures stored in PDB Java Run Environment Version and registration information Parameter Files used by Support Vector Machine 13 Chapter 3 Features Walkthrough Let’s familiarize ourselves with RAPTOR. T his section of the manual will walk us through most of the basic functionality of RAPTOR 4.1. After completing this section we will have seen how easy it is to load a sequence, perform testing, all the way through viewing a predicted three dimensional structure. Begin the Quick Tour Welcome to the quick tour of RAPTOR. The RAPTOR software is streamlined for user ease. We start off loading up the program and are presented with an empty task pane. The logical thing to do is load a query sequence. Load Sequence The sequence can be obtained from any directory accessible by your computer. To load this, under the file menu, click "Load File". In this case, we are going to run just one sequence, the provided sample sequence, 2acy.seq, located at RAPTOR\data\sample\. RAPTOR operates by running sequences with the base tag "SEQ" and produces output files with the base tag "XML". Press OK. 14 Figure 1: Load a sequence into the workspace Now we see the query sequence, 2acy.seq, in its entirety. Figure 2: Test sequence in the workspace Run Sequence To run the selected sequence, select “Run” in the menu and select “Run Selected” from the dropdown menu. A work flow panel will pop up. You can select to run RAPTOR or PSI-BLAST or both. You can click the “settings” buttons in Figure 3 to customize their configuration. Figure 3: Work Flow Configuration Panel 15 For this test, make sure Run-PSI-Blast and Run RAPTOR are selected. If we click the button to the right of each option, we can modify the search settings. For example, with RAPTOR we see the different types of tests we can run, No Core, NP Core and IP. • • • No Core: Dynamic Programming used to align the query sequence to a template. NP Core: Dynamic Programming used to align the query sequence to the template, but the template is parsed as a series of cores connected by loops. IP: Integer Programming used to align the query sequence to the template. o Pair-wise interactions are treated rigorously After we have chosen our preferred settings, click OK and you will return to the Work Flow panel. Specify an output path and click “Run”. This will thread the sequence into each template in the structure library. It will take about one hour for RAPTOR to run one sequence, depending on the sequence length. PSI-BLAST is much faster and will about 10 minutes to finish one sequence. After the sequence is finished, a tabbed window will appear on the right. You will find PSP matrix obtained by PSI-BLAST, Secondary Structure, Score Ranking, and all of the Alignments including the PSI-BLAST output. Figure 4: Output Display Panel The first pane that opens up is the PSI-BLAST Profile pane. This displays which residues are conservative. The dark colours mean the residues are very conservative and the light colours correspond to less or non-conservative residues. The Secondary Structure pane located next to the PSI-BLAST Profile pane represents loops (in blue), helixes (in red) and beta strands (in yellow). Here we see such relevant details as the Amino Acid sequence (AA) and the Predicted Secondary Structure (PHD). The third row displays the confidence (Rel) score which is a number corresponding to each residue between 0 and 9, (0 being poor, 9 being optimal). In the third pane, Score Ranking (of the templates), displays the evaluations of each test we performed. When you click a test method folder, each result within it is displayed. Here you can find such relevant factors as eValues, specially generated Z scores and you can also find the alignment at the bottom. 16 The last pane is the Alignment pane, which allows us to compare between the different methods of testing performed. For example, we can observe the top 5 alignments for one method or we can compare any two alignments from any two methods at the same time. This tutorial was designed to simply give users and potential users a quick impression of what RAPTOR is capable of producing. Other features not discussed on this page, but possible with RAPTOR include; running multiple sequences, advanced configuration and simple navigation to relevant sequences within the NCBI website, just to name a few. 17 Chapter 4 Using RAPTOR Input and Output Files Figure 5: Load a sequence file RAPTOR accepts FASTA format sequence files as input. To load a sequence file, click “File” menu and select “Load File”. In the popup file browser, select the right file filter and display all .seq files. Here is an example of FASTA format sequence: >2acy(len=98) AEGDTLISVDYEIFGKVQGVFFRKYTQAEGKKLGLVGWVQNTDQGTVQGQLQG PASKVRHMQEWLETKGSPKSHIDRASFHNEKVIVKLDYTDFQIVK The default suffix for sequence file is “.seq”. If the file you loaded does not have right suffix, “.seq” will be appended to the file name. 18 You can also create a new sequence in RAPTOR. To do that, select “File” menu and choose “New Seq”. This will add a new node in the navigation panel and a new sequence window on the right as shown in Figure 6. You can use the “Edit” menu to copy and paste a new sequence to the sequence window and save it to the hard drive. Figure 6: Create a new sequence file The output of RAPTOR is stored in XML files. You can load an XML file saved by RAPTOR and display its content. To load an XML file, click “File” menu and select “Load File”. In the popup file browser, as shown in Figure 5, select the right file type and click “Open” button to display an .xml file. For sequence XYZ, after it is run by RAPTOR, in the output directory, you will find a subdirectory XYZ/.All the output files of XYZ are stored in this subdirectory. In XYZ/, you will find an XYZ.xml file which storesthe RAPTOR and Blast output. And there is a XYZ.raptor_xml file which only stores RAPTOR output. There is a raptor/ subdirectory in XYZ/ which stores the raw output files of XYZ. Here is the organization of RAPTOR output files in directory XYZ XYZ/ XYZ.xml XYZ.raptor_xml raptor/ PSP/ SS/ [method name]/ MODEL OUT <Modeller Output> <ICM Pro Input> PSI-BLAST output files PSI-PRED output files Alignment files .pir file Ranking files .scoreRank file Modelleroutput PDB file ICM Pro input files The structure of output directory: PSP SS [method name] PSI-BLAST output file Secondary structure prediction output files Temporarily store threading output 19 Where [method name] can be NoCore, NPCore, or IP. Directories embraced by <> are only created when the corresponding option checkbox is selected in the configuration panel. PSI-BLAST Database In RAPTOR, PSI-BLAST is used internally to generate position specific matrix (sequence profile) of a target sequence. By default, PSI-BLAST uses NR database, but the size of NR database is very large (1 G after compression). So an alternative database is RefSeq, which is a curetted nonredundant sequence database of genomes, transcripts and proteins maintained by NCBI. RefSeq is much smaller, about half size of NR. We conducted a comparison of the two. The profiles obtained from them are almost the same. So you can always use RefSeq to replace NR. NR database can be downloaded from ftp://ftp.ncbi.nih.gov/blast/db/nr.00.tar.gz and ftp://ftp.ncbi.nih.gov/blast/db/nr.01.tar.gz. RefSeq can be downloaded from ftp://ftp.ncbi.nih.gov/blast/db/refseq_protein.tar.gz. After uncompressing, you will obtain a bunch of index files. You need to put them in some directory and specify the path in the configuration panel. Figure 7: RAPTOR configuration panel 20 Threading Methods Dynamic Programming vs. Integer Programming RAPTOR has three threading methods available: NoCore, NPCore, and IP. NoCore and NPCore both use dynamic programming to optimize the scoring function. IP uses integer programming to optimize the scoring function. The difference is that if a scoring function considers pair-wise contact, dynamic program can only find a local optimum solution while integer programming can find the global optimal solution. Most of other threading servers are based on dynamic programming and RAPTOR’s integer programming is unique. NoCore vs. NPCore NoCore and NPCore are both based on dynamic programming. The difference is that in NPCore, the template and target are first divided into cores before doing threading. A core is a conserved segment of a protein. NoCore and NPCore are very effective for easy targets. Running one sequence with more than one method IP’s running time is longer than NoCore and NPCore. Thus, given a target sequence, you can run NoCore first. If the prediction is not good, try NPCore. If both cannot give good predictions, you can try IP. This will save you much time. Of course, you can also run more than one methods at one time. RAPTOR can keep up to three methods’ output in the XML file. When you run NPCore after running NoCore, the output will be automatically inserted into the XML file. If you run NoCore for the second time with different configuration, the old result in the XML file will be overwritten by the new result. The fist step of RAPTOR is to run PSI-BLAST. If you already run NoCore, then when you run NPCore, this step will be skipped, as the PSI-BLAST is stored in PSP/ under the output directory. If the program finds those files, PSI-BLAST will be skipped. This will save running time. Judging prediction quality from alignment First, you can compare the actual secondary structure of the template with the predicted secondary structure of the query sequence. As the accuracy of secondary structure is around 80%, this is an important measure of the prediction quality. Then you can look at the gaps in the 21 alignment. The fewer the gaps, the better the prediction quality. The shorter the gaps, the better the prediction quality. Ending gaps normally can be ignored. Sometimes, the ending gaps may be very long. This means the program can only give good prediction for part of the query sequence. What if the ending gaps are too long? In many cases, for long sequences, they may have more than one domain. Thus the ending gaps may be very long. You can cut them into domains first and run each domain with RAPTOR. Using Modeller If you are an academic user, you can download Modeller for free from http://www.salilab.org/modeller/download_installation.html and you need to register at http://www.salilab.org/modeller/registration.html to get a license key in order to install Modeller. After you install it, you also need to specify the Modeller path in the configuration panel, i.e., /home/usr/modeller8v2/bin/mod8v2 under Linux and C:\modeller8v2\bin\mod8v2 under Windows. As Modeller8v2 has used python internally, it may give the follow error message while running, due to a bug in python: 'import site' failed; use -v for traceback”. Please ignore this. Customizing Templates RAPTOR/data/parameters/fssp.list stores the names f all the templates in the template library. If you are interested in a specific template, you can save its name in another file and specify the path in the configuration panel. You can also create your own template library. You need a PDB file and generate PSM and fssp file from it. Then put PSM file in RAPTOR/data/PSM and fssp file in RAPTOR/data/fssp. Using Jmol The default viewer for PDB files is Jmol. The default display mode is cartoon. The structure is colored according to the secondary structure. You can rotate the structure by pressing and dragging the left key of the mouse. To move the structure, press the right mouse key and drag. To shrink or enlarge the display, press “shift” key, press the right mouse key and drag. For a full reference of Jmol, you can visit http://jmol.sourceforge.net/ If you want to use some view other than Jmol, please contact us and we can customize it for you. For example, another popular viewer compatible with RAPTOR is RasMol. 22 Reporting Bugs If you find any problem when you run RAPTOR, you can report the problem to us and we will try to help you out as soon as possible. RAPTOR’s configuration files are in .raptor/ under your home directory. To report a bug, please send us the two .conf files in .raptor/. You can make some snapshots of the RAPTOR GUI and the terminal from which you launched RAPTOR and send them to us. 23 Chapter 5 Using PSI-BLAST PSI-BLAST Introduction Position Specific Iterative BLAST (PSI-BLAST) refers to a feature of BLAST 2.0 in which a profile (or position specific scoring matrix, PSSM) is constructed (automatically) from a multiple alignment of the highest scoring hits in an initial BLAST search. The PSSM is generated by calculating position-specific scores for each position in the alignment. Highly conserved positions receive high scores and weakly conserved positions receive scores near zero. The profile is used to perform a second (etc.) BLAST search and the results of each "iteration" used to refine the profile. This iterative searching strategy results in increased sensitivity. Input and Output The input of PSI-BLAST is also a protein sequence in FASTA format. To load a sequence file, click “File” menu and select “Load File”. In the popup file browser, select the right file filter and display all .seq files. Here is an example of FASTA format sequence: >2acy(len=98) AEGDTLISVDYEIFGKVQGVFFRKYTQAEGKKLGLVGWVQNTDQGTVQGQLQGP ASKVRHMQEWLETKGSPKSHIDRASFHNEKVIVKLDYTDFQIVK The default suffix for sequence file is “.seq”. If the file you loaded does not have right suffix, “.seq” will be appended to the file name. The output is a ranking list of protein sequences by their eValues. The alignments and 3D structures of the top hits may optionally be produced. The output is stored in an XML file. To load an XML file, click “File” menu and select “Load File”. In the popup file browser, select the right file type and click “Open” button to display an .xml file. 24 For sequence XYZ, after it is run by PSI-BLAST, in the specified output directory, you will find a subdirectory XYZ/. All the output files of XYZ are stored in this subdirectory. In XYZ/, you will find an XYZ.xml file which stores the RAPTOR and BLAST output. And there is a XYZ.BLAST_xml file which only stores BLAST output. There is a BLAST/ subdirectory in XYZ/ which stores the raw and intermediate output files of XYZ. Here is the organization of BLAST outputs in directory XYZ XYZ/ XYZ.xml XYZ.BLAST_xml BLAST/ profile/ XYZ.chk profile generated by searching REFSEQ XYZ.raw screen output generated by PSI-BLAST pir/ XYZ-<template>.pir alignment file pdb/ template.pdb PDB files downloaded from RCSB PDB pdbseq/ XYZ_pdb.* a bunch of index files generated by formatting sequences extracted from template PDB files pdbout/ XYZ-<template>.pdb PDB files generated by Modeller top/ XYZ-<template>.top top script files generated for calling Modeller How PSI-BLAST Works There are two steps involved in PSI-BLAST search. In the first step, PSI-BLAST searches genomics REFSEQ database to generate the profile matrix (position specific matrix). You can use NR database instead of REFSEQ. You need to specify how many iterations to be repeated to generate the profile. Normally, it is from 1 to 5. An eValue threshold should also be specified for inclusion in the position specific matrix used for PSI-BLAST iterations. 25 Figure 8: PSI-BLAST configuration panel. A database used in the second step is all the protein sequences of protein structures stored at RCSB PDB. We call it PDBSEQ here. After the profile has been generated, PSI-BLAST will search the PDBSEQ by using the profile generated in step one. A ranking list will be generated after the search. PSI-BLAST Tutorial: http://www.ncbi.nlm.nih.gov/Education/BLASTinfo/psi1.html, PDBSEQ’s url: ftp://ftp.rcsb.org/pub/pdb/derived_data/pdb_seqres.txt By default, if a sequence profile from a previous run is found, step one will be skipped. You can start from scratch by selecting the checkbox on the top of the panel. How to generate the 3D structures As the protein sequences stored in PDBSEQ have different lengths than the corresponding structures, the alignments generated in step two can not be used to build the 3D structures. To solve that, the PDB files of the templates are downloaded from RCSB websites and sequences will be extracted from the PDB files and formatted into index files. Then PSI-BLAST searches those index files to regenerate the alignments which will be used to build the 3D structures. 26 Chapter 6 Using Jmol Jmol Introduction Jmol is a Java molecular viewer, designed for three-dimensional chemical structures. Inherent features include reading a variety of file types and output from quantum chemistry programs, and animation of multi-frame files and computed normal modes from quantum programs. RAPTOR utilizes its three-dimensional capabilities and seamlessly displays molecular structures, derived from confirmed/solved protein structure templates. Jmol Mouse Commands Open Jmol menu Ctrl + click the left key or click on 'Jmol' logo, or click the right key Rotate around X,Y Drag the left key Move along X,Y (= translate) Shift + double-click and drag the left key, or ctrl-drag the right key Reset and centre Shift + double-click This only works if double-click is done away from the molecule Rotate around Z Shift + drag horizontally the left key, or Shift + drag horizontally the right key Zoom in / out Shift + drag vertically the left key, or use mouse wheel 27 Jmol Menu Commands Change Background Color Go to ColorÆBackground Change Background Color Go to ColorÆAtomsÆScheme Change Display Scheme Go to StyleÆScheme For a complete reference of Jmol commands, please go to http://jmol.sourceforge.net/docs/JmolUserGuide/ 28 Chapter 7 Menu System Launch RAPTOR Double click RAPTOR icon on your Desktop. Or in RAPTOR/, run RAPTOR_GUI.bat to launch RAPTOR GUI. On Linux, go into RAPTOR/, run RAPTOR_GUI.sh to start RAPTOR. The navigation panel is on the left and the output display panel is on the right, as shown below in Figure 9 (a sequence is already loaded). Figure 9: Navigation window and output display window 29 File Figure 10: File Menu File->New Seq Open a new window on the right to create a new sequence in FASTA format. The default name for the sequence is New0, New1…etc. You can copy your own sequence to the windows. Figure 11: Create a new sequence File->Save Seq Save the content in the window to a .seq file as shown in Figure 12. 30 Figure 12: Save a new sequence to a .seq file File->Load Load a sequence file (.seq) or a result file (.xml). Figure 13: Open a sequence file or an XML file File->Close Selected You can close the output windows for the selected sequence. File->Close All Close the windows for all the sequences in the workspace. File->Delete Output 31 Delete the XML file for the selected sequence. File->Exit Exit the GUI. Edit Figure 14: Edit Menu Copy, Cut & Paste allow you to create a new sequence Edit->RAPTOR Config This will pop up the RAPTOR configuration panel where you can control the settings of RAPTOR Edit->PSI-BLAST Config This will pop up the PSI-BLAST configuration panel where you can control the settings of PSIBLAST. Run Figure 15: Run Menu Run->Run PSI-BLAST 32 This will pop up the PSI-BLAST configuration panel and after you press “Run” PSI-BLAST will run the selected sequence. Run->Run RAPTOR This will pop up the RAPTOR configuration panel and after you press “Run” RAPTOR will run the selected sequence. Run->Run Selected This will pop up the flow control panel and after you press “Run” RAPTOR or BLAST or both will run the selected sequence. Run->Run All This will pop up the flow control panel and after you press “Run” RAPTOR or BLAST or both will run all the sequences in the work space. Tools Figure 16a: Tools Menu Update PDB Sequence This will pop up a window showing the URL of the PDB sequence file. Click ok to download and format the sequence file. Figure 16b: Download PDB sequences 33 Window Figure 17: Window Menu This will select different window from the drop down menu. Help This will launch a browser to allow you to read this manual or visit BSI website. Work Flow Panel Figure 18: Work Flow Menu In work flow panel, you can choose to RAPTOR, PSI-BLAST or both and configure it/their settings. Or, you can setup a simple pipeline that runs PSI-BLAST first and conditionally runs RAPTOR. For that, you need to input an eValue threshold. PSI-BLAST will be run first. If the eValue of the top hit is larger than the threshold, the RAPTOR will be invoked. This allows maximum speed and efficiency; RAPTOR will only be used for sequences that PSI-BLAST cannot handle. 34 PSI-BLAST Configuration Panel Figure 19: PSI-BLAST Configuration Menu Parameters Do not use profile from previous run This will create profile file from scratch. By default, PSI-BLAST may use any existing profile file from previous runs.. Threshold of eValue This specifies the eValue threshold for inclusion into the position specific matrix (profile). Number of Iterations This specifies how many iterations will repeated to generate the position specific matrix. Number of output alignments 35 This specifies how many alignments will be generated by PSI-BLST. If Modeller is used, a 3D structure will be generated for each alignment. Run Modeller to generate 3D structures This will generate a 3D structure for each of the alignments. Produce ICM-Pro Input Files This will generate ICM Pro inputs files in the specified directory. You should call ICM PRO to generate 3D structures instead of using Modeller. Database Paths Database used to generate profile This is the database used to generate the profile. By default, genomics REFSEQ is used. You can use NR instead of it. Database searched by PSI-BLAST This is the protein sequence database. By default, pdb_seq.txt downloaded from PDB website is used. Output Path This is the directory in which RAPTOR will be run and all the output files will be stored. You can chose any location you prefer to store the results. To do this, simply click browse in the configuration window and navigate to your desired location, then press Select. Once all your configurations are set, press Save and you will be able to reuse these settings later. 36 RAPTOR Configuration Panel Basic Options Figure 20: Basic Panel Threading Method There are three threading methods available in RAPTOR: NoCore, NPCore and IP. You can select to run one, two or all of them in a run. . It is recommended to run NoCore and NPCore first. If both cannot come up with any good prediction, try IP. This is due to that IP’s running time is longer than that of NoCore and NPCore, as it is very rigorous in its investigation. 3D Modeling You can let RAPTOR call Modeller automatically after performing the threading. Select the check box and locate the Modeller program in the file browser. If you prefer to do 3D modeling with ICM PRO, RAPTOR, you can also output ICM Pro input files. You just select the check box and specify an output path. For example, the path could be /home/usr/modeller8v2/bin/mod8v2 on Linux, or c:\modeller8v2\bin\mod8v2 on Windows. Output Path 37 This is the directory in which RAPTOR will be run and all the output files will be stored. Output Files You will need to specify how many templates are saved in the templates. If you save too many in the XML file, the file will take up too much disk space. Advanced Options Figure 21: Advanced Panel Template Settings List Path The list of the path of the template is a text file which stores the names of all the templates in the template library. FSSP Path The directory where all the .fssp files are stored PSM Path 38 The directory where all the .psm files are stored PDB Path The directory where all the trimmed .PDB files are stored. Database for PSI-BLAST If you use NR database, it should be [nr path]/nr. If you use RefSeq database, it should be [refseq path]/refseq_protein. Example: if all the NR files are in /home/usr/RAPTOR/data/NR, then this field should be like: /home/usr/RAPTOR/data/NR/nr. If the RefSeq files are in /home/usr/RAPTOR/data/RefSeq/, then this field should read /home/usr/RAPTOR/data/RefSeq/refseq_protein PDB File Viewer This is the view that will be called automatically in RAPTOR. A Jmol viewer comes with RAPTOR. Template Ranking Method RAPTOR supports two template ranking methods: Support Vector Machine (SVM) and Z-score. Normally, you should use SVM. For very long or short sequences, you can use Z-score for possible better result. 39 Chapter 8 Navigation Panel Output Window The left hand side is the navigation panel. Each Sequence is represented by . After running RAPTOR, the RAPTOR output is represented by . You can browse different sequences and their outputs by clicking different icons in the navigation panel. PSI-BLAST Profile The output window is composed of a set of tab windows. The first tab window is PSI-BLAST profile. It is a 20 row matrix, each row corresponding to some amino acid. The column width is the length of the query sequence. Thus each residue in a query sequence has a 20-element vector with it. Each element represents the occurring frequency of certain amino acid at that position in the multiple sequence alignment obtained from PSI-BLAST output. The frequency is from 0 to 100. To make it easier for you to read the profile, the frequency is divided into 10 segments. Each segment will be represented by a color. In this way, the matrix can be represented by a rectangle in the window which is composed of many small square cells. The color of cell is determined by the occurring frequency. You can easily find out the conserved residues and non-conserved residues by differentiating colors. The top half is the ranking list by eValues and if you click a template, the bottom half displays the alignment and functional information. Only templates with (structure icons) have alignments. 40 Figure 22: PSI-BLAST Profile Secondary Structure Different colors are used to represent helices, beta sheets, loops (add color in html). Some acronyms: • AA amino acid • PHD PsiPred predicted secondary structure. • E Beta Strand • H Helices. • Space Loops • Rel Confidence of predicted secondary structure type • PrE Chance of being beta strand (0 to 9) • PrH Chance of being helix (0 to 9) • PrL Cchance of being loop (0 to 9) 41 Figure 23: Secondary Structure Prediction Ranking by Score Top Window Each method is represented by a folder icon, as shown in Figure 24a. If you double click it, the (structure icon) have a templates will be displayed, ranked by their eValues. Templates with a predicted 3D structure. Figure 24a: Output Display Panel 42 Figure 24b: Output Display Panel Table fields: eValue: Short for the Expected Value, it represents the likelihood that this alignment could be obtained randomly. Smaller eValues are optimal as they promote greater confidence. SCOP: the identifier of the template in the SCOP database. The four fields delimited by period ('.') denote class, fold, superfamily and family, respectively, in increasing level of similarity. 2, 3, 4 : to the left of the template name is the number of methods that report this template. : The structure icon indicates that there is a predicted 3D structure. Extra fields: tLen: template length sLen: target length mScore: mutation score fScore: environmental fitness score gScore: gap score 43 ssScore: secondary structure score pScore: pairwise score cScore: contact capacity score Specific to RAPTOR SVMout: score output by the Support Vector Machine zScore: indicates how far and in what direction, that the alignment quality deviates from the average alignment quality, normalized by the standard deviation. Specific to PSI-BLAST BitsScore: calculated from the raw alignment score by normalizing with the statistical variables that define a given scoring system Description: Descriptive header of the PDB sequence Jmol Window If you click a template, its predicted 3D structure will be displayed in the Jmol Window in cartoon mode. You can manipulate the structure in the Jmol window. For a reference of basic Jmol commands, read “Using Jmol”. If you right click the mouse anywhere over the ranking list, a popup window will appear as shown in Figure 25. Figure 25: Popup Window If you select the check box “Show all scores”, the table will expand to 7 columns, showing more detailed scores. 44 Figure 26: Expanded Table You can also choose from the popup menu to let the Jmol window display the predicted structure or the template structure. The last option on the popup menu allows you to export the ranking list to an excel table. The ranking list from each method is stored in one sheet. Bottom Window If you click a template, its alignment will be displayed in a drop down window. The color of the template is consistent with its actual secondary structure and the color of the target is consistent with its predicted secondary structure. If you click “Export PDB file”, a file browser will pop up and you can save the 3D structure in a PDB file. Figure 27: Alignment and Functional Information If you click “Functional Information” tab, a window will drop down and show the functional information extracted from the template PDB file. 45 Alignments The left side of the toolbar allows you to select some session(s) and specify how many templates you want to display. The right side of the tool bar allows you to compare any two alignments. To specify an alignment, you can use method name and its rank. Figure 28: Alignment Comparison 46 Chapter 9 About Bioinformatics Solutions Inc. BSI provides advanced software tools for the analysis of biological data. Bioinformatics Solutions Inc. develops advanced algorithms based on innovative ideas and research, providing solutions to fundamental bioinformatics problems. This small, adaptable group is committed to serving the needs of pharmaceutical, biotechnological and academic scientists; and to the progression of drug discovery research. The company, founded in 2000 in Waterloo, Canada, comprises a select group of talented, award-winning, and intelligent developers, scientists and sales people. At BSI, groundbreaking research and customer focus go hand in hand on our journey towards excellent software solutions. We value an intellectual space that fosters learning and an understanding of current scientific knowledge. With an understanding of theory, we can focus our talents on providing solutions to difficult, otherwise unsolved problems that have resulted in research bottlenecks. At BSI, we are not satisfied with a solution that goes only partway to solving these problems; our solutions must offer something more than existing software. The BSI team recognizes that real people will use our software tools. As such, we hold in principle that it is not enough to develop solely on theory; we must develop with customer needs in mind. We believe the only solution is one that incorporates quality and timely results, a satisfying product experience, customer support and two-way communication. So then, we value market research, development flexibility and company-wide collaboration, evolving our offerings to match the market/user’s needs. Efficient and concentrated research, development, customer focus and market analysis have produced: PEAKS software for protein and peptide identification from tandem mass spectrometry data, RAPTOR and PROSPECT Pro software for threading based 3D protein structure prediction, and PatternHunter software for all types of homology search sequence comparison. 47 Chapter 10 RAPTOR Software License This is the same agreement presented on installation. It is provided here for reference only. If we are evaluating a time limited trial version of RAPTOR, and we wish to update the software to the full version, we must purchase RAPTOR and obtain a full version registration key. 1. License. Subject to the terms and conditions of this Agreement, Bioinformatics Solutions (BSI) grants to you (Licensee) a non-exclusive, perpetual, non-transferable, personal license to install, execute and use one copy of RAPTOR (Software) on one single CPU at any one time. Licensee may use the Software for its internal business purposes only. 2. Ownership. The Software is a proprietary product of BSI and is protected by copyright laws and international copyright treaties, as well as other intellectual property laws and treaties. BSI shall at all times own all right, title and interest in and to the Software, including all intellectual property rights therein. You shall not remove any copyright notice or other proprietary or restrictive notice or legend contained or included in the Software and you shall reproduce and copy all such information on all copies made hereunder, including such copies as may be necessary for archival or backup purposes. 3. Restrictions. Licensee may not use, reproduce, transmit, modify, adapt or translate the Software, in whole or in part, to others, except as otherwise permitted by this Agreement. Licensee may not reverse engineer, decompile, disassemble, or create derivative works based on the Software. Licensee may not use the Software in any manner whatsoever with the result that access to the Software may be obtained through the Internet including, without limitation, any web page. Licensee may not rent, lease, license, transfer, assign, sell or otherwise provide access to the Software, in whole or in part, on a temporary or permanent basis, except as otherwise permitted by this Agreement. Licensee may not alter, remove or cover proprietary notices in or on the Licensed Software, or storage media; or use the Licensed Software in any unlawful manner whatsoever. 4. Limitation of Warranty. THE LICENSED SOFTWARE IS PROVIDED AS IS WITHOUT ANY WARRANTIES OR CONDITIONS OF ANY KIND, INCLUDING BUT NOT LIMITED TO WARRANTIES OR CONDITIONS OF MERCHANTABILITY OR FITNESS FOR A PARTICULAR PURPOSE. LICENSEE ASSUMES THE ENTIRE RISK AS TO THE RESULTS AND PERFORMANCE OF THE LICENSED SOFTWARE. 48 5. Limitation of Liability. IN NO EVENT WILL LICENSOR OR ITS SUPPLIERS BE LIABLE TO LICENSEE FOR ANY INDIRECT, INCIDENTAL, SPECIAL, OR CONSEQUENTIAL DAMAGES WHATSOEVER, EVEN IF THE LICENSOR OR ITS SUPPLIERS HAVE BEEN ADVISED OF THE POSSIBILITY OF SUCH DAMAGE OR CLAIM, OR IT IS FORESEEABLE. LICENSOR'S MAXIMUM AGGREGATE LIABILITY TO LICENSEE SHALL NOT EXCEED THE AMOUNT PAID BY LICENSEE FOR THE SOFTWARE. THE LIMITATIONS OF THIS SECTION SHALL APPLY WHETHER OR NOT THE ALLEGED BREACH OR DEFAULT IS A BREACH OF A FUNDAMENTAL CONDITION OR TERM. 6. Termination. This Agreement is effective until terminated. This Agreement will terminate immediately without notice if you fail to comply with any provision of this Agreement. Upon termination, you must destroy all copies of the Software. Provisions 2,5,6,7 and 10 shall survive any termination of this Agreement. 7. Export Controls. The Software is subject at all times to all applicable export control laws and regulations in force from time to time. You agree to comply strictly with all such laws and regulations and acknowledge that you have the responsibility to obtain all necessary licenses to export, re-export, or import as may be required. 8. Assignment. Customer may assign Customer's rights under this Agreement to another party if the other party agrees to accept the terms of this Agreement, and Customer either transfer all copies of the Program and the Documentation, whether in printed or machine-readable form (including the original), to the other party, or Customer destroy any copies not transferred. Before such a transfer, Customer must deliver a hard copy of this Agreement to the recipient. 9. Maintenance and Support. BSI will provide technical support for a period of thirty (30) days from the date the Software is shipped to Licensee. Further maintenance and support is available to subscribers of BSI's Maintenance plan at BSI's then current rates. Technical support is available by phone, fax and email between the hours of 9 am and 5 pm, Eastern Time, excluding statutory holidays. 10. Governing Law. This Agreement shall be governed by and construed in accordance with the laws in force in the Province of Ontario and the laws of Canada applicable therein, without giving effect to conflict of law provisions, and without giving effect to United Nations Convention on contracts for the International Sale of Goods. 49 Chapter 11 RAPTOR Reference List Feng Jiao, Jinbo Xu, Libo Yu, Dale Schuurmans. Protein Fold Recognition Using Gradient Boost Algorithm. Accepted by CSB 2006. Jinbo Xu. Protein Fold Recognition by Predicted Alignment Accuracy. ACM/IEEE Transactions on Computational Biology and Bioinformatics, 2(2):157-165. 2005. Jinbo Xu, Ming Li, Dongsup Kim, Ying Xu. RAPTOR: optimal protein threading by linear programming. Journal of Bioinformatics and Computational Biology 1:1(2003) 95-117. Jinbo Xu and Ming Li. Assessment of RAPTOR's linear programming approach in CAFASP3. Proteins: Structure, Function, and Genetics, 53(S6): 579--584, Oct. 2003. Invited paper for CASP5, voted by peers as the "most innovative method in CASP5". 50