1
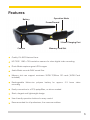
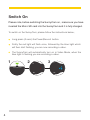
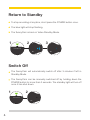
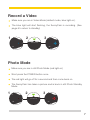
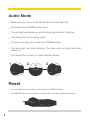
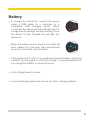
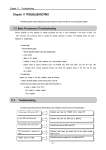
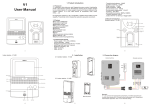
MANUAL & TROUBLE SHOOTING GUIDE
Attention:
Please make sure to fully charge your SunnyCam before use.
Contents
Features
Switch On
.............................................................................................3
..........................................................................................4
Operational Modes
..........................................................................5
Return to Standby / Switch Off
Video Mode / Photo Mode
Audio Mode / Reset
.....................................................6
..............................................................7
.........................................................................8
Battery ................................................................................................9
Lens Change ....................................................................................10
Memory .............................................................................................11
System Requirements
...................................................................12
Saving / Deleting Files ...................................................................13
Trouble Shooting Guide ................................................................14
Features
Operation Mode
Battery
Power/Record
3.5mm Charging Port
Camera
Memory Card Slot
Quality UV 400 Polarized Lens
HD 720P: 1280 x 720 resolution camera for clear digital video recording
Photo Mode captures great JPG images
Audio Mode records WAV sound files
Memory slot can support maximum 32GB TF/Micro SD card (16GB Card
included)
Rechargeable lithium-ion polymer battery for approx. 2-3 hours video
recording
Easily connection to a PC/Laptop/Mac,no driver needed
Sleek, elegant and lightweight design
User friendly operation buttons for easy control
Recommended for all professions, the uses are endless
3
Switch On
Please note, before switching the SunnyCam on, make sure you have
inserted the Micro SD card into the SunnyCam and it is fully charged.
To switch on the SunnyCam, please follow the instructions below;
Long press (2 secs) the Power/Record button.
Firstly the red light will flash once, followed by the blue light which
will then start flashing; you are now recording a video.
The SunnyCam will automatically turn on in Video Mode, when the
blue light is flashing you are recording a video.
1
2
Power/Record
4
Mic
Power/Record
Reset
Micro SD USB
Micro SD
3
Video
Power/Record
Audio
Photo
Video
Audio
Photo
Mic
Micro SD
Mic
Operational Modes
The SunnyCam has 3 different functional modes. It can record video,
still photos, and audio.
The SunnyCam will always automatically switch on in Video Mode.
Toggle between the different modes by pressing the mode button.
The lights indicate which mode you are in;
The blue light indicates the Sunnycam is in Video Mode.
1
x1
Video
Audio
Photo
2
3
Power/Record
Reset
Video
Audio
Photo
USB Reset
Power/Record
Micro SD
USB
Mic
Micro SD
Mic
The red light indicates the Sunnycam is in still Photo Mode.
1
x2
Video
Video
Audio
Photo
Audio
2
3
Power/Record
Power/Record
Photo
Reset Reset
USB USB
MicroSD
SD
Micro
Mic
Mic
Both red and blue lights on indicates the Sunnycam is in Audio Mode.
1
x3
Video
2
3
Power/Record
Audio
Photo
Video
Reset
Audio
Photo
Power/Record
Reset
USB
USB
Micro SD
Micro SD
Mic
Mic
5
Return to Standby
To stop recording at anytime; short press the POWER button once.
The blue light will stop flashing.
The SunnyCam is back in Video Standby Mode.
1
2
Video
Audio
Photo
Reset
Video
udio
Photo
USB
3
Power/Record
Video
Audio
Photo
Power/Record
Reset
Power/Record
USB
Reset
Micro SD USB
Micro SD
Video
Audio
Photo
Mic
Micro SD
M
Mic
Mic
Switch Off
The SunnyCam will automatically switch off after 3 minutes if left in
Standby Mode.
The SunnyCam can be manually switched off by holding down the
POWER button for more than 2 seconds. The standby light will turn off
once it has shut down.
1
2
Video
Audio
Photo
Reset
Video
dio
Photo
USB
Micro SD
6
Power/Record
Power/Record
Micro SD
Mic
Video
Audio
Photo
Reset
Mic
USB
M
Record a Video
Make sure you are in Video Mode (default mode, blue light on).
The blue light will start flashing, the SunnyCam is recording. (See
page 6 to return to standby)
1
3
Video
Audio
Photo
Reset
Video
Audio
Photo
Reset
Mic
Micro SD
Micro SD
2
Power/Record
Power/Record
USB
USB
Power/Record
Micro SD
Micro SD
Mic
Mic
Photo Mode
Make sure you are in still Photo Mode (red light on)
Short press the POWER button once.
The red light will go off for a second and then come back on.
The SunnyCam has taken a picture and is back in still Photo Standby
Mode.
1
2
Reset
Video
Audio
Photo
Reset
Mic
USB
3
Video
Audio
Photo
Power/Record
USB
Micro SD
Power/Record
Power/Record
Micro SD
Mic
Mic
7
Audio Mode
Make sure you are in Audio Mode (blue and red light on)
Short press the POWER button once.
The red light will remain on and the blue light will start flashing.
The SunnyCam is recording audio.
To stop recording, short press the POWER button.
The blue light will stop flashing. The blue and red lights will both
remain on
The SunnyCam is back in Audio Standby Mode.
1
2
Power/Record
Reset
Video
Audio
Photo
Micro SD
3
Video
Audio
Photo
Reset
Mic
USB
Power/Record
Power/Record
USB
Micro SD
Micro SD
Mic
Mic
Reset
To reset device at any time, short press the RESET button.
The RESET button is located in a small hole to avoid accidental contact.
Video
Audio
Photo
Video
Power/Record
Audio
Power/Record
Photo
Reset
Reset
USB
USB
8
Micro SD
Mic
Micro SD
Mic
Battery
To charge the SunnyCam, connect theVideo
device
Audio
using a USB cable, to a computer Photo
or a
Reset
compatible USB charging device. When
connected the device will automatically
start Micro
to SD
USB
charge and the red light will start flashing. Once
the device is fully charged the red light will
remain on.
Video
Audio
Photo
When the battery level is low the blue light will
Reset
flash rapidly for 5 seconds, then automatically
save the current files and shut down.
USB
Micro SD
Power/Record
Mic
Power/Record
x5
Mic
If the glasses fail to start, it is usually because the battery is flat and
needs to be recharged. For the first charge, it is recommended that
you charge the battery for at least 8 hours.
A full charge takes 3-4 hours.
To avoid damage, please do not use any other charging adaptor.
9
Lens Change
To change lenses, hold each lens firmly on one side and pull one
corner out in a circular movement (Please see in diagram below).
You will feel the corner of the lens unclip from the frame. Now carefully
slide the whole lens out of the frame groove to complete removal.
1
2
Video
Audio
Pho
Reset
USB
To place lenses into frame; position one corner of the lens making sure
the lens corner clips into place. Now carefully slide the next corner into
place making sure the lens is positioned in the groove of the frame slot
all the way along. The next corner of the lens should now clip into
place, please make sure the lens is tightly positioned correctly before
use.
1
10
2
Reset
USB
Memory
The SunnyCam saves all files onto a Micro SD card.
It can support up to a 32GB Micro SD card.
SunnyCam has a 16GB card included.
When the card is full, blue light will stop flashing and remain on.
Power/Record
oto
Micro SD
Mic
You are kindly requested to ONLY insert and pull out the Micro SD
card in power off mode to avoid data loss and corruption to the
SunnyCam and the Micro SD card.Video
Power/Record
Audio
1
2
Video
Audio
Photo
Reset
Power/Record
USB
3
Micro SD
Mic
Power/Record
USB
Micro SD
Micro SD
Mic
16GB
Video
Audio
Photo
Reset
Photo
Mic
Please note; the SunnyCam automatically saves the video files to the
memory card every 20 minutes.
11
System Requirements
Windows Requirement:
CPU must be at least 1.6Ghz above
Operating system:
Windows 98/Me/2000/XP/Vista/Windows 7/ Windows 8
USB / SD Card Slot
CD-Rom/DVD Rom
Minimum 1GB free hard disk space
Minimum 512MB memory
Lower configuration PC’s, with integrated graphics may sometimes
encounter slower video playback. We recommend using a PC with
discrete graphics.
Mac Requirement:
CPU must be at least 1.6Ghz above
Operating system: Mac OS X 10.4.7 or later
USB / SD Card Slot
CD-Rom/DVD Rom
Minimum 1GB free hard disk space
Minimum 512MB memory
12
Saving / Deleting Files
Save/Copy Files
To save/copy a file from your SunnyCam, click and hold on the video file
(in the “Video” folder) you want to keep and drag the file onto your
desktop or personal folder to copy/save it.
Delete Files
To delete, simply highlight the video file you want to delete by clicking the
file once and then press the delete button on your keyboard.
Mac: Remember to empty your trash folder after deleting your files or
your files will remain saved on the Micro SD card in the trash folder.
Remember!
Always transfer your files before viewing your videos for maximum quality
playback.
Mac: Remember to empty your trash folder after deleting your files or
your files will remain saved on the Micro SD card in the trash folder.
Clear all videos/photos from your SD Card after transfer to your PC/Mac.
This will leave maximum disc/SD card space for the next use of your
Sunnycam.
Eject removable disk before removing USB cable or Sunnycam device
from computer.
13
14
Video s and P ho to s are no t
saving o n the M icro SD Card:
I can't co nnect the device to
my co mputer via M emo ry Card:
I can't co nnect the device to
my co mputer via USB :
Will no t switch o n:
Symptoms
yes
no
Have yo u tried searching fo r the disk in the menu?
Do es the remo vable disk appear o n the deskto p?
Have yo u checked to see if the memo ry is full?
Have yo u tried searching fo r the disk in the menu?
Do es the remo vable disk appear o n the deskto p?
WINDOWS: Go to the 'Start' menu and select 'Co mputer'. Check to see if the
device sho ws in the 'Devices with Remo vable Sto arge' sectio n.
M A C: Go to the 'Finder' menu and the remo vable disk will sho w in the
left co lumn.
WINDOWS: If the device still do es appear; try refo rmatting the
memo ry card.
M A C: If the device still do es appear; try refo rmatting the
memo ry card.
M A C: Yo ur memo ry card might be full. P lease mo ve yo ur files o nto yo ur
co mputer o r delete yo ur unwanted pho to s. P LEA SE REM EM B ER TO
EM P TY YOUR TRA SH FOLDER.
P lease try ano ther USB po rt.
If the device still do es no t wo rk, try inserting the M icro SD card directly into a
card reader.
WINDOWS: Go to the 'Start' menu and select 'Co mputer'. Check to see if the
device sho ws in the 'Devices with Remo vable Sto arge' sectio n.
M A C: Go to the 'Finder' menu and the remo vable disk will sho w in the
left co lumn.
M A C: Can yo u see the remo vable disk? If no t; please read belo w:
P lease click to o pen the disk and access yo ur files.
WINDOWS: If the device still do es appear; try refo rmatting the
memo ry card.
M A C: If the device still do es appear; try refo rmatting the
memo ry card.
WINDOWS: Yo ur memo ry card might be full. P lease mo ve yo ur files o nto
WINDOWS: Can yo u see the remo vable disk? If no t; please read belo w:
yo ur
co mputer o r delete yo ur unwanted pho to s.
P lease try ano ther USB po rt.
If the device still do es no t wo rk, try inserting the M icro SD card directly into a
card reader.
M A C: Go to the 'Finder' menu and the remo vable disk will sho w in
the left co lumn.
M A C: If the device still do es no t appear; try inserting the M icro SD
card directly into a card reader.
P lease click to o pen the disk and access yo ur files.
WINDOWS: Go to the 'Start' menu and select 'Co mputer'. Check to see if the
device sho ws in the 'Devices with Remo vable Sto arge' sectio n.
WINDOWS: If the device still do es appear; try inserting the M icro SD
card directly into a card reader.
Have yo u tried searching fo r the disk in the menu?
P lease try ano ther USB po rt.
If the device still do es no t wo rk, try inserting the M icro SD card directly into a
card reader.
P lease click to o pen the disk and access yo ur files.
Do es the remo vable disk appear o n the deskto p?
The SunnyCam reco rds all data directly o nto the micro sd card.
The memo ry card must be in the device fo r the pro duct to wo rk.
Yo u may have a faulty charger; please try charging the device directly to a
co mputer o r lapto p via the usb cable.
P lease try ano ther USB po rt.
If the device still do es no t wo rk, try inserting the M icro SD card directly into a
card reader. If the remo vable disk appears o n yo ur deskto p, yo u may have a
faulty USB cable.
This means yo ur SunnyCam is charging co rrectly; please allo w a few
ho urs fo r a full charge.
M ake sure the blue light is flashing o n the device to co nfirm the
device is reco rding.
If the blue lights flashes quickly 5 times; this means the battery is
dead.
If the blue light do es no t flash and simply remains o n; this means the
memo ry card is full.
P lease try ano ther USB po rt.
This means yo ur SunnyCam is charging co rrectly; please allo w a few
If the device still do es no t wo rk, try charging via the mains adapto r.
ho urs fo r a full charge.
If the device still will no t charge, it may have a faulty usb cable.
Try further charging the device via the mains o r usb to make sure the
battery is full.
M ake sure the lights o n the arm are flashing to co nfirm the device is
charging pro perly.
The battery might be dead. Try charging the device via the mains o r usb.
If the blue lights flashes quickly 5 times; this means the battery is
M ake sure the lights o n the arm are flashing to co nfirm the device is charging
pro perly.
dead.
If the blue light do es no t flash and simply remains o n; this means the
memo ry card is full.
This means yo ur SunnyCam is charging and also co nnected to the
Do the lights flash when co nnected to a co mputer via
co mputer. The remo vable disk will appear o n yo ur deskto p like any
the USB cable?
o ther Camera o r USB device.
Is the memo ry card in the device?
Do the light flash when charging via the mains?
Do the lights flash when co nnected to a co mputer?
Do the lights co me o n when butto ns pressed?
QUESTION
Trouble Shooting Guide
Please be aware:
All SunnyCam products must be used in conjunction with your country’s privacy laws.
Please use SunnyCam products responsibly. SunnyCam accepts no liability for any
misuse of our products.
The SunnyCam is not waterproof so should be used carefully during extreme sports
activities or extreme weather conditions (please see page 16 for working temperatures).
The SunnyCam lenses are UV protected but not shatterproof. SunnyCam accepts no
liability for any injuries received while wearing the SunnyCam.
Warranty
Every SunnyCam comes with a one year warranty starting from the day the product was
purchased. Physical or water damage constitutes damage that cannot be considered
reasonable wear and tear.
Warranty is invalid if the defect is caused by misuse, neglect, tampering or incorrect
adjustment.
Warranty is invalid if any alterations and/or repairs are conducted by an unauthorised
person.
For more information please visit www.sunnycamglasses.com.
Replacement Scheme
Sunnycam offer a replacement scheme for customers with SunnyCam Eyewear outside of
warranty, please contact us on 01905 720180 or email us at [email protected]
for more information.