1
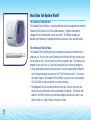
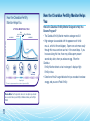
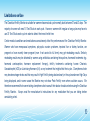
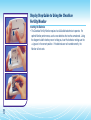
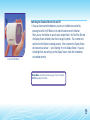
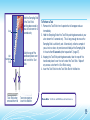
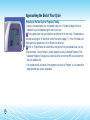
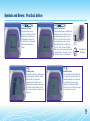
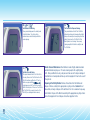
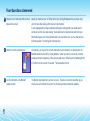
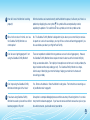
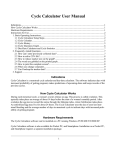
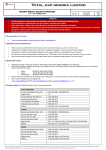
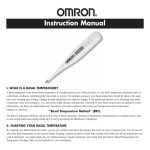
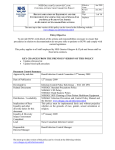
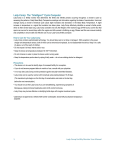
Fertility Monitor
Proven to INCREASE the chances of CONCEPTION by 89%*
INSTRUCTION BOOKLET
CONTENTS
How Does the System Work?
3
Understanding Ovulation and the Menstrual Cycle
4
How the Clearblue Fertility Monitor Helps You
5
Limitations on Use
6
Step by Step Guide to Using the Monitor
8
Determine the Correct Testing Window for Use
11
Setting the ‘m’ Button
12
Testing
15
Your Fertility Status
17
Approaching the End of Your Cycle
19
Symbols and Errors: Practical Advice
20
Your Questions Answered
22
How to Start Using Your Monitor Again
Careline Information (or Authorised Distributor)
30
outside back cover
*In the first 2 cycles of use. Robinson JE., et al. Fertility & Sterility (2007) 87 (2): 329-334.
The Clearblue Fertility Monitor must be used according
to these instructions. The Clearblue Fertility Monitor is
an in vitro diagnostic medical device designed for home
use. Not for internal use. Store in a dry place at room
temperature. Keep out of the reach of children. Do not
use a Test Stick if the foil wrapper containing it is
damaged. Do not use a Test Stick that has passed its
expiry date.
THERE ARE NO PRODUCTS AVAILABLE THAT CAN
GUARANTEE SUCCESS IN ACHIEVING PREGNANCY.
THE Clearblue FERTILITY MONITOR HAS BEEN
DESIGNED TO ASSIST IN CONCEPTION. THE
Clearblue FERTILITY MONITOR IS NOT INTENDED
FOR CONTRACEPTION.
Clearblue Fertility Monitor Helps Maximise The Chance of Conceiving Your Baby.
The Time in Your Life for Children
Now that you have reached the time in your life for children, the Clearblue Fertility
Monitor can help you by identifying the days you are most likely to become pregnant.
When you have sex on these days, you have the greatest chance of conceiving your
baby.
There are only a limited number of days during the menstrual cycle when having sex
can lead to pregnancy. Conception is most likely to occur if you have sex on the day the
ovaries release a new egg (ovulation), or during the days leading up to it.
Most home ovulation tests only identify the 2 Peak Fertility days during the cycle, by
detecting the surge in Luteinising Hormone (LH) that triggers ovulation. The Clearblue
Fertility Monitor not only shows these 2 Peak Fertility days, but also identifies additional
days when you can conceive. By detecting a rise in estrogen, it can inform most women
of an extra 1–5 days of High Fertility prior to their Peak Fertility. This means that you
know all the days when having sex is most likely to lead to conception, allowing you to
identify those days when you are most likely to conceive your baby.
2
How Does the System Work?
The Clearblue Fertility Monitor
The Clearblue Fertility Monitor is a hand-held Monitor which is designed to be used with
Clearblue Fertility Monitor Test Sticks (sold separately). Together these identify
changes in 2 key hormones that control your fertility. The Monitor records your
personal cycle to build up a complete and accurate picture of your most fertile days.
The Information That You Need
The Clearblue Fertility Monitor gives you comprehensive, personal information that is
unique to you. You can relax as the Clearblue Fertility Monitor will count the days and
tell you when to test. It will even warn you when your period is due. This allows you to
prepare for your next cycle, or, if you think your period is late, to test for pregnancy.
• All you need to do are simple urine tests each cycle when requested by the Monitor.
You will always be asked to use one set of 10 Test Sticks each cycle. If your cycles
are long or irregular, the Clearblue Fertility Monitor may ask you to use a second set
of 10 Test Sticks to help you identify your most fertile days.
• The disposable Test Sticks collect hormones from your first urine of the day and
convert them into information which can be read by the Monitor. The Monitor then
reads the Test Stick, interprets your hormone changes, and tells you clearly if your
Fertility will be Low, High or Peak, for the next 24 hours.
3
FALLOPIAN TUBE
UTERUS LINING
Understanding Ovulation and the Menstrual Cycle
The Menstrual Cycle
• The menstrual cycle is the process during which your body prepares for pregnancy.
Hormone changes during the cycle trigger the ovaries to release an egg.
OVARY
UTERUS
CERVIX
VAGINA
EGG IN FOLLICLE
• The eggs are contained within fluid-filled cavities called follicles. Both ovaries have
many follicles, each containing an egg. During the first part of the menstrual cycle,
one of the follicles prepares to release an egg. This follicle produces increasing
amounts of estrogen, which causes the lining of the uterus to thicken and the cervix
to produce ‘fertile mucus’. This ‘fertile mucus’ is important (refer to page 5). A high
estrogen level triggers the surge of another hormone, Luteinising Hormone (LH).
Ovulation normally occurs 24 to 36 hours after the LH surge, when the follicle
ruptures, releasing an egg.
• The egg can be fertilised for up to 24 hours after ovulation. If fertilisation does not
occur, the estrogen level will gradually fall. The lining of the womb is shed and the
menstrual flow begins, marking the start of the next cycle.
4
How the Clearblue Fertility Monitor Helps
You
How the Clearblue Fertility
Monitor Helps You
A TYPICAL MENSTRUAL CYCLE
PEAK
HIGH FERTILITY
FERTILITY
Day of Ovulation
LOW FERTILITY
Hormone Level
LOW FERTILITY
E3G**
LH
1
2
3
4
5
6
7
8
9
10
11
12
13
14
15
16
17
18
19 20 21 22 23 24 25 26
Day of Cycle
** The form of estrogen measured in urine is estrone-3-glucuronide (E3G)
Please Note: For the greatest chance of conception you should
have sex both when your fertility is HIGH and when your fertility is
PEAK.
5
How is the Clearblue Fertility Monitor Designed to Help You
Become Pregnant?
• The Clearblue Fertility Monitor monitors estrogen and LH.
• High estrogen is associated with the appearance of ‘fertile
mucus’, which is thin and slippery. Sperm can swim more easily
through this mucus and can survive in it for several days. If you
have sex during this time, there may still be sperm present
several days later, when you release an egg. When the
Clearblue
Fertility Monitor detects a rise in estrogen, it displays High
Fertility status.
• Detection of the LH surge indicates that you are about to release
an egg, and you are at Peak Fertility.
Limitations on Use
The Clearblue Fertility Monitor is suitable for women whose natural cycle normally lasts between 21 and 42 days. The
majority of women will need 10 Test Sticks in each cycle. However, women with irregular or long cycles may have to
use 20 Test Sticks each cycle in order to detect their most fertile time.
Certain medical conditions and medications can adversely affect the performance of the Clearblue Fertility Monitor.
Women who have menopausal symptoms, polycystic ovarian syndrome, impaired liver or kidney function, are
pregnant or have recently been pregnant (even if not carried to full term), may get misleading results. Similarly
misleading results may be obtained by women using antibiotics containing tetracyclines, hormonal treatments (e.g.
hormonal contraception, hormone replacement therapy), fertility treatments containing human Chorionic
Gonadotrophin (hCG) or Luteinising Hormone (LH), or any treatment that might affect their cycle. Clomiphene citrate
may elevate estrogen levels and this may result in High Fertility being declared early in the cycle and more High Days
being displayed, and in some cases the Monitor may not show Peak Fertility even when ovulation occurs. We
therefore recommend that women taking clomiphene citrate consult their doctor for advice before using the Clearblue
Fertility Monitor. Always read the manufacturer’s instructions for any medication that you are taking before
conducting a test.
6
Women who have recently been breastfeeding, using hormonal treatments (e.g. hormonal contraception, fertility
treatments, hormone replacement therapy), or any other treatment that might affect their cycle, may wish to wait until
they have at least two natural menstrual cycles in a row (each lasting 21- 42 days), before using the Clearblue Fertility
Monitor.
Women who have recently been pregnant (even if not carried to full term) may still have hCG in their bodies. HCG can
adversely affect the performance of the Clearblue Fertility Monitor. Therefore they are advised to wait until they have
had at least two natural menstrual cycles in a row (each lasting 21-42 days), before using the Clearblue Fertility
Monitor.
Please speak to your doctor if you need further advice.
7
Step by Step Guide to Using the Clearblue
Fertility Monitor
3 Display Screen
1 On/Off
Button
Fertility
Status 3a
Cycle Day
3b Number
4 ‘m’
Button
2 Test
Stick Slot
Test Stick
Sampling End
Cap
Knowing Your Clearblue Fertility Monitor
In your pack you will find your Clearblue Fertility Monitor. You will need to buy
a pack of Clearblue Fertility Monitor Test Sticks and four new AAA alkaline
batteries before you can get started.
You must wait until your next period starts before using the Clearblue Fertility
Monitor. In the meantime you should read this instruction booklet fully and
familiarise yourself with the features below.
1. On/Off Button: press once to switch on/ off.
Unless it is reading a Test Stick, the Monitor will switch off automatically
after 30 seconds to conserve power. You will be unable to switch the
Monitor off while it is reading a Test Stick.
2. Test Stick Slot: this locates the Test Stick in the Monitor allowing it to read
the test result accurately.
3. Display Screen: this provides details about your:
3a.
Fertility Status
3b.
Cycle Day Number: (day of your cycle)
Other information will also appear on the Display Screen, such as when to
test.
4. ‘m’ Button: this is used to set the Monitor at the start of each cycle.
Refer to pages 10 and 11 of this instruction booklet BEFORE pressing
the ‘m’ Button.
8
Step by Step Guide to Using the Clearblue
Fertility Monitor
Inserting the Batteries
• The Clearblue Fertility Monitor requires four AAA alkaline batteries to operate. For
optimal Monitor performance, use four new batteries that are the same brand. Using
the diagram inside the battery cover to help you, insert the batteries making sure the
+ signs are in the correct position. If the batteries are not inserted correctly, the
Monitor will not work.
CLICK
9
Push the On/Off Button
Switching the Clearblue Monitor On and Off
• Once you have inserted the batteries, you can turn the Monitor on and off by
pressing the white On/Off Button on the top left hand corner of the Monitor.
When you turn the Monitor on you will see a red light flash in the Test Stick Slot and
the Display Screen will briefly show the full range of symbols. This is normal and
confirms that the Monitor is working correctly. After a moment the Display Screen
will clear and you will see ‘--’ and a flashing ‘m’ on the Display Screen. If you see
the red light flash, but nothing is on the Display Screen, check that the batteries
are installed correctly.
Please Note: Read the instructions on pages 11 and 12 carefully
BEFORE pressing the ‘m’ button.
10
PLEASE READ POINTS 1-4 BEFORE
SETTING YOUR ‘m’ BUTTON
PRESS ‘m’ BUTTON
-3 HOURS
+3 HOURS
TESTING WINDOW IN HOURS
TESTING WINDOW EXAMPLE
PRESS ‘m’
BUTTON
Testing Window Example:
It is easy to Set a Testing Window
that is convenient for you. For
example, if you set the ‘m’ Button
at 9:00a.m., you will be able to
test anytime between 6:00a.m.
and 12:00 noon for that cycle.
Determine the Correct Testing Window
1. You can start using the Clearblue Fertility Monitor on the first day of your next
cycle, but not before. The first thing to do is to set the ‘m’ Button.
2. When you press the ‘m’ Button you:
• Tell your Monitor that your period has started and a new cycle has begun.
• Establish the 6 hours each day during which you can do a test. This is called
the ‘Testing Window’. Clearblue Fertility Monitor should be set so that it is
convenient for you to test the first urine of the day. This is important as this will
contain the highest amount of hormones.
3. The Testing Window is set to run from 3 hours before the time you press the ‘m’
Button, to 3 hours after. The Clearblue Fertility Monitor will only request a test
during the Testing Window, so you must check the Monitor during this time to see
if you need to do a test that day. See example opposite.
4. At the start of each new cycle you will need to press the ‘m’ Button to establish
the Testing Window for the new cycle.
Please Note: Your Testing Window must be convenient for you to
test the first urine of the day (both weekdays and weekends).
11
Initial Display
Press ‘m’ Button and hold for
5 seconds until ‘1’ appears
Display after ‘m’ Button is pressed
Fertility Status Bar
Setting the ‘m’ Button
• If your period starts in the night, or in the morning before your chosen ‘m’ Button setting time,
press the ‘m’ Button that morning. If your period starts, after your chosen ‘m’ Button setting
time, WAIT until the following morning before pressing the ‘m’ Button. Set this as day 1 of
your cycle.
• Press the ‘m’ Button firmly for 5 seconds. Release it when an ‘m’ and the day number ‘1’
appear on the Display Screen. Both will flash when they first appear but will stop flashing
and stay on the Screen when you release the ‘m’ Button. DO NOT do a test yet.
Only perform a test when the Monitor requests one.
• When you have set the ‘m’ Button correctly, a number ‘1’ and an ‘m’ will appear, indicating it
is the first day of your cycle. A Fertility Status bar will also appear on the screen to indicate
that your fertility is presently at a Low level, which is normal at the start of a cycle.
• If you press the ‘m’ Button for too long, a number ‘2’ will appear. If you have set your ‘m’
Button on the wrong day, you MUST cancel it. To cancel, press the ‘m’ Button again for
5 seconds until the ‘m’ Symbol disappears. The Display Screen will then return to its original
state (as if you had not yet set your ‘m’ Button).
Please Note: The ‘m’ Button can be set from day 1 to day 5 of
your cycle. For further information refer to question 7 on page 24.
12
Testing
Display indicates that the Monitor
requires a Test Stick
Doing Tests
You will need a box of Test Sticks before starting. Always start your cycle with enough Test
Sticks from the same LOT for 10 Tests.
• Switch on your Clearblue Fertility Monitor every morning within your Testing Window and
before going to the bathroom. You will notice that the ‘m’ symbol is displayed for the first
5 days of each cycle, and that the number on the Display Screen changes each day to tell you
which day of your cycle you are on. Please note that the cycle day only advances when the
Testing Window opens.
• On mornings when the Monitor requires further information about your hormone changes,
a test will be requested
. Tests must be performed with the first urine of the
day, within the Testing Window.
• In Cycle 1, your first test will be requested on day 6. The Monitor will then request a test
every day for a total of 10 or 20 days depending on your cycle length, and when it sees your
Peak Fertility. In subsequent cycles the first test day will vary between cycle day 6 and 9,
according to what the Clearblue Fertility Monitor has learned about your cycle, and you will
still be asked for a test every day for 10 or 20 days.
Please Note: Only use Clearblue Fertility Monitor Test Sticks with
the Clearblue Fertility Monitor.
13
Cap
Wet
Sampling
End
Test Stick when
removed from foil
Hold the Sampling End
of the Test Stick
pointing downwards in
your urine stream for 3
seconds only
Take the cap off the
handle and place over
‘wet’ end of the Test
Stick
Test Stick ready to
insert into Monitor
To Perform a Test
1. Remove the Test Stick from its protective foil wrapper and use
immediately.
2. Hold the Sampling End of the Test Stick pointing downwards in your
urine stream for 3 seconds only. This is long enough to ensure the
Sampling End is sufficiently wet. Alternatively, collect a sample of
your urine in a clean, dry container and hold just the Sampling End
in the urine for 15 seconds (refer to question17 page 27).
3. Keeping the Test Stick pointing downwards, take the cap off the
handle and place it over the ‘wet’ end of the Test Stick. Wipe off
any excess urine from the Test Stick casing.
4. Insert the Test Stick into the Test Stick Slot of the Monitor.
Please Note: Test Sticks can NEVER be used more than once.
14
Testing
1
2
CLICK
Test Stick
15
Inserting a Test Stick
• You should only insert a Test Stick when you see the Insert Test Stick Symbol
.
• Switch on your Monitor. You will see a red light flash in the Test Stick Slot. This is
the
Monitor checking the Slot is ready to receive a Test Stick.
• After performing
1 a test, place the Test Stick into the Test Stick Slot within 15 minutes
of wetting it.
Holding the Test Stick by the cap with the cut corner of the Test
Stick
2 pointing downwards, put it into the Test Stick Slot as shown on the diagram.
Push the Test Stick down until it lies flat and clicks into place.
• When you have inserted the Test Stick correctly the Display Screen will flash the Test
Stick Symbol
for 5 minutes while the Monitor reads and interprets the
information from your Test Stick. Do not remove the Test Stick while it is being read.
The Monitor cannot be turned off while a Test Stick is being read.
Testing
The Test Symbol will flash while
the Monitor is reading a Test Stick
Inserting a Test Stick
• The Test Stick will not be recognised until correctly inserted. The symbol
will be displayed until the Test Stick has been properly placed and recognised.
• At the end of 5 minutes, the Monitor will ask you to remove the Test Stick,
which should be thrown away. Your Fertility Status will then be displayed.
• If you do not remove the Test Stick within 60 seconds after the Monitor has finished reading
it,
the Monitor will turn itself off. Remove the Test Stick and switch the Monitor back on to see
your Fertility Status.
Number of Test Sticks Required
• You will be asked for a test on 10 days each cycle. If the Monitor does not detect your LH
surge with 10 tests, it will request an additional 10 tests for that cycle. This may happen if
your cycles are irregular or long. You should perform all of the tests requested by the
Monitor.
Monitor has finished reading
a Test Stick
16
Your Fertility Status
Low Fertility:
very small chance of conception
17
It is important that you do all the tests requested by the Monitor. If you miss a test, the Monitor
will use the information it has already collected to calculate your Fertility Status. If a test is
missed close to ovulation, you may miss the chance to identify your days of Peak Fertility.
Following a missed test you should perform all further tests requested by the Monitor.
Fertility Status: What does this mean?
• The Clearblue Fertility Monitor will display your Fertility Status using three bars which
correspond to three different levels of Fertility: Low, High and Peak. The Monitor will
interpret your fertility based on the Test Stick reading and the information stored in its
memory.
Low Fertility: What does this mean?
• Low Fertility is indicated by one bar on the Display Screen. Low Fertility is displayed at times
during the cycle when your fertility hormones are low. It is unlikely, but not impossible that
you will conceive from sex on a Low Fertility day.
High Fertility:
increased chance of conception
High Fertility: What does this mean?
• High Fertility is indicated by two bars on the Display Screen. These are displayed when the
Clearblue Fertility Monitor detects an increase in estrogen, which occurs as you approach
your Peak Fertility.
• If you have sex on days of High Fertility you can maximise the chances of becoming
pregnant.
Peak Fertility: What does this mean?
• Peak Fertility is indicated by three bars on the Display Screen and the
symbol.
• If you have sex during this Peak Fertility time, then you have the greatest chance of becoming
pregnant.
• The Clearblue Fertility Monitor identifies your days of Peak Fertility by detecting the surge in
LH, which triggers ovulation to occur approximately 24-36 hours later. Peak Fertility will be
indicated on the day of the LH surge, as well as the following day.
• There is a chance that the egg can still be fertilised after this time, therefore you will be shown
1 day of High Fertility following your days of Peak Fertility.
• There may be a small percentage of cycles in which you do not see Peak Fertility – for more
information refer to question 11 on page 25.
Peak Fertility:
highest chance of conception
18
Approaching the End of Your Cycle
Preparing for the Next Cycle or Pregnancy Testing
• Usually, a few days before your next period is due, the ‘m’ Symbol will begin to flash to
indicate that you are approaching the end of your cycle.
1 If your period starts then you should set your Monitor for the next cycle. The procedure is
the same as setting the ‘m’ Button for the first time (refer to page 11). If the ‘m’ Symbol is not
flashing and your period starts, the ‘m’ Button can still be set.
2 If the ‘m’ Symbol flashes for several days, and you think that your period is late, you may
have conceived. You can find out if you are pregnant by using a Clearblue Pregnancy Test.
• Clearblue Pregnancy Tests give you a clear result that is more than 99% accurate from the
day your period is due.
• You should consult your doctor if the pregnancy test result is ‘Pregnant’ as it is important to
begin prenatal care as early as possible.
19
Symbols and Errors: Practical Advice
1.
Reinsert the Test Stick.
This symbol will appear if you
remove the Test Stick from the Test
Stick Slot before the Monitor has
finished reading it. Replace the
Test Stick into the slot immediately
and the Monitor will read it as
normal.
3.
Batteries are Low.
Your Monitor’s batteries are getting low and
need to be replaced. Replace the batteries
within 4 weeks of this symbol first
appearing. Leave the batteries in your
Monitor until you are ready to replace them.
If the Monitor is without batteries for more
than 2 hours the internal clock may become
inaccurate.
2.
Remove Your Test Stick.
This symbol may appear if your Monitor was
switched on with a Test Stick in the Slot or
your Monitor was not ready for a test. If
there is no Test Stick in the Slot and this
error is displayed you need to clean the
Black Button which is located in the Test
Stick Slot. If the centre bar of the Black
Button is pushed in, try releasing it by gently
cleaning with a dry cotton swab. If you are
still unable to release it, call the Careline.
Black
Button
Centre Bar of the
Black Button
4.
Batteries are Dead.
This symbol indicates that the Monitor will
no longer function unless the batteries are
replaced immediately. Leave the batteries
in your Monitor until you are ready to
replace them. If the Monitor is without
batteries for more than 2 hours the internal
clock may become inaccurate.
20
5.
or
Your Monitor is Not Working.
These symbols will appear in the unlikely event
of a Monitor failure. They tell you that a
problem has been detected and your Monitor
needs replacing.
7.
Test Stick Slot is Not Ready.
This symbol indicates that the Test Stick Slot is
not ready. Remove the Test Stick from the Test
Stick Slot and turn your Monitor off. Turn the
Monitor on again and if the
symbol appears, put the Test Stick in correctly
until it clicks into place. If there is no Test Stick in
the Test Stick Slot you need to clean the Test
Stick Slot (see cleaning instructions above).
21
6.
The Test Stick Slot Requires Cleaning.
This symbol indicates that the Test Stick Slot is
dirty and should be gently cleaned with a slightly
damp cotton swab (never use anything other than
water). Never clean the Test Stick Slot if the
Brush Symbol is not showing. Unnecessary
cleaning may affect the Monitor’s ability to read
the Test Sticks.
Monitor Care and Maintenance: Your Monitor is made of highly durable materials
and will withstand everyday use. If it needs cleaning, wipe it with a slightly damp
cloth. Store your Monitor in a dry, safe place and take care not to drop or damage it.
Your Monitor is not waterproof and like any electrical equipment it must not be used if
it has got wet.
Disposing of the Fertility Monitor: Remove the batteries from the Monitor and
dispose of them according to the appropriate recycling scheme. Caution: Do not
disassemble, recharge or dispose of the batteries in fire. Do no swallow. Keep away
from children. Dispose of the Monitor according to the appropriate recycling scheme
for electrical equipment. Do not dispose of electrical equipment in fire.
Your Questions Answered
Q1 How accurate is the Clearblue Fertility
Monitor?
Q2 I’ve been using basal body temperature
and home ovulation tests. Does the
Clearblue Fertility Monitor replace these?
Q3 How effective will the Clearblue Fertility
Monitor be for me?
The Clearblue Fertility Monitor has been shown in laboratory testing to be 99% accurate in
detecting the LH surge in cycles in which an LH surge had also been identified by a reference
method.
The advantage of the Clearblue Fertility Monitor is that, unlike the basal body temperature
method, it predicts ovulation before it happens. The basal body temperature method can only
tell you after ovulation has occurred, which may be too late to take advantage of all your fertile
days. Home ovulation tests detect the LH surge which precedes ovulation by 24-36 hours, thus
identifying your 2 most fertile days each cycle. The Clearblue Fertility Monitor gives additional
warning of ovulation by identifying days of High Fertility as well as the Peak Fertility days
indicated by home ovulation tests. It also counts your days for you, tells you which days to test,
interprets the tests, displays your fertility level every day and develops a personalised
understanding of your cycle.
If you have sex during High and Peak Fertility it can help you maximise the chances of
conceiving your baby. However, there are no products available that can guarantee success in
achieving pregnancy.
22
Your Questions Answered
Q4 Will hormonal contraceptives affect the
result?
Q5 What conditions or medication could
interfere with my test result?
Please Note: Some medications are
contra-indicated in pregnancy. Therefore,
we recommend that you consult your doctor
if you are taking any medication, before you
try to conceive.
Q6 What should I do if I pressed the ‘m’ Button
by mistake?
23
After using hormonal contraceptives your cycle may be irregular and take some time to stabilise.
You may wish to wait until you have had at least two natural menstrual cycles in a row each
lasting 21- 42 days before using the Clearblue Fertility Monitor.
Always read the manufacturers’ instructions for any medication you are taking before using the
Clearblue Fertility Monitor. Most medications should not affect the way the Clearblue Fertility
Monitor works. However, certain medical conditions and medications can adversely affect the
performance of the Clearblue Fertility Monitor. Refer to ‘Limitation on Use’, for further
information. If in any doubt, please speak to your doctor.
If you set the ‘m’ Button on the wrong day, you must cancel it. To cancel, press the ‘m’ Button
for 5 seconds until the ‘m’ Symbol disappears. When the ‘m’ Button is released, the Display
Screen will return to its original state.
Q7 What if I am unable, or forget to set the ‘m’
If you are on day 2, 3, 4 or before your chosen ‘m’ Button setting time on day 5 of your cycle,
simply hold the ‘m’ Button down at your chosen ‘m’ Button setting time, and release it when the
correct day number is shown on the display. The Monitor will then work correctly. You can also
do this to set a different Testing Window during days 2 to 5 of your cycle, if the Testing Window
set on day 1 is inconvenient. If you are not able to set the ‘m’ Button during the first 5 days of
your cycle, you should wait until your next cycle starts to set the ‘m’ Button.
Q8 If my period starts during the day and I
You should set it as day 1.
Button on day 1 of my cycle?
have to wait until the next morning before
setting the ‘m’ Button should I set it as day
1 or day 2?
Q9 Can I use more Test Sticks if I want to?
No. Tests can only be performed when requested by the Monitor.
Q10 How do I know if I’ve inserted the test
If you have inserted the Test Stick correctly a flashing Test Stick Symbol
will indicate
that the Test Stick is being read. Do not remove the Test Stick until requested to do so.
correctly?
24
Your Questions Answered
Q11 My Monitor did not display a Peak
Fertility Symbol this cycle.
What does this mean?
Q12 My Monitor displayed Low Fertility during
all of my last cycle. What does this mean?
Q13 My Monitor changed straight from Low to
Peak Fertility this cycle. What does this
mean?
25
There may be a small percentage of cycles in which you do not see Peak Fertility status.
Possible reasons for this are, for example, a test may have been missed or performed
incorrectly or you may not have ovulated this cycle. An unusually short or long cycle may result
in Peak Fertility not being detected. If Peak Fertility is not detected, the Monitor may show High
Fertility for an extended period of time (up to 19 days). If this occurs, it is unlikely that you will
be fertile during this entire time. If after completing 3 cycles you have not seen Peak Fertility we
would recommend that you speak to your doctor.
The Monitor did not detect the necessary change in the hormones that control your fertility. You
may not have ovulated during this cycle or it may be due to a missed test, or a test being
performed incorrectly. If after completing 3 cycles your Fertility status is only ever Low, you
should speak to your doctor.
This may happen for example when a rise in estrogen is detected on the same day as your LH
surge or if the Monitor does not detect a change in your estrogen before your LH surge. This
can happen if you miss a test, or perform a test incorrectly, or if you have a very short cycle
following longer cycles.
Q14 Can I use Test Sticks from different packs?
No. Always use Test Sticks in sets of 10 from the same pack (LOT). The Clearblue Fertility
Monitor works by comparing the current day’s test reading with those of previous days. As
there are slight sensitivity differences between Test Stick LOTs, optimal performance is
achieved when the Test Sticks are used in sets of 10 from the same LOT. After carrying out
your first 10 tests, the Monitor may request a further 10 tests in the same cycle. If you do not
have any more Test Sticks from the same LOT, then you may use 10 Test Sticks from a different
LOT to complete your testing.
Q15 How should I dispose of used Test Sticks?
Dispose of used Test Sticks with your household waste. Do NOT flush them down the toilet.
26
Your Questions Answered
Q16 How do I test if I work night shifts or travel
between time zones?
Ideally you should set your ‘m’ Button so that your Testing Window permits you to test using
your first urine after waking, which may be in the afternoon.
If your sleeping pattern changes temporarily during your testing period, you should collect a
sample of your first urine upon waking. You should store the collected urine and check your
Monitor during your next Testing Window and, if you need to do a test, use the collected urine.
(Refer to question 17 on testing with collected urine.)
Q17 How do I test with collected urine?
Occasionally, you may wish to test with collected urine (for example, if you need to go to the
bathroom before the start of the Testing Window). Collect your urine in a clean, dry container
and keep it at room temperature. When you are ready to test, immerse just the Sampling End of
a Test Stick into the urine for 15 seconds. Then proceed as normal.
Q18 Can the information in the Monitor’s
The Monitor retains data from your last six cycles. This data is constantly overwritten as you
continue to use the Monitor to ensure it has the most up to date information available.
memory be lost?
27
Q19 How will I know if the Monitor is working
properly?
Q20 Since it tells me when I’m fertile, can I use
the Clearblue Fertility Monitor as a
contraceptive?
Q21 Can I be sure of getting pregnant if I am
using the Clearblue Fertility Monitor?
Q22 Can I stop using the Clearblue Fertility
Monitor and start again in the future?
Q23 I have been using Clearblue Fertility
Monitor for several cycles and have still not
become pregnant. Why not?
When the batteries are inserted correctly and the Monitor has power, it will warn you if there is a
problem by displaying the error symbol: This symbol will be accompanied by another,
explaining the problem. For a definition of these symbols, refer to the symbols section.
No. The Clearblue Fertility Monitor is designed to tell you when you are most likely to conceive.
As sperm can survive for several days, you may still have a chance of becoming pregnant if you
have sex before you detect your High or Peak Fertility.
There are no products available that can guarantee success in achieving pregnancy. However,
the Clearblue Fertility Monitor allows couples to make the best use of their natural fertility by
timing sex around ovulation. The majority of conceptions occur from sex in a 6 day window (the
day of ovulation and the days leading up to it). The Clearblue Fertility Monitor is a simple,
effective way of identifying your most fertile days, helping you maximise the chances of
conceiving your baby.
Yes. Remove the batteries. Store the Monitor in a dry place. For instructions on resuming use
of your Monitor refer to page 30.
Conception is a complex biological process and there are many influencing factors. It can take
many months to become pregnant. If you have not conceived after 6 consecutive cycles or you
have other concerns, you should consult your doctor.
28
29
How to Start Using Your Monitor Again
Read the following notes first.
• Check that you are still suitable to use the Clearblue Fertility Monitor.
• Reprogramming your Monitor erases all the previous information stored about your cycles and is not reversible.
• You will need a Test Stick to reprogramme your Monitor. The Test Stick can be previously used or unused. Therefore, you may
wish to save a Test Stick for this purpose.
• Ensure working batteries are in your Monitor prior to reprogramming.
Reprogramming Procedure
1. Ensure your Monitor is switched off.
2. Insert a Test Stick into the Test Stick Slot, checking the position carefully, as there will be no symbol to tell you that the Test
Stick is correctly inserted.
3. Press and hold the ‘m’ Button while you complete steps 4, 5 & 6 below.
4. Press the On/Off Button to turn your Monitor on.
5.
will be displayed*. Continue to hold the ‘m’ Button and leave the Test Stick in position.
6. After approximately 15 seconds, all symbols on the Display Screen will be shown.
will again be displayed.
Release the ‘m’ Button and remove the Test Stick.
7. You should see the following symbols on your Display Screen ‘-- m’. Your Monitor is now reprogrammed and ready for use.
*If
is not displayed, the Test Stick is not inserted correctly.
30
Please read instructions before use. This device is for home use. Keep out of the reach of children. Store at room temperature.
www.clearblue.com
Clearblue Careline
Advisors available 07:00 – 15:00hrs Mon-Fri, excluding Bank Holidays.
UK - 0845 6076596 IE - 1890 882 885
Call charges vary; please check with your provider.
Please be ready to quote the
number.
Calls are recorded for training and quality control.
Manufacturer
Batch Code
Temperature Limitation
2ºC - 30ºC
In vitro diagnostic
medical device
Manufacturer: SPD Swiss Precision Diagnostics GmbH, Route de St Georges 47, 1213
Petit-Lancy,
Geneva, Switzerland.
© 2011 SPD Swiss Precision Diagnostics GmbH. All rights reserved.
2300166.01 2011-01