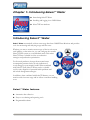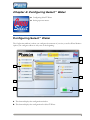
1
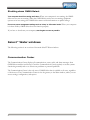
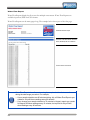
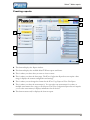
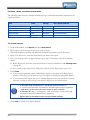
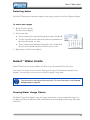
©2011 Phason Inc. All rights reserved. Printed in Canada 25047700 2010-10-04 Limited warranty Software Phason Inc. (Phason) warrants for a period of 90 days from the date of purchase that the software product will execute its programming instructions when properly installed on the personal computer or workstation indicated on this package. Phason does not warrant that the operation of the software will be uninterrupted or error free. Should this software product fail to execute its programming instructions during the warranty period, the purchaser’s remedy shall be to return the software CD (media) to Phason for replacement. Should Phason be unable to replace the media within a reasonable amount of time, the purchaser’s alternate remedy shall be a refund of the purchase price upon return of the product and all copies. Media Phason warrants the media upon which this product is recorded to be free from defects in materials and workmanship under normal use for a period of 90 days from the date of purchase. Should the media prove to be defective during the warranty period, the purchaser’s remedy shall be to return the media to Phason for replacement. Should Phason be unable to replace the media within a reasonable amount of time, the purchaser’s alternate remedy shall be a refund of the purchase price upon return of the product and all copies. Notice of warranty claims The purchaser must notify Phason in writing of any warranty claim no later than 30 days after the warranty period expires. Limitation of warranty Phason makes no other express warranty, whether written or oral, with respect to this product. Any implied warranty of merchantability or fitness is limited to the 90 days of this written warranty. Some states or provinces do not allow limitations on how long an implied warranty lasts, so the above limitation or exclusion may not apply to you. This warranty gives specific legal rights and you may have other rights, which vary from state to state, or province to province. Exclusive remedies The remedies provided above are the purchaser’s sole and exclusive remedies. Phason shall not be liable for any direct, indirect, special, incidental, or consequential damages (including lost profit) whether based on warranty, contract, tort, or any other legal theory. Some states or provinces do not allow the exclusion or limitation of incidental or consequential damages, so the above limitation or exclusion may not apply to you. Warranty service Warranty service may be obtained from the Phason office location indicated in the user manual or service booklet. i Service and technical support Phason will be happy to answer all technical questions that will help you use your OMNI-Select system. Before contacting Phason, collect the following information: A description of the problem A description of what you were doing before the problem occurred The model(s) and serial number(s) of the devices Any messages displayed by the software My dealer’s name: How to contact my dealer: Street/PO Box City State/Province Zip/Postal Phone Fax E-mail Web site 2 Terracon Place Winnipeg, Manitoba Canada R2J 4G7 ii Phone Fax E-mail Web site 204-233-1400 204-233-3252 [email protected] www.phason.ca About the manual This manual describes the features of the Select™ Water module for OMNI-Select and how to use them. In addition to reading this manual, you should be familiar with the following. Microsoft Windows™ – how to perform basic Windows functions such as opening and closing windows, finding and opening files, saving and closing files, as well as using a mouse and keyboard. OMNI hardware and equipment – devices such as Select™ Water Monitors. You should also be familiar with the equipment connected to them, such as water meters. Styles The following styles are used in the manual. All buttons and tabs are bolded. For example, click OK to save the changes. All filenames and directories are in a monospace font. For example, the reports directory in Windows Vista is C:\Users\<username>\Documents \phason\OmniSelect\Reports\. Hint/tip This is a hint or tip. It contains helpful information that may make it easier for you to set up or use Select™ Water. Note This is a note. It contains important information that may help you better understand Select™ Water. A copy of the manual is also on the OMNI-Select installation CD. The PDF (Portable Document Format) file installs in C:\Program Files\Phason\OmniSelect\Docs\ during a normal installation. You can view the file by opening it using a PDF viewer, such as Foxit Reader. iii iv Table of contents Chapter 1: Introducing Select™ Water ........................................................................................... 1 Introducing Select™ Water........................................................................................................................ 1 Select™ Water features ......................................................................................................................... 1 Charting and reporting tools ................................................................................................................. 2 Water Monitor inputs and alarms.......................................................................................................... 2 OMNI-Select requirements ................................................................................................................... 2 Installing and logging in to OMNI-Select .................................................................................................. 2 Installing OMNI-Select .......................................................................................................................... 2 Logging in to OMNI-Select ................................................................................................................... 3 Shutting down OMNI-Select ................................................................................................................. 4 Select™ Water windows ............................................................................................................................ 4 Communication Center ......................................................................................................................... 4 Configuration window ........................................................................................................................... 6 Settings window .................................................................................................................................... 7 Reports window .................................................................................................................................... 8 Chapter 2: Configuring Select™ Water .......................................................................................... 9 Configuring Select™ Water ....................................................................................................................... 9 Adding, editing, and removing Water Monitors .................................................................................. 10 Activating and deactivating Water Monitors ....................................................................................... 12 Configuring Water Monitors ................................................................................................................ 12 Setting up water meters .......................................................................................................................... 15 Setting up water meters and alarms ................................................................................................... 16 Chapter 3: Analyzing data ............................................................................................................ 19 Select™ Water reports............................................................................................................................. 19 Report descriptions............................................................................................................................. 20 Creating reports .................................................................................................................................. 23 Selecting dates ................................................................................................................................... 25 Select™ Water charts .............................................................................................................................. 25 Viewing Water Usage Charts .............................................................................................................. 25 Viewing Water Flow Charts ................................................................................................................. 27 Appendices ................................................................................................................................... 29 Appendix A: Troubleshooting ................................................................................................................. 29 Appendix B: Glossary ............................................................................................................................. 30 Index........................................................................................................................................................ 31 v vi Chapter 1: Introducing Select™ Water Introducing Select™ Water Installing and logging in to OMNI-Select Select™ Water windows Introducing Select™ Water Select™ Water automatically collects water usage data from OMNI Water Monitors and provides tools for monitoring and analyzing usage and flow rates. Whether you want to monitor water usage or flow in each room, each building, or the entire site, you can configure the versatile Select™ Water system to your individual needs. This makes Select™ Water a valuable tool for cost reduction strategies and production optimization. For livestock producers, changes from normal water consumption patterns can be an early indication of costly changes in your animals’ health. When combined with Select™ Feed, Select™ Water can be a valuable tool for early diagnosis of potential health problems and aid in feed management strategies. In addition, when combined with Select™ Manure, you can monitor total site water usage and its effects on manure handling costs. Select™ Water features Automatic data collection Easy-to-use charting and reporting tools Programmable alarms 1 Charting and reporting tools Usage reports display a chart and list the daily and total water usage for multiple water meters. Usage charts display usage for a single water meter. Flow reports display the flow rates multiple water meters. Flow charts display flow rates for up to five water meters. Configuration reports list configuration and settings for a Water Monitor. Configuration reports provide an easy reference and backup in case of data loss. For more information about Select™ Water charts and reports, read Chapter 3: Analyzing data on page 19. Water Monitor inputs and alarms Each Water Monitor has five pulse counter inputs. For each pulse counter, you enter the output rate of the water meter and program the high and low flow alarm settings. Select™ Water displays alarms in the Communications Center. For more information about alarm settings, read Setting up water meters on page 16. OMNI-Select requirements For Select™ Water to work properly, your system must meet specific computer requirements. For the latest computer and system requirements, visit www.phason.ca or contact Phason Customer Support at 204-233-1400 or [email protected]. Installing and logging in to OMNI-Select Installing OMNI-Select OMNI-Select has an installation wizard that guides you through the installation. 2 Installing and logging in to OMNI-Select To install Select™ Water 1. Insert the OMNI CD into your computer’s CD-ROM drive. The Installation Wizard should start automatically. If it does not start automatically, find and start the file Install_OmniSelect.exe on the CD-ROM. 2. Follow the instructions on the screen. Logging in to OMNI-Select All OMNI-Select users must have a user name and password to access settings, configuration, viewers, and reports. Security helps prevent unauthorized access and allows OMNI-Select to track which users have performed certain tasks within the program. Each time you open the Main window—the one with the Settings/Configuration/Reports buttons at the top—the OMNI-Select login window displays. The default username is sysadmin and for the password is omniadmin. For more information about the audit log and user names and passwords, see the OMNI-Select user manual. To access settings, configuration, viewers, and reports, you need to log in to OMNI-Select. To log in to OMNI-Select, you must have a username and password. To log in to OMNI-Select 1. On the Communication Center, click Login. The OMNI-Select login window displays. 2. Beside User name, type your user name. 3. Beside Password, type your password. 4. Click OK. 3 Shutting down OMNI-Select Your computer should be running at all times. When your computer is not running, the OMNI- Select services are not running. When the OMNI-Select services are not running, equipment operates at its last settings, but OMNI-Select cannot collect information or update settings. Do not use power management settings such as "sleep" or "hibernate" mode. When your computer is in these modes, OMNI-Select does not function properly. If you have to shut down your computer, start it again as soon as possible. Select™ Water windows The following section is an overview of the main Select™ Water windows. Communication Center The Communication Center displays all communication, status, audit, and alarm messages from OMNI-Select modules and devices. Check the Communication Center regularly to ensure systems functioning normally and to see if there are problems or potential problems. The Communication Center is the only area of OMNI-Select that is available to all users, regardless of their access. The Communication Center is also the gateway to the Main window, where you can access settings, configuration, and reports. 4 Select™ Water windows C B A D A This area lists your devices and their status. To see a list of communication and system messages for a specific device, click on that device. B This button opens a window that displays all messages for all devices. C This button opens a window that displays version information. D This button opens the OMNI-Select login window, which is where you enter your username and password to access other areas of the system. For more information about logging in to OMNI-Select, read Installing and logging in to OMNISelect on page 2. For more information about the Communication Center, see Monitoring the Communication Center in the OMNI-Select user manual. 5 Configuration window The Configuration window is where you configure the structure of your site, as well as Select™ Water options you configure seldom or only once at the beginning. A B C A This button displays the configuration window. B This button displays the configuration for Select™ Water. C This is a list of Water Monitors in each building at your site and where you select the device you want to configure. For more information about the Configuration window and configuring Water Monitors, Read Chapter 2: Configuring Select™ Water on page 9. 6 Select™ Water windows Settings window The Settings window is where you setup sample durations and alarm settings for each water meter. A B C A This button displays the Settings window. B This button displays the settings for Select™ Water. C This is a list of Water Monitors and water meters in each building at your site and where you select the device you want to set up. For more information about the Settings window and setting up Water Monitors, read Setting up water meters on page 15. 7 Reports window A B C A This button displays the reports window. B This button displays the available Select™ Water reports. C This is where you select the report and details. For more information about the Reports window, read Creating reports on page 23. 8 Chapter 2: Configuring Select™ Water Configuring Select™ Water Setting up water meters Configuring Select™ Water The Configuration window is where you configure the structure of your site, as well as Water Monitor options you configure seldom or only once at the beginning. A D B F C E G A This button displays the configuration window. B This button displays the configuration for Select™ Water. 9 C This is a list of Water Monitors in each building at your site and where you select the device you want to configure. D This is the name and address of the selected Water Monitor. E The top two buttons open the Water Monitor description window, which is where you add a new Water Monitor or edit the selected Water Monitor. The bottom button removes the selected Water Monitor from your system. F This button opens the Water Monitor configuration window, which is where you configure the pulse counters (water meters) for the selected Water Monitor. G This is where you activate or deactivate the selected Water Monitor. Adding, editing, and removing Water Monitors Select™ Water identifies Water Monitors using an address, which the software uses to locate and identify each device. Each Water Monitor is programmed with an address before it leaves the factory. The address is in the following format: XXXXXXXX, where X is either a number or letter. The address is printed on the outside of the enclosure, just above the knockouts, and on the circuit board inside the enclosure. For more information, read the OWM installation guide. Because remembering eight-digit codes to identify Water Monitors is all but impossible for us humans, Select™ Water makes it easier by allowing you to give each device a name. When giving a device a name, try to make the name as descriptive and useful as possible. For example, North 1West, North 1-East, South 1-West, and South 1-East are more descriptive and useful than OWM 1, OWM 2, and so on. When you add a new Water Monitor, none of the pulse counters are enabled. To enable pulse counters, you must configure the Water Monitor. For more information, read Configuring Water Monitors on page 12. Before you can add Water Monitors, you must have at least one building. For information about adding buildings, see the OMNI-Select user manual. To add a Water Monitor 1. In the main window, click Configuration, and then Water meters. 2. Click Add Water Monitor. The Water Monitor description window displays. 10 Configuring Select™ Water 3. Beside Name, type a descriptive name for the Water Monitor. 4. Beside Address, type the address of the new Water Monitor, exactly as it appears on the product. 5. Beside Building, select the building in which the Water Monitor is located. 6. If you are using wireless communication, beside Wireless adapter, select the address of the adapter (PWA) connected to the Water Monitor. 7. Click OK to save the information and return to the Configuration window. When you add a Water Monitor, its status is automatically set to active. If you want the Water Monitor to be inactive, follow the Activating and deactivating Water Monitors instructions on page 12. For information about Phason Wireless Adapters, read the PWA section in the OMNI-Select user manual. To edit a Water Monitor 1. In the main window, click Configuration, and then Water meters. 2. Below Your Water Monitors, select the Water Monitor you want to edit and then click Edit Water Monitor. The Water Monitor description window displays. 3. Make the changes. Beside Name, type a descriptive name (maximum 15 characters) for the device. Beside Address, type the address of the device, exactly as it appears on the product. For information about where to find the address, see the OWM installation guide. Beside Building, select the building in which the device is located. If you are using wireless communication, beside Wireless adapter, select the address of the adapter (PWA) connected to the Water Monitor. 4. Click OK to save the device information and return to the Configuration window. 11 To remove a Water Monitor 1. In the main window, click Configuration, and then Water meters. 2. Below Your Water Monitors, select the Water Monitor you want to remove and then click Remove Water Monitor. A warning message displays. 3. To remove the Water Monitor, click Yes. To cancel and return to the Configuration window, click No. Activating and deactivating Water Monitors When you add a Water Monitor, its status is automatically set to active. When a Water Monitor is active, you can change its configuration and settings, as well as view and print charts and reports for it. When a Water Monitor is inactive, you do not collect or receive data from it. You can view and print charts and reports for it using existing data. To activate or deactivate a Water Monitor 1. In the main window, click Configuration, and then Water meters. 2. Below Your Water Monitors, select the Water Monitor you want to activate or deactivate. 3. Below Active, click and drag the slider to the status you want. Configuring Water Monitors Each Water Monitor has five pulse counters where you can connect a water meter. When you add a new Water Monitor, none of the pulse counters are enabled. To enable the pulse counters, you must configure the Water Monitor. Configuring Water Monitors includes enabling and naming the pulse counters, selecting the measuring method, and entering the pulse output rate of the water meter. Enable pulse counter When enabled, Select™ Water monitors and collects data from the pulse counter. When it is not enabled, Select™ Water will does not monitor or collect data from the pulse counter. 12 Configuring Select™ Water Name The name you give to a pulse counter makes it easier to identify. For example, if the pulse counter is monitoring the water flow for the whole site, you could call it ‘Site flow’. The defaults are PC1, PC2, and so on. Measuring method Select whether your water meter pulses by volume (gallons or litres) or weight (pounds or kilograms). Selecting the wrong unit of measure will cause incorrect measurements and display. Pulse rates and conversions Your water meter pulse rate output is in units per pulse (for example, 10 US gallons per pulse) or pulses per unit (for example 10 pulses per US gallon). When you enter the pulse rate into Select™ Water, you need to enter it in units per pulse. If your water meter pulse rate is in pulses per unit, you need to convert it to units per pulse. Number of pulses per unit number of pulses 1 unit Is the same as saying This is how you convert it and what you enter pulses unit = unit pulses 10 pulses 1 gallon 10 pulses 1 gallon = 1 gallon 10 pulses 1 gallon ÷ 10 pulses = 0.1 gallons per pulse 25 pulses 1 litre 25 pulses 1 litre = 1 litre 25 pulses 1 litre ÷ 25 pulses = 0.04 litres per pulse .5 pulses 1 gallon .5 pulses 1 gallon = 1 gallon .5 pulses 1 gallon ÷ 0.5 pulses = 2.0 gallons per pulse unit ÷ pulses = converted Practical examples Converting between units of measure If you want to display usage and flow rates in a different unit of measure than your water meter measures, you need to convert the pulse rate output. The following table shows the conversion values of one unit for each of the units of measure. Using the table, you can calculate the pulse rate you need to enter. For example, if your water meter pulse output is one pulse per 5 US gallons and you want to display information in liters, you would enter 18.925 litres (5 × 3.785 = 18.925). 13 US gallon Litre Imperial gallon Pound Kilogram US gallon 1.000 0.264 1.201 — — Litre 3.785 1.000 4.546 — — Imperial gallon 0.833 0.220 1.000 — — Pound — — — 1.000 2.205 Kilogram — — — 0.454 1.000 To configure Water Monitors 1. In the main window, click Configuration, and then Water meters. 2. Below Your Water Monitors, select the Water Monitor you want to configure. 3. Click Configure Water Monitor. The Water Monitor configuration window displays. 4. Below Pulse counters, select the pulse counter you want to configure. 5. Configure or make the changes to the pulse counter. To enable or disable the pulse counter, select or deselect Enable pulse counter. There is a checkmark in the box when enabled. To enter or change the name, beside Name, type a description for the pulse counter/water meter. The name is how you will identify the water meter in charts and reports. Below Measuring method, select the method that corresponds to your meter. Below Pulse rate, select the existing value and then enter the pulse output for your meter, or click Up or Down to adjust the value. 6. Repeat steps 4 to 5 for each input you want to configure. 7. Click OK to save the changes and return to the Configuration window. 14 Setting up water meters Setting up water meters The Settings window is where you set up water meters. A D B E C F A This button displays the Settings window. B This button displays the settings for Select™ Water. C This is a list of Water Monitors and water meters in each building at your site and where you select the water meter you want to set up. D This is information about the selected water meter. E These are the alarm settings for the selected water meter. F This button opens the Water meter settings window, which is where you set the sample duration and alarm settings. 15 Setting up water meters and alarms Sample duration Sample duration is the amount of time the Select™ Water Monitor counts pulses before calculating the flow rate for that duration. Sample duration can be from 1 to 60 minutes, in 1-minute intervals Enable low/high flow alarm When the low and/or high alarm is enabled, Select™ Water displays alarm messages when an alarm condition occurs. When it is not enabled, Select™ Water does not display any alarm messages. Minimum/maximum flow Minimum flow is the lowest flow rate you want to see over the sample duration. A flow rate less than the minimum is a fault condition. Maximum flow is the highest flow rate you want to see over the sample duration. A flow rate higher than the maximum is a fault condition. Adjust the minimum and maximum flow rates by adjusting the number of pulses. Consecutive fault samples Consecutive fault samples is the number of consecutive sample durations (samples) that must have a fault condition before an alarm condition occurs. Water flow alarms example In the following example, the sample duration is 5 minutes. 16 Setting up water meters Low flow alarms For the low flow alarm, the set point is 0 pulses and consecutive fault samples is 6. For a low flow alarm to occur there must be 6 consecutive samples of 5 minutes each where the flow rate is 0. In other words, if there is no water use for 30 minutes (5 × 6 = 30 minutes), there will be a low flow alarm. High flow alarms For the high flow alarm, the set point is 100 and consecutive fault samples is 2. For a high flow alarm to occur there must be 2 consecutive samples of 5 minutes where the flow rate is more than 100 gallons. maximum flow 5 minutes = 1 sample minimum flow 2 consecutive samples = high flow alarm 120 100 80 6 consecutive samples = low flow alarm 60 40 0 gal. fault 20 110 gal. fault 60 gal. normal 101 gal. fault 110 gal. fault 80 gal. normal 0 gal. fault 0 gal. fault 0 gal. fault 0 gal. fault 0 gal. fault 0 gal. fault 0 0 5 10 15 20 25 30 35 40 45 50 55 60 elapsed time (minutes) 17 To set up water meters 1. In the main window, click Settings, and then Water meters. 2. Below Your water meters, select the pulse counter (water meter) you want to set up. Select™ Water displays the settings for the selected water meter 3. Click Edit settings. The Water Monitor settings window displays. 4. Make the changes to the settings. To increase or decrease the Sample duration, select the existing value and then enter a new one, or click Up or Down to adjust the value. To enable or disable the low or high alarm, below the alarm you want to change, select or deselect Enable... alarm. There is a checkmark in the box when enabled. To increase or decrease the Number of pulses, below the alarm you want to change, select the existing value and then enter a new one, or click Up or Down to adjust the value. To increase or decrease the Consecutive fault samples, below the alarm you want to change, select the existing value and then enter a new one, or click Up or Down to adjust the value. 5. Click OK to save the changes and return to the Settings window. 18 Select™ Water reports Chapter 3: Analyzing data Select™ Water reports Select™ Water charts Select™ Water reports One of the great advantages of Select™ Water is the detailed reports that are available. OMNISelect reports are available in preview/PDF or CSV format. Preview/PDF These reports display using OMNI-Select's built-in Report Preview window. From there, you can print or save reports as a PDF (portable document format). CSV You can import CSV reports into a third-party reporting, database, or spreadsheet program, or email them off-site for evaluation. CSV reports are not suitable for normal viewing. 19 Report descriptions Water Configuration Report (below) Water Usage Report (on page 21) Water Flow Report (on page 22) Water Configuration Report Water Configuration Reports provide an easy reference for configuration and settings and can be a backup in case of data loss. The report lists the current configuration and settings for the selected Water Monitor. Water Configuration Reports are available only in preview/PDF format. Information about the report The configuration for the selected Water Monitor 20 Select™ Water reports Water Usage Report Water Usage Reports display a chart and list the daily and total water usage for the date range. You can select multiple water meters; each water meter has its own chart and usage statistics. Water Usage Reports are available in preview/PDF and CSV formats. The chart is available only in the preview/PDF format. Information about the report The name of the Water Monitor and water meter, followed by the unit of measure A chart showing the water usage for each day NOTE: You cannot zoom or scroll along the chart. The daily water usage, sorted by date, totaled at the end. 21 Water Flow Report Water Flow Reports display the flow rates for multiple water meters. Water Flow Reports are available in preview/PDF and CSV formats. Water Flow Reports can be many pages long. The example below shows part of the first page. Information about the report The name of the Water Monitor and water meter, followed by the unit of measure The flow rate for each interval Water Flow Reports show flow rates using the sample duration that was active during the date range you select. For example, If your sample duration was 30 minutes during July, all Water Flow Reports you create for July will show readings every 30 minutes. If you change your sample duration to 15 minutes in August, reports you create for August will show readings every 15 minutes, but reports for July will still show readings every 30 minutes. 22 Select™ Water reports Creating reports A D B F C E G A This button displays the Reports window. B This button displays the available Select™ Water reports and charts. C This is where you select what you want to view or create. D This is where you select the date range. The Water Configuration Report does not require a date range; it displays the current configuration and settings. E This is where you can change the format for the Water Usage Report or Water Flow Report. F This is where you select the water meter(s). You can select one water meter for a chart, or multiple water meters for a usage or flow report. The Water Configuration Report does not require you to select water meters; it displays information for all devices. G This button creates and/or displays the chart or report. 23 Formats, dates, and other information The following table shows the formats available, date type, and other information required for the reports and charts. Name Format Date type Other required information Water Configuration Report Water Usage Report Water Flow Report Water Flow Chart Water Usage Chart Preview/PDF Preview/PDF/CSV Preview/PDF/CSV Chart Chart Current Date range Date range Date range Date range Water meter One or more water meters One or more water meters Up to five water meters Water meter To create reports 1. In the main window, click Reports, and then Water meters. 2. Below Reports, select the type of report you want to create. The window updates and adds any additional information required to create the report. 3. Below Your water meters, select the water meters you want in the report. 4. If you are creating a Water Configuration Report, go to step 5. Otherwise, select the remaining details. Below Report dates, select the start and end dates. For more information, read Selecting dates on page 25. If you want to export the data to third-party software, below Report format, select CSV. 5. Click Create. If you created a printable report, OMNI-Select displays your report in the Report Preview window. From here, you can print or save your report by clicking the appropriate button. If you created a CSV report, the Save As window displays so that you can select a location and save your report. After saving your report, it displays in your default editor. In Windows Vista and Windows 7, the default reports directory is C:\Users\<username>\Documents\Phason\OmniSelect\Reports. <username> is the name you use to log on to your computer. In Windows XP, it is C:\Documents and Settings\<username>\My Documents\Phason\OmniSelect\Reports. Reports print to the default printer using the default settings. 6. Click Close to return to the Reports window. 24 Select™ Water charts Selecting dates All Select™ Water reports and charts require a date range, except for the Water Configuration Report. To select date ranges 1. Beside Start date, click . The date selector displays. 2. Select a start date: To move backward or forward through the months, click or . To select a specific month, click the month on the calendar and then select the month you want. To move forward and backward through the years, double-click the year on the calendar and then select the year you want. 3. Repeat steps 1 and 2 for the end date. Select™ Water charts Select™ Water has two charts available: The Water Usage Chart and the Water Flow Chart. You cannot save charts, but you can view them again as long as the information remains in the database. You must have at least one hour of data to display a usage chart. You can zoom in and pan/scroll along charts. For more information, read To zoom and pan charts on page 28. Viewing Water Usage Charts The Water Usage Chart displays usage for a single water meter, over the selected date range. You can display the chart in either bar or line format. Because the chart displays daily usage, bar format works best. 25 H A C F D E A G This is where you can change the water meter you are viewing. B This is the chart area. You can zoom in and scroll along the chart. C This is where you can change the date range. If you change the date range, click Refresh chart to update the chart. D This allows you to switch between bar and line view. E This is the total usage for the water meter, over the date range. F This button prints the chart. G This button resets the zoom and any panning. You can display the total usage for a day by right clicking on a bar (or a portion of the line for a day). To view Water Usage Charts 1. In the main window, click Reports, and then Water meters. 26 Select™ Water charts 2. Below Reports, select Water usage chart. The window updates and adds information required to create the chart. 3. Below Report dates, select the start and end dates. For more information, read Selecting dates on page 25. 4. Below Your water meters, select the water meter you want to view. 5. Click View chart. The chart displays. 6. Click Close to return to the Reports window. Viewing Water Flow Charts The Water Flow Chart displays flow rates for up to five water meters, over the selected date range. The chart displays in line format only. B A C F D E A G This is where you can change the water meters you are viewing. If you change the water meters, click Refresh chart to update the chart. B This is the chart area. You can zoom in and scroll along the chart. 27 C This is where you can change the date range. If you change the date range, click Refresh chart to update the chart. D This allows you to increase or decrease the line width. The default is 2. E This button resets the zoom and any panning. F This is the legend for the chart. G This button prints the chart. To view Water Flow Charts 1. In the main window, click Reports, and then Water meters. 2. Below Reports, select Water flow chart. The window updates and adds information required to create the chart. 3. Below Report dates, select the start and end dates. For more information, read Selecting dates on page 25. 4. Below Your water meters, select the water meters you want to view. You can select up to five water meters. 5. Click View chart. The chart displays. 6. Click Close to return to the Reports window. To zoom and pan charts You can zoom in, zoom out, and scroll along a chart. To zoom in, click and drag to select the area you want to magnify and then release the mouse button. A chart magnifies the area you selected. To zoom out, click on the chart, drag to the top- left and then release the mouse button, or click Zoom out. The chart returns to normal magnification. To scroll along, right-click the chart and drag the mouse in the direction you want the chart to move. You can make the chart larger or smaller by left clicking the bottom-right corner of the window and then dragging. 28 Appendices Appendix A: Troubleshooting Appendix B: Glossary Appendix A: Troubleshooting If you are having problems using Select™ Water, look up the problem in the table below and then follow the instructions to resolve the problem. If you have a problem that is not listed here, try to determine what might be causing the problem. If you cannot resolve the problem, call your dealer or Phason’s Customer Support (read Service and technical support at the front of the manual). Problem/message Possible cause Incorrect water usage or flow The pulse rate entered in the configuration window does not match the water meter output. No water usage or flow The Water Monitor is inactive or the input is disabled The Water Monitor is not communicating. Resolution Make sure the pulse rate in the Water Monitor configuration window matches the pulse output for your water meter. For more information, read Configuring Water Monitors on page 12. Make sure the Water Monitor is active and the pulse counter is enabled. For more information, read Activating and deactivating Water Monitors and Configuring Water Monitors on page 12. Make sure the Water Monitor has power and that the communication cable is connected properly. For more information, read the OWM installation guide. 29 Appendix B: Glossary alarm condition An alarm condition is a fault condition that has been consistently present for at least the fault duration. consecutive fault samples Consecutive fault samples is the number of consecutive sample durations (samples) that must have a fault condition before an alarm condition occurs. CSV Comma separated value A CSV file is a data file consisting of fields and records stored as text. The fields are separated from each other by commas. You can import CSV files into most databases and spreadsheet programs. fault condition A fault condition is a condition outside of the defined "normal range". The normal range is any value between the low and high alarm settings. PDF Portable document format When you save an OMNI-Select preview report, it saves as a PDF file. sample duration 30 Sample duration is the amount of time the Water Monitor counts pulses before sending the total count back to Select™ Water and starting the count again at zero. Index Index A P activating Water Monitors ................................ 12 panning charts .................................................29 adding Water Monitors .............................. 10–11 programmable alarms ....................... See alarms alarms ................................... 2, See also settings pulse counter settings ................................ 16–19 C pulse counters ............................................ 12–15 charts ...................................... See specific chart R-S closing OMNI-Select .......................................... 4 removing Water Monitors .................................12 Communication Center ................................. 4–5 reports .................................................... 8, 24–25 computer requirements ..................................... 2 sample duration ...............................................17 configuration reports ....................................... 21 scrolling charts .................................................29 configuration window .............................. 6, 9–10 security ...............................................................3 configuring Water Monitors ......................... 9–15 selecting dates .................................................26 consecutive fault samples ............................... 17 Select™ Water features ......................................1 creating reports ......................................... 24–25 settings ....................................................... 16–19 D-I dates ................................................................ 26 settings window..................................................7 shutting down .....................................................4 deactivating Water Monitors ............................ 12 V-Z editing Water Monitors .............................. 10–11 viewing reports ........................................... 24–25 enabling pulse counters .................................. 12 Water Flow Charts ...................................... 28–29 fault samples ................................................... 17 Water Flow Report ............................................23 inputs .................................... See pulse counters water meters ......................... See pulse counters installing Select™ Water ................................ 2–3 Water Usage Charts ................................... 26–28 L-M logging in ........................................................... 3 Water Usage Report .........................................22 zooming charts.................................................29 magnifying charts ............................................ 29 minimum flow .................................................. 17 31 2 Terracon Place Winnipeg, Manitoba Canada R2J 4G7 Phone Fax E-mail Web site 204-233-1400 204-233-3252 [email protected] www.phason.ca