Transcript
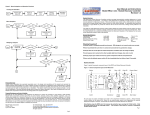
R-DAS quick start guide
If you don't want to read the complete manual, simply follow these steps to fly your R-DAS.
1. Install a battery
Install a fresh 9V battery in the battery holder (note the polarity). Use a tie-rap to securely attach the battery
to its holder. For the most secure connection, we advise to solder small wires between the battery poles, and
the solder tabs on the battery holder.
2. Mounting of R-DAS
Mount R-DAS with the switch pointing downwards in you electronics bay. Use small standoffs between RDAS and the mounting panel.
3. Make a static port
Make a small hole in your rocket body, through which you can reach the switch to switch R-DAS on and
off. If made big enough, this hole also serves as a static port. Typical values are 6 to 10 mm in diameter.
4. Configure R-DAS
Install the R-DAS user interface on your PC. Hook up R-DAS to a serial port on the PC, using the supplied
cable. Select the following two options: g-switch triggering and smart recovery. Make sure all other
settings are switched off. Pressure and acceleration measurements are always carried out. If the flight time
of your rocket is longer than the indicated measuring time, select a lower sample frequency. If desired, you
can also change the parachute deployment altitude. Finally store the configuration by the "store config"
button.
5. Hook up igniters
Attach the pilot parachute charge to the pyro output connector that is most close to the on/off switch.
Attach the main parachute charge to other pyro output stage. Switch R-DAS on (do not move the unit, as
that may cause it to detect lift-off). If there is a problem with the continuity of one of the igniters, red LED's
will be on close to the pyro output terminals. Switch off R_DAS after testing the igniters.
6. Launch
Prep your rocket, and install it on the launch pad. Switch on R-DAS, and listen. After a continuous tone for
about 4 seconds, R-DAS responds with a single beep every second. Now you can launch your rocket!
7. Data retrieval
After recovery of the rocket, you can leave R-DAS switched on and collect the data, or switch it off and
retrieve the data later. All data is stored in a non-volatile memory, so by switching of R-DAS no data is
lost. Hook up your PC using the supplied cable, and select "download" from the file menu. Select the "Start
download" button to start downloading of the data. A status bar shows the download progress. After
downloading you can view the data. Do not forget to save it!
______________________________________________________________________________________
For more information consult the R-DAS user manual. The latest version of this manual can be obtained
from http://www.iae.nl/users/aed/rdas/download.htm.
AED Electronics
Bertelindislaan 3
5581 CS Waalre
The Netherlands
email: [email protected]
phone/fax: +31-40-2213972
http://www.iae.nl/users/aed